目录
页面跳转
携带参数
返回上一级页面
路由_redirectTo
页面跳转
路由_reLaunch
页面跳转
路由_switchTab
实现 tabbar
页面跳转
交互_消息提示框
基本弹出框
常用属性
icon详情
hideToast
交互_ loading 提示框
基本实现
常用属性
交互_模态对话框
基本对话框
常用属性
存在输入框
交互_操作菜单
基本实现
常用属性
获取数据
动态设置导航栏
常用设置
网络请求
基本使用
生产环境
开发环境
网络请求_常用参数
常用属性
封装网络请求
下拉刷新
实现下拉刷新的四步
下拉刷新应用
json 文件配置
逻辑文件
页面渲染
样式文件
上拉加载
实现上拉加载的四步
上拉加载应用
简易音乐播放器_搜索音乐
视图实现
样式实现
逻辑实现
简易音乐播放器_音乐列表
视图实现
样式实现
逻辑实现
简易音乐播放器_播放音乐
模块化
文件上传
上传参数
数据缓存
数据缓存_同步与异步
微信分享
分享好友
分享朋友圈
获取用户信息
常用参数
小程序登录流程
用户登录_服务器端
用户登录
自定义组件
创建组件
自定义组件_常用属性和方法
自定义组件_插槽
实现组件
引用组件
路由_navigateTo

保留当前页面,跳转到应用内的某个页面。但是不能跳到 tabbar 页面。
温馨提示
程序中页面栈最多十层
页面跳转
可以从 pageA 页面通过点击事件跳转到 pageB 页面
<view>PageA</view>
<button type="primary" bindtap="clickTapButton">跳转到PageB</button>
Page({
    clickTapButton(e){
        wx.navigateTo({
          url: '/pages/pageB/pageB',
       })
   }
})
携带参数
// pageA
Page({
    clickTapButton(e){
        wx.navigateTo({
          url: '/pages/pageB/pageB?name=itbaizhan',
       })
   }
})
// pageB
Page({
    onLoad(options) {
        console.log(options.name);
   }
})
返回上一级页面
关闭当前页面,返回上一页面
// pageB
Page({
    onLoad(options) {
        console.log(options.name);
   },
    backHandle() {
        wx.navigateBack({
            url:"/pages/pageA/pageA"
       })
   }
})
1. 在微信小程序中, navigateTo 跳转页面特点正确的是:
保留当前页面,跳转到应用内的某个页面,但是不能跳到 tabbar 页面
路由_redirectTo

关闭当前页面,跳转到应用内的某个页面。但是不允许跳转到 tabbar 页面
redirectTo 和 navigateTo 最大的区别就是前者无法在返回之前的页面,也 就是在页面栈中不存在之前的页面了
页面跳转
<view>PageA</view>
<button type="primary" bindtap="clickTapButton">跳转到PageB</button>
Page({
clickTapButton(e){
wx.redirectTo({
url: '/pages/pageB/pageB?name=itbaizhan',
})
}
})温馨提示
这里的参数携带依然是生效的!
1. 在微信小程序中, redirectTo 跳转下列特点正确的是:
关闭当前页面,跳转到应用内的某个页面,但是不能跳到 tabbar 页面
路由_reLaunch

关闭所有页面,打开到应用内的某个页面
页面跳转
// PageA
Page({
    clickTapButton(e){
        wx.navigateTo({
          url: '/pages/pageB/pageB?name=itbaizhan',
       })
   }
})
// PageB
Page({
onLoad(options) {
console.log(options.name);
},
backHandle() {
wx.reLaunch({
url:"/pages/pageC/pageC"
})
}
})1. 在微信小程序中, reLaunch 跳转下列特点正确的是:
关闭所有页面,打开到应用内的某个页面
路由_switchTab

跳转到 tabBar 页面,并关闭其他所有非 tabBar 页面
实现 tabbar
"tabBar": {
    "color": "#bfbfbf",
    "selectedColor": "#d81e06",
    "backgroundColor": "#fff",
    "borderStyle": "black",
    "position": "bottom",
    "list": [{
        "pagePath": "pages/pageA/pageA",
        "text": "首页",
        "iconPath": "./images/home.png",
        "selectedIconPath": "./images/home_select.png"
   },
   {
                 "pagePath": "pages/pageB/pageB",
                 "text": "新闻",
                 "iconPath": "./images/news.png",
                 "selectedIconPath": "./images/news_select.png"
             }
   ]
}
温馨提示
由于之前详细讲解过tabbar,这里就不展开代码,大家可以参考之前的代码
页面跳转
// home
Page({
    clickHandle(){
        wx.switchTab({
          url: '/pages/pageA/pageA',
       })
   }
})
1. 在微信小程序中, switchTab 跳转下列特点正确的是:
跳转到 tabBar 页面,并关闭其他所有非 tabBar 页面
交互_消息提示框

显示消息提示框,给出用户提示,注意该提示框是无焦点的
基本弹出框
<button type="primary" bindtap="clickToastHandle">弹出提示框</button>Page({
onLoad(options) {},
clickToastHandle(){
wx.showToast({
title: '成功',
icon: 'success',
duration: 2000
})
}
})
常用属性
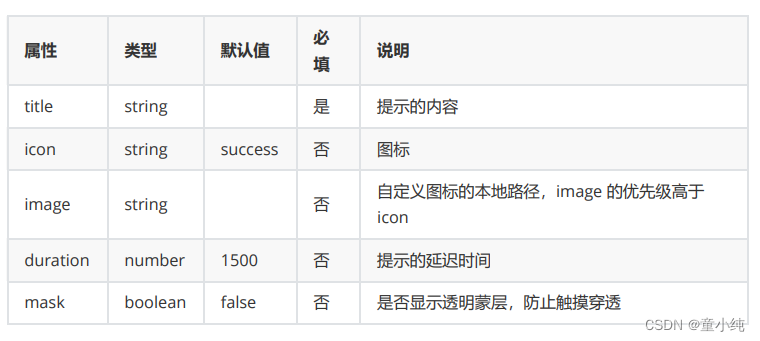
icon详情

Page({
    onLoad(options) {},
    clickToastHandle(){
        wx.showToast({
            title: '等待数据加载',
            icon: 'loading',
            duration: 2000,
            mask:true,
            image:"../../images/loading.png"
       })
   }
})
hideToast
隐藏消息提示框
Page({
    onLoad(options) {},
    clickToastHandle(){
        wx.showToast({
            title: '等待数据加载',
            icon: 'loading',
            duration: 5000,
            mask:false,
            image:"../../images/loading.png"
       })
   },
    clickHideToast(){
        wx.hideToast()
   }
})
1. 在微信小程序中,下列那个属性可以设置 showToast 防止触摸穿透:mask
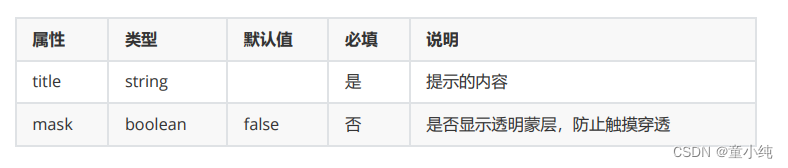
交互_ loading 提示框
显示 loading 提示框。需主动调用 wx.hideLoading 才能关闭提示框
基本实现
Page({
    onLoad(options) {
        wx.showLoading({
            title: '加载中'
       })
   }
})
常用属性
Page({
    onLoad(options) {
        wx.showLoading({
            title: '加载中',
            mask:true
       })
        setTimeout(() =>{
            wx.hideLoading()
       },2000)
   }
})
1. 在微信小程序中,下列那个属性可以设置 showLoading 防止触摸穿透 :mask
交互_模态对话框
显示模态对话框,其实就是可以进行交互了
基本对话框
<button type="primary" bindtap="clickModalHandle">显示对话框</button>Page({
clickModalHandle(){
wx.showModal({
title: '提示',
content: '这是一个模态弹窗',
success(res) {
if (res.confirm) {
console.log('用户点击确定')
} else if (res.cancel) {
console.log('用户点击取消')
}
}
})
}
})常用属性

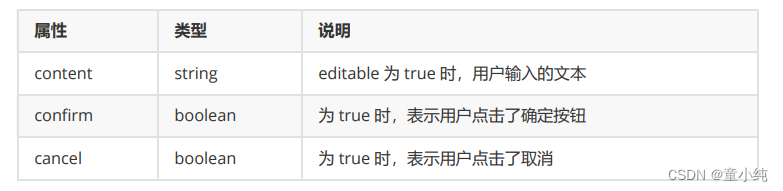
存在输入框
object.success 回调函数
Page({
    clickModalHandle(){
        wx.showModal({
            title: '提示',
            // content: '这是一个模态弹窗',
            showCancel:true,
            cancelText:"残忍拒绝",
            cancelColor:"#ff0000",
            confirmText:"欣然接受",
            confirmColor:"#00ff00",
            editable:true,
            placeholderText:"请输入信息",
            success(res) {
                if (res.confirm) {
                    // res.content获取用户输入信息
                    console.log('用户点击确定',res.content)
               } else if (res.cancel) {
                    console.log('用户点击取消')
               }
           }
       })
   }
})
1. 在微信小程序中,下列那个属性可以设置 showModal 显示输入框 :editable
交互_操作菜单

显示操作菜单,菜单会从底部弹出
基本实现
<button type="primary" bindtap="clickActionSheetHandle">显示底部菜单栏</button>Page({
clickActionSheetHandle() {
wx.showActionSheet({
itemList: ['A', 'B', 'C'],
success(res) {
console.log(res.tapIndex)
},
fail(res) {
console.log(res.errMsg)
}
})
}
})常用属性
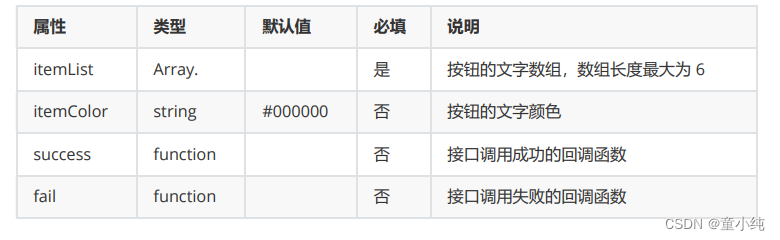
获取数据
object.success 回调函数

Page({
    data:{
        citys:["北京","西安","太原","河北","内蒙"]
   },
    clickActionSheetHandle() {
        var that = this;
        wx.showActionSheet({
            itemList: this.data.citys,
            itemColor:"#f00",
            success(res) {
              console.log(that.data.citys[res.tapIndex])
           },
            fail(res) {
                console.log(res.errMsg)
           }
       })
   }
})
1. 在微信小程序中,下列那个属性可以获取 showActionSheet 的数据 :
通过 tapIndex 下标在数组中获取数据
动态设置导航栏

在微信小程序中,我们可以通过逻辑动态设置导航栏
常用设置

<button type="primary" bindtap="bindShowBarHandle">显示加载动画</button>
<button type="primary" bindtap="bindHideBarHandle">隐藏加载动画</button>
<button type="primary" bindtap="bindSetBarTitle">设置导航条文本</button>
Page({
    bindShowBarHandle(){
        wx.showNavigationBarLoading();
   },
    bindHideBarHandle(){
        wx.hideNavigationBarLoading();
   },
    bindSetBarTitle(){
        wx.setNavigationBarTitle({
            title: '当前页面'
       })
   },
    onShow(){
        wx.hideHomeButton()
   }
})
1. 在微信小程序中,下列那个属性可以动态设置当前页面的标题:setNavigationBarTitle
网络请求

发起 HTTPS 网络请求,从后端获取数据,显示在页面之上
基本使用
通过 wx.request 请求数据
Page({
    onLoad(options) {
        wx.request({
            url: 'https://iwenwiki.com/api/blueberrypai/getChengpinDetails.php',
            success(res) {
                console.log(res.data)
           }
       })
   }
})
温馨提示
在小程序中使用网络相关的 API 时,需要注意下列问题,请开 发者提前了解
1、每个微信小程序需要事先设置通讯域名,小程序只可以跟指定的域名进行网络通信(生产环境)
2、通过开发者工具配置:“不效验合法域名” (开发环境)
生产环境
服务器域名请在 「小程序后台 - 开发 - 开发设置 - 服务器域名」 中进行配置
开发环境
小程序开发者工具:详情 - 本地设置 - 勾选 “不效验合法域名” 选项
<view>
    <block wx:for="{{ chengpinDetails }}" wx:key="index">
        <text>{{ item.title }}</text>
    </block>
</view>
Page({
data:{
chengpinDetails:[]
},
onLoad(options) {
var that = this;
wx.request({
url: 'https://iwenwiki.com/api/blueberrypai/getChengpinDetails.php',
success(res) {
that.adapterView(res)
}
})
},
adapterView(res){
this.setData({
chengpinDetails:res.data.chengpinDetails
})
}
})1. 在微信小程序中,下列代码,划横线处应该填写的内容是:
Page({
    data:{
        chengpinDetails:[]
   },
    onLoad(options) {
        var that = _1_;
        wx.request({
            url: 'https://iwenwiki.com/api/blueberrypai/getChengpinDetails.php',
            success(res) {
                _2_.adapterView(res)
           }
       })
   },
    adapterView(res){
        this.setData({
            chengpinDetails:res.data.chengpinDetails
      })
   }
})
D、this that
网络请求_常用参数

我们了解了基本的网络请求之后,在考虑在网络请求中的属性如何 使用。例如:如何传递参数?
常用属性

Page({
    data: {
        chengpinDetails: []
   },
    onLoad(options) {
        wx.request({
            url: 'http://iwenwiki.com:3002/api/foods/list',
            method: "GET",
            data: {
                city: "北京"
           },
            header: {
                'content-type': 'application/json'
           },
            timeout:5000,
            success(res) {
                console.log(res.data);
           },
            fail(error){
                console.log(error);
           },
            complete(){
                console.log("网络请求完成");
           }
       })
   }
})
1. 在微信小程序中,网络请求中,下列那个属性是设置参数的:data
封装网络请求

封装网路请求是为了日后使用更加方便
/**
 *
 * @param { string } url
 * @param { string/object/ArrayBuffer } params
 * @param { GET|POST } method
 */
function request(url, params, method) {
    wx.showLoading({
        title: '加载中...',
        mask: true
   })
    let promise = new Promise((resolve, reject) => {
        wx.request({
            url: url,
            data: params,
            header: {
                 'content-type': 'application/json'
           },
            method: method,
            success: res => {
                resolve(res.data)
           },
            fail: err => {
                reject(err)
           },
            complete: () => {
                wx.hideLoading();
           }
       })
   })
    return promise;
}
module.exports = {
    request
}
const { request } = require("../../utils/request.js")
Page({
data: {
result: []
},
onLoad(options) {
request("http://iwenwiki.com:3002/api/foods/list",{city:"北京"},"GET")
.then(res =>{
console.log(res.data);
this.setData({
result:res.data.result
})
})
}
})<view>
<block wx:for="{{ result }}" wx:key="index">
<view>{{ item.name }}</view>
</block>
</view>下拉刷新
下拉刷新是我们在移动端所见的最多效果,所有用户希望看到的最新数据的解决方案基本上都会选择”下拉刷新“方式实现。例如:微信的朋友圈
实现下拉刷新的四步
第一步: json 文件配置下拉刷新
{
    "enablePullDownRefresh": true,
    "backgroundColor": "#f1f1f1",
    "backgroundTextStyle":"dark"
}
第二步:实现下拉刷新逻辑
Page({
    data: {
        list:[1,2,3,4,5]
   },
    onPullDownRefresh() {
        setTimeout(() =>{
            this.setData({
                list:[6,7,8,9,10]
           })
            wx.stopPullDownRefresh();
       },1000)
   }
})
第三步:渲染视图
<view class="root">
    <view wx:for="{{ list }}" wx:key="index">
        <view class="item">{{ item }}</view>
    </view>
</view>
第四步:设计样式
page{
    background: #fff;
}
.root{
    padding: 10px;
}
.item{
    width: 100%;
    height: 50px;
    border-bottom: 1px solid #afafaf;
    line-height: 50px;
}
1. 在微信小程序中,实现下拉刷新的方法是:onPullDownRefresh
下拉刷新应用
掌握了基础的下拉刷新之后,我们要做的就是真实的应用场景,我们通过网络请求获取数据,并渲染到页面上
json 文件配置
{
    "enablePullDownRefresh": true,
    "backgroundColor": "#f1f1f1",
    "backgroundTextStyle":"dark"
}
逻辑文件
const { request } =
require("../../utils/request.js")
Page({
    data: {
        list:[],
        page:1
      },
    onLoad(options){
        this.http(this.data.page)
   },
    onPullDownRefresh() {
        this.setData({
            page:this.data.page+=1
       })
        this.http(this.data.page)
   },
    http(page){
      request("http://iwenwiki.com:3002/api/foods/list","GET",{
            city:"北京",
            page:page
       }).then(res =>{
            if(!res.msg){
                this.setData({
                    list:res.data.result
               })
           }else{
                wx.showToast({
                  title: res.msg,
               })
           }
            wx.stopPullDownRefresh()
       })
   }
})
页面渲染
<view class="root">
    <view class="item" wx:for="{{ list }}" wx:key="index">
        <image src="{{ item.pic }}"></image>
        <text>{{ item.name }}</text>
    </view>
</view>
样式文件
page{
    background: #f1f1f1;
}
.root{
    padding: 10px;
}
.item{
    height: 80px;
    margin: 5px 0;
    background: #fff;
    line-height: 100px;
    padding: 10px;
}
image{
    width: 80px;
    height: 80px;
}
text{
    height: 80px;
    padding-left: 10px;
    position: absolute;
    line-height: 80px;
}
上拉加载

"下拉刷新"是为了更新数据,"上拉加载"是为了增加数据,也是页面 最常见的效果。例如:微信朋友圈
实现上拉加载的四步
第一步: json 文件配置(可选项)
{
    "onReachBottomDistance":50
}
第二步:实现上拉加载逻辑
Page({
    data: {
        list:[1,2,3,4,5]
   },
    onReachBottom() {
        this.setData({
          list:this.data.list.concat([6,7,8,9,10])
       })
   }
})
第三步:渲染页面
<view class="container">
    <view class="item" wx:for="{{ list }}" wx:key="index">
        <text>{{ item }}</text>
    </view>
</view>
第四步:样式加载
.item{
    height: 200px;
}
text{
    font-size: 30px;
}
1. 在微信小程序中,实现上拉加载的方法是:onReachBottom
上拉加载应用

掌握了基础的上拉加载之后,我们要做的就是真实的应用场景,我们通过网络请求获取数据,并渲染到页面上
json 文件配置
{
    "onReachBottomDistance":50
}
逻辑文件
const { request } = require("../../utils/request.js")
Page({
    data: {
        list:[],
        page:1
   },
    onLoad(options) {
        this.http(this.data.page);
   },
    onReachBottom() {
        this.setData({
               page:this.data.page+=1
       })
        this.http(this.data.page)
   },
    http(page){
      request("http://iwenwiki.com:3002/api/foods/list","GET",{
            city:"北京",
            page:page
       }).then(res =>{
            if(!res.msg){
                this.setData({
                  list:this.data.list.concat(res.data.result)
               })
           }else{
                wx.showToast({
                  title: res.msg,
               })
           }
       })
   }
})
页面渲染
<view class="root">
    <view class="item" wx:for="{{ list }}" wx:key="index">
        <image src="{{ item.pic }}"></image>
        <text>{{ item.name }}</text>
    </view>
</view>
样式文件
page{
    background: #f1f1f1;
}
.root{
    padding: 10px;
}
.item{
    height: 80px;
    margin: 5px 0;
    background: #fff;
    line-height: 100px;
    padding: 10px;
}
image{
    width: 80px;
    height: 80px;
}
text{
    height: 80px;
    padding-left: 10px;
    position: absolute;
    line-height: 80px;
}
简易音乐播放器_搜索音乐

视图实现
<view class="container">
    <input bindinput="bindKeyInput" class="search" placeholder="输入您喜欢的歌曲名"/>
    <button class="btn" bindtap="bindgotoList" type="primary">搜索</button>
</view>
样式实现
.container{
    margin: 5px;
    margin-top: 100px;
}
.container .search{
    height: 40px;
    border: 2px solid #C20C0C;
    padding-left: 10px;
}
.container .btn{
    margin-top: 5px;
}
逻辑实现
Page({
    data: {
        search:""
   },
    bindgotoList(){
        wx.navigateTo({
          url: '/pages/musiclist/musiclist?search=' + this.data.search,
       })
   },
    bindKeyInput(e){
        this.setData({
            search:e.detail.value
       })
   }
})
简易音乐播放器_音乐列表

视图实现
<view class="container">
    <view
        class="item"
        wx:for="{{ songs }}"
        wx:key="index"
        >
        <text class="name">{{ item.name }}</text>
        <text class="author">{{ item.artists[0].name }}</text>
    </view>
</view>
样式实现
page{
    background: #f1f1f1;
}
.container{
    margin: 5px;
}
.item{
    height: 50px;
    background: #fff;
    margin: 5px;
    line-height: 50px;
    padding-left: 10px;
}
.author{
    font-size: 12px;
    margin-left: 20px;
    color: #999;
}
逻辑实现
const { request } = require("../../utils/request.js")
Page({
    data: {
        songs: [],
        search: "",
        limit: 20,
        offset: 1
   },
    onLoad(options) {
        this.setData({
            search: options.search
       })
        this.http(options.search,this.data.limit, this.data.offset)
   },
    http(keywords, limit, offset) {
      request("http://iwenwiki.com:3000/search","GET", {
            keywords,
            limit,
            offset
       }).then(res => {
            if (res.result.songs) {
                 this.setData({
                    songs: this.data.songs.concat(res.result.songs)
               })
           } else {
                wx.showToast({
                    title: "暂无数据",
               })
           }
       })
   },
    onReachBottom() {
        this.setData({
            offset: this.data.offset += 20
       })
        this.http(this.data.search,this.data.limit, this.data.offset)
   }
})
简易音乐播放器_播放音乐
列表视图实现
<view class="container">
    <view
        data-id="{{ item.id }}"
        data-name="{{ item.name }}"
        data-poster="{{ item.artists[0].img1v1Url }}"
        data-author="{{ item.artists[0].name }}"
        class="item"
        wx:for="{{ songs }}"
        wx:key="index"
        bindtap="bindgotoPlay"
        >
        <text class="name">{{ item.name }}</text>
        <text class="author">{{ item.artists[0].name }}</text>
    </view>
</view>
列表逻辑实现
const { request } = require("../../utils/request.js")
Page({
    data: {
        songs: [],
        search: "",
        limit: 20,
        offset: 1
   },
    onLoad(options) {
        this.setData({
            search: options.search
       })
        this.http(options.search,this.data.limit, this.data.offset)
   },
    http(keywords, limit, offset) {
      request("http://iwenwiki.com:3000/search","GET", {
            keywords,
            limit,
            offset
       }).then(res => {
            if (res.result.songs) {
                this.setData({
                    songs: this.data.songs.concat(res.result.songs)
               })
           } else {
               wx.showToast({
                    title: "暂无数据",
               })
           }
       })
   },
    onReachBottom() {
        this.setData({
            offset: this.data.offset += 20
       })
        this.http(this.data.search,this.data.limit, this.data.offset)
   },
    bindgotoPlay(e){
        let { id,name,author,poster } = e.currentTarget.dataset
        wx.navigateTo({
          url: '/pages/musicplay/musicplay?id=' + id +"&name=" + name + "&author=" +author +"&poster=" + poster
       })
   }
})
播放视图实现
<audio
    poster="{{poster}}"
    name="{{name}}"
    author="{{author}}"
    src="{{src}}"
    id="myAudio"
    controls>
</audio>
播放逻辑实现
Page({
    data: {
        src:"",
        name:"",
        poster:"",
        author:""
   },
    onLoad(options) {
        console.log(options);
        this.setData({
          src:"https://music.163.com/song/media/outer/url?id=" + options.id,
            name:options.name,
          poster:"https://p2.music.126.net/6y-UleORITEDbvrOLV0Q8A==/5639395138885805.jpg",
            author:options.author
       })
   }
})
模块化


我们可以使用 module.exports 导出,并且使用 require 导入
// hello.js
const num = 10;
function hello(){
    return "hello"
}
// module.exports.num = num;
// module.exports.hello = hello;
module.exports = {
    hello,
    num
}
// index.js
const { num,hello } = require("./modules/hello.js")
Page({
onLoad(options) {
console.log(num);
console.log(hello());
}
})1. 在微信小程序中,实现导入到文件的方法是:require
文件上传

将本地资源上传到服务器,最常见的就是图片上传了,大家都经历 过上传身份证吧~
首先我们要搞定服务器
在项目的根目录下存在一个文件夹 server , 进入这个文件夹,打开终 端
npm install 或 cnpm install
node index.js
之后存在上传图片的接口地址: http://localhost:3000/api/upload
上传参数

Page({
    bindUploadHandle(){
        wx.chooseImage({
            success(res) {
                const tempFilePaths = res.tempFilePaths
                wx.uploadFile({
                    url: 'http://localhost:3000/api/upload',
                    filePath: tempFilePaths[0],
                    name: 'file',
                    formData: {
                         'user': 'test'
                   },
                    timeout:50000,
                    success(res) {
                        const data = res.data
                        console.log(data);
                   },
                    fail(err){
                        console.log(err);
                   },
                    complete(){
                        console.log("完成");
                   }
               })
           }
       })
   }
})
1. 在微信小程序中,下列那个属性可以指定上传文件的路径:filePath
数据缓存

在开发过程中,有些需求是数据需要持久保存在程序中的,不随程序关闭而删除
例如:用户基本信息、主题颜色等

wx.setStorage()
将数据存储在本地缓存中指定的 key 中。会覆盖掉原来该 key 对应 的内容。除非用户主动删除或因存储空间原因被系统清理,否则数 据都一直可用。单个 key 允许存储的最大数据长度为 1MB,所有数 据存储上限为 10MB
Page({
    onLoad(options) {
        wx.setStorage({
            key: "name",
            data: "xiaotong"
       })
   }
})
温馨提示
AES加密:高级加密标准(英语:Advanced Encryption Standard,缩写:AES)
是一种区块加密标准。AES可以使用128、192和256位密钥,从安全性来看,AES256安全性最高。从性能来看,AES128性能最高
Page({
    onLoad(options) {
        wx.setStorage({
            key: "username",
            data: "xiaotong",
            encrypt: true
       })
   }
})
wx.getStorage()
从本地缓存中异步获取指定 key 的内容
Page({
    onLoad(options) {
        wx.setStorage({
            key: "name",
            data: "itbaizhan"
       })
        wx.getStorage({
            key:"name",
            success(res){
                console.log(res.data);
           }
       })
        wx.setStorage({
            key: "username",
            data: "sxt",
            encrypt: true
       })
        wx.getStorage({
            key:"username",
            encrypt: true,
            success(res){
                console.log(res.data);
           }
       })
   }
})
wx.removeStorage()
从本地缓存中移除指定 key
Page({
    onLoad(options) {
        wx.setStorage({
            key: "name",
            data: "xiaotong"
       })
        wx.removeStorage({
            key: 'name',
            success(res) {
                console.log(res)
           }
       })
   }
})
为了避免意外,我们最好用 try...catch 进行捕获
Page({
    onLoad(options) {
        wx.setStorage({
            key: "name",
            data: "xiaotong"
       })
        try {
            wx.removeStorage({
                key: 'name',
                success(res) {
                    console.log(res)
               }
           })
       } catch (e) {
            // 发生意外
            console.log(e);
       }
   }
})
wx.clearStorage()
清理本地数据缓存
Page({
    onLoad(options) {
        wx.setStorage({
            key: "name",
            data: "xiaotong"
       })
        wx.clearStorage()
   }
})
1. 在微信小程序中,实现数据缓存删除某一条数据使用下列那个方法:removeStorage
数据缓存_同步与异步

数据缓存有两套操作方案,一套是异步操作,一套是同步操作 我们之前讲解的就是异步操作,而同步操作如下(只是在后面多了 Sync ):

温馨提示
异步不会阻塞当前任务,同步缓存直到同步方法处理完才能继 续往下执行 通俗的说:异步就是不管保没保存成功,程序都会继续往下执行. 同步是等保存成功了,才会执行下面的代码
使用异步,性能会更好;而使用同步,数据会更安全
Page({
    onLoad(options) {
        wx.setStorageSync("color","red")
        var value = wx.getStorageSync('color')
        console.log(value);
        wx.removeStorageSync('color')
        wx.clearStorageSync()
   }
})
1. 在微信小程序中,实现同步添加数据存储的方案是:setStorageSync
微信分享

监听用户点击页面内转发按钮,可以发送给你的好友或者分享到你 的朋友圈哦

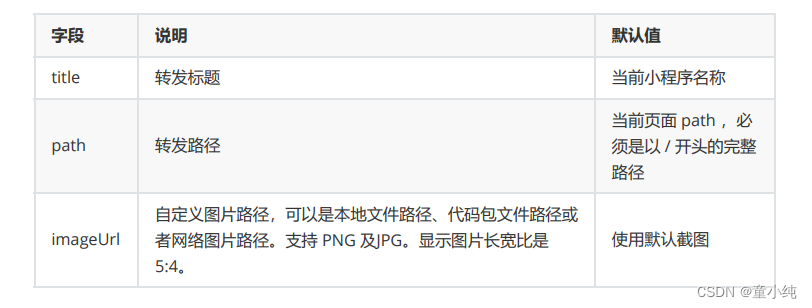
分享好友
Page({
    /**
     * 用户点击右上角分享
     */
    onShareAppMessage() {
        return {
            title: 'xiaotong程序员',
            path: '/pages/upload/upload',
            imageUrl:"../../images/1.png",
            menus: ['shareAppMessage']
       }
   }
})
分享朋友圈

Page({
    onShareAppMessage() {
        return {
            title: '我的小程序',
            path: '/pages/upload/upload',
            imageUrl:"../../images/1.png",
            menus: ['shareAppMessage','shareTimeline']
       }
    },
    /**
     * 用户点击右上角分享到朋友圈
     */
    onShareTimeline(){
        return {
            title: '分享到朋友圈',
            query: '/pages/upload/upload',
            imageUrl:"../../images/2.jpg"
       }
   }
})
1. 在微信小程序中,实现分享到朋友圈的方法是:onShareTimeline
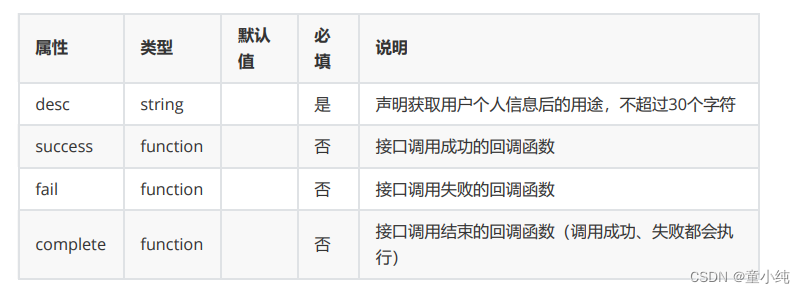
获取用户信息

获取用户信息。页面产生点击事件后才可调用,每次请求都会弹出 授权窗口,用户同意后返回 userInfo
通过 wx.getUserProfile() 方法进行获取
常用参数
<button type="primary" bindtap="getUserProfile"> 获取头像昵称</button>
<view>
    <image src="{{userInfo.avatarUrl}}"></image>
    <text>{{userInfo.nickName}}</text>
</view>
Page({
data: {
userInfo: {},
},
getUserProfile(e) {
wx.getUserProfile({
desc: '展示用户信息',
success: (res) => {
console.log(res)
this.setData({
userInfo: res.userInfo
})
},
fail(err){
console.log(err);
},
complete(){
console.log("获取完成");
}
})
}
})
1. 在微信小程序中,获取用户信息,是否可以直接获取用户的微信号:无法获取
小程序登录流程

小程序可以通过微信官方提供的登录能力方便地获取微信提供的用户身份标识,快速建立小程序内的用户体系


用户登录_服务器端

服务器端我们采用 nodejs 来实现,需要提示大家,我们注重的是前 端,所以服务器端代码不考虑优化加密问题,单纯是为了测试,在 真实的开发场景中,服务器端代码会由服务器开发人员编写
const express = require("express");
const app = express();
const router = require("./router");
const bodyParser = require("body-parser");
const cors = require("cors");

// 解决跨域
app.use(cors());
app.use(bodyParser.urlencoded({
    extended:true
}))
app.use("/api",router);

app.listen(3000,()=>{
    console.log("服务器运行在3000端口上");
})
const express = require("express");
const router = express.Router();
const request = require("request");
const authorization_code = "itbaizhan"
const appid = "wxe4135ba344b525f4"
const secret01 = "3d197129a2efc0c5ee4d93c102480724"
router.post("/login", (req, res) => {
// 获取到登录后的code
const { code} = req.body;
// 向微信服务器发送信息获取到 openid 和 session_key
request(`https://api.weixin.qq.com/sns/jscode2session?
appid=${appid}&secret=${secret01 }&js_code=${code}&grant_type=${authorization_code}`, (err, response, body) => {
if (err) console.log(err);
const data = JSON.parse(body);
/*
签名校验以及数据加解密涉及用户的会话密钥 session_key。 需要保存在服务器
openid 判断是否是同一个用户
session_key 判断用户是否失效
data: {
openid: '**********',
session_key: '********'
}
*/
res.send(data)
})
})
module.exports = router;用户登录

服务器端实现之后,我们来写小程序端的代码
调用接口获取登录凭证(code)。通过凭证进而换取用户登录态信 息,包括用户在当前小程序的唯一标识(openid)、微信开放平台 帐号下的唯一标识(unionid,若当前小程序已绑定到微信开放平台 帐号)及本次登录的会话密钥(session_key)等。用户数据的加解 密通讯需要依赖会话密钥完成
Page({
    bindLoginHandle() {
        wx.login({
            success(response) {
                console.log(response.code);
                wx.request({
                    url: 'http://localhost:3000/api/login',
                    method: "POST",
                    data: {
                        code: response.code
                   },
                    header: {
                        'Content-Type': 'application/x-www-form-urlencoded'
                   },
                    success(result) {
                       console.log(result.data)
                   },
                    fail(err) {
                        console.log('失败返回的信息', err);
                   }
               })
           },
            fail(err) {
                console.log('login error',err);
           }
       })
   }
})
自定义组件

开发者可以将页面内的功能模块抽象成自定义组件,以便在不同的 页面中重复使用;也可以将复杂的页面拆分成多个低耦合的模块, 有助于代码维护。自定义组件在使用时与基础组件非常相似
创建组件
类似于页面,一个自定义组件由 json wxml wxss js 4个文件组成。要 编写一个自定义组件,首先需要在 json 文件中进行自定义组件声明 (将 component 字段设为 true 可将这一组文件设为自定义组件)
{
  "component": true
}
引用自定义组件
使用已注册的自定义组件前,首先要在页面的 json 文件中进行引用 声明。此时需要提供每个自定义组件的标签名和对应的自定义组件 文件路径
{
  "usingComponents": {
    "component-tag-name": "../../components/counter/counter"
 }
}
之后,将组件名字在 .wxml 文件中引入即可
<counter></counter>
1. 在微信小程序中,在 .wxml 中引用组定义组件的方式下列描述正确的是:
将组件名字在 .wxml 文件中引入即可
自定义组件_常用属性和方法


<!-- 自定义组件 -->
<view>我是自定义组件</view>
<view>{{ title }}</view>
<view>{{ text }}</view>
<button type="primary" bindtap="clickHandle">按钮</button>
Component({
properties: {
title: {
type: String,
value: 'default value',
}
},
data: {
text:"测试数据"
},
methods: {
clickHandle(){
console.log("点击了");
}
}
})<!-- 引用组件的页面 -->
<view class="counter">
<counter title="自定义组件"></counter>
</view>
1. 在微信小程序中,自定义组件中,那个属性可以接受外部传递的参数:properties
自定义组件_插槽

在组件模板中可以提供一个节点,用于承载页面引用时提供的子节点
这种方式与直接传递数据是有区别的,他是可以传递视图的!
实现组件
<!-- components/list/list.wxml -->
<view>
    <view class="title">
        <slot></slot>
    </view>
    <view wx:for="{{ listData }}" wx:key="index">
        <view>{{ item }}</view>
    </view>
</view>
// components/list/list.js
Component({
properties: {
listData:{
type:Array,
value:[]
}
}
}).title{
margin: 5px;
}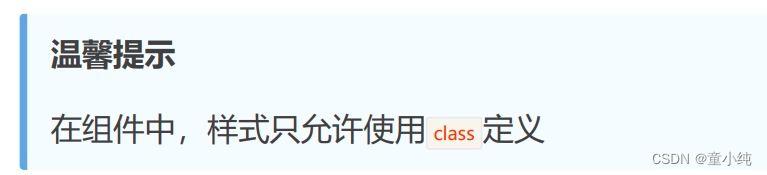
引用组件
{
    "usingComponents": {
        "list":"../../components/list/list"
   }
}
<view>
    <list listData="{{ userList }}">
        <view style="font-size:30px;">{{ userTitle }}</view>
    </list>
    <list listData="{{ dataList }}">
        <view style="font-size:20px;">{{ dataTitle }}</view>
    </list>
</view>
Page({
    data: {
        userList:["iwen","ime","frank"],
        userTitle:"用户列表",
        dataList:["前端","python","Java"],
        dataTitle:"课程列表"
   }
})