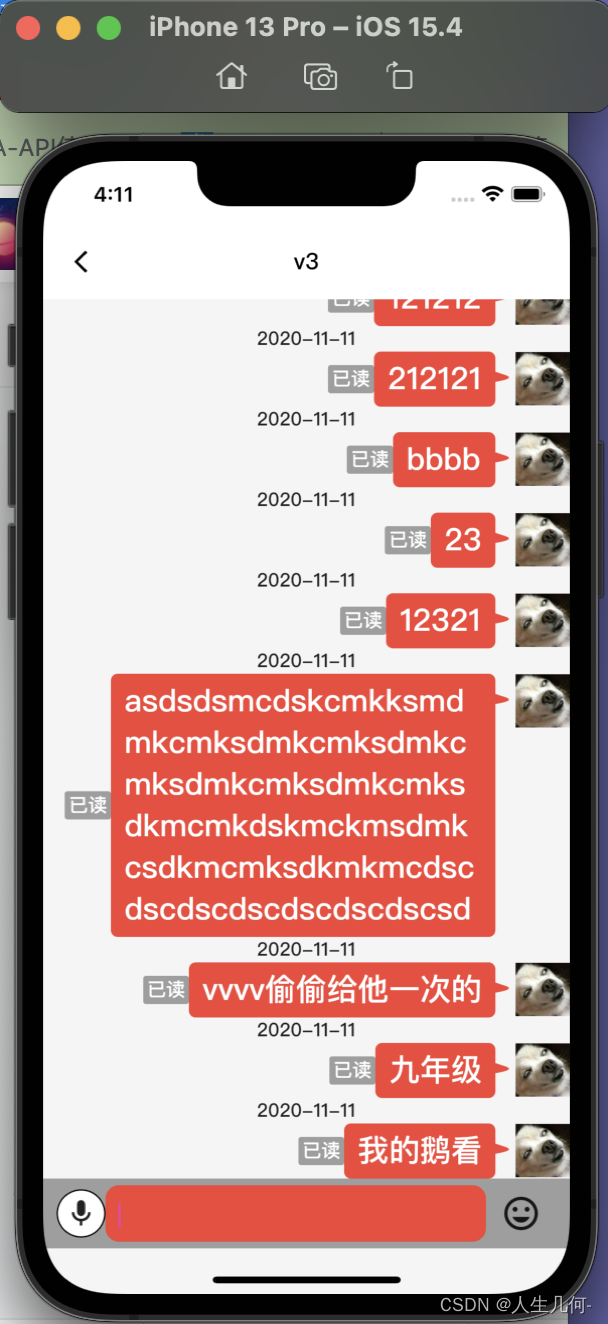
先看效果
前言::::
网上好多气泡框,都让写固定宽高,无法自适应文本内容。
还有的就是通过算child 然后动态计算气泡框宽高,脱裤子💨,放到listview 刷新数据还会丢ui,因为要算某一个widget 的大小,必须是已经加载过,然后你再刷新listview然后更新大小。会被回收ui。不管是text内容,还是布局大小你要计算那就GG。不想多言
源码
import 'package:flutter/material.dart';

class BubbleViewClip extends CustomClipper<Path> {

  /// 夹角宽度
  static double ARRWIDTH = 15;

  /// 夹角高度
  double arrHeight = 10;

  /// 气泡框圆角 /// 夹角圆角自己写去吧
  double radius = 5;

  /// 夹角Y位置
  double arrPointY  = 15;

  // @override
  Path getClip(Size size) {

    double height = size.height;
    double width = size.width;

    var controllPoint = Offset(width, arrPointY + arrHeight / 2);
    var endPoint = Offset(width - 15, arrPointY + arrHeight / 4 * 3);

    Path zone = Path()
      ..addRRect(RRect.fromLTRBR(0, 0, width - ARRWIDTH, height, Radius.circular(radius)))
      // ..close()
      ..moveTo(width - ARRWIDTH, arrPointY)
      ..lineTo(width - (ARRWIDTH / 2), arrPointY + arrHeight /4 )
      ..quadraticBezierTo(controllPoint.dx, controllPoint.dy, endPoint.dx, endPoint.dy)
      ..lineTo(width - ARRWIDTH, arrPointY + arrHeight)
      ..lineTo(width - ARRWIDTH, arrPointY)
      ..close();

    return zone;
  }

  @override
  bool shouldReclip(covariant CustomClipper oldClipper) {
    return true;
  }
}
使用
ClipPath(
            clipper: BubbleViewClip(),
            child: Container(
              color: Colors.red,
              constraints: BoxConstraints(
                /// 这里我建议给一下,放到row里面如果加入Spacer 可能不换行。
                /// 然后 Display.screenWidth 是屏幕宽度。 mainPicSize 是头像大小 50是已读宽度。
                maxWidth: Display.screenWidth - mainPicSize - 50, // 最大宽度
              ),
              padding: EdgeInsets.only(left: 10,right: BubbleViewClip.ARRWIDTH + 10,top: 5,bottom: 5),
              child: Text(message.textElem!.text!,
                  softWrap: true,
                  style: TextStyle(color: Colors.white, fontSize: 23,)),
            ),
          );
原理 ======为啥如此简单:
来 关注点赞一下我告告你为啥如此简单
Container 红色正方形 然后 你剪切绘制成 气泡框的样子,然后 夹角长, 你直接Container padding 个夹角长度 ,内容不就显示全了么?,不就完美解决了吗?
别人都是直接绘制成气泡框Widget 。罗里吧嗦不看。
看看我发表时间,我真的潦草一下博客吧。困了😴:2023.07.18 04:32
-所以我只写了 右侧夹角,左侧夹角自己搞吧。忘记了


