CS 144 Lab Zero
- 环境搭建
- 使用socket写一个网络程序
- In-memory reliable byte stream
对应课程视频: 【计算机网络】 斯坦福大学CS144课程
Lab 0 对应的PDF: Lab Checkpoint 0: networking warmup
Lab 0 会省去Telnet部分内容。
环境搭建
- Run Ubuntu version 22.10, then install the required packages:
sudo apt update && sudo apt install git cmake gdb build-essential clang \
clang-tidy clang-format gcc-doc pkg-config glibc-doc tcpdump tshark
使用socket写一个网络程序
在IP层,数据包传输的原则是“best-effort”,即尽最大努力传输数据包,但不保证一定送达。数据包可能会丢失、重传、出错、乱序到达。把这种混乱的数据包变成可靠的字节流,则是TCP传输层的责任。
本节我们将写一个“webget”程序,创建一个TCP stream socket,去和一个web server建立连接。你可以认为你的socket是一个双向的可靠的字节流传输服务,这种可靠性是TCP协议所保证的。
git clone https://gitee.com/DaHuYuXiXi/cs144-sponge.git

cd cs144-sponge
mkdir build
cd build

cmake ..
make
实验指导书建议我们使用Modern C++的特性,来写这个实验。并建议我们使用git来管理项目。
建议仔细阅读一下文档:
- https://cs144.github.io/doc/lab0
- FileDescriptor, Socket, TCPSocket, and Address classes
各个类的继承关系如下:
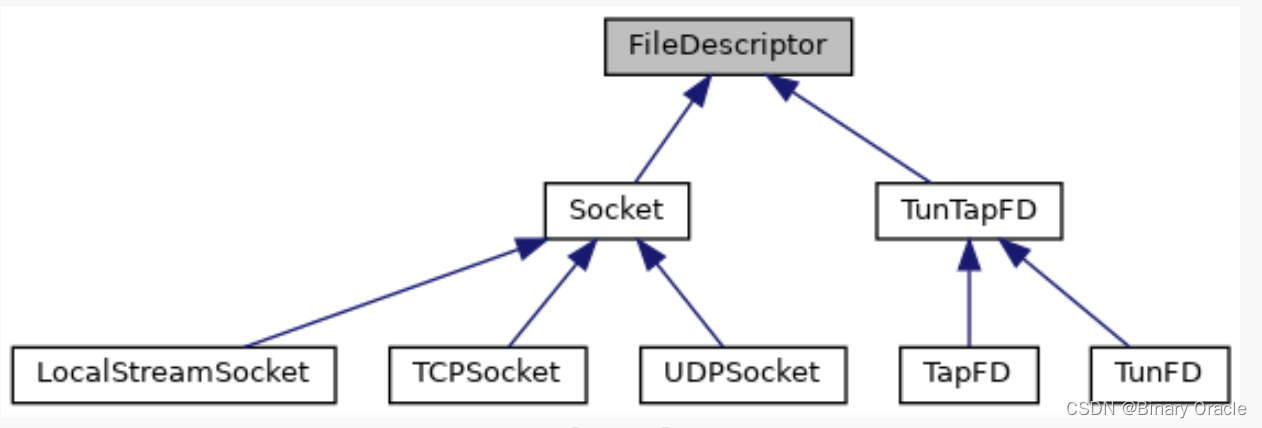
看上去比较重要的是TCPSocket这个类,读完文档之后,我们就可以去实现webget程序了,代码量预计 10 行左右,位于apps/webget.cc,实现代码时务必借助 libsponge 中的 TCPSocket 和 Address 类来完成。
需要注意的是
-
HTTP 头部的每一行末尾都是以
\r\n结尾,而不是\n -
需要包含
Connection: close的HTTP头部,以指示远程服务器在处理完当前请求后直接关闭。 -
除非获取到EOF,否则必须循环从远程服务器读取信息。
-
因为网络数据的传输可能断断续续,需要多次 read。
具体代码实现如下:
void get_URL(const string &host, const string &path) {
    // You will need to connect to the "http" service on
    // the computer whose name is in the "host" string,
    // then request the URL path given in the "path" string.

    // Then you'll need to print out everything the server sends back,
    // (not just one call to read() -- everything) until you reach
    // the "eof" (end of file).
    TCPSocket socket;
    socket.connect(Address(host, "http"));
    // message template
    string messages;
    messages += "GET " + path + " HTTP/1.1\r\n";
    messages += "Host: " + host + "\r\n";
    messages += "Connection: close\r\n\r\n";
    // write message
    socket.write(messages);
    cout << "Message: \r" << messages;
    while (!socket.eof()) {
        cout << socket.read();
    }
    socket.close();
}
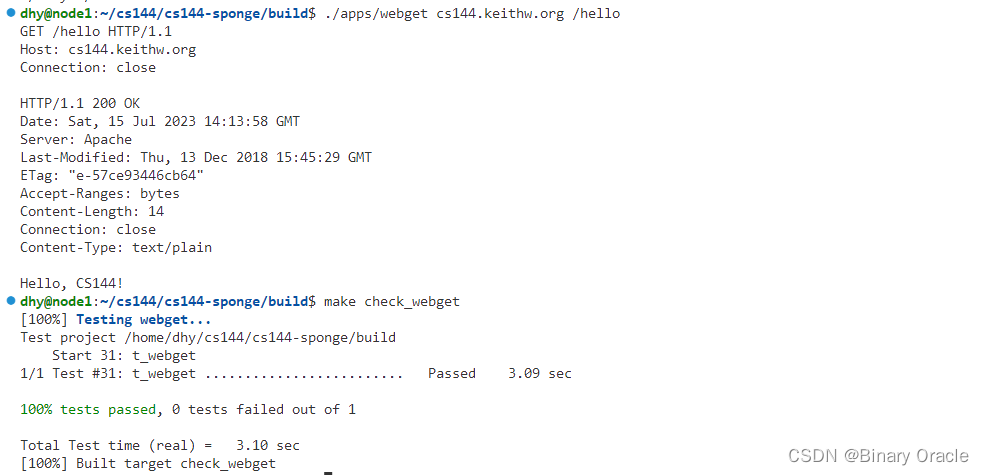
实现完之后,在/biuld目录下,构建,并运行
make
./apps/webget cs144.keithw.org /hello
它的行为应该和上述2.1小节的行为保持一致。
最后它应该能够通过测试
make check_webget
In-memory reliable byte stream
要求
- 字节流可以从写入端写入,并以相同的顺序,从读取端读取
- 字节流是有限的,写者可以终止写入。而读者可以在读取到字节流末尾时,产生EOF标志,不再读取。
- 所实现的字节流必须支持流量控制,以控制内存的使用。当所使用的缓冲区爆满时,将禁止写入操作。直到读者读取了一部分数据后,空出了一部分缓冲区内存,才让写者写入。
- 写入的字节流可能会很长,必须考虑到字节流大于缓冲区大小的情况。即便缓冲区只有1字节大小,所实现的程序也必须支持正常的写入读取操作。
在单线程环境下执行,因此不用考虑各类条件竞争问题。
这是在内存中的有序可靠字节流,接下来的实验会让我们在不可靠网络中实现一个这样的可靠字节流,而这便是传输控制协议(Transmission Control Protocol,TCP)
以下是实现的代码:
- byte_stream.hh
#include <deque>
#include <string>
#include <vector>

//!  An in-order byte stream.

//! Bytes are written on the "input" side and read from the "output"
//! side.  The byte stream is finite: the writer can end the input,
//! and then no more bytes can be written.
class ByteStream {
  private:
    // Your code here -- add private members as necessary.

    // Hint: This doesn't need to be a sophisticated data structure at
    // all, but if any of your tests are taking longer than a second,
    // that's a sign that you probably want to keep exploring
    // different approaches.

    std::deque<char> buffer_;
    size_t capacity_;
    bool is_ended_, is_eof_;
    size_t bytes_written_, bytes_read_;

    bool _error{};  //!< Flag indicating that the stream suffered an error.

  public:
    //! Construct a stream with room for `capacity` bytes.
    ByteStream(const size_t capacity);
    //! Write a string of bytes into the stream. Write as many
    //! as will fit, and return how many were written.
    size_t write(const std::string &data);
    //! Write one character into the stream.
    bool write_char(char datum);
    //! \returns the number of additional bytes that the stream has space for
    size_t remaining_capacity() const;
    //! Signal that the byte stream has reached its ending
    void end_input();
    //! Indicate that the stream suffered an error.
    void set_error() { _error = true; }
    //! Peek at next "len" bytes of the stream
    std::string peek_output(const size_t len) const;
    //! Remove bytes from the buffer
    void pop_output(const size_t len);
    //! Read (i.e., copy and then pop) the next "len" bytes of the stream
    std::string read(const size_t len);
    //! \returns `true` if the stream input has ended
    bool input_ended() const;
    //! \returns `true` if the stream has suffered an error
    bool error() const { return _error; }
    //! \returns the maximum amount that can currently be read from the stream
    size_t buffer_size() const;
    //! \returns `true` if the buffer is empty
    bool buffer_empty() const;
    //! \returns `true` if the output has reached the ending
    bool eof() const;
    //! Total number of bytes written
    size_t bytes_written() const;
    //! Total number of bytes popped
    size_t bytes_read() const;
};
- byte_stream.cc
#include "byte_stream.hh"

#include <iostream>

// Dummy implementation of a flow-controlled in-memory byte stream.

// For Lab 0, please replace with a real implementation that passes the
// automated checks run by `make check_lab0`.

// You will need to add private members to the class declaration in
// `byte_stream.hh`

using namespace std;

ByteStream::ByteStream(const size_t capacity)
    : buffer_()
    , capacity_(capacity)
    , is_ended_(false)
    , is_eof_(false)
    , bytes_written_(0)
    , bytes_read_(0)
    , _error(false) {}

size_t ByteStream::write(const string &data) {
    size_t write_amount = remaining_capacity() < data.length()
                              ? remaining_capacity()
                              : data.length();  // min(remaining_capacity(), data.length());
    for (size_t i = 0; i < write_amount; i++) {
        buffer_.push_back(data[i]);
    }
    bytes_written_ += write_amount;
    return write_amount;
}

bool ByteStream::write_char(char datum) {
    if (remaining_capacity() == 0)
        return false;
    buffer_.push_back(datum);
    bytes_written_++;
    return true;
}

//! \param[in] len bytes will be copied from the output side of the buffer
string ByteStream::peek_output(const size_t len) const {
    size_t peek_length = len < buffer_size() ? len : buffer_size();
    string out_string(peek_length, ' ');
    for (size_t i = 0; i < peek_length; i++) {
        out_string[i] = buffer_[i];
    }
    return out_string;
}

//! \param[in] len bytes will be removed from the output side of the buffer
void ByteStream::pop_output(const size_t len) {
    size_t pop_length = len < buffer_size() ? len : buffer_size();
    for (size_t i = 0; i < pop_length; i++)
        buffer_.pop_front();
    bytes_read_ += pop_length;
    if (is_ended_ && buffer_empty())
        is_eof_ = true;
}

//! Read (i.e., copy and then pop) the next "len" bytes of the stream
//! \param[in] len bytes will be popped and returned
//! \returns a string
std::string ByteStream::read(const size_t len) {
    string out = peek_output(len);
    pop_output(len);
    return out;
}

void ByteStream::end_input() {
    if (buffer_.empty())
        is_eof_ = true;
    is_ended_ = true;
}

bool ByteStream::input_ended() const { return is_ended_; }
size_t ByteStream::buffer_size() const { return buffer_.size(); }
bool ByteStream::buffer_empty() const { return buffer_.empty(); }
bool ByteStream::eof() const { return is_eof_; }
size_t ByteStream::bytes_written() const { return bytes_written_; }
size_t ByteStream::bytes_read() const { return bytes_read_; }
size_t ByteStream::remaining_capacity() const { return capacity_ - buffer_.size(); }
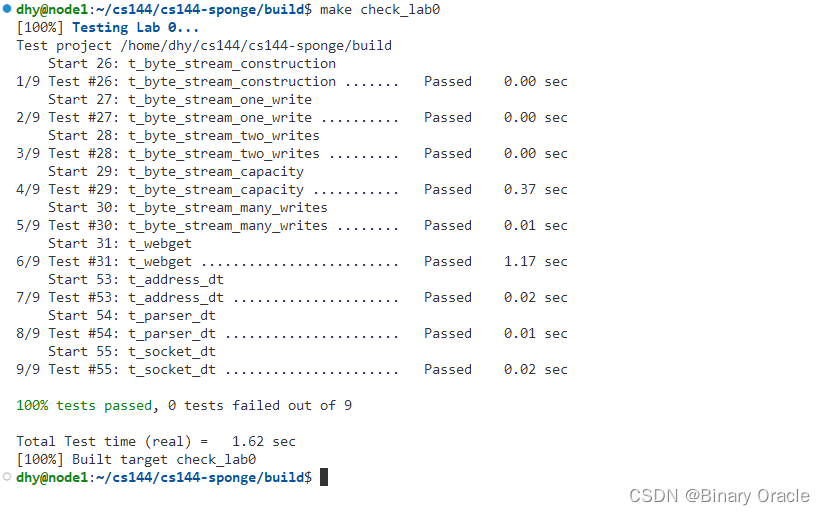
实现完之后,使用如下命令进行测试:
cd build
make
make check_lab0
