Poi-tl参考文档地址:http://deepoove.com/poi-tl/1.8.x/#hack-loop-table
word模板替换,转pdf
- 1. 依赖引入:
- 2. word模板配置:
- 3. 示例demo:
- 4 . 效果图
- 5. 本地测试没问题,上Linux服务乱码,出现小方框
1. 依赖引入:
  <dependency>
      <groupId>org.apache.poi</groupId>
      <artifactId>poi-ooxml</artifactId>
      <version>4.1.2</version>
  </dependency>

  <dependency>
      <groupId>com.aspose</groupId>
      <artifactId>aspose-words</artifactId>
      <version>18.2</version>
      <classifier>jdk16</classifier>
  </dependency>

  <dependency>
      <groupId>com.deepoove</groupId>
      <artifactId>poi-tl</artifactId>
      <version>1.8.2</version>
  </dependency>

<!-- 通过Maven库拿不到,就加下面的配置 -->
<repositories>
     <repository>
         <id>AsposeJavaAPI</id>
         <name>Aspose Java API</name>
         <url>https://repository.aspose.com/repo/</url>
     </repository>
 </repositories>
 <pluginRepositories>
     <pluginRepository>
         <id>AsposeJavaAPI</id>
         <url>https://repository.aspose.com/repo/</url>
     </pluginRepository>
 </pluginRepositories>
2. word模板配置:
绿色部分是直接渲染的,对应map中的key-value,蓝色部分是绑定collections对象,进行遍历循环集合数据

3. 示例demo:
public static void main(String[] args) throws Exception {
       public static void main(String[] args) throws Exception {
        ByteArrayOutputStream docOutput = new ByteArrayOutputStream();

        Map<String, Object> map = new HashMap<>(3);
        map.put("zfkp", "AAAA");
        map.put("kpjg", "123");
        map.put("kpr", "李四");

        List<Map> list = new ArrayList<>();
        Map<String, Object> map1 = new HashMap<>(3);
        map1.put("number", 1);
        map1.put("kprlist", "xxxa");
        map1.put("fs", 17);
        Map<String, Object> map2 = new HashMap<>(3);
        map2.put("number", 2);
        map2.put("kprlist", "xxxa3aa");
        map2.put("fs", 10);
        list.add(map1);
        list.add(map2);
        //列表集合数据
        map.put("collections", list);

        HackLoopTableRenderPolicy policy = new HackLoopTableRenderPolicy();
        Configure config = Configure.newBuilder()
                //绑定集合数据
                .bind("collections", policy).build();

        System.out.println(map);
        //加载配置的word模板
        XWPFTemplate template = XWPFTemplate.compile("C:\\Users\\DELL\\Desktop\\kpwtlb.docx", config);

        template.render(map);
        //写入word,swapStream可输出word文档
        template.write(docOutput);
        ByteArrayInputStream swapStream = new ByteArrayInputStream(docOutput.toByteArray());

        //word转PDF
        Document doc = new Document(swapStream);
        ByteArrayOutputStream pdfOutput = new ByteArrayOutputStream();
        doc.save(pdfOutput, SaveFormat.PDF);

        ByteArrayInputStream pdfinput = new ByteArrayInputStream(pdfOutput.toByteArray());
        FileUtil.inputStreamToFile(pdfinput, "C:\\Users\\DELL\\Desktop\\", "123.pdf");
    }
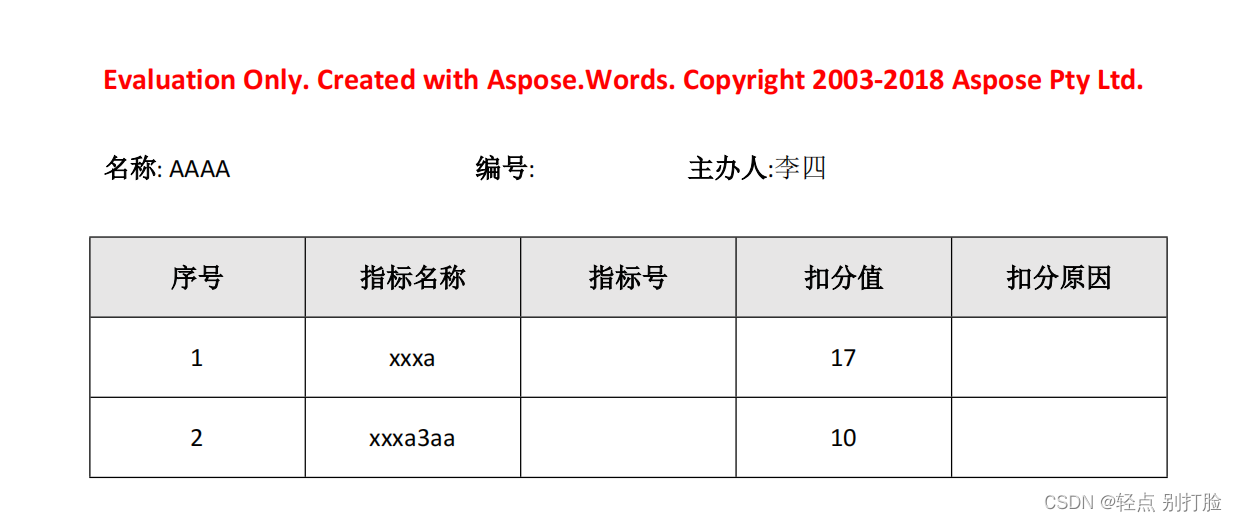
4 . 效果图
转换的pdf有水印,去水印很方便, 加载License(要买)即可 封装一个工具类
https://blog.csdn.net/weixin_42827159/article/details/105031663
5. 本地测试没问题,上Linux服务乱码,出现小方框
参考博客:https://blog.csdn.net/qq_42055933/article/details/128285226
1、将windows字体压缩上传到Linux,并安装进行缓存
//查看linux有的字体
fc-list
//linux中的中文字体
fc-list :lang=zh
//进入c:\windows\fonts,压缩字体包,上传至Linux /usr/share/fonts/路径,自建一个文件夹 win
//解压上传的windows字体至win中
//给以下格式字体文件赋权限
chmod 755 *.ttf  chmod 755 *.ttc  chmod 755 *.TTF
//安装字体以及缓存字体
sudo mkfontscale
sudo mkfontdir
sudo fc-cache -fv
//生效指令
source /etc/profile
2、在转换之前设置一下字体路径来源
执行完以上步骤,加上以下代码,两个截图是两种不同的方法,选其一,打包上传重启基本就解决了,如果是docker启动,还需做一步。重构docker容器,将windows字体存放的路径,即以下代码指定的路径,做挂载,然后重启
docker相关操作:https://blog.csdn.net/loney_wolf/article/details/128255199 构建容器时,除了挂载项目路径,再加 -v /usr/share/fonts/(window字体的文件夹) :/usr/share/fonts/ 将安装的windows字体路径挂在至docker容器中,重启即可


