作者:学Java的冬瓜
博客主页:☀冬瓜的主页🌙
专栏:【JavaEE】
分享:
谜一样的 沉默着的
故事你真的在听吗
——《平凡之路》
主要内容:准备工作:创建maven,引入依赖。设计数据库并编写数据库代码。前后端分离功能的实现。博客列表,博客详情,登录功能,注册功能,验证登录,退出登录功能实现。

文章目录
- 一、博客系统展示
- 二、准备项目和基本代码
- 1)准备工作
- 2)设计数据库
- 3)编写数据库代码
- 1> sql建表
- 2> 封装DBUtil
- 3> 创建实体类:Blog、User
- 4> 编写UserDao和BlogDao
- 三、前后端分离实现博客系统
- 1)博客列表
- 2)博客详情
- 3)登录功能
- 4)验证登录
- 5)注册用户
- 6)退出登录
一、博客系统展示
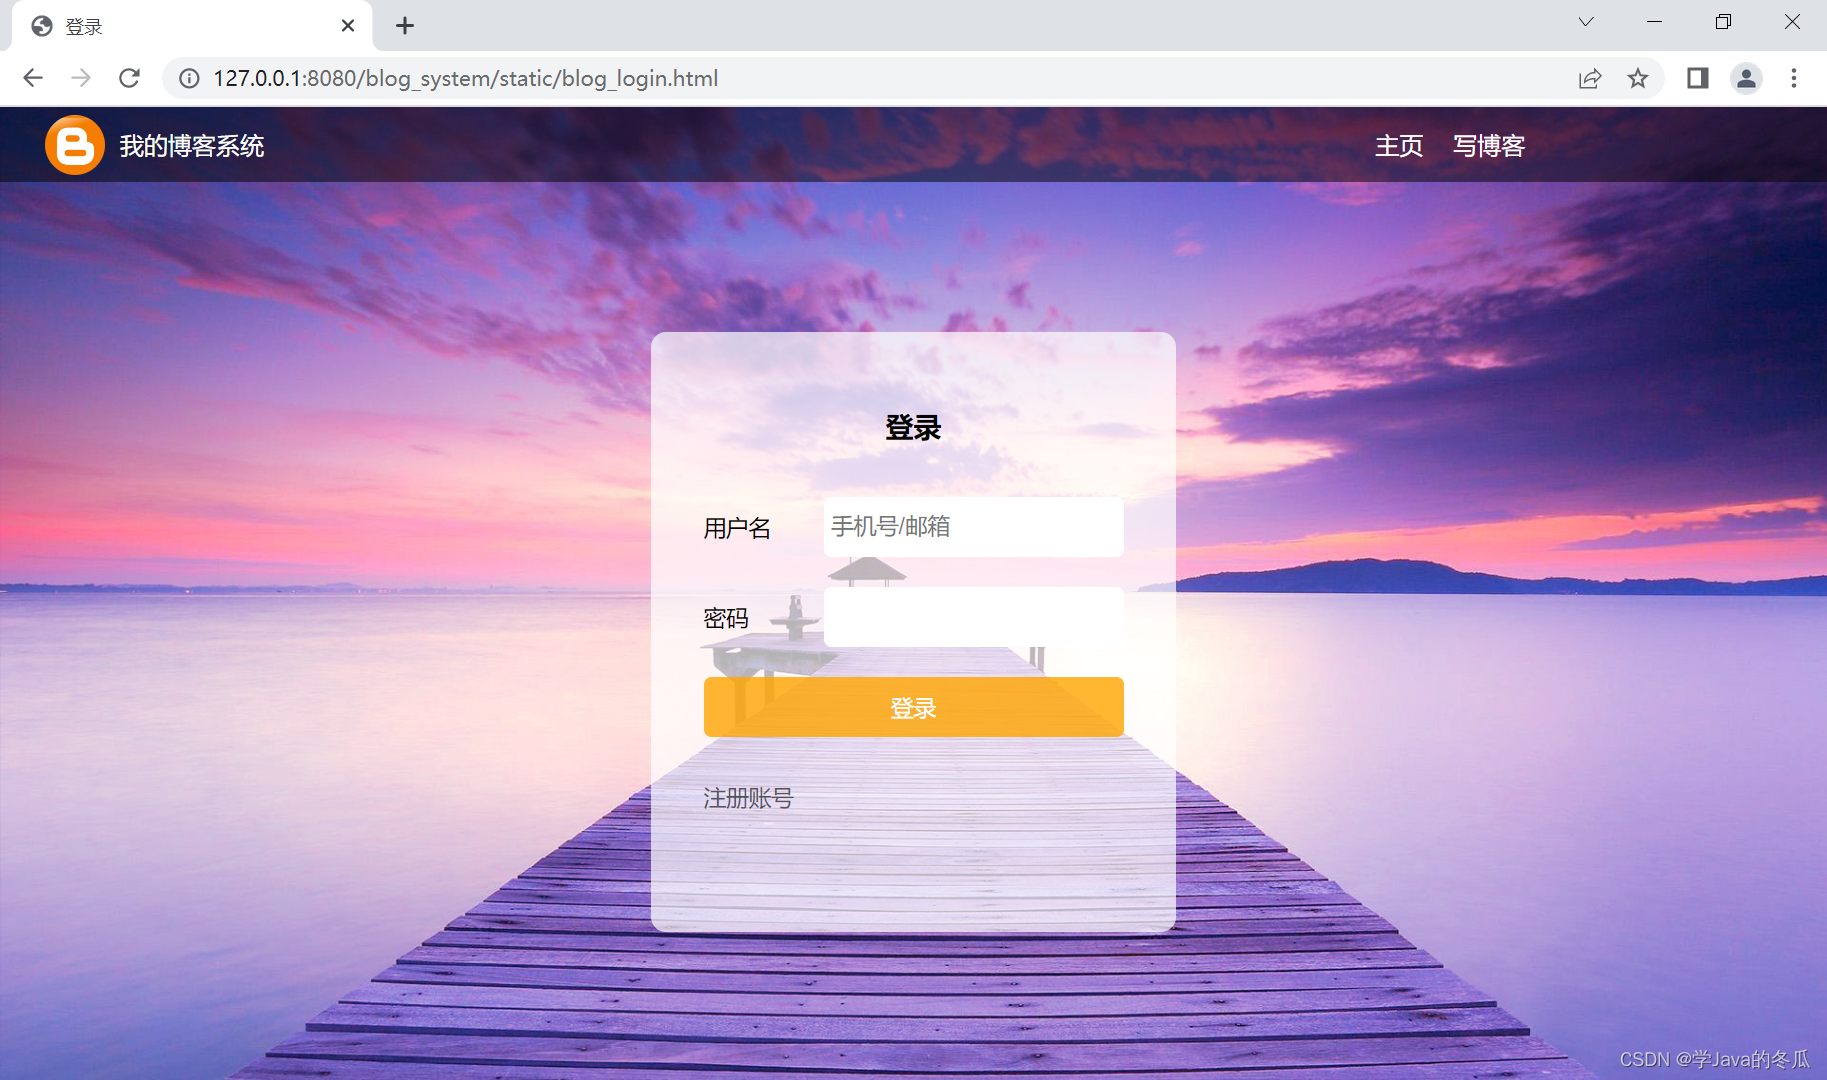
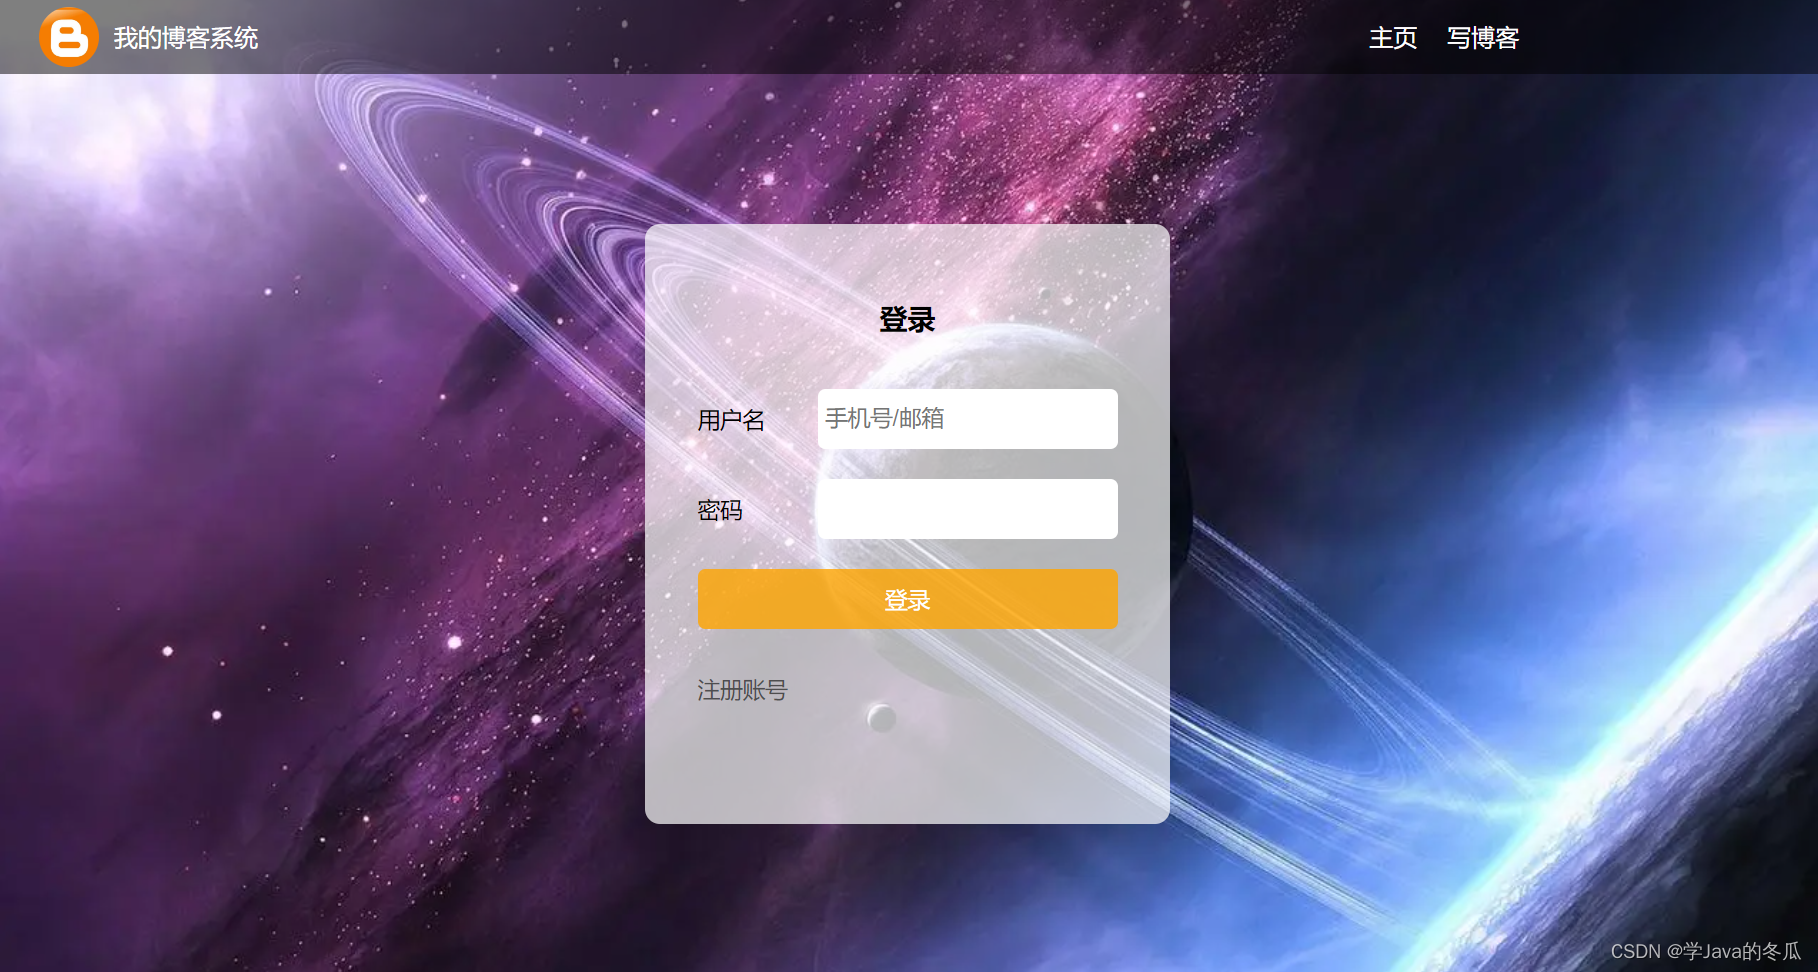
1.登录
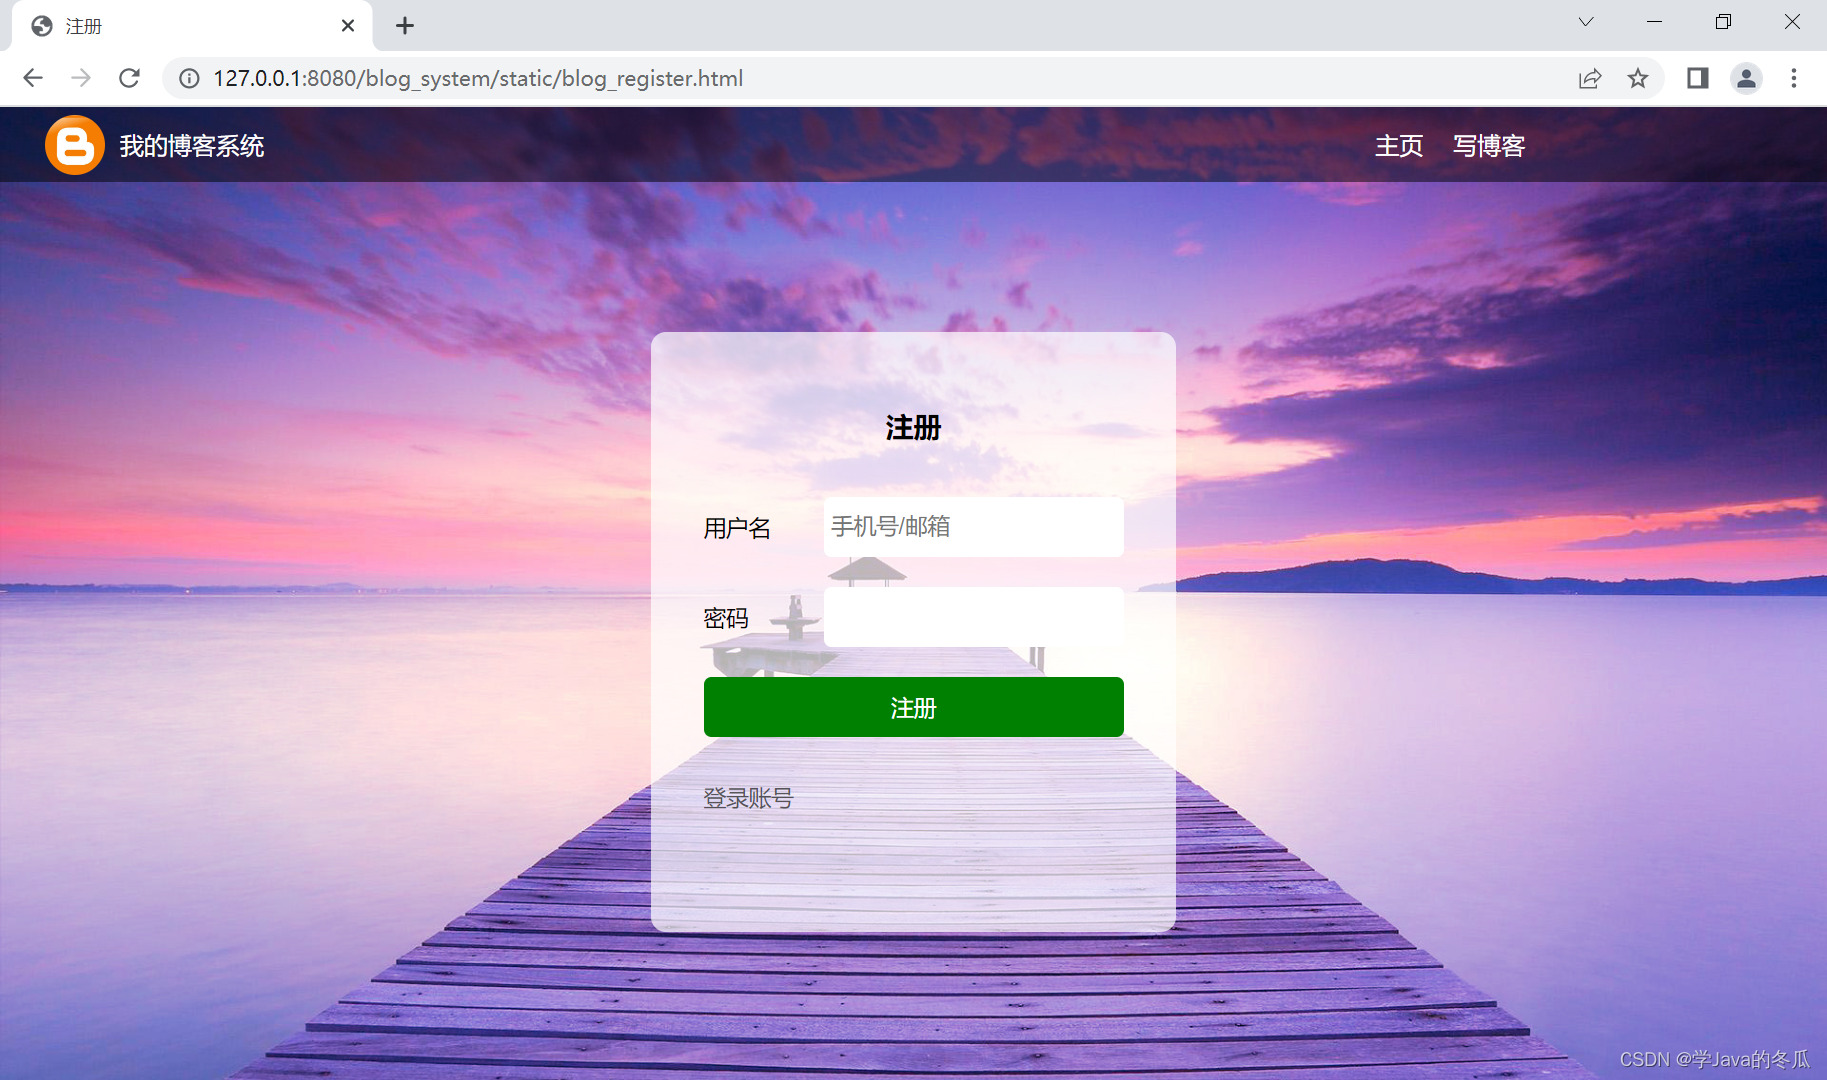
2.注册
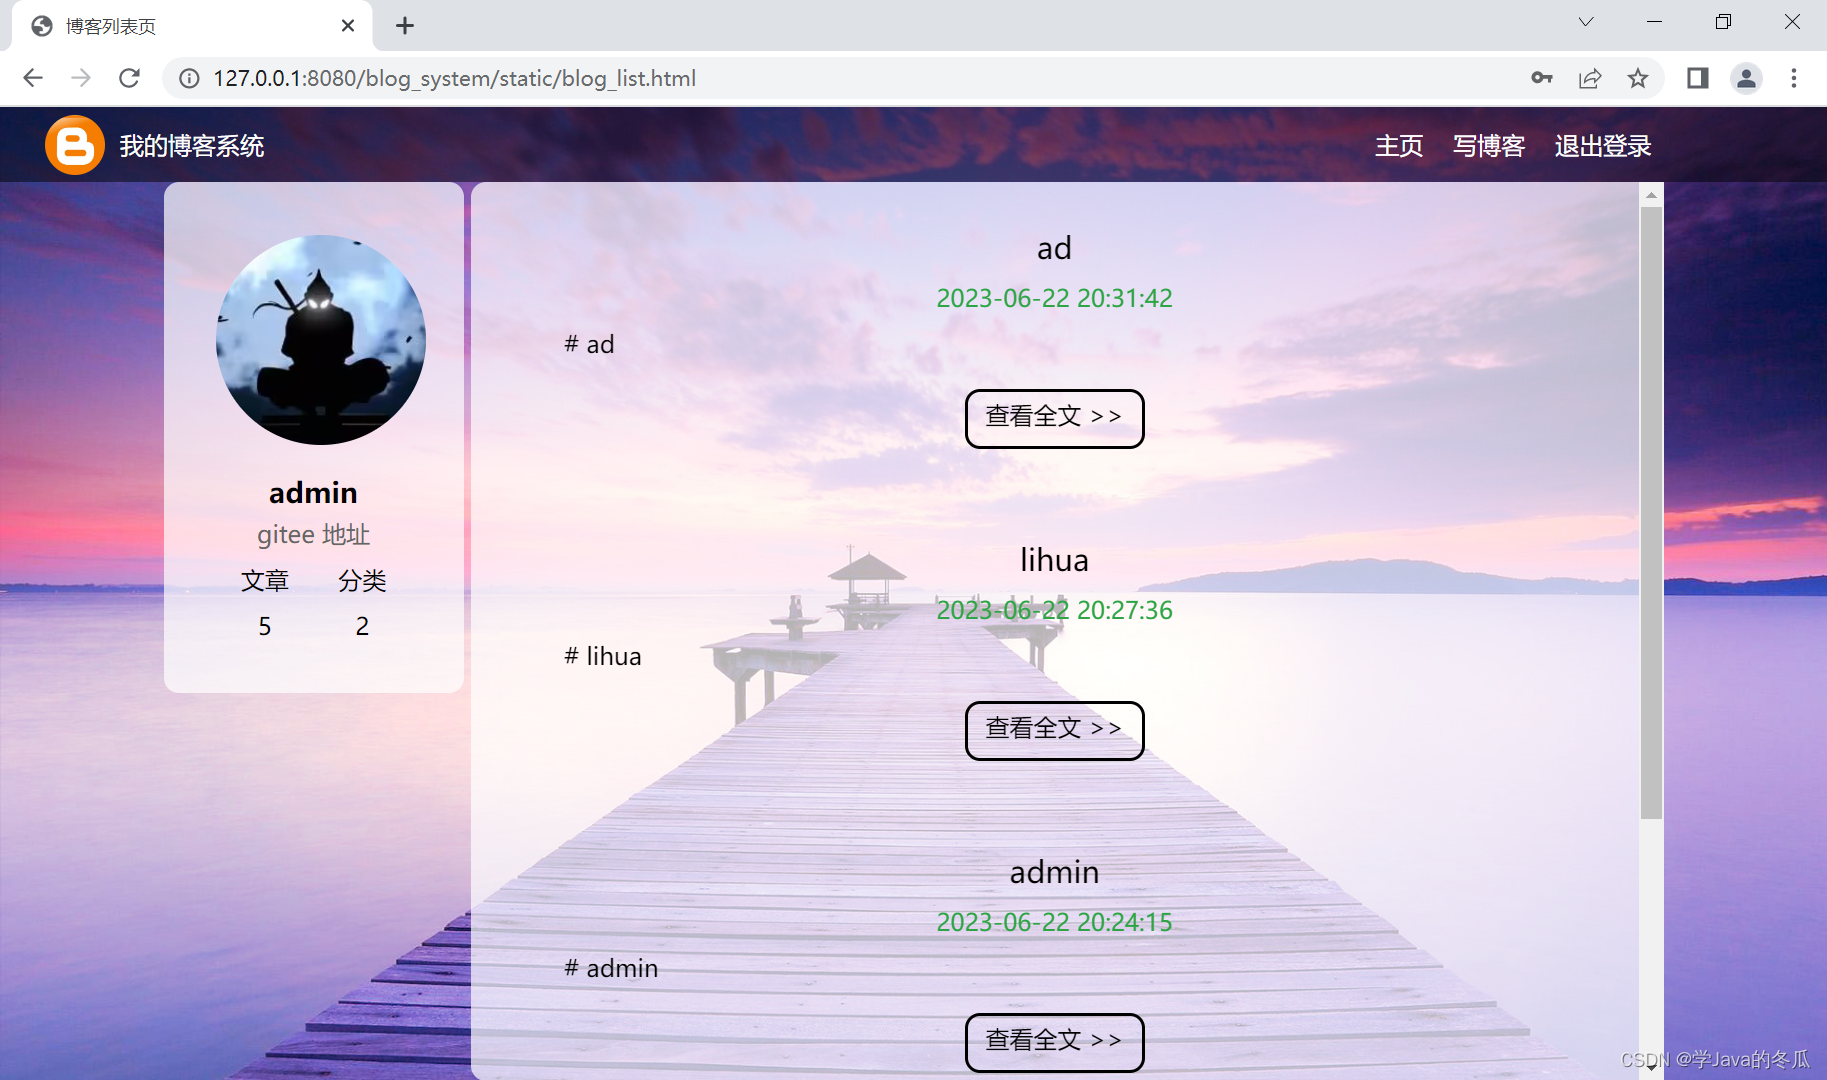
3.博客列表:展示登录用户信息(暂时只有头像和名字),展示博客列表。
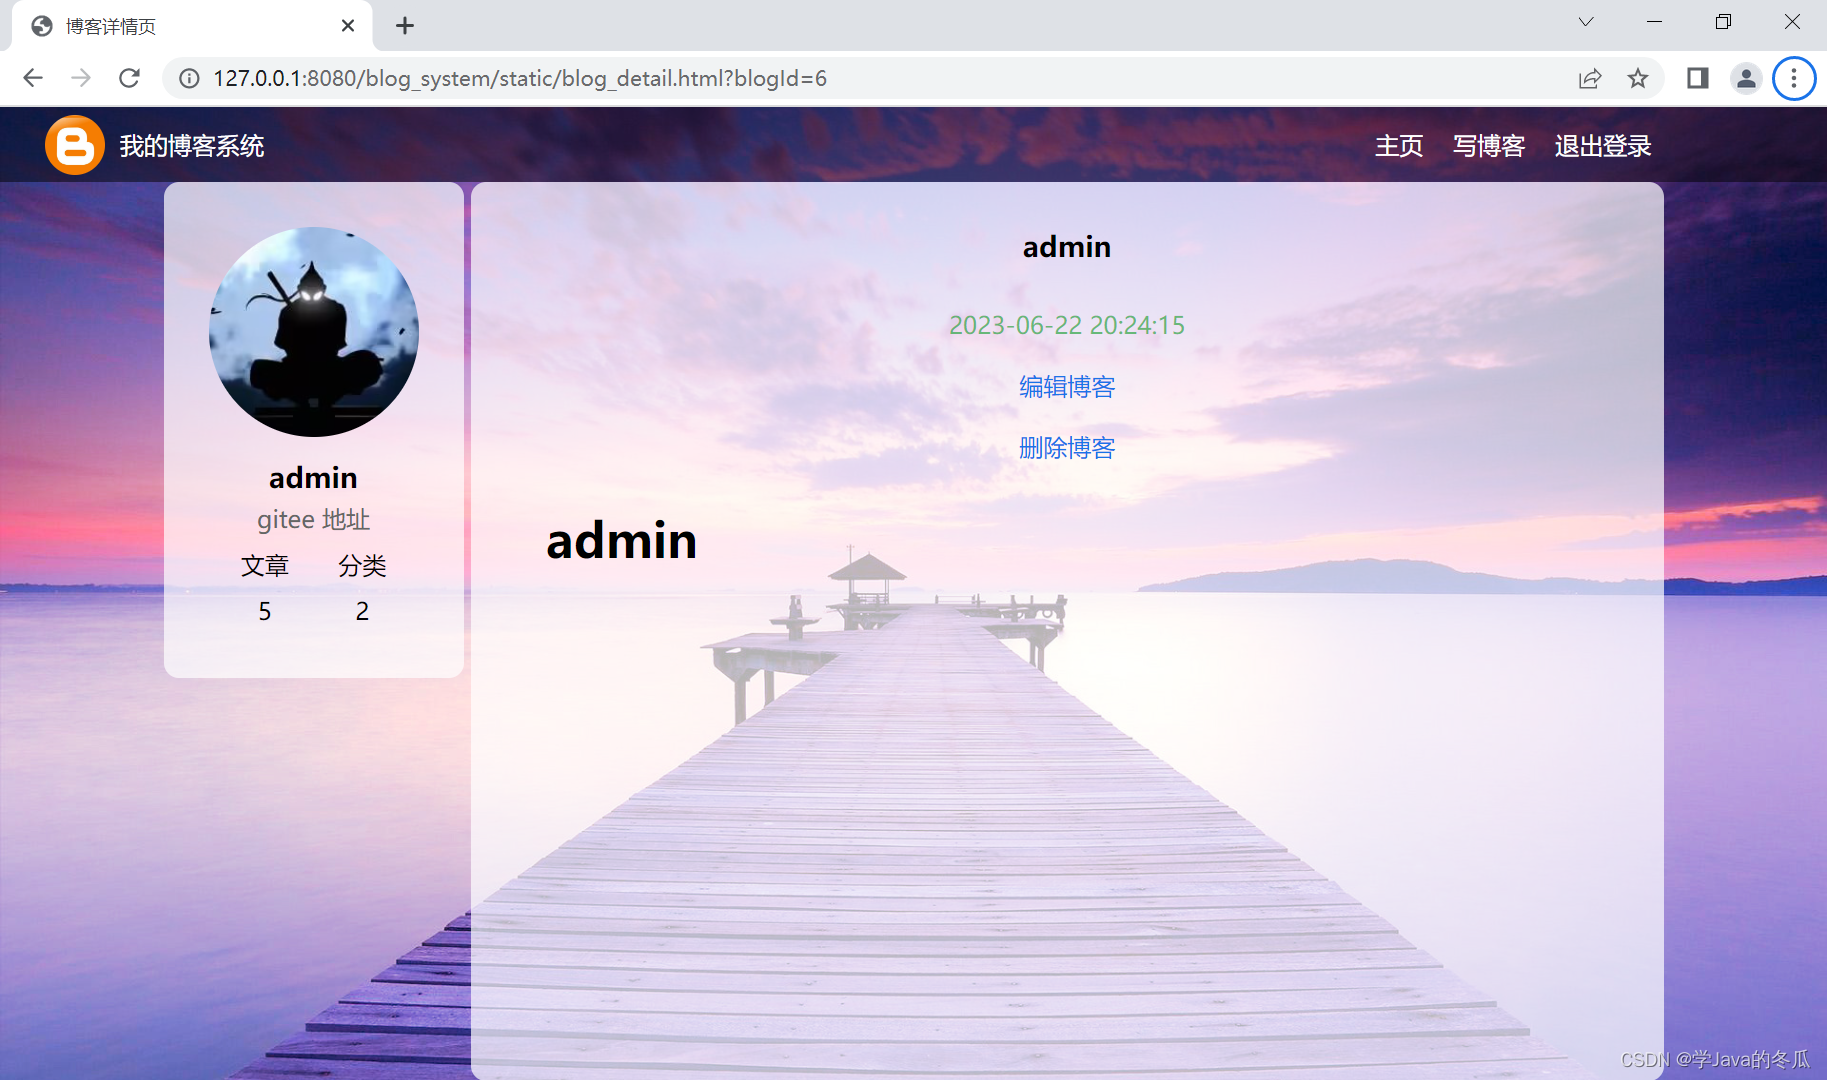
4.博客详情:展示博客作者信息,显示博客详情。如果当前登录用户和博客作者一致,则显示博客编辑和删除按钮。

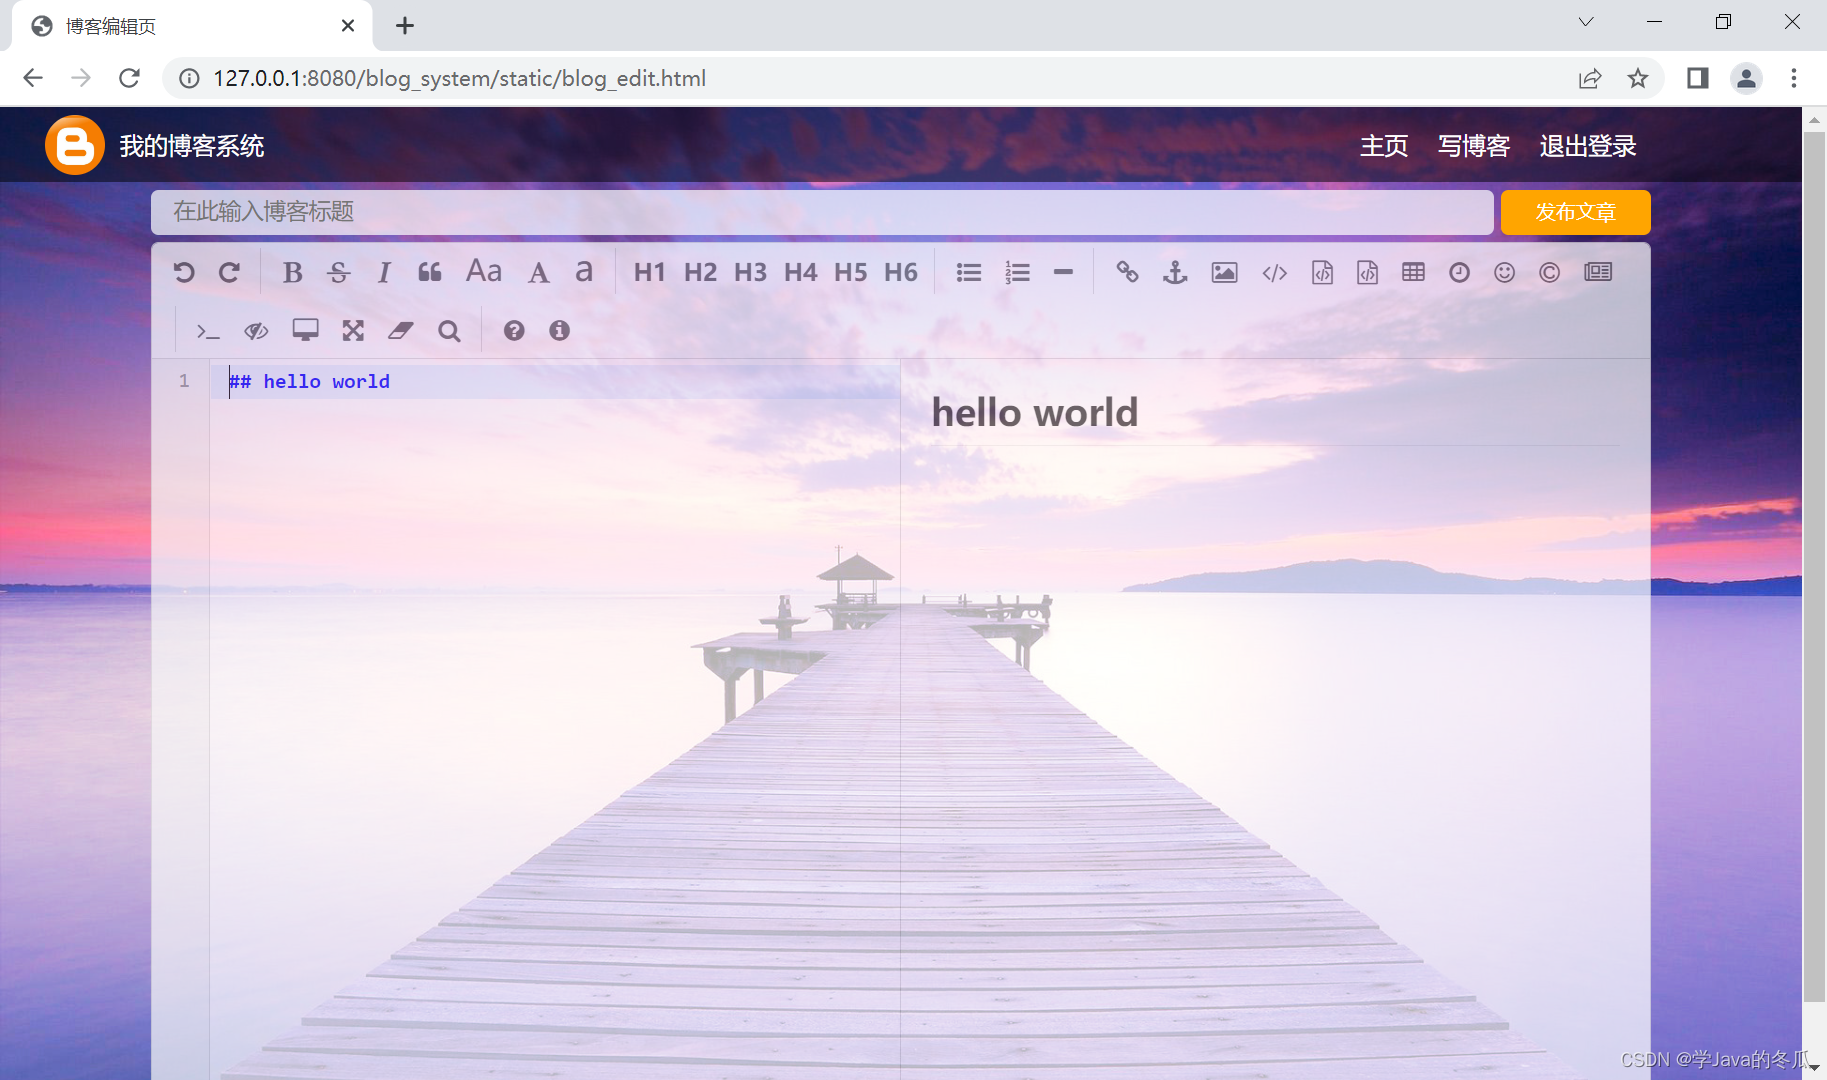
5.新增博客:点击写博客,输入博客标题和正文发布,新增博客。
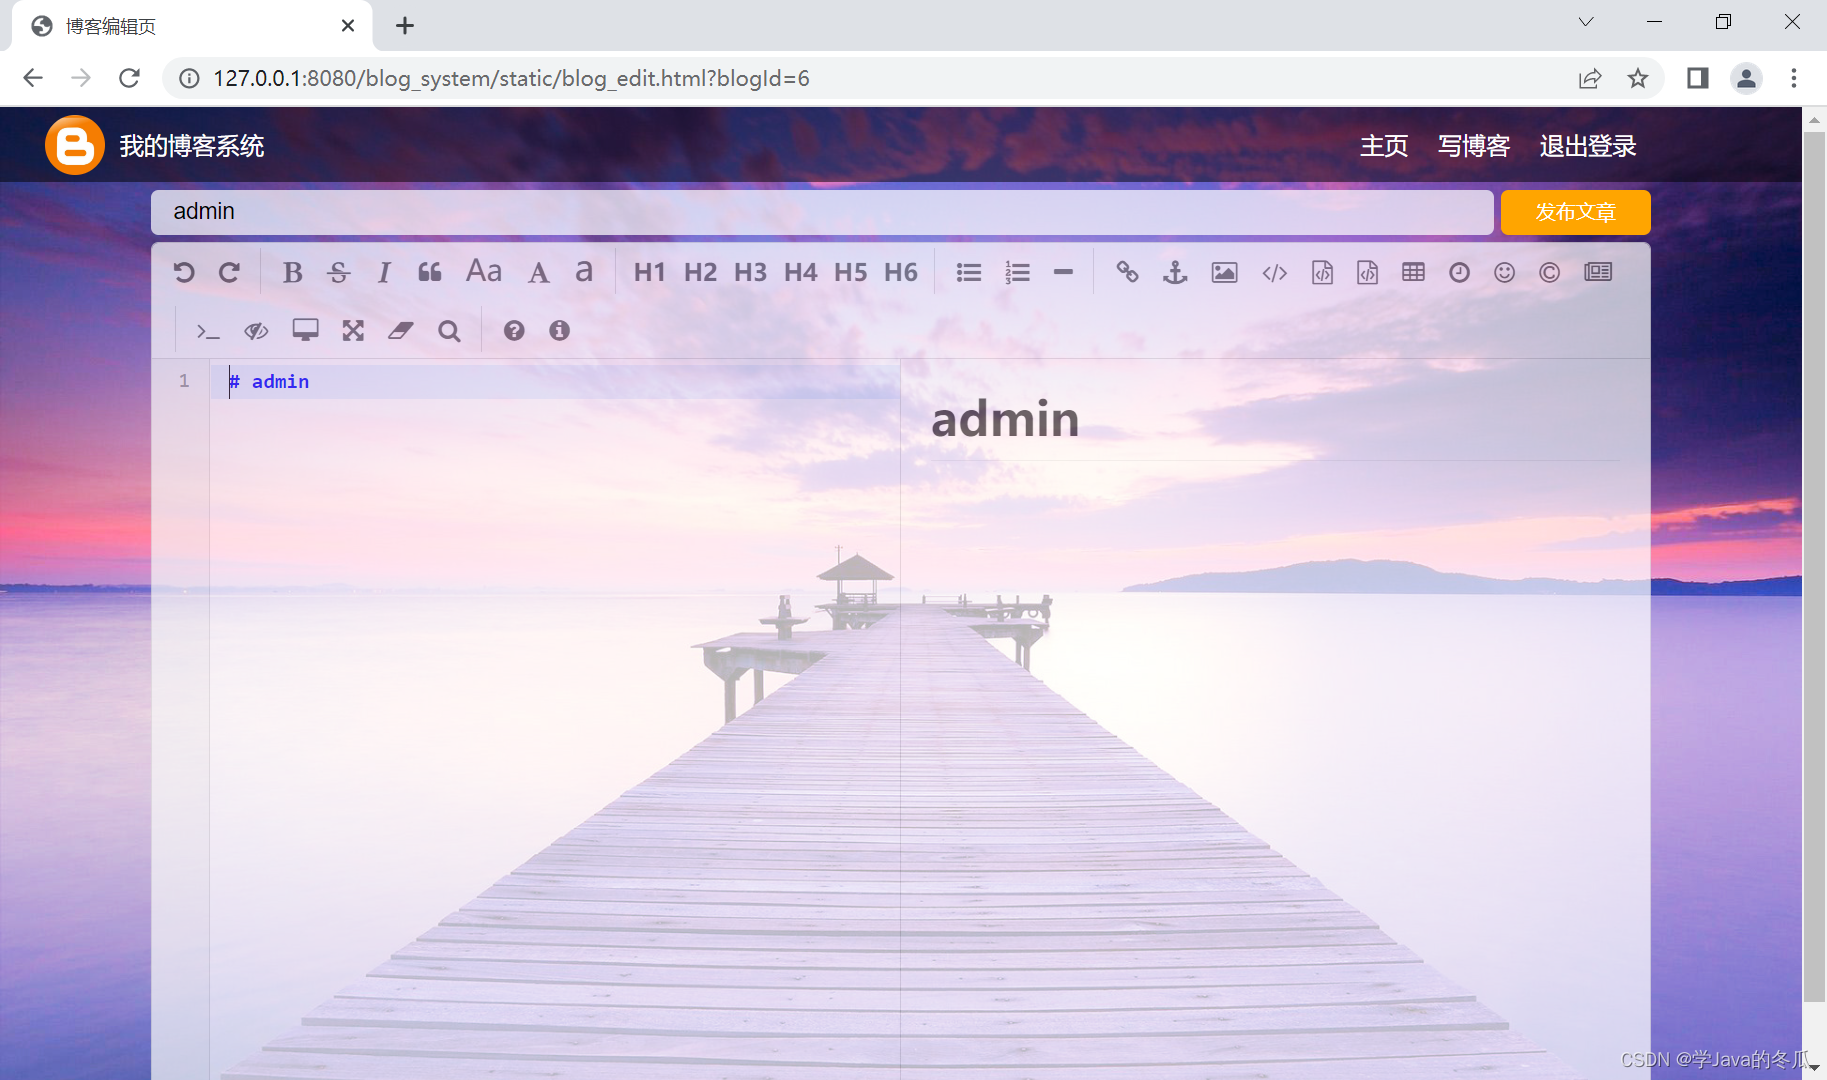
6.编辑博客:在详情页点击编辑博客,跳转博客编辑页,修改标题或正文,发布文章,修改博客。

7.删除博客:在博客详情页点击删除按钮,跳转回到博客列表页,重新从数据库获取博客列表展示在页面上。
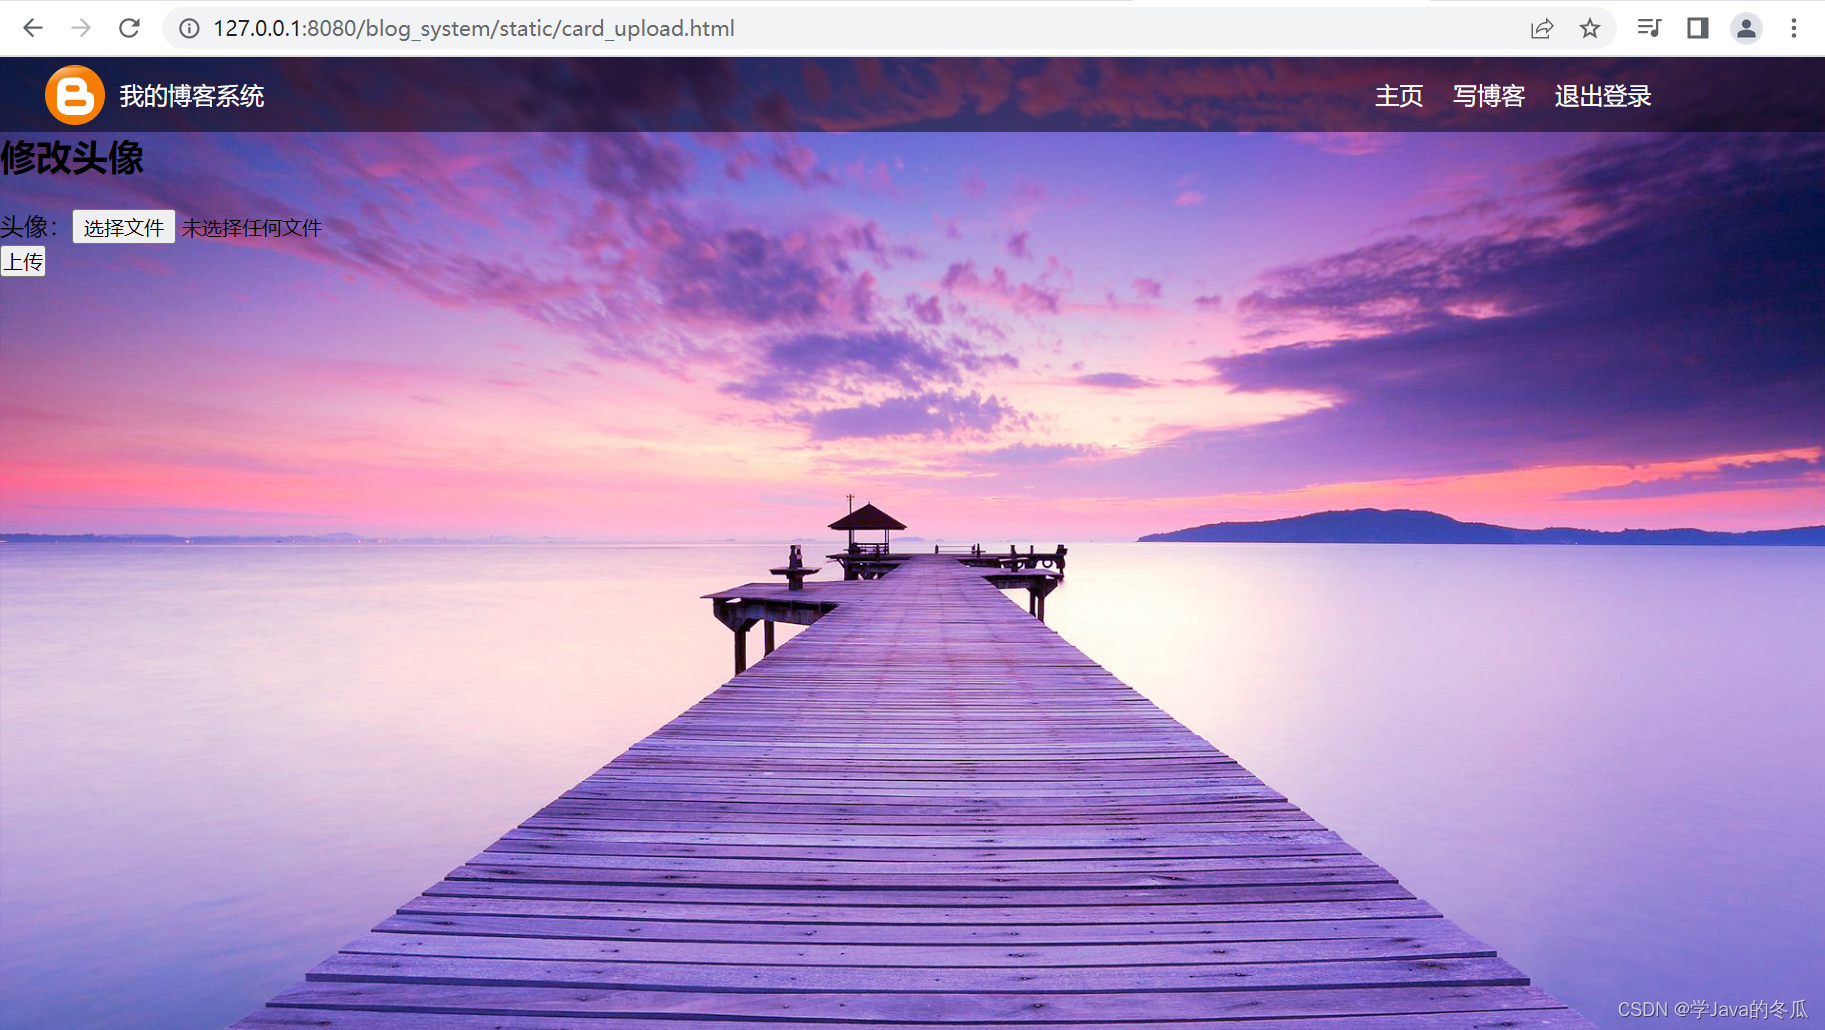
8.上传头像:在博客列表页将鼠标移动到头像显示 点击头像修改个人信息(可以扩充名字,gitee地址修改等),点击后跳转到上传头像页面,如下图,上传完成后点击显示的返回,回到博客列表页,重新申请头像信息,获取头像。
二、准备项目和基本代码
1)准备工作
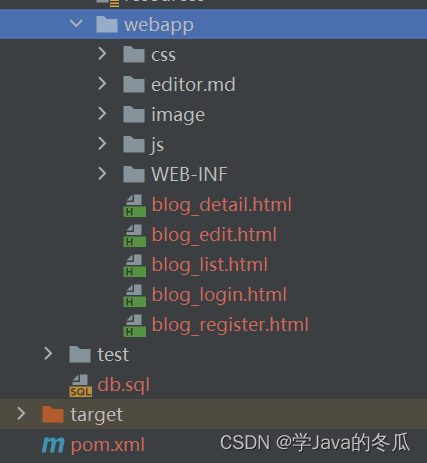
创建项目;引入依赖(servlet,mysql,jackson…),在pox.xml中引入依赖,是在WEB-INF下的lib包中引入jar包的简写。引入前面的博客系统前端部分的代码,放在webapp目录下。
如下图所示:我这里是写完代码,才写这篇博客,因此这里比起之前发布的前端页面的博客,我新增了注册的页面。
2)设计数据库
分析:博客系统的表结构,其实很简单,最基本的表是:博客表,用户表。想要分类功能可以加上个分类表(博客和分类表一对多),想要博客评论功能加上个评论表(博客和评论一对多)。这篇博客里就只使用到用户表,博客表,具体字段如下:
user(userId, username, password)
blog(blogId, title, content, postTime, userId)

注:用户和博客是一对多的关系,所以在博客表中增加一个userId字段,从而定位这篇博客的作者
3)编写数据库代码
1> sql建表
可以在src目录下新建一个sql表,将这个项目的关于数据库的代码放在这里,以便有需要时,在其它机器上快速部署。
sql建库建表语句
-- 不存在则建库
create database if not exists blog_system;
use blog_system;

-- 存在则删表
drop table if exists blog;
drop table if exists user;

-- 建表
create table blog(
    blogId int primary key auto_increment,
    title varchar(48),
    content varchar(4096),
    postTime dateTime,
    userId int
);
create table user(
    userId int primary key auto_increment,
    username varchar(20),
    password varchar(20)
);
2> 封装DBUtil
package model;

import com.mysql.cj.jdbc.MysqlDataSource;

import javax.sql.DataSource;
import java.sql.Connection;
import java.sql.PreparedStatement;
import java.sql.ResultSet;
import java.sql.SQLException;

public class DBUtil {
    private static DataSource dataSource = new MysqlDataSource();

    static {
        ((MysqlDataSource)dataSource).setUrl("jdbc:mysql://127.0.0.1:3306/blog_system?charset=utf8&useSSL=false&allowPublicKeyRetrieval=true");
        ((MysqlDataSource)dataSource).setUser("root");
        ((MysqlDataSource)dataSource).setPassword("xxxxxx");//此处输入你自己的数据库密码
    }

    public static Connection getConnection() throws SQLException {
        return dataSource.getConnection();
    }
    public static void close(Connection connection, PreparedStatement statement, ResultSet resultSet){
        if(resultSet != null){
            try {
                resultSet.close();
            } catch (SQLException throwables) {
                throwables.printStackTrace();
            }
        }
        if (statement != null){
            try {
                statement.close();
            } catch (SQLException throwables) {
                throwables.printStackTrace();
            }
        }
        if (connection != null){
            try {
                connection.close();
            } catch (SQLException throwables) {
                throwables.printStackTrace();
            }
        }
    }
}
3> 创建实体类:Blog、User
//User
package model;
// 封装User,对应数据库中的user表
public class User {
    // 根据数据库中的blog表的字段来定这里blog的 成员变量
    private int userId;
    private String username;
    private String password;

    public int getUserId() {
        return userId;
    }

    public void setUserId(int userId) {
        this.userId = userId;
    }

    public String getUsername() {
        return username;
    }

    public void setUsername(String username) {
        this.username = username;
    }

    public String getPassword() {
        return password;
    }

    public void setPassword(String password) {
        this.password = password;
    }
}
//Blog
package model;
import java.sql.Timestamp;
import java.text.SimpleDateFormat;

// 封装Blog,对应数据库中的blog表
public class Blog {
    // 根据数据库中的blog表的字段来定这里blog的 成员变量
    private int blogId;
    private String title;
    private String content;
    private Timestamp postTime;
    private int userId;

    public int getBlogId() {
        return blogId;
    }

    public void setBlogId(int blogId) {
        this.blogId = blogId;
    }

    public String getTitle() {
        return title;
    }

    public void setTitle(String title) {
        this.title = title;
    }

    public String getContent() {
        return content;
    }

    public void setContent(String content) {
        this.content = content;
    }

    public Timestamp getPostTimestamp() {
        return postTime;
    }
    public String getPostTime(){
        // 格式化输入时间SimpleDateFormat类
        SimpleDateFormat simpleDateFormat = new SimpleDateFormat("yyyy-MM-dd HH:mm:ss");
        return simpleDateFormat.format(postTime);
    }

    public void setPostTime(Timestamp postTime) {
        this.postTime = postTime;
    }

    public int getUserId() {
        return userId;
    }

    public void setUserId(int userId) {
        this.userId = userId;
    }


    @Override
    public String toString() {
        return "Blog{" +
                "blogId=" + blogId +
                ", title='" + title + '\'' +
                ", content='" + content + '\'' +
                ", postTime=" + postTime +
                ", userId=" + userId +
                '}';
    }
}
4> 编写UserDao和BlogDao
Dao的全写是,data access object,是针对数据进行操作。此处就是针对blog表和user表,使用UserDao和BlogDao进行数据库的相关操作。
//UserDao
package model;
import java.sql.Connection;
import java.sql.PreparedStatement;
import java.sql.ResultSet;
import java.sql.SQLException;

// 对应数据库user表,对user表进行增删查改操作
public class UserDao {
    // 注册时使用
    public void add(User user){
        Connection connection = null;
        PreparedStatement statement = null;
        try {
            connection = DBUtil.getConnection();
            String sql = "insert into user values(null, ?, ?)";
            statement = connection.prepareStatement(sql);
            statement.setString(1, user.getUsername());
            statement.setString(2, user.getPassword());
            statement.executeUpdate();
        } catch (SQLException throwables) {
            throwables.printStackTrace();
        } finally {
            DBUtil.close(connection, statement, null);
        }
    }
    // 通过userId查找用户(在前后端交互内部使用,userId对应到博客)
    public User searchById(int userId){
        Connection connection = null;
        PreparedStatement statement = null;
        ResultSet resultSet = null;
        try {
            connection = DBUtil.getConnection();
            String sql = "select * from user where userId = ?";
            statement = connection.prepareStatement(sql);
            statement.setInt(1, userId);
            resultSet = statement.executeQuery();
            if (resultSet.next()){
                User user = new User();
                user.setUserId(resultSet.getInt("userId"));
                user.setUsername(resultSet.getString("username"));
                user.setPassword(resultSet.getString("password"));
                return user;
            }
        } catch (SQLException throwables) {
            throwables.printStackTrace();
        } finally {
            DBUtil.close(connection, statement, resultSet);
        }
        return null;
    }
    // 通过username查找用户(登录的时候使用)
    public User searchByName(String username){
        Connection connection = null;
        PreparedStatement statement = null;
        ResultSet resultSet = null;
        try {
            connection = DBUtil.getConnection();
            String sql = "select * from user where username = ?";
            statement = connection.prepareStatement(sql);
            statement.setString(1, username);
            resultSet = statement.executeQuery();
            if (resultSet.next()){
                User user = new User();
                user.setUserId(resultSet.getInt("userId"));
                user.setUsername(resultSet.getString("username"));
                user.setPassword(resultSet.getString("password"));
                return user;
            }
        } catch (SQLException throwables) {
            throwables.printStackTrace();
        } finally {
            DBUtil.close(connection, statement, resultSet);
        }
        return null;
    }
}
//BlogDao
package model;
import java.sql.Connection;
import java.sql.PreparedStatement;
import java.sql.ResultSet;
import java.sql.SQLException;
import java.util.ArrayList;
import java.util.List;

// 对应数据库blog表,对blog表进行增删查改操作
public class BlogDao {
    // 操作1:
    // 新增博客
    public void add(Blog blog){
        Connection connection = null;
        PreparedStatement statement = null;
        try {
            // 1.获取连接
            connection = DBUtil.getConnection();
            // 2.创建sql
            String sql = "insert into blog values(null, ?, ?, ?, ?)";
            // 3.进行预编译,并填充数据
            statement = connection.prepareStatement(sql);
            statement.setString(1, blog.getTitle());
            statement.setString(2, blog.getContent());
            statement.setTimestamp(3, blog.getPostTimestamp());
            statement.setInt(4, blog.getUserId());
            // 4.进行数据库操作
            statement.executeUpdate();
        } catch (SQLException throwables) {
            throwables.printStackTrace();
        } finally {
            DBUtil.close(connection, statement, null);
        }
    }
    // 操作2:
    // 根据博客id查询博客,博客列表跳转到博客详情处使用
    public Blog searchById(int blogId){
        Connection connection = null;
        PreparedStatement statement = null;
        ResultSet resultSet = null;

        try {
            // 1.获取连接
            connection = DBUtil.getConnection();
            // 2.创建sql
            String sql = "select * from blog where blogId = ?";
            // 3.进行预编译,并填充数据
            statement = connection.prepareStatement(sql);
            statement.setInt(1, blogId);
            // 4.进行数据库操作
            resultSet = statement.executeQuery();
            // 5.处理结果集
            if (resultSet.next()){
                Blog blog = new Blog();
                blog.setBlogId(resultSet.getInt("blogId"));
                blog.setTitle(resultSet.getString("title"));
                blog.setContent(resultSet.getString("content"));
                blog.setPostTime(resultSet.getTimestamp("postTime"));
                blog.setUserId(resultSet.getInt("userId"));
                return blog;
            }
        } catch (SQLException throwables) {
            throwables.printStackTrace();
        } finally {
            DBUtil.close(connection, statement, resultSet);
        }
        return null;
    }
    // 操作3:
    // 查询所有博客,博客列表页
    public List<Blog> searchAll(){
        List<Blog> blogList = new ArrayList<>();
        Connection connection = null;
        PreparedStatement statement = null;
        ResultSet resultSet = null;

        try {
            connection = DBUtil.getConnection();

            // 在查询全部时,查出并按照时间逆序排序,从而使博客列表是按照时间逆序的
            String sql = "select * from blog order by postTime desc";
            statement = connection.prepareStatement(sql);

            resultSet = statement.executeQuery();
            while (resultSet.next()){
                Blog blog = new Blog();
                blog.setBlogId(resultSet.getInt("blogId"));
                blog.setTitle(resultSet.getString("title"));
                // 注意:博客列表页,正文显示字数有限制。以下是对超过字数的博客正文进行截取操作
                String content = resultSet.getString("content");
                if(content.length() >= 200){
                    content = content.substring(0, 200) + "...";
                }
                blog.setContent(content);
                blog.setPostTime(resultSet.getTimestamp("postTime"));
                blog.setUserId(resultSet.getInt("userId"));

                blogList.add(blog);
            }
        } catch (SQLException throwables) {
            throwables.printStackTrace();
        } finally {
            DBUtil.close(connection, statement, resultSet);
        }
        return blogList;
    }
    // 操作4:
    // 删除博客
    public void delete(int blogId){
        Connection connection = null;
        PreparedStatement statement = null;
        try {
            // 1.获取连接
            connection = DBUtil.getConnection();
            // 2.创建sql
            String sql = "delete from blog where blogId = ?";
            // 3.进行预编译,并填充数据
            statement = connection.prepareStatement(sql);
            statement.setInt(1, blogId);
            // 4.进行数据库操作
            statement.executeUpdate();
        } catch (SQLException throwables) {
            throwables.printStackTrace();
        } finally {
            DBUtil.close(connection, statement, null);
        }
    }
}
三、前后端分离实现博客系统
前后端分离:前端向后端发送请求,后端给前端返回数据,让前端自己去展示。
非前后端分离:前端给后端发送请求,展示页面由后端渲染,再给前端返回一个该页面。
前后端分离的好处:
1>降低了后端服务器的压力 2>更好的做到了解耦合
1)博客列表
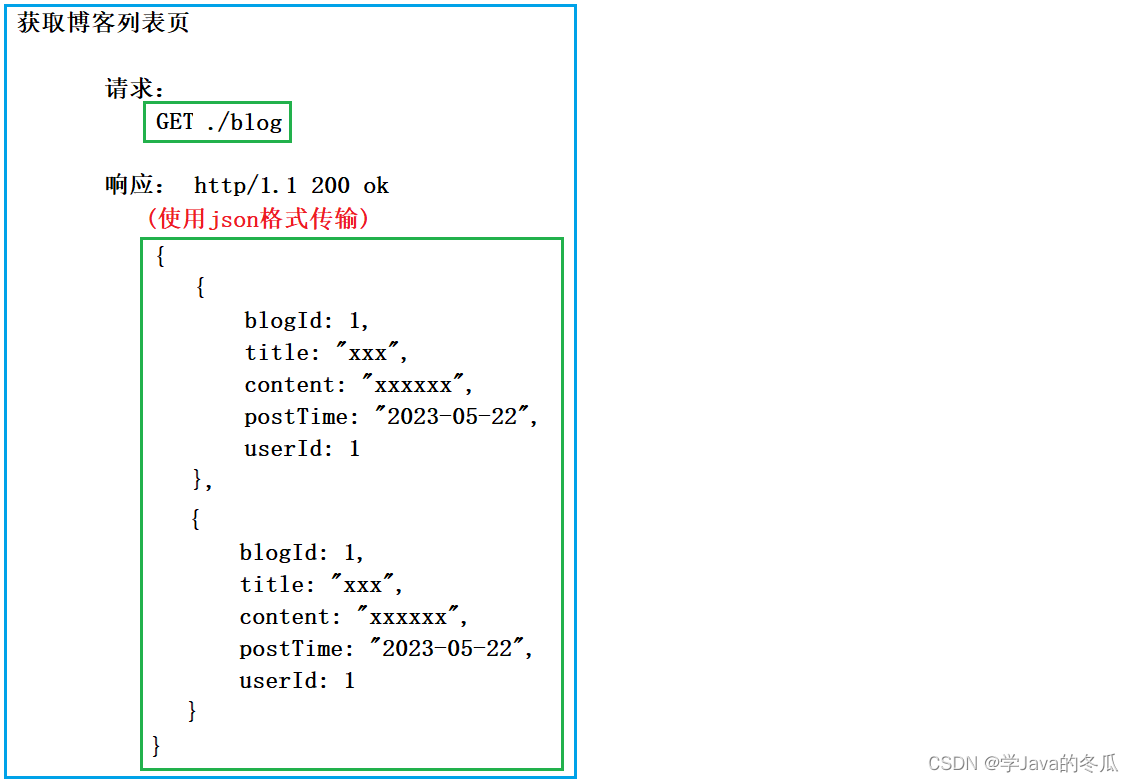
说明:处理登录请求的后端servlet,完成操作后,跳转到blog_list.html页面,在blog_list.html页面中,通过jQuery封装的Ajax发送get请求,从后端获取所有博客信息,并把信息展示在这个blog_list.html页面中。
1>约定前后端交互接口
2>开发前端代码
在blog_list.html页面中:
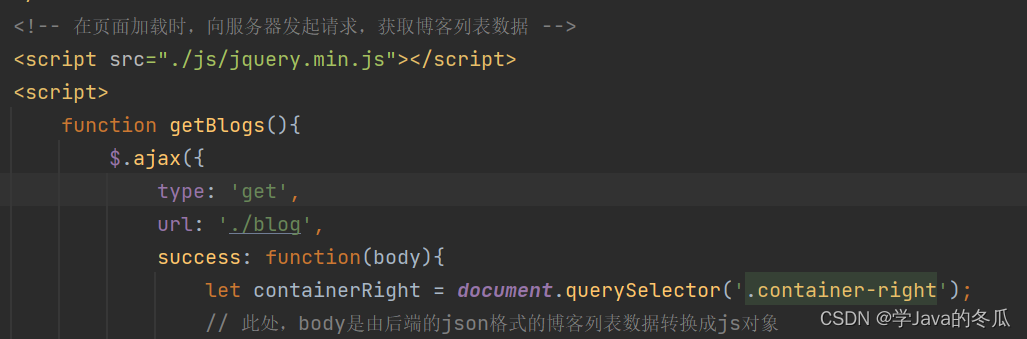
- 在博客列表页面(blog_list.html)加载过程中,触发ajax请求,访问数据库的博客列表数据,再把博客列表数据通过json格式从回调函数中取到并展示到页面上。
- 下面代码注意调用函数getBlogs。
sucess: function(body){ }即回调函数,响应的数据是一个json格式的字符串,此处body已经被jQuery自动解析成JavaScript对象。
我这里直接调用最原始的js操作dom树的方式,创建博客列表元素,并将数据展示在页面上,如果使用前端的框架,比如vue,react会简单很多。
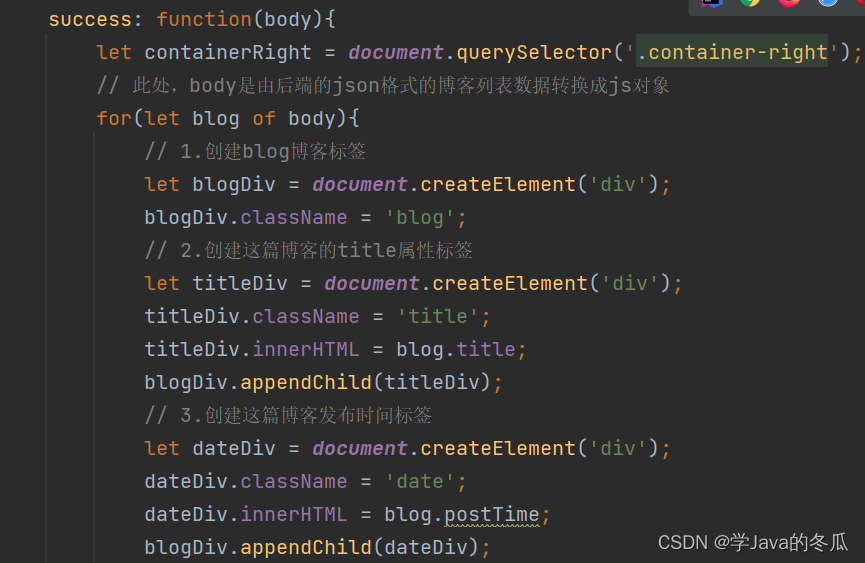
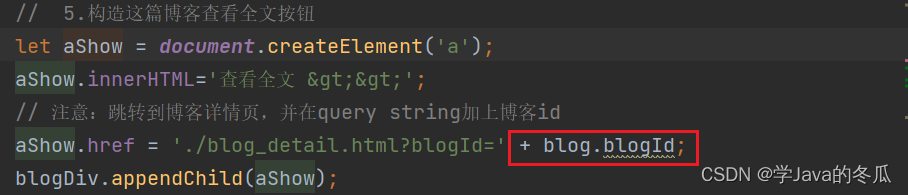
- 在回调函数中可以得到博客的blogId,在每一篇博客添加一个查看全文的按钮(使用a标签),从而跳转到博客详情页面。
3>开发后端代码
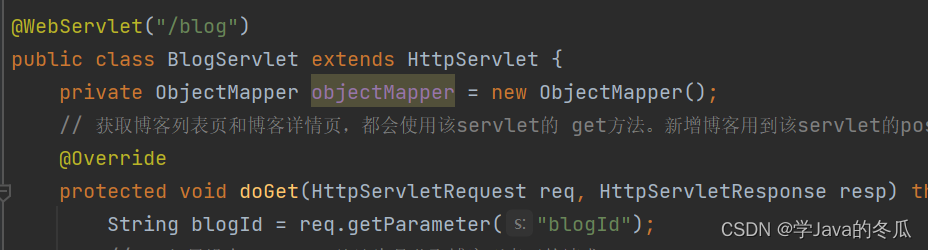
在BlogServlet的doGet方法中:
-
约定前后端交互接口时,请求为get请求,因此在后端需要使用一个servlet的doGet方法来处理这个请求。且这个获取博客列表的请求的路径是
/blog,因此这个处理请求的servlet的路径也是/blog(这里使用注解的方式)
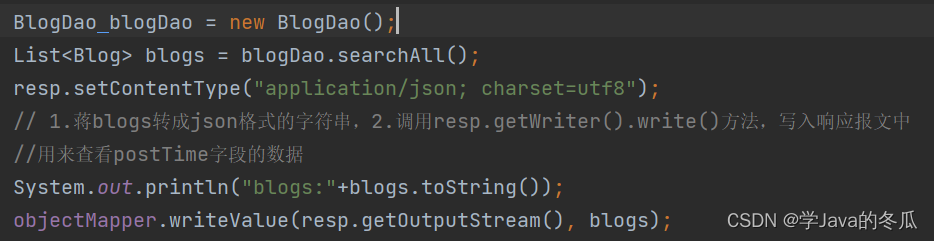
在doGet方法中,使用Dao层去操作数据库,将数据查询出来放入blog对象中,把blog对象添加到list集合中,再利用引入的依赖jackson把list集合中的全部blog对象转成json格式字符串,并写入resp中,tomcat将resp对象转成http响应数据包,json格式的数据就在响应数据包的响应体中。
-
注意1:此处是获取博客列表页,正文应当是只显示部分,这怎们实现?可以在从数据库读取出来时(blogDao的searchAll()方法中),截断一下,如下代码所示:

-
注意2:时间的类型转换。封装的Blog对象的postTime是TimeStamp类型的时间格式为yyyy-MM-dd HH:mm:ss.SSS,即:是毫秒级的时间,想要具体到哪里自己需要进行类型转换。如下图所示,在Blog的javaBean中,getPostTime方法返回值格式化后是精确到秒,并返回一个字符串。
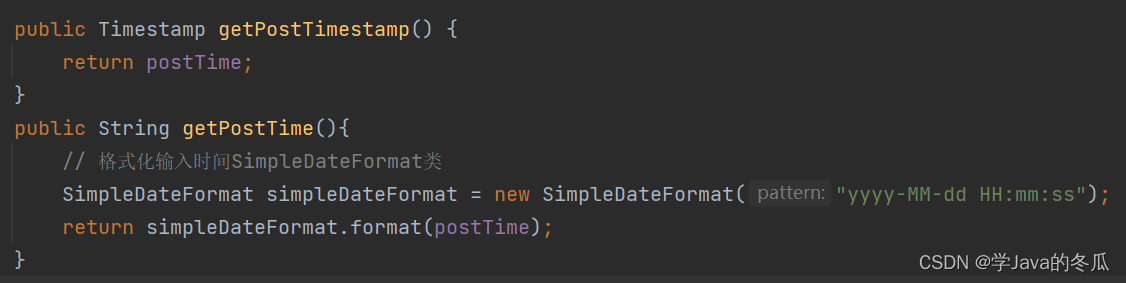
还需要注意的是,前端代码需要调用的是这个转换后的方法postTime对应的getPostTime方法从而显示正确的格式。

上面的代码中,blog.postTime本质上就是getPostTime这个格式化之后的方法返回的值,为什么呢?抓个包就知道了! 响应报文的响应体中的数据包含下面两个关于时间的,postTime就是我们在Blog类中的getPostTime格式化之后的方法。而postTimeStamp则是后端代码从数据库查询出后放在Tmstamp类型的blog对象的postTime属性中,经过jackson转换成json字符串后依然是Tmstamp类型的时间戳。

为什么强调前端的blog.postTime对应的是getPostTime方法呢?因为getPostTimeStamp方法中的postTime返回一个TimeStamp类型的时间戳,和结果不符,具体打印格式如下:精度是0.1秒,秒后面还跟个小数位。

-
注意3: 博客从上到下的顺序:越新发布的博客,越靠近上方。可以在查询数据库时根据时间倒序查询出博客。

2)博客详情
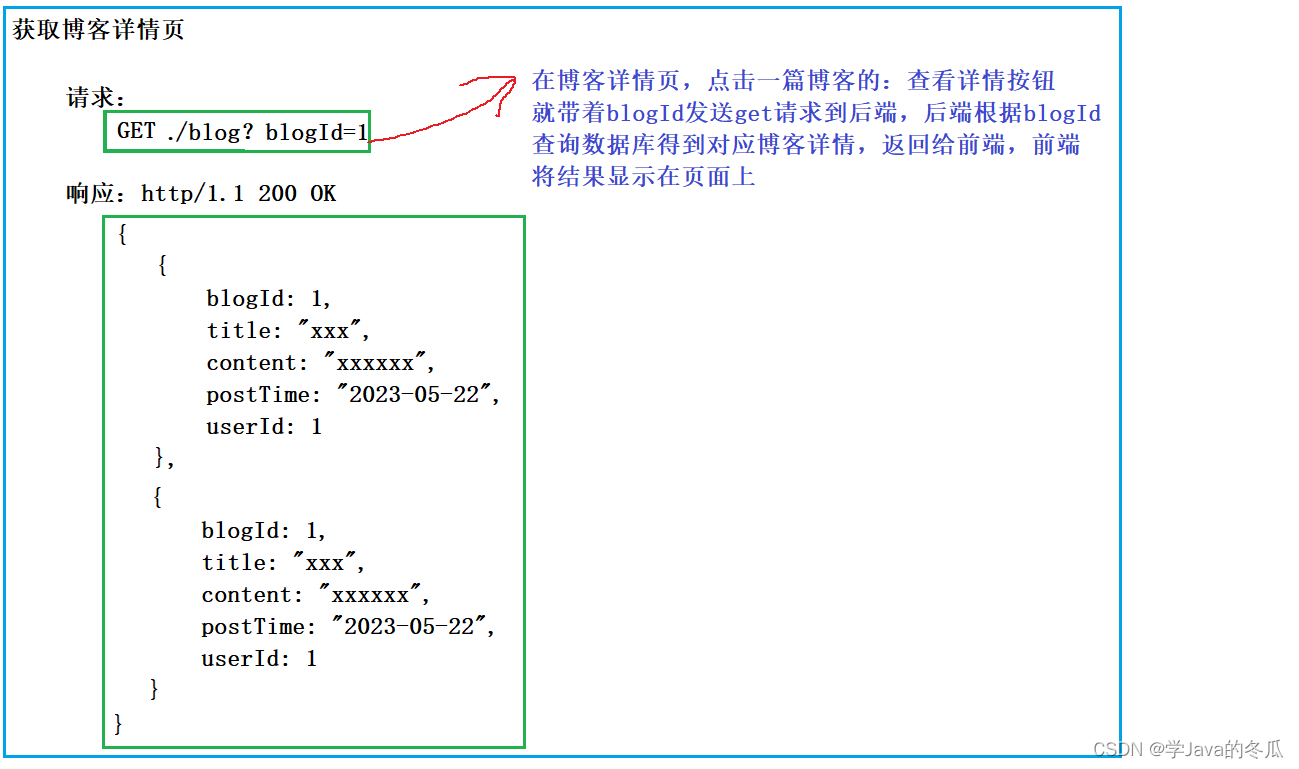
说明:在博客列表页(blog_list.html)点击查看全文,会带着blogId跳转到博客详情页(blog_detail),在博客详情页中带上blogId发送get请求给后端,获取blogId对应的该篇博客,并展示在前端页面中。
1>约定前后端交互接口
2>开发前端代码
在blog_detail.html页面中:
- 从点击查看全文到博客详情显示这个过程,经历了哪些?
①点击查看全文时,blog_list.html页面的回调函数中的创建的每个博客有个a标签,点击的博客对应的a标签发送一个get请求给后端。
②如果是第一次发送获取列表的请求,还没有列表页面的缓存,服务器就返回相应的请求给前端,如果浏览器已经有了列表页面的缓存,后端会直接返回304告诉浏览器从缓存中获取。从而获取到blog_detail.html页面。
第一次请求:
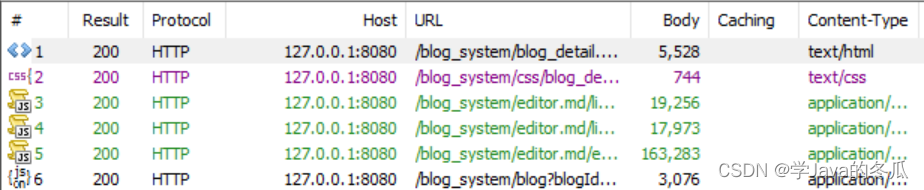
后续请求(从缓存中获取部分信息):

③访问到blog_detail.html后,blog_detail.html中通过ajax发送带有blogId的请求(location.search在此处等价于?blogId=博客id)。

④后端通过获取query string得到前端发送过来的blogId,从而去查询数据库中的数据。
⑤需要注意的点是,博客正文部分的显示,需要使用markdown官方文档的要求实现,从而写博客将博客信息写入数据库,查博客从数据库查询出来时,能够正确使用markdown语法渲染前端页面。
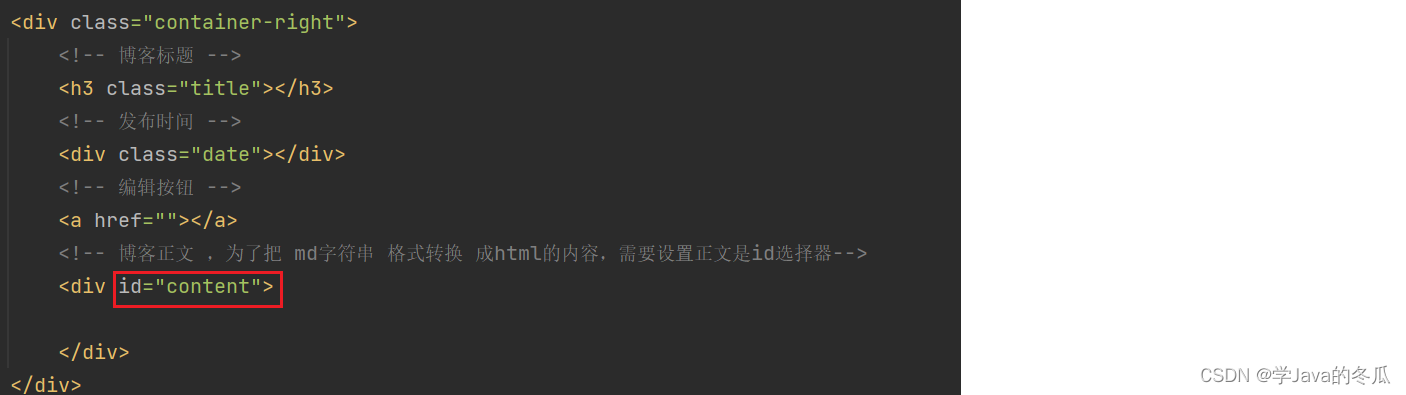
具体实现:在blog_detail.html的回调函数中写相关显示博客正文的代码前,要在这些代码上面,需要引入关于markdown的js文件。同时使用editormd.markdownToHTML()显示正文部分。下图中editormd中的markdownToHTML()方法将markdown格式的字符串转换成html,显示到#content这个标签内。
引入markdown相关的样式。

回调函数中使用markdown显示正文:

注意1:这个正文部分的id必须是和上图editormd.markdownToHTML('content', {markdown: body.content})的相对应的第一个参数对应。
注意2:如果修改页面正确后,但是没有正确显示,一定要注意缓存!解决:ctrl+f5强制刷新 or ctrl+shift+delete删除缓存。
3>开发后端代码
在BlogServlet的doGet方法中:
- 获取博客列表页的请求是/blog,获取博客详情页的请求是/blog?blogId=博客Id,通过有没有query string,就可以判断是获取列表页请求还是获取详情页的请求。有blogId则为博客详情页请求,从而根据blogId从数据库获取博客信息并通过json格式的形式响应给前端。因此,在BlogServlst的doGet方法中,可以写成如下:
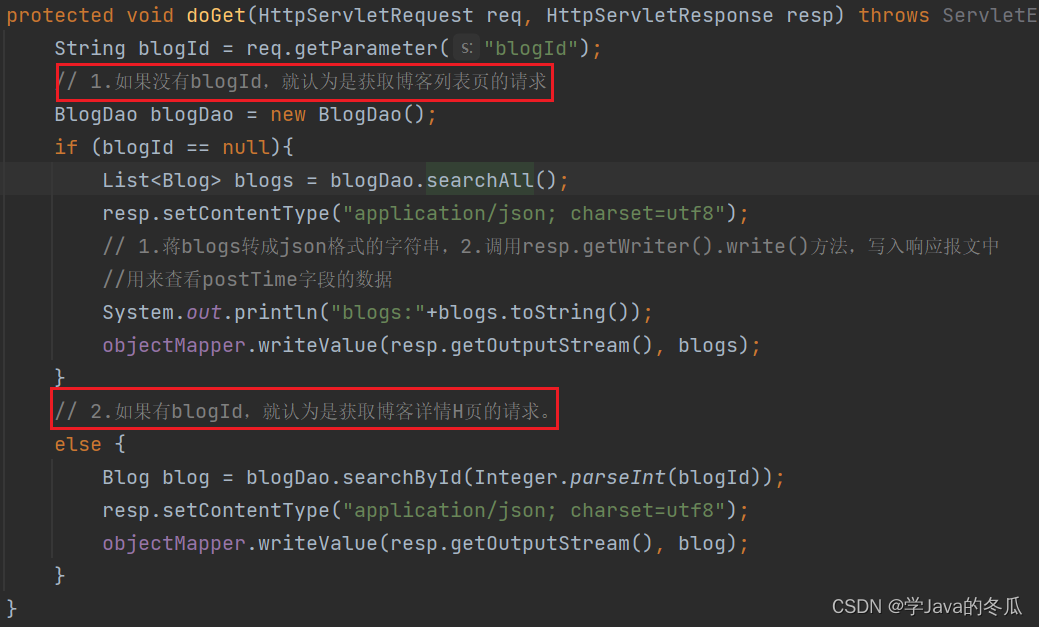
- 注意1:此时是获取博客详情页,因此博客正文部分content应当是完整的,而不是像获取博客博客列表页时的后端代码需要简述正文而去截断。因此这部分代码如下:

3)登录功能
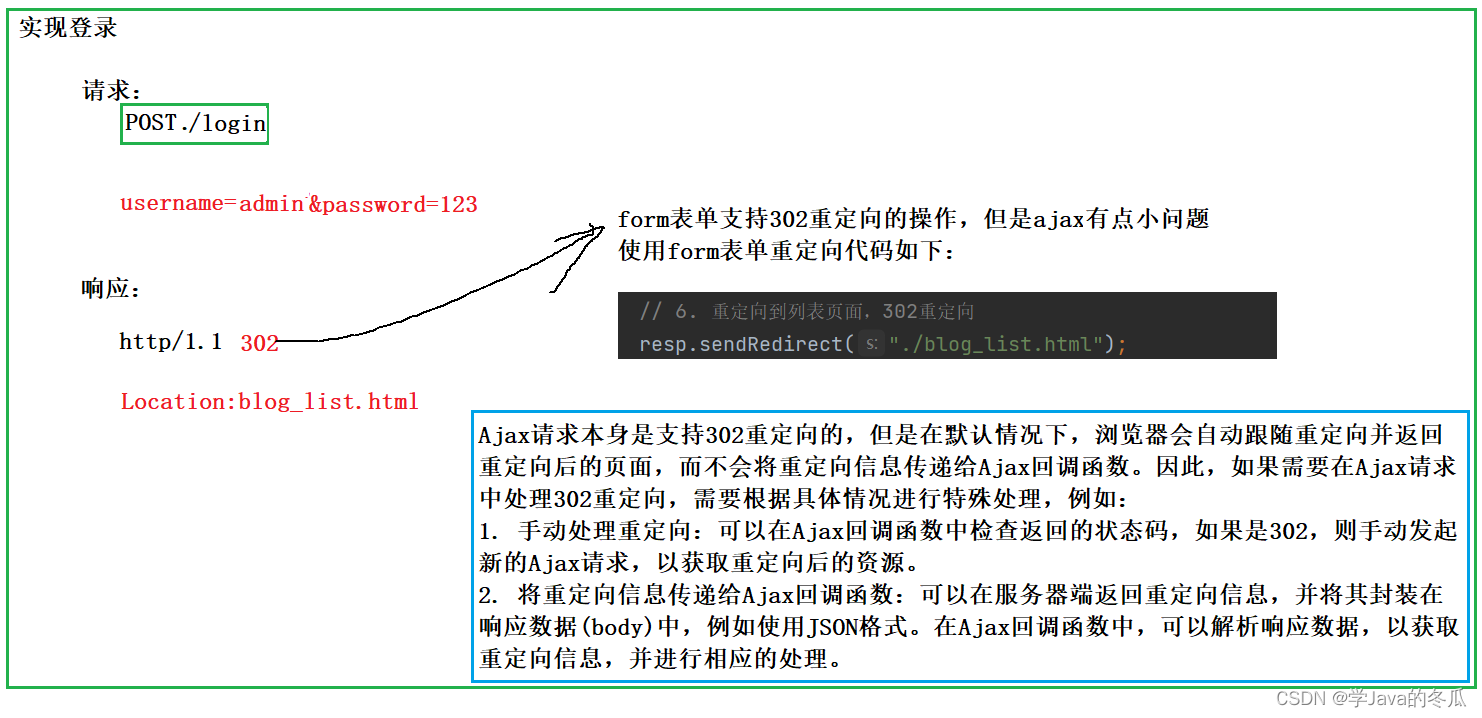
说明:blog_login.html使用post提交登录请求,后端使用doPost方法处理请求,验证输入是否为null,输入不空则根据信息查询数据库比对,是否已经注册,已注册则验证成功,创建session,并将用户信息放在session中,然后跳转到blog_list.html页面。
1>约定前后端交互接口
2>编写前端代码
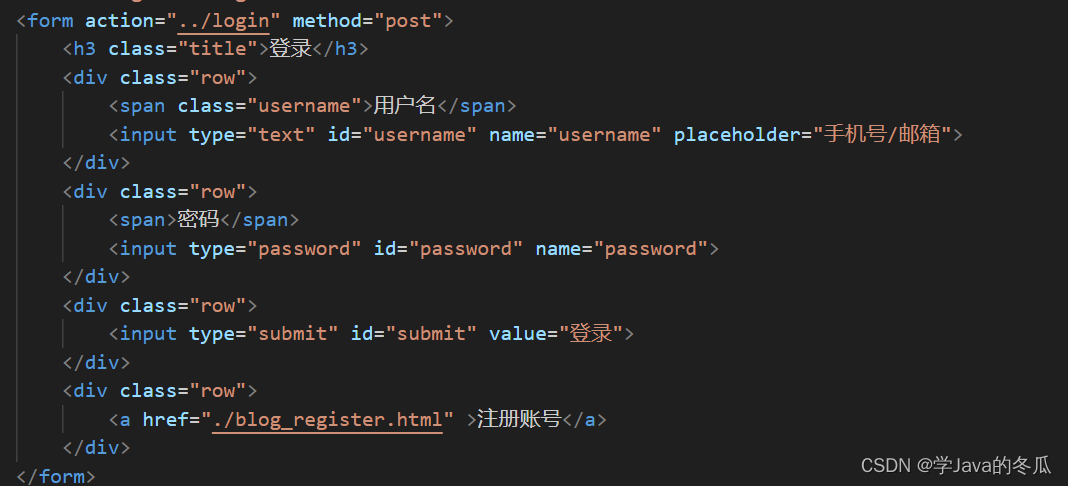
在blog_login.html页面中:
- 使用form表单,发送post请求。这里的action的值要和上面的
@WebServlet("/login")相对应。
3>编写后端代码
在LoginServlet的doPost方法中:
- 前端点击登录按钮后,登录信息就放入请求报文的body中,然后跳转到
@WebServlet("/login")这里执行doPost方法。
在LoginServlet类的doPost方法中,通过getParameter方法获取用户名和密码(注意:getParameter里的参数一定要和前端输入时input标签里的name属性的值一致),需要验证用户名和密码是否为空,然后查数据库是否有该用户,没有则注册,有则跳转到博客列表blog_list.html页面。

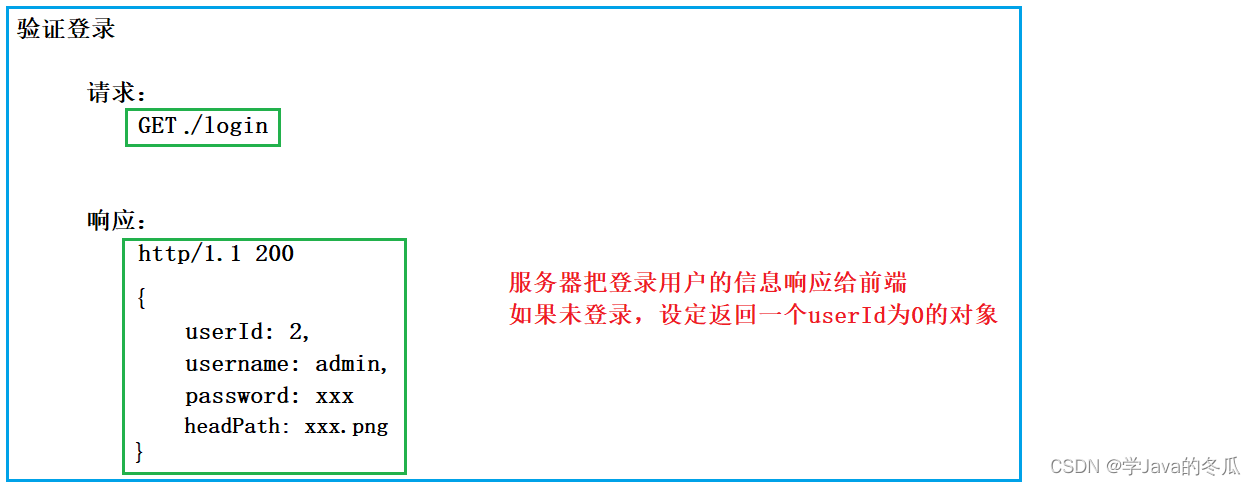
4)验证登录
说明:验证当前操作用户是否登录,如果未登录,就强制跳转到登录页面,要求先登录,才能进行后续操作。和过滤器的功能很相似。
注意:发送请求的部分前端代码需要写到blog_list.html、blog_detail.html、blog_edit.html等前端页面中中,在这些页面中,各自发送GET /login请求,验证是否已经登录,而因为请求是相同的,所以后端都是用LoginServlet的 doGet方法处理这些请求,如果后端验证不通过则响应userId为0的对象给前端,如果通过,则从session中查出userId,并再去查询数据库(),响应从数据库中查询出来的user给前端。通过则看各自页面逻辑做相应处理,如果验证未通过,就强制跳转到blog_login.html页面。
1>约定前后端交互接口
2>编写前端代码
- 如果验证登陆成功,跳转到blog_list.html页面后,使用jQuery封装的ajax提交get请求检查是否已经登录,请求路径是
/login。在回调函数中通过是否有userId和userId是否大于0判断当前用户是否已经登录。未登录则在前端使用重定向,向后端重新发送重定向请求;如果已经登录,则暂时不做。等后续操作。

3>编写后端代码
在LoginServlet的doGet方法中:
- 请求是
GET /login,是使用LoginServlet的doGet方法来处理是否登录的验证。 - 前提:在登录成功的时候,需要把该用户存入session。
操作:验证登录的时候,获取session,如果session为null或者session里的user为null,代表用户未登录,返回一个空的user对象,这个对象的userId=0(java默认),如果session和user都不为空,则根据userId查询数据库,响应从数据库查询出来的user对象(不能直接返回这个session中的user,因为如果用登陆后做了信息修改,那么session中的user的信息就是过去的信息)。

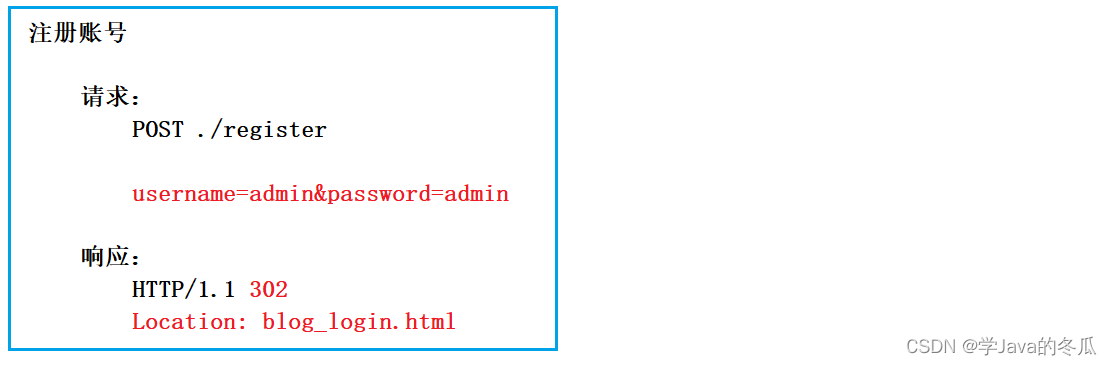
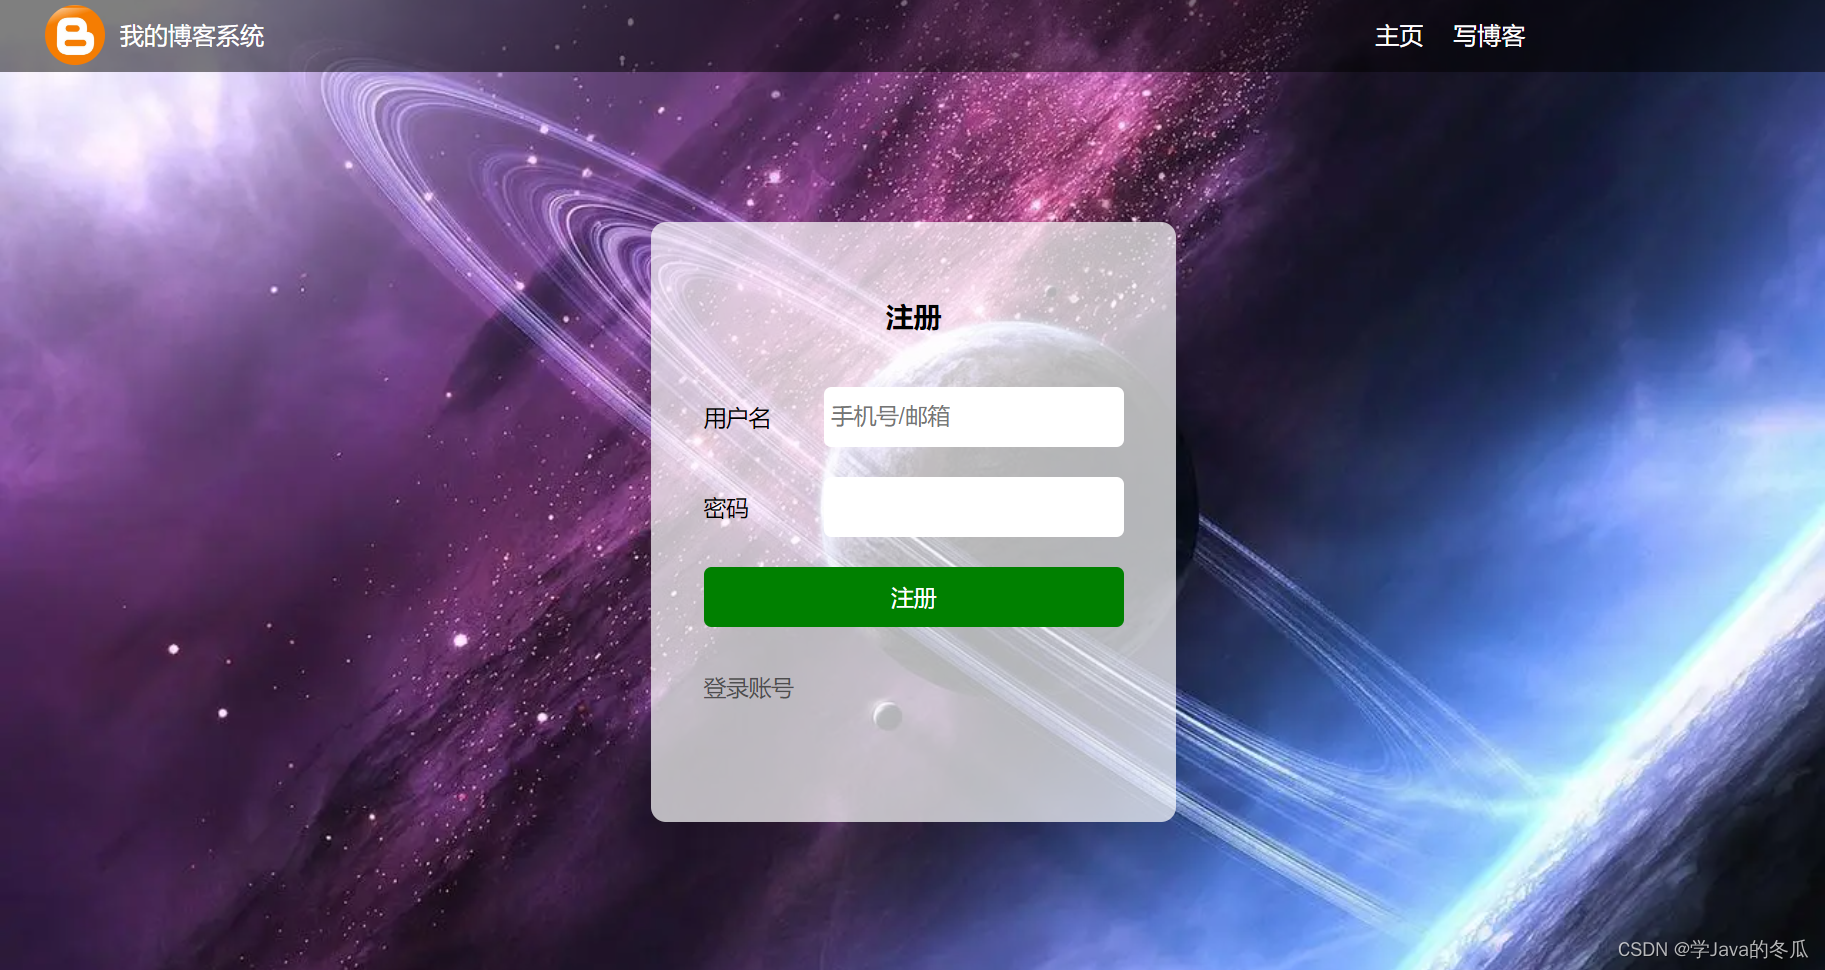
5)注册用户
说明:在登录页面中,点击注册账号,跳转到注册页面,输入信息,点击注册,就给后端发送post请求,后端使用doPost处理请求,获取信息,验证输入信息非空,查询数据库该用户是否已经存在,不存在则将当前用户信息插入到数据库中,注册成功则跳转到登录页面。
1>约定前后端交互接口
2>编写前端代码
blog_register.html页面中:
说明:可以直接复制粘贴登录页面的代码和样式,稍作修改,然后把form表单请求路径action的值改一下。然后在两个页面中添加一个a标签,用于实现两个标签之间的跳转即可。
3>编写后端代码
在RegisterServlet的doPost方法中:
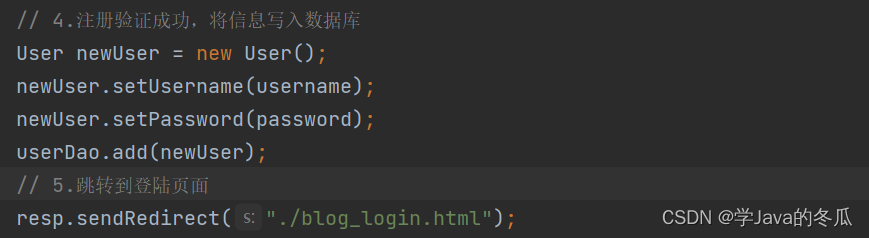
说明:非空验证,是否注册验证,验证成功(不空,未注册),则向数据库插入数据,并且跳转到登陆页面
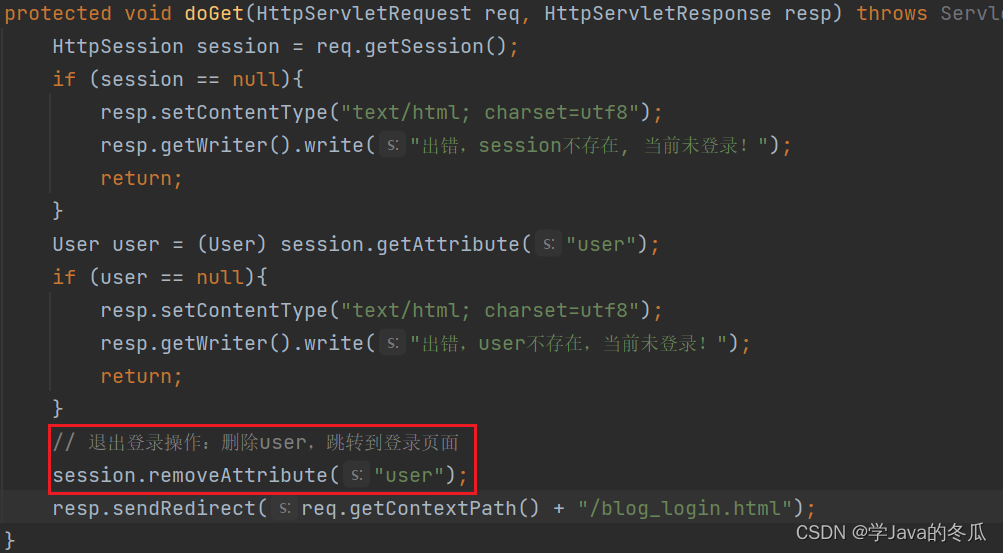
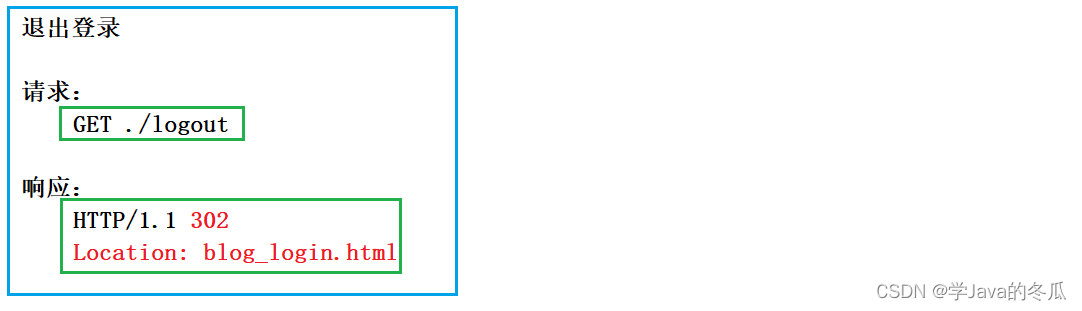
6)退出登录
说明:在blog_list.html、blog_detail.html、blog_edit.html等页面任何一处点击退出登录(a标签),发送get请求,后端使用doGet方法处理,删除session或者session里的用户信息后,返回到登录页面。
1>约定前后端交互接口
2>编写后端代码
LogoutServlet的doGet方法中,先判断有没有session,无session,返回错误,在判断session中有没有user,无user,返回错误,因为这两个都存在是登录的前提,如果有一个不存在就代表未登录(可以看登录的分析,获取了当前用户session,session里存了用户信息)。二者都有时,才表示当前已经登录,就可以退出登录。- 退出登录的具体操作:获取session和user,并判断两者都存在后,把user从session中remove或者销毁session。