文章目录
- 七、文件和存储
- 7.2 serde 与 bincode 序列化
- 7.3 实现一个 hexdump
- 7.4 操作文件
- 7.4.1 打开文件
- 7.4.2 用 std::fs::Path 交互
- 7.5 基于 append 模式实现 kv数据库
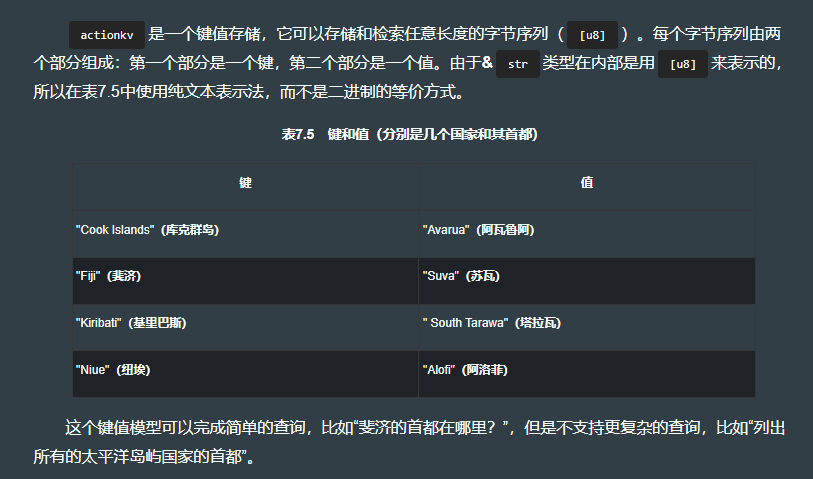
- 7.5.1 kv 模型
- 7.5.2 命令行接口
- 7.6 前端代码
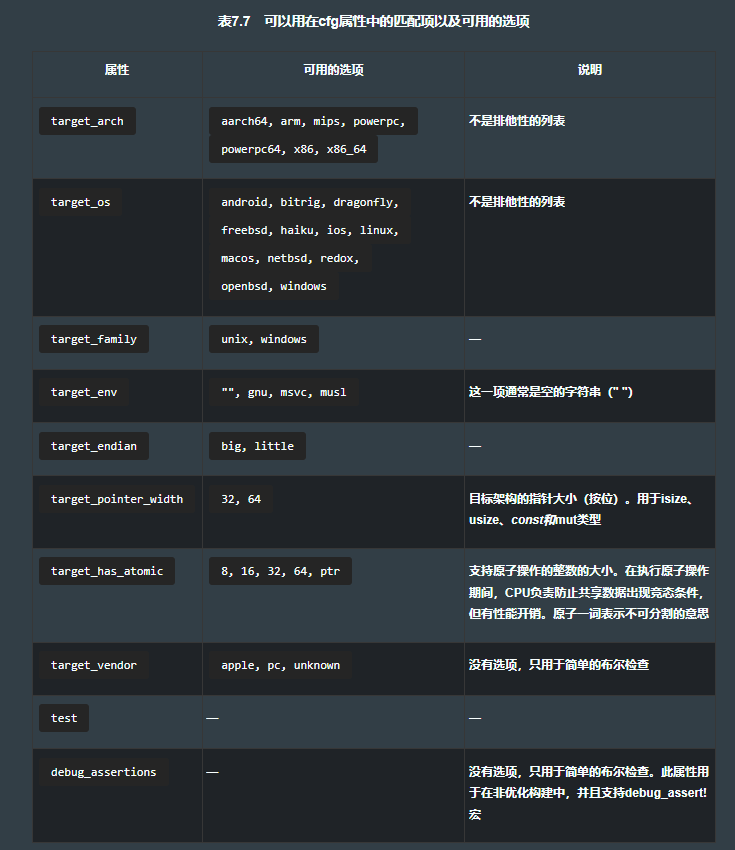
- 7.6.1 用条件编译定制要编译的内容
- 7.7 核心:LIBACTIONKV 包
- 7.7.1 初始化 ActionKV 结构体
- 7.7.2 处理单条记录
- 7.7.3 以确定的字节顺序将多字节二进制数据写入磁盘
- 7.7.4 用校验和验证 I/O 错误
- 7.7.8 创建 HashMap 和写入
- 7.7.9 查询 HashMap
- 7.7.10 HashMap 和 BTreeMap 对比
- 7.7.11 添加数据库索引
- 八、网络
- 8.1 网络七层
- 8.2 用 reqwest 发起 HTTP 请求
- 8.3 trait object
- 8.3.3 实现 rpg 游戏项目
- 8.4 TCP
- 8.4.2 用 DNS 将 hostname 转换为 IP地址
- 8.5 用 Result 处理错误
- 8.5.2 自定义错误类型,包装下游的错误
- 8.6 MAC 地址
- 8.6.1 生成 MAC 地址
- 8.7 用 enum 实现状态机
- 8.9 创建一个虚拟网络设备
- 8.10 原始 HTTP
- 九、时间 和 NTP
- 十、进程、线程、容器
- 10.2 线程
- 10.2.1 闭包
- 10.2.2 产生线程
- 10.2.3 产生线程的效果
- 10.2.4 产生很多个线程的效果
- 10.2.5 重新生成这些结果
- 10.2.6 共享的变量
- 10.3 闭包
- 10.4 多线程解析器、头像生成器
- 10.4.1 render-hex 运行效果
- 10.5 并发和任务虚拟化
- 十一、内核
- 11.1 初级 os
- 11.1.1 搭建开发环境
- 11.1.2 验证开发环境
- 11.2 第一次引导启动
- 11.2.3 源清单
- 十二、信号、中断、异常
- 12.4 硬件中断
- 12.5 信号处理
- 12.5.1 默认的行为
七、文件和存储
7.2 serde 与 bincode 序列化
源码地址为 git clone https://github.com/rust-in-action/code rust-in-action && cd rust-in-action/ch7/ch7-serde-eg。
若想自己创建项目,可设置 Cargo.toml 如下:
[package]
name = "ch7-serde-eg"
version = "0.1.0"
authors = ["Tim McNamara <author@rustinaction.com>"]
edition = "2021"

[dependencies]
bincode = "1"
serde = "1"
serde_cbor = "0.8"
serde_derive = "1"
serde_json = "1"
use bincode::serialize as to_bincode; // <1>
use serde_cbor::to_vec as to_cbor; // <1>
use serde_derive::Serialize;
use serde_json::to_string as to_json; // <1>

#[derive(Serialize)] // 这会让serde_derive软件包来自行编写必要的代码,用来执行在内存中的City和磁盘中的City的转换。
struct City {
  name: String,
  population: usize,
  latitude: f64,
  longitude: f64,
}

fn main() {
  let calabar = City {
    name: String::from("Calabar"),
    population: 470_000,
    latitude: 4.95,
    longitude: 8.33,
  };

  let as_json = to_json(&calabar).unwrap(); // <3>
  let as_cbor = to_cbor(&calabar).unwrap(); // <3>
  let as_bincode = to_bincode(&calabar).unwrap(); // <3>

  println!("json:\n{}\n", &as_json);
  println!("cbor:\n{:?}\n", &as_cbor);
  println!("bincode:\n{:?}\n", &as_bincode);
  println!("json (as UTF-8):\n{}\n", String::from_utf8_lossy(as_json.as_bytes()));
  println!("cbor (as UTF-8):\n{:?}\n", String::from_utf8_lossy(&as_cbor));
  println!("bincode (as UTF-8):\n{:?}\n", String::from_utf8_lossy(&as_bincode));
}

// code result:
json:
{"name":"Calabar","population":470000,"latitude":4.95,"longitude":8.33}

cbor:
[164, 100, 110, 97, 109, 101, 103, 67, 97, 108, 97, 98, 97, 114, 106, 112, 111, 112, 117, 108, 97, 116, 105, 111, 110, 26, 0, 7, 43, 240, 104, 108, 97, 116, 105, 116, 117, 100, 101, 251, 64, 19, 204, 204, 204, 204, 204, 205, 105, 108, 111, 110, 103, 105, 116, 117, 100, 101, 251, 64, 32, 168, 245, 194, 143, 92, 41]

bincode:
[7, 0, 0, 0, 0, 0, 0, 0, 67, 97, 108, 97, 98, 97, 114, 240, 43, 7, 0, 0, 0, 0, 0, 205, 204, 204, 204, 204, 204, 19, 64, 41, 92, 143, 194, 245, 168, 32, 64]

json (as UTF-8):
{"name":"Calabar","population":470000,"latitude":4.95,"longitude":8.33}

cbor (as UTF-8):
"�dnamegCalabarjpopulation\u{1a}\0\u{7}+�hlatitude�@\u{13}������ilongitude�@ ��\u{8f}\\)"

bincode (as UTF-8):
"\u{7}\0\0\0\0\0\0\0Calabar�+\u{7}\0\0\0\0\0������\u{13}@)\\���� @"
7.3 实现一个 hexdump
首先从原始字符串中读取,程序如下:
use std::io::prelude::*;   // prelude导入了在I/O操作中常用的一些trait,例如Read和Write。

const BYTES_PER_LINE: usize = 16;
// 当你使用原始字符串字面量(raw string literal)来构建多行的字符串字面量时,双引号是不需要转义的(注意这里的r前缀和#分隔符)。
// 额外的那个b前缀表示, 应该把这里的字面量数据视为字节数据(&[u8]),而不是UTF-8文本数据(&str)。
const INPUT: &'static [u8] = br#"
fn main() {
    println!("Hello, world!");
}"#;

fn main() -> std::io::Result<()> {
    let mut buffer: Vec<u8> = vec!();
    INPUT.read_to_end(&mut buffer)?;

    let mut position_in_input = 0;
    for line in buffer.chunks(BYTES_PER_LINE) {
        print!("[0x{:08x}] ", position_in_input); // 输出当前位置的信息,最多8位,不足8位则在左侧用零填充。如[0x00000000]
        for byte in line {
            print!("{:02x} ", byte); // 如 0a 66 6e 20 6d 61 69
        }
        println!();
        position_in_input += BYTES_PER_LINE;
    }
    Ok(())
}

// code result:
[0x00000000] 0a 66 6e 20 6d 61 69 6e 28 29 20 7b 0a 20 20 20
[0x00000010] 20 70 72 69 6e 74 6c 6e 21 28 22 48 65 6c 6c 6f
[0x00000020] 2c 20 77 6f 72 6c 64 21 22 29 3b 0a 7d
其次从文件中读取,程序如下:
use std::env;
use std::fs::File;
use std::io::prelude::*;
const BYTES_PER_LINE: usize = 16; // <1>

fn main() {
  let arg1 = env::args().nth(1);
  let fname = arg1.expect("usage: fview FILENAME");

  let mut f = File::open(&fname).expect("Unable to open file.");
  let mut pos = 0;
  let mut buffer = [0; BYTES_PER_LINE];

  while let Ok(_) = f.read_exact(&mut buffer) {
    print!("[0x{:08x}] ", pos);
    for byte in &buffer {
      match *byte {
        0x00 => print!(".  "),
        0xff => print!("## "),
        _ => print!("{:02x} ", byte),
      }
    }

    println!("");
    pos += BYTES_PER_LINE;
  }
}

// code result:
y% echo abcabcabcabcabcabcabcabcabcabcabcabc > d.txt
y% cargo run d.txt
[0x00000000] 61 62 63 61 62 63 61 62 63 61 62 63 61 62 63 61
[0x00000010] 62 63 61 62 63 61 62 63 61 62 63 61 62 63 61 62
7.4 操作文件
7.4.1 打开文件
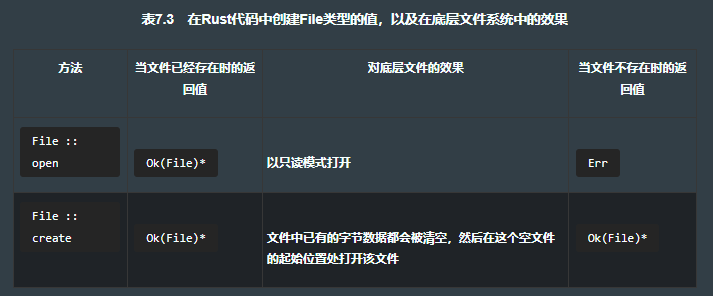
如果需要更多的控制权限,可以使用std::fs::OpenOptions。它提供了必要的选项,可以根据任何预期的应用情况来调整。清单7.16给出了一个很好的示例,在此代码中使用了 append(追加) 模式。此应用程序需要文件是可读可写的,而且如果文件不存在,它就会创建出该文件。清单7.5摘自清单7.16,展示了使用std::fs::OpenOptions创建一个可写的文件,并且打开文件时不会清空文件内容。
let f = OpenOptions::new() // 建造者模式例子。每个方法都会返回一个OpenOptions结构体的新实例,并且附带相关选项的集合。
        .read(true)   // 为读取而打开文件。
        .write(true)  // 开启写入。这行代码不是必需的,因为后面的append隐含了写入的选项。
        .create(true) // 如果在path处的文件不存在,则创建一个文件出来。
        .append(true) // 不会删除已经写入磁盘中的任何内容。
        .open(path)?; // 打开在path处的文件,然后解包装中间产生的Result。
7.4.2 用 std::fs::Path 交互
处理文件就用专业的 Path 包,而不要用 String 包,防止意想不到的麻烦,例如下文代码中 x 为 Some(“”):
fn main() {
    let hello = String::from("/tmp/ hello.txt");
    let x = hello.split("/").nth(0);
    let y = hello.split("/").nth(1);
    let z = hello.split("/").nth(2);
    println!("{:?}, {:?}, {:?}", x, y, z);
}

// code result:
Some(""), Some("tmp"), Some(" hello.txt")
7.5 基于 append 模式实现 kv数据库
目标是,通过 append 模式,使 kv 的数据永不丢失或损坏。
7.5.1 kv 模型
7.5.2 命令行接口
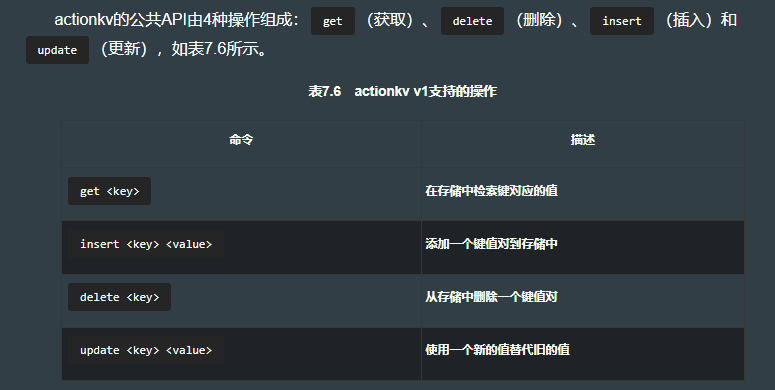
cargo new --lib actionkv
touch src/akv_mem.rs

tree # 输出如下:
├──src
│   ├──akv_mem.rs
│   └──lib.rs
└──Cargo.toml
设置 Cargo.toml 如下:
[package]
name = "actionkv"
version = "0.1.0"
edition = "2021"

# See more keys and their definitions at https://doc.rust-lang.org/cargo/reference/manifest.html

[dependencies]
byteorder = "1.2" # 使用额外的trait扩展了许多Rust类型,让它们能够以可重复的、易于使用的方式被写入磁盘和读回到程序中。
crc = "1.7"       # 校验

[lib]
name = "libactionkv"  # Cargo.toml中的这个分段,为你将要构建出的库给出一个名字。注意,一个crate中只可以有一个库。
path = "src/lib.rs"

[[bin]]  # [[bin]]分段可以有多个,定义了将从此包中构建出的可执行文件。双方括号语法是必需的,因为它明确地将这个bin描述为一个或多个bin元素的一部分。
name = "akv_mem"
path = "src/akv_mem.rs"
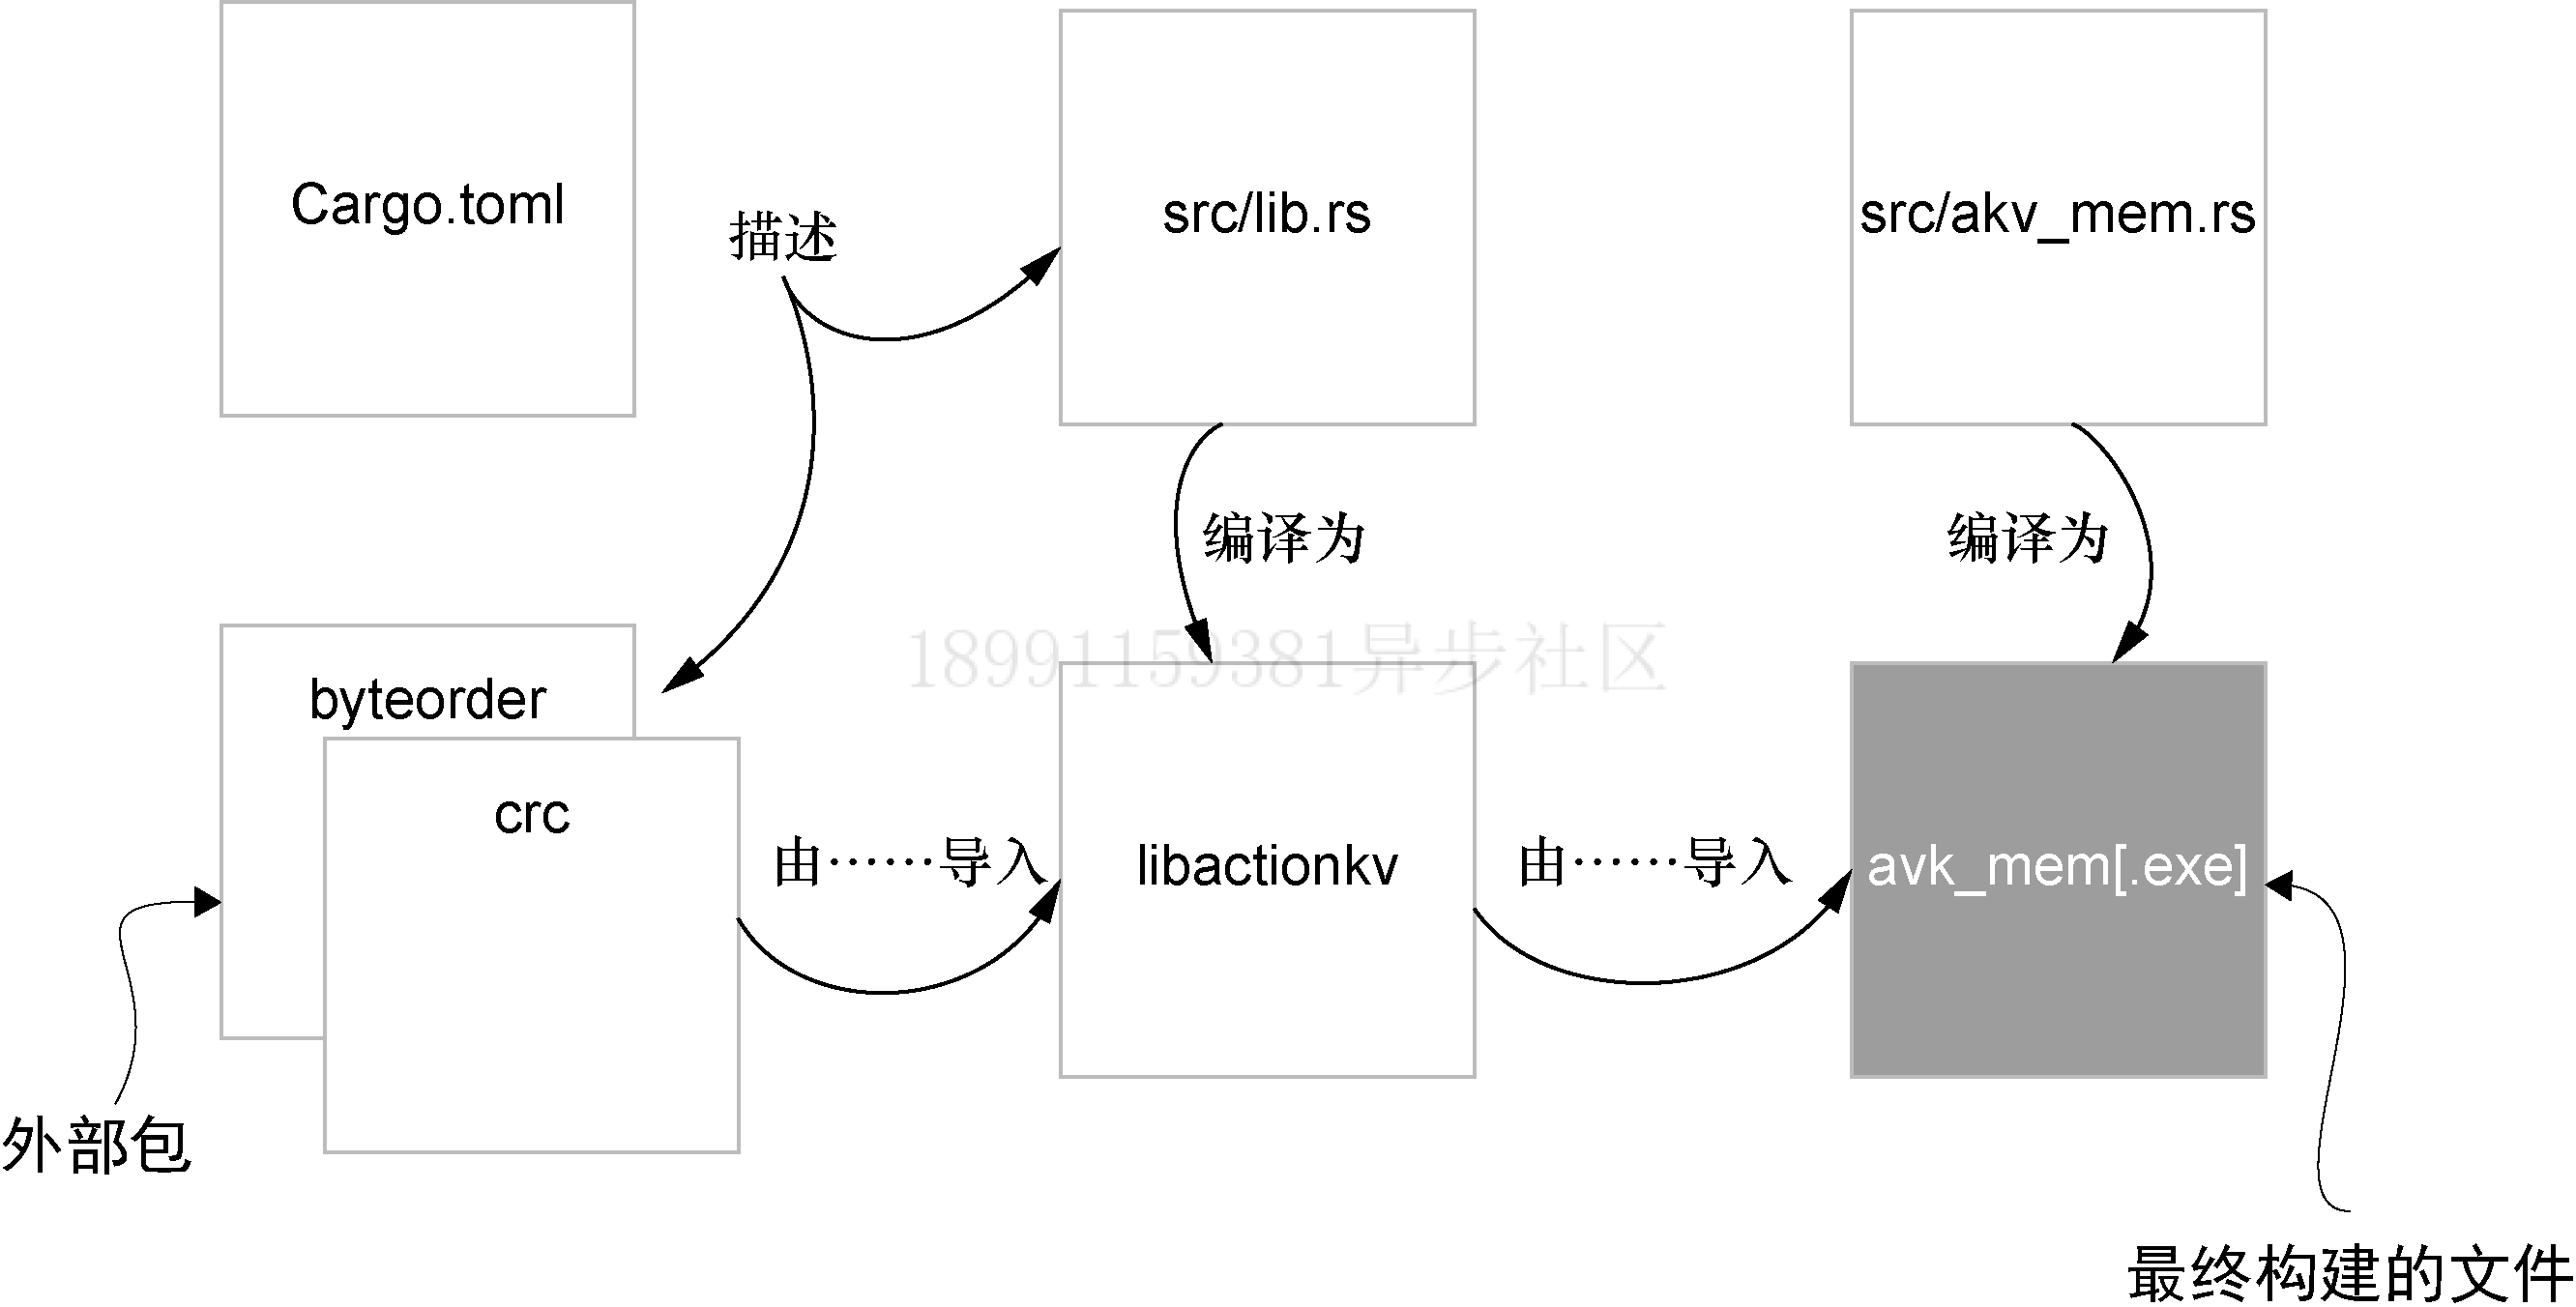
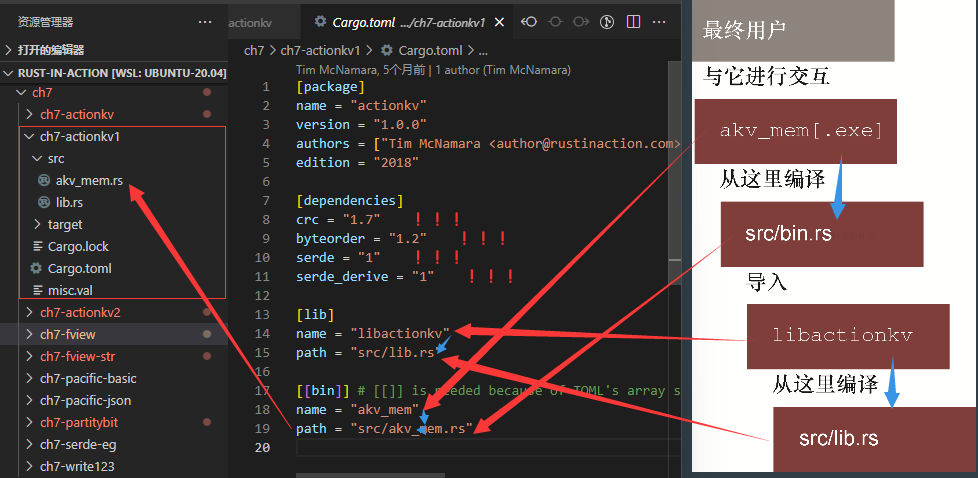
actionkv 项目最后会由多个文件组成。图7.1展示了这些文件之间的关系,以及它们如何协同工作来构建名为akv_mem的可执行文件,这个可执行文件在项目的Cargo. toml文件的分段中进行了描述。
7.6 前端代码
use libactionkv::ActionKV; // 尽管src/lib.rs是存在于我们的项目中的,但是在我们项目中的src/bin.rs文件,会把它视为与任何其他的包一样,同等对待。

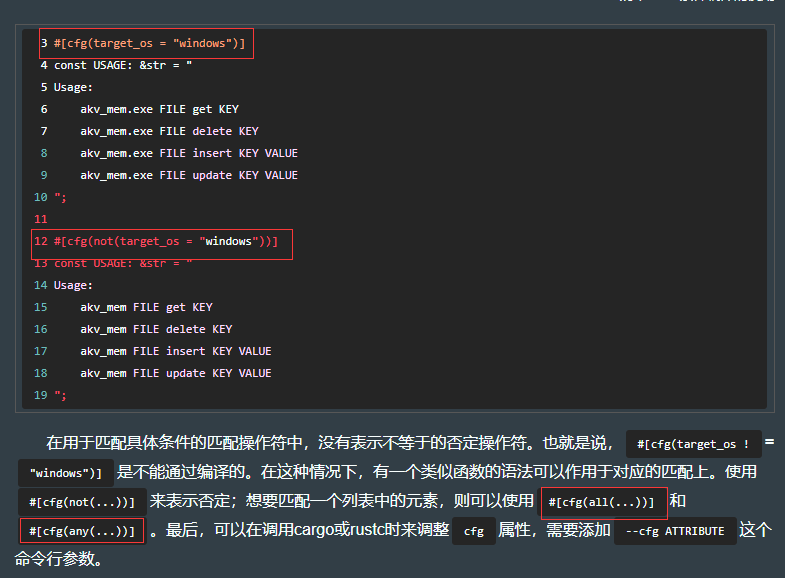
#[cfg(target_os = "windows")] // 此处的cfg属性注解,可以让Windows用户在此应用的帮助文档中看到正确的文件扩展名。这个属性注解将会在后文中进行讲解。
const USAGE: &str = "
Usage:
    akv_mem.exe FILE get KEY
    akv_mem.exe FILE delete KEY
    akv_mem.exe FILE insert KEY VALUE
    akv_mem.exe FILE update KEY VALUE
";

#[cfg(not(target_os = "windows"))]
const USAGE: &str = "
Usage:
    akv_mem FILE get KEY
    akv_mem FILE delete KEY
    akv_mem FILE insert KEY VALUE
    akv_mem FILE update KEY VALUE
";

fn main() {
  let args: Vec<String> = std::env::args().collect();
  let fname = args.get(1).expect(&USAGE);
  let action = args.get(2).expect(&USAGE).as_ref();
  let key = args.get(3).expect(&USAGE).as_ref();
  let maybe_value = args.get(4);

  let path = std::path::Path::new(&fname);
  let mut store = ActionKV::open(path).expect("unable to open file");
  store.load().expect("unable to load data");

  match action {
    "get" => match store.get(key).unwrap() {
      None => eprintln!("{:?} not found", key),
      Some(value) => println!("{:?}", value),
    },

    "delete" => store.delete(key).unwrap(),

    "insert" => {
      let value = maybe_value.expect(&USAGE).as_ref();
      store.insert(key, value).unwrap()
    }

    "update" => {
      let value = maybe_value.expect(&USAGE).as_ref();
      store.update(key, value).unwrap()
    }

    _ => eprintln!("{}", &USAGE),
  }
}
7.6.1 用条件编译定制要编译的内容
7.7 核心:LIBACTIONKV 包
在7.6节中构建的命令行应用程序,把具体的工作分派给了 libactionkv::ActionKV。结构体 ActionkV 负责管理与文件系统的交互,以及编码和解码来自磁盘中的格式数据。图7.2描述了这些关系。
7.7.1 初始化 ActionKV 结构体
use std::collections::HashMap;
use std::fs::{File, OpenOptions};
use std::io;
use std::io::prelude::*;
use std::io::{BufReader, BufWriter, SeekFrom};
use std::path::Path;

use byteorder::{LittleEndian, ReadBytesExt, WriteBytesExt};
use crc::crc32;
use serde_derive::{Deserialize, Serialize};

type ByteString = Vec<u8>;
type ByteStr = [u8];

#[derive(Debug, Serialize, Deserialize)] // 让编译器自动生成序列化的代码,以便将KeyValuePair(键值对)的数据写入磁盘。
pub struct KeyValuePair {
  pub key: ByteString,
  pub value: ByteString,
}

#[derive(Debug)]
pub struct ActionKV {
  f: File,
  pub index: HashMap<ByteString, u64>,
}

impl ActionKV {
  pub fn open(path: &Path) -> io::Result<Self> {
    let f = OpenOptions::new()
      .read(true)
      .write(true)
      .create(true)
      .append(true)
      .open(path)?;
    let index = HashMap::new();
    Ok(ActionKV { f, index })
  }

  fn process_record<R: Read>(
    // <1>
    f: &mut R,
  ) -> io::Result<KeyValuePair> {
    let saved_checksum = f.read_u32::<LittleEndian>()?;
    let key_len = f.read_u32::<LittleEndian>()?;
    let val_len = f.read_u32::<LittleEndian>()?;
    let data_len = key_len + val_len;

    let mut data = ByteString::with_capacity(data_len as usize);

    {
      f.by_ref() // <2>
        .take(data_len as u64)
        .read_to_end(&mut data)?;
    }
    debug_assert_eq!(data.len(), data_len as usize);

    let checksum = crc32::checksum_ieee(&data);
    if checksum != saved_checksum {
      panic!(
        "data corruption encountered ({:08x} != {:08x})",
        checksum, saved_checksum
      );
    }

    let value = data.split_off(key_len as usize);
    let key = data;

    Ok(KeyValuePair { key, value })
  }

  pub fn seek_to_end(&mut self) -> io::Result<u64> {
    self.f.seek(SeekFrom::End(0))
  }

  pub fn load(&mut self) -> io::Result<()> {
    let mut f = BufReader::new(&mut self.f);

    loop {
      let current_position = f.seek(SeekFrom::Current(0))?;

      let maybe_kv = ActionKV::process_record(&mut f);
      let kv = match maybe_kv {
        Ok(kv) => kv,
        Err(err) => {
          match err.kind() {
            io::ErrorKind::UnexpectedEof => {
              // <3>
              break;
            }
            _ => return Err(err),
          }
        }
      };

      self.index.insert(kv.key, current_position);
    }

    Ok(())
  }

  pub fn get(&mut self, key: &ByteStr) -> io::Result<Option<ByteString>> {
    // <4>
    let position = match self.index.get(key) {
      None => return Ok(None),
      Some(position) => *position,
    };

    let kv = self.get_at(position)?;

    Ok(Some(kv.value))
  }

  pub fn get_at(&mut self, position: u64) -> io::Result<KeyValuePair> {
    let mut f = BufReader::new(&mut self.f);
    f.seek(SeekFrom::Start(position))?;
    let kv = ActionKV::process_record(&mut f)?;

    Ok(kv)
  }

  pub fn find(&mut self, target: &ByteStr) -> io::Result<Option<(u64, ByteString)>> {
    let mut f = BufReader::new(&mut self.f);

    let mut found: Option<(u64, ByteString)> = None;

    loop {
      let position = f.seek(SeekFrom::Current(0))?;

      let maybe_kv = ActionKV::process_record(&mut f);
      let kv = match maybe_kv {
        Ok(kv) => kv,
        Err(err) => {
          match err.kind() {
            io::ErrorKind::UnexpectedEof => {
              // <3>
              break;
            }
            _ => return Err(err),
          }
        }
      };

      if kv.key == target {
        found = Some((position, kv.value));
      }

      // important to keep looping until the end of the file,
      // in case the key has been overwritten
    }

    Ok(found)
  }

  pub fn insert(&mut self, key: &ByteStr, value: &ByteStr) -> io::Result<()> {
    let position = self.insert_but_ignore_index(key, value)?;

    self.index.insert(key.to_vec(), position);
    Ok(())
  }

  pub fn insert_but_ignore_index(&mut self, key: &ByteStr, value: &ByteStr) -> io::Result<u64> {
    let mut f = BufWriter::new(&mut self.f);

    let key_len = key.len();
    let val_len = value.len();
    let mut tmp = ByteString::with_capacity(key_len + val_len);

    for byte in key {
      tmp.push(*byte);
    }

    for byte in value {
      tmp.push(*byte);
    }

    let checksum = crc32::checksum_ieee(&tmp);

    let next_byte = SeekFrom::End(0);
    let current_position = f.seek(SeekFrom::Current(0))?;
    f.seek(next_byte)?;
    f.write_u32::<LittleEndian>(checksum)?;
    f.write_u32::<LittleEndian>(key_len as u32)?;
    f.write_u32::<LittleEndian>(val_len as u32)?;
    f.write_all(&tmp)?;

    Ok(current_position)
  }

  #[inline]
  pub fn update(&mut self, key: &ByteStr, value: &ByteStr) -> io::Result<()> {
    self.insert(key, value)
  }

  #[inline]
  pub fn delete(&mut self, key: &ByteStr) -> io::Result<()> {
    self.insert(key, b"")
  }
}
7.7.2 处理单条记录
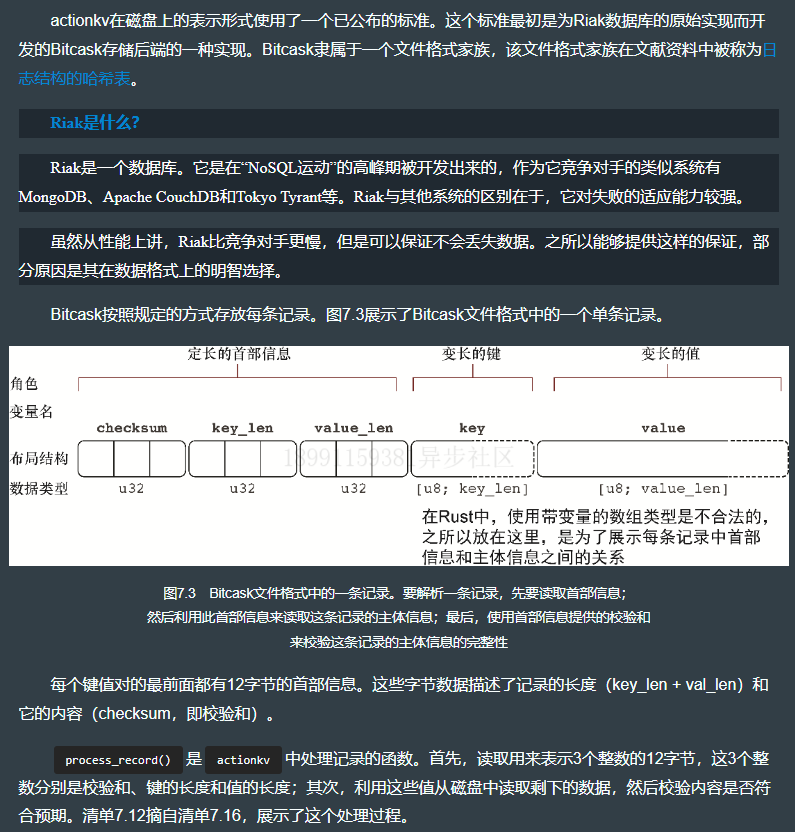
处理代码详见上节的 fn process_record() 函数。
7.7.3 以确定的字节顺序将多字节二进制数据写入磁盘
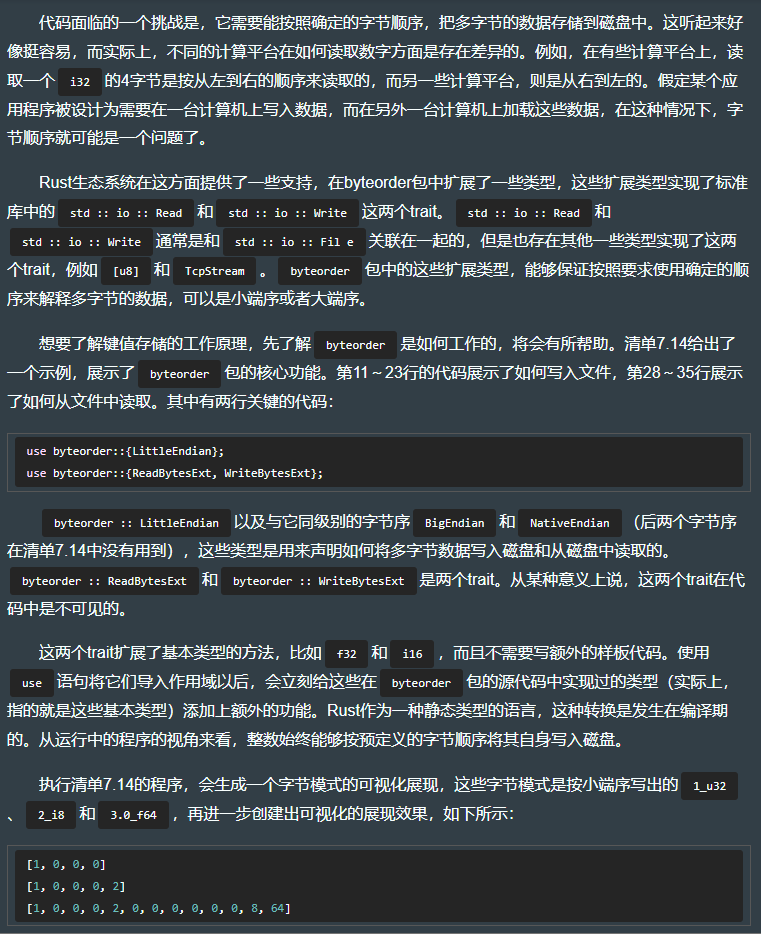
use std::io::Cursor; // 因为文件支持seek(),即拥有向前或者向后移动到不同的位置上的能力,要让Vec<T> 能够模拟文件,必须要额外做一些事情。而io::Cursor就是做这个的,它使得位于内存中的Vec<T> 在行为上类似于文件。
use byteorder::LittleEndian; // 这个类型在此程序中调用多个read_*() 和write_*()方法时,作为这些方法的类型参数来使用。
use byteorder::{ReadBytesExt, WriteBytesExt}; // 这两个trait提供了read_*() 和write_*()方法。

fn write_numbers_to_file() -> (u32, i8, f64) {
  let mut w = vec![]; // 这个变量名w是writer的缩写。

  let one: u32 = 1;
  let two: i8 = 2;
  let three: f64 = 3.0;

  w.write_u32::<LittleEndian>(one).unwrap(); // 把值写入“磁盘”。这些方法会返回io::Result,在这里我们使用简单处理,直接把它给“吞掉了”,因为除非运行该程序的计算机出现严重问题,否则这些方法不会失败。
  println!("{:?}", &w);

  w.write_i8(two).unwrap(); // 单字节的类型i8和u8,显然,因为它们是单字节类型,所以不会接收字节序的参数。
  println!("{:?}", &w);

  w.write_f64::<LittleEndian>(three).unwrap();
  println!("{:?}", &w);

  (one, two, three)
}

fn read_numbers_from_file() -> (u32, i8, f64) {
  let mut r = Cursor::new(vec![1, 0, 0, 0, 2, 0, 0, 0, 0, 0, 0, 8, 64]);
  let one_ = r.read_u32::<LittleEndian>().unwrap();
  let two_ = r.read_i8().unwrap();
  let three_ = r.read_f64::<LittleEndian>().unwrap();

  (one_, two_, three_)
}

fn main() {
  let (one, two, three) = write_numbers_to_file();
  let (one_, two_, three_) = read_numbers_from_file();

  assert_eq!(one, one_);
  assert_eq!(two, two_);
  assert_eq!(three, three_);
}
7.7.4 用校验和验证 I/O 错误

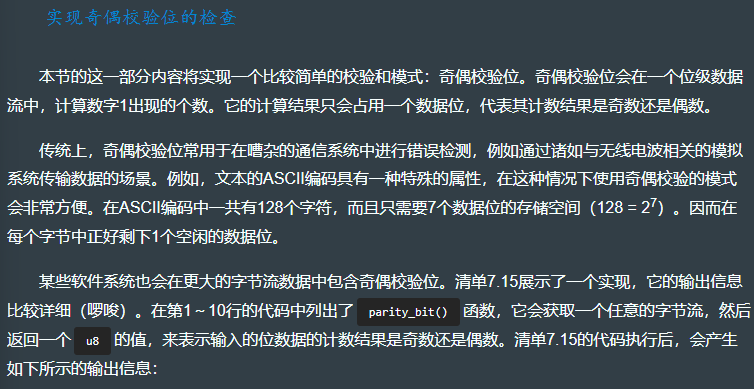
fn parity_bit(bytes: &[u8]) -> u8 {
  // 获取一个字节切片作为参数bytes,并返回一个单字节作为输出。此函数可以很容易地返回一个布尔值,但是在这里返回u8,可以让这个返回结果在之后能够移位到某个期望的位置上。
  let mut n_ones: u32 = 0;

  for byte in bytes {
    let ones = byte.count_ones(); // Rust的所有整数类型,都配有count_ones() 方法和count_zeros() 方法。
    n_ones += ones;
    println!("{} (0b{:08b}) has {} one bits", byte, byte, ones);
  }
  (n_ones % 2 == 0) as u8 // 有多种方法可以用来优化这个函数。一种很简单的方法就是,可以硬编码一个类型为const [u8; 256]的数组,数组中的0和1与预期的结果相对应,然后用每个字节对此数组进行索引。
}

fn main() {
  let abc = b"abc";
  println!("input: {:?}", abc);
  println!("output: {:08x}", parity_bit(abc));
  println!();
  let abcd = b"abcd";
  println!("input: {:?}", abcd);
  println!("result: {:08x}", parity_bit(abcd))
}

// code result:
input: [97, 98, 99]
97 (0b01100001) has 3 one bits
98 (0b01100010) has 3 one bits
99 (0b01100011) has 4 one bits
output: 00000001 // 因(3+3+4)%2 == 0 成立, 故返回output=1

input: [97, 98, 99, 100]
97 (0b01100001) has 3 one bits
98 (0b01100010) has 3 one bits
99 (0b01100011) has 4 one bits
100 (0b01100100) has 3 one bits
result: 00000000 // 因(3+3+4+3)%2 == 0 不成立, 故返回output=0
7.7.8 创建 HashMap 和写入
use std::collections::HashMap;

fn main() {
  let mut capitals = HashMap::new();             // <1>

  capitals.insert("Cook Islands", "Avarua");
  capitals.insert("Fiji", "Suva");
  capitals.insert("Kiribati", "South Tarawa");
  capitals.insert("Niue", "Alofi");
  capitals.insert("Tonga", "Nuku'alofa");
  capitals.insert("Tuvalu", "Funafuti");

  let tongan_capital = capitals["Tonga"];        // <2>

  println!("Capital of Tonga is: {}", tongan_capital);
}

// code result:
Capital of Tonga is: Nuku'alofa
#[macro_use]                          // 把serde_json包合并到此包中,并使用它的宏。这个语法会把 json! 宏导入作用域中
extern crate serde_json;              // <1>

fn main() {
  let capitals = json!({              // json! 会接收一个JSON字面量(这个JSON字面量是由字符串组成的Rust表达式),这个宏会把JSON字面量转换成类型为serde_json::Value的Rust值,这个类型是枚举体,能够表示JSON规范中所描述的所有类型。
    "Cook Islands": "Avarua",
    "Fiji": "Suva",
    "Kiribati": "South Tarawa",
    "Niue": "Alofi",
    "Tonga": "Nuku'alofa",
    "Tuvalu": "Funafuti"
  });

  println!("Capital of Tonga is: {}", capitals["Tonga"])
}
7.7.9 查询 HashMap
capitals["Tonga"]     // 返回 "Nuku’alofa"。这种方式会返回该值的一个只读的引用(当处理包含字符串字面量的示例时,这里存在一定的"欺骗性”,因为它们作为引用的状态有些变形)。在Rust文档中,这是指& v,其中&表示只读引用,而v是值的类型。如果键不存在,程序将会引发 panic。

capitals.get("Tonga") // 返回Some( "Nuku’alofa" ), 返回一个 Option<&V>,防止 panic。
7.7.10 HashMap 和 BTreeMap 对比
use std::collections::BTreeMap;

fn main() {
  let mut voc = BTreeMap::new();

  voc.insert(3_697_915, "Amsterdam");
  voc.insert(1_300_405, "Middelburg");
  voc.insert(540_000, "Enkhuizen");
  voc.insert(469_400, "Delft");
  voc.insert(266_868, "Hoorn");
  voc.insert(173_000, "Rotterdam");

  for (guilders, kamer) in &voc {
    println!("{} invested {}", kamer, guilders); // 按照排序顺序输出。
  }

  print!("smaller chambers: ");
  for (_guilders, kamer) in voc.range(0..500_000) {
    // BTreeMap允许你使用范围(range)语法进行迭代,以此来选择操作全部键的一部分。
    print!("{} ", kamer);
  }
  println!("");
}

// code result:
Rotterdam invested 173000
Hoorn invested 266868
Delft invested 469400
Enkhuizen invested 540000
Middelburg invested 1300405
Amsterdam invested 3697915
smaller chambers: Rotterdam Hoorn Delft
7.7.11 添加数据库索引
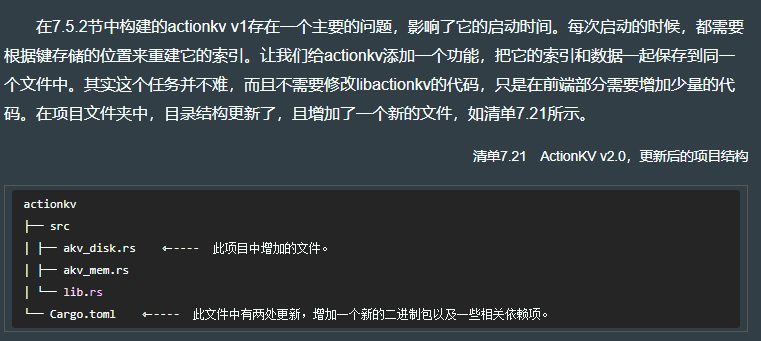
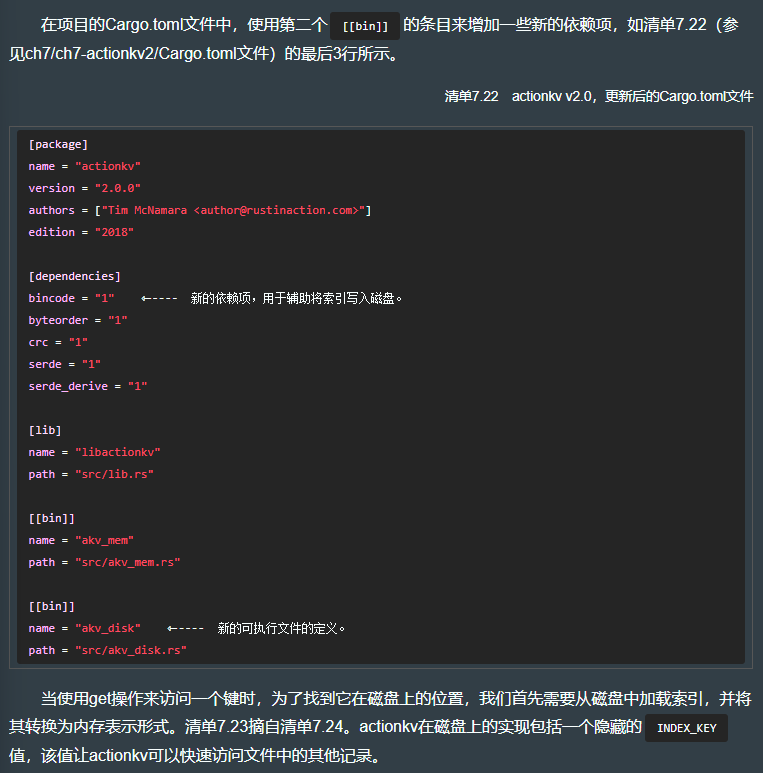
use libactionkv::ActionKV;
use std::collections::HashMap;

#[cfg(target_os = "windows")]
const USAGE: &str = "
Usage:
    akv_disk.exe FILE get KEY
    akv_disk.exe FILE delete KEY
    akv_disk.exe FILE insert KEY VALUE
    akv_disk.exe FILE update KEY VALUE
";

#[cfg(not(target_os = "windows"))]
const USAGE: &str = "
Usage:
    akv_disk FILE get KEY
    akv_disk FILE delete KEY
    akv_disk FILE insert KEY VALUE
    akv_disk FILE update KEY VALUE
";

type ByteStr = [u8];
type ByteString = Vec<u8>;

fn store_index_on_disk(a: &mut ActionKV, index_key: &ByteStr) {
  a.index.remove(index_key);
  let index_as_bytes = bincode::serialize(&a.index).unwrap();
  a.index = std::collections::HashMap::new();
  a.insert(index_key, &index_as_bytes).unwrap();
}

fn main() {
  const INDEX_KEY: &ByteStr = b"+index";

  let args: Vec<String> = std::env::args().collect();
  let fname = args.get(1).expect(&USAGE);
  let action = args.get(2).expect(&USAGE).as_ref();
  let key = args.get(3).expect(&USAGE).as_ref();
  let maybe_value = args.get(4);

  let path = std::path::Path::new(&fname);
  let mut a = ActionKV::open(path).expect("unable to open file");

  a.load().expect("unable to load data");

  match action {
    "get" => {
      let index_as_bytes = a.get(&INDEX_KEY)
                                    .unwrap()
                                    .unwrap();

      let index_decoded = bincode::deserialize(&index_as_bytes);

      let index: HashMap<ByteString, u64> = index_decoded.unwrap();

      match index.get(key) {
        None => eprintln!("{:?} not found", key),
        Some(&i) => {
          let kv = a.get_at(i).unwrap();
          println!("{:?}", kv.value)                <1>
        }
      }
    }

    "delete" => a.delete(key).unwrap(),

    "insert" => {
      let value = maybe_value.expect(&USAGE).as_ref();
      a.insert(key, value).unwrap();
      store_index_on_disk(&mut a, INDEX_KEY);       <2>
    }

    "update" => {
      let value = maybe_value.expect(&USAGE).as_ref();
      a.update(key, value).unwrap();
      store_index_on_disk(&mut a, INDEX_KEY);       <2>
    }
    _ => eprintln!("{}", &USAGE),
  }
}
八、网络
8.1 网络七层

8.2 用 reqwest 发起 HTTP 请求
use std::error::Error;

use reqwest;

fn main() -> Result<(), Box<dyn Error>> {        // <1>
  let url = "http://www.rustinaction.com/";
  let mut response = reqwest::get(url)?;

  let content = response.text()?;
  print!("{}", content);

  Ok(())
}
// code result:
Error: Error(Hyper(Error(Connect, Os { code: 22, kind: InvalidInput, message: "Invalid argument" })), "http://www.rustinaction.com/")
8.3 trait object
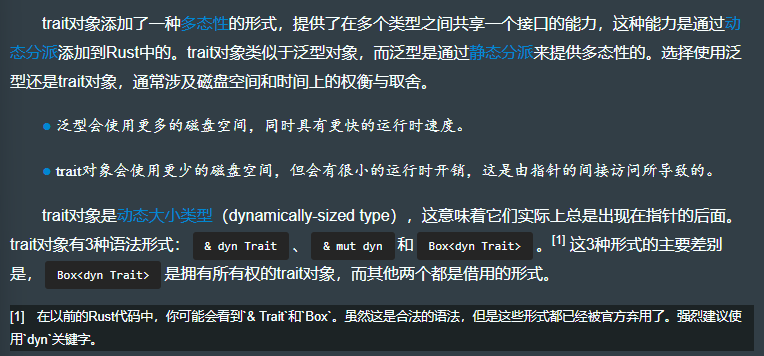
可将多种 struct 都视为同一种 trait object 类型。 提供了多态性。
8.3.3 实现 rpg 游戏项目
use rand;
use rand::seq::SliceRandom;
use rand::Rng;

#[derive(Debug)]
struct Dwarf {} // dwarves 矮人族

#[derive(Debug)]
struct Elf {} // elves 精灵族

#[derive(Debug)]
struct Human {} // 人族

#[derive(Debug)]
enum Thing {
  Sword,   // 剑
  Trinket, // 小饰品
}

// 魔法师
trait Enchanter: std::fmt::Debug {
  fn competency(&self) -> f64; // 能力

  // 附魔
  fn enchant(&self, thing: &mut Thing) {
    let probability_of_success = self.competency();
    let spell_is_successful = rand::thread_rng().gen_bool(probability_of_success); // <1>

    print!("{:?} mutters incoherently. ", self); // 语无伦次地嘀咕着
    if spell_is_successful {
      println!("The {:?} glows brightly.", thing); // 发出明亮的光
    } else {
      println!("The {:?} fizzes, then turns into a worthless trinket.", thing); // 发出嘶嘶声,然后变成毫无价值的饰品
      *thing = Thing::Trinket;
    }
  }
}

impl Enchanter for Dwarf {
  fn competency(&self) -> f64 {
    0.5
  }
}
impl Enchanter for Elf {
  fn competency(&self) -> f64 {
    0.95
  }
}
impl Enchanter for Human {
  fn competency(&self) -> f64 {
    0.8
  }
}

fn main() {
  let mut it = Thing::Sword;

  let d = Dwarf {};
  let e = Elf {};
  let h = Human {};

  let party: Vec<&dyn Enchanter> = vec![&d, &h, &e]; // 可把不同类型的成员放到同一个Vec中,因这些成员都实现了这个Enchanter trait
  let spellcaster = party.choose(&mut rand::thread_rng()).unwrap();

  spellcaster.enchant(&mut it);
}

// code result:
Elf mutters incoherently. The Sword glows brightly.
上文中的这两行代码是有区别的,区别如下:
use rand::Rng; // 是一个 trait。&dyn Rng 表示实现了 Rng 的某种东西的一个引用。
use rand::rngs::ThreadRng; // 是一个结构体。&ThreadRng 是一个 ThreadRng 的引用。
trait object 为 rust 提供了类型擦除(type erasure)的形式,当调用 enchant() 时,编译器无法访问这些对象的原始类型。
trait 有如下使用场景:
- 创建异质对象的集合
- 作为返回值,使函数可返回多个具体类型
- 支持动态分派,使在运行时而不是编译时,来确定所要调用的函数
8.4 TCP
use std::io::prelude::*;
use std::net::TcpStream;

fn main() -> std::io::Result<()> {
  let mut connection = TcpStream::connect("www.rustinaction.com:80")?; // 必须显式指定端口号(80),TcpStream并不知道这将成为一个HTTP的请求
  connection.write_all(b"GET / HTTP/1.0")?; // 用HTTP 1.0可以确保在服务器发送响应后关闭此连接。然而,HTTP 1.0并不支持""keep alive”(保持活动状态)的请求。如果使用HTTP 1.1,默认会启用"keep alive",这实际上会使这段代码变得混乱,因为服务器将拒绝关闭此连接,直到它收到另一个请求,可是客户端已经不会再发送一个请求了。
  connection.write_all(b"\r\n")?; // 在许多的网络协议中,都是用\r\n来表示换行符的
  connection.write_all(b"Host: www.rustinaction.com")?; // 我们提供了主机名。我们在第7~8行中建立连接时已经使用了这个确切的主机名,所以你可能会觉得这行代码是多余的。然而,你应该记住的一点是,此连接是通过IP地址建立起来的,其中并没有主机名。当使用TcpStream : connect()连接到服务器的时候,它只使用一个IP地址。通过添加HTTP首部的Host信息,我们把这些信息重新注入上下文。
  connection.write_all(b"\r\n\r\n")?; // 两个换行符表示本次请求结束
  std::io::copy(&mut connection, &mut std::io::stdout())?; // 把字节流从一个Reader写到一个Writer中

  Ok(())
}

// code result:
HTTP/1.0 301 Moved Permanently
content-type: text/html; charset=utf-8
location: https://www.rustinaction.com/
permissions-policy: interest-cohort=()
vary: Origin
date: Fri, 23 Jun 2023 11:13:29 GMT
content-length: 64

<a href="https://www.rustinaction.com/">Moved Permanently</a>.
8.4.2 用 DNS 将 hostname 转换为 IP地址
到目前为止,我们已经为Rust提供了主机名www.ustinaction.com。但是,要通过Internet发送消息,IP(Internet Protocol,互联网协议)需要使用P地址。TCP对域名一无所知,要把域名转换为IP地址,我们需要依赖于域名系统(DNS)以及称为域名解析的这个处理过程。
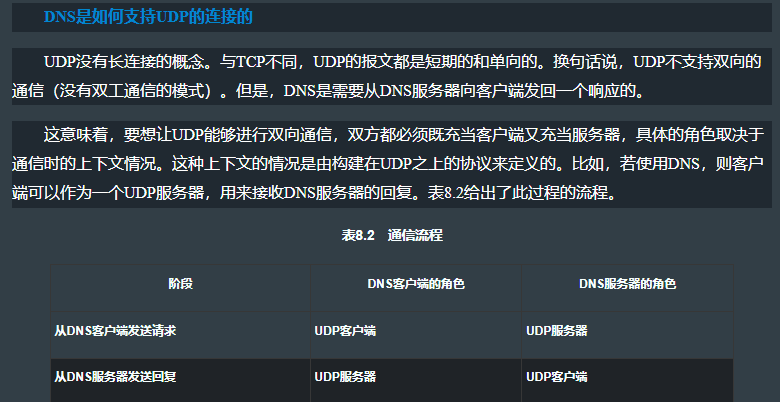
我们可以通过询问一台服务器来解析名称,而这些服务器可以递归地询问其他的服务器。DNS请求可以通过TCP来发送,包括使用TLS加密,但也可以通过UDP (User Datagram Protocol,用户数据报协议)来发送。我们将在这里使用DNS,因为它对我们的学习目标(HTIP)很有用。
为了说明从域名到IP地址的转换是如何进行的,我们会创建一个小应用程序来执行这个转换。这个程序的名字是 resolve,在清单8.9中给出了源代码。resolve 会使用公共DNS服务,但是你也可以使用 -s参数来轻松添加自己的DNS服务。
resolve 仅能了解DNS协议的一小部分,但这一小部分就足以满足我们的需要了。此项目使用了外部的包,trust-dns,用以完成繁重的工作。trust-dns非常忠实地实现了RFC1035(定义了DNS)以及多个后来的RFC,并使用了从中衍生的术语。表8.1概要地列出了一些的术语,这些术语对于理解DNS很有帮助。
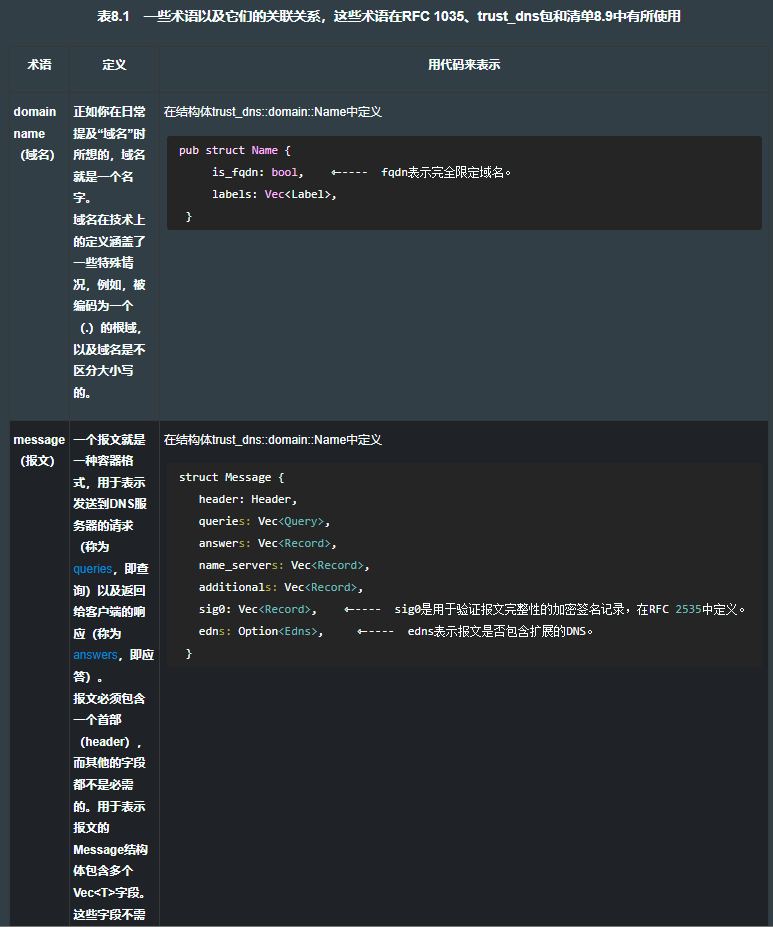
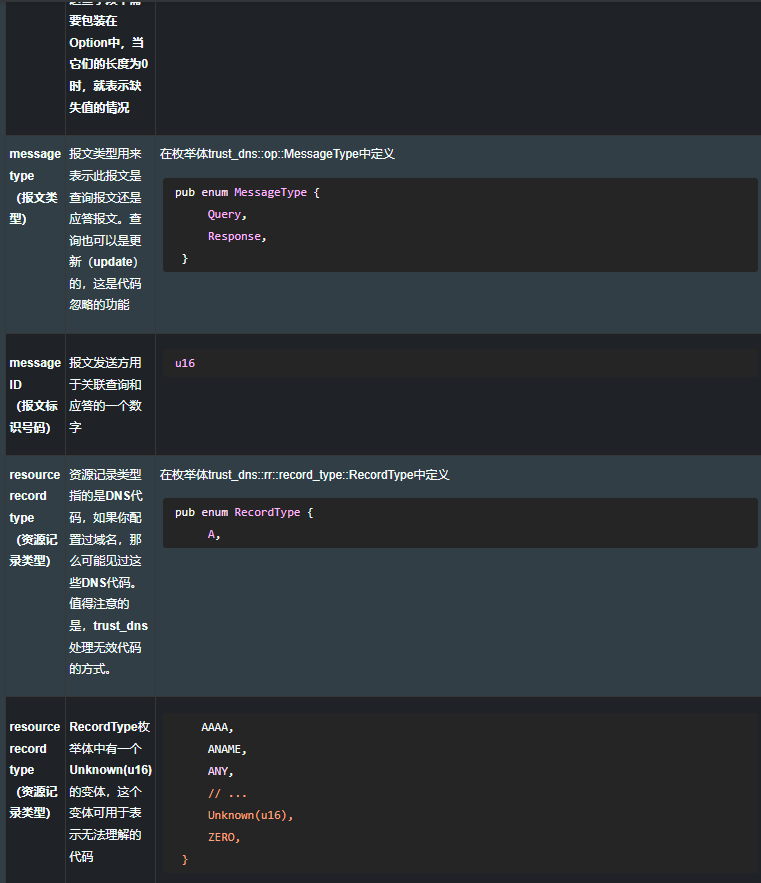
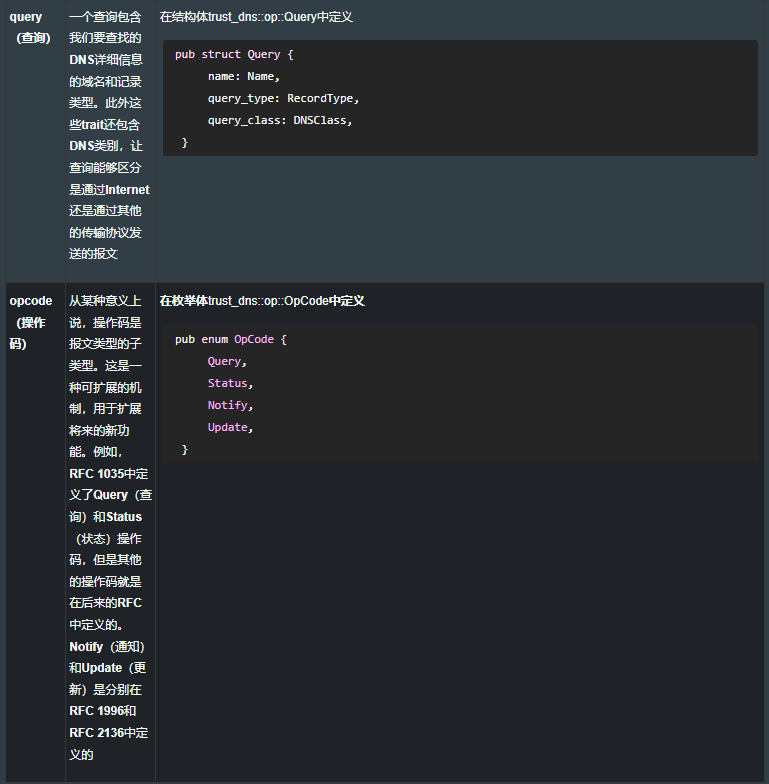
构造请求的示例如下:
// https:/ /github.com/rust-in-action/code rust-in-action/ch8/ch8-resolve
use std::net::{SocketAddr, UdpSocket};
use std::time::Duration;

use clap::{App, Arg};
use rand;
use trust_dns::op::{Message, MessageType, OpCode, Query};
use trust_dns::rr::domain::Name;
use trust_dns::rr::record_type::RecordType;
use trust_dns::serialize::binary::*;

fn main() {
  let app = App::new("resolve")
    .about("A simple to use DNS resolver")
    .arg(Arg::with_name("dns-server").short("s").default_value("1.1.1.1"))
    .arg(Arg::with_name("domain-name").required(true))
    .get_matches();

  let domain_name_raw = app.value_of("domain-name").unwrap(); // 把命令行参数转换为一个有类型的域名。
  let domain_name = Name::from_ascii(&domain_name_raw).unwrap();

  let dns_server_raw = app.value_of("dns-server").unwrap();
  let dns_server: SocketAddr = format!("{}:53", dns_server_raw).parse().expect("invalid address"); // 把命令行参数转换为一个有类型的DNS服务器。

  let mut request_as_bytes: Vec<u8> = Vec::with_capacity(512); // 在此清单的后面,解释了为什么要使用两种初始化形式。
  let mut response_as_bytes: Vec<u8> = vec![0; 512];

  let mut msg = Message::new(); // Message表示一个DNS报文,它是一个容器,可以用于保存查询,也可以保存其他信息,例如应答。
  msg
    .set_id(rand::random::<u16>())
    .set_message_type(MessageType::Query) // 在这里指定了这是一个DNS查询,而不是DNS应答。在通过网络传输时,这两者具有相同的表示形式,但在Rust的类型系统中则是不同的。
    .add_query(Query::query(domain_name, RecordType::A))
    .set_op_code(OpCode::Query)
    .set_recursion_desired(true);

  let mut encoder = BinEncoder::new(&mut request_as_bytes); // 使用BinEncoder把这个Message类型转换为原始字节。
  msg.emit(&mut encoder).unwrap();

  let localhost = UdpSocket::bind("0.0.0.0:0").expect("cannot bind to local socket"); // 0.0.0.0:0表示在一个随机的端口号上监听所有的地址,实际的端口号将由操作系统来分配。
  let timeout = Duration::from_secs(3);
  localhost.set_read_timeout(Some(timeout)).unwrap();
  localhost.set_nonblocking(false).unwrap();

  let _amt = localhost
    .send_to(&request_as_bytes, dns_server)
    .expect("socket misconfigured");

  let (_amt, _remote) = localhost.recv_from(&mut response_as_bytes).expect("timeout reached");

  let dns_message = Message::from_vec(&response_as_bytes).expect("unable to parse response");

  for answer in dns_message.answers() {
    if answer.record_type() == RecordType::A {
      let resource = answer.rdata();
      let ip = resource.to_ip_addr().expect("invalid IP address received");
      println!("{}", ip.to_string());
    }
  }
}


// code result:
y% cargo run - --help
    Finished dev [unoptimized + debuginfo] target(s) in 0.03s
     Running `target/debug/resolve - --help`
resolve
A simple to use DNS resolver

USAGE:
    resolve [OPTIONS] <domain-name>

FLAGS:
    -h, --help       Prints help information
    -V, --version    Prints version information

OPTIONS:
    -s <dns-server>         [default: 1.1.1.1]

ARGS:
    <domain-name>
8.5 用 Result 处理错误
单个错误如下:
y% cat io-error.rs
use std::fs::File;

fn main() -> Result<(), std::io::Error> {
    let _f = File::open("invisible.txt")?;

    Ok(())
}%
y% rustc io-error.rs
y% ls
io-error  io-error.rs
y% ./io-error
Error: Os { code: 2, kind: NotFound, message: "No such file or directory" }
多个错误如下:
y% cat multierror.rs
use std::fs::File;
use std::net::Ipv6Addr;

fn main() -> Result<(), std::io::Error> {
  let _f = File::open("invisible.txt")?;

  let _localhost = "::1".parse::<Ipv6Addr>()?;

  Ok(())
}

y% rustc multierror.rs && ./multierror
error[E0277]: `?` couldn't convert the error to `std::io::Error`
 --> multierror.rs:8:25
  |
4 | fn main() -> Result<(), std::io::Error> {
  |              -------------------------- expected `std::io::Error` because of this
...
8 |     .parse::<Ipv6Addr>()?;
  |                         ^ the trait `From<AddrParseError>` is not implemented for `std::io::Error`
  |
  = note: the question mark operation (`?`) implicitly performs a conversion on the error value using the `From` trait
  = help: the following other types implement trait `From<T>`:
            <std::io::Error as From<ErrorKind>>
            <std::io::Error as From<IntoInnerError<W>>>
            <std::io::Error as From<NulError>>
  = note: required for `Result<(), std::io::Error>` to implement `FromResidual<Result<Infallible, AddrParseError>>`

error: aborting due to previous error

For more information about this error, try `rustc --explain E0277`.

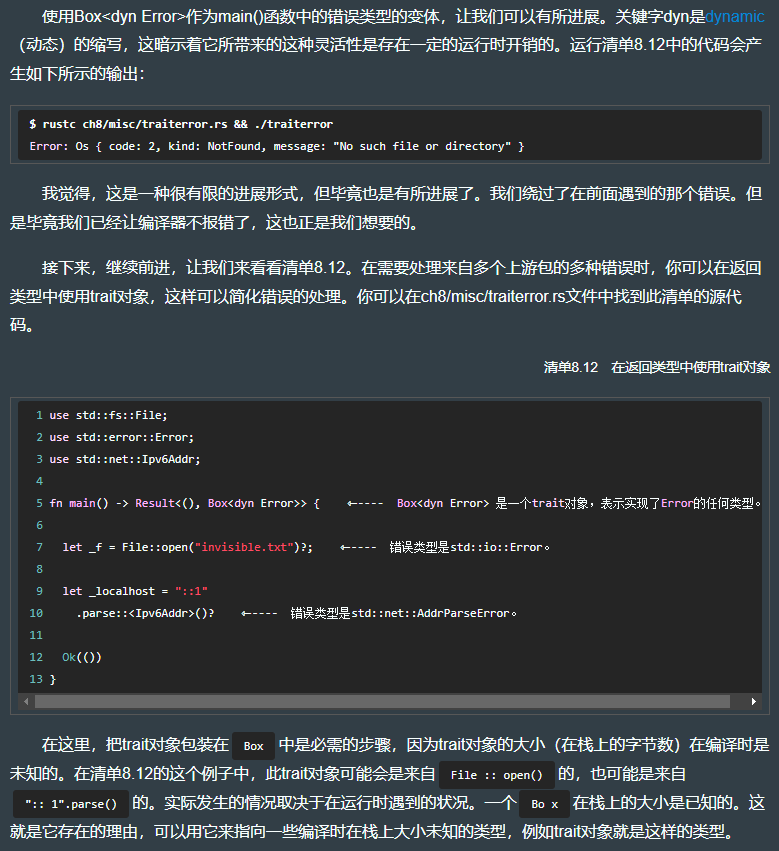
y% cat traiterror.rs
use std::fs::File;
use std::error::Error;
use std::net::Ipv6Addr;
fn main() -> Result<(), Box<dyn Error>> {
    let _f = File::open("invisible.txt")?;
    let _localhost = "::1".parse::<Ipv6Addr>()?;

    Ok(())
}

// code result:
y% rustc traiterror.rs && ./traiterror
Error: Os { code: 2, kind: NotFound, message: "No such file or directory" }
8.5.2 自定义错误类型,包装下游的错误
use std::io;
use std::fmt;
use std::net;
use std::fs::File;
use std::net::Ipv6Addr;

#[derive(Debug)]
enum UpstreamError{
  IO(io::Error), 				// 函数
  Parsing(net::AddrParseError), // 函数
}

impl fmt::Display for UpstreamError {
    fn fmt(&self, f: &mut fmt::Formatter<'_>) -> fmt::Result {
        write!(f, "{:?}", self) // 借用debug trait实现了display trait
    }
}

fn main() -> Result<(), UpstreamError> {
	// map_err()函数可以把一个错误映射到一个函数中
    let _f = File::open("invisible.txt").map_err(UpstreamError::IO)?;
    let _localhost = "::1".parse::<Ipv6Addr>().map_err(UpstreamError::Parsing)?;

    Ok(())
}

// code result:
Error: IO(Os { code: 2, kind: NotFound, message: "No such file or directory" })
也可以实现 std::convert::From,这样就不用再调用 map_err() 了,代码如下:
use std::io;
use std::fmt;
use std::net;
use std::fs::File;
use std::net::Ipv6Addr;

#[derive(Debug)]
enum UpstreamError{
  IO(io::Error),
  Parsing(net::AddrParseError),
}

impl fmt::Display for UpstreamError {
    fn fmt(&self, f: &mut fmt::Formatter<'_>) -> fmt::Result {
        write!(f, "{:?}", self) // <1> Implement Display in terms of Debug
    }
}

impl From<io::Error> for UpstreamError {
    fn from(error: io::Error) -> Self {
        UpstreamError::IO(error)
    }
}

impl From<net::AddrParseError> for UpstreamError {
    fn from(error: net::AddrParseError) -> Self {
        UpstreamError::Parsing(error)
    }
}

fn main() -> Result<(), UpstreamError> {
    let _f = File::open("invisible.txt").map_err(UpstreamError::IO)?;
    let _localhost = "::1".parse::<Ipv6Addr>().map_err(UpstreamError::Parsing)?;

    Ok(())
}

// code result:
Error: IO(Os { code: 2, kind: NotFound, message: "No such file or directory" })
当然也可用 unwrap() 和 expect() 处理错误。
8.6 MAC 地址
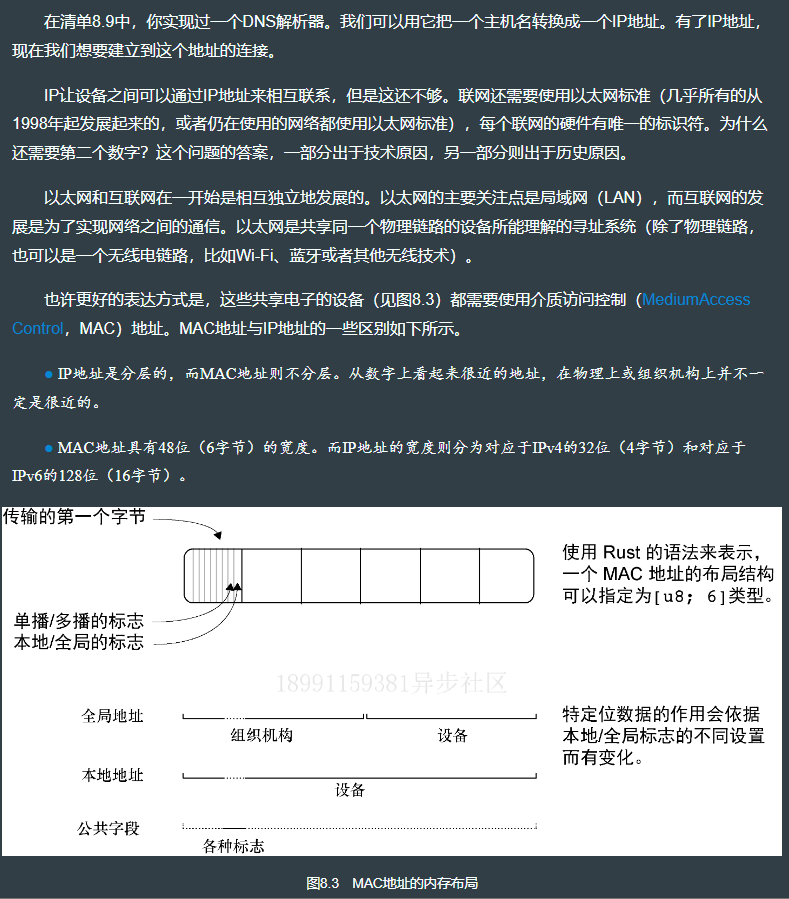
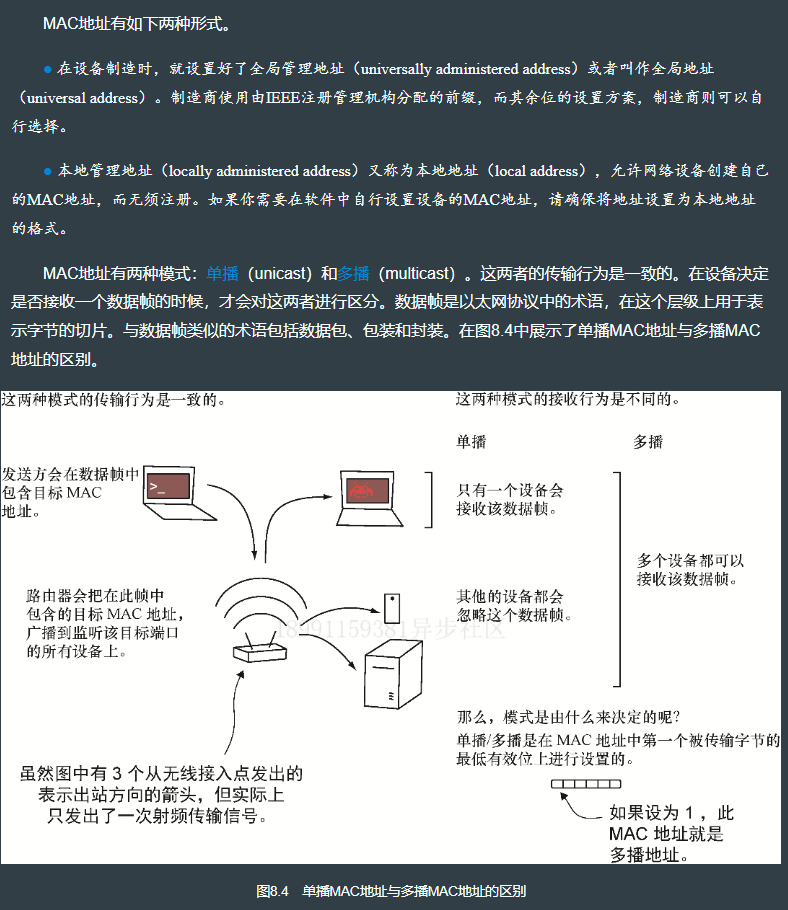

8.6.1 生成 MAC 地址
extern crate rand;

use rand::RngCore;
use std::fmt;
use std::fmt::Display;

#[derive(Debug)]
struct MacAddress([u8; 6]); // 使用newtype(新类型)模式包装一个数组,没有任何额外的开销

impl Display for MacAddress {
  fn fmt(&self, f: &mut fmt::Formatter<'_>) -> fmt::Result {
    let octet = &self.0;
    write!(
      f,
      "{:02x}:{:02x}:{:02x}:{:02x}:{:02x}:{:02x}", // 把每个字节都转换为十六进制的表示形式
      octet[0],octet[1],octet[2],octet[3],octet[4],octet[5]
    )
  }
}

impl MacAddress {
  fn new() -> MacAddress {
    let mut octets: [u8; 6] = [0; 6];
    rand::thread_rng().fill_bytes(&mut octets);
    octets[0] |= 0b_0000_0011; // 把MAC地址设置为本地分配和单播的模式
    MacAddress { 0: octets }
  }

  fn is_local(&self) -> bool {
    (self.0[0] & 0b_0000_0010) == 0b_0000_0010
  }

  fn is_unicast(&self) -> bool {
    (self.0[0] & 0b_0000_0001) == 0b_0000_0001
  }
}

fn main() {
  let mac = MacAddress::new();
  assert!(mac.is_local());
  assert!(mac.is_unicast());
  println!("mac: {}", mac);
}
8.7 用 enum 实现状态机
enum HttpState {
    Connect,
    Request,
    Response,
}

loop {
    state = match state {
        HttpState::Connect if !socket.is_active() => {
            socket.connect();
            HttpState::Request
        }

        HttpState::Request if socket.may_send() => {
            socket.send(data);
            HttpState::Response
        }

        HttpState::Response if socket.can_recv() => {
            received = socket.recv();
            HttpState::Response
        }

        HttpState::Response if !socket.may_recv() => {
            break;
        }
        _ => state,
    }
}
8.9 创建一个虚拟网络设备
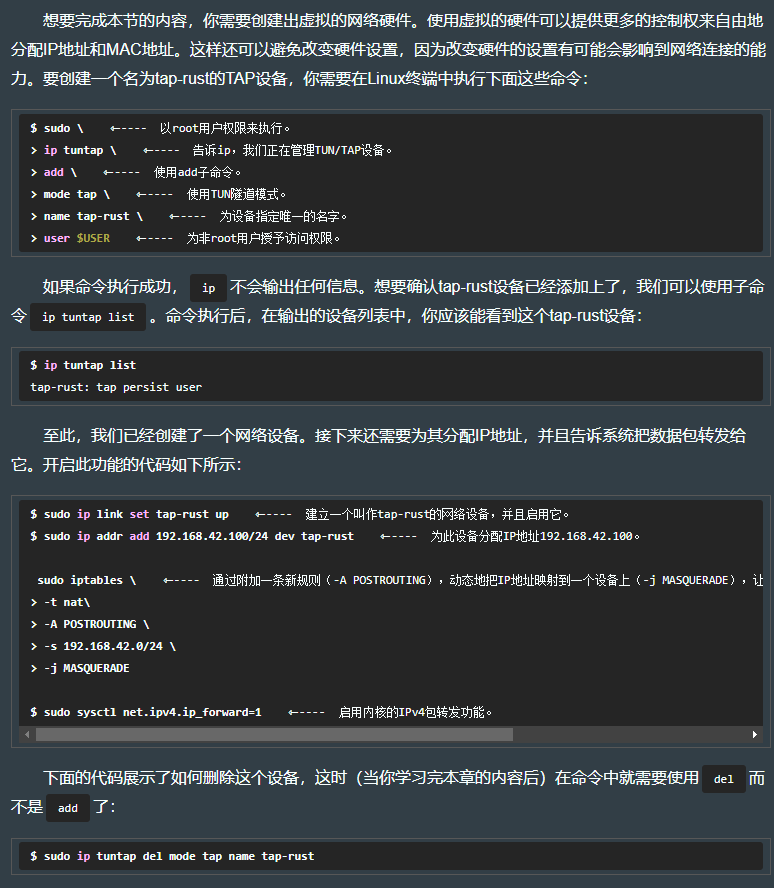
操作过程如下:

8.10 原始 HTTP
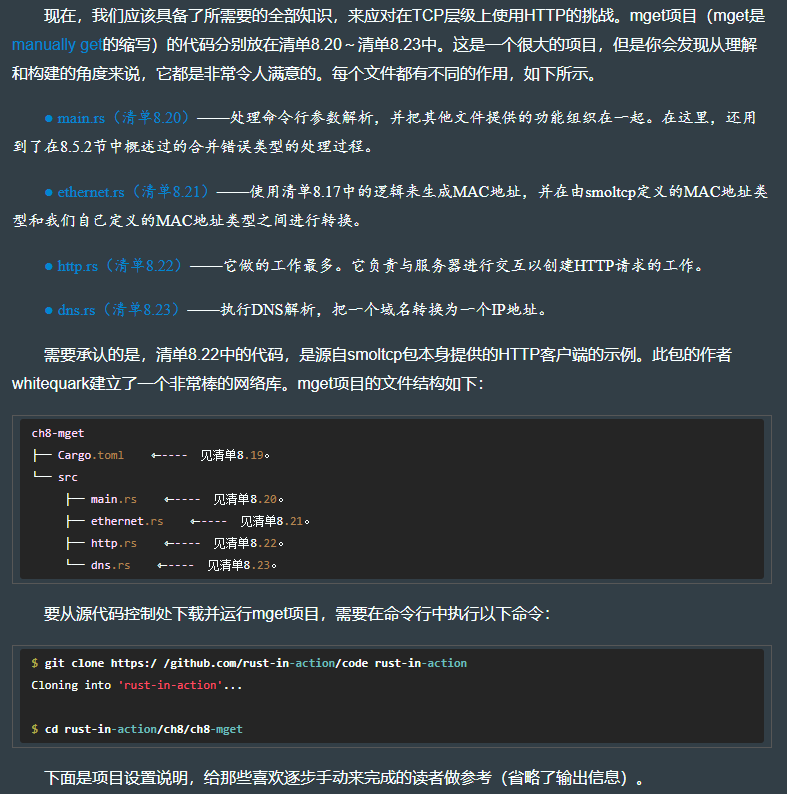
$ cargo new mget
$ cd mget
$ cargo install cargo-edit
$ cargo add clap@2
$ cargo add url@02
$ cargo add rand@0.7
$ cargo add trust-dns@0.16 --no-default-features
$ cargo add smoltcp@0.6 --features='proto-igmp proto-ipv4 verbose log'
Cargo.toml 如下:
[package]
name = "mget"
version = "0.1.0"
authors = ["Tim McNamara <author@rustinaction.com>"]
edition = "2018"

[dependencies]
clap = "2"    	# 提供命令行参数解析的功能。
rand = "0.7"    # 用来选择一个随机的端口号。
smoltcp = {    	# 提供了一个TCP的实现。
  version = "0.6",
  features = ["proto-igmp", "proto-ipv4", "verbose", "log"]
}
trust-dns = {   # 允许连接到DNS服务器。
  version = "0.16",
  default-features = false
}
url = "2"    	# 用于URL的解析和验证。
九、时间 和 NTP
#[cfg(windows)]
use kernel32;
#[cfg(not(windows))]
use libc;
#[cfg(windows)]
use winapi;
use byteorder::{BigEndian, ReadBytesExt};
use chrono::{
DateTime, Duration as ChronoDuration, TimeZone, Timelike,
};
use chrono::{Local, Utc};
use clap::{App, Arg};
use std::mem::zeroed;
use std::net::UdpSocket;
use std::time::Duration;
const NTP_MESSAGE_LENGTH: usize = 48; <1>
const NTP_TO_UNIX_SECONDS: i64 = 2_208_988_800;
const LOCAL_ADDR: &'static str = "0.0.0.0:12300"; <2>
#[derive(Default, Debug, Copy, Clone)]
struct NTPTimestamp {
seconds: u32,
fraction: u32,
}
struct NTPMessage {
data: [u8; NTP_MESSAGE_LENGTH],
}
#[derive(Debug)]
struct NTPResult {
t1: DateTime<Utc>,
t2: DateTime<Utc>,
t3: DateTime<Utc>,
t4: DateTime<Utc>,
}
impl NTPResult {
fn offset(&self) -> i64 {
let delta = self.delay();
delta.abs() / 2
}
fn delay(&self) -> i64 {
let duration = (self.t4 - self.t1) - (self.t3 - self.t2);
duration.num_milliseconds()
}
}
impl From<NTPTimestamp> for DateTime<Utc> {
fn from(ntp: NTPTimestamp) -> Self {
let secs = ntp.seconds as i64 - NTP_TO_UNIX_SECONDS;
let mut nanos = ntp.fraction as f64;
nanos *= 1e9;
nanos /= 2_f64.powi(32);
Utc.timestamp(secs, nanos as u32)
}
}
impl From<DateTime<Utc>> for NTPTimestamp {
fn from(utc: DateTime<Utc>) -> Self {
let secs = utc.timestamp() + NTP_TO_UNIX_SECONDS;
let mut fraction = utc.nanosecond() as f64;
fraction *= 2_f64.powi(32);
fraction /= 1e9;
NTPTimestamp {
seconds: secs as u32,
fraction: fraction as u32,
}
}
}
impl NTPMessage {
fn new() -> Self {
NTPMessage {
data: [0; NTP_MESSAGE_LENGTH],
}
}
fn client() -> Self {
const VERSION: u8 = 0b00_011_000; <3>
const MODE: u8 = 0b00_000_011; <3>
let mut msg = NTPMessage::new();
msg.data[0] |= VERSION; <4>
msg.data[0] |= MODE; <4>
msg <5>
}
fn parse_timestamp(
&self,
i: usize,
) -> Result<NTPTimestamp, std::io::Error> {
let mut reader = &self.data[i..i + 8]; <6>
let seconds = reader.read_u32::<BigEndian>()?;
let fraction = reader.read_u32::<BigEndian>()?;
Ok(NTPTimestamp {
seconds: seconds,
fraction: fraction,
})
}
fn rx_time(
&self
) -> Result<NTPTimestamp, std::io::Error> { <7>
self.parse_timestamp(32)
}
fn tx_time(
&self
) -> Result<NTPTimestamp, std::io::Error> { <8>
self.parse_timestamp(40)
}
}
fn weighted_mean(values: &[f64], weights: &[f64]) -> f64 {
let mut result = 0.0;
let mut sum_of_weights = 0.0;
for (v, w) in values.iter().zip(weights) {
result += v * w;
sum_of_weights += w;
}
result / sum_of_weights
}
fn ntp_roundtrip(
host: &str,
port: u16,
) -> Result<NTPResult, std::io::Error> {
let destination = format!("{}:{}", host, port);
let timeout = Duration::from_secs(1);
let request = NTPMessage::client();
let mut response = NTPMessage::new();
let message = request.data;
let udp = UdpSocket::bind(LOCAL_ADDR)?;
udp.connect(&destination).expect("unable to connect");
let t1 = Utc::now();
udp.send(&message)?;
udp.set_read_timeout(Some(timeout))?;
udp.recv_from(&mut response.data)?;
let t4 = Utc::now();
let t2: DateTime<Utc> =
response
.rx_time()
.unwrap()
.into();
let t3: DateTime<Utc> =
response
.tx_time()
.unwrap()
.into();
Ok(NTPResult {
t1: t1,
t2: t2,
t3: t3,
t4: t4,
})
}
fn check_time() -> Result<f64, std::io::Error> {
const NTP_PORT: u16 = 123;
let servers = [
"time.nist.gov",
"time.apple.com",
"time.euro.apple.com",
"time.google.com",
"time2.google.com",
//"time.windows.com",
];
let mut times = Vec::with_capacity(servers.len());
for &server in servers.iter() {
print!("{} =>", server);
let calc = ntp_roundtrip(&server, NTP_PORT);
match calc {
Ok(time) => {
println!(" {}ms away from local system time", time.offset());
times.push(time);
}
Err(_) => {
println!(" ? [response took too long]")
}
};
}
let mut offsets = Vec::with_capacity(servers.len());
let mut offset_weights = Vec::with_capacity(servers.len());
for time in × {
let offset = time.offset() as f64;
let delay = time.delay() as f64;
let weight = 1_000_000.0 / (delay * delay);
if weight.is_finite() {
offsets.push(offset);
offset_weights.push(weight);
}
}
let avg_offset = weighted_mean(&offsets, &offset_weights);
Ok(avg_offset)
}
struct Clock;
impl Clock {
fn get() -> DateTime<Local> {
Local::now()
}
#[cfg(windows)]
fn set<Tz: TimeZone>(t: DateTime<Tz>) -> () {
use chrono::Weekday;
use kernel32::SetSystemTime;
use winapi::{SYSTEMTIME, WORD};
let t = t.with_timezone(&Local);
let mut systime: SYSTEMTIME = unsafe { zeroed() };
let dow = match t.weekday() {
Weekday::Mon => 1,
Weekday::Tue => 2,
Weekday::Wed => 3,
Weekday::Thu => 4,
Weekday::Fri => 5,
Weekday::Sat => 6,
Weekday::Sun => 0,
};
let mut ns = t.nanosecond();
let is_leap_second = ns > 1_000_000_000;
if is_leap_second {
ns -= 1_000_000_000;
}
systime.wYear = t.year() as WORD;
systime.wMonth = t.month() as WORD;
systime.wDayOfWeek = dow as WORD;
systime.wDay = t.day() as WORD;
systime.wHour = t.hour() as WORD;
systime.wMinute = t.minute() as WORD;
systime.wSecond = t.second() as WORD;
systime.wMilliseconds = (ns / 1_000_000) as WORD;
let systime_ptr = &systime as *const SYSTEMTIME;
unsafe {
SetSystemTime(systime_ptr);
}
}
#[cfg(not(windows))]
fn set<Tz: TimeZone>(t: DateTime<Tz>) -> () {
use libc::settimeofday;
use libc::{suseconds_t, time_t, timeval, timezone};
let t = t.with_timezone(&Local);
let mut u: timeval = unsafe { zeroed() };
u.tv_sec = t.timestamp() as time_t;
u.tv_usec = t.timestamp_subsec_micros() as suseconds_t;
unsafe {
let mock_tz: *const timezone = std::ptr::null();
settimeofday(&u as *const timeval, mock_tz);
}
}
}
fn main() {
let app = App::new("clock")
.version("0.1.3")
.about("Gets and sets the time.")
.after_help(
"Note: UNIX timestamps are parsed as whole seconds since 1st \
January 1970 0:00:00 UTC. For more accuracy, use another \
format.",
)
.arg(
Arg::with_name("action")
.takes_value(true)
.possible_values(&["get", "set", "check-ntp"])
.default_value("get"),
)
.arg(
Arg::with_name("std")
.short("s")
.long("use-standard")
.takes_value(true)
.possible_values(&["rfc2822", "rfc3339", "timestamp"])
.default_value("rfc3339"),
)
.arg(Arg::with_name("datetime").help(
"When <action> is 'set', apply <datetime>. Otherwise, ignore.",
));
let args = app.get_matches();
let action = args.value_of("action").unwrap();
let std = args.value_of("std").unwrap();
if action == "set" {
let t_ = args.value_of("datetime").unwrap();
let parser = match std {
"rfc2822" => DateTime::parse_from_rfc2822,
"rfc3339" => DateTime::parse_from_rfc3339,
_ => unimplemented!(),
};
let err_msg =
format!("Unable to parse {} according to {}", t_, std);
let t = parser(t_).expect(&err_msg);
Clock::set(t);
} else if action == "check-ntp" {
let offset = check_time().unwrap() as isize;
let adjust_ms_ = offset.signum() * offset.abs().min(200) / 5;
let adjust_ms = ChronoDuration::milliseconds(adjust_ms_ as i64);
let now: DateTime<Utc> = Utc::now() + adjust_ms;
Clock::set(now);
}
let maybe_error =
std::io::Error::last_os_error();
let os_error_code =
&maybe_error.raw_os_error();
match os_error_code {
Some(0) => (),
Some(_) => eprintln!("Unable to set the time: {:?}", maybe_error),
None => (),
}
let now = Clock::get();
match std {
"timestamp" => println!("{}", now.timestamp()),
"rfc2822" => println!("{}", now.to_rfc2822()),
"rfc3339" => println!("{}", now.to_rfc3339()),
_ => unreachable!(),
}
}
十、进程、线程、容器
10.2 线程
10.2.1 闭包
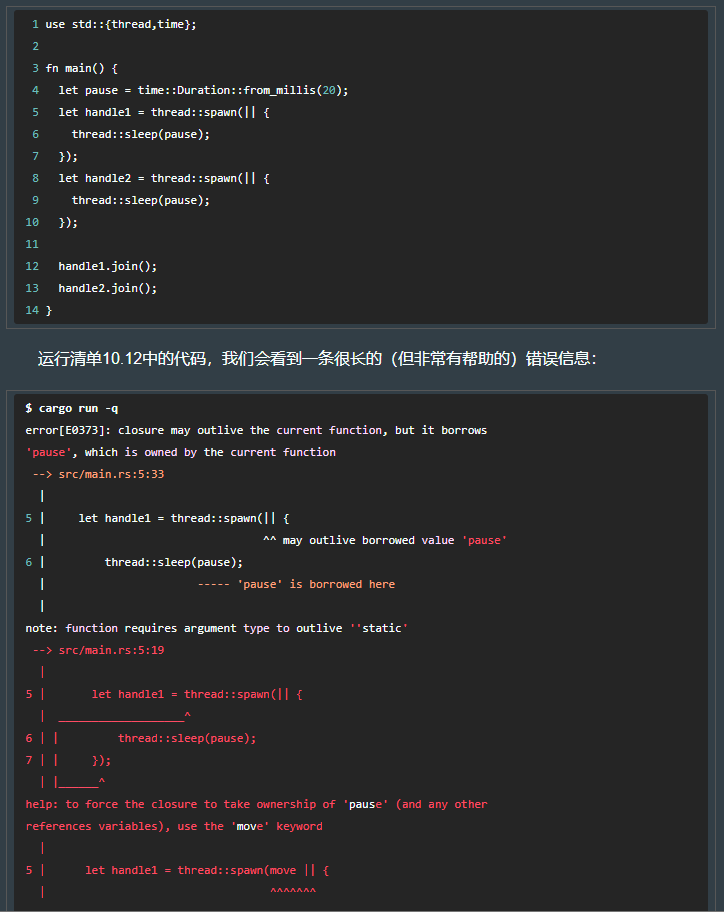
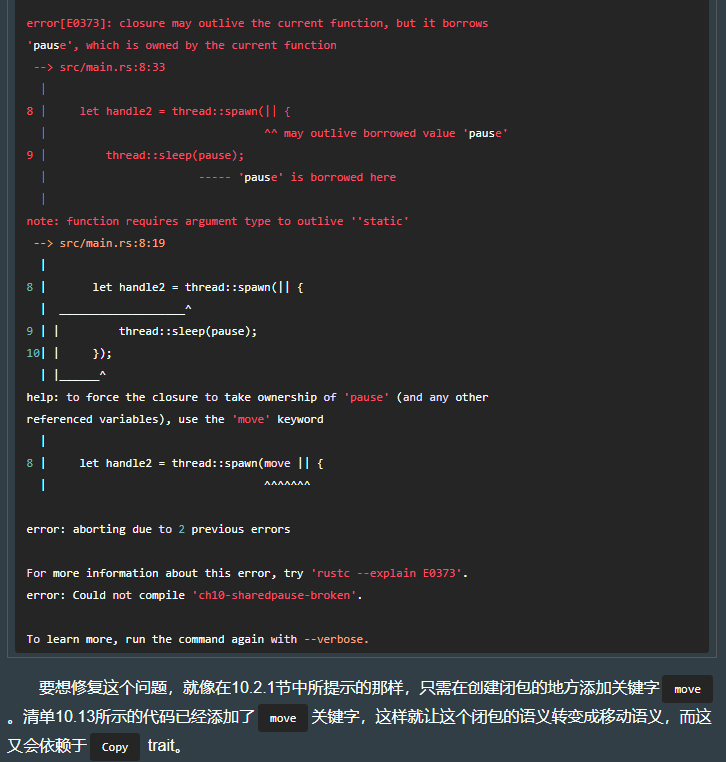
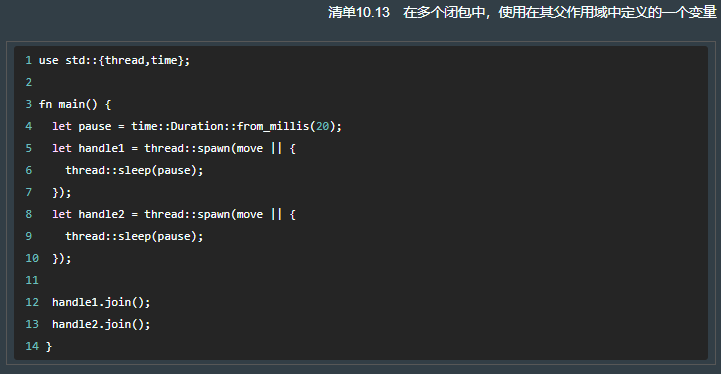
如果要【捕获】父级作用域的变量,需用 move 移动所有权(因为 rust 总是要保证访问的数据是有效的,故需将相应数据的所有权移动到闭包里)。
- 如果想避免编译时的一些问题,也可以用 copy。
- 来自外部作用域的值,可能需要静态生命周期。
- 子线程可能会比父线程活的更久,故需用 move 将所有权转义到子线程中。
thread::spawn(move || {
	// ...
});
10.2.2 产生线程
一个简单的任务,让 CPU 休眠 300ms,如果你有一个 3GHz 的 CPU,这意味着会让程序休息 10亿个 CPU 周期,休息时这些电子会非常放松。
use std::{thread, time};

fn main() {
  let start = time::Instant::now();

  let handler = thread::spawn(|| {
    let pause = time::Duration::from_millis(300);
    thread::sleep(pause.clone());
  });

  handler.join().unwrap();

  let finish = time::Instant::now();
  println!("{:02?}", finish.duration_since(start));
}
// code result:
300.490649ms
join(连接)是线程隐喻的一个引申。当产生新线程的时候,这些线程被认为是从它们的父线程中复刻(forked)出来的。连接这些线(线程)的意思是把这些线(线程)重新编织在一起。而在实际的操作中,join的意思是等待另一个线程结束工作。join()函数会指示操作系统推迟对正在调用的线程的调度,直到另一个线程完成工作为止。
10.2.3 产生线程的效果
如下例,创建两个线程和创建一个线程的时间差不多。
use std::{thread, time};

fn main() {
  let start = time::Instant::now();

  let handler_1 = thread::spawn(move || {
    let pause = time::Duration::from_millis(300);
    thread::sleep(pause.clone());
  });

  let handler_2 = thread::spawn(move || {
    let pause = time::Duration::from_millis(300);
    thread::sleep(pause.clone());
  });

  handler_1.join().unwrap();
  handler_2.join().unwrap();

  let finish = time::Instant::now();
  println!("{:02?}", finish.duration_since(start));
}

// code result:
300.234848ms
如果你接触过这个领域,那么可能听说过“线程不能扩展”(threads don’t scale)这句话。这又是什么意思呢?
每个线程都需要有自己的内存,言下之意就是,(如果我们创建了非常多的新线程)我们最终会耗尽系统的内存。不过,在还没有出现这种终极状况之前,新线程的创建就已经开始让其他一些方面的性能降低了。随着需要调度的线程数量的增加,操作系统调度器的工作量也在增加。当存在很多线程需要调度时,要决定下一个应该调度的是哪个线程,这个决定的过程也相应地会花费更多的时间。
10.2.4 产生很多个线程的效果
产生新线程并不是没有成本的。这个过程是需要消耗内存资源和CPU时间的,而且线程间的切换还会让缓存失效。
图10.1展示了清单10.4连续运行很多次以后所产生的数据。可以看到,当每个批次所产生的线程数大致低于400个时,多次运行的变化量相对还是较小的。但是从这个点往后看,你几乎没法确定一个20ms的休眠究竟会花费多长时间。


10.2.5 重新生成这些结果
现在我们已经看到线程的效果了,接下来让我们来看一看产生图10.1和图10.2所示的输入数据的代码。欢迎你来重新生成这些结果。要想重新生成这些结果,就需要把清单10.4和清单10.5的输出信息分别写到两个文件中,然后对这些结果数据进行分析。
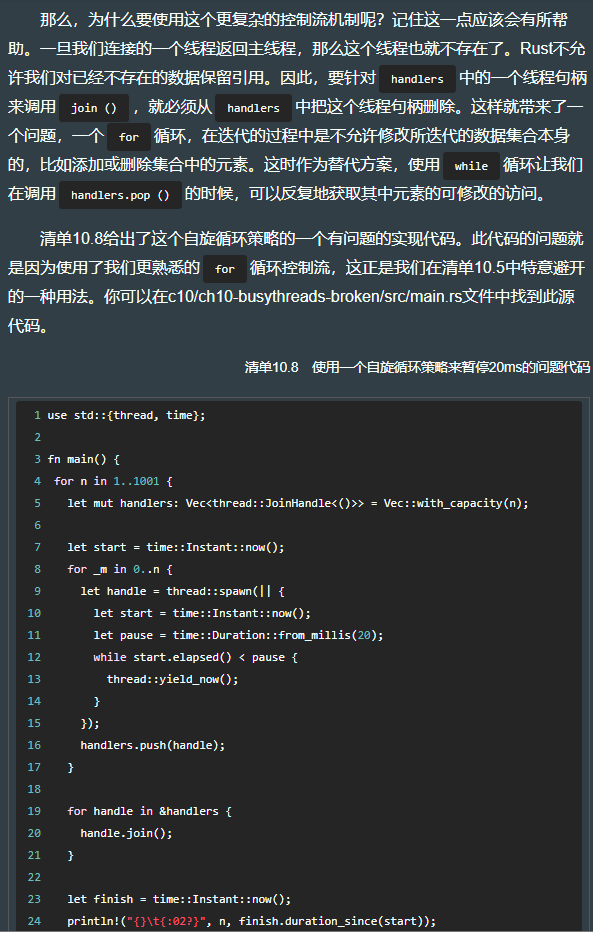
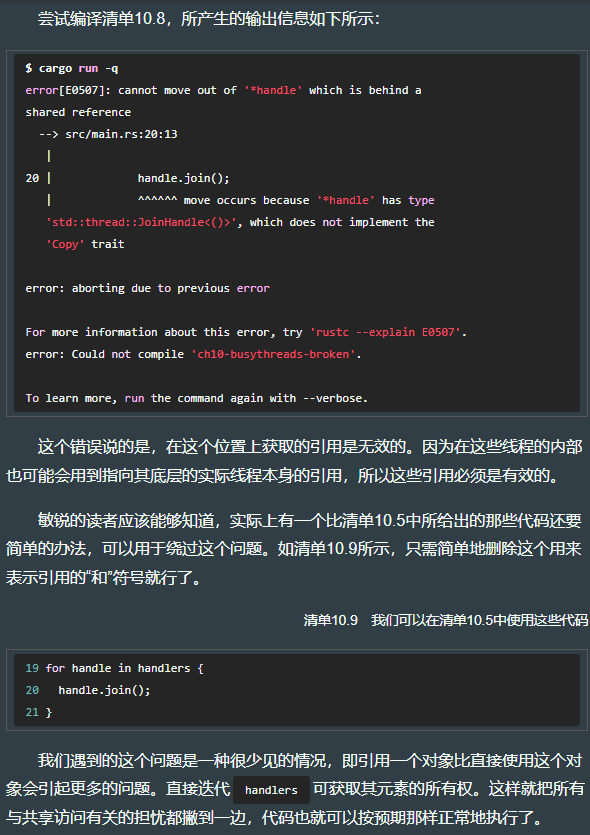
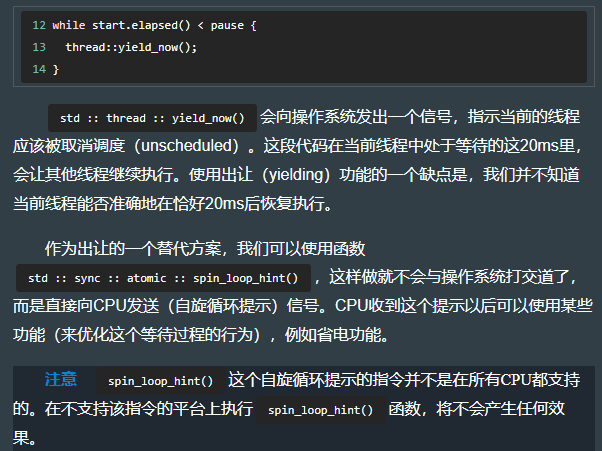
清单10.4展示了使用休眠来让线程暂停20ms的代码,此源代码保存在c10/ch10- multijoinlsrc/main.rs文件中。sleep(休眠)会向操作系统发出一个请求,让线程暂停执行,直到休眠的时间结束为止。清单10.5展示了使用忙等待(busy waiting,也叫作忙循环或者自旋循环)策略来暂停20ms的代码,此源代码保存在c10/ch10-busythreads/src/main.rs文件中。
use std::{thread, time};

fn main() {
  for n in 1..1001 {
    let mut handlers: Vec<thread::JoinHandle<()>> = Vec::with_capacity(n);

    let start = time::Instant::now();
    for _m in 0..n {
      let handle = thread::spawn(|| {
        let pause = time::Duration::from_millis(20);
        thread::sleep(pause);
      });
      handlers.push(handle);
    }

    while let Some(handle) = handlers.pop() {
      handle.join();
    }

    let finish = time::Instant::now();
    if n % 50 == 1 {
      println!("{}\t{:02?}", n, finish.duration_since(start));
    }
  }
}

// code result:
1       20.162059ms
51      21.044974ms
101     23.101888ms
151     23.18179ms
201     24.467632ms
251     25.155952ms
301     25.700023ms
351     26.790791ms
401     27.743707ms
451     28.589303ms
501     29.71202ms
use std::{thread, time};

fn main() {
  for n in 1..501 {
    let mut handlers: Vec<thread::JoinHandle<()>> = Vec::with_capacity(n);

    let start = time::Instant::now();
    for _m in 0..n {
      let handle = thread::spawn(|| {
        let start = time::Instant::now();
        let pause = time::Duration::from_millis(20);
        while start.elapsed() < pause {
          thread::yield_now();
        }
      });
      handlers.push(handle);
    }

    while let Some(handle) = handlers.pop() {
      handle.join();
    }

    let finish = time::Instant::now();
    if n % 50 == 1 {
      println!("{}\t{:02?}", n, finish.duration_since(start));
    }
  }
}

// code result:
1       20.130187ms
51      30.203125ms
101     39.237232ms
151     47.478327ms
201     61.974729ms
251     53.723767ms
301     49.225965ms
351     56.981376ms
401     139.46488ms
451     80.24628ms
10.2.6 共享的变量
10.3 闭包
10.4 多线程解析器、头像生成器
10.4.1 render-hex 运行效果
y% echo 'Rust in Action' | sha1sum | cut -f1 -d' '
5deaed72594aaa10edda990c5a5eed868ba8915e

cargo run 5deaed72594aaa10edda990c5a5eed868ba8915e

y% ls
5deaed72594aaa10edda990c5a5eed868ba8915e.svg  Cargo.lock  Cargo.toml  src  target

y% cat 5deaed72594aaa10edda990c5a5eed868ba8915e.svg
<svg height="400" style='style="outline: 5px solid #800000;"' viewBox="0 0 400 400" width="400" xmlns="http://www.w3.org/2000/svg">
<rect fill="#ffffff" height="400" width="400" x="0" y="0"/>
<path d="M200,200 L200,400 L200,400 L200,400 L200,400 L200,400 L200,400 L480,400 L120,400 L-80,400 L560,400 L40,400 L40,400 L40,400 L40,400 L40,360 L200,200 L200,200 L200,200 L200,200 L200,200 L200,560 L200,-160 L200,200 L200,200 L400,200 L400,200 L400,0 L400,0 L400,0 L400,0 L80,0 L-160,0 L520,0 L200,0 L200,0 L520,0 L-160,0 L240,0 L440,0 L200,0" fill="none" stroke="#2f2f2f" stroke-opacity="0.9" stroke-width="5"/>
<rect fill="#ffffff" fill-opacity="0.0" height="400" stroke="#cccccc" stroke-width="15" width="400" x="0" y="0"/>
</svg>%

10.5 并发和任务虚拟化

十一、内核
11.1 初级 os
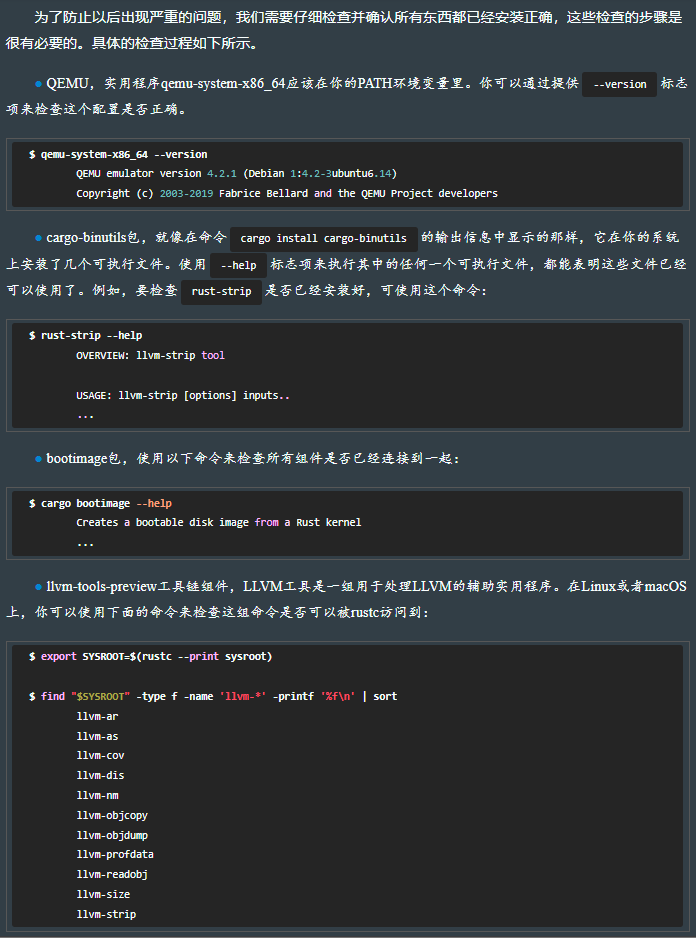
11.1.1 搭建开发环境
 $ apt-get install qemu # https://www.cnblogs.com/Rainingday/p/15068414.html
 $ sudo apt-get install qemu-system

 $ cargo install cargo-binutils
         ...
            Installed package 'cargo-binutils v0.3.3' (executables 'cargo-cov',
            'cargo-nm', 'cargo-objcopy', 'cargo-objdump', 'cargo-profdata',
            'cargo-readobj', 'cargo-size', 'cargo-strip', 'rust-ar', 'rust-cov',
            'rust-ld', 'rust-lld', 'rust-nm', 'rust-objcopy', 'rust-objdump',
            'rust-profdata', 'rust-readobj', 'rust-size', 'rust-strip')

 $ cargo install bootimage
         ...
            Installed package 'bootimage v0.10.3' (executables 'bootimage',
            'cargo-bootimage')

 $ rustup toolchain install nightly
         info: syncing channel updates for 'nightly-x86_64-unknown-linux-gnu'
         ...

 $ rustup default nightly
         info: using existing install for 'nightly-x86_64-unknown-linux-gnu'
         info: default toolchain set to 'nightly-x86_64-unknown-linux-gnu'
         ...

 $ rustup component add rust-src
         info: downloading component 'rust-src'
         ...

 $ rustup component add llvm-tools-preview    ⇽----  随着时间的推移,这可能会成为llvm-tools组件。
         info: downloading component 'llvm-tools-preview'
         ...
11.1.2 验证开发环境
11.2 第一次引导启动
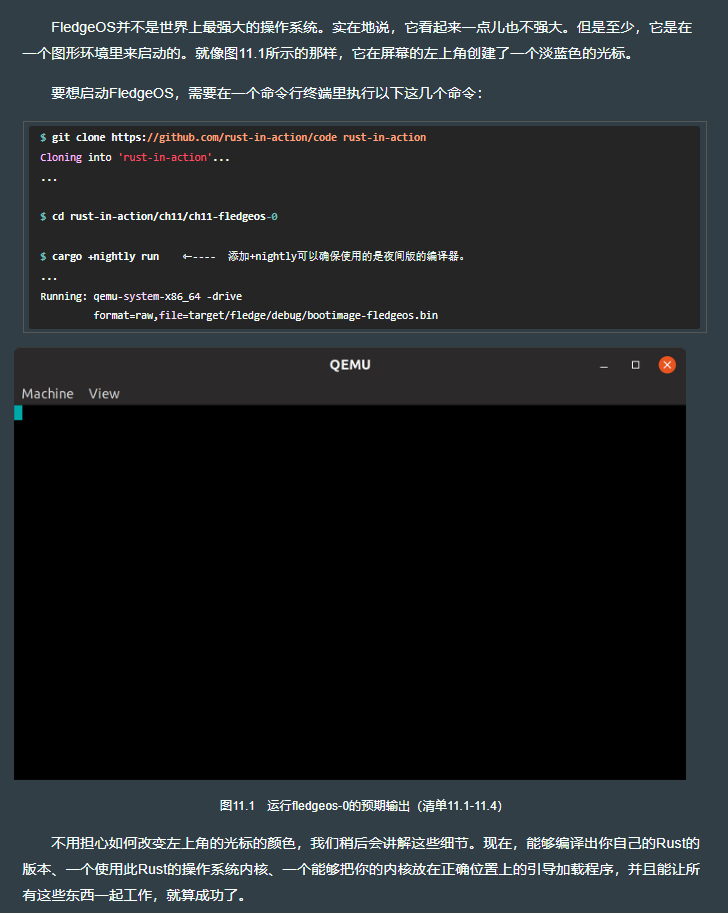
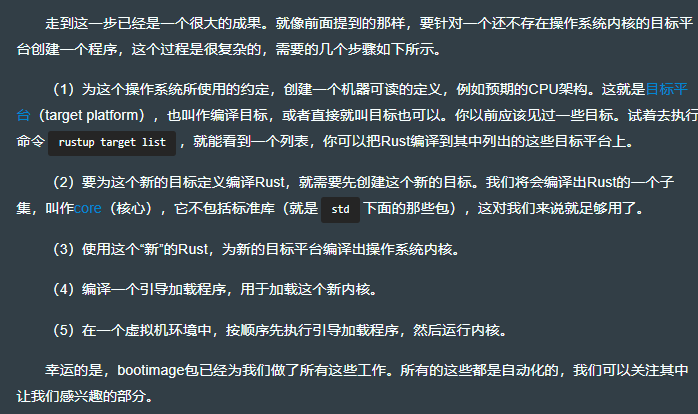
11.2.3 源清单
fledgeos-0
├── Cargo.toml    ⇽----  见清单11.1。
├── fledge.json    ⇽----  见清单11.2。
├── .cargo
│    └── config.toml    ⇽----  见清单11.3。
└── src
      └── main.rs    ⇽----  见清单11.4。
十二、信号、中断、异常

12.4 硬件中断

12.5 信号处理
12.5.1 默认的行为

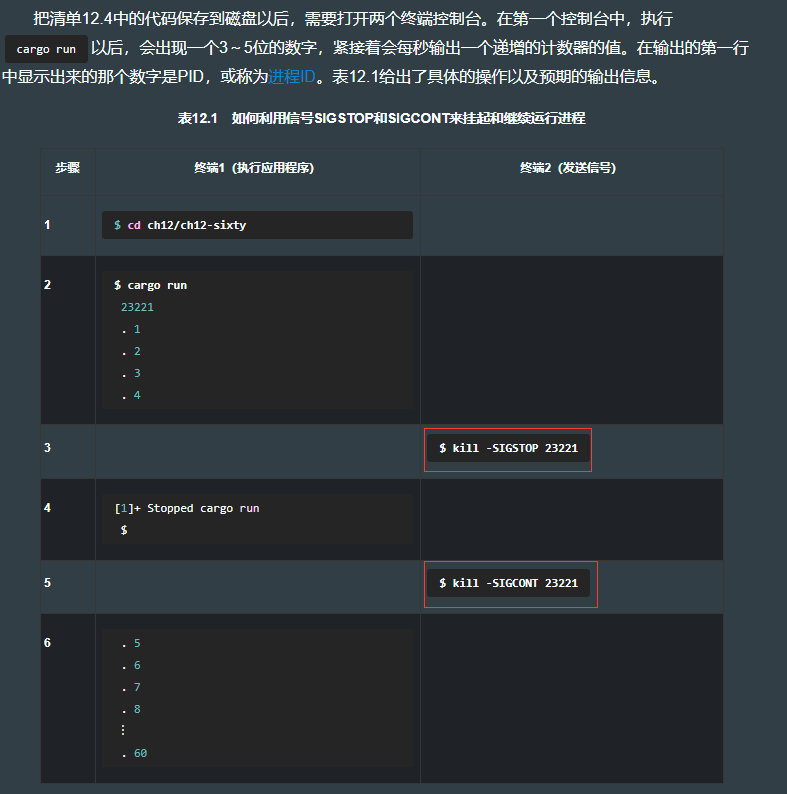
use std::process;
use std::thread::sleep;
use std::time;

fn main() {
  let delay = time::Duration::from_secs(1);

  let pid = process::id();
  println!("{}", pid);

  for i in 1..=60 {
    sleep(delay);
    println!(". {}", i);
  }
}
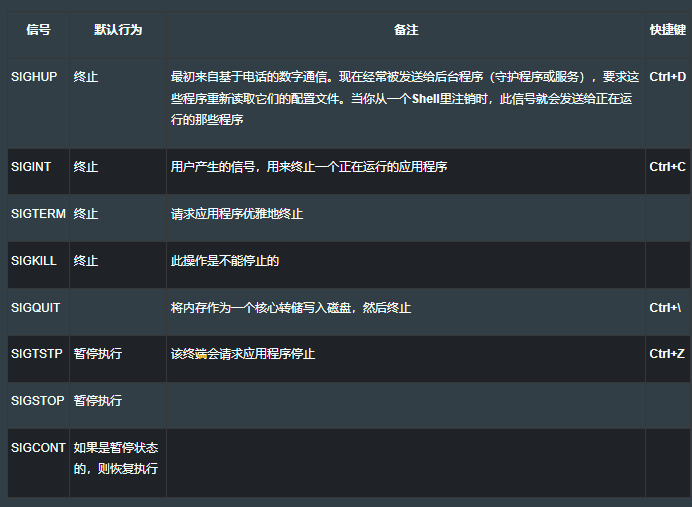
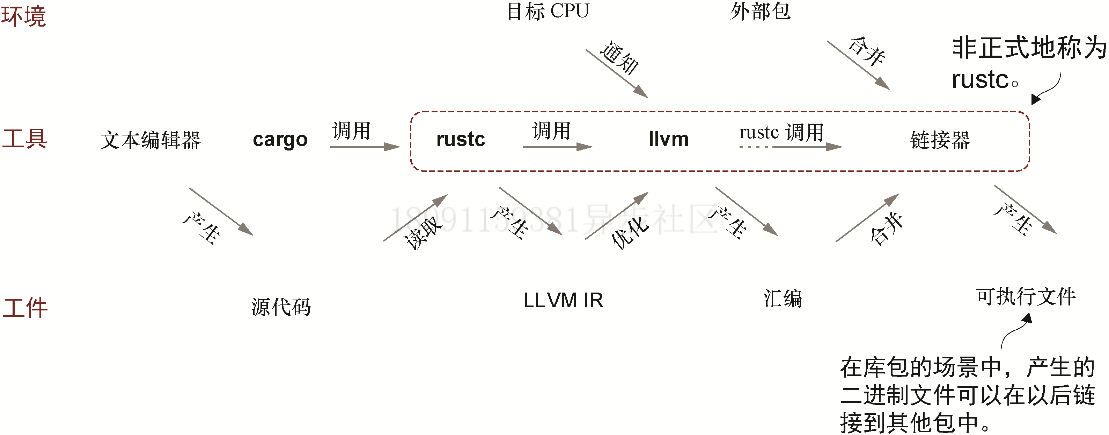
从Rust程序员的角度来看,LLVM可以看作Rust的编译器rustc的一个子组件。LLVM是与rustc捆绑在一起的一个外部工具。Rust程序员可以利用它提供的工具。在LLVM提供的这些工具中,有一组工具就是固有函数。LLVM自己就是一个编译器。它的作用如图12.6所示。
LLVM将rustc产生的代码,即LLVM IR(中间语言)转换为机器可读的汇编语言。更为复杂的是,必须要使用另外一种称为链接器的工具,把多个库拼接到一起。在Windows上,Rust使用的是一个由微软提供的程序link.exe来作为其链接器。在一些其他操作系统上,使用的是GNU的链接器1d。
