NIO 网络编程
代码已同步至GitCode:https://gitcode.net/ruozhuliufeng/java-project.git
Java NIO简介
IO概述
IO的操作方式通常分为几种:同步阻塞BIO、同步非阻塞NIO、异步非阻塞AIO。
(1)在JDK1.4之前,我们建立网络连接的时候采用的是BIO模式。
(2)Java NIO(New IO或者Non Blocking NIO)是从Java 1.4版本开始引入的一个新的IO API,可以替代标准的 Java IO API。NIO支持面向缓冲区的、基于通道的IO操作。NIO将以更加搞笑的方式进行文件的读写操作。BIO与NIO一个比较重要的不同是,我们使用BIO的时候往往会引入多线程,每个连接对应一个单独的线程;而NIO则是使用单线程或者只使用少量的线程,让连接共用一个线程。
(3)AIO也就是NIO 2,在Java 7中引入了NIO改进版 NIO 2,它是异步非阻塞的IO模型。
阻塞IO(BIO)
阻塞IO(BIO)是最传统的一种IO模型,即在读写数据过程中会发生阻塞现象,直至有可供读取的数据或者数据能够写入。
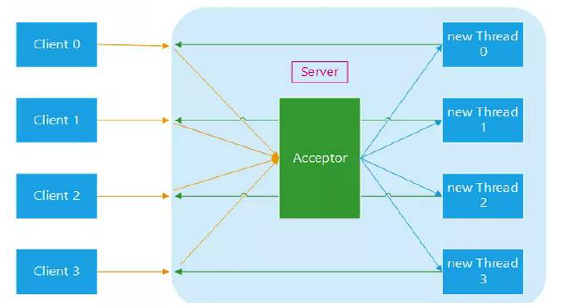
- 1、在BIO模式中,服务器会为每个客户端请求建立一个线程,由该线程单独负责处理一个客户请求,这种模式虽然简单方便,但由于服务器为每个客户端的连接都采用一个线程去处理,使得资源占用非常大。因此,当连接数量达到上限时,如果再有用户请求连接,直接回导致资源瓶颈,严重的可能会直接导致服务器崩溃。
- 2、大多数情况下为了避免上述问题,都采用了线程池模型。也就是创建一个固定大小的线程池,如果有客户端请求,就从线程池中取一个空闲线程来处理,当客户端处理完操作之后,就会释放对线程的占用。因此这样就避免为每一个客户端都要创建线程带来的资源浪费,使得线程可以复用。单线程池也有它的弊端,如果链接大多是长连接,可能会导致在一段时间内,线程池中的线程都被占用,那么再有客户端请求链接时,由于没有空闲线程来处理,就会导致客户端连接失败。传统的BIO模式如下图所示:
非阻塞IO(NIO)
基于 BIO 的各种弊端,在JDK1.4 开始出现了高性能IO设计模式:非阻塞IO(NIO)。
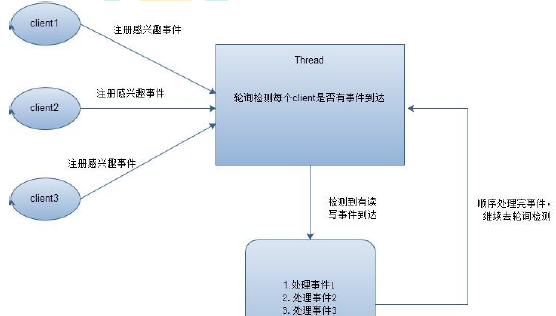
- 1、NIO采用非阻塞模式,基于Reactor模式的工作方式,IO调用不会被阻塞,它的实现过程是:会先对每个客户端注册感兴趣的事件,然后有一个线程专门去轮询每个客户端是否有事件发生,当有事件发生时,变顺序处理每个事件,当所有事件处理完之后,便再转去继续轮询。如下图所示:
- 2、NIO实现非阻塞IO的核心对象就是Selector,Selector就是注册各种IO事件的地方,而且当我们感兴趣的事件发生时,就是这个对象告诉我们所发生的时间,如下图所示:
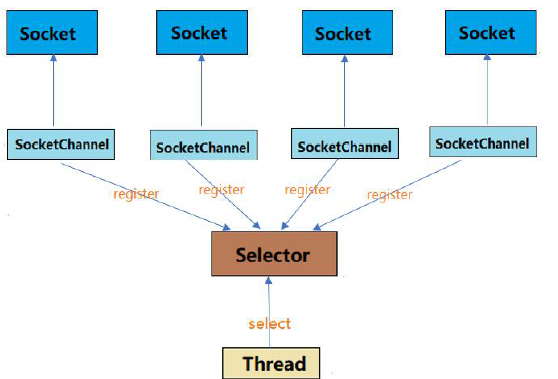
- 3、NIO的最重要的地方是当一个连接创建后,不需要对应一个线程,这个连接会被注册到多路复用器上面,一个选择器线程可以同时处理成千上万个连接,系统不必创建大量的线程,也不必维护这些线程,从而大大减小了系统的开销。
| IO | NIO |
|---|---|
| 面向流(Stream Oriented) | 面向缓冲区(Buffer Oriented) |
| 阻塞IO(Blocking IO) | 非阻塞IO(Non Blocking IO) |
| 无 | 选择器(Selectors) |
异步非阻塞IO(AIO)
- AIO 也就是NIO 2,在Java 7 中引入了NIO的改进版 NIO 2,它是异步非阻塞的IO模型。异步IO是基于事件和回调机制实现的,也就是说AIO模式不需要selector操作,而是事件驱动形式,也就是当客户端发送数据之后,会主动通知服务器,接着服务器再进行读写操作。
- Java的AIO API其实就是Proactor模式的应用,和Reactor模式类似。Reactor和Proactor模式的主要区别就是真正的读取和写入操作是有谁来完成的,Reactor中需要应用程序自己读取或者写入数据,而Proactor模式中,应用程序不要进行实际的读写过程,它需要从缓存区读取或者写入即可,操作系统会读取缓存区或者写入缓存区到真正的IO设备。
NIO 概述
Java NIO由一下几个核心部分组成:
- Channel
- Buffers
- Selectors
虽然Java NIO中除此之外还有很多类和组件,但Channel、Buffer和Selector构成了核心的API。其他组件,如Pipe和FileLock,只不过是与三个核心组件共同使用的工具类。
Channel
首先说一下Channel,可以翻译成“通道”。Channel和IO中的Stream(流)是差不多一个等级的。只不过Stream是单向的,比如:InputStream,OutputStream。而Channel是双向的,既可以用来读操作,又可以用来进行写操作。
NIO中的Channel的主要实现有:FileChannel、DatagramChannel、SocketChannel和ServerSocketChannel,这里看名字就可以猜出个所以然来,分别可以对应文件IO、UPD和TCP(Server和Client)。
Buffer
NIO中的关键Buffer实现有:ByteBuffer、CharBuffer、DoubleBuffer、FloatBuffer、IntBuffer、LongBuffer、ShortBuffer,分别对应基本数据类型:byte、char、double、float、int、long、short。
Selector
Selector运行单线程处理多个Channel,如果你的应用打开了多个通道,但每个连接的流量都很低,使用Selector就会很方便。例如在一个聊天服务器中。要使用Selector,得向Selector注册侧Channel,然后调用它的select()方法。这个方法会一直阻塞到某个注册的通道有事件就绪。一旦这个方法返回,线程就可以处理这些事件,事件的例子有如新的连接进来、数据接收等。
Channel、Buffer、Selector三者关系
- 一个Channel就像一个流,只是Channel是双向的,Channel读数据到Buffer,Buffer写数据到Channel。
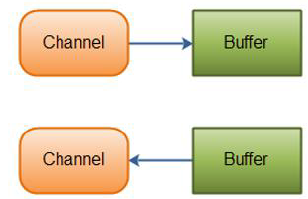
- 一个Selector允许一个线程处理多个Channel
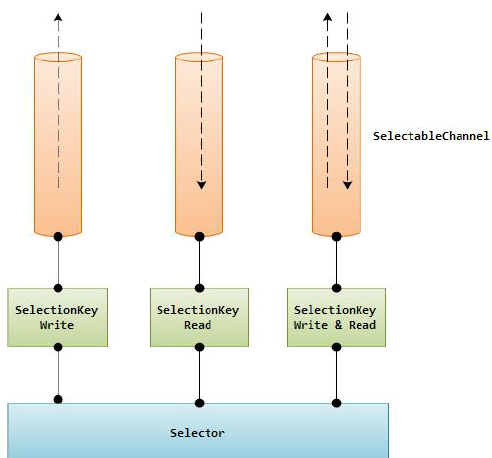
NIO Channel
Channel概述
Java NIO的通道类似流,但又有些不同:
- 既可以从通道中读取数据,又可以写数据到通道,但流的读写通常是单向的。
- 通道可以异步的读写
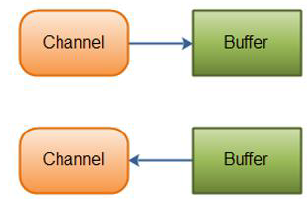
- 通道中的数据总是要先读到一个Buffer,或者总是要从一个Buffer中写入。
正如上面所属,从通道读取数据到缓冲区,从缓冲区写入数据到通道。如下图所示:
Channel实现
下面是NIO中最重要的Channel的实现:
- FileChannel:从文件中读写数据
- DatagramChannel:通过UDP读写网络中的数据
- SocketChannel:通过TCP读写网络中的数据
- ServerSocketChannel:可以监听新进来的TCP连接,像Web服务器那样。对每一个新进来的连接都会创建一个SocketChannel。
这些通道涵盖了UPD和TCP 网络IO,以及文件IO。
FileChannel介绍和示例
FileChannel类可以实现常用的read,write以及scatter/gather操作,同时它也提供了很多专用于文件的新方法。这些方法中的许多都是我们所熟悉的文件操作。
| 方法 | 描述 |
|---|---|
| int read(ByteBuffer dst) | 从Channel中读取数据到 ByteBuffer |
| long read(ByteBuffer[] dsts) | 将Channel中的数据“分散”到ByteBuffer[] |
| int write(ByteBuffer src) | 将ByteBuffer中的数据写入到Channel |
| long write(ByteBuffer[] srcs) | 将ByteBuffer[]中的数据“聚集“到Channel |
| long position() | 返回此通道的文件位置 |
| FileChannel position(long p) | 设置此通道的文件位置 |
| long size() | 返回此通道的文件的当前大小 |
| FileChannel truncate(long s) | 将此通道的文件截取为指定大小 |
| void force(boolean metaData) | 强制将所有对此通道的文件更新写入到存储设备中 |
下面是一个使用FileChannel读取数据到Buffer中的示例:
package tech.msop.project.nio.channel;

import java.io.IOException;
import java.io.RandomAccessFile;
import java.nio.ByteBuffer;
import java.nio.channels.FileChannel;

/**
 * File Channel 示例代码
 */
public class FileChannelDemo1 {

    public static void main(String[] args) throws IOException {
        // 使用RandomAccessFile打开FileChannel
        RandomAccessFile accessFile = new RandomAccessFile("F:\\data\\nio\\1.txt", "rw");
        FileChannel inChannel = accessFile.getChannel();
        // 从FileChannel中读取数据
        ByteBuffer buf = ByteBuffer.allocate(48);
        // 返回读取的字节数
        int byteRead = inChannel.read(buf);
        while (byteRead != -1) {
            System.out.println("读取:" + byteRead);
            buf.flip();
            while (buf.hasRemaining()) {
                System.out.println((char) buf.get());
            }
            buf.clear();
            byteRead = inChannel.read(buf);

        }
        accessFile.close();
        System.out.println("操作结束");
    }
}
Buffer通常的操作:
- 将数据写入到缓冲区
- 调用buffer.flip()反转读写模式
- 从缓冲区中读取数据
- 调用buffer.clear()或buffer.compact()清除缓冲区内容
FileChannel操作详解
打开FileChannel
在使用FileChannel之前,必须先打开它。但是,我们无法直接打开一个FIleChannel,需要通过使用一个InputStream、OutStream或RandomAccessFile来获取一个FIleChannel实例。下面是通过RandomAccessFile打开FileChannel的示例:
RandomAccessFile accessFile = new RandomAccessFile("F:\\data\\nio\\1.txt", "rw");
FileChannel inChannel = accessFile.getChannel();
从FileChannel读取数据
调用多个read()方法之一从FileChannel中读取数据,如:
// 从FileChannel中读取数据
ByteBuffer buf = ByteBuffer.allocate(48);
// 返回读取的字节数
int byteRead = inChannel.read(buf);
首先,分配一个Buffer。从FileChannel中读取的数据将被读到Buffer中。然后,调用FileChannel.read()方法。该方法将数据从FileChannel读取到Buffer中。read()方法返回的int值表示了有多少字节被读到了Buffer中。如果返回-1,表示到了文件末尾。
向FileChannel写数据
使用FileChannel.write()方法向FileChannel写数据,方法的参数是一个Buffer。如:
package tech.msop.project.nio.channel;

import java.io.IOException;
import java.io.RandomAccessFile;
import java.nio.ByteBuffer;
import java.nio.channels.FileChannel;

/**
 * 向FileChannel写数据
 */
public class FileChannelDemo2 {

    public static void main(String[] args) throws IOException {
        // 使用RandomAccessFile打开FileChannel
        RandomAccessFile accessFile = new RandomAccessFile("F:\\data\\nio\\1.txt", "rw");
        FileChannel inChannel = accessFile.getChannel();

        String newData = "New String to Write to FIle ..."+System.currentTimeMillis();
        ByteBuffer buf = ByteBuffer.allocate(48);
        buf.clear();
        buf.put(newData.getBytes());
        buf.flip();
        while (buf.hasRemaining()) {
           inChannel.write(buf);
        }
        inChannel.close();
        accessFile.close();
        System.out.println("操作结束");
    }
}
注意:FileChannel.write()是在while循环中调用的因为无法保证write()方法一次能向FileChannel写入多少字节,因此需要重复调用write()方法,直到Buffer中已经没有尚未写入通道的字节。
关闭FileChannel
用完FileChannel后必须将其关闭。如:
inChannel.close();
FileChannel的position方法
有时可能需要在FileChannel的某个特定位置进行数据的读写操作。可以通过调用position()方法获取FileChannel的当前位置。也可以通过调用position(long pos)方法设置FileChannel的当前位置。
示例代码:
long pos = channel.position();
channel.position(pos + 123);
如果将位置设置在文件结束符之后,然后试图从文件通道中读取数据,读方法将返回-1(文件结束标志)。
如果将位置设置在文件结束符之后,然后向通道中写数据,文件将撑大到当前位置并写入数据。这可能导致“文件空洞”,磁盘上物理文件中写入的数据间有空隙。
FileChannel的size方法
FileChannel示例的size()方法将返回该实例所关联文件的大小。如:
long fileSize = channel.size();
FileChannel的truncate方法
可以使用FileChannel.truncate()方法截取一个文件。截取文件时,文件当中指定长度后面的部分将被删除。如:
// 截取文件的前1024个字节。
channel.truncate(1024);
FileChannel的force方法
FileChannel.force()方法将通道里尚未写入磁盘的数据强制写到磁盘上。处于性能方面的考虑,操作系统会将数据缓存到内存中,所以无法保证写入到FileChannel里的数据一定会即时写到磁盘上。要保证这一点,需要调用force()方法。
force()方法有一个boolean类型的参数,指明是否同时将文件元数据(权限信息等)写到磁盘上。
FileChannel的transferTo和transferFrom方法
通道之间的数据传输:
如果两个通道中有一个是FileChannel,那可以直接将数据从一个Channel传输到另外一个Channel。
- transferFrom()方法
FileChannel的transferFrom()方法可以将数据从源通道传输到FileChannel中(这个方法在JDK文档中的解释为将字节从给定的可读取字节通道传输到此通道的文件中)。
示例代码:FileChannel完成文件间复制
package tech.msop.project.nio.channel;

import java.io.FileNotFoundException;
import java.io.RandomAccessFile;
import java.nio.channels.FileChannel;

/**
 * FileChannel transferFrom 方法
 */
public class FileChannelDemo3 {
    public static void main(String[] args) throws Exception {
        // 使用RandomAccessFile打开FileChannel
        RandomAccessFile aFile = new RandomAccessFile("F:\\data\\nio\\1.txt", "rw");
        FileChannel fromChannel = aFile.getChannel();

        RandomAccessFile bFile = new RandomAccessFile("F:\\data\\nio\\2.txt", "rw");
        FileChannel toChannel = bFile.getChannel();

        long position = 0;
        long count = fromChannel.size();
        toChannel.transferFrom(fromChannel, position, count);
        aFile.close();
        bFile.close();
        System.out.println("over!");

    }
}
方法的输入参数position表示从position出开始向目标文件写入数据,count表示最多传输的字节数。如果源通道的剩余空间小于count个字节,所传输的字节数要小于请求的字节数。此外要注意,在SocketChannel的实现中,SocketChannel只会传输此刻准备好的数据(可能不足count字节)。因此,SocketChannel可能不会将请求的所有数据(count个字节)全部传输到FileChannel中。
- transferTo()方法
transferTo()方法将数据从FileChannel传输到其他的Channel中。
示例代码:
package tech.msop.project.nio.channel;

import java.io.RandomAccessFile;
import java.nio.channels.FileChannel;

/**
 * FileChannel transferTo 方法
 */
public class FileChannelDemo4 {
    public static void main(String[] args) throws Exception {
        // 使用RandomAccessFile打开FileChannel
        RandomAccessFile aFile = new RandomAccessFile("F:\\data\\nio\\2.txt", "rw");
        FileChannel fromChannel = aFile.getChannel();

        RandomAccessFile bFile = new RandomAccessFile("F:\\data\\nio\\3.txt", "rw");
        FileChannel toChannel = bFile.getChannel();

        long position = 0;
        long count = fromChannel.size();
        fromChannel.transferTo(position, count, toChannel);
        aFile.close();
        bFile.close();
        System.out.println("over!");

    }
}
Scatter/Gather
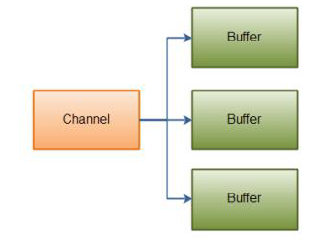
Java NIO 开始支持scatter/gather,scatter/gather用于描述从Channel中读取或者写入到Channel的操作。
**分散(scatter) **从Channel中读取是指在读操作时将读取的数据写入到多个buffer或在那个。因此,Channel将从Channel中读取到的数据“分散(scatter)”到多个Buffer中。
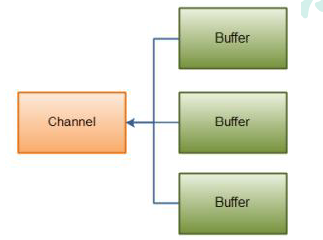
聚集(gather) 写入Channel是指在写操作时将多个buffer的数据写入到同一个Channel,因此,Channel将多个Buffer中的数据“聚集(gather)”后发送到Channel。
scatter/gather经常用于需要将传输的数据分开处理的场合,例如传输一个由消息头和消息体组成的消息,可能会将消息体和消息头分散到不同的buffer中,这样可以方便的处理消息头和消息体。
Scattering Reads
Scattering Reads是指数据从一个Channel中读取到多个buffer中。如下图描述:
ByteBuffer header = ByteBuffer.allocate(128);
ByteBuffer body = ByteBuffer.allocate(1024);
ByteBuffer[] bufferArray = {header,body};
channel.read(bufferArray);
注意:Buffer首先被插入到数组,然后再将数组作为channel.read()的输入函数。
read()方法按照buffer在数组中的顺序将从Channel中读取的数据写入到buffer,当一个buffer被写满后,channel紧接着向另一个buffer中写。
Scattering Reads在移动到下一个buffer前,必须填满当前的buffer,这也意味着它不适用于动态消息(消息大小不固定)。也就是说,如果存在消息头和消息体,消息头必须完成完成填充(例如128byte),Scattering Reads才能正常工作。
Gatering Writes
Gathering Writes是指数据从多个Buffer中写入到同一个Channel。如下图描述:
ByteBuffer header = ByteBuffer.allocate(128);
ByteBuffer body = ByteBuffer.allocate(1024);
// write dat into buffers
ByteBuffer[] bufferArray = {header,body};
channel.write(bufferArray);
buffers数组是write()方法的入参,write()方法会按照buffer在数组中的熟悉怒,将数据写入到channel,注意只会有position和limit之间的数据才会被写入。因此,如果一个buffer容量为128byte,但是仅仅包含58byte的数据,那么这58byte的数据将被写入到channel中。因此与Scattering Reads相反,Gathering Writes能较好的处理动态消息。
NIO SocketChannel
- (1)SocketChannel就是NIO对于非阻塞socket操作的支持的组件,其在socket上封装了一层,主要是支持了非阻塞的读写。同时改进了传统的单向流API,Channel同时支持读写。
- (2)Socket通道类主要分为DatagramChannel、SocketChannel和ServerSocketChannel,他们在被实例化时都会创建一个对等socket对象。要把一个socket通道置于非阻塞模式,我们要依靠所有socket通道类的公有超级类:SelectableChannel。就绪选择(readlines selection)是一种可以用来查询通道的机制,该查询可以判断通道是否准备好执行一个目标操作,如读或者写。非阻塞IO和可选择性是紧密项链的,那也正是管理阻塞模式的API代码要在SelectableChannel超级类中定义的原因。
- (3)设置或重新设置一个通道的阻塞模式是很简单的,只要调用configureBlocking()方法即可,传递参数值为true则设为阻塞模式,参数值为false,则设为非阻塞模式。可以通过调用isBlocking()方法来判断某个socket通道当前处于哪种模式。
AbstractSelectableChannel.java中实现configureBlocking()方法如下:
public final SelectableChannel configureBlocking(boolean block)
        throws IOException
    {
        synchronized (regLock) {
            if (!isOpen())
                throw new ClosedChannelException();
            if (blocking == block)
                return this;
            if (block && haveValidKeys())
                throw new IllegalBlockingModeException();
            implConfigureBlocking(block);
            blocking = block;
        }
        return this;
    }
ServerSocketChannel
ServerSocketChannel是一个基于通道的socket监听器。它同我们所熟悉的java.net.ServerSocket执行相同的任务,不过它增加了通道语义,因此能够在非阻塞模式下运行。
由于ServerSocketChannel没有bind()方法,因此有必要取出对等的socket并使用它来绑定到一个端口以开始监听连接。我们也是使用对等ServerSocket的API来根据需要设置其他的socket选项。
同java.net.ServerSocket一样,ServerSocketChannel也有accept()方法。ServerSocketChannel的accept()方法会返回SocketChannel类型对象,SocketChannel可以在非阻塞模式下运行。
示例代码:
package tech.msop.project.nio.channel;

import java.net.InetSocketAddress;
import java.nio.ByteBuffer;
import java.nio.channels.ServerSocketChannel;
import java.nio.channels.SocketChannel;

public class FileChannelAccept {

    public static final String GREETING= "Hello Java NIO. \r\n";
    public static void main(String[] args) throws Exception {
        // 端口号
        int port = 8888;
        // Buffer
        ByteBuffer buffer = ByteBuffer.wrap(GREETING.getBytes());
        // ServerSocketChannel
        ServerSocketChannel ssc = ServerSocketChannel.open();
        // 绑定端口
        ssc.socket().bind(new InetSocketAddress(port));
        // 设置非阻塞模式
        ssc.configureBlocking(false);
        // 监听有新链接传入
        while (true){
            System.out.println("Waiting for connections");
            SocketChannel sc = ssc.accept();
            if (sc == null){
                // 没有链接传入
                System.out.println("Socket Channel Is Null!");
                Thread.sleep(2000);
            }else {
                System.out.println("Incoming connection from:"+sc.socket().getRemoteSocketAddress());
                // 指针0
                buffer.rewind();
                sc.write(buffer);
                sc.close();
            }
        }
    }
}
浏览器访问:127.0.0.1:8888,控制台打印数据:
Waiting for connections
Socket Channel Is Null!
Waiting for connections
Socket Channel Is Null!
Waiting for connections
Socket Channel Is Null!
Waiting for connections
Incoming connection from:/127.0.0.1:57338
Waiting for connections
Incoming connection from:/127.0.0.1:57339
Waiting for connections
Socket Channel Is Null!
主要步骤:
-
1、打开ServerSocketChannel
-
通过代用ServerSocketChannel.open()方法来打开ServerSocketChannel。
-
ServerSocketChannel ssc = ServerSocketChannel.open();
-
-
2、关闭ServerSocketChannel
-
通过调用ServerSocketChannel.close()方法来关闭ServerSocketChannel。
-
ssc.close();
-
-
3、监听新的连接
-
通过ServerSocketChannel.accept()方法监听新进的连接。当accept()方法返回时,它返回一个包含新进来连接的SocketChannel。因此,accept()方法会一直阻塞到有新连接到达。
-
通常不会仅仅只监听一个连接,在while循环中调用accept()方法。如以下示例:
-
while (true){
            System.out.println("Waiting for connections");
            SocketChannel sc = ssc.accept();
    ....
}
-
-
4、阻塞模式
- ServerSocketChannel.configureBlocking(true)时为阻塞模式,会在SocketChannel sc = ssc.accept()这里阻塞住进程
-
5、非阻塞模式
-
ServerSocketChannel可以设置成非阻塞模式。在非阻塞模式下,accept()方法会like返回,如果还没有新进来的连接,返回的将是null。因此,需要检查返回的SocketChannel是否为null。如:
-
while (true){
    System.out.println("Waiting for connections");
    SocketChannel sc = ssc.accept();
    if (sc == null){
        // 没有链接传入
        System.out.println("Socket Channel Is Null!");
        ...
    }
}
-
SocketChannel
SocketChannel简介
Java NIO中的SocketChannel是一个连接到TCP网络套接字的通道。
A selectable channel for stream-oriented connecting sockets.
以上是Java docs中对于SocketChannel的描述:SocketChannel是一种面向流连接sockets套接字的可选择通道。从这里可以看出:
- SocketChannel是用来连接Socket套接字
- SocketChannel主要用途用来处理网络IO的通道
- SocketChannel是基于TCP连接传输
- SocketChannel实现了可选择通道,可以被多路复用的。
SocketChannel特征
- 对于已经存在的Socket不能创建SocketChannel
- SocketChannel中提供的open接口创建的Channel并没有网络级联,需要使用connect接口连接到指定地址
- 未进行连接的SocketChannel执行IO操作时,会抛出NotYetConnectedException
- SocketChannel支持两种IO模式:阻塞式和非阻塞式
- SocketChannel支持异步关闭。如果SocketChannel在一个线程上read阻塞,另一个线程对该SocketChannel调用shutdownInput,则读堵塞的线程将返回-1,表示没有读取任何数据;如果SocketChannel在一个线程上write阻塞,另一个线程对该SocketChannel调用shutdownWrite,则写阻塞的线程将抛出AsynchronousCloseException
- SocketChannel支持设定参数
- SO_SNDBUF:套接字发送缓冲区大小
- SO_RCVBUF:套接字接受缓冲区大小
- SO_KEEPLIVE:保活连接
- SO_REUSEARRD:复用地址
- SO_LINGER:有数据传输时延缓关闭Channel(仅在非阻塞模式下有用)
- TCP_NODELAY:禁用Nagle算法
SocketChannel使用
-
创建SocketChannel
-
有两种创建SocketChannel的方式,可以直接使用有参open api或者使用无参open api,但是无参open只是创建了一个SocketChannel对象,并没有进行实质的TCP连接。
-
// 方式一
SocketChannel socketChannel = SocketChannel.open(new InetSocketAddress("www.baidu.com",80));
// 方式二
//        SocketChannel socketChannel1 = SocketChannel.open();
//        socketChannel1.connect(new InetSocketAddress("www.baidu.com",80));
-
-
连接校验
-
// 连接校验
       // 测试SocketChannel是否为Open状态
       System.out.println("连接是否打开:"+socketChannel.isOpen());
       // 测试SocketChannel是否已经被连接
       System.out.println("是否已经被连接:"+socketChannel.isConnected());
       // 测试SocketChannel是否正在进行连接
       System.out.println("是否正在进行连接:"+socketChannel.isConnectionPending());
       // 校验正在进行套接字连接的SocketChannel是否已经完成连接
       System.out.println("是否已经完成连接:"+socketChannel.finishConnect());
-
-
读写模式
-
SocketChannel支持阻塞和非阻塞两种模式,false表示非阻塞,true表示阻塞
-
// 设置SocketChannel的读写模式。false表示非阻塞,true表示阻塞
        socketChannel.configureBlocking(false);
-
-
设置和获取参数
-
通过setOption方法可以设置socket套接字的相关参数
-
通过getOption方法获取相关参数的值,如默认的接收缓冲区大小为8192bytes
-
SocketChannel还支持多路复用,多路复用后续会介绍。
-
// 设置和获取参数
       socketChannel.setOption(StandardSocketOptions.SO_KEEPALIVE,Boolean.TRUE)
               .setOption(StandardSocketOptions.TCP_NODELAY,Boolean.TRUE);
       System.out.println("获取保活连接:"+socketChannel.getOption(StandardSocketOptions.SO_KEEPALIVE));
       System.out.println("获取接收缓冲区大小:"+socketChannel.getOption(StandardSocketOptions.SO_RCVBUF));
-
-
读写数据
-
读写都是面向缓冲区,这个读写方式与前文中的FileChannel相同
-
    // 读写数据
    ByteBuffer byteBuffer = ByteBuffer.allocate(16);
    socketChannel.read(byteBuffer);
    socketChannel.close();
    System.out.println("read over");
-
DatagramChannel
正如SocketChannel对应Socket,ServerSocketChannel对应ServerSocket,每一个DatagramChannel对象也有一个关联的DatagramSoket。正如SocketChannel模拟连接导向的流协议(如TCP/IP),DatagramChannel则模拟包导向的无连接协议(如UDP/IP)。DatagramChannel是无连接的,每个数据包(datagram)都是一个自包含的实体,拥有它自己的目的地址及不依赖其他数据包的数据负载。与面向流的socket不同,DatagramChannel可以发送单独的数据包给不同的目的地址。同样,DatagramChannel对象也可以接受来自任意地址的数据包。每个到达的数据包都含有关于它来自何处的信息(源地址)。
打开DatagramChannel
DatagramChannel server = DatagramChannel.open();
server.socket().bing(new InetSocketAddress(10086));
此示例是打开10086接端口接收UDP数据包
接收数据
通过receive()接收UDP包
ByteBuffer receiveBuffer = ByteBuffer.allocate(64);
receiveBuffer.clear();
SocketAddress receiveAddr = server.receive(receiveBuffer);
SocketAddress可以获得发包的IP、端口等信息,用toString()方法查询看,格式如下:/127.0.0.1:57126
发送数据
通过send()发送UDP包
DatagramChannel sendChannel = DatagramChannel.open();
InetSocketAddress sendAddress = new InetSocketAddress("127.0.0.1",9999);   sendChannel.send(ByteBuffer.wrap("发包".getBytes(StandardCharsets.UTF_8)),sendAddress);
连接
UDP不存在真正意义上的连接,这里的连接是向特定服务地址用read和write接收发送数据包。
read()和write()只有在connet()后才能使用,不然会抛NotYetConnectedException异常。用read()方法接收时,如果没有接收到包,会抛PortUnreachableException异常。
client.connect(new InetSocketAddress("127.0.0.1",10086));
int readSize = client.read(sendBuffer);
server.write(sendBuffer);
DatagramChannel示例
客户端发送,服务端接收数据示例:
package tech.msop.project.nio.channel;

import org.junit.Test;

import java.net.InetSocketAddress;
import java.net.SocketAddress;
import java.nio.ByteBuffer;
import java.nio.channels.DatagramChannel;
import java.nio.charset.StandardCharsets;

/**
 * DatagramChannel 测试代码
 */
public class DatagramChannelTest {

    /**
     * 发包的 datagram
     *
     * @throws Exception 异常信息
     */
    @Test
    public void sendDatagram() throws Exception {
        DatagramChannel sendChannel = DatagramChannel.open();
        InetSocketAddress sendAddress = new InetSocketAddress("127.0.0.1", 9999);
        while (true) {
            sendChannel.send(ByteBuffer.wrap("发包".getBytes(StandardCharsets.UTF_8)), sendAddress);
            System.out.println("客户端发包");
            Thread.sleep(1000);
        }
    }

    /**
     * 接收数据包端
     *
     * @throws Exception 异常
     */
    @Test
    public void receive() throws Exception {
        DatagramChannel receiveChannel = DatagramChannel.open();
        InetSocketAddress receiveAddress = new InetSocketAddress(9999);
        receiveChannel.bind(receiveAddress);
        ByteBuffer receiveBuffer = ByteBuffer.allocate(512);
        while (true) {
            receiveBuffer.clear();
            SocketAddress sendAddress = receiveChannel.receive(receiveBuffer);
            receiveBuffer.flip();
            System.out.println("源地址:" + sendAddress.toString());
            System.out.println("接收数据:" + StandardCharsets.UTF_8.decode(receiveBuffer));
        }
    }

    /**
     * 只接收和发送9999的数据包
     *
     * @throws Exception 异常
     */
    @Test
    public void receiveSpec() throws Exception {
        DatagramChannel connChannel = DatagramChannel.open();
        connChannel.bind(new InetSocketAddress(9998));
        connChannel.connect(new InetSocketAddress("127.0.0.1", 9999));
        connChannel.write(ByteBuffer.wrap("发包".getBytes(StandardCharsets.UTF_8)));
        ByteBuffer readBuffer = ByteBuffer.allocate(512);
        while (true) {
            readBuffer.clear();
            connChannel.read(readBuffer);
            readBuffer.flip();
            System.out.println(StandardCharsets.UTF_8.decode(readBuffer));
        }
    }
}
NIO Buffer
Buffer简介
Java NIO中的Buffer用于和NIO通道进行交互。数据是从通道读入缓冲区,从缓冲区写入到通道中的。
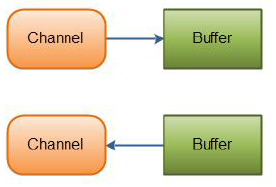
缓冲区本质上是一块可以写入数据,然后可以丛中读取数据的内存 。这块内存被包装成NIO Buffer对象,并提供了一组方法,用来方便的访问该块内存。缓冲区实际上是一个容器对象,更直接的说,其实就是一个数组,在NIO库中,所有数据都使用缓冲区处理的。 在读取数据时,它是直接读到缓冲区的;在写入数据时,它也是写入到缓冲区中的;任何时候访问NIO中的数据,都是将它放到缓冲区中。而在面向流IO系统中,所有数据都是直接写入或者直接将数据读取到Stream对象中。
在NIO中,所有的缓冲区类型都继承于抽象类Buffer,最常用的就是ByteBuffer,对于Java的基本类型,基本上都有一个具体的Buffer类型与之相对应,它们质检的继承关系如下图所示:

Buffer的基本使用
介绍
使用Buffer读写数据,一般遵循以下四个步骤:
- 写入数据到Buffer
- 调用flip()方法
- 从Buffer中读取数据
- 调用clear()方法或者compact()方法
当向Buffer写入数据时,Buffer会记录下写了多少数据。一旦读取数据,需要通过flip()方法将Buffer从写模式切换到读模式。在该模式下,可以读取之前写入到buffer的所有数据。一旦读完了所有的数据,就需要清空缓冲区,让它可以再次被写入。有两种方法能清空缓冲区:clear()或compat()方法。clear()方法会清空整个缓冲区。compact()方法只会清除已读过的数据。任何未读的数据都被移到缓冲区的起始处,新写入的数据将放到缓冲区未读数据的后面
示例
package tech.msop.project.nio.buffer;

import org.junit.Test;

import java.io.IOException;
import java.io.RandomAccessFile;
import java.nio.ByteBuffer;
import java.nio.IntBuffer;
import java.nio.channels.FileChannel;

/**
 * Buffer 示例代码
 */
public class BufferDemoTest {
    /**
     * 测试ByteBuffer
     *
     * @throws IOException 异常
     */
    @Test
    public void testByteBuffer() throws IOException {
        // 使用RandomAccessFile打开FileChannel
        RandomAccessFile accessFile = new RandomAccessFile("F:\\data\\nio\\1.txt", "rw");
        FileChannel inChannel = accessFile.getChannel();
        // 从FileChannel中读取数据
        ByteBuffer buf = ByteBuffer.allocate(48);
        // 返回读取的字节数
        int byteRead = inChannel.read(buf);
        while (byteRead != -1) {
            System.out.println("读取:" + byteRead);
            buf.flip();
            while (buf.hasRemaining()) {
                System.out.println((char) buf.get());
            }
            buf.clear();
            byteRead = inChannel.read(buf);

        }
        accessFile.close();
    }

    /**
     * 使用IntBuffer 示例
     *
     * @throws IOException 异常
     */
    @Test
    public void testIntBuffer() throws IOException {
        // 分配新的Int缓冲区,参数为缓冲区容量
        // 新缓冲区的当前位置为0,其界限(限制位置)将为其容量
        // 它将具有一个底层实现数组,其数组偏移量为0
        IntBuffer buffer = IntBuffer.allocate(8);
        for (int i = 0; i < buffer.capacity(); i++) {
            int j = 2 * (i + 1);
            // 将给定证书写入此缓冲区的当前位置,当前位置递增
            buffer.put(j);
        }
        // 重设此缓冲区,将限制设置为当前位置,然后将当前位置设置为0
        buffer.flip();
        // 查看当前位置和限制位置之间是否有元素
        while (buffer.hasRemaining()) {
            // 读取此缓冲区当前位置的证书,然后当前位置递增
            int j = buffer.get();
            System.out.println(j);
        }
    }
}
Buffer的capacity、position和limit
为了理解Buffer的工作原理,需要熟悉它的三个属性:
- capacity
- posistion
- limit
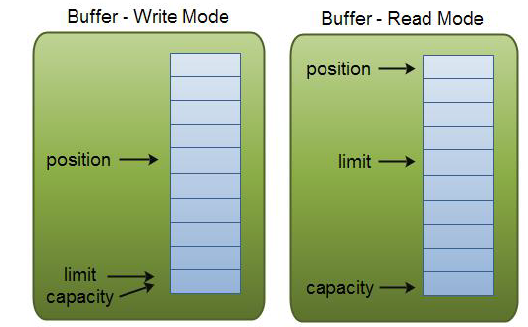
position和limit的含义取决于Buffer处在读模式还是写模式。不管Buffer处在什么模式,capacity的含义从事一样的。
下图是一个关于capacity、position和limit在读写模式中的说明
-
capacity:作为一个内存块,Buffer有一个固定的大小值,也叫“capacity”。只能往里写capacity个byte、long、char等类型。一旦Buffer满了,需要将其清空(通过读数据或者清除数据)才能继续王Buffer里写数据。
-
position
- 写数据到Buffer中时 ,position表示写入数据的当前位置,position的初始值为0。当一个byte、long等数据写到Buffer后,position会向下移动到下一个可插入数据的Buffer单元。position最大可为capacity-1(因为position的初始值为0)。
- 读数据到Buffer中时 ,position表示读入数据的当前位置,如position=2时表示已开始读入了3个byte,或从第3个byte开始读取。通过ByteBuffer.flip()切换到读模式时position会被重置为0,当Buffer从position读入数据后,position会下移到下一个可读入的数据Buffer单元。
-
limit
- 写数据时 ,limit表示可对Buffer最多写入多少个数据。写模式下limit等于Buffer的capacity。
- 读数据时 ,limit表示Buffer里有多少可读数据(not null的数据),因此能读到之前写入的所有数据(limit被设置成已写数据的数量,这个值在写模式下就是position)。
Buffer的类型
Java NIO 有以下Buffer类型:
- ByteBuffer
- MapperdByteBuffer
- CharBuffer
- DoubleBuffer
- FloatBuffer
- IntBuffer
- LongBuffer
- ShortBuffer
这些Buffer类型代表了不同的数据类型。换句话说,就是可以通过char、short、int、long、float或者double类型来操作缓冲区中的字节。
Buffer分配和写数据
Buffer分配
要想获得一个Buffer对象,首先要进行分配。每一个Buffer类都有一个allocate方法。
示例代码:
// 分配48字节的ByteBuffer
ByteBuffer byteBuffer = ByteBuffer.allocate(48);
// 分配1024字节的CharBuffer
CharBuffer charBuffer = CharBuffer.allocate(1024);
向Buffer中写数据
写数据到Buffer有两种方式:
- 从Channel写到Buffer
- 通过Buffer的put()方法写到Buffer里。
示例代码:
// 从Channel中写到Buffer的例子
// read into buffer
int byteRead = inChannel.read(buf);
// 通过put方法写Buffer的例子:
buf.put(127);
// put有很多版本,允许你以不同的方式把数据写入到Buffer中。例如,写到一个指定的位置,或者把一个字节数组写到Buffer
flip()方法
flip方法将Buffer从写模式切换到读模式。调用flip方法会将position返回0,并将limit设置成之前的position的值。换句话说,position现在用于标记读的位置,limit表示之前写进了多少个byte,char等(现在能读取多少个byte、char等)。
从Buffer中读取数据
从Buffer中读取数据有两种方式:
- 从Buffer读取数据到Channel
- 使用get()方法从Buffer中读取数据
示例代码:
//从Buffer读取数据到Channel
int bytesWritten = inChannel.write(buf);
// 使用get()方法从Buffer中读取数据
byte aByte = buf.get;
// get方法有很多版本,允许以不同的方式从Buffer中读取数据。例如,从指定position读取,或者从Buffer中读取数据到字节数组。
Buffer几个方法
rewind()方法
Buffer.rewind()将position返回0,所以可以重读Buffer中的所有数据。limit保持不变,仍然表示能从Buffer中读取多少个元素(byte,char等)。
clear()与compact()方法
一旦读完Buffer中的数据,需要让Buffer准备好再次被写入。可以通过clear()或compact()方法来完成。
如果调用的是clear()方法,position将被设回0,limit被设置成capacity的值。换句话说,Buffer被清空了。Buffer中的数据并未清除,但是这些标记告诉我们可以从哪里开始往Buffer里写数据。
如果Buffer中有一些未读的数据,调用clear()方法,数据将“被遗忘”,意味着不再有任何标记会告诉你哪些数据被读过,哪些还没有。
如果Buffer中仍有未读的数据,且后续还需要这些数据,但是此时想要先写一些数据,那么可以使用compac()方法。
compact()方法将所有未读的数据拷贝到Buffer起始处。然后将position设到最后一个未读元素的正后面。limit属性依然像clear()方法一样,设置成capacity。现在Buffer准备好写数据了,但是不会覆盖未读的数据。
mark()与reset()方法
通过调用Buffer.mark()方法,可以标记Buffer中的一个特定position。之后可以通过调用Buffer.reset()方法恢复到这个position。
示例代码:
buffer.mark();
// call buffer.get()
buffer.reset();// set position back to mark
缓冲区操作
缓冲区分片
在NIO中,除了可以分配或者包装一个缓冲区对象外,还可以根据现有的缓冲区对象来创建一个子缓冲区,即在现有缓冲区上切出一片来作为一个新的缓冲区,但现有的缓冲区与创建的子缓冲区在底层数据层面上是数据共享的,也就是说,子缓冲区相当于是现有缓冲区的一个视图窗口。调用slice()方法可以创建一个子缓冲区。
示例代码:
/**
     * 缓冲区分片
     *
     * @throws IOException 异常
     */
    @Test
    public void testBufferSlice() throws IOException {
        ByteBuffer buffer = ByteBuffer.allocate(10);
        // 存入缓冲区中的数据 0-9
        for (int i = 0; i < buffer.capacity(); i++) {
            buffer.put((byte) i);
        }
        // 创建子缓冲区
        buffer.position(3);
        buffer.limit(7);
        ByteBuffer slice = buffer.slice();
        // 改变子缓冲区的内容
        for (int i = 0; i < slice.capacity(); i++) {
            byte b = slice.get(i);
            b *= 10;
            slice.put(i, b);
        }
        buffer.position(0);
        buffer.limit(buffer.capacity());
        while (buffer.remaining() > 0) {
            System.out.println("存储数据:" + buffer.get());
        }
    }
只读缓冲区
只读缓冲区非常简单,可以读取它们,但是不能向它们写入数据。可以通过调用缓冲区的asReadOnlyBuffer()方法,将任何常规缓冲区转换为只读缓冲区,这个方法返回一个与原缓冲区完全相同的缓冲区,并与原缓冲区共享数据,只不过它是只读的。如果原缓冲区的内容发生了变化,只读缓冲区的内容也随之发生变化。
示例代码:
   /**
     * 只读缓冲区
     *
     * @throws IOException 异常
     */
    @Test
    public void testBufferReadOnly() throws IOException {
        ByteBuffer buffer = ByteBuffer.allocate(10);
        // 存入缓冲区中的数据 0-9
        for (int i = 0; i < buffer.capacity(); i++) {
            buffer.put((byte) i);
        }
        // 创建只读缓冲区
        ByteBuffer readOnly = buffer.asReadOnlyBuffer();
        // 改变原缓冲区的内容
        for (int i = 0; i < buffer.capacity(); i++) {
            byte b = buffer.get(i);
            b *= 10;
            buffer.put(i, b);
        }
        readOnly.position(0);
        readOnly.limit(buffer.capacity());
        // 只读缓冲区的内容也随之改变
        while (readOnly.remaining() > 0) {
            System.out.println("只读缓冲区数据:" + readOnly.get());
        }
    }
如果尝试修改只读缓冲区的内容,则会报ReadOnlyBufferException异常。只读缓冲区对于保护数据很有用。在将缓冲区传递给某个对象的方法时,无法知道这个方法是否会修改缓冲区中的数据。创建一个只读缓冲区可以保证该缓冲区不会被修改。只可以把常规缓冲区转换为只读缓冲区,而不能将只读的缓冲区转换为可写的缓冲区。
直接缓冲区
直接缓冲区是为加快IO速度,使用一种特殊方式为其分配内存的缓冲区,JDK文档中的描述为:给定一个直接字节缓冲区,Java虚拟机将尽最大努力直接对它执行本机IO操作。也就是说,它会在每一次调用底层操作系统的本机IO操作之前(或之后),尝试避免将缓冲区的内容拷贝到一个中间缓冲区中,或者从一个中间缓冲区中拷贝数据。要分配直接缓冲区,需要调用allocateDirect()方法,而不是allocate()方法。使用方式与普通缓冲区并无区别。
示例代码:
    /**
     * 直接缓冲区
     *
     * @throws IOException 异常
     */
    @Test
    public void testBufferDirect() throws IOException {
        String inFile  = "F:\\data\\nio\\1.txt";
        FileInputStream fin = new FileInputStream(inFile);
        FileChannel fcin = fin.getChannel();

        String outFile  = "F:\\data\\nio\\2.txt";
        FileOutputStream fout = new FileOutputStream(outFile);
        FileChannel fcout = fout.getChannel();
        // 使用allocateDirect,而不是allocate
        ByteBuffer buffer = ByteBuffer.allocateDirect(1024);
        for (;;){
            buffer.clear();
            int r = fcin.read(buffer);
            if ( r == -1){
                break;
            }
            buffer.flip();
            fcout.write(buffer);
        }
    }
内存映射文件I/O
内存映射文件I/O是一种读和写文件数据的方法,它可以比常规的基于流或者基于通道的I/O快得多。内存映射文件IO是通过是文件中的数据出现为内存数组的内容来完成的,这起初听起来似乎不过就是将这个文件读到内存中,但事实上并不是这样。一般来说,只有文件实际读取或者写入的部分才会映射到内存中。
示例代码:
    /**
     * 内存映射文件IO
     *
     * @throws IOException 异常
     */
    @Test
    public void testBufferMapped() throws IOException {
        final int start = 0;
        final int size = 1024;
        RandomAccessFile accessFile = new RandomAccessFile("F:\\data\\nio\\1.txt", "rw");
        FileChannel inChannel = accessFile.getChannel();
        MappedByteBuffer buffer = inChannel.map(FileChannel.MapMode.READ_WRITE,start,size);
        buffer.put(0, (byte) 97);
        buffer.put(1023, (byte) 122);
        accessFile.close();
    }
NIO Selector
Selector简介
Selector和Channel的关系
Selector一般称为选择器,也可以翻译为 多路复用器 。它是Java NIO核心组件中的一个,用于检查一个或多个NIO Channel(通道)的状态是否处于可读、可写。如此可以实现单线程管理多个channels,也就是可以管理多个网络链接。

使用Selector的好处在于:使用更少的线程来就可以处理通道了,相比使用多个线程,避免了线程上下文切换带来的开销。
可选择通道(SelectableChannel)
- (1)、不是所有的Channel都可以被Selector复用的。比如,FileChannel就不能被选择器复用。判断一个Channel能否被Selector复用,有一个前提:判断它是否继承了一个抽象类
SelectableChannel。如果继承了SelectableChannel,则可以被复用,否则不能。 - (2)、SelectableChannel类提供了实现通道的可选择性所需要的公共方法。它是所有支持就绪检查的通道类的父类,所有socket通道,都继承了SelectableChannel类都是可选择的,包括从管道(pipe)对象中获得的通道。而FileChannel类,没有继承SelectableChannel,因此不是可选通道。
- (3)、一个通道可以被注册到多个选择器上,但对每个选择器而言只能被注册一次。通道和选择器之间的关系,使用注册的方式完成。SelectableChannel可以被注册到Selector对象上,在注册的时候,需要指定通道的哪些操作,是Selector感兴趣的。
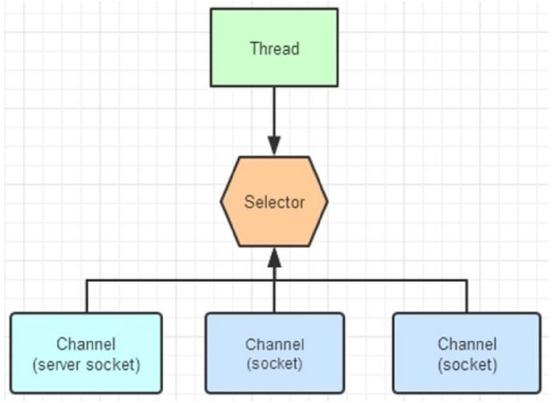
Channel注册到Selector
- (1)、使用Channel.register(Selector sel,int ops)方法,将一个通道注册到一个选择器。第一参数,指定通道要注册的选择器,第二个参数,指定选择器需要查询的通道操作。
- (2)、可以供选择器查询的通道操作,从类型上来分,包括以下四种:
- 可读:SelectionKey.OP_READ
- 可写:SelectionKey.OP_WRITE
- 连接:SelectionKey.OP_CONNECT
- 接收:SelectionKey.OP_ACCEPT
- 如果Selector对通道的多操作类型感兴趣,可以用“位或”操作符来实现:
- 示例:int key = SelectionKey.OP_READ|SelectionKey.OP_WRITE
- (3)、选择器查询的不是通道的操作,而是通道的某个操作的一种就绪状态。所谓操作的就绪状态,就是一旦通道具备完成某个操作的条件,表示该通道的某个操作已经就绪,就可以被Selector查询到,程序可以对通道进行对应的操作。比如,某个SocketChannel通道可以连接到一个服务器,则处于“连接就绪”(OP_CONNECT)状态;一个ServerSocketChannel服务器通道准备好接收新进入的连接,则处于“接收就绪”(OP_ACCEPT)状态;一个有数据库可读的通道,可以说是“读就绪”(OP_READ);一个等待写数据的通道可以说是“写就绪”(OP_WRITE)。
选择键(SelectionKey)
- 1、Channel注册到后,并且一旦通道处于某种就绪的状态,就可以被选择器查询到。这个工作,使用选择器的Selector的select()方法完成。select方法的作用,对感兴趣的通道操作,进行就绪状态的查询。
- 2、Selector可以不断的查询Channel中发生的操作的就绪状态,并且挑选感兴趣的操作就绪状态。一旦通道有操作的就绪状态打成,并且是Selector感兴趣的操作,就会被Selector选中,放入选择键集合汇总。
- 3、一个选择键,首先是包含了注册在Selector的通道操作的类型,比如,SelectionKey.OP_READ。也包含了特定的通道与特定的选择器之间的注册关系。
- 开发应用程序时,选择键是编程的关键。NIO的编程,就是根据对应的选择键,进行不同的业务逻辑处理。
- 4、选择键的概念,和事件的概念比较类似。一个选择键类似监听器模式里的已给事件。由于Selector不是事件触发的模式,而是主动去查询的模式,所有不叫事件Event,而是叫SelectionKey选择键。
Selector的使用方法
Selector的创建
通过调用Selector.open()方法创建一个Selector对象,如下:
// 获取Selector选择器
Selector selector = Selector.open();
注册Channel到Selector
要实现Selector管理Channel,需要将Channel注册到相应的Selector上。
// 1.获取Selector选择器
Selector selector = Selector.open();
// 2.获取通道
ServerSocketChannel ssc = ServerSocketChannel.open();
// 3.设置为非阻塞
ssc.configureBlocking(false);
// 4.绑定连接
ssc.socket().bind(new InetSocketAddress("127.0.0.1", 8000));
// 5.将通道注册到选择器上并指定监听事件为:接收事件
ssc.register(selector,SelectionKey.OP_ACCEPT);
上述通过调用通道的register方法将它注册到一个选择器上。
首先需要注意的是:
- 1、与Selector一起使用时,Channel必须处于非阻塞模式下 ,否则将抛出异常
IllegalBlockingModeException。这意味着,FileChannel不能与Selector一起使用,因为FileChannel不能切换到非阻塞模式,而套接字相关的所有的通道都可以 - 2、一个通道,并没有一定要支持所有的四种操作。比如服务器通道ServerSocketChannel支持Accept接受操作,而SocketChannel客户端通道则不支持。可以通过通道上的validOps()方法,来获取特定通道下所有支持的操作集合。
轮询查询就绪操作
- 通过Selector的select()方法,可以查询出已经就绪的通道操作,这些就绪的状态集合,保存在一个元素是SelectionKey对象的Set集合中
- 下面是Selector几个重载的查询select()方法:
- select():阻塞到至少有一个通道在你注册的事件上就绪了
- select(long timeout):与select()一致,单最长阻塞事件为timeout毫秒
- selectNow():非阻塞,只要有通道就绪就like返回
select()方法返回的int值,表示有多少通道已经就绪,更准确的说,是目前一次select方法以来到这一次select方法质检的时间段上,有多少通道变成就绪状态。
例如:首次调用select()方法,如果有一个通道变成就绪状态,返回了1,如果再次调用select()方法,另一个通道就绪了,会再次返回1.如果对第一就绪的Channel没有做任何操作,现在就有两个就绪的通道,但在每次select()方法调用之间,只有一个通道就绪了。
一旦调用select()方法,并且返回值不为0时,在Selector中有一个selectedKeys()方法,用来访问已选择键集合,迭代集合的每一个选择键元素,根据就绪操作的类型,完成对应的操作。
示例:
int nReady = selector.select();
Set<SelectionKey> keys = selector.selectedKeys();
Iterator<SelectionKey> it = keys.iterator();
while (it.hasNext()) {
    SelectionKey key = it.next();
    it.remove();
    if (key.isAcceptable()) {
       // 接受就绪操作
    } else if (key.isConnectable()) {
        // 连接就绪操作
    } else if (key.isReadable()) {
        // 读就绪操作
    } else if (key.isWritable()) {
        // 写就绪操作
    }
}
停止选择的方法
选择器执行选择的过程,系统底层会一次询问每个通道是否已经就绪,这个错恒可能会造成调用线程进入阻塞状态,那么我们有以下方法唤醒在select()方法中在阻塞的线程。
wakeup()方法:通过调用Selector对象的wakeup()方法让处在阻塞状态的select()方法立刻返回。该方法使得选择器上的第一个还没有返回的选择操作立即返回。如果当前没有进行中的选择操作,那么下一次对select()方法的一次调用就立即返回。
close()方法:通过close()方法关闭Selector。该方法使得任何一个在选择线程中阻塞的线程都被唤醒(类似wakeup()),同时使得注册到该Selector的所有Channel被注销,所有的键被取消,但是Channel本身并不会关闭。
NIO编程步骤
- 1、创建Selector选择器
- 2、创建ServerSocketChannel通道,并绑定监听端口
- 3、设置Channel通道哦为非阻塞模式
- 4、把Channel注册到Selector选择器上,监听连接事件
- 5、调用Selector的select方法(循环调用),监测通道的就绪状态
- 6、代用selectKeys方法获取就绪Channel集合
- 7、遍历就绪Channel集合,判断就绪事件类型,实现具体的业务操作
- 8、根据业务,决定是否需要再次注册监听事件,重复执行第三步操作
示例代码
服务端代码
    /**
     * 服务端代码
     */
    @Test
    public void ServerDemoTest() {
        try {
            ServerSocketChannel ssc = ServerSocketChannel.open();
            ssc.socket().bind(new InetSocketAddress("127.0.0.1", 8000));
            ssc.configureBlocking(false);

            Selector selector = Selector.open();
            // 注册Channel,并且指定感兴趣的事件是Accept
            ssc.register(selector, SelectionKey.OP_ACCEPT);
            ByteBuffer readBuffer = ByteBuffer.allocate(1024);
            ByteBuffer writeBuffer = ByteBuffer.allocate(128);

            writeBuffer.put("received".getBytes());
            writeBuffer.flip();
            while (true) {
                int nReady = selector.select();
                Set<SelectionKey> keys = selector.selectedKeys();
                Iterator<SelectionKey> it = keys.iterator();
                while (it.hasNext()) {
                    SelectionKey key = it.next();
                    it.remove();
                    if (key.isAcceptable()) {
                        // 创建新的连接,并且把链接注册到selector上
                        // 声明这个Channel只对读操作感兴趣
                        SocketChannel socketChannel = ssc.accept();
                        socketChannel.configureBlocking(false);
                        socketChannel.register(selector, SelectionKey.OP_READ);
                    } else if (key.isReadable()) {
                        SocketChannel socketChannel = (SocketChannel) key.channel();
                        readBuffer.clear();
                        socketChannel.read(readBuffer);
                        readBuffer.flip();
                        System.out.println("received:" + new String(readBuffer.array()));
                        key.interestOps(SelectionKey.OP_WRITE);
                    } else if (key.isWritable()) {
                        writeBuffer.rewind();
                        SocketChannel socketChannel = (SocketChannel) key.channel();
                        socketChannel.write(writeBuffer);
                        key.interestOps(SelectionKey.OP_READ);
                    }
                }
            }
        } catch (Exception e) {
            e.printStackTrace();
客户端代码
    /**
     * 客户端代码
     */
    @Test
    public void clientDemoTest() {
        try {
            SocketChannel socketChannel = SocketChannel.open();
            socketChannel.connect(new InetSocketAddress("127.0.0.1",8000));
            ByteBuffer writeBuffer = ByteBuffer.allocate(32);
            ByteBuffer readBuffer = ByteBuffer.allocate(32);

            writeBuffer.put("hello".getBytes());
            writeBuffer.flip();
            for (;;){
                writeBuffer.rewind();
                socketChannel.write(writeBuffer);
                readBuffer.clear();
                socketChannel.read(readBuffer);
            }
        }catch (IOException e){
            e.printStackTrace();
        }
    }
NIO Pipe与FileLock
Pipe
Java NIO管道是2个线程之间的单向数据连接。Pipe有一个Source通道和一个Sink通道。数据会被写进Sink通道,从Source通道读取。

创建管道
通过Pipe.open()方法打开管道
Pipe pipe = Pipe.open();
写入管道
要向管道写数据,需要访问Sink通道:
Pipe.SinkChannel sinkChannel = pipe.sink();
通过调用SinkChannel的write()方法,将数据写入SinkChannel
String newData = "New String to write to file ..." + System.currentTimeMillis();
ByteBuffer buffer = ByteBuffer.allocate(48);
buffer.clear();
buffer.put(newData.getBytes());
buffer.flip();
while(buffer.hasRemaining()){
    sinkChannel.write(buffer);
}
从管道读取数据
从管道读取数据,需要访问Source通道:
Pipe.SourceChannel sourceChannel = pipe.source();
调用Source通道的read()方法来读取数据
ByteBuffer buffer = ByteBuffer.allocate(48);
int bytesRead = sourceChannel.read(buffer);
read()方法返回的int值会告诉我们多少字节被读进了缓冲区。
示例
package tech.msop.project.nio.pipe;

import java.io.IOException;
import java.nio.ByteBuffer;
import java.nio.channels.Pipe;

/**
 * 管道示例代码
 */
public class PipeDemo {

    public static void main(String[] args) throws IOException {
        // 1.获取管道
        Pipe pipe = Pipe.open();
        // 2.获取sink管道,用来传送数据
        Pipe.SinkChannel sinkChannel = pipe.sink();
        // 3.申请一定大小的缓冲区
        ByteBuffer buffer = ByteBuffer.allocate(1024);
        buffer.put("testPipe".getBytes());
        buffer.flip();
        // 4.sink发送数据
        sinkChannel.write(buffer);
        // 5.创建接收Pipe数据的Source管道
        Pipe.SourceChannel sourceChannel = pipe.source();
        // 6.接收数据,并保存到缓冲区中
        ByteBuffer readBuffer = ByteBuffer.allocate(1024);
        int length = sourceChannel.read(readBuffer);
        System.out.println(new String(readBuffer.array(),0,length));
        // 7.关闭通道
        sourceChannel.close();
        sinkChannel.close();
    }
}
FileLock
FileLock简介
文件锁在OS中很常见,如果多个程序同时访问、修改同一个文件,很容易因为文件数据不同步而出现问题。给文件加一个锁,同一时间,只能有一个程序修改此文件,或者程序都只能读此文件,这就解决了同步问题。
文件锁是进程级别的,不是线程级别的。文件锁可以解决多个进程并发访问、修改同一个文件的问题,但不能解决多线程并发访问、修改同一文件的问题。使用文件锁时,同一进程内的多个线程,可以同时访问、修改此文件。
文件锁是当前程序所属的JVM实例持有的,一旦获取到文件锁(对文件加锁),要调用release(),或者关闭对应的FileChannel对象,或者当前JVM退出,才会释放这个锁。
一旦某个进程(比如说JVM实例)对文件加锁,则在释放这个锁之前,此进程不能再对此文件加锁,也就是说JVM实例在同一文件上的文件锁是不重叠的(进程级别不能重复在同一文件上获取锁)。
文件锁分类
- 排他锁 :又叫独占锁。对文件加排他锁后,该进程可以对此文件进行读写,该进程独占此文件,其他进程不能读写此文件,直到该进程释放文件锁
- 共享锁 :某个进程对文件加共享锁,其他文件进程也可以访问此文件,但这些进程都只能读此文件,不能写。线程是安全的。只要还有一个进程持有共享锁,此文件就只能读,不能写。
使用示例
// 创建FileChannel对象,文件锁只能通过FileChannel对象来使用
FileChannel fileChannel = new FileOuotputStream("./1.txt").getChannel();
// 对文件加锁
FileLock lock = fileChannel.lock();
// 对此文件进行一些读写操作
// ...
// 释放锁
lock.release();
获取文件锁方法
有四种获取文件锁的方法:
- lock():对整个文件加锁,默认为排他锁
- lock(long position,long size,boolean shared):自定义加锁方式,前2个参数指定要加锁的部分(可以只对此文件的部分内容加锁),第三个参数值指定是否是共享锁
- tryLock():对整个文件加锁,默认为排他锁
- tryLock(long position,long size,boolean shared):自定义加锁方式
如果指定为共享锁,则其他进程可读此文件,所有进程均不能写此文件,如果某进程视图对此文件进行写操作,会抛出异常。
lock与tryLock的区别
lock() 是阻塞式的,如果未获取到文件锁,会一直阻塞当前线程,直到获取文件锁
tryLock() 和 lock的作用相同,只不过tryLock是非阻塞式的,tryLock是尝试获取文件锁,获取成功就返回锁对象,否则返回Null,不会阻塞当前线程。
FileLock的两个方法
boolean isShared():此文件锁是否是共享锁
boolean isValid():此文件锁是否还有效。
在某些OS上,对某个文件加锁后,不能对此文件使用通道映射。
完整例子
NIO 其他
Path
Path简介
Java Path接口是Java NIO更新的一部分,同Java NIO一起已经包括在Java6和Java7中。Java Path接口是在Java7中添加到Java NIO的。Path接口位于java.nio.file包中,所以Path接口的完全限定名称为java.nio.file.Path。
Java Path示例表示文件系统中的路径。一个路劲可以指向一个文件或一个目录。路径可以是绝对路径,也可以是相对路径。绝对路径包含从文件系统的根目录到它指向的文件或目录的完整路径。相对路径包含相对于其他路径的文件或目录的路径。
在许多方面,java.nio.file.Path接口类似于java.io.File类,但是有一些差别。不过,在许多情况下,可以使用Path接口来替换File类的使用。
创建Path实例
在使用java.nio.file.Path示例必须创建一个Path实例。可以使用Paths(java.nio.file.Paths)中的静态方法Paths.get()来创建路径示例。
package tech.msop.project.nio.path;

import java.nio.file.Path;
import java.nio.file.Paths;

/**
 * Path 示例代码
 */
public class PathDemo {
    public static void main(String[] args) {
        String fp = "F:\\data\\nio\\1.txt";
        Path pt = Paths.get(fp);
    }
}
上述代码,可以理解为,Paths.get()方法是Path实例的工厂方法。
创建绝对路径
创建绝对路径,通过调用Paths.get()方法,给定绝对路径文件作为参数来完成。
示例代码:
package tech.msop.project.nio.path;

import java.nio.file.Path;
import java.nio.file.Paths;

/**
 * Path 示例代码
 */
public class PathDemo {
    public static void main(String[] args) {
        String fp = "F:\\data\\nio\\1.txt";
        Path pt = Paths.get(fp);
    }
}
上述代码中,绝对路径是F:\data\nio\1.txt。在Java字符串中,\是一个转义字符,需要编写\,告诉Java编译器在字符串中写入一个\字符。
如果在Linux、MacOS等操作系统上,上面的绝对路径如下:
String fp = "/home/data/1.txt";
Path pt = Paths.get(fp);
绝对路径为 /home/data/1.txt
如果在Windows机器上使用了从/开始的路径,那么路径将被解释为相对于当前驱动器。
创建相对路径
Java NIO Path类也可以用于处理相对路径。可以使用Paths.get(basePath,relativePath)方法来创建一个相对路径。
示例代码:
// 示例1:使用相对路径创建,指向路径(目录)
Path projects = Paths.get("F:\\data","nio");
// 示例2: 使用相对路径创建,指向路径(文件)
Path file = Paths.get("F:\\data","nio\\1.txt");
示例1 创建了一个Java Path的实例,指向路径(目录):F:\data\nio
示例2 创建了一个Java Path的实例,指向路径(文件):F:\data\nio\1.txt
Path.normalize()
Path接口的normalize()方法可以使路径标准化。标准化意味着它将移除所有在路径字符串的中间的.和..代码,并解析路径字符串中所引用的路径。
示例代码:
// 标准化路径
String originalPath = "F:\\data\\nio\\..\\chat";
Path path1 = Paths.get(originalPath);
System.out.println("未标准化的路径:"+path1);
Path path2 = path1.normalize();
System.out.println("标准化后的路径:"+path2);
输出结果:标准化的路径不包含nio\…的部分
未标准化的路径:F:\data\nio\..\chat
标准化后的路径:F:\data\chat
Files
Java NIO Files类(java.nio.file.Files)提供了几种操作文件系统中的文件的方法。以下内容介绍Java NIO Files最常用的一些方法。java.nio.file.File类与java.nio.file.Path实例一起工作,因此在学习Files类之前,需要先了解Path类。
Files.createDirectory()
Files.createDirectory()方法,用于根据Path实例创建一个新目录。
示例代码:
Path path = Paths.get("F:\\nio\\files");
try {
    Path newDir = Files.createDirectory(path);
} catch (FileAlreadyExistsException e) {
    // 目录存在异常
    System.out.println("目录已存在:" + e.getMessage());
} catch (IOException e) {
    // 其他异常
    System.out.println("其他异常信息:" + e.getMessage());
}
第一行创建表示要创建的目录的Path示例。在try-catch代码块中,用路径作为参数调用Files.createDirectory()方法。如果创建目录成功,将返回一个Path实例,该实例指向新创建的路径。
如果该目录已经存在,则是抛出一个java.nio.file.FileAlreadyExistsException。如果出现其他错误,可能会抛出IOException。例如,如果想要的新目录的父目录不存在,则可能会抛出IOException。
Files.copy()
Files.copy()方法从一个路径拷贝一个文件到另外一个目录。
示例代码:
Path sourcePath = Paths.get("F:\\nio\\data\\1.txt");
Path destinationPath = Paths.get("F:\\nio\\data\\2.txt");
try {
    // 普通复制
    Files.copy(sourcePath,destinationPath);
}catch (FileAlreadyExistsException e) {
    // 目录存在异常
    System.out.println("目录已存在:" + e.getMessage());
} catch (IOException e) {
    // 其他异常
    System.out.println("其他异常信息:" + e.getMessage());
}
首先,该示例创建两个Path示例。然后,调用Files.copy(),将两个实例作为参数传递。这可以让源路径引用的文件被复制到目标路径引用的文件中。
如果目标文件已经存在,则抛出一个java.nio.file.FileAlreadyExistsException异常。如果有其他错误,则会抛出IOException。例如,如果将该文件复制到不存在的目录,则会抛出IOException。
如何覆盖已存在的文件?
Files.copy()方法的的第三个参数,如果目标文件已经存在,这个参数指示copy()方法覆盖现有的文件。
Files.copy(sourcePath,destinationPath, StandardCopyOption.REPLACE_EXISTING);
Files.move()
Files.move()用于将文件从一个路径移动到另一个路径。移动文件与重命名相同,但是移动文件既可以移动到不同的目录,也可以在相同的操作中更改它的名称。
示例代码:
Path sourcePath = Paths.get("F:\\nio\\data\\1.txt");
Path destinationPath = Paths.get("F:\\nio\\data\\3.txt");
try {
    // 重命名
    Files.move(sourcePath,destinationPath, StandardCopyOption.REPLACE_EXISTING);
} catch (IOException e) {
    // 异常信息
    System.out.println("移动文件失败,异常信息:" + e.getMessage());
}
Files.move()的第三个参数。这个参数告诉我们Files.move()方法来覆盖目标路径上的任何现有文件。
Files.delete()
Files.delete()方法可以删除一个文件或者目录
Path path = Paths.get("F:\\nio\\data\\2.txt");
try {
    Files.delete(path);
} catch (IOException e) {
    // 异常信息
    System.out.println("删除文件失败,异常信息:" + e.getMessage());
}
创建指向要删除的文件的Path,然后调用Files.delete()方法。如果Files.delete()不能删除文件(例如,文件或者目录不存在),会抛出一个IOException。
Files.walkFileTree()
Files.walkFileTree()方法包含递归遍历目录树功能,将Path实例和FileVisitor作为参数。Path实例指向要遍历的目录,FileVisitor在遍历期间被调用。
FileVisitor是一个接口,必须自己实现FileVistor接口,并将实现的实例传递给walkFileTree()方法。在目录遍历过程中,FileVistor实现的每个方法都将被调用。如果不需要实现这些所有方法,那么可以扩展SimpleFileVistor类,它包含FileVistor接口中所有方法的默认实现。
FileVistor接口的方法中,每个都返回一个FileVisitResult枚举示例。FileVisitResult枚举包含一下四个选项:
- CONTINUE:继续
- TERMINATE:终止
- SKIP_SIBLING:跳过同级
- SKIP_SUBTREE:跳过子级
示例代码:查找一个名为1.txt的文件示例
Path path = Paths.get("F:\\nio\\data");
String fileToFind = File.separator + "1.txt";
try {
    Files.walkFileTree(path,new SimpleFileVisitor<Path>(){
        @Override
        public FileVisitResult visitFile(Path file, BasicFileAttributes attrs) throws IOException {
            String fileString = file.toAbsolutePath().toString();
            if (fileString.endsWith(fileToFind)){
                System.out.println("File Found At Path:"+file.toAbsolutePath());
                return FileVisitResult.TERMINATE;
            }
            return FileVisitResult.CONTINUE;
        }
    });
} catch (IOException e) {
    // 异常信息
    System.out.println("查找文件失败,异常信息:" + e.getMessage());
}
java.nio.file.Files类包含许多其他的函数,有关这些方法的更多信息,请查阅java.nio.file.Files类的JavaDoc
AsynchronousFileChannel
在Java 7中,Java NIO中添加了AsynchronousFileChannel,也就是异步的将数据写入文件。
创建AsynchronousFileChannel
通过静态方法open()创建。
示例代码:
Path path = Paths.get("F:\\nio\\data\\1.txt");
try {
    AsynchronousFileChannel fileChannel = AsynchronousFileChannel.open(path, StandardOpenOption.READ);
}catch (IOException e){
    e.printStackTrace();
}
open()方法的第一个参数指向AsynchronousFileChannel相关联的Path示例。
第二个参数是一个或多个打开选项,它告诉AsynchronousFileChannel在文件上执行什么操作。在上述示例代码中,使用的是StandardOpenOption.READ选项,表示该文件将被打开阅读。
通过Future读取数据
通过两种方式从AsynchronousFileChannel读取数据。第一种是调用返回Future的read()方法。
示例代码:
Path path = Paths.get("F:\\nio\\data\\1.txt");
AsynchronousFileChannel fileChannel = null;
try {
    fileChannel = AsynchronousFileChannel.open(path, StandardOpenOption.READ);
}catch (IOException e){
    e.printStackTrace();
}
ByteBuffer buffer = ByteBuffer.allocate(1024);
long position = 0;
Future<Integer> operation = fileChannel.read(buffer,position);
while (!operation.isDone());
buffer.flip();
byte[] data = new byte[buffer.limit()];
buffer.get(data);
System.out.println(new String(data));
buffer.clear();
上述代码:
- 1、创建了一个AsynchronousFileChannel
- 2、创建了一个ByteBuffer,它被传递给read()方法作为参数,以及一个0的位置
- 3、在调用read()之后,循环,知道返回的isDone()方法返回为true
- 4、读取操作完成后,读取数据到ByteBuffer中,然后打印System.out中
通过CompletionHandler读取数据
第二种方法是调用read()方法,该方法将一个CompletionHandler作为参数
示例代码:
Path path = Paths.get("F:\\nio\\data\\1.txt");
AsynchronousFileChannel fileChannel = null;
try {
    fileChannel = AsynchronousFileChannel.open(path, StandardOpenOption.READ);
} catch (IOException e) {
    e.printStackTrace();
}
ByteBuffer buffer = ByteBuffer.allocate(1024);
long position = 0;
fileChannel.read(buffer, position, buffer, new CompletionHandler<Integer, ByteBuffer>() {
    @Override
    public void completed(Integer result, ByteBuffer attachment) {
        System.out.println("result=" + result);
        attachment.flip();
        byte[] data = new byte[attachment.limit()];
        attachment.get(data);
        System.out.println(new String(data));
        attachment.clear();
    }

    @Override
    public void failed(Throwable exc, ByteBuffer attachment) {

    }
});
- 1、读操作完成,将调用CompletionHandler的completed()方法
- 2、对于completed()方法的参数传递一个整数,它告诉我们读取了多少字节,以及传递给read()方法的“附件”。“附件”是read()方法的第三个参数,在上述示例中,它是ByteBuffer,数据也被读取。
- 3、如果读操作失败,则将调用CompletionHandler的failed()方法
通过Future写入数据
和读取一样,可以通过两种方式将数据写入一个AsynchronousFileChannel。
示例代码
Path path = Paths.get("F:\\nio\\data\\1.txt");
AsynchronousFileChannel fileChannel = null;
try {
    fileChannel = AsynchronousFileChannel.open(path, StandardOpenOption.WRITE);
} catch (IOException e) {
    e.printStackTrace();
}
ByteBuffer buffer = ByteBuffer.allocate(1024);
long position = 0;
buffer.put("test async data".getBytes());
buffer.flip();
Future<Integer> future = fileChannel.write(buffer, position);
buffer.clear();
while (!future.isDone());
System.out.println("Write Over");
首先,AsynchronousFileChannel以写模式打开,然后创建一个ByteBuffer,并将一些数据写入其中。然后,ByteBuffer中的数据被写入到文件中。最后,示例检查返回的Future,已查看写操作完成时的情况。
注意,文件必须已经存在,如果该文件不存在,那么write()方法将抛出一个java.nio.fie.NoSuchFileException。
通过CompletionHandler写入数据
示例代码:
Path path = Paths.get("F:\\nio\\data\\1.txt");
if (!Files.exists(path)) {
    // 文件不存在,创建文件
    try {
        Files.createFile(path);
    } catch (IOException e) {
        e.printStackTrace();
    }
}
AsynchronousFileChannel fileChannel = null;
try {
    fileChannel = AsynchronousFileChannel.open(path, StandardOpenOption.WRITE);
} catch (IOException e) {
    e.printStackTrace();
}
ByteBuffer buffer = ByteBuffer.allocate(1024);
long position = 0;
buffer.put("test async data".getBytes());
buffer.flip();
fileChannel.write(buffer, position, buffer, new CompletionHandler<Integer, ByteBuffer>() {
    @Override
    public void completed(Integer result, ByteBuffer attachment) {
        System.out.println("bytes written:"+result);
    }

    @Override
    public void failed(Throwable exc, ByteBuffer attachment) {
        System.out.println("Write Failed");
        exc.printStackTrace();
    }
});
当写操作完成时,会调用CompletionHandler的completed()方法,如果写失败,则会调用failed()方法。
字符集
Java中使用Charset来表示字符集编码对象。
Charset常用静态方法
// 通过编码类型获得Charset对象
public static Charset forName(String charsetName)
// 获得系统支持的所有编码方式
public static SortedMap<String,Charset> availableCharsets()
// 获得当前系统默认的编码方式
public static Charset defaultCharset()
// 判断是否支持该编码类型
public static boolean isSupported(String charsetName)
Charset常用普通方法
// 获得Charset对象的编码类型(String)
public final String name()
// 获得编码器对象
public abstract CharsetEncoder newEncoder()
// 获得解码器对象
public abstract CharsetDecoder newDecoder()
示例代码:
Charset charset = Charset.forName("UTF-8");
// 1. 获得编码器
CharsetEncoder charsetEncoder = charset.newEncoder();
// 2. 获得解码器
CharsetDecoder charsetDecoder = charset.newDecoder();

// 3. 获取需要解码编码的数据
CharBuffer charBuffer = CharBuffer.allocate(1024);
charBuffer.put("字符集编码解码数据");
// 4. 编码数据
ByteBuffer byteBuffer = charsetEncoder.encode(charBuffer);
System.out.println("编码后的数据: ");
for (int i = 0; i < byteBuffer.limit(); i++) {
    System.out.println(byteBuffer.get());
}
// 5. 解码数据
byteBuffer.flip();
CharBuffer decodeBuffer = charsetDecoder.decode(byteBuffer);
System.out.println("解码后的数据: ");
System.out.println(decodeBuffer.toString());
System.out.println("指定其他格式解码:");
Charset otherCharset = Charset.forName("GBK");
byteBuffer.flip();
CharBuffer otherBuffer = otherCharset.decode(byteBuffer);
System.out.println(otherBuffer.toString());
// 6. 获取Charset所支持的字符编码
SortedMap<String, Charset> map = Charset.availableCharsets();
Set<Map.Entry<String, Charset>> set = map.entrySet();
for (Map.Entry<String, Charset> entry:set){
    System.out.println(entry.getKey() + "="+entry.getValue().toString());
}
NIO 综合案例
使用Java NIO 实现一个多人聊天室
服务端代码
package tech.msop.project.nio.chat.server;

import java.io.IOException;
import java.net.InetSocketAddress;
import java.nio.ByteBuffer;
import java.nio.channels.*;
import java.nio.charset.Charset;
import java.nio.charset.StandardCharsets;
import java.util.Iterator;
import java.util.Set;

import static java.nio.charset.StandardCharsets.UTF_8;

/**
 * 聊天室 服务端
 */
public class ChatServer {
    /**
     * 服务端启动方法
     *
     * @throws IOException 异常信息
     */
    public void startServer() throws IOException {
        // 1. 创建Selector选择器
        Selector selector = Selector.open();

        // 2. 创建ServerSocketChannel通道
        ServerSocketChannel serverSocketChannel = ServerSocketChannel.open();

        // 3. 为Channel通道绑定监听端口
        serverSocketChannel.bind(new InetSocketAddress(8000));
        // 设置为非阻塞模式
        serverSocketChannel.configureBlocking(false);

        // 4. 将Channel通道注册到selector选择器上
        serverSocketChannel.register(selector, SelectionKey.OP_ACCEPT);
        System.out.println("服务器已经启动成功了");

        // 5. 循环,等待有新链接进入
        for (; ; ) {
            // 获取Channel数量
            int readChannels = selector.select();
            if (readChannels == 0) {
                continue;
            }
            // 获取可用的Channel
            Set<SelectionKey> selectionKeys = selector.selectedKeys();
            // 遍历集合
            Iterator<SelectionKey> iterator = selectionKeys.iterator();
            while (iterator.hasNext()) {
                SelectionKey selectionKey = iterator.next();
                // 移除set结合当前selectionKey
                iterator.remove();
                // 6. 根据就绪状态,调用对应方法实现具体业务操作
                // 6.1 如果是accept状态
                if (selectionKey.isAcceptable()) {
                    acceptOperator(serverSocketChannel, selector);
                }
                // 6.2 如果是可读状态
                if (selectionKey.isReadable()) {
                    readOperator(selector, selectionKey);
                }
            }
        }
    }

    /**
     * 处理可读状态操作
     *
     * @param selector     选择器
     * @param selectionKey key
     */
    private void readOperator(Selector selector, SelectionKey selectionKey) throws IOException {
        // 1. 从SelectionKey获取已经就绪的通道
        SocketChannel socketChannel = (SocketChannel) selectionKey.channel();

        // 2. 创建Buffer
        ByteBuffer buffer = ByteBuffer.allocate(1024);

        // 3. 循环读取客户端消息
        int readLength = socketChannel.read(buffer);
        String message = "";
        if (readLength > 0) {
            // 切换读模式
            buffer.flip();
            // 读取内容
            message += UTF_8.decode(buffer);
        }
        // 4. 将Channel再次注册到选择器上,监听可读状态
        socketChannel.register(selector, SelectionKey.OP_READ);
        // 5. 把客户端发送消息,广播到其他客户端
        if (message.length() > 0) {
            // 广播给其他客户端
            System.out.println(message);
            castOtherClient(message, selector, socketChannel);
        }
    }

    /**
     * 将消息广播到其他客户端
     *
     * @param message       消息内容
     * @param selector      选择器
     * @param socketChannel 通道
     */
    private void castOtherClient(String message, Selector selector, SocketChannel socketChannel) throws IOException {
        // 1. 获取所有已经接入的channel
        Set<SelectionKey> selectionKeySet = selector.keys();
        // 2. 循环向所有channel广播消息
        for (SelectionKey selectionKey : selectionKeySet) {
            // 获取每个Channel
            SelectableChannel tarChannel = selectionKey.channel();
            // 不需要给自己发送
            if (tarChannel instanceof SocketChannel && tarChannel != socketChannel) {
                ((SocketChannel) tarChannel).write(UTF_8.encode(message));
            }
        }
    }

    /**
     * 处理accept状态操作
     *
     * @param serverSocketChannel 通道
     * @param selector            选择器
     */
    private void acceptOperator(ServerSocketChannel serverSocketChannel, Selector selector) throws IOException{
        // 1. 接入状态,创建SocketCh
        SocketChannel socketChannel = serverSocketChannel.accept();

        // 2. 把SocketChannel设置非阻塞模式
        socketChannel.configureBlocking(false);

        // 3. 把Channel注册到Selector选择器上,监听可读状态
        socketChannel.register(selector,SelectionKey.OP_READ);

        // 4. 客户端回复消息
        socketChannel.write(UTF_8.encode("欢迎进入聊天室,请注意隐私安全。"));
    }

    /**
     * 主方法启动
     *
     * @param args 参数
     */
    public static void main(String[] args) {
        try {
            new ChatServer().startServer();
        } catch (IOException e) {
            e.printStackTrace();
        }
    }
}
客户端代码
客户端启动方法
package tech.msop.project.nio.chat.client;

import java.io.IOException;
import java.net.InetSocketAddress;
import java.nio.channels.SelectionKey;
import java.nio.channels.Selector;
import java.nio.channels.SocketChannel;
import java.util.Scanner;

import static java.nio.charset.StandardCharsets.UTF_8;

/**
 * 客户端方法
 */
public class ChatClient {

    /**
     * 启动客户端方法
     * @param name 客户名称
     * @throws IOException 异常
     */
    public void startClient(String name) throws IOException{
        // 连接服务端
        SocketChannel socketChannel = SocketChannel.open(new InetSocketAddress("127.0.0.1",8000));
        // 接收服务端相应数据
        Selector selector = Selector.open();
        socketChannel.configureBlocking(false);
        socketChannel.register(selector, SelectionKey.OP_READ);
        // 创建线程
        new Thread(new ClientThread(selector)).start();
        // 向服务端发送消息
        Scanner scanner = new Scanner(System.in);
        while (scanner.hasNext()){
            String msg = scanner.nextLine();
            if (msg.length() >0){
                socketChannel.write(UTF_8.encode(name+":"+msg));
            }
        }
    }
}
客户端线程
package tech.msop.project.nio.chat.client;

import java.io.IOException;
import java.nio.ByteBuffer;
import java.nio.channels.SelectableChannel;
import java.nio.channels.SelectionKey;
import java.nio.channels.Selector;
import java.nio.channels.SocketChannel;
import java.util.Iterator;
import java.util.Set;

import static java.nio.charset.StandardCharsets.UTF_8;

/**
 * 客户端线程
 */
public class ClientThread implements Runnable{
    private Selector selector;
    public ClientThread(Selector selector){
        this.selector = selector;
    }
    @Override
    public void run() {
        try{
            for (;;) {
                // 获取Channel数量
                int readChannels = selector.select();
                if (readChannels == 0) {
                    continue;
                }
                // 获取可用的channel
                Set<SelectionKey> selectionKeys = selector.selectedKeys();
                // 遍历集合
                Iterator<SelectionKey> iterator = selectionKeys.iterator();
                while (iterator.hasNext()){
                    SelectionKey selectionKey = iterator.next();
                    // 移除Set集合当前SelectionKey
                    iterator.remove();
                    // 如果是可读状态
                    if (selectionKey.isReadable()){
                        readOperator(selector,selectionKey);
                    }
                }
            }
        }catch (IOException e){
            e.printStackTrace();
        }
    }

    /**
     * 处理可读状态操作
     *
     * @param selector     选择器
     * @param selectionKey key
     */
    private void readOperator(Selector selector, SelectionKey selectionKey) throws IOException {
        // 1. 从SelectionKey获取已经就绪的通道
        SocketChannel socketChannel = (SocketChannel) selectionKey.channel();

        // 2. 创建Buffer
        ByteBuffer buffer = ByteBuffer.allocate(1024);

        // 3. 循环读取客户端消息
        int readLength = socketChannel.read(buffer);
        String message = "";
        if (readLength > 0) {
            // 切换读模式
            buffer.flip();
            // 读取内容
            message += UTF_8.decode(buffer);
        }
        // 4. 将Channel再次注册到选择器上,监听可读状态
        socketChannel.register(selector, SelectionKey.OP_READ);
        // 5. 把客户端发送消息,广播到其他客户端
        if (message.length() > 0) {
            // 广播给其他客户端
            System.out.println(message);
            castOtherClient(message, selector, socketChannel);
        }
    }

    /**
     * 将消息广播到其他客户端
     *
     * @param message       消息内容
     * @param selector      选择器
     * @param socketChannel 通道
     */
    private void castOtherClient(String message, Selector selector, SocketChannel socketChannel) throws IOException {
        // 1. 获取所有已经接入的channel
        Set<SelectionKey> selectionKeySet = selector.keys();
        // 2. 循环向所有channel广播消息
        for (SelectionKey selectionKey : selectionKeySet) {
            // 获取每个Channel
            SelectableChannel tarChannel = selectionKey.channel();
            // 不需要给自己发送
            if (tarChannel instanceof SocketChannel && tarChannel != socketChannel) {
                ((SocketChannel) tarChannel).write(UTF_8.encode(message));
            }
        }
    }
}
测试客户端
package tech.msop.project.nio.chat.client;

import java.io.IOException;

/**
 * 测试客户端1
 */
public class FirstClient {
    public static void main(String[] args) {
        try {
            new ChatClient().startClient("ZhangSan");
        }catch (IOException e){
            e.printStackTrace();
        }
    }
}


