目录
1.算法描述
2.仿真效果预览
3.MATLAB核心程序
4.完整MATLAB
1.算法描述
自然场景下的文本检测是自然场景图像信息提取的基础,在车牌识别、实时翻译、图像检索等领域具有广泛的应用价值及研究意义。基于连通区域的方法是自然场景文本检测中最为常见的方法,其中最大稳定极值区域(Maximally Stable Extremal Regions,MSER)算法和颜色聚类算法都有着广泛的应用。
MSER = Maximally Stable Extremal Regions
最大极值稳定区
业界认为是性能最好的仿射不变区域,MSER是当使用不同的灰度阈值对图像进行二值化时得到的最稳定的区域,特点:
1.对于图像灰度的仿射变化具有不变性
2.稳定性,区域的支持集相对灰度变化稳定
3.可以检测不同精细程度的区域
交通标志检测和识别系统的关键在于交通标志候选区域的分割、交通标志的特征提取和分类器的设计。交通标志背景复杂,很难从其背景中将其分割出来,并且由于交通标志一般放在户外场景中,受外界原因(光照,损坏、遮挡等)影响较大,这就大大加大了交通标志检测的难度。交通标志本身种类繁多,相同形状的交通标志根据其象形图案的不同,意义千差万别,造成识别阶段准确率低。
交通标志路牌中的每个交通标志信息均可以用一个区域特征来表示,最大稳定极值区域(Maximally Stable Extremal Regions,简称 MSER)就是一种很好的区域检测算子,它是由 Matas等人]提出的一种局部区域仿射不变特征的区域检查算子。该算子已用于大规模图像索、识别、以及跟踪,相比其他区域算子,该算子对图像灰度具有仿射变换不变性和多尺度检测目标的优点,能够很好的提取交通标志有效区域,有助于交通标志的定位及分割。MSER算法中,其极值区域的定义为和图像的阈值相关,设定好灰度阈值后,在图像中的某个区域能够成为极值区域的条件是无法再找到一个不大于所设定的灰度阈值的像素点去扩大当前区域。在所有的二值化图中,每个连通区域都是一个极值区域,即使是一个黑点,也是一个极值区域。任选两个极值区域,只有两种关系,一种是没有交集,一种是包含。每个二值图像上可以有多个极值区域,原始灰度图像中每个像素点可能对应多个二值图像上的极值区域。
MSER算法中,其最大稳定极值区域的定义为极值区域随着设置的灰度阈值的增大而逐渐“长大”。这样的一组极值区域由小到大是相互嵌套的关系,分别用来表示这一系列相互嵌套的极值区域序列。如果为MSER,则其满足如下条件:
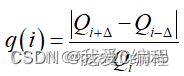
变量表示的是像素差值。由于 Q 是一个像素点的集合,所以绝对值代表的是该集合的基数,表示这个极值区域的面积。需先要先找到所有的极值区域,然后通过上面的“稳定标准”来确定最终的 MSER。
MSER = Maximally Stable Extremal Regions
业界认为是性能最好的仿射不变区域,MSER是当使用不同的灰度阈值对图像进行二值化时得到的最稳定的区域,特点:
1.对于图像灰度的仿射变化具有不变性
2.稳定性,区域的支持集相对灰度变化稳定
3.可以检测不同精细程度的区域
MSER提取过程
1.使用一系列灰度阈值对图像进行二值化处理
2.对于每个阈值得到的二值图像,得到相应的黑色区域与白色区域
3.在比较宽的灰度阈值范围内保持形状稳定的区域就是MSERs
4.评判标准: dA/dt
A: 二值图像区域面积,t: 灰度阈值
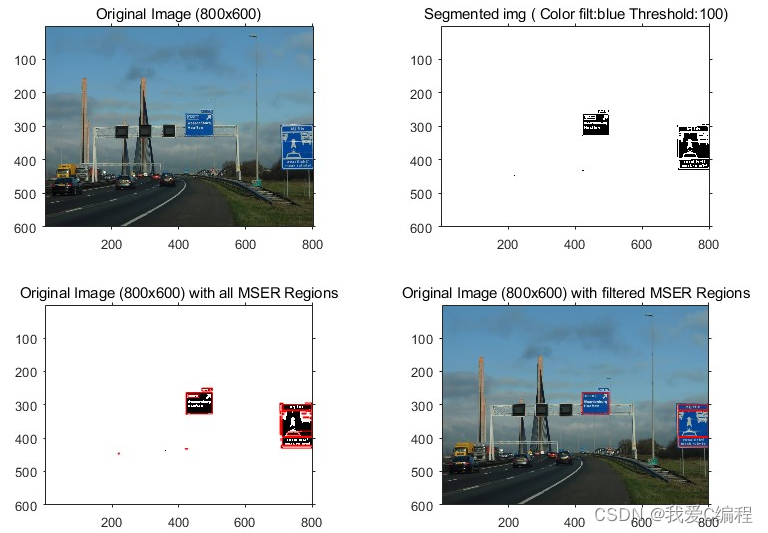
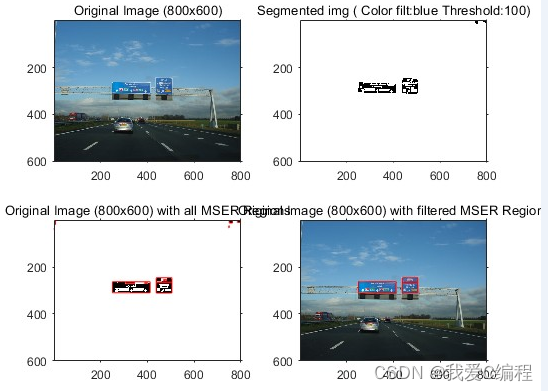
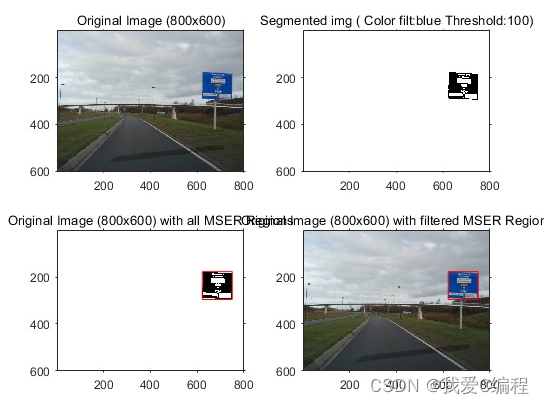
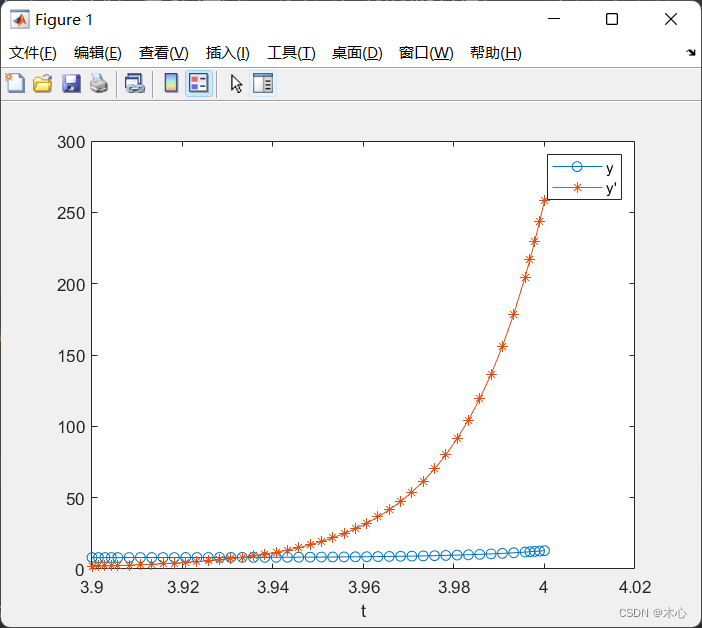
2.仿真效果预览
matlab2022a仿真如下:
3.MATLAB核心程序
% 1) Select input image to process if it's gray or segmented and create a single
% row vector with the image
switch usage
  case 'segmented'
    % Simple segmentation by color threshold
    img_seg = f_seg(img, color_threshold, color_of_interest, ratio);
    subplot(2,2,1);
    imshow(img);
    title(['Original Image (' num2str(width) 'x' num2str(height) ')']);
    subplot(2,2,2);
    imshow(img_seg);
    title(['Segmented img ( Color filt:' color_of_interest ' Threshold:' ...
                                                 num2str(color_threshold) ')']);
    i = 1;
    for y=1:height
      for x=1:width
        if img_seg(y,x) == 0
          img_scan(i,1) = 1;
        else
          img_scan(i,1) = img_seg(y,x);
        end
        i=i+1;
      end
    end
    img_selected = img_seg;
  case 'gray'
    % Image converted in gray scale
    img_grey = rgb2gray(img);
    subplot(2,2,1);
    imshow(img);
    title(['Original Image (' num2str(width) 'x' num2str(height) ')']);
    subplot(2,2,2);
    imshow(img_grey);
    title(['Gray Image (' num2str(size(img_grey,2)) 'x' ...
                                                num2str(size(img_grey,1)) ')']);
    i = 1;
    for y=1:height
      for x=1:width
        if img_grey(y,x) == 0
          img_scan(i,1) = 1;
        else
          img_scan(i,1) = img_grey(y,x);
        end
        i=i+1;
      end
    end
    img_selected = img_grey;
end

% 2) Create the bin mask with accessed pixels
bin_mask_access = zeros(total_pixels_img,1);

% 3) Initialize control variables
priority = 256;                           % Variable that defines the smallest
                                          % 'dark' pixel
current_pixel = 1;
current_edge  = 0;
current_level = img_scan(current_pixel);
bin_mask_access(current_pixel) = 1;
index_regions = 0;
g_index_stack = 0;

% Create the LIFO for the 256 gray leves
for i=1:256
  boundary_pixels(i) = CStack();
end

% Insert into the tree the most 'bright' pixel that equivalent to 256
g_index_stack = g_index_stack + 1;
index_regions = index_regions + 1;
region_stack(index_regions).level = 256;
region_stack(index_regions).area = 0;
region_stack(index_regions).mom(1) = 0;
region_stack(index_regions).mom(2) = 0;
region_stack(index_regions).mom(3) = 0;
region_stack(index_regions).mom(4) = 0;
region_stack(index_regions).mom(5) = 0;
region_stack(index_regions).variation_mser = 999999;
region_stack(index_regions).stable = 0;
region_stack(index_regions).parent = 0;
region_stack(index_regions).child = 0;
region_stack(index_regions).next = 0;
% This is an auxiliary vector (LIFO) to store the regions pushed and not process
% ed by the function 'process_stack' yet, which defines the parent and child nod
% es. In normal behavior this must inflate and deinflate during the image proces
% sing
stack(g_index_stack).node = index_regions;

% Each region_stack has a correspondent rect that represents the rectangle assoc
% iated with that region, it facilitates in the later step
rect(index_regions).top = Inf;
rect(index_regions).bottom = 0;
rect(index_regions).left = Inf;
rect(index_regions).right = 0;
rect(index_regions).draw = 1;

% Insert into the tree the first region for the first pixel level in the image
g_index_stack = g_index_stack + 1;
index_regions = index_regions + 1;
region_stack(index_regions).level = current_level;
region_stack(index_regions).area = 0;
region_stack(index_regions).mom(1) = 0;
region_stack(index_regions).mom(2) = 0;
region_stack(index_regions).mom(3) = 0;
region_stack(index_regions).mom(4) = 0;
region_stack(index_regions).mom(5) = 0;
region_stack(index_regions).variation_mser = 999999;
region_stack(index_regions).stable = 0;
region_stack(index_regions).parent = 0;
region_stack(index_regions).child = 0;
region_stack(index_regions).next = 0;
stack(g_index_stack).node = index_regions;

rect(index_regions).top = Inf;
rect(index_regions).bottom = 0;
rect(index_regions).left = Inf;
rect(index_regions).right = 0;
rect(index_regions).draw = 1;

% 4) Run the main algorithm that will scan all pixels inside the image
gCounter = 0;
done = 0;
while (done == 0)
  gCounter = gCounter+1; % ...it'll always be the total_pixels_img

  % While loop to scan all edges of the pixel in analisys
  while current_edge < 4
    % ...get the neighbor pixel according to correspondent edge in the BIG row v
    % ector that contains all pixels
    neighbor_pixel = f_neighbor_pixel(current_pixel,current_edge,width,height);
    if (bin_mask_access(neighbor_pixel) == 0)
      neighbor_level = img_scan(neighbor_pixel,1);
      bin_mask_access(neighbor_pixel) = 1;
      % If the neighbor pixel has a 'lowest (black)' level than the current one,
      % let push a new region and define as our new current pixel
      if (neighbor_level < current_level)
        boundary_pixels(current_level).push(bitor(bitshift(current_pixel,4), ...
                                                             (current_edge+1)));
        % ..always define priority as the 'darkest' pixel founded, because we'll
        % search for that pixel in the boundary stack after if we do not find an
        % y pixel lowest (black) in the edges
        if (current_level < priority)
          priority = current_level;
        end
				current_pixel = neighbor_pixel;
				current_edge = 0;
				current_level = neighbor_level;

        % Push a new region with the new 'darkest' pixel founded
        index_regions = index_regions + 1;
        region_stack(index_regions).level = current_level;
        region_stack(index_regions).area = 0;
        region_stack(index_regions).mom(1) = 0;
        region_stack(index_regions).mom(2) = 0;
        region_stack(index_regions).mom(3) = 0;
        region_stack(index_regions).mom(4) = 0;
        region_stack(index_regions).mom(5) = 0;
        region_stack(index_regions).variation_mser = 999999;
        region_stack(index_regions).stable = 0;
        region_stack(index_regions).parent = 0;
        region_stack(index_regions).child = 0;
        region_stack(index_regions).next = 0;
        g_index_stack = g_index_stack + 1;
        stack(g_index_stack).node = index_regions;
        % ..and its rectangle combined
        rect(index_regions).top = Inf;
        rect(index_regions).bottom = 0;
        rect(index_regions).left = Inf;
        rect(index_regions).right = 0;
        rect(index_regions).draw = 1;
        continue;
      end

      % If the current pixel is the 'lowest (black)', store the neighboor for la
      % ter search iteration
      boundary_pixels(neighbor_level).push(bitor(bitshift(neighbor_pixel,4),0));
      if (neighbor_level < priority)
        priority = neighbor_level;
      end
    end
    current_edge = current_edge + 1;
  end
A86
4.完整MATLAB
V
![[附源码]Python计算机毕业设计SSM街舞公司管理系统(程序+LW)](https://img-blog.csdnimg.cn/c4b0df466b8a478ba2c39e2f6fb9f5f1.png)


![[阶段4 企业开发进阶] 3. 消息队列--RabbitMQ](https://img-blog.csdnimg.cn/3b2dca96cac045d386d56ecb257cd6fb.png#pic_center)
![[附源码]计算机毕业设计校刊投稿系统Springboot程序](https://img-blog.csdnimg.cn/54f724cde166462cb9ad7f65e0a165e5.png)


![[附源码]计算机毕业设计线上社区管理系统Springboot程序](https://img-blog.csdnimg.cn/5536eb21df34473bba4ddf46f2e94b8f.png)


![[附源码]JAVA毕业设计框架的企业机械设备智能管理系统的设计与实现(系统+LW)](https://img-blog.csdnimg.cn/a1d56a0926054c0b8eaff5b13ed87295.png)