1、PyListObject对象
PyListObject 对象可以有效地支持插入,添加,删除等操作,在 Python 的列表中,无一例外地存放的都是 PyObject 的指针。所以实际上,你可以这样看待 Python 中的列表: vector<PyObject*>。
[listobject.h]
typedef struct {
	PyObject_VAR_HEAD
	/* Vector of pointers to list elements. list[0] is ob_item[0],etc.*/
	PyObject **ob_item;
	int allocated;
} PyListObject;
PyObject_VAR_HEAD中的 ob_size 和 allocated 都和内存的管理有关,类似于C++ 中 vector 的 size 和 capacity ,allocated存放的是当前已经申请到的内存数量,而ob_size是实际存储的元素个数。因此一定满足:
- 0 <= ob_size <= allocatted
- len(list) == ob_size
- ob_item == NULL 则 ob_size == allocated == 0
ob_item指针指向元素列表所在内存块首地址。
2、PyListObject对象的创建和维护
Python 中只提供了唯一一种创建 PyListObject 对象的方法 PyList_New。而且与想象中不一样的是,该方法仅仅制定了元素的个数而没有指定元素的具体内容。
[listobject.c]
PyObject* PyList_New(int size)
{
	PyListObject *op;
	size_t nbytes;
	nbytes = size * sizeof(PyObject *);

	// 获得新的 PyListObject 对象的指针
	if (num_free_lists) {
		//使用缓冲池
		num_free_lists--;
		op = free_lists[num_free_lists];
		_Py_NewReference((PyObject *)op); // 调整引用计数
	}
    else {
		//缓冲池中没有可用的对象,创建对象
		op = PyObject_GC_New(PyListObject, &PyList_Type);
	}

	//为 PyListObject 对象中维护的元素指针数组申请空间
	if (size <= 0)
		op->ob_item = NULL;
	else {
		op->ob_item = (PyObject **) PyMem_MALLOC(nbytes);
		memset(op->ob_item, 0, nbytes);
	}
	op->ob_size = size;
	op->allocated = size;
	_PyObject_GC_TRACK(op);
	return (PyObject *) op;
}
首先,注意到PyListObject同样使用了缓冲池,和前面一样,缓冲池中全部是对象的指针,也就是说节省了对PyListObject这个结构的所占用的内存的反复创建与回收。在创建PyListObject时,会先检查缓冲池free_list中是否有可用的对象。如果有,则直接使用,否则通过PyObject_GC_New咋系统堆中申请内存,创建新的PyListObject。
默认情况下,freelist 列表中会缓存80个对象指针。
#define PyList_MAXFREELIST 80
#endif
static PyListObject *free_list[PyList_MAXFREELIST];
static int numfree = 0;其次,列表对象实际上分为两部分,一是PyListObject对象本身,二是PyListObject对象维护的元素列表,这是两块分离的内存,通过ob_item建立联系。这是一块与PyListtObject对象分离的内存,通过PyObject**类型的op->ob_item连接,初始化中仅仅是使其比特位全0。

最后,就是新初始化的数组的ob_size和allocated是同一个值。
3、设置元素
[listobject.c]
int PyList_SetItem(register PyObject *op, register int i, register
PyObject *newitem)
{
	register PyObject *olditem;
	register PyObject **p;
	if (!PyList_Check(op)) {
		......
	}
	if (i < 0 || i >= ((PyListObject *)op) -> ob_size) {
		Py_XDECREF(newitem);
		PyErr_SetString(PyExc_IndexError, "list assignment index out of range");
		return -1;
	}
	p = ((PyListObject *)op) -> ob_item + i;
	olditem = *p;
	*p = newitem;
	Py_XDECREF(olditem);
	return 0;
}
首先是进行类型检查,然后进行索引的有效性检查,当类型和索引检查通过 后,将待加入的 PyObject 指针放到指定的位置,然后将这个位置原来存放的对象的引用计数减 1。这里的 olditem 很可能会是 NULL,比如向一个新创建的 PyListObject 对象加入元素,就会碰到这样的情况,所以这里必须使用 Py_XDECREF。

4、插入元素
调用PyList_Insert函数,实际是调用内部的ins1函数
[listobject.c]
int PyList_Insert(PyObject *op, int where, PyObject *newitem)
{
	......//类型检查
	return ins1((PyListObject *)op, where, newitem);
}

static int ins1(PyListObject *self, int where, PyObject *v)
{
	int i, n = self->ob_size;
	PyObject **items;
	......
    //注意这里的resize
	if (list_resize(self, n+1) == -1)
		return -1;
	if (where < 0) {
		where += n;
		if (where < 0)
			where = 0;
	}
	if (where > n)
		where = n;
	items = self->ob_item;
	for (i = n; --i >= where; )
		items[i+1] = items[i];
	Py_INCREF(v);
	items[where] = v;
	return 0;
}
插入流程:
- 检查是否为空值;
- 检查allocated是否已经达到系统定义的最大值;
- 对负数游标进行转换;
- 对插入元素右边元素右移一位;
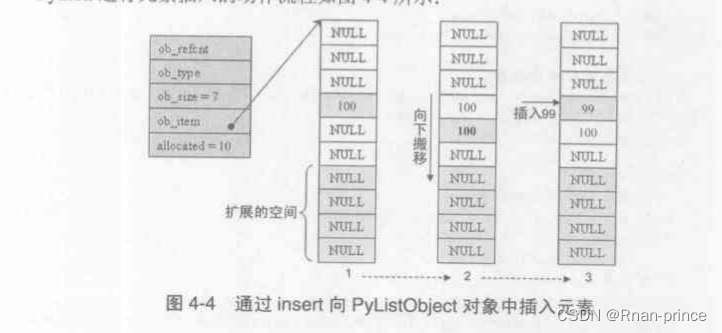
resize函数:
[listobject.c]
static int list_resize(PyListObject *self, int newsize)
{
	PyObject **items;
	size_t new_allocated;
	int allocated = self->allocated;
	/* Bypass realloc() when a previous overallocation is large enough to accommodate the newsize. If the newsize falls lower than half the allocated size, then proceed with the realloc() to shrink the list. */
	if (allocated >= newsize && newsize >= (allocated >> 1)) {
		assert(self->ob_item != NULL || newsize == 0);
		self->ob_size = newsize;
		return 0;
	}
	/* This over-allocates proportional to the list size, making room
	 * for additional growth. The over-allocation is mild, but is
	 * enough to give linear-time amortized behavior over a long
	 * sequence of appends() in the presence of a poorly-performing
	 * system realloc().
	 * The growth pattern is: 0, 4, 8, 16, 25, 35, 46, 58, 72, 88, ...
	 */
    // 新的内存大小
	new_allocated = (newsize >> 3) + (newsize < 9 ? 3 : 6) + newsize;
	if (newsize == 0)
		new_allocated = 0;
	items = self->ob_item;
	PyMem_RESIZE(items, PyObject *, new_allocated);

	self->ob_item = items;
	self->ob_size = newsize;
	self->allocated = new_allocated;
	return 0;
}
分四种情况处理:
- newsize > ob_size && newsize < allocated :简单调整 ob_size 值。
- newsize < ob_size && newsize > allocated/2 :简单调整 ob_size 值。
- newsize < ob_size && newsize < allocated/2 :当前空间过大,收缩空间。
- newsize > ob_size && newsize > allocated :存货不足,继续申请。
append操作其实就是先使用list_resize让现有元素数加 1 ,然后使用PyList_SetItem设置最后一个元素的值。
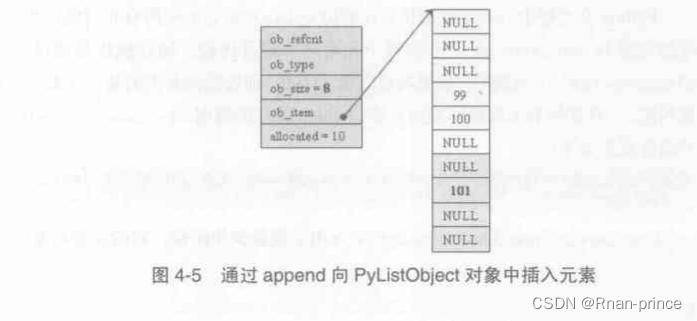
5、删除元素
[listobject.c]
static PyObject * listremove(PyListObject *self, PyObject *v)
{
	int i;
	for (i = 0; i < self->ob_size; i++) {
		int cmp = PyObject_RichCompareBool(self->ob_item[i], v, Py_EQ);
		if (cmp > 0) {
			if (list_ass_slice(self, i, i+1,(PyObject *)NULL) == 0)
			Py_RETURN_NONE;
			return NULL;
		}
		else if (cmp < 0)
			return NULL;
	}
	PyErr_SetString(PyExc_ValueError, "list.remove(x): x not in list");
	return NULL;
}

[listobject.h]
static int list_ass_slice(PyListObject *a, int ilow, int ihigh, PyObject *v);
在遍历 PyListObject 中所有元素的过程中,将待删除的元素与 PyListObject 中的每个元素一一进行比较,比较操作是通过 PyObject_RichCompareBool 完成的。如果发现了匹配,则调用 list_ass_slice 进行删除操作。而list_ass_slice函数则是实现了切片功能,当传入的v是NULL时,实际效果就是将被切的部分删除。在该函数内部,memmove 通过搬移内存+来达到删除元素的目的。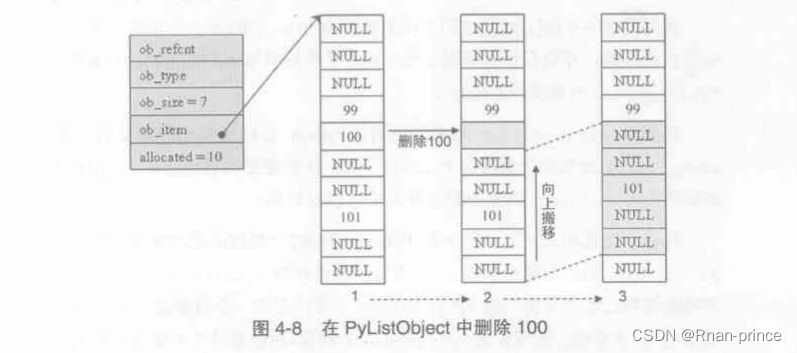
6、PyListObject 对象缓冲池
在创建一个新list时,我们可以看到创建过程分为两部,PyListObject对象和维护的元素列表。与之对应,在销毁一个list时,销毁过程也分离,先销毁PyListObject维护的元素列表,再释放PyListObject自身。
[listobject.c]
static void list_dealloc(PyListObject *op)
{
	int i;
    //调整 list 中对象的引用计数
	if (op->ob_item != NULL) {
		/* Do it backwards, for Christian Tismer. There's a simple test case where somehow this reduces thrashing when a *very* large list is created and immediately deleted. */
		i = op->ob_size;
		while (--i >= 0) {
			Py_XDECREF(op->ob_item[i]);
		}
		PyMem_FREE(op->ob_item);
	}
    //将被销毁的 PyListObject 对象放入缓冲池
	if (num_free_lists < MAXFREELISTS && PyList_CheckExact(op))
		free_lists[num_free_lists++] = op;
	else
		op->ob_type->tp_free((PyObject *)op);
}
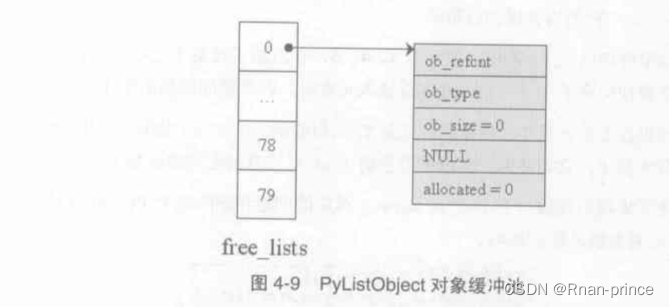
在删除PyListObject自身时,python会先检查缓冲池free_list,查看其中缓冲的PyListObject对象是否满了,如果没有,就将该PyListObject对象放在缓冲池中,以备后用。
删除的时候,使用倒序将op->ob_size中的对象的引用计数全部减一,释放op->ob_size的空间,然后尝试将该对象PyListObject结构体放入缓冲池。注意没有将ob_size和allocated置0,因为下次从缓冲池取用的时候会为其赋新值。
————————————————
参考:
- Python源码剖析(陈孺)


![[附源码]计算机毕业设计校园代取快递系统Springboot程序](https://img-blog.csdnimg.cn/42c57f5301f549cdb1d0c89f225c93a1.png)



![[附源码]计算机毕业设计网上鲜花购物系统Springboot程序](https://img-blog.csdnimg.cn/daa309c783fe45439d301c5cefa1c0ee.png)

![[附源码]计算机毕业设计基于SpringBoot的党务管理系统](https://img-blog.csdnimg.cn/ecb6f2d98eb74baf80dc334ede819a74.png)
