oracle依赖环境包

一、创建用户属组
[root@localhost ~]# groupadd oinstall

[root@localhost ~]# groupadd dba

[root@localhost ~]# groupadd oper

[root@localhost ~]# useradd -g oinstall -G dba,oper oracle

[root@localhost ~]# passwd oracle #修改oracle用户密码
二、创建目录并赋予权限
[root@localhost ~]# mkdir /u01/

[root@localhost ~]# mkdir -p /u01/app/oracle/product/19.3.0/dbhome_1

[root@localhost ~]# mkdir -p /u01/app/oraInventory

[root@localhost ~]# chown -R oracle:oinstall /u01/*

[root@localhost ~]# chmod -R 775 /u01/*
三、解压oracle安装包
[root@localhost ~]# su oracle

[oracle@localhost dbhome_1]# unzip LINUX.X64_193000_db_home.zip #解压oracle安装包到当前路径
四、配置limits限制参数
编辑limits.conf,加入下面几行代码
[root@localhost app]# vim  /etc/security/limits.conf

oracle soft nofile 1024
oracle hard nofile 65536
oracle soft nproc 16384
orcale hard nproc 16384
orcale soft stack 10240
orcale hard stack 32768
orcale hard memlock  134217728
orcale soft memlock  134217728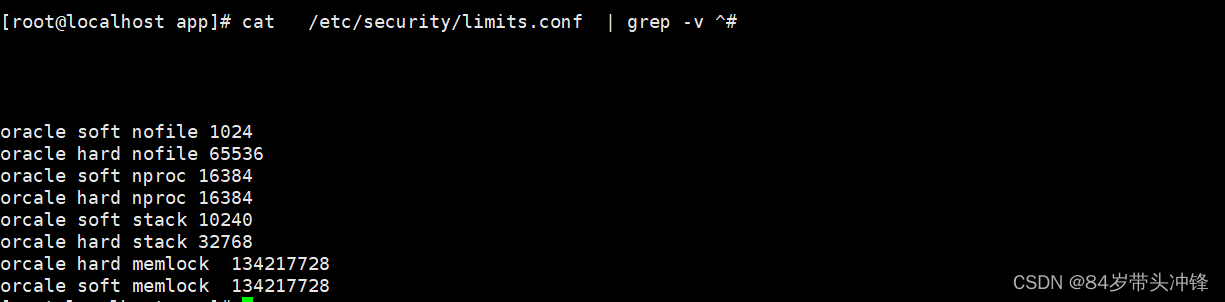
五、PAM验证
在login文件中加入下面一行代码
[root@localhost ~]#
 vim /etc/pam.d/login

session required pam_limits.so 
六、修改内核参数
在sysctl.conf中添加下面代码
[root@localhost app]# cat /etc/sysctl.conf | grep -v ^#
fs.file-max = 6815744
kernel.sem = 250 32000 100 128
kernel.shmmni = 4096
kernel.shmall = 1073741824
kernel.shmmax = 4398046511104
kernel.panic_on_oops =1
net.core.rmem_default =262144
net.core.rmem_max = 4194304
net.core.wmem_default = 262144
net.core.wmem_max = 1048576
net.ipv4.conf.all.rp_filter = 2
net.ipv4.conf.default.rp_filter = 2
fs.aio-max-nr = 1048576
net.ipv4.ip_local_port_range = 9000 65500
kernel.shmmax是共享内存,用内存 * 1024 * 1024 * 1024 * 0.9 算出结果。
kernel.shmall=kernel.shmmax / kernel.shmmni 算出来
如果你想了解下面的参数功能,请参考官方文档。

使用sysctl -p 使之生效。
七、设置oracle用户环境变量
打开下面文件,添加以下内容。
[oracle@wangxin root]$ vim /home/oracle/.bash_profile

export PATH
export TMP=/tmp
export LANG=en_US
export TMPDIR=$TMP
export ORACLE_UNQNAME=orcl
export ORACLE_SID=orcl
export ORACLE_BASE=/u01/app/oracle
export ORACLE_HOME=/u01/app/oracle/product/19.3.0/dbhome_1
export NLS_DATE_FORMAT="yyyy-mm-dd HH24:MI:SS"
PATH=$PATH:$HOME/.local/bin:$HOME/bin:$HOME/bin:$ORACLE_HOME/bin
八、扩展虚拟内存
注意:如是内存小于4G,才需要执行此步骤,否则后面会报内存不足的问题,有些虚拟机会报,购买的云服务器若是小于4G,则必须执行此步骤,若是大于4G,则跳到下一步。
8.1 添加swap分区
先切换至root用户,使用dd命令创建名为swapfile 的swap交换文件,count指定扩展4G虚拟内存。
[root@localhost ~]#
 dd if=/dev/zero of=/var/swapfile bs=1024 count=4194304
8.2、对交换文件格式化并转换为swap分区
[root@localhost ~]# mkswap /var/swapfile8.3、挂载并且激活分区
[root@localhost ~]# swapon /var/swapfile8.4、查看新的swap分区是否激活
[root@localhost ~]#
 free -h
              total        used        free      shared  buff/cache   available
Mem:           1.7G        395M         76M        304K        1.3G        1.2G
Swap:          4.0G        212M        3.8G
8.5、修改 fstab 配置,设置开机自动挂载该分区,添加如下代码
[root@localhost ~]#
 vi /etc/fstab
/var/swapfile   swap  swap  defaults  0  0
8.6、查看是否使用了虚拟内存
[root@localhost ~]# free九、安装oracle数据库(oracle用户)
配置文件位置
数据库安装配置文件 /u01/app/oracle/product/19.3.0/install/response/db_install.rsp
监听配置文件       /u01/app/oracle/product/19.3.0/assistants/netca/netca.rsp
数据库创建配置文件 /u01/app/oracle/product/19.3.0/assistants/dbca/dbca.rsp
端口号配置文件    /u01/app/oracle/product/19.3.0/db_home1/network/admin/listener.ora
db_install.rsp为模板文件,先备份再修改
[root@localhost dbhome_1]$ chmod -R 755 /u01/*
//此处不可以为777
[root@localhost dbhome_1]$ chown -R oracle:oinstall /u01/*
[root@localhost dbhome_1]$ su oracle
[oracle@localhost root]$ cd /u01/app/oracle/product/19.3.0/dbhome_1/
[oracle@localhost dbhome_1]$ cd install/response/
[oracle@localhost response]$ cp db_install.rsp db_install.rsp.bak
编辑db_install.rsp文件
[oracle@localhost response]$ vi db_install.rsp修改如下参数
oracle.install.option=INSTALL_DB_SWONLY

UNIX_GROUP_NAME=oinstall

INVENTORY_LOCATION=/u01/app/oraInventory

ORACLE_HOME=/u01/app/oracle/product/19.3.0/dbhome_1

ORACLE_BASE=/u01/app/oracle

**#****db版本 EE企业版 SE标准版**

oracle.install.db.InstallEdition=EE

oracle.install.db.OSDBA_GROUP=dba

oracle.install.db.OSOPER_GROUP=dba

oracle.install.db.OSBACKUPDBA_GROUP=dba

oracle.install.db.OSDGDBA_GROUP=dba

oracle.install.db.OSKMDBA_GROUP=dba

oracle.install.db.OSRACDBA_GROUP=dba

oracle.install.db.rootconfig.executeRootScript=false
执行安装程序,以oracle用户执行
[oracle@localhost response]$ $ORACLE_HOME/runInstaller -silent -responseFile $ORACLE_HOME/install/response/db_install.rsp
如果报错
You can find the log of this install session at:
 /tmp/InstallActions2023-03-20_09-12-49PM/installActions2023-03-20_09-12-49PM.log
[FATAL] Error in invoking target 'libasmclntsh19.ohso libasmperl19.ohso client_sharedlib' of makefile '/u01/app/oracle/product/19.3.0/dbhome_1/rdbms/lib/ins_rdbms.mk'. See '/tmp/InstallActions2022-12-26_10-15-49AM/installActions2022-12-26_10-15-49AM.log' for details.
Moved the install session logs to:
 /u01/app/oraInventory/logs/InstallActions2023-12-26_09-12-49PM
说明oracle依赖没有安装成功。需重新安装。
安装成功结果如下

重新开一个窗口登录root账号,执行下面2个脚本(root用户)
第一个脚本是对目录和用户组权限的一些修改,第二个是检查日志是否有错误。
[root@localhost ~]# /u01/app/oraInventory/orainstRoot.sh

[root@localhost ~]# /u01/app/oracle/product/19.3.0/dbhome_1/root.sh
若出现如下错误,
CAUSE: Some of the mandatory prerequisites are not met. See logs for details. /u01/app/oraInventory/logs/InstallActions2021-08-20_11-08-55PM/installActions20 21-08-20_11-08-55PM.log
执行,忽略报错,再执行上面两个脚本
[oracle@localhost logs]$ $ORACLE_HOME/runInstaller -ignorePrereq -silent -responseFile $ORACLE_HOME/install/response/db_install.rsp在这里会有有一个问题,若是只生成了root.sh,没有orainstroot.sh脚本,说明你之前装过oracle,且卸载的时候没有删除/etc/oraInst.loc文件,此时就只会生成root.sh一个脚本, 只执行者一个即可。
十、启动默认监听
若是遇到下面的问题,你一定是忘记重新应用环境变量了
[oracle@localhost dbhome_1]$ lsnrctl status bash: lsnrctl: command not found...重新应用环境变量,查看监听状态。
[oracle@localhost dbhome_1]$ source /home/oracle/.bash_profile
[oracle@localhost dbhome_1]$ lsnrctl status

LSNRCTL for Linux: Version 19.0.0.0.0 - Production on 21-AUG-2021 07:56:07

Copyright (c) 1991, 2019, Oracle.  All rights reserved.

Connecting to (ADDRESS=(PROTOCOL=tcp)(HOST=)(PORT=1521))
TNS-12541: TNS:no listener
 TNS-12560: TNS:protocol adapter error
  TNS-00511: No listener
   Linux Error: 111: Connection refused

我们现在打开监听
[oracle@localhost response]$ lsnrctl start

LSNRCTL for Linux: Version 19.0.0.0.0 - Production on 20-MAR-2023 21:24:33

Copyright (c) 1991, 2019, Oracle.  All rights reserved.

Starting /u01/app/oracle/product/19.3.0/dbhome_1/bin/tnslsnr: please wait...

TNSLSNR for Linux: Version 19.0.0.0.0 - Production
Log messages written to /u01/app/oracle/diag/tnslsnr/localhost/listener/alert/log.xml
Listening on: (DESCRIPTION=(ADDRESS=(PROTOCOL=tcp)(HOST=localhost)(PORT=1521)))

Connecting to (ADDRESS=(PROTOCOL=tcp)(HOST=)(PORT=1521))
STATUS of the LISTENER
------------------------
Alias                     LISTENER
Version                   TNSLSNR for Linux: Version 19.0.0.0.0 - Production
Start Date                20-MAR-2023 21:24:33
Uptime                    0 days 0 hr. 0 min. 0 sec
Trace Level               off
Security                  ON: Local OS Authentication
SNMP                      OFF
Listener Log File         /u01/app/oracle/diag/tnslsnr/localhost/listener/alert/log.xml
Listening Endpoints Summary...
  (DESCRIPTION=(ADDRESS=(PROTOCOL=tcp)(HOST=localhost)(PORT=1521)))
The listener supports no services
The command completed successfully

监听已经打开了,端口1521
十一、创建新的监听
安装监听的时候一定要把默认监听停掉,否则会报错
[oracle@localhost root]$ netca /silent /responseFile $ORACLE_HOME/assistants/netca/netca.rsp

Parsing command line arguments:
    Parameter "silent" = true
    Parameter "responsefile" = /u01/app/oracle/product/19.3.0/dbhome_1/assistants/netca/netca.rsp
Done parsing command line arguments.
Oracle Net Services Configuration:
Profile configuration complete.
Oracle Net Listener Startup:
The information provided for this listener is currently in use by other software on this computer.
Check the trace file for details: /u01/app/oracle/cfgtoollogs/netca/trace_OraDB19Home1-2108218AM3113.log
Oracle Net Services configuration failed.  The exit code is 1
我们停掉监听重新建立监听。
[oracle@localhost root]$ lsnrctl stop

LSNRCTL for Linux: Version 19.0.0.0.0 - Production on 21-AUG-2021 08:31:48

Copyright (c) 1991, 2019, Oracle.  All rights reserved.

Connecting to (DESCRIPTION=(ADDRESS=(PROTOCOL=TCP)(HOST=localhost)(PORT=1539)))
The command completed successfully
[oracle@localhost root]$ netca /silent /responseFile $ORACLE_HOME/assistants/netca/netca.rsp

Parsing command line arguments:
    Parameter "silent" = true
    Parameter "responsefile" = /u01/app/oracle/product/19.3.0/dbhome_1/assistants/netca/netca.rsp
Done parsing command line arguments.
Oracle Net Services Configuration:
Profile configuration complete.
Listener "LISTENER" already exists.
Oracle Net Services configuration successful. The exit code is 0
这个时候我们启动监听,可以发现默认监听是1521端口,新建的监听是1539端口。
[oracle@localhost root]$ lsnrctl start

LSNRCTL for Linux: Version 19.0.0.0.0 - Production on 21-AUG-2021 08:34:42

Copyright (c) 1991, 2019, Oracle.  All rights reserved.

Starting /u01/app/oracle/product/19.3.0/dbhome_1/bin/tnslsnr: please wait...

TNSLSNR for Linux: Version 19.0.0.0.0 - Production
System parameter file is /u01/app/oracle/product/19.3.0/dbhome_1/network/admin/listener.ora
Log messages written to /u01/app/oracle/diag/tnslsnr/wangxin/listener/alert/log.xml
Listening on: (DESCRIPTION=(ADDRESS=(PROTOCOL=tcp)(HOST=wangxin)(PORT=1539)))
Listening on: (DESCRIPTION=(ADDRESS=(PROTOCOL=ipc)(KEY=EXTPROC1521_1)))

Connecting to (DESCRIPTION=(ADDRESS=(PROTOCOL=TCP)(HOST=localhost)(PORT=1539)))

STATUS of the LISTENER
------------------------

Alias                     LISTENER
Version                   TNSLSNR for Linux: Version 19.0.0.0.0 - Production
Start Date                21-AUG-2021 08:34:42
Uptime                    0 days 0 hr. 0 min. 0 sec
Trace Level               off
Security                  ON: Local OS Authentication
SNMP                      OFF
Listener Parameter File   /u01/app/oracle/product/19.3.0/dbhome_1/network/admin/listener.ora
Listener Log File         /u01/app/oracle/diag/tnslsnr/wangxin/listener/alert/log.xml
Listening Endpoints Summary...
  (DESCRIPTION=(ADDRESS=(PROTOCOL=tcp)(HOST=wangxin)(PORT=1539)))
  (DESCRIPTION=(ADDRESS=(PROTOCOL=ipc)(KEY=EXTPROC1521_1)))
The listener supports no services
The command completed successfully
十二、创建数据库
静默安装数据库先修改创建响应文件
我们先给响应文件做一个备份。响应文件在$ORACLE_HOME/assistants/dbca下面
[oracle@localhost dbhome_1]$ cd assistants/dbca/
[oracle@localhost dbca]$ ls
dbca.rsp  doc  jlib  templates
[oracle@localhost dbca]$ cp dbca.rsp dbca.rsp.bak
然后我们对响应文件做一个修改
gdbName=orcl

sid=orcl

databaseConfigType=SI

templateName=General_Purpose.dbc

sysPassword=JAVANUMBERONE

systemPassword=JAVANUMBERONE

datafileDestination={ORACLE_BASE}/oradata/{DB_UNIQUE_NAME}/

characterSet=AL32UTF8

nationalCharacterSet=UTF8

listeners=LISTENER

initParams=processes=800,sga_target=1536MB,pga_aggregate_target=512MB
上面的gdbname是全局数据库名称,sid是数据库实例名,可以自己设定,syspassword和systempassword是数据库管理员密码,可以自己随意设定。然后指定了字符集,监听名字。最后面是指定了内存参数,原则上是sga_target占75%,pga_aggregate_target占25%。我电脑只有2G内存,就设定了这样,内存大的可以自行设定换取更好的性能。
开始安装数据库,安装数据库持续时间很长。
[oracle@localhost dbca]$ dbca -silent -createDatabase -responseFile /u01/app/oracle/product/19.3.0/dbhome_1/assistants/dbca/dbca.rsp若是出现报错
[FATAL] [DBT-50000] Unable to check for available memory.
[FATAL] [DBT-50001] Unable to check the value of kernel parameter {0}
则执行安装脚本添加一个参数,去掉内存检查。
[oracle@localhost root]$ dbca -silent -createDatabase -J-Doracle.assistants.dbca.validate.ConfigurationParams=false -responseFile /u01/app/oracle/product/19.3.0/dbhome_1/assistants/dbca/dbca.rsp出现报错
[oracle@localhost dbca]$ dbca -silent -createDatabase -responseFile /u01/app/oracle/product/19.3.0/dbhome_1/assistants/dbca/dbca.rsp
[FATAL] [DBT-10503] Template file is not specified.
解决方案:
dbca.rsp配置文件中templateName=General_Purpose.dbc
出现报错
[oracle@localhost dbca]$ dbca -silent -createDatabase -responseFile /u01/app/oracle/product/19.3.0/dbhome_1/assistants/dbca/dbca.rsp
[FATAL] [DBT-07505] Selected listener (LISTENER) does not exist. ACTION: Specify an existing listener.
新建监听即可解决
[oracle@localhost dbca]$ netca /silent /responseFile $ORACLE_HOME/assistants/netca/netca.rsp

Parsing command line arguments:
    Parameter "silent" = true
    Parameter "responsefile" = /u01/app/oracle/product/19.3.0/dbhome_1/assistants/netca/netca.rsp
Done parsing command line arguments.
Oracle Net Services Configuration:
Profile configuration complete.
Oracle Net Listener Startup:
    Running Listener Control:
      /u01/app/oracle/product/19.3.0/dbhome_1/bin/lsnrctl start LISTENER
    Listener Control complete.
    Listener started successfully.
Listener configuration complete.
Oracle Net Services configuration successful. The exit code is 0
[oracle@localhost dbca]$ lsnrctl stop

LSNRCTL for Linux: Version 19.0.0.0.0 - Production on 20-MAR-2023 22:01:22

Copyright (c) 1991, 2019, Oracle.  All rights reserved.

Connecting to (DESCRIPTION=(ADDRESS=(PROTOCOL=TCP)(HOST=localhost)(PORT=1522)))
The command completed successfully
[oracle@localhost dbca]$ netca /silent /responseFile $ORACLE_HOME/assistants/netca/netca.rsp

Parsing command line arguments:
    Parameter "silent" = true
    Parameter "responsefile" = /u01/app/oracle/product/19.3.0/dbhome_1/assistants/netca/netca.rsp
Done parsing command line arguments.
Oracle Net Services Configuration:
Profile configuration complete.
Listener "LISTENER" already exists.
Oracle Net Services configuration successful. The exit code is 0
[oracle@localhost dbca]$ lsnrctl start

LSNRCTL for Linux: Version 19.0.0.0.0 - Production on 20-MAR-2023 22:02:12

Copyright (c) 1991, 2019, Oracle.  All rights reserved.

Starting /u01/app/oracle/product/19.3.0/dbhome_1/bin/tnslsnr: please wait...

TNSLSNR for Linux: Version 19.0.0.0.0 - Production
System parameter file is /u01/app/oracle/product/19.3.0/dbhome_1/network/admin/listener.ora
Log messages written to /u01/app/oracle/diag/tnslsnr/localhost/listener/alert/log.xml
Listening on: (DESCRIPTION=(ADDRESS=(PROTOCOL=tcp)(HOST=localhost)(PORT=1522)))
Listening on: (DESCRIPTION=(ADDRESS=(PROTOCOL=ipc)(KEY=EXTPROC1522)))

Connecting to (DESCRIPTION=(ADDRESS=(PROTOCOL=TCP)(HOST=localhost)(PORT=1522)))
STATUS of the LISTENER
------------------------
Alias                     LISTENER
Version                   TNSLSNR for Linux: Version 19.0.0.0.0 - Production
Start Date                20-MAR-2023 22:02:12
Uptime                    0 days 0 hr. 0 min. 0 sec
Trace Level               off
Security                  ON: Local OS Authentication
SNMP                      OFF
Listener Parameter File   /u01/app/oracle/product/19.3.0/dbhome_1/network/admin/listener.ora
Listener Log File         /u01/app/oracle/diag/tnslsnr/localhost/listener/alert/log.xml
Listening Endpoints Summary...
  (DESCRIPTION=(ADDRESS=(PROTOCOL=tcp)(HOST=localhost)(PORT=1522)))
  (DESCRIPTION=(ADDRESS=(PROTOCOL=ipc)(KEY=EXTPROC1522)))
The listener supports no services
The command completed successfully
[oracle@localhost dbca]$ dbca -silent -createDatabase -responseFile /u01/app/oracle/product/19.3.0/dbhome_1/assistants/dbca/dbca.rsp
[WARNING] [DBT-06208] The 'SYS' password entered does not conform to the Oracle recommended standards.
   CAUSE:
a. Oracle recommends that the password entered should be at least 8 characters in length, contain at least 1 uppercase character, 1 lower case character and 1 digit [0-9].
b.The password entered is a keyword that Oracle does not recommend to be used as password
   ACTION: Specify a strong password. If required refer Oracle documentation for guidelines.
[WARNING] [DBT-06208] The 'SYSTEM' password entered does not conform to the Oracle recommended standards.
   CAUSE:
a. Oracle recommends that the password entered should be at least 8 characters in length, contain at least 1 uppercase character, 1 lower case character and 1 digit [0-9].
b.The password entered is a keyword that Oracle does not recommend to be used as password
   ACTION: Specify a strong password. If required refer Oracle documentation for guidelines.
Prepare for db operation
10% complete
Copying database files
40% complete
Creating and starting Oracle instance
42% complete
46% complete
you50% complete
54% complete
60% complete
Completing Database Creation
66% complete
69% complete
70% complete
Executing Post Configuration Actions
100% complete
Database creation complete. For details check the logfiles at:
 /u01/app/oracle/cfgtoollogs/dbca/orcl.
Database Information:
Global Database Name:orcl
System Identifier(SID):orcl
Look at the log file "/u01/app/oracle/cfgtoollogs/dbca/orcl/orcl.log" for further details.
到此数据库安装就已经完成了,我们可以使用命令测试一下。
[oracle@localhost root]$ sqlplus / as sysdba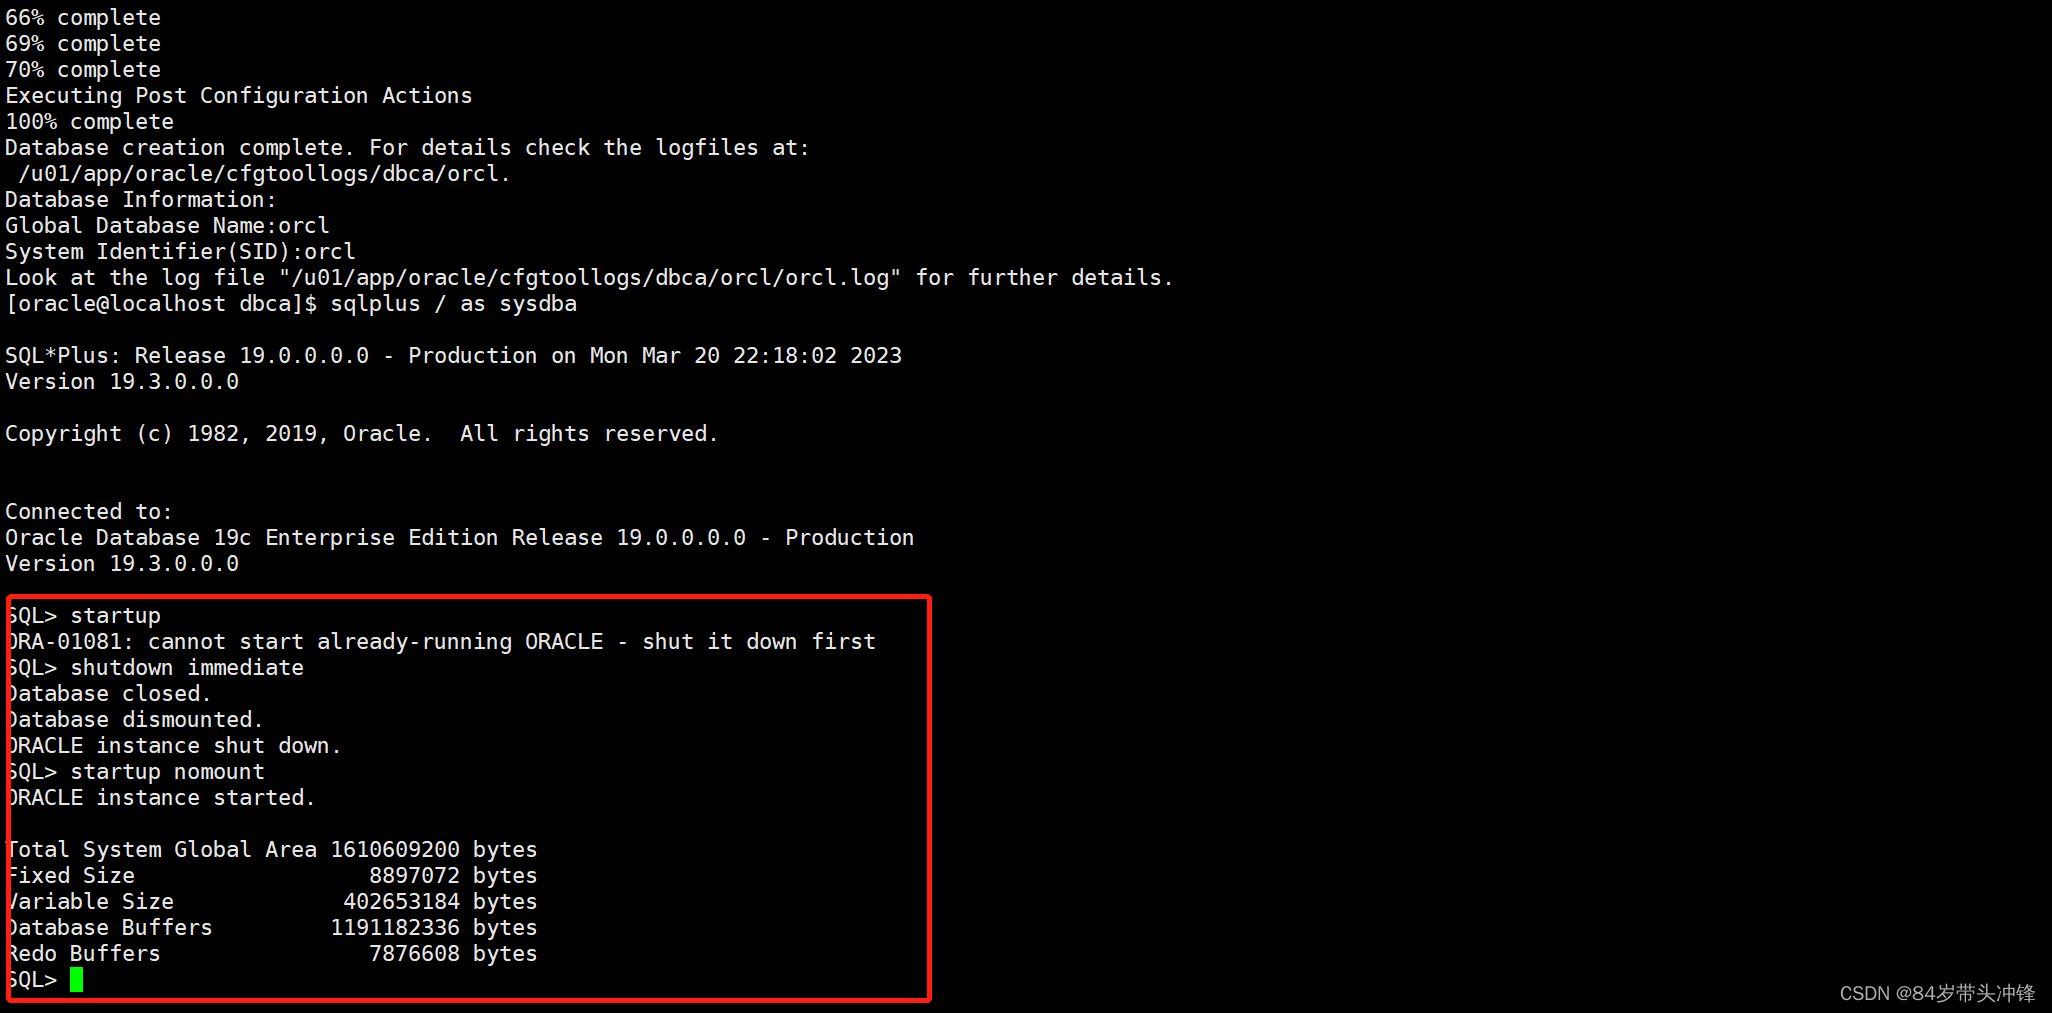
启动时报错
SQL> startup
ORA-01081: cannot start already-running ORACLE - shut it down first
解决办法
sql>shutdown immediate关闭再进行
sql>startup nomount重新开启就可以了
然后使用startup命令启动数据库
也可以使用pl/sql工具连接数据库测试。如果是用购买的云服务器,且用第三方工具连接,请在服务器控制台安全策略配置开放端口。