2022年第十一届认证杯数学中国数学建模国际赛小美赛:C 题 对人类活动进行分类 建模方案及代码实现

1 题目
人类行为理解的一个重要方面是对日常活动的识别和监控。可穿戴活动识别系统可以在许多关键领域提高生活质量,如门诊监测、居家康复、跌倒检测等。基于惯性传感器的活动识别系统通过个人报警系统[1]、跌倒检测和分类[2]、医疗诊断和治疗[3]、在家或学校远程监测儿童、康复和物理治疗、生物力学研究、人体工程学、体育科学、芭蕾舞和舞蹈、动画、电影制作、电视、现场娱乐、虚拟现实和电脑游戏[4]等应用于远程监测和观察老年人。我们尝试使用微型惯性传感器和定位于身体不同部位的磁力计来对人类活动进行分类,获得了以下数据。
这19项活动由8名受试者(4名女性,4名男性,年龄在20至30岁之间)进行,每项活动持续5分钟。每个受试者的每项活动信号总持续时间为5分钟。受试者被要求以自己的风格执行活动,不受活动应该如何执行的限制。因此,在一些活动的速度和幅度上存在着学科间的变化。
对传感器单元进行校准,以获取25赫兹采样频率的数据。5分钟的信号被分成5秒的片段,因此每个活动可获得480(= 60 × 8)个信号片段。
这19个活动是:
1.坐(A1);
2.站(A2);
3.仰卧(A3);
4.右侧卧(A4);
5.上升楼梯(A5);
6.下行楼梯(A6);
7.静止站在电梯里(A7);
8.在电梯里四处走动(A8);
9.在停车场散步(A9);
10.在跑步机上以4公里/小时的速度平卧和15度斜卧行走(A10);
11.在跑步机上以4公里/小时的速度以15度倾斜姿势行走(A11);
12.在跑步机上以8公里/小时的速度跑步(A12);
13.在步进机上锻炼(A13);
14.在交叉训练机上锻炼(A14);
15.水平骑健身自行车(A15);
16.以垂直姿势骑健身自行车(A16);
17.划船(第A17);
18.跳(A18);
19.打篮球(A19)。
要求你们队建立一个合理的数学模型来解决以下问题。
1.请设计一组特征和一个高效的算法,以便从这些穿戴式传感器的数据中对19种人类行为进行分类。
2.由于数据成本高,我们需要在有限的数据集下,使模型具有良好的泛化能力。我们需要对这个问题进行具体的研究和评估。请设计一个可行的方法来评估你的模型的泛化能力。
3.请研究并克服过拟合问题,让你的分类算法可以广泛应用于人的动作分类问题。
完整的数据可以通过以下链接下载:https://caiyun.139.com/m/i?0F5CJUOrpy8oq
附录:文件结构
19项活动(a)
8个科目§
60个片段
躯干(T),右臂(RA),左臂(LA),右腿(RL),左腿(LL) 5个单元
每个单元上有9个传感器(x, y, z加速度计,x, y, z陀螺仪,x, y, z磁力计)
文件夹a01, a02,…, a19包含19个活动记录的数据。
对于每个活动,子文件夹p1, p2,…, p8包含了这8个主题中的每一个的数据。
在每个子文件夹中,有60个文本文件s01, s02,…, s60,每个段一个。
在每个文本文件中,有5个单元× 9个传感器= 45列,5秒× 25赫兹= 125行。
每一列包含在5秒的时间内从其中一个单元的其中一个传感器获取的125个数据样本。
每一行包含在一个用逗号分隔的特定采样时刻从所有45个传感器轴获得的数据。
列1-45对应于:
T_xacc, T_yacc, T_zacc, T_xgyro,…, T_ymag, T_zmag,
RA_xacc, RA_yacc, RA_zacc, RA_xgyro,…, RA_ymag, RA_zmag,
LA_xacc, LA_yacc, LA_zacc, LA_xgyro,…, LA_ymag, LA_zmag,
RL_xacc, RL_yacc, RL_zacc, RL_xgyro,…, RL_ymag, RL_zmag,
LL_xacc, LL_yacc, LL_zacc, LL_xgyro,…, LL_ymag, LL_zmag。因此,1-9对应1号单元(T)的传感器,10-18对应2号单元(RA)的传感器,19-27对应3号单元(LA)的传感器,28-36对应4号单元(RL)的传感器,37-45对应5号单元(LL)的传感器。
2 思路解析
这是分类问题,大多数现成的模型是深度学习,主流的研究方向也是采用的深度学习。用机器学习的很少。当涉及到挖掘特征的时候,需要考虑的就是机器学习方法了。
1.请设计一组特征和一个高效的算法,以便从这些穿戴式传感器的数据中对19种人类行为进行分类。
解析:合并19个文件夹中的文件,对数据预处理,包括缺失值处理、数据归一化,滑动窗口设置。归一化的时候,注意
磁力计的数值远高于加速度计和陀螺仪的数值。如果我们用这些数据训练我们的网络,磁力计数据将比加速度计和陀螺仪具有更高的重要性。将所有传感器数据缩放在一起归一化会保持这种不平衡。单独对每种传感器的数据归一化,就是是重新缩放数据传感器,可以打破这种平衡。
2.由于数据成本高,我们需要在有限的数据集下,使模型具有良好的泛化能力。我们需要对这个问题进行具体的研究和评估。请设计一个可行的方法来评估你的模型的泛化能力。
提高模型的泛化能力。可以采用迁移学习,或者小样本学习中的元学习,都能在有限的样本内提高泛化能力。从四个角度出发
(1)从数据上提升性能
- 对数据做缩放(归一化,标准化等方法)
- 对数据做变换
- 特征选择(机器学习方法时采用)
(2)从算法上提升性能
- 算法的筛选(采用不同的分类模型)
- 重采样的方法(k折交叉验证、分层采样划分)
(3)从算法调优上提升性能
深度学习模型采用一下方法
- 模型可诊断性
- 权重的初始化
- 学习率
- 激活函数
- 网络结构
- batch和epoch
- 正则项
- 优化目标
- 提早结束训练
机器学习模型采用调参,可以考虑网格调参法。
(4)从模型融合上提升性能
- Bagging
- stacking
3.请研究并克服过拟合问题,让你的分类算法可以广泛应用于人的动作分类问题。
(1)数据集角度
- 增加样本量,数据集扩增
- 原有数据加随机噪声
- 重采样
(2)特征角度
- 特征选择
- 特征降维
(3)模型角度
- 降低模型复杂度
正则化 ,正则化正是通过在损失函数上添加额外的参数稀疏性惩罚项(正则项),来限制网络的稀疏性,以此约束网络的实际容量,从而防止模型出现过拟合。L1正则化是将权值的绝对值之和加入损失函数,使得权值中0值比重增大,因此得到的权值较为稀疏。L2正则化是将权重的平方之和加入损失函数,使得权值分布更加平均,所以权值较为平滑。
Dropout舍弃,在深度学习网络的训练过程中,对于神经网络单元,按照一定的概率将其暂时从网络中丢弃,使得每次训练的网络结构多样。
(4)训练角度
-
早停止,如在训练中多次迭代后发现模型性能没有显著提高就停止训练
-
交叉验证
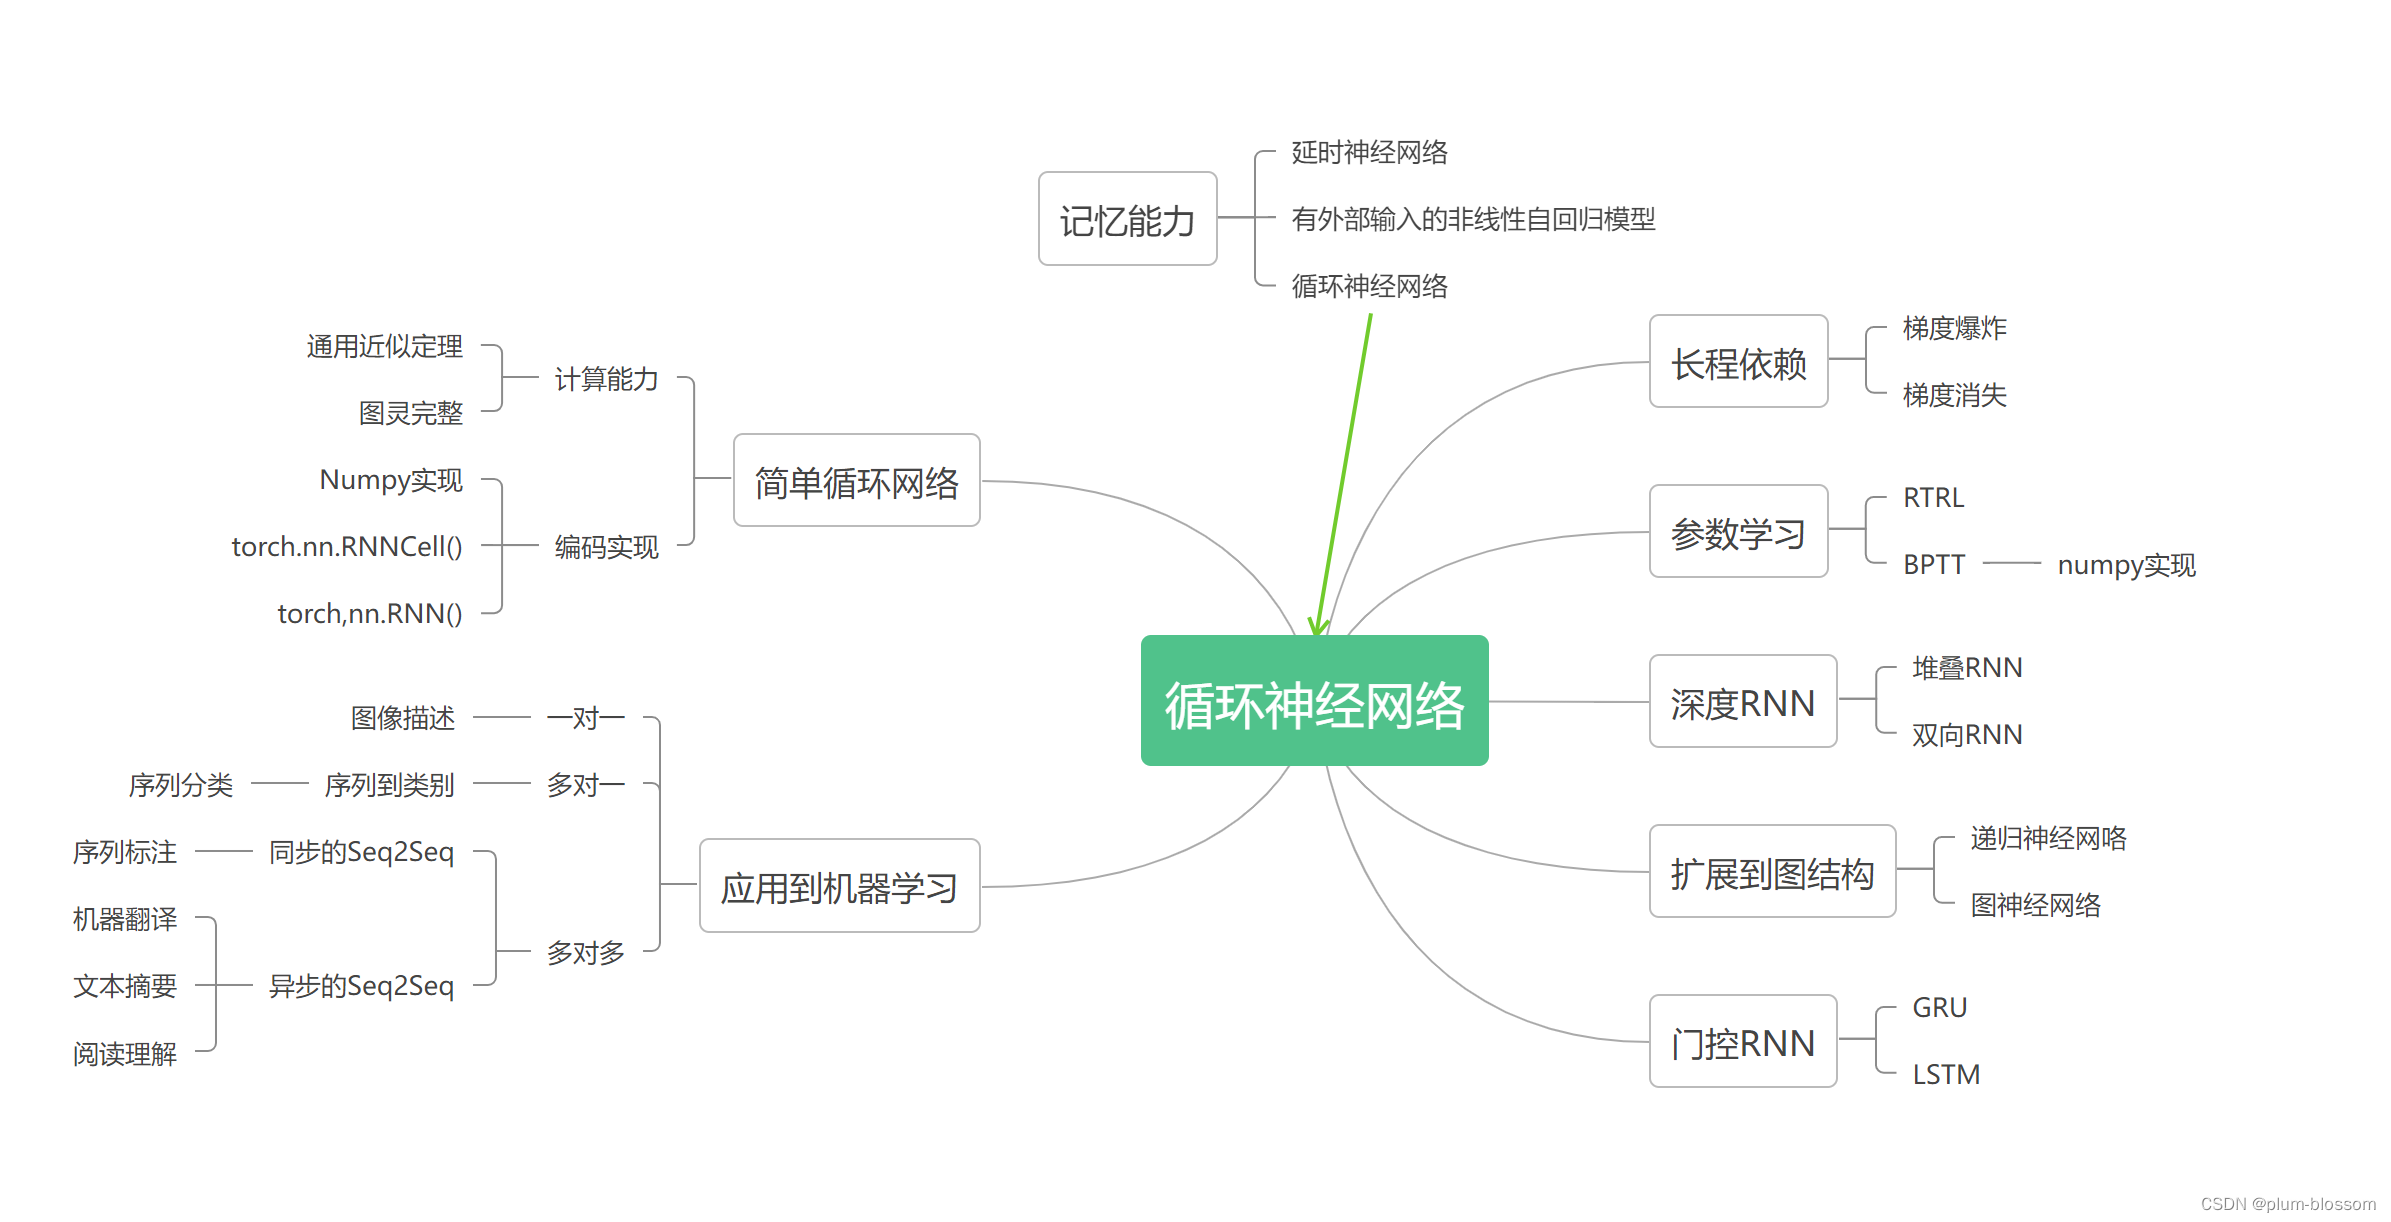
2 python代码实现
2.1 数据分析
(1)数据集分析
data下有19个文件夹,分表表示19个活动,如a01,a01文件夹下有8个文件夹,表示8种科目,如p1,p1下有60个txt文件。表示60个片段。
[外链图片转存失败,源站可能有防盗链机制,建议将图片保存下来直接上传(img-bO0WWsPc-1670034890082)(/Users/mgege007/Desktop/1.png)]
其中每个txt文件中的格式如下
[外链图片转存失败,源站可能有防盗链机制,建议将图片保存下来直接上传(img-EBd4PZpb-1670034890082)(/Users/mgege007/Desktop/2.png)]
有125行,45列。总共费时5秒,一秒25赫兹的速度采集样本,得到5×25行的数据。45列表示身体放置有5个部位的设备,每种设备中有三个传感器,分别是加速度计、陀螺仪和磁力计,每个传感器有x,y,z三个坐标,就得到3×3×5 = 45列。
(2)读取文件分析
以19个动作分类,合并所有文件
import os
import pandas as pd
path = "data" #文件夹目录
files= os.listdir(path) #得到文件夹下的所有文件名称
s = []
all_txt = []
label = []
for A in files: #遍历文件夹
    P_path= path+'/'+A
    if os.path.isdir(P_path): #判断是文件夹,是文件夹才打开
        P= os.listdir(path+'/'+A)
        for s in P:
            S_path= path+'/'+A+'/'+s
            if os.path.isdir(S_path): #判断是文件夹,是文件夹才打开
                S= os.listdir(path+'/'+A+'/'+s)
                for t in S:
                    txtpath  =path+'/'+A+'/'+s+'/'+t
                    。。。略
                    all_txt.append(txtfile)
                    label.extend([A]*len(txtfile))

data = pd.concat(all_txt, axis=0)
cols_str = 'T_xacc1,T_yacc1,T_zacc1,T_xacc2,T_yacc2,T_zacc2,T_xacc3,T_yacc3,T_zacc3,\
        RA_xgyro1,RA_ymag1,RA_zmag1,RA_xgyro2,RA_ymag2,RA_zmag2,RA_xgyro3,RA_ymag3,RA_zmag3,\
        LA_xgyro1,LA_ymag1,LA_zmag1,LA_xgyro2,LA_ymag2,LA_zmag2,LA_xgyro3,LA_ymag3,LA_zmag3,\
        RL_xgyro1,RL_ymag1,RL_zmag1,RL_xgyro2,RL_ymag2,RL_zmag2,RL_xgyro3,RL_ymag3,RL_zmag3,\
        LL_xgyro1,LL_ymag1,LL_zmag1,LL_xgyro2,LL_ymag2,LL_zmag2,LL_xgyro3,LL_ymag3,LL_zmag3'
cols = cols_str.split(',')
data.columns = cols
....
分析总数据集
import pandas as pd

data = pd.read_csv('data/all_txt.csv')
data
[外链图片转存失败,源站可能有防盗链机制,建议将图片保存下来直接上传(img-K6DqzLPm-1670034890083)(/Users/mgege007/Desktop/3.png)]
分析标签的分布
import matplotlib.pyplot as plt

x_axis  = dict(data.label.value_counts()).keys()
y_axis = dict(data.label.value_counts()).values()
plt.figure(figsize=(12, 5))
plt.bar(x_axis, y_axis, width=0.5)
plt.xlabel('Activity label')
plt.ylabel('Count')
plt.title('Label Distribution')
plt.show()
[外链图片转存失败,源站可能有防盗链机制,建议将图片保存下来直接上传(img-Ck0FBrQZ-1670034890084)(/Users/mgege007/Desktop/4.png)]
查看是否 有缺失值
data.isnull().any().value_counts()
False 46 dtype: int64
无缺失值
2.2 数据预处理
(1)归一化
数据归一化,归一化的有两种,在每个标签的样本中逐个归一化,或者在整个数据集中归一化。对比一下归一化效果
def plot_data(y,title):
    plt.figure(figsize=(15, 10))
    x = range(len(y))
    if isinstance(y, pd.DataFrame):
        y1 = list(y.iloc[:,0])
        y2 = list(y.iloc[:,1])
        y3 = list(y.iloc[:,2])
    else:
        y1 = list(y[:,0])
        y2 = list(y[:,1])
        y3 = list(y[:,2])
    plt.plot(x, y1)
    plt.plot(x, y2)
    plt.plot(x, y3)
    plt.title(f'{title}')
    plt.show()
原始数据中挑第一个传感器的x,y,z可视化
# 原始数据
plot_data(data,'origin dataset')
[外链图片转存失败,源站可能有防盗链机制,建议将图片保存下来直接上传(img-K3NolcFl-1670034890084)(/Users/mgege007/Desktop/5.png)]
两种 不同方式的归一化后可视化分析
from sklearn.preprocessing import MinMaxScaler
import pandas as pd

scaler = MinMaxScaler(feature_range=[-1,1])
data_activity_wise = {}
data_activity_wise_scaled = []
all_activites = pd.unique(pd.Series(data.iloc[:, -1]))

for activity in all_activites:
    data_activity_wise[activity] = data[data.iloc[:, -1] == activity]
import numpy as np
for activity, activity_data in data_activity_wise.items():
    data_activity_wise_scaled.append(scaler.fit_transform(activity_data.iloc[:,0:-1]))

scaled_data = scaler.fit_transform(data.iloc[:, 0:-1])
data_scaled_at_once = np.concatenate((scaled_data, data.iloc[:, -1][:, None]), axis=1)
data_activity_wise2 = np.concatenate(data_activity_wise_scaled)
# 第一种归一化方式
plot_data(data_scaled_at_once[:, 0:3], "Scaled at once")
# 第二种归一化方式
plot_data(data_activity_wise2, 'Activity-Wise Scaled')

print("Scaled at once:")
print("Mean(x): " + str(np.mean(data_scaled_at_once[:, 1])) + "; Std(x): " + str(np.std(data_scaled_at_once[:, 1])))
print("Mean(y): " + str(np.mean(data_scaled_at_once[:, 2])) + "; Std(y): " + str(np.std(data_scaled_at_once[:, 2])))
print("Mean(z): " + str(np.mean(data_scaled_at_once[:, 3])) + "; Std(z): " + str(np.std(data_scaled_at_once[:, 3])))

print("\nScaled activity-wise:")
print("Mean(x): " + str(np.mean(data_activity_wise2[:, 0])) + "; Std(x): " + str(np.std(data_activity_wise2[:, 0])))
print("Mean(y): " + str(np.mean(data_activity_wise2[:, 1])) + "; Std(y): " + str(np.std(data_activity_wise2[:, 1])))
print("Mean(z): " + str(np.mean(data_activity_wise2[:, 2])) + "; Std(z): " + str(np.std(data_activity_wise2[:, 2])))
[外链图片转存失败,源站可能有防盗链机制,建议将图片保存下来直接上传(img-UbUKiXe5-1670034890085)(/Users/mgege007/Desktop/6.png)]
[外链图片转存失败,源站可能有防盗链机制,建议将图片保存下来直接上传(img-y7u11Mdy-1670034890085)(/Users/mgege007/Desktop/7.png)]
[外链图片转存失败,源站可能有防盗链机制,建议将图片保存下来直接上传(img-uEhtdRKn-1670034890086)(/Users/mgege007/Desktop/8.png)]
对数据归一化后设置滑动窗口
注意:这里采用了方法二,因为简单。但是磁力计的数值远高于加速度计和陀螺仪的数值。如果我们用这些数据训练我们的网络,磁力计数据将比加速度计和陀螺仪具有更高的重要性。将所有传感器数据缩放在一起归一化会保持这种不平衡。方法一的归一化方法是重新缩放数据传感器,可以打破这种平衡。在改进的时候,可以对比讨论一下,丰富论文的实验内容。
from sklearn.model_selection import StratifiedShuffleSplit
# 归一化
scaled_data = scaler.fit_transform(data.iloc[:, 0:-1])
data_scaled_at_once = np.concatenate((scaled_data, data.iloc[:, -1][:, None]), axis=1)
# 层次划分训练集和验证集
split = StratifiedShuffleSplit(n_splits=1, test_size=0.2, random_state=42)
for train_index, valid_index in split.split(scaled_data,data.iloc[:, -1]):
    train_data = data_scaled_at_once[train_index,:]
    valid_data = data_scaled_at_once[valid_index,:]   # 保证测试集
(2)设置滑动窗口,封装数据集
import numpy as np


def sliding_window_seconds(data, length_in_seconds=1, sampling_rate=50, overlap_ratio=None):
    """
    Return a sliding window measured in seconds over a data array.
    :param data: input array, can be numpy or pandas dataframe
    :param length_in_seconds: window length as seconds
    :param sampling_rate: sampling rate in hertz as integer value
    :param overlap_ratio: overlap is meant as percentage and should be an integer value
    :return: tuple of windows and indices
    """
    windows = []
    indices = []
    curr = 0
    overlapping_elements = 0
    win_len = int(length_in_seconds * sampling_rate)
    if overlap_ratio is not None:
        overlapping_elements = int((overlap_ratio / 100) * win_len)
        if overlapping_elements >= win_len:
            print('Number of overlapping elements exceeds window size.')
            return
    while curr < len(data) - win_len:
        windows.append(data[curr:curr + win_len])
        indices.append([curr, curr + win_len])
        curr = curr + win_len - overlapping_elements
    return np.array(windows), np.array(indices)

def sliding_window_samples(data, samples_per_window, overlap_ratio):
    """
    Return a sliding window measured in number of samples over a data array.
    :param data: input array, can be numpy or pandas dataframe
    :param samples_per_window: window length as number of samples per window
    :param overlap_ratio: overlap is meant as percentage and should be an integer value
    :return: tuple of windows and indices
    """
    windows = []
    indices = []
    curr = 0
    win_len = int(samples_per_window)
    if overlap_ratio is not None:
        overlapping_elements = int((overlap_ratio / 100) * (win_len))
        if overlapping_elements >= win_len:
            print('Number of overlapping elements exceeds window size.')
            return
    while curr < len(data) - win_len:
        windows.append(data[curr:curr + win_len])
        indices.append([curr, curr + win_len])
        curr = curr + win_len - overlapping_elements
    try:
        result_windows = np.array(windows)
        result_indices = np.array(indices)
    except:
        result_windows = np.empty(shape=(len(windows), win_len, data.shape[1]), dtype=object)
        result_indices = np.array(indices)
        for i in range(0, len(windows)):
            result_windows[i] = windows[i]
            result_indices[i] = indices[i]
    return result_windows, result_indices

def apply_sliding_window(data_x, data_y, sliding_window_size, unit, sampling_rate, sliding_window_overlap):
    """
    Function which transforms a dataset into windows of a specific size and overlap.
    :param data_x: numpy float array
        Array containing the features (can be 2D)
    :param data_y: numpy float array
        Array containing the corresponding labels to the dataset (is 1D)
    :param sliding_window_size: integer or float
        Size of each window (either in seconds or units)
    :param unit: string, ['units', 'seconds']
        Unit in which the sliding window is measured
    :param sampling_rate: integer
        Number of hertz in which the dataset is sampled
    :param sliding_window_overlap: integer
        Amount of overlap between the sliding windows (measured in percentage, e.g. 20 is 20%)
    :return:
    """
    output_x = None
    output_y = None
    if unit == 'units':
        tmp_x, _ = sliding_window_samples(data_x, sliding_window_size, sliding_window_overlap)
        tmp_y, _ = sliding_window_samples(data_y, sliding_window_size, sliding_window_overlap)
    elif unit == 'seconds':
        tmp_x, _ = sliding_window_seconds(data_x, sliding_window_size, sampling_rate, sliding_window_overlap)
        tmp_y, _ = sliding_window_seconds(data_y, sliding_window_size, sampling_rate, sliding_window_overlap)
    output_x = tmp_x
    output_y = tmp_y

    output_y = [[i[-1]] for i in output_y]
    return output_x, np.array(output_y).flatten()

# settings for the sliding window (change them if you want to!)
sw_length = 50
sw_unit = 'units'
sw_overlap = 50
# apply a sliding window on top of both the train and validation data; you can use our predefined method
# you can import it via from preprocessing.sliding_window import apply_sliding_window
X_train, y_train = apply_sliding_window(train_data.iloc[:, :-1], train_data.iloc[:, -1], sliding_window_size=sw_length, unit=sw_unit, sampling_rate=50, sliding_window_overlap=sw_overlap)
X_valid, y_valid = apply_sliding_window(valid_data.iloc[:, :-1], valid_data.iloc[:, -1], sliding_window_size=sw_length, unit=sw_unit, sampling_rate=50, sliding_window_overlap=sw_overlap)
2.3 模型训练
(1)采用LSTM,框架是Pytorch。定义LSTM网络结构
from torch import nn

class DeepConvLSTM(nn.Module):
    def __init__(self, config):
        super(DeepConvLSTM, self).__init__()
        # parameters
        self.window_size = config['window_size']
        self.drop_prob = config['drop_prob']
        self.nb_channels = config['nb_channels']
        self.nb_classes = config['nb_classes']
        self.seed = config['seed']
        self.nb_filters = config['nb_filters']
        self.filter_width = config['filter_width']
        self.nb_units_lstm = config['nb_units_lstm']
        self.nb_layers_lstm = config['nb_layers_lstm']

        # define activation function
        self.relu = nn.ReLU(inplace=True)

        # define conv layers
        self.conv1 = nn.Conv2d(1, self.nb_filters, (self.filter_width, 1))
        self.conv2 = nn.Conv2d(self.nb_filters, self.nb_filters, (self.filter_width, 1))
        self.conv3 = nn.Conv2d(self.nb_filters, self.nb_filters, (self.filter_width, 1))
        self.conv4 = nn.Conv2d(self.nb_filters, self.nb_filters, (self.filter_width, 1))

        # define lstm layers
        self.lstm = nn.LSTM(input_size=self.nb_filters * self.nb_channels, hidden_size=self.nb_units_lstm, num_layers=self.nb_layers_lstm)

        # define dropout layer
        self.dropout = nn.Dropout(self.drop_prob)

        # define classifier
        self.fc = nn.Linear(self.nb_units_lstm, self.nb_classes)

    def forward(self, x):
        # reshape data for convolutions
        x = x.view(-1, 1, self.window_size, self.nb_channels)

        # apply convolution and the activation function
        x = self.relu(self.conv1(x))
        x = self.relu(self.conv2(x))
        x = self.relu(self.conv3(x))
        x = self.relu(self.conv4(x))

        # sets the final sequence length
        final_seq_len = x.shape[2]

        # permute dimensions and reshape for LSTM
        x = x.permute(0, 2, 1, 3)
        x = x.reshape(-1, final_seq_len, self.nb_filters * self.nb_channels)

        # apply LSTM (note: it has two outputs!)
        x, _ = self.lstm(x)

        # reshape data for classifier
        x = x.view(-1, self.nb_units_lstm)

        # apply dropout and feed data through classifier
        x = self.dropout(x)
        x = self.fc(x)

        # reshape data and return predicted label of last sample within final sequence (determines label of window)
        out = x.view(-1, final_seq_len, self.nb_classes)
        return out[:, -1, :]
(2)定义训练过程
import torch
from torch.utils.data import DataLoader
from sklearn.metrics import precision_score, recall_score, f1_score, jaccard_score
import time
from misc.torchutils import seed_torch


# this is the config object which contains all relevant settings. Feel free to change them and see how it influences
# your results. Parameters which shouldn't be changed are marked.
config = {
    'nb_filters': 64,
    'filter_width': 11,
    'nb_units_lstm': 128,
    'nb_layers_lstm': 1,
    'drop_prob': 0.5,
    'seed': 1,
    'epochs': 20,
    'batch_size': 100,
    'learning_rate': 1e-4,
    'weight_decay': 1e-6,
    'gpu_name': 'cuda:0',
    'print_counts': False
}

# in order to get reproducible results, we need to seed torch and other random parts of our implementation
seed_torch(config['seed'])

# define the missing parameters within the config file.
# window_size = size of the sliding window in units
# nb_channels = number of feature channels
# nb_classes = number of classes that can be predicted
config['window_size'] = X_train.shape[1]
config['nb_channels'] = X_train.shape[2]
config['nb_classes'] = len(class_names)

# initialize your DeepConvLSTM object
network = DeepConvLSTM(config)

# sends network to the GPU and sets it to training mode
network.to(config['gpu_name'])
network.train()

# initialize the optimizer and loss
optimizer = torch.optim.Adam(network.parameters(), lr=config['learning_rate'], weight_decay=config['weight_decay'])
criterion = nn.CrossEntropyLoss()

# initializes the train and validation dataset in Torch format
train_dataset = torch.utils.data.TensorDataset(torch.from_numpy(X_train), torch.from_numpy(y_train))
val_dataset = torch.utils.data.TensorDataset(torch.from_numpy(X_valid), torch.from_numpy(y_valid))

# define the train- and valloader; use from torch.utils.data import DataLoader
trainloader = DataLoader(train_dataset, batch_size=config['batch_size'], shuffle=True)
valloader = DataLoader(val_dataset, batch_size=config['batch_size'], shuffle=True)

# define your training loop; iterates over the number of epochs
for e in range(config['epochs']):
    # helper objects needed for proper documentation
    train_losses = []
    train_preds = []
    train_gt = []
    start_time = time.time()
    batch_num = 1

    # iterate over the trainloader object (it'll return batches which you can use)
    for i, (x, y) in enumerate(trainloader):
        # sends batch x and y to the GPU
        inputs, targets = x.to(config['gpu_name']), y.to(config['gpu_name'])
        optimizer.zero_grad()

        # send inputs through network to get predictions
        train_output = network(inputs)

        # calculates loss
        loss = criterion(train_output, targets.long())

        # backprogate your computed loss through the network
        # use the .backward() and .step() function on your loss and optimizer
        loss.backward()
        optimizer.step()

        # calculate actual predictions (i.e. softmax probabilites); use torch.nn.functional.softmax()
        train_output = torch.nn.functional.softmax(train_output, dim=1)

        # appends the computed batch loss to list
        train_losses.append(loss.item())

        # creates predictions and true labels; appends them to the final lists
        y_preds = np.argmax(train_output.cpu().detach().numpy(), axis=-1)
        y_true = targets.cpu().numpy().flatten()
        train_preds = np.concatenate((np.array(train_preds, int), np.array(y_preds, int)))
        train_gt = np.concatenate((np.array(train_gt, int), np.array(y_true, int)))

        # prints out every 100 batches information about the current loss and time per batch
        if batch_num % 100 == 0 and batch_num > 0:
            cur_loss = np.mean(train_losses)
            elapsed = time.time() - start_time
            print('| epoch {:3d} | {:5d} batches | ms/batch {:5.2f} | train loss {:5.2f}'.format(e, batch_num, elapsed * 1000 / config['batch_size'], cur_loss))
            start_time = time.time()
            batch_num += 1

    # helper objects
    val_preds = []
    val_gt = []
    val_losses = []

    # sets network to eval mode and
    network.eval()
    with torch.no_grad():
        # iterate over the valloader object (it'll return batches which you can use)
        for i, (x, y) in enumerate(valloader):
            # sends batch x and y to the GPU
            inputs, targets = x.to(config['gpu_name']), y.to(config['gpu_name'])

            # send inputs through network to get predictions
            val_output = network(inputs)

            # calculates loss by passing criterion both predictions and true labels
            val_loss = criterion(val_output, targets.long())

            # calculate actual predictions (i.e. softmax probabilites); use torch.nn.functional.softmax() on dim=1
            val_output = torch.nn.functional.softmax(val_output, dim=1)

            # appends validation loss to list
            val_losses.append(val_loss.item())

            # creates predictions and true labels; appends them to the final lists
            y_preds = np.argmax(val_output.cpu().numpy(), axis=-1)
            y_true = targets.cpu().numpy().flatten()
            val_preds = np.concatenate((np.array(val_preds, int), np.array(y_preds, int)))
            val_gt = np.concatenate((np.array(val_gt, int), np.array(y_true, int)))

        # print epoch evaluation results for train and validation dataset
        print("\nEPOCH: {}/{}".format(e + 1, config['epochs']),
                  "\nTrain Loss: {:.4f}".format(np.mean(train_losses)),
                  "Train Acc: {:.4f}".format(jaccard_score(train_gt, train_preds, average='macro')),
                  "Train Prec: {:.4f}".format(precision_score(train_gt, train_preds, average='macro')),
                  "Train Rcll: {:.4f}".format(recall_score(train_gt, train_preds, average='macro')),
                  "Train F1: {:.4f}".format(f1_score(train_gt, train_preds, average='macro')),
                  "\nVal Loss: {:.4f}".format(np.mean(val_losses)),
                  "Val Acc: {:.4f}".format(jaccard_score(val_gt, val_preds, average='macro')),
                  "Val Prec: {:.4f}".format(precision_score(val_gt, val_preds, average='macro')),
                  "Val Rcll: {:.4f}".format(recall_score(val_gt, val_preds, average='macro')),
                  "Val F1: {:.4f}".format(f1_score(val_gt, val_preds, average='macro')))

        # if chosen, print the value counts of the predicted labels for train and validation dataset
        if config['print_counts']:
            print('Predicted Train Labels: ')
            print(np.vstack((np.nonzero(np.bincount(train_preds))[0], np.bincount(train_preds)[np.nonzero(np.bincount(train_preds))[0]])).T)
            print('Predicted Val Labels: ')
            print(np.vstack((np.nonzero(np.bincount(val_preds))[0], np.bincount(val_preds)[np.nonzero(np.bincount(val_preds))[0]])).T)


    # set network to train mode again
    network.train()
2.4 模型评价
采用的评价指标有
(1)准确率
a
c
c
=
T
P
+
T
N
T
P
+
T
N
+
F
N
+
F
P
acc = \frac{TP+TN}{ TP+TN+FN+FP}
acc=TP+TN+FN+FPTP+TN
准确率是分类问题中最简单直观的评价指标,但存在明显的缺陷。比如如果样本中有99%的样本为正样本,那么分类器只需要一直预测为正,就可以得到99%的准确率,但其实际性能是非常低下的。也就是说,当不同类别样本的比例非常不均衡时,占比大的类别往往成为影响准确率的最主要因素。
(2)精确率
p
r
e
c
i
s
i
o
n
=
T
P
T
P
+
F
P
precision=\frac{TP}{TP+FP}\\
precision=TP+FPTP
指模型预测为正的样本中实际也为正的样本占被预测为正的样本的比例。计算公式为:
P
r
e
c
i
s
i
o
n
=
T
P
T
P
+
F
P
Precision = \frac{TP}{TP+FP}
Precision=TP+FPTP
(3)召回率
R
e
c
a
l
l
=
T
P
T
P
+
F
N
Recall = \frac{TP}{TP + FN}
Recall=TP+FNTP
指实际为正的样本中被预测为正的样本所占实际为正的样本的比例。
sklearn中recall_score方法和precision_score方法的参数说明都是一样的,
(4)F1得分
F1 score是精确率和召回率的调和平均值,计算公式为:
F
1
=
2
∗
p
r
e
c
i
s
i
o
n
∗
r
e
c
a
l
l
p
r
e
c
i
s
i
o
n
+
r
e
c
a
l
l
F1 = \frac{2 * precision * recall}{precision + recall}
F1=precision+recall2∗precision∗recall
Precision体现了模型对负样本的区分能力,Precision越高,模型对负样本的区分能力越强;Recall体现了模型对正样本的识别能力,Recall越高,模型对正样本的识别能力越强。F1 score是两者的综合,F1 score越高,说明模型越稳健。
from misc.torchutils import seed_torch

config = {
    #### TRY AND CHANGE THESE PARAMETERS ####
    # sliding window settings
    'sw_length': 50,
    'sw_unit': 'units',
    'sampling_rate': 50,
    'sw_overlap': 30,
    # network settings
    'nb_conv_blocks': 2,
    'conv_block_type': 'normal',
    'nb_filters': 64,
    'filter_width': 11,
    'nb_units_lstm': 128,
    'nb_layers_lstm': 1,
    'drop_prob': 0.5,
    # training settings
    'epochs': 10,
    'batch_size': 100,
    'loss': 'cross_entropy',
    'weighted': True,
    'weights_init': 'xavier_uniform',
    'optimizer': 'adam',
    'lr': 1e-4,
    'weight_decay': 1e-6,
    'shuffling': True,
    ### UP FROM HERE YOU SHOULD RATHER NOT CHANGE THESE ####
    'no_lstm': False,
    'batch_norm': False,
    'dilation': 1,
    'pooling': False,
    'pool_type': 'max',
    'pool_kernel_width': 2,
    'reduce_layer': False,
    'reduce_layer_output': 10,
    'nb_classes': 8,
    'seed': 1,
    'gpu': 'cuda:0',
    'verbose': False,
    'print_freq': 10,
    'save_gradient_plot': False,
    'print_counts': False,
    'adj_lr': False,
    'adj_lr_patience': 5,
    'early_stopping': False,
    'es_patience': 5,
    'save_test_preds': False
}
import time
import numpy as np
import torch

from sklearn.model_selection import train_test_split
from sklearn.metrics import precision_score, recall_score, f1_score, jaccard_score
from model.train import train
from model.DeepConvLSTM import DeepConvLSTM
from data_processing.sliding_window import apply_sliding_window
from misc.torchutils import seed_torch


# in order to get reproducible results, we need to seed torch and other random parts of our implementation
seed_torch(config['seed'])

# needed for saving results
log_date = time.strftime('%Y%m%d')
log_timestamp = time.strftime('%H%M%S')

print(train_data.shape, valid_data.shape)

# apply the sliding window on top of both the train and validation data; use the "apply_sliding_window" function
# found in data_processing.sliding_window
X_train, y_train = apply_sliding_window(train_data[:, :-1], train_data[:, -1], sliding_window_size=config['sw_length'], unit=config['sw_unit'], sampling_rate=config['sampling_rate'], sliding_window_overlap=config['sw_overlap'])

print(X_train.shape, y_train.shape)

X_valid, y_valid = apply_sliding_window(valid_data[:, :-1], valid_data[:, -1], sliding_window_size=config['sw_length'], unit=config['sw_unit'], sampling_rate=config['sampling_rate'], sliding_window_overlap=config['sw_overlap'])

print(X_valid.shape, y_valid.shape)

# (optional) omit the first feature column (subject_identifier) from the train and validation dataset
# you can do it if you want to as it is not a useful feature
X_train, X_valid = X_train[:, :, 1:], X_valid[:, :, 1:]

# within the config file, set the parameters 'window_size' and 'nb_channels' accordingly
# window_size = size of the sliding window in units
# nb_channels = number of feature channels
config['window_size'] = X_train.shape[1]
config['nb_channels'] = X_train.shape[2]

# define the network to be a DeepConvLSTM object; can be imported from model.DeepConvLSTM
# pass it the config object
net = DeepConvLSTM(config=config)

# defines the loss and optimizer
loss = torch.nn.CrossEntropyLoss()
opt = torch.optim.Adam(net.parameters(), lr=config['lr'], weight_decay=config['weight_decay'])

# convert the features of the train and validation to float32 and labels to uint8 for GPU compatibility
X_train, y_train = X_train.astype(np.float32), y_train.astype(np.uint8)
X_valid, y_valid = X_valid.astype(np.float32), y_valid.astype(np.uint8)

# feed the datasets into the train function; can be imported from model.train
train_valid_net,_, val_output, train_output = train(X_train, y_train, X_valid, y_valid, network=net, optimizer=opt, loss=loss, config=config, log_date=log_date, log_timestamp=log_timestamp)

# the next bit prints out your results if you did everything correctly
cls = np.array(range(config['nb_classes']))

print('\nVALIDATION RESULTS: ')
print("\nAvg. Accuracy: {0}".format(jaccard_score(val_output[:, 1], val_output[:, 0], average='macro')))
print("Avg. Precision: {0}".format(precision_score(val_output[:, 1], val_output[:, 0], average='macro')))
print("Avg. Recall: {0}".format(recall_score(val_output[:, 1], val_output[:, 0], average='macro')))
print("Avg. F1: {0}".format(f1_score(val_output[:, 1], val_output[:, 0], average='macro')))

print("\nVALIDATION RESULTS (PER CLASS): ")
print("\nAccuracy:")
for i, rslt in enumerate(jaccard_score(val_output[:, 1], val_output[:, 0], average=None, labels=cls)):
    print("   {0}: {1}".format(class_names[i], rslt))
print("\nPrecision:")
for i, rslt in enumerate(precision_score(val_output[:, 1], val_output[:, 0], average=None, labels=cls)):
    print("   {0}: {1}".format(class_names[i], rslt))
print("\nRecall:")
for i, rslt in enumerate(recall_score(val_output[:, 1], val_output[:, 0], average=None, labels=cls)):
    print("   {0}: {1}".format(class_names[i], rslt))
print("\nF1:")
for i, rslt in enumerate(f1_score(val_output[:, 1], val_output[:, 0], average=None, labels=cls)):
    print("   {0}: {1}".format(class_names[i], rslt))

print("\nGENERALIZATION GAP ANALYSIS: ")
print("\nTrain-Val-Accuracy Difference: {0}".format(jaccard_score(train_output[:, 1], train_output[:, 0], average='macro') -
                                                  jaccard_score(val_output[:, 1], val_output[:, 0], average='macro')))
print("Train-Val-Precision Difference: {0}".format(precision_score(train_output[:, 1], train_output[:, 0], average='macro') -
                                                   precision_score(val_output[:, 1], val_output[:, 0], average='macro')))
print("Train-Val-Recall Difference: {0}".format(recall_score(train_output[:, 1], train_output[:, 0], average='macro') -
                                                recall_score(val_output[:, 1], val_output[:, 0], average='macro')))
print("Train-Val-F1 Difference: {0}".format(f1_score(train_output[:, 1], train_output[:, 0], average='macro') -
                                            f1_score(val_output[:, 1], val_output[:, 0], average='macro')))
import numpy as np
from sklearn.metrics import accuracy_score,precision_score,recall_score,f1_score

def print_metric(y_true, y_pred):
    print(accuracy_score(y_true, y_pred))
    print(precision_score(y_true, y_pred, average='macro'))
    print(recall_score(y_true, y_pred, average='macro'))
    print(f1_score(y_true, y_pred, average='macro'))
3 建模方案及代码下载
(1)方法一:https://gitee.com/liumengdemayun/BetterBench-Shop/tree/master
(2)方法二:私信我
(3)本文历史竞赛博客
![[附源码]Python计算机毕业设计Django茂名特产销售商城网站](https://img-blog.csdnimg.cn/6ffe9a19a2484de2a8f9dcaa8f492322.png)
![[Java安全]—再探Filter内存马](https://img-blog.csdnimg.cn/img_convert/1509903dfabbad47c0833af53a44fc92.png)
![[Python私活案例]24行代码,轻松赚取400元,运用Selenium爬取39万条数据](https://img-blog.csdnimg.cn/img_convert/72dff3caf8ea5bfb18b5d65186900045.png)