前言
上一篇我们具体分析了窗口管理者WindowManagerService的启动流程,对于WindowManagerService有了一个初步的认识。在此基础上,我本打算应该进一步分析WindowManagerService是如何管理系统中的各种窗口的,然而由于Android系统的架构设计,在分析WindowManagerService之前,我们必须先对WindowManager有一个基本的认识,才能更好的理解WindowManagerService的对窗口的管理过程。
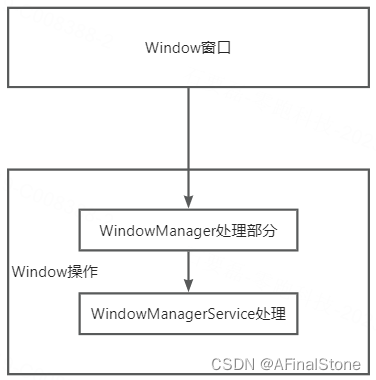
如上图所示,系统主要是通过WindowManager和WindowManagerService对窗口进行操作管理的,WindowManager更上层一些,WindowManagerService更底层一些,WindowManager对窗口的各种处理最终都是通过调用WindowMnagerService实现的。不同类型的窗口,WindowManager的添加过程可能会有所不同,但是WindowManagerService处理的部分,基本上是一样的。
一、窗口类型
在分析WindowManager对窗口的管理之前,我们需要先来认识一下Android系统中的窗口类型,因为不同的窗口类型,WindowManager的添加过程会有所不同。
Window的类型有很多种,比如应用程序窗口、系统错误窗口、输入法窗口、PopupWindow、Toast、Dialog等。总的来说Window分为三大类型,分别是Application Window(应用程序窗口)、Sub Window(子窗口)、System Window(系统窗口),每个大类型中又分很多小类型,它们都定义在WindowManager的静态内部类LayoutParams中,下面简单介绍一下Window的三大类型。
1、应用程序窗口
Activity就是一个典型的应用程序窗口,应用程序窗口包含的类型如下所示:
frameworks/base/core/java/android/view/WindowManager.java
public interface WindowManager extends ViewManager {
    public static class LayoutParams extends ViewGroup.LayoutParams implements Parcelable {
        //应用程序窗口的开始值
        public static final int FIRST_APPLICATION_WINDOW = 1;
        //应用程序窗口的基础值,其他窗口的值都要大于这个值
        public static final int TYPE_BASE_APPLICATION   = 1;
        //普通的应用程序窗口类型
        public static final int TYPE_APPLICATION        = 2;
        //应用程序启动窗口类型,用户系统在应用程序窗口启动前显示的窗口
        public static final int TYPE_APPLICATION_STARTING = 3;
        //这是TYPE_APPLICATION的变体,确保WindowManager在APP展示之前绘制完成此窗口
        public static final int TYPE_DRAWN_APPLICATION = 4;
        ///应用程序窗口的开始值
        public static final int LAST_APPLICATION_WINDOW = 99;
}
}
应用程序窗口的Type值的范围为1~99。
2、子窗口
子窗口不能单独存在,需要依附于其他窗口才行,PopupWindow就属于子窗口。子窗口的类型定义如下所示:
frameworks/base/core/java/android/view/WindowManager.java
public interface WindowManager extends ViewManager {
    public static class LayoutParams extends ViewGroup.LayoutParams implements Parcelable {
       //子窗口类型初始值
       public static final int FIRST_SUB_WINDOW = 1000;
        public static final int TYPE_APPLICATION_PANEL = FIRST_SUB_WINDOW;
        public static final int TYPE_APPLICATION_MEDIA = FIRST_SUB_WINDOW + 1;
        public static final int TYPE_APPLICATION_SUB_PANEL = FIRST_SUB_WINDOW + 2;
        public static final int TYPE_APPLICATION_ATTACHED_DIALOG = FIRST_SUB_WINDOW + 3;
        public static final int TYPE_APPLICATION_MEDIA_OVERLAY  = FIRST_SUB_WINDOW + 4;
        public static final int TYPE_APPLICATION_ABOVE_SUB_PANEL = FIRST_SUB_WINDOW + 5;
        //子窗口类型结束值
        public static final int LAST_SUB_WINDOW = 1999;
}
}
子窗口的Type值的范围为1000~1999。
3、系统窗口
Toast、输入法窗口、系统音量条窗口、系统错误窗口都属于系统窗口。系统窗口的类型定义如下所示:
public interface WindowManager extends ViewManager {
    public static class LayoutParams extends ViewGroup.LayoutParams implements Parcelable {
        //系统窗口类型初始值
        public static final int FIRST_SYSTEM_WINDOW     = 2000;
        //系统状态栏,会显示在所有用户窗口中
        public static final int TYPE_STATUS_BAR         = FIRST_SYSTEM_WINDOW;
        //搜索条,会显示在所有用户窗口中
        public static final int TYPE_SEARCH_BAR         = FIRST_SYSTEM_WINDOW+1;
        //通话界面,会显示在所有用户窗口中
        @Deprecated //use TYPE_APPLICATION_OVERLAY instead
        public static final int TYPE_PHONE              = FIRST_SYSTEM_WINDOW+2;
        //系统Alert,只会显示在拥有者的窗口中
        @Deprecated //use TYPE_APPLICATION_OVERLAY instead
        public static final int TYPE_SYSTEM_ALERT       = FIRST_SYSTEM_WINDOW+3;
       //锁屏界面,会显示在所有用户窗口中
        public static final int TYPE_KEYGUARD           = FIRST_SYSTEM_WINDOW+4;
        //Toast窗口,只会显示在拥有者的窗口中
        @Deprecated//use TYPE_APPLICATION_OVERLAY instead
        public static final int TYPE_TOAST              = FIRST_SYSTEM_WINDOW+5;
        //系统重载窗口,只会显示在拥有者的窗口中
        @Deprecated //use TYPE_APPLICATION_OVERLAY instead
        public static final int TYPE_SYSTEM_OVERLAY     = FIRST_SYSTEM_WINDOW+6;
        //高权限通话窗口,会显示在所有用户窗口中
        @Deprecated //use TYPE_APPLICATION_OVERLAY instead
        public static final int TYPE_PRIORITY_PHONE     = FIRST_SYSTEM_WINDOW+7;
        //系统弹窗,会显示在所有用户窗口中
        public static final int TYPE_SYSTEM_DIALOG      = FIRST_SYSTEM_WINDOW+8;
        //锁屏弹窗,会显示在所有用户窗口中
        public static final int TYPE_KEYGUARD_DIALOG    = FIRST_SYSTEM_WINDOW+9;
        //系统错误,只会显示在拥有者的窗口中
        @Deprecated//use TYPE_APPLICATION_OVERLAY instead
        public static final int TYPE_SYSTEM_ERROR       = FIRST_SYSTEM_WINDOW+10;
        //输入法,只会显示在拥有者的窗口中
        public static final int TYPE_INPUT_METHOD       = FIRST_SYSTEM_WINDOW+11;
        //输入法弹窗,只会显示在拥有者的窗口中
        public static final int TYPE_INPUT_METHOD_DIALOG= FIRST_SYSTEM_WINDOW+12;
        //壁纸,只会显示在拥有者的窗口中
        public static final int TYPE_WALLPAPER          = FIRST_SYSTEM_WINDOW+13;
        //状态栏控制面板,会显示在所有用户窗口中
        public static final int TYPE_STATUS_BAR_PANEL   = FIRST_SYSTEM_WINDOW+14;
        //安全系统重载,只会显示在拥有者的窗口中
        public static final int TYPE_SECURE_SYSTEM_OVERLAY = FIRST_SYSTEM_WINDOW+15;
       //拖拽,只会显示在拥有者的窗口中
        public static final int TYPE_DRAG               = FIRST_SYSTEM_WINDOW+16;
       //状态栏子控制面板,会显示在所有用户窗口中
        public static final int TYPE_STATUS_BAR_SUB_PANEL = FIRST_SYSTEM_WINDOW+17;
        //焦点,会显示在所有用户窗口中
        public static final int TYPE_POINTER = FIRST_SYSTEM_WINDOW+18;
        //系统导航栏,会显示在所有用户窗口中
       public static final int TYPE_NAVIGATION_BAR = FIRST_SYSTEM_WINDOW+19;
        //音量,会显示在所有用户窗口中
        public static final int TYPE_VOLUME_OVERLAY = FIRST_SYSTEM_WINDOW+20;
        //Boot进度条,会显示在所有用户窗口中
        public static final int TYPE_BOOT_PROGRESS = FIRST_SYSTEM_WINDOW+21;
        //当状态栏被隐藏后的自定义输入事件,会显示在所有用户窗口中
        public static final int TYPE_INPUT_CONSUMER = FIRST_SYSTEM_WINDOW+22;
       //导航栏控制面板,会显示在所有用户窗口中
        public static final int TYPE_NAVIGATION_BAR_PANEL = FIRST_SYSTEM_WINDOW+24;
        //显示屏重载窗口,会显示在所有用户窗口中
        @UnsupportedAppUsage(maxTargetSdk = Build.VERSION_CODES.R, trackingBug = 170729553)
        public static final int TYPE_DISPLAY_OVERLAY = FIRST_SYSTEM_WINDOW+26;
        //放大器窗口,会显示在所有用户窗口中
        public static final int TYPE_MAGNIFICATION_OVERLAY = FIRST_SYSTEM_WINDOW+27;
        //提示窗口上的私有虚拟显示
        public static final int TYPE_PRIVATE_PRESENTATION = FIRST_SYSTEM_WINDOW+30;
        //窗口的声音交互层
        public static final int TYPE_VOICE_INTERACTION = FIRST_SYSTEM_WINDOW+31;

        public static final int TYPE_ACCESSIBILITY_OVERLAY = FIRST_SYSTEM_WINDOW+32;
        //启动窗口的声音交互层
        public static final int TYPE_VOICE_INTERACTION_STARTING = FIRST_SYSTEM_WINDOW+33;
        //调整分屏模式下每个窗口大小的分割线
        public static final int TYPE_DOCK_DIVIDER = FIRST_SYSTEM_WINDOW+34;
        //快捷设置弹窗
        public static final int TYPE_QS_DIALOG = FIRST_SYSTEM_WINDOW+35;
        //截屏,会显示在所有用户窗口中
        public static final int TYPE_SCREENSHOT = FIRST_SYSTEM_WINDOW + 36;

        public static final int TYPE_PRESENTATION = FIRST_SYSTEM_WINDOW + 37;
        //很多废弃的系统弹窗类型都可以使用这个进行替换,只会显示在拥有者的窗口中
        public static final int TYPE_APPLICATION_OVERLAY = FIRST_SYSTEM_WINDOW + 38;
        //会显示在所有用户窗口中
        public static final int TYPE_ACCESSIBILITY_MAGNIFICATION_OVERLAY = FIRST_SYSTEM_WINDOW + 39;
        //会显示在所有用户窗口中
        public static final int TYPE_NOTIFICATION_SHADE = FIRST_SYSTEM_WINDOW + 40;
        //会显示在所有用户窗口中
        public static final int TYPE_STATUS_BAR_ADDITIONAL = FIRST_SYSTEM_WINDOW + 41;
        //系统窗口类型的结束值
        public static final int LAST_SYSTEM_WINDOW      = 2999;
}
}
系统窗口的类型值有接近40个,系统窗口的Type值范围为2000~2999。
4、窗口的显示次序
当一个进程向系统申请一个窗口的时候,系统会为窗口确定显示次序。为了方便窗口显示次序的管理,手机屏幕可以虚拟地用X、Y、Z轴来表示,其中Z轴垂直于屏幕,从屏幕内指向屏幕外,这样窗口的显示次序其实就是窗口在Z轴上的次序,这个次序称为Z-Oder。Type值是Z-Order排序的依据,我们知道应用程序窗口的Type值范围为1-99,子窗口为1000-1999,系统窗口为2000-2999,在一般情况下,Type值越大则Z~Order排序越靠前,窗口越靠近用户。
不过窗口显示次序的逻辑并不仅仅依靠窗口的Type,情况是比较多的;最常见的情况,当多个窗口的Type都是Type_APPLICATION,这时系统还需要结合具体情况来计算最终的Z-Oder。
二、系统窗口StatusBar的添加过程
前面我们介绍过Window的三种类型,像是应用开发最常见的Activity,它所对应的Window是应用程序类型。由于分析Activity对应的Window的添加过程还需要先分析它们所对应的Window的创建过程,这里我们简单点,先以系统状态栏窗口StatusBar为例,跟随源码梳理下一下WindowMnager是如何添加状态栏窗口的。
1、StatusBar是SystemUI的重要组成部分,具体指的就是系统状态栏,我们在Android 12系统源码_SystemUI(二)系统状态栏StatusBar的创建流程具体分析过它的相关源码。StatusBar主要是调用createAndAddWindows方法实现状态栏窗口的添加的。
frameworks/base/packages/SystemUI/src/com/android/systemui/statusbar/phone/StatusBar.java
public class StatusBar extends SystemUI implements ActivityStarter, LifecycleOwner {

   private final StatusBarWindowController mStatusBarWindowController;//状态栏窗口控制器
   private final StatusBarComponent.Factory mStatusBarComponentFactory;//Dagger2状态栏组件工厂
   private StatusBarComponent mStatusBarComponent;//Dagger2状态栏子组件

   protected PhoneStatusBarView mStatusBarView;//状态栏视图
   private PhoneStatusBarViewController mPhoneStatusBarViewController;//状态栏视图控制器

    public StatusBar(
		...代码省略...
		StatusBarWindowController statusBarWindowController,//状态栏控制器
        StatusBarComponent.Factory statusBarComponentFactory,//状态栏Dagger2组件工厂
		...代码省略...
	){
		...代码省略...
		//为状态栏控制器mStatusBarWindowController赋值
        mStatusBarWindowController = statusBarWindowController;
      	//为状态栏Dagger2组件工厂mStatusBarComponentFactory赋值
        mStatusBarComponentFactory = statusBarComponentFactory;
        ...代码省略...
    }

    @Override
    public void start() {
    	...代码省略...
    	createAndAddWindows(result);
    	...代码省略...
    }

    public void createAndAddWindows(@Nullable RegisterStatusBarResult result) {
        makeStatusBarView(result);
        ...代码省略...
        mStatusBarWindowController.attach();
    }

   protected void makeStatusBarView(@Nullable RegisterStatusBarResult result) {
		...代码省略...
        inflateStatusBarWindow();
        ...代码省略...
        mStatusBarWindowController.getFragmentHostManager()
                .addTagListener(CollapsedStatusBarFragment.TAG, (tag, fragment) -> {代码省略})
                .getFragmentManager()
                .beginTransaction()
                .replace(R.id.status_bar_container,
                        mStatusBarComponent.createCollapsedStatusBarFragment(),
                        CollapsedStatusBarFragment.TAG)
                .commit();
        ...代码省略...
   	}

    private void inflateStatusBarWindow() {
     	mStatusBarComponent = mStatusBarComponentFactory.create();
     	...代码省略...
     }
}
createAndAddWindows方法首先调用makeStatusBarView构建状态栏视图,然后会调用StatusBarWindowController的attach方法,将状态栏视图添加到窗口上。
2、StatusBarWindowController类和attach方法相关的代码如下所示。
frameworks/base/packages/SystemUI/src/com/android/systemui/statusbar/phone/StatusBarWindowController.java
@SysUISingleton
public class StatusBarWindowController {

    private final WindowManager mWindowManager;
    private WindowManager.LayoutParams mLp;
    @Inject
    public StatusBarWindowController(
            Context context,
            @StatusBarWindowModule.InternalWindowView StatusBarWindowView statusBarWindowView,
            WindowManager windowManager,
            IWindowManager iWindowManager,
            StatusBarContentInsetsProvider contentInsetsProvider,
            @Main Resources resources) {
		...代码省略...
        mWindowManager = windowManager;
        mStatusBarWindowView = statusBarWindowView;
        if (mBarHeight < 0) {
            mBarHeight = SystemBarUtils.getStatusBarHeight(mContext);
        }
    }

    public void attach() {
    	//获取状态栏类型窗口所需要的布局参数
        mLp = getBarLayoutParams(mContext.getDisplay().getRotation());
        //调用WindowManager的addView方法将状态栏窗口添加到Window中。
        mWindowManager.addView(mStatusBarWindowView, mLp);
		...代码省略...
    }

    private WindowManager.LayoutParams getBarLayoutParams(int rotation) {
        WindowManager.LayoutParams lp = getBarLayoutParamsForRotation(rotation);
        lp.paramsForRotation = new WindowManager.LayoutParams[4];
        for (int rot = Surface.ROTATION_0; rot <= Surface.ROTATION_270; rot++) {
            lp.paramsForRotation[rot] = getBarLayoutParamsForRotation(rot);
        }
        return lp;
    }

    private WindowManager.LayoutParams getBarLayoutParamsForRotation(int rotation) {
        int height = mBarHeight;
        if (INSETS_LAYOUT_GENERALIZATION) {
            switch (rotation) {
                case ROTATION_UNDEFINED:
                case Surface.ROTATION_0:
                case Surface.ROTATION_180:
                    height = SystemBarUtils.getStatusBarHeightForRotation(
                            mContext, Surface.ROTATION_0);
                    break;
                case Surface.ROTATION_90:
                    height = SystemBarUtils.getStatusBarHeightForRotation(
                            mContext, Surface.ROTATION_90);
                    break;
                case Surface.ROTATION_270:
                    height = SystemBarUtils.getStatusBarHeightForRotation(
                            mContext, Surface.ROTATION_270);
                    break;
            }
        }
        WindowManager.LayoutParams lp = new WindowManager.LayoutParams(
                WindowManager.LayoutParams.MATCH_PARENT,//填充设备整个宽度
                height,//根据当前屏幕旋转角度所得到的状态栏高度
                WindowManager.LayoutParams.TYPE_STATUS_BAR,//指定窗口类型为状态栏
                WindowManager.LayoutParams.FLAG_NOT_FOCUSABLE
                        | WindowManager.LayoutParams.FLAG_SPLIT_TOUCH
                        | WindowManager.LayoutParams.FLAG_DRAWS_SYSTEM_BAR_BACKGROUNDS,
                PixelFormat.TRANSLUCENT);//窗口背景半透明
        lp.privateFlags |= PRIVATE_FLAG_COLOR_SPACE_AGNOSTIC;
        lp.token = new Binder();
        lp.gravity = Gravity.TOP;
        lp.setFitInsetsTypes(0 /* types */);
        lp.setTitle("StatusBar");
        lp.packageName = mContext.getPackageName();
        lp.layoutInDisplayCutoutMode = LAYOUT_IN_DISPLAY_CUTOUT_MODE_ALWAYS;
        return lp;
    }

}
StatusBarWindowController的attach首先调用getBarLayoutParams方法获取状态栏类型窗口所需要的布局参数,在成功获取状态栏类型窗口所需要的布局参数后,便会调用WindowManager的addView方法将状态栏视图窗口添加到Window中。
三、WindowManager的addView方法
1、关于WindowManager的addView方法,具体是在WindowManagerImpl中实现的。
frameworks/base/core/java/android/view/WindowManagerImpl.java
public final class WindowManagerImpl implements WindowManager {

    @UnsupportedAppUsage
    private final WindowManagerGlobal mGlobal = WindowManagerGlobal.getInstance();

    @Override
    public void addView(@NonNull View view, @NonNull ViewGroup.LayoutParams params) {
        applyTokens(params);
        mGlobal.addView(view, params, mContext.getDisplayNoVerify(), mParentWindow,
                mContext.getUserId());
    }

}
2、WindowManagerImpl的addView又进一步调用WindowManagerGlobal的addView方法。
frameworks/base/core/java/android/view/WindowManagerGlobal.java
public final class WindowManagerGlobal {

    @UnsupportedAppUsage
    private final ArrayList<View> mViews = new ArrayList<View>();//当前存在的View列表
    @UnsupportedAppUsage
    private final ArrayList<ViewRootImpl> mRoots = new ArrayList<ViewRootImpl>();//当前存在的ViewRootImpl列表
    @UnsupportedAppUsage
    private final ArrayList<WindowManager.LayoutParams> mParams =
            new ArrayList<WindowManager.LayoutParams>();//当前存在的布局参数列表

    public void addView(View view, ViewGroup.LayoutParams params,
            Display display, Window parentWindow, int userId) {
        if (view == null) {
            throw new IllegalArgumentException("view must not be null");
        }
        if (display == null) {
            throw new IllegalArgumentException("display must not be null");
        }
        if (!(params instanceof WindowManager.LayoutParams)) {
            throw new IllegalArgumentException("Params must be WindowManager.LayoutParams");
        }

        final WindowManager.LayoutParams wparams = (WindowManager.LayoutParams) params;
        if (parentWindow != null) {
            parentWindow.adjustLayoutParamsForSubWindow(wparams);
        } else {
            // If there's no parent, then hardware acceleration for this view is
            // set from the application's hardware acceleration setting.
            final Context context = view.getContext();
            if (context != null
                    && (context.getApplicationInfo().flags
                            & ApplicationInfo.FLAG_HARDWARE_ACCELERATED) != 0) {
                wparams.flags |= WindowManager.LayoutParams.FLAG_HARDWARE_ACCELERATED;
            }
        }

        ViewRootImpl root;
        View panelParentView = null;

        synchronized (mLock) {
            // Start watching for system property changes.
            if (mSystemPropertyUpdater == null) {
                mSystemPropertyUpdater = new Runnable() {
                    @Override public void run() {
                        synchronized (mLock) {
                            for (int i = mRoots.size() - 1; i >= 0; --i) {
                                mRoots.get(i).loadSystemProperties();
                            }
                        }
                    }
                };
                SystemProperties.addChangeCallback(mSystemPropertyUpdater);
            }

            int index = findViewLocked(view, false);
            if (index >= 0) {
                if (mDyingViews.contains(view)) {
                    // Don't wait for MSG_DIE to make it's way through root's queue.
                    mRoots.get(index).doDie();
                } else {
                    throw new IllegalStateException("View " + view
                            + " has already been added to the window manager.");
                }
                // The previous removeView() had not completed executing. Now it has.
            }

            // If this is a panel window, then find the window it is being
            // attached to for future reference.
            if (wparams.type >= WindowManager.LayoutParams.FIRST_SUB_WINDOW &&
                    wparams.type <= WindowManager.LayoutParams.LAST_SUB_WINDOW) {
                final int count = mViews.size();
                for (int i = 0; i < count; i++) {
                    if (mRoots.get(i).mWindow.asBinder() == wparams.token) {
                        panelParentView = mViews.get(i);
                    }
                }
            }

            root = new ViewRootImpl(view.getContext(), display);

            view.setLayoutParams(wparams);

            mViews.add(view);
            mRoots.add(root);
            mParams.add(wparams);

            // do this last because it fires off messages to start doing things
            try {
                root.setView(view, wparams, panelParentView, userId);
            } catch (RuntimeException e) {
                // BadTokenException or InvalidDisplayException, clean up.
                if (index >= 0) {
                    removeViewLocked(index, true);
                }
                throw e;
            }
        }
    }

}
1)WindowManagerGlobal中维护了和Window操作相关的3个关键列表,在窗口的添加、更新和删除过程中都会涉及这3个列表,他们分别是View列表,ViewRootImpl列表,布局参数列表。
2)addView方法首先会对传入的参数view、params、display进行检查,另外如果parentWindow不为空,还需要父窗口根据WindowManager.LayoutParams类型的wparams参数对view进行相应调整。
3)一切准备就绪会创建ViewRootImpl对象实例,在将view、root、mparams保存到对应的数据列表中后,便会调用ViewRootImpl的setView方法将窗口和窗口参数设置到ViewRootImpl中。
4)ViewRootImpl肩负了很多职责,主要有以下几点:
- View树的根并管理View树
- 触发View的测量、布局和绘制
- 输入事件的中转站
- 管理Surface
- 负责与WindowManagerService进行进程间通信
3、 了解了ViewRootImpl的职责以后,继续来着看ViewRootImpl的setView的方法。
frameworks/base/core/java/android/view/ViewRootImpl.java
public final class ViewRootImpl implements ViewParent,
        View.AttachInfo.Callbacks, ThreadedRenderer.DrawCallbacks {

  public void setView(View view, WindowManager.LayoutParams attrs, View panelParentView) {
        synchronized (this) {
              ...代码省略...
                try {
                    mOrigWindowType = mWindowAttributes.type;
                    mAttachInfo.mRecomputeGlobalAttributes = true;
                    collectViewAttributes();
                    res = mWindowSession.addToDisplay(mWindow, mSeq, mWindowAttributes,
                            getHostVisibility(), mDisplay.getDisplayId(),
                            mAttachInfo.mContentInsets, mAttachInfo.mStableInsets,
                            mAttachInfo.mOutsets, mInputChannel);
                }
              ...代码省略...
    }
}
setView方法中有很多逻辑代码,这里只截取了最关键的一部分,调用了mWindowSession的addToDisplay方法,mWindowSession是IWindowSession类型的,它是一个Binder对象,用于进行进程间通信,IWindowSession是Client端的代理,它的Server端的实现为Session,此前的代码逻辑都是运行在本地进程的,而Session的addToDisplay方法则运行在WindowManagerService所在的进程(SystemServer)中。

从上图可以看出,本地进程的ViewRootImpl要想和WindowManagerService进行通信需要经过Session,那么Session为何包含在WindowManagerService中呢?
4、继续看Session的addToDisplay方法。
frameworks/base/services/core/java/com/android/server/wm/Session.java
class Session extends IWindowSession.Stub implements IBinder.DeathRecipient {

    final WindowManagerService mService;

    public Session(WindowManagerService service, IWindowSessionCallback callback,
            IInputMethodClient client, IInputContext inputContext) {
        mService = service;
        ...代码省略...
 	}

    @Override
    public int addToDisplay(IWindow window, int seq, WindowManager.LayoutParams attrs,
            int viewVisibility, int displayId, Rect outContentInsets, Rect outStableInsets,
            Rect outOutsets, InputChannel outInputChannel) {
        return mService.addWindow(this, window, seq, attrs, viewVisibility, displayId,
                outContentInsets, outStableInsets, outOutsets, outInputChannel);
    }
}
1)addToDisplay方法会进一步调用WindowManagerService的addWindow方法,并将自身作为参数传了进去,每个应用程序进程都会对应一个Session,WindowManagerService会用ArrayList来保存这些Session,这就是为什么WindowManagerService包含Session的原因。
2)之后的工作就全都交给了WindowManagerService处理,WindowManagerService会为这个添加的窗口分配Surface,并确定窗口显示次序,可见负责显示界面的是画布Surface,而不是窗口本身。WindowManagerService会将它所管理的Surface交由SurfaceFlinger处理,SurfaceFlinger会将这些Surface混合并绘制到屏幕上。
四、总结




![Java并发体系-锁与同步-[1]](https://img-blog.csdnimg.cn/8d410fe9f73248489e96496cebed2d2d.png)
