一、集群配置准备
(1)方式一,从网盘下载ElasticSearch7.13.4
链接: https://pan.baidu.com/s/1vwUu1kbpCc5exkfOPgb29g 提取码: thn5 (2)方式二,从官网下载
https://www.elastic.co/cn/downloads/past-releases/elasticsearch-7-13-4(3)各个节点之间,设置免密登录
我当前有192.168.1.102、192.168.1.103、192.168.1.104三个节点,192.168.1.102为主节点
<1>首先在各个节点下,执行该操作
ssh-keygen -t rsa (一路回车就行,然后可以通过 ll -a 可以看到.ssh 文件夹)
cat ~/.ssh/id_rsa.pub >> ~/.ssh/authorized_keys


<2> 把主节点的公钥追加到从节点上
把主节点的公钥添加到从节点上, 远程复制的过程需要密码,
当前我的主节点IP信息是192.168.1.102
scp ~/.ssh/authorized_keys 192.168.1.103:~/
scp ~/.ssh/authorized_keys 192.168.1.104:~/
拷贝完成后,分别在192.168.1.103,192.168.1.104添加192.168.1.102的公钥,执行如下操作:
cat ~/authorized_keys >> ~/.ssh/authorized_keys
<3> 通过ssh 测试一下,看能能链接上去, 下面是操作成功的测试

注:我这里的安装环境是 CentOS-7-x86_64
二、配置ElasticSearch的启动环境
(1)因为ElasticSearch不能用root用户启动,先创建一个用户
useradd -d /home/es -m es(2)修改/etc/security/limits.conf文件,添加如下配置,否则会报错

代码如下:
* soft nofile 65536
* hard nofile 131072
* soft nproc 2048
* hard nproc 4096
# 退出保存后执行如下命令 :sysctl -p 也可先不执行,等稍后配置完/etc/sysctl.conf文件,执行
重启命令:reboot -h now
(3)修改/etc/sysctl.conf文件,添加如下配置 :

代码如下:
vm.max_map_count=262144# 退出保存后执行如下命令 :sysctl -p 如果你上一步配置没有执行sysctl -p 的话,现在可执行
重启命令:reboot -h now
三、修改ElasticSearch7.13.4配置文件
(1)上传elasticsearch-7.13.4-linux-x86_64.tar.gz文件到服务器
我这里上传到了/opt/elk目录,elk是我自定义的的,创建命令:mkdir elk
(2)解压文件
tar -zxvf elasticsearch-7.13.4-linux-x86_64.tar.gz
(3)使用elasticsearch-7.13.4本身的jdk
执行: vim /etc/profile
添加:export ES_JAVA_HOME=/opt/elk/elasticsearch-7.13.4/jdk
保存成功后执行生效:source /etc/profile

(4)修改192.168.1.102服务器上
/opt/elk/elasticsearch-7.13.4/config 目录下的 elasticsearch.yml 文件
# ======================== Elasticsearch Configuration =========================
#
# NOTE: Elasticsearch comes with reasonable defaults for most settings.
#       Before you set out to tweak and tune the configuration, make sure you
#       understand what are you trying to accomplish and the consequences.
#
# The primary way of configuring a node is via this file. This template lists
# the most important settings you may want to configure for a production cluster.
#
# Please consult the documentation for further information on configuration options:
# https://www.elastic.co/guide/en/elasticsearch/reference/index.html
#
# ---------------------------------- Cluster -----------------------------------
#
# Use a descriptive name for your cluster:
#
cluster.name: bamboo-application
#
# ------------------------------------ Node ------------------------------------
#
# Use a descriptive name for the node:
#
node.name: es-node-102
#
# Add custom attributes to the node:
#
node.attr.rack: r1
#
# ----------------------------------- Paths ------------------------------------
#
# Path to directory where to store the data (separate multiple locations by comma):
#
#path.data: /path/to/data
#
# Path to log files:
#
#path.logs: /path/to/logs
#
# ----------------------------------- Memory -----------------------------------
#
# Lock the memory on startup:
#
#bootstrap.memory_lock: true
#
# Make sure that the heap size is set to about half the memory available
# on the system and that the owner of the process is allowed to use this
# limit.
#
# Elasticsearch performs poorly when the system is swapping the memory.
#
# ---------------------------------- Network -----------------------------------
#
# By default Elasticsearch is only accessible on localhost. Set a different
# address here to expose this node on the network:
#
network.host: 192.168.1.102
#
# By default Elasticsearch listens for HTTP traffic on the first free port it
# finds starting at 9200. Set a specific HTTP port here:
#
http.port: 9200
#
# For more information, consult the network module documentation.
#
# --------------------------------- Discovery ----------------------------------
#
# Pass an initial list of hosts to perform discovery when this node is started:
# The default list of hosts is ["127.0.0.1", "[::1]"]
#
discovery.seed_hosts: ["192.168.1.102", "192.168.1.103", "192.168.1.104"]
#
# Bootstrap the cluster using an initial set of master-eligible nodes:
#
cluster.initial_master_nodes: ["192.168.1.102"]
#
# For more information, consult the discovery and cluster formation module documentation.
#
# ---------------------------------- Various -----------------------------------
#
# Require explicit names when deleting indices:
#
action.destructive_requires_name: true
修改192.168.1.103上的elasticsearch.yml 文件
# ======================== Elasticsearch Configuration =========================
#
# NOTE: Elasticsearch comes with reasonable defaults for most settings.
#       Before you set out to tweak and tune the configuration, make sure you
#       understand what are you trying to accomplish and the consequences.
#
# The primary way of configuring a node is via this file. This template lists
# the most important settings you may want to configure for a production cluster.
#
# Please consult the documentation for further information on configuration options:
# https://www.elastic.co/guide/en/elasticsearch/reference/index.html
#
# ---------------------------------- Cluster -----------------------------------
#
# Use a descriptive name for your cluster:
#
cluster.name: bamboo-application
#
# ------------------------------------ Node ------------------------------------
#
# Use a descriptive name for the node:
#
node.name: es-node-103
#
# Add custom attributes to the node:
#
#node.attr.rack: r1
#
# ----------------------------------- Paths ------------------------------------
#
# Path to directory where to store the data (separate multiple locations by comma):
#
#path.data: /path/to/data
#
# Path to log files:
#
#path.logs: /path/to/logs
#
# ----------------------------------- Memory -----------------------------------
#
# Lock the memory on startup:
#
#bootstrap.memory_lock: true
#
# Make sure that the heap size is set to about half the memory available
# on the system and that the owner of the process is allowed to use this
# limit.
#
# Elasticsearch performs poorly when the system is swapping the memory.
#
# ---------------------------------- Network -----------------------------------
#
# By default Elasticsearch is only accessible on localhost. Set a different
# address here to expose this node on the network:
#
network.host: 192.168.1.103
#
# By default Elasticsearch listens for HTTP traffic on the first free port it
# finds starting at 9200. Set a specific HTTP port here:
#
http.port: 9200
#
# For more information, consult the network module documentation.
#
# --------------------------------- Discovery ----------------------------------
#
# Pass an initial list of hosts to perform discovery when this node is started:
# The default list of hosts is ["127.0.0.1", "[::1]"]
#
discovery.seed_hosts: ["192.168.1.102", "192.168.1.103", "192.168.1.104"]
#
# Bootstrap the cluster using an initial set of master-eligible nodes:
#
cluster.initial_master_nodes: ["192.168.1.102"]
#
# For more information, consult the discovery and cluster formation module documentation.
#
# ---------------------------------- Various -----------------------------------
#
# Require explicit names when deleting indices:
#
action.destructive_requires_name: true
修改192.168.1.104上的elasticsearch.yml 文件
# ======================== Elasticsearch Configuration =========================
#
# NOTE: Elasticsearch comes with reasonable defaults for most settings.
#       Before you set out to tweak and tune the configuration, make sure you
#       understand what are you trying to accomplish and the consequences.
#
# The primary way of configuring a node is via this file. This template lists
# the most important settings you may want to configure for a production cluster.
#
# Please consult the documentation for further information on configuration options:
# https://www.elastic.co/guide/en/elasticsearch/reference/index.html
#
# ---------------------------------- Cluster -----------------------------------
#
# Use a descriptive name for your cluster:
#
cluster.name: bamboo-application
#
# ------------------------------------ Node ------------------------------------
#
# Use a descriptive name for the node:
#
node.name: es-node-104
#
# Add custom attributes to the node:
#
#node.attr.rack: r1
#
# ----------------------------------- Paths ------------------------------------
#
# Path to directory where to store the data (separate multiple locations by comma):
#
#path.data: /path/to/data
#
# Path to log files:
#
#path.logs: /path/to/logs
#
# ----------------------------------- Memory -----------------------------------
#
# Lock the memory on startup:
#
#bootstrap.memory_lock: true
#
# Make sure that the heap size is set to about half the memory available
# on the system and that the owner of the process is allowed to use this
# limit.
#
# Elasticsearch performs poorly when the system is swapping the memory.
#
# ---------------------------------- Network -----------------------------------
#
# By default Elasticsearch is only accessible on localhost. Set a different
# address here to expose this node on the network:
#
network.host: 192.168.1.104
#
# By default Elasticsearch listens for HTTP traffic on the first free port it
# finds starting at 9200. Set a specific HTTP port here:
#
http.port: 9200
#
# For more information, consult the network module documentation.
#
# --------------------------------- Discovery ----------------------------------
#
# Pass an initial list of hosts to perform discovery when this node is started:
# The default list of hosts is ["127.0.0.1", "[::1]"]
#
discovery.seed_hosts: ["192.168.1.102", "192.168.1.103", "192.168.1.104"]
#
# Bootstrap the cluster using an initial set of master-eligible nodes:
#
cluster.initial_master_nodes: ["192.168.1.102"]
#
# For more information, consult the discovery and cluster formation module documentation.
#
# ---------------------------------- Various -----------------------------------
#
# Require explicit names when deleting indices:
#
#action.destructive_requires_name: true
四、配置完成后,修改各个节点的elasticsearch-7.13.4文件的权限
(1)192.168.1.102 节点上
chmod 777 -R /opt/elk/elasticsearch-7.13.4
(2)192.168.1.103 节点上
chmod 777 -R /opt/elk/elasticsearch-7.13.4
(3)192.168.1.104 节点上
chmod 777 -R /opt/elk/elasticsearch-7.13.4
五、修改完成后,切换用户启动
(1)su es
(2)在elasticsearch-7.13.4文件下 bin/elasticsearch -d

六、查看是否配置成功
通过jps查看:

在浏览器总执行请求:http://192.168.1.102:9200/_nodes/_all?pretty 成功显示如下:

也可以查看单个节点数据:

七、集群监控
方式一、可以通过浏览器插件的方式

展示效果如下:

方式二、cerebro监控
(1)下载cerebro安装包
链接: https://pan.baidu.com/s/1L2BHL9-bbTWzPwA6WNFcZg 提取码: n3md (2)解压并启动


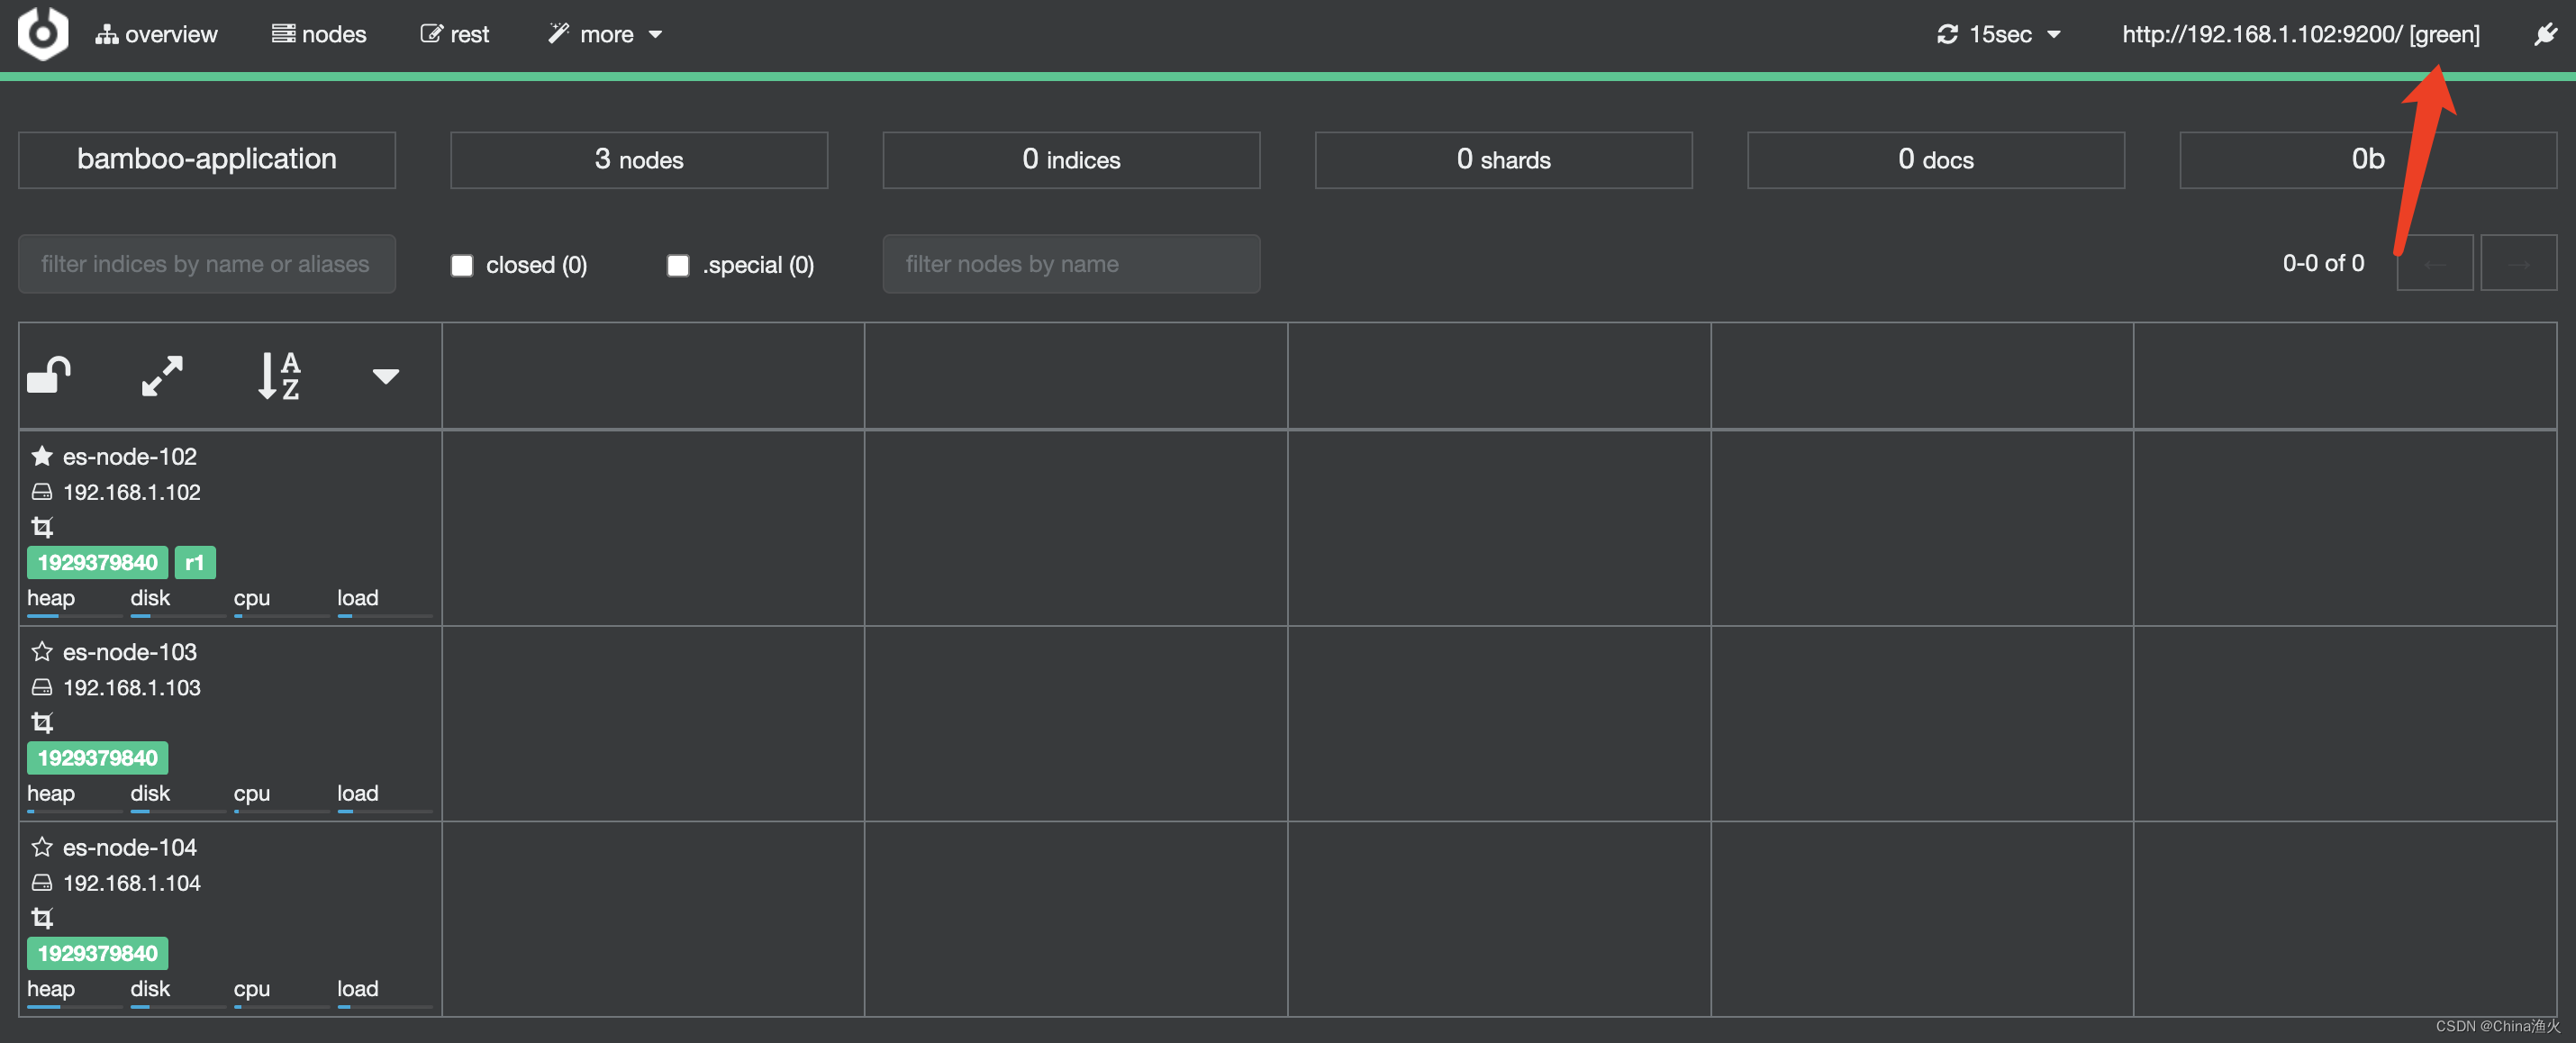
(3)访问 http://192.168.1.102:9000/ 然后输入 http://192.168.1.102:9200 连接,成功如下:
安全校验的话,可引入xpark认证





![buu [AFCTF2018]MyOwnCBC 1](https://img-blog.csdnimg.cn/b53a15be88f14bb49e60ad3d0ec8fbc7.png)





![[CTF/网络安全] 攻防世界 xff_referer 解题详析](https://img-blog.csdnimg.cn/11f390c5dd2c45fda42155833b78bd99.png#pic_center)
