目录
剧情简介:
数据来源
加载数据
分割数据和可视化
时间序列的多元波网模型:实现(多步预测)
创建模型
创建数据集
数据准备
1- Training dataset preparation
2- Validation dataset preparation
Train the Model with TPU:
使用经过训练的适应Google WaveNet预测时间序列(MultiStep):
Visualizations
MSE Computation
Training dataset
Validation dataset
参考文献
剧情简介:
我试图通过使用竞争数据集实现最近在时间序列预测中使用的深度学习模型(即最近的研究论文),从而使它们“栩栩如生”,我相信这会让您感到兴奋。
有一些研究论文失败了,也有一些研究论文在竞争数据集上运行得很好,比如我已经在这里实现的STAM模型。STAM(SpatioTemporal Attention)Model Implementation | Kaggle
不久前,我试着专注于一个我喜欢的模型:使用卷积神经网络的条件时间序列预测,它是谷歌WaveNet对时代序列的改编。以下是该论文的链接:时间序列的WaveNet !https://arxiv.org/pdf/1703.04691.pdf
令人惊讶的是,改编后的Google WaveNet模型(正如其作者所建议的那样)在时间序列预测上表现良好,尤其是在竞争数据集上。
在本笔记本中,我实现了它(以及一些可爱的视觉效果,使它更容易…)我还提供了一些我使用过的有趣的链接:
原始的WaveNet模型(Google): WaveNet论文https://www.researchgate.net/publication/308026508_WaveNet_A_Generative_Model_for_Raw_Audio
通过因果和扩展卷积神经网络预测金融时间序列:这篇文章深入研究了因果和扩展卷积(WaveNet模型的基础)。https://mdpi-res.com/d_attachment/entropy/entropy-22-01094/article_deploy/entropy-22-01094.pdf?version=1601376469
import tensorflow as tf
from tensorflow import keras
import pandas as pd

import numpy as np
import matplotlib.pyplot as plt
from tensorflow.keras import backend as K
from sklearn import preprocessing
2022-05-03 15:20:09.481560: W tensorflow/stream_executor/platform/default/dso_loader.cc:60] Could not load dynamic library 'libcudart.so.11.0'; dlerror: libcudart.so.11.0: cannot open shared object file: No such file or directory; LD_LIBRARY_PATH: /opt/conda/lib 2022-05-03 15:20:09.481682: I tensorflow/stream_executor/cuda/cudart_stub.cc:29] Ignore above cudart dlerror if you do not have a GPU set up on your machine.
数据来源
数据来源:
本文用的实验数据可以再此下载:https://www.kaggle.com/code/abireltaief/adapted-google-wavenet-time-series-forecasting/input
加载数据
train_path = '../input/smart-homes-temperature-time-series-forecasting/train.csv'
test_path = '../input/smart-homes-temperature-time-series-forecasting/test.csv'
df = pd.read_csv(train_path)
df.head() Id Date ... Day_of_the_week Indoor_temperature_room
0 0 13/03/2012 ... 2.0 17.8275
1 1 13/03/2012 ... 2.0 18.1207
2 2 13/03/2012 ... 2.0 18.4367
3 3 13/03/2012 ... 2.0 18.7513
4 4 13/03/2012 ... 2.0 19.0414
[5 rows x 19 columns]
进程已结束,退出代码0
df.drop(['Id','Date','Time','Day_of_the_week'],axis=1,inplace=True)df.dtypes
print(df.dtypes)CO2_(dinning-room) float64 CO2_room float64 Relative_humidity_(dinning-room) float64 Relative_humidity_room float64 Lighting_(dinning-room) float64 Lighting_room float64 Meteo_Rain float64 Meteo_Sun_dusk float64 Meteo_Wind float64 Meteo_Sun_light_in_west_facade float64 Meteo_Sun_light_in_east_facade float64 Meteo_Sun_light_in_south_facade float64 Meteo_Sun_irradiance float64 Outdoor_relative_humidity_Sensor float64 Indoor_temperature_room float64 dtype: object
df = df.astype(dtype="float32")
df.dtypes
print(df.dtypes)CO2_(dinning-room) float32 CO2_room float32 Relative_humidity_(dinning-room) float32 Relative_humidity_room float32 Lighting_(dinning-room) float32 Lighting_room float32 Meteo_Rain float32 Meteo_Sun_dusk float32 Meteo_Wind float32 Meteo_Sun_light_in_west_facade float32 Meteo_Sun_light_in_east_facade float32 Meteo_Sun_light_in_south_facade float32 Meteo_Sun_irradiance float32 Outdoor_relative_humidity_Sensor float32 Indoor_temperature_room float32 dtype: object
分割数据和可视化
Splitting Data & Visualizations:
用80%来训练
percentage = 0.8
splitting_time = int(len(df) * percentage)
train_x = np.array(df.values[:splitting_time],dtype=np.float32)
val_x = np.array(df.values[splitting_time:],dtype=np.float32)
print("train dataset size : %d" %len(train_x))
print("validation dataset size : %d" %len(val_x))train dataset size : 2211 validation dataset size : 553
# Construction of the series
train_x = tf.convert_to_tensor(train_x)
test_x = tf.convert_to_tensor(val_x)
scaler = preprocessing.MinMaxScaler()
scaler.fit(train_x)
train_x_norm = scaler.transform(train_x)
val_x_norm = scaler.transform(val_x)# Displaying some scaled series
cols = list(df.columns)
fig, ax = plt.subplots(constrained_layout=True, figsize=(15,5))
for i in range(5):
ax.plot(df.index[:splitting_time].values,train_x_norm[:,i], label= cols[i])
ax.legend()
plt.show()
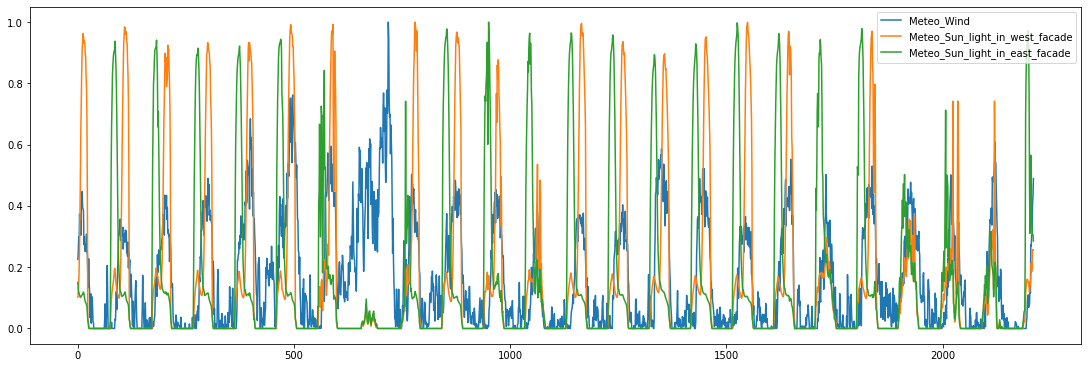
fig, ax = plt.subplots(constrained_layout=True, figsize=(15,5))
for i in range(8,11):
ax.plot(df.index[:splitting_time].values,train_x_norm[:,i], label= cols[i])
ax.legend()
plt.show()
时间序列的多元波网模型:实现(多步预测)
提示:
我使用的纸张有:
条件时间序列预测与卷积神经网络:WaveNet时间序列!https://arxiv.org/pdf/1703.04691.pdf
原始的WaveNet模型(Google): WaveNet论文https://www.researchgate.net/publication/308026508_WaveNet_A_Generative_Model_for_Raw_Audio
通过因果和扩展卷积神经网络预测金融时间序列:这篇文章深入研究了因果和扩展卷积(WaveNet模型的基础)。https://mdpi-res.com/d_attachment/entropy/entropy-22-01094/article_deploy/entropy-22-01094.pdf?version=1601376469
注意:
首先,让您了解一下我使用的实现基础(用我自己的话)。
1-Causal卷积
因果卷积使我们能够保持数据的正确顺序(不违反数据建模的顺序)。
预测是连续的:每次预测之后,预测值作为输入返回(同时移动移动窗口…)
在训练阶段,计算可以并行化。
2-Dilated卷积
允许增加序列的长度(窗口大小)而不增加隐藏层的数量
模型使用大小为1、2、4、8、16、32、64、…、512等的膨胀。
时间序列的3-WaveNet
为了使WaveNet模型(Google的原始版本)适应时间序列预测,已经做了一些改变。
实际上,ReLU(而不是tanh和sigmoid,就像最初的音频数据WaveNet模型一样)已经被用来取代激活函数。
由于音频数据是离散数据,因此使用Softmax预测原始WaveNet的输出,但对于时间序列,使用线性函数之后的卷积(1x1)。
要了解更多细节,请参阅我上面提供的论文。
可以使用许多架构
时间序列的条件WaveNet考虑了其他外生序列“协变量”(以及目标序列)。
有两种条件体系结构:我将使用(根据我提供的论文中的建议)第二种体系结构,如下图所示。应该注意的是,第一个架构是时间序列的单变量WaveNet,它只考虑目标序列(不考虑外生严重)。

视觉效果
首先,为了简单起见,为了理解扩展卷积和因果卷积的原理,我提供了单变量WaveNet的详细可视化(仅使用目标序列进行预测)。
然后,我提供了我将实现的架构的详细可视化:条件WaveNet(或多元WaveNet),使用外生序列和目标序列。
注意:
这些视觉效果是由我创建的(我使用了一些背景来制作它们,比如扩张的卷积(…),来自之前引用的源论文和参考文献,你可以自己检查一下)。
时间序列的单变量波网

多元WaveNet(时间序列的条件WaveNet)

def model_wavenet_timeseries(len_seq, len_out, dim_exo, nb_filters, dim_filters, dilation_depth, use_bias, res_l2, final_l2,batch_size):
input_shape_exo = tf.keras.Input(shape=(len_seq, dim_exo), name='input_exo')
input_shape_target = tf.keras.Input(shape=(len_seq, 1), name='input_target')
input_exo = input_shape_exo
input_target = input_shape_target
outputs = []
# 1st loop: I'll be making multi-step predictions (every prediction will serve as input for the second prediction, when I move the window size...).
for t in range(len_out):
# Causal convolution for the 1st input: exogenous series
# out_exo : (batch_size,len_seq,dim_exo)
out_exo = K.temporal_padding(input_exo, padding=((dim_filters - 1), 0)) #To keep the same len_seq for the hidden layers
out_exo = tf.keras.layers.Conv1D(filters=nb_filters, kernel_size=dim_filters,dilation_rate=1,use_bias=True,activation=None,
name='causal_convolution_exo_%i' %t, kernel_regularizer=tf.keras.regularizers.l2(res_l2))(out_exo)
# Causal convolution for the 2nd input: target series
# out_target : (batch_size,len_seq,1)
out_target = K.temporal_padding(input_target, padding=((dim_filters - 1), 0))#To keep the same len_seq for the hidden layers
out_target = tf.keras.layers.Conv1D(filters=nb_filters, kernel_size=dim_filters,dilation_rate=1,use_bias=True,activation=None,
name='causal_convolution_target_%i' %t, kernel_regularizer=tf.keras.regularizers.l2(res_l2))(out_target)
# Frist Layer #1 (See visual Above)
# Dilated Convolution (1st Layer #1): part of exogenous series(see visual above)
# skip_exo : (batch_size,len_seq,dim_exo)
# first_out_exo (the same as skip_exo, before adding the residual connection): (batch_size, len_seq, dim_exo)
skip_outputs = []
z_exo = K.temporal_padding(out_exo, padding=(2*(dim_filters - 1), 0))
z_exo = tf.keras.layers.Conv1D(filters=nb_filters,kernel_size=dim_filters,dilation_rate=2,use_bias=True,activation="relu",
name='dilated_convolution_exo_1_%i' %t, kernel_regularizer=tf.keras.regularizers.l2(res_l2))(z_exo)
skip_exo = tf.keras.layers.Conv1D(dim_exo, 1, padding='same', use_bias=False, kernel_regularizer=tf.keras.regularizers.l2(res_l2))(z_exo)
first_out_exo = tf.keras.layers.Conv1D(dim_exo, 1, padding='same', use_bias=False, kernel_regularizer=tf.keras.regularizers.l2(res_l2))(z_exo)
# Dilated Convolution (1st Layer #1): part of target series(see visual above)
# skip_target : (batch_size,len_seq,1)
# first_out_target (the same as skip_target, before adding the residual connection): (batch_size, len_seq,1)
z_target = K.temporal_padding(out_target, padding=(2*(dim_filters - 1), 0))
z_target = tf.keras.layers.Conv1D(filters=nb_filters,kernel_size=dim_filters,dilation_rate=2,use_bias=True,activation="relu",
name='dilated_convolution_target_1_%i' %t, kernel_regularizer=tf.keras.regularizers.l2(res_l2))(z_target)
skip_target = tf.keras.layers.Conv1D(1, 1, padding='same', use_bias=False, kernel_regularizer=tf.keras.regularizers.l2(res_l2))(z_target)
first_out_target = tf.keras.layers.Conv1D(1, 1, padding='same', use_bias=False, kernel_regularizer=tf.keras.regularizers.l2(res_l2))(z_target)
# Concatenation of the skip_exo & skip_target AND Saving them as we go through the 1st for loop (through len_seq)
# skip_exo : (batch_size,len_seq,dim_exo)
# skip_target : (batch_size,len_seq,1)
# The concatenation of skip_exp & skip_target : (batch_size,len_seq,dim_exo+1)
skip_outputs.append(tf.concat([skip_exo,skip_target],axis=2))
# Adding the Residual connections of the exogenous series & target series to inputs
# res_exo_out : (batch_size,len_seq,dim_exo)
# res_target_out : (batch_size,len_seq,1)
res_exo_out = tf.keras.layers.Add()([input_exo, first_out_exo])
res_target_out = tf.keras.layers.Add()([input_target, first_out_target])
# Concatenation of the updated outputs (after having added the residual connections)
# out_concat : (batch_size,len_seq,dim_exo+1)
out_concat = tf.concat([res_exo_out, res_target_out],axis=2)
out = out_concat
# From 2nd Layer Layer#2 to Final Layer (Layer #L): See Visual above
# 2nd loop: inner loop (Going through all the intermediate layers)
# Intermediate dilated convolutions
for i in range(2, dilation_depth + 1):
z = K.temporal_padding(out_concat, padding=(2**i * (dim_filters - 1), 0)) # To keep the same len_seq
z = tf.keras.layers.Conv1D(filters=nb_filters,kernel_size=dim_filters,dilation_rate=2**i,use_bias=True,activation="relu",
name='dilated_convolution_%i_%i' %(i,t), kernel_regularizer=tf.keras.regularizers.l2(res_l2))(z)
skip_x = tf.keras.layers.Conv1D(dim_exo+1, 1, padding='same', use_bias=False, kernel_regularizer=tf.keras.regularizers.l2(res_l2))(z)
first_out_x = tf.keras.layers.Conv1D(dim_exo+1, 1, padding='same', use_bias=False, kernel_regularizer=tf.keras.regularizers.l2(res_l2))(z)
res_x = tf.keras.layers.Add()([out, first_out_x]) #(batch_size,len_seq,dim_exo+1)
out = res_x
skip_outputs.append(skip_x) #(batch_size,len_seq,dim_exo+1)
# Adding intermediate outputs of all the layers (See Visual above)
out = tf.keras.layers.Add()(skip_outputs) #(batch_size,len_seqe,dim_exo+1)
# Output Layer (exogenous series & target series)
# outputs : (batch_size,1,1) # The predcition Y
# out_f_exo (will be used to Adjust the input for the following prediction, see below) : (batch_size,len_seq,dim_exo)
out = tf.keras.layers.Activation('linear', name="output_linear_%i" %t)(out)
out_f_target = tf.keras.layers.Conv1D(1, 1, padding='same', kernel_regularizer=tf.keras.regularizers.l2(final_l2))(out)
out_f_exo = tf.keras.layers.Conv1D(dim_exo, 1, padding='same', kernel_regularizer=tf.keras.regularizers.l2(final_l2))(out)
outputs.append(out_f_target[:,-1:,:])
# Adjusting the entry of exogenous series,for the following prediction (of MultiStep predictions): see the 1st loop
# First: concatenate the previous exogenous series input with the final exo_prediction(current exo_prediction)
input_exo = tf.concat([input_exo, out_f_exo[:,-1:,:]],axis=1)
# Second, shift the moving window (of len_seq size) by one
input_exo = tf.slice(input_exo,[0,1,0],[batch_size,input_shape_exo.shape[1],dim_exo])
# Adjusting the entry of target series,for the following prediction (of MultiStep predictions): see the 1st loop
# First: concatenate the previous target series input with the final prediction(current prediction)
input_target = tf.concat([input_target,out_f_target[:,-1:,:]],axis=1)
# Second, shift the moving window (of len_seq size) by one
input_target = tf.slice(input_target,[0,1,0],[batch_size,input_shape_target.shape[1],1])
outputs = tf.convert_to_tensor(outputs) # (len_out,batch_size,1,1)
outputs = tf.squeeze(outputs,-1) # (len_out,batch_size,1)
outputs = tf.transpose(outputs,perm=[1,0,2]) # (batch_size,len_out,1)
model = tf.keras.Model([input_shape_exo,input_shape_target], outputs)
return model创建模型
def compute_len_seq(dilation_depth):
return (2 ** dilation_depth * 2)nb_filters = 96
dim_filters = 2
dilation_depth = 4 # len_seq = 32
use_bias = False
res_l2 = 0
final_l2 = 0
batch_size = 128
len_out = 5
dim_exo = 14
len_seq = compute_len_seq(dilation_depth)
print(len_seq)
model = model_wavenet_timeseries(len_seq, len_out, dim_exo, nb_filters, dim_filters, dilation_depth, use_bias, res_l2, final_l2,batch_size=batch_size)
model.summary()创建数据集
# This is required for Model implementation (for more information, see the Model Architecture Above).
def prepare_dataset_XY(seriesx, seriesy, len_seq, len_out, batch_size,shift):
'''
A function for creating a dataset from time series data as follows:
X = {((X1_1,X1_2,...,X1_T),(X2_1,X2_2,...,X2_T),(X3_1,X3_2,...,X3_T)),
(Y1,Y2,...,YT)}
Y = YT+1
seriesx-- Exogenous series, shape: (Tin, number_of_exogenous_series) with Tin: length of the time series
seriesy-- Target series, shape: (Tin, 1)
len_seq-- Sequence length: integer
len_out-- Length of the predicted sequence (output): integer
shift-- The window offset: integer
batch_size-- Size of the batch: integer
'''
# Exogenous series
# ((X1_1,X1_2,...,X1_T),(X2_1,X2_2,...,X2_T),(X3_1,X3_2,...,X3_T),....)
dataset_x = tf.data.Dataset.from_tensor_slices(seriesx)
dataset_x = dataset_x.window(len_seq+len_out, shift = shift, drop_remainder=True)
dataset_x = dataset_x.flat_map(lambda x: x.batch(len_seq+len_out))
dataset_x = dataset_x.map(lambda x: x[0:len_seq][:,:]) # shape:[[ ]]
dataset_x = dataset_x.batch(batch_size, drop_remainder=True).prefetch(1) # shape: [[[]]] (adding the batch_size)
# The target series
# (Y1,Y2,...,YT)
dataset_y = tf.data.Dataset.from_tensor_slices(seriesy)
dataset_y = dataset_y.window(len_seq+len_out, shift = shift, drop_remainder=True)
dataset_y = dataset_y.flat_map(lambda x: x.batch(len_seq+len_out))
dataset_y = dataset_y.map(lambda x: x[0:len_seq][:,:])
dataset_y = dataset_y.batch(batch_size, drop_remainder=True).prefetch(1)
# Y = YT+1 (the values to predict)
dataset_ypred = tf.data.Dataset.from_tensor_slices(seriesy)
dataset_ypred = dataset_ypred.window(len_seq+len_out+1, shift=shift, drop_remainder=True)
dataset_ypred = dataset_ypred.flat_map(lambda x: x.batch(len_seq+len_out+1))
dataset_ypred = dataset_ypred.map(lambda x: (x[0:len_seq+1][-len_out:,:]))
dataset_ypred = dataset_ypred.batch(batch_size, drop_remainder=True).prefetch(1)
dataset = tf.data.Dataset.zip((dataset_x, dataset_y))
dataset = tf.data.Dataset.zip((dataset, dataset_ypred))
return dataset# Example (Simple example for breaking down the function)
X1 = np.linspace(1,100,100) # 3 exogenous series
X2 = np.linspace(101,200,100)
X3 = np.linspace(201,300,100)
Y = np.linspace(301,400,100) # target series
X1 = tf.expand_dims(X1,-1)
X2 = tf.expand_dims(X2,-1)
X3 = tf.expand_dims(X3,-1)
Y = tf.expand_dims(Y,-1)
series_x = tf.concat([X1,X2,X3], axis=1)
series_y = Y
print(series_x.shape)
print(series_y.shape)(100, 3) (100, 1)
len_seq = 10
len_out = 1
shift = 1
batch_size = 1
dataset_example = prepare_dataset_XY(series_x, series_y, len_seq, len_out, batch_size,shift)for element in dataset_example.take(1):
print("Exogenous series: ")
print(element[0][0])
print("----------------------")
print("Target series: ")
print(element[0][1])
print("======================")
print("Value to predict: ")
print(element[1])Exogenous series: tf.Tensor( [[[ 1. 101. 201.] [ 2. 102. 202.] [ 3. 103. 203.] [ 4. 104. 204.] [ 5. 105. 205.] [ 6. 106. 206.] [ 7. 107. 207.] [ 8. 108. 208.] [ 9. 109. 209.] [ 10. 110. 210.]]], shape=(1, 10, 3), dtype=float64) ---------------------- Target series: tf.Tensor( [[[301.] [302.] [303.] [304.] [305.] [306.] [307.] [308.] [309.] [310.]]], shape=(1, 10, 1), dtype=float64) ====================== Value to predict: tf.Tensor([[[311.]]], shape=(1, 1, 1), dtype=float64)
# The characteristics of the dataset I want to create
batch_size = 128
len_out = 5
len_seq = compute_len_seq(dilation_depth)
shift=1
# Dataset creation
dataset = prepare_dataset_XY(train_x_norm[:,0:-1], train_x_norm[:,-1:], len_seq, len_out, batch_size, shift)
dataset_val = prepare_dataset_XY(val_x_norm[:,0:-1], val_x_norm[:,-1:], len_seq, len_out, batch_size, shift)print(len(list(dataset.as_numpy_iterator())))
print(("---------------"))
for element in dataset.take(1):
print(element[0][0].shape)
print(element[0][1].shape)
print(element[1].shape)16 --------------- (128, 32, 14) (128, 32, 1) (128, 5, 1)
print(len(list(dataset_val.as_numpy_iterator())))
print(("---------------"))
for element in dataset.take(1):
print(element[0][0].shape)
print(element[0][1].shape)
print(element[1].shape)4 --------------- (128, 32, 14) (128, 32, 1) (128, 5, 1)
数据准备
1- Training dataset preparation
X1 = []
X2 = []
# Extracting x and y from the dataset
x,y = tuple(zip(*dataset)) #x: 16x((BS,32,14),(BS,32,1)) with BS= batch_size
#y: 16x(BS,5,1)
for i in range(len(x)):
X1.append(x[i][0])
X2.append(x[i][1])
X1 = np.asarray(X1, dtype = np.float32) # (16,BS,32,14)
X2 = np.asarray(X2, dtype = np.float32) # (16,BS,32,1)
y = np.asarray(y, dtype= np.float32) # (16,BS,5,1)
# Reshaping them
X1 = np.reshape(X1,(X1.shape[0]*X1.shape[1], X1.shape[2], X1.shape[3])) # (16,BS,32,14) --> (16xBS,32,14)
X2 = np.reshape(X2,(X2.shape[0]*X2.shape[1], X2.shape[2], X2.shape[3])) # (16,BS,32,1) --> (16xBS,32,1)
x_train = [X1,X2]
y_train = np.reshape(y,(y.shape[0]*y.shape[1], y.shape[2], y.shape[3])) # (16,BS,5,1) --> (16xBS,5,1)
print(x_train[0].shape)
print(x_train[1].shape)
print(y_train.shape)(2048, 32, 14) (2048, 32, 1) (2048, 5, 1)
2- Validation dataset preparation
# Extracting x and y from the validation dataset
X1 =[]
X2 =[]
x,y = tuple(zip(*dataset_val))
for i in range(len(x)):
X1.append(x[i][0])
X2.append(x[i][1])
X1 = np.asarray(X1,dtype=np.float32)
X2 = np.asarray(X2, dtype = np.float32)
y = np.asarray(y, dtype= np.float32)
# Reshaping them
X1 = np.reshape(X1,(X1.shape[0]*X1.shape[1], X1.shape[2], X1.shape[3]))
X2 = np.reshape(X2,(X2.shape[0]*X2.shape[1], X2.shape[2], X2.shape[3]))
x_val = [X1,X2]
y_val = np.reshape(y,(y.shape[0]*y.shape[1], y.shape[2], y.shape[3]))
print(x_val[0].shape)
print(x_val[1].shape)
print(y_val.shape)(512, 32, 14) (512, 32, 1) (512, 5, 1)
Train the Model with TPU:
# detect and initialize the TPU
tpu = tf.distribute.cluster_resolver.TPUClusterResolver()
tf.config.experimental_connect_to_cluster(tpu)
tf.tpu.experimental.initialize_tpu_system(tpu)
print("All devices: ", tf.config.list_logical_devices('TPU'))max_periods = 1000
# instantiate a distribution strategy
tpu_strategy = tf.distribute.experimental.TPUStrategy(tpu)
with tpu_strategy.scope():
model = model_wavenet_timeseries(len_seq, len_out, dim_exo, nb_filters, dim_filters, dilation_depth, use_bias, res_l2, final_l2, batch_size=int(batch_size/8))
lr_schedule = tf.keras.optimizers.schedules.InverseTimeDecay(
initial_learning_rate=0.005,
decay_steps=50,
decay_rate=0.01)
opt=tf.keras.optimizers.Adam(learning_rate=lr_schedule)
CheckPoint = tf.keras.callbacks.ModelCheckpoint("weights_train.hdf5", monitor='loss', verbose=1, save_best_only=True, save_weights_only = True, mode='auto', save_freq='epoch')
model.compile(loss="mse", optimizer=opt, metrics="mse")
history = model.fit(x=[x_train[0],x_train[1]],y=y_train, validation_data=([x_val[0],x_val[1]],y_val), epochs=max_periods,verbose=1, callbacks=[CheckPoint,tf.keras.callbacks.EarlyStopping(monitor='loss', patience=200)],batch_size=batch_size)
# The evolution of loss during the training
loss_train = history.history["loss"]
loss_val = history.history["val_loss"]
plt.figure(figsize=(10, 6))
plt.plot(np.arange(0,len(loss_train)),loss_train, label="Loss_train")
plt.plot(np.arange(0,len(loss_train)),loss_val, label ="Loss_val")
plt.legend()
plt.title("Evolution of the loss")Text(0.5, 1.0, 'Evolution of the loss')

使用经过训练的适应Google WaveNet预测时间序列(MultiStep):
# I saved the best weights on the Kaggle/Output by using the ModelCheckPoint callback during the training phase.
model = model_wavenet_timeseries(len_seq, len_out, dim_exo, nb_filters, dim_filters, dilation_depth, use_bias, res_l2, final_l2,batch_size=batch_size)
model.load_weights("./weights_train.hdf5")pred_train = model.predict((x_train[0],x_train[1]),verbose=1,batch_size=batch_size)
pred_val = model.predict((x_val[0],x_val[1]),verbose=1,batch_size=batch_size)16/16 [==============================] - 2s 45ms/step 4/4 [==============================] - 0s 38ms/step
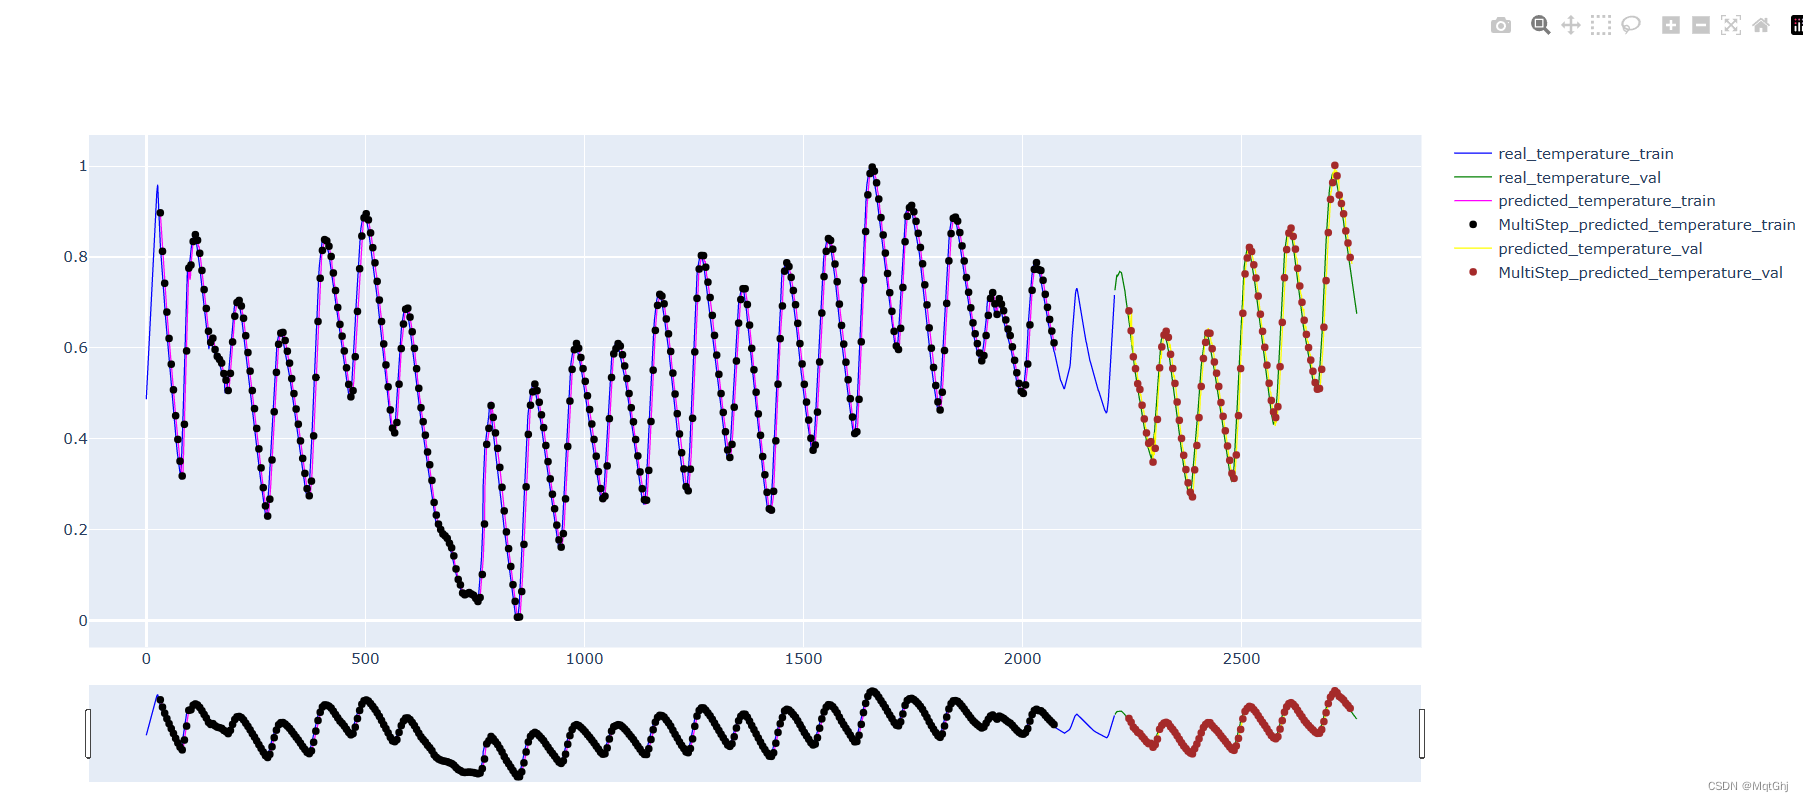
Visualizations
import plotly.graph_objects as go
shift = len_out
fig = go.FigureWidget()
# Original series of 'Indoor_Temperature_room'
fig.add_trace(go.Scatter(x=df.index,y=train_x_norm [:,-1],line = {'color':'blue', 'width':1}, name= 'real_temperature_train'))
fig.add_trace(go.Scatter(x=df.index[splitting_time:],y=val_x_norm[:,-1],line = {'color':'green', 'width':1}, name = 'real_temperature_val' ))
# Dislply the MultiStep predictions (for the train dataset)
preds = []
pred_index = []
step_time = []
step_val = []
max = int(len(pred_train)/len_out)
for i in range(0,max):
preds.append(tf.squeeze(pred_train[i*len_out,0:shift,:],1))
pred_index.append(df.index[len_seq + i*len_out:len_seq + (i+1)*len_out])
step_val.append(pred_train[i*len_out,0,0])
step_time.append(df.index[len_seq + i*len_out])
preds = tf.convert_to_tensor(preds).numpy()
preds = np.reshape(preds,(preds.shape[0]*preds.shape[1]))
pred_index = np.asarray(pred_index)
pred_index = np.reshape(pred_index,(pred_index.shape[0]*pred_index.shape[1]))
fig.add_trace(go.Scatter(x=pred_index,y=preds, mode='lines', line=dict(color='magenta', width=1), name= 'predicted_temperature_train'))
fig.add_trace(go.Scatter(x=step_time,y=step_val, mode='markers', line=dict(color='black', width=1), name= 'MultiStep_predicted_temperature_train'))
# Dislply the predictions (for the validation dataset)
predsv = []
predv_index = []
stepv_time = []
stepv_val = []
maxv = int(len(pred_val)/len_out)
for i in range(0,maxv):
predsv.append(tf.squeeze(pred_val[i*len_out,0:shift,:],1))
predv_index.append(df.index[splitting_time + i*shift+ len_seq:splitting_time+ i*shift+len_seq+len_out])
stepv_val.append(pred_val[i*len_out,0,0])
stepv_time.append(df.index[splitting_time + i*shift + len_seq])
predsv = tf.convert_to_tensor(predsv).numpy()
predsv = np.reshape(predsv,(predsv.shape[0]*predsv.shape[1]))
predv_index = np.asarray(predv_index)
predv_index = np.reshape(predv_index,(predv_index.shape[0]*predv_index.shape[1]))
fig.add_trace(go.Scatter(x=predv_index,y=predsv, mode='lines', line=dict(color='yellow', width=1), name= 'predicted_temperature_val'))
fig.add_trace(go.Scatter(x=stepv_time,y=stepv_val, mode='markers', line=dict(color='brown', width=1), name= 'MultiStep_predicted_temperature_val'))
fig.update_xaxes(rangeslider_visible=True)
yaxis=dict(autorange = True,fixedrange= False)
fig.update_yaxes(yaxis)
fig.show()
MSE Computation
Training dataset
preds = []
pred_index = []
step_time = []
step_val = []
max = int(len(pred_train)/len_out)
for i in range(0,max):
preds.append(tf.squeeze(pred_train[i*len_out,0:shift,:],1))
preds = tf.convert_to_tensor(preds).numpy()
preds = np.reshape(preds,(preds.shape[0]*preds.shape[1]))
train_x_norm_2 = train_x_norm[len_seq:-(train_x_norm[len_seq:,:].shape[0]-preds.shape[0]),:]
mse_train = tf.keras.losses.mse(train_x_norm_2[:,-1],preds)
print( f"MSE on the train dataset is: {mse_train.numpy()}")MSE on the train dataset is: 0.0016751608345657587
Validation dataset
predsv = []
maxv = int(len(pred_val)/len_out)
for i in range(0,maxv):
predsv.append(tf.squeeze(pred_val[i*len_out,0:shift,:],1))
predsv = tf.convert_to_tensor(predsv).numpy()
predsv = np.reshape(predsv,(predsv.shape[0]*predsv.shape[1]))
val_x_norm_2 = val_x_norm[len_seq:-(val_x_norm[len_seq:,:].shape[0]-predsv.shape[0]),:]
mse_val = tf.keras.losses.mse(val_x_norm_2[:,-1],predsv)
print( f"MSE on the validation dataset is: {mse_val.numpy()}")MSE on the validation dataset is: 0.0014205272309482098
全部代码(代码中还有你如果没有TPU的解决方法,利用CPU代替):
import tensorflow as tf
from tensorflow import keras
import pandas as pd
import numpy as np
import matplotlib.pyplot as plt
from tensorflow.keras import backend as K
from sklearn import preprocessing
'''
import tensorflow as tf
# 安装TPU相关包
!pip install tensorflow-gpu==1.15.5
!pip install tensorflow_datasets -U
!pip install cloud-tpu-client
# 配置环境参数
os.environ['TF_CPP_MIN_LOG_LEVEL'] = '3'
tpu = tf.distribute.cluster_resolver.TPUClusterResolver.connect()
tf.config.experimental_connect_to_cluster(tpu)
tf.tpu.experimental.initialize_tpu_system(tpu)
tpu_strategy = tf.distribute.experimental.TPUStrategy(tpu)
2. 检查您提供的TPU名称是否正确。如果您手动在代码中提供TPU名称,则确保提供的名称与您的TPU名称匹配。您可以在Google云平台中的“Cloud Console”页面上查看TPU名称和地址。
3. 确保您具有访问TPU所需的权限。如果验证失败,则可能是由于您没有以正确的方式授权您的访问密钥或没有访问TPU的权限。请确保您在使用TPU之前已经授权并分配了相应的权限。
总之,您需要对代码进行审查,确保您提供了正确的TPU名称和在连接TPU之前已经启用了TPU。如果您仍然无法解决问题,可以考虑查看该平台的文档或寻求相关技术支持。
'''
train_path = 'train.csv'
test_path = 'test.csv'
df = pd.read_csv(train_path)
df.head()
print(df.head())
df.drop(['Id','Date','Time','Day_of_the_week'],axis=1,inplace=True)
df.dtypes
print(df.dtypes)
df = df.astype(dtype="float32")
df.dtypes
print(df.dtypes)
percentage = 0.8
splitting_time = int(len(df) * percentage)

train_x = np.array(df.values[:splitting_time],dtype=np.float32)
val_x = np.array(df.values[splitting_time:],dtype=np.float32)

print("train dataset size : %d" %len(train_x))
print("validation dataset size : %d" %len(val_x))
# Construction of the series

train_x = tf.convert_to_tensor(train_x)
test_x = tf.convert_to_tensor(val_x)

scaler = preprocessing.MinMaxScaler()
scaler.fit(train_x)

train_x_norm = scaler.transform(train_x)
val_x_norm = scaler.transform(val_x)
# Displaying some scaled series
cols = list(df.columns)

fig, ax = plt.subplots(constrained_layout=True, figsize=(15,5))
for i in range(5):
  ax.plot(df.index[:splitting_time].values,train_x_norm[:,i], label= cols[i])
ax.legend()
plt.show()
fig, ax = plt.subplots(constrained_layout=True, figsize=(15,5))
for i in range(8,11):
  ax.plot(df.index[:splitting_time].values,train_x_norm[:,i], label= cols[i])
ax.legend()
plt.show()
def model_wavenet_timeseries(len_seq, len_out, dim_exo, nb_filters, dim_filters, dilation_depth, use_bias, res_l2,
final_l2, batch_size):
input_shape_exo = tf.keras.Input(shape=(len_seq, dim_exo), name='input_exo')
input_shape_target = tf.keras.Input(shape=(len_seq, 1), name='input_target')
input_exo = input_shape_exo
input_target = input_shape_target
outputs = []
# 1st loop: I'll be making multi-step predictions (every prediction will serve as input for the second prediction, when I move the window size...).
for t in range(len_out):
# Causal convolution for the 1st input: exogenous series
# out_exo : (batch_size,len_seq,dim_exo)
out_exo = K.temporal_padding(input_exo,
padding=((dim_filters - 1), 0)) # To keep the same len_seq for the hidden layers
out_exo = tf.keras.layers.Conv1D(filters=nb_filters, kernel_size=dim_filters, dilation_rate=1, use_bias=True,
activation=None,
name='causal_convolution_exo_%i' % t,
kernel_regularizer=tf.keras.regularizers.l2(res_l2))(out_exo)
# Causal convolution for the 2nd input: target series
# out_target : (batch_size,len_seq,1)
out_target = K.temporal_padding(input_target,
padding=((dim_filters - 1), 0)) # To keep the same len_seq for the hidden layers
out_target = tf.keras.layers.Conv1D(filters=nb_filters, kernel_size=dim_filters, dilation_rate=1, use_bias=True,
activation=None,
name='causal_convolution_target_%i' % t,
kernel_regularizer=tf.keras.regularizers.l2(res_l2))(out_target)
# Frist Layer #1 (See visual Above)
# Dilated Convolution (1st Layer #1): part of exogenous series(see visual above)
# skip_exo : (batch_size,len_seq,dim_exo)
# first_out_exo (the same as skip_exo, before adding the residual connection): (batch_size, len_seq, dim_exo)
skip_outputs = []
z_exo = K.temporal_padding(out_exo, padding=(2 * (dim_filters - 1), 0))
z_exo = tf.keras.layers.Conv1D(filters=nb_filters, kernel_size=dim_filters, dilation_rate=2, use_bias=True,
activation="relu",
name='dilated_convolution_exo_1_%i' % t,
kernel_regularizer=tf.keras.regularizers.l2(res_l2))(z_exo)
skip_exo = tf.keras.layers.Conv1D(dim_exo, 1, padding='same', use_bias=False,
kernel_regularizer=tf.keras.regularizers.l2(res_l2))(z_exo)
first_out_exo = tf.keras.layers.Conv1D(dim_exo, 1, padding='same', use_bias=False,
kernel_regularizer=tf.keras.regularizers.l2(res_l2))(z_exo)
# Dilated Convolution (1st Layer #1): part of target series(see visual above)
# skip_target : (batch_size,len_seq,1)
# first_out_target (the same as skip_target, before adding the residual connection): (batch_size, len_seq,1)
z_target = K.temporal_padding(out_target, padding=(2 * (dim_filters - 1), 0))
z_target = tf.keras.layers.Conv1D(filters=nb_filters, kernel_size=dim_filters, dilation_rate=2, use_bias=True,
activation="relu",
name='dilated_convolution_target_1_%i' % t,
kernel_regularizer=tf.keras.regularizers.l2(res_l2))(z_target)
skip_target = tf.keras.layers.Conv1D(1, 1, padding='same', use_bias=False,
kernel_regularizer=tf.keras.regularizers.l2(res_l2))(z_target)
first_out_target = tf.keras.layers.Conv1D(1, 1, padding='same', use_bias=False,
kernel_regularizer=tf.keras.regularizers.l2(res_l2))(z_target)
# Concatenation of the skip_exo & skip_target AND Saving them as we go through the 1st for loop (through len_seq)
# skip_exo : (batch_size,len_seq,dim_exo)
# skip_target : (batch_size,len_seq,1)
# The concatenation of skip_exp & skip_target : (batch_size,len_seq,dim_exo+1)
skip_outputs.append(tf.concat([skip_exo, skip_target], axis=2))
# Adding the Residual connections of the exogenous series & target series to inputs
# res_exo_out : (batch_size,len_seq,dim_exo)
# res_target_out : (batch_size,len_seq,1)
res_exo_out = tf.keras.layers.Add()([input_exo, first_out_exo])
res_target_out = tf.keras.layers.Add()([input_target, first_out_target])
# Concatenation of the updated outputs (after having added the residual connections)
# out_concat : (batch_size,len_seq,dim_exo+1)
out_concat = tf.concat([res_exo_out, res_target_out], axis=2)
out = out_concat
# From 2nd Layer Layer#2 to Final Layer (Layer #L): See Visual above
# 2nd loop: inner loop (Going through all the intermediate layers)
# Intermediate dilated convolutions
for i in range(2, dilation_depth + 1):
z = K.temporal_padding(out_concat, padding=(2 ** i * (dim_filters - 1), 0)) # To keep the same len_seq
z = tf.keras.layers.Conv1D(filters=nb_filters, kernel_size=dim_filters, dilation_rate=2 ** i, use_bias=True,
activation="relu",
name='dilated_convolution_%i_%i' % (i, t),
kernel_regularizer=tf.keras.regularizers.l2(res_l2))(z)
skip_x = tf.keras.layers.Conv1D(dim_exo + 1, 1, padding='same', use_bias=False,
kernel_regularizer=tf.keras.regularizers.l2(res_l2))(z)
first_out_x = tf.keras.layers.Conv1D(dim_exo + 1, 1, padding='same', use_bias=False,
kernel_regularizer=tf.keras.regularizers.l2(res_l2))(z)
res_x = tf.keras.layers.Add()([out, first_out_x]) # (batch_size,len_seq,dim_exo+1)
out = res_x
skip_outputs.append(skip_x) # (batch_size,len_seq,dim_exo+1)
# Adding intermediate outputs of all the layers (See Visual above)
out = tf.keras.layers.Add()(skip_outputs) # (batch_size,len_seqe,dim_exo+1)
# Output Layer (exogenous series & target series)
# outputs : (batch_size,1,1) # The predcition Y
# out_f_exo (will be used to Adjust the input for the following prediction, see below) : (batch_size,len_seq,dim_exo)
out = tf.keras.layers.Activation('linear', name="output_linear_%i" % t)(out)
out_f_target = tf.keras.layers.Conv1D(1, 1, padding='same', kernel_regularizer=tf.keras.regularizers.l2(final_l2))(
out)
out_f_exo = tf.keras.layers.Conv1D(dim_exo, 1, padding='same',
kernel_regularizer=tf.keras.regularizers.l2(final_l2))(out)
outputs.append(out_f_target[:, -1:, :])
# Adjusting the entry of exogenous series,for the following prediction (of MultiStep predictions): see the 1st loop
# First: concatenate the previous exogenous series input with the final exo_prediction(current exo_prediction)
input_exo = tf.concat([input_exo, out_f_exo[:, -1:, :]], axis=1)
# Second, shift the moving window (of len_seq size) by one
input_exo = tf.slice(input_exo, [0, 1, 0], [batch_size, input_shape_exo.shape[1], dim_exo])
# Adjusting the entry of target series,for the following prediction (of MultiStep predictions): see the 1st loop
# First: concatenate the previous target series input with the final prediction(current prediction)
input_target = tf.concat([input_target, out_f_target[:, -1:, :]], axis=1)
# Second, shift the moving window (of len_seq size) by one
input_target = tf.slice(input_target, [0, 1, 0], [batch_size, input_shape_target.shape[1], 1])
outputs = tf.convert_to_tensor(outputs) # (len_out,batch_size,1,1)
outputs = tf.squeeze(outputs, -1) # (len_out,batch_size,1)
outputs = tf.transpose(outputs, perm=[1, 0, 2]) # (batch_size,len_out,1)
model = tf.keras.Model([input_shape_exo, input_shape_target], outputs)
return model
def compute_len_seq(dilation_depth):
  return (2 ** dilation_depth * 2)
nb_filters = 96
dim_filters = 2
dilation_depth = 4     # len_seq = 32
use_bias = False
res_l2 = 0
final_l2 = 0

batch_size = 128
len_out = 5
dim_exo = 14

len_seq = compute_len_seq(dilation_depth)
print(len_seq)

model = model_wavenet_timeseries(len_seq, len_out, dim_exo, nb_filters, dim_filters, dilation_depth, use_bias, res_l2, final_l2,batch_size=batch_size)
model.summary()
# This is required for Model implementation (for more information, see the Model Architecture Above).

def prepare_dataset_XY(seriesx, seriesy, len_seq, len_out, batch_size,shift):
  '''
  A function for creating a dataset from time series data as follows:
  X = {((X1_1,X1_2,...,X1_T),(X2_1,X2_2,...,X2_T),(X3_1,X3_2,...,X3_T)),
       (Y1,Y2,...,YT)}
  Y = YT+1
  seriesx-- Exogenous series, shape: (Tin, number_of_exogenous_series) with Tin: length of the time series
  seriesy-- Target series, shape: (Tin, 1)
  len_seq-- Sequence length: integer
  len_out-- Length of the predicted sequence (output): integer
  shift-- The window offset: integer
  batch_size-- Size of the batch: integer

  '''
  # Exogenous series
  # ((X1_1,X1_2,...,X1_T),(X2_1,X2_2,...,X2_T),(X3_1,X3_2,...,X3_T),....)
  dataset_x = tf.data.Dataset.from_tensor_slices(seriesx)
  dataset_x = dataset_x.window(len_seq+len_out, shift = shift, drop_remainder=True)
  dataset_x = dataset_x.flat_map(lambda x: x.batch(len_seq+len_out))
  dataset_x = dataset_x.map(lambda x: x[0:len_seq][:,:]) # shape:[[ ]]
  dataset_x = dataset_x.batch(batch_size, drop_remainder=True).prefetch(1) # shape: [[[]]] (adding the batch_size)

  # The target series
  # (Y1,Y2,...,YT)
  dataset_y = tf.data.Dataset.from_tensor_slices(seriesy)
  dataset_y = dataset_y.window(len_seq+len_out, shift = shift, drop_remainder=True)
  dataset_y = dataset_y.flat_map(lambda x: x.batch(len_seq+len_out))
  dataset_y = dataset_y.map(lambda x: x[0:len_seq][:,:])
  dataset_y = dataset_y.batch(batch_size, drop_remainder=True).prefetch(1)

  # Y = YT+1 (the values to predict)
  dataset_ypred = tf.data.Dataset.from_tensor_slices(seriesy)
  dataset_ypred = dataset_ypred.window(len_seq+len_out+1, shift=shift, drop_remainder=True)
  dataset_ypred = dataset_ypred.flat_map(lambda x: x.batch(len_seq+len_out+1))
  dataset_ypred = dataset_ypred.map(lambda x: (x[0:len_seq+1][-len_out:,:]))
  dataset_ypred = dataset_ypred.batch(batch_size, drop_remainder=True).prefetch(1)

  dataset = tf.data.Dataset.zip((dataset_x, dataset_y))
  dataset = tf.data.Dataset.zip((dataset, dataset_ypred))
  return dataset
# Example (Simple example for breaking down the function)

X1 = np.linspace(1,100,100) # 3 exogenous series
X2 = np.linspace(101,200,100)
X3 = np.linspace(201,300,100)
Y = np.linspace(301,400,100) # target series

X1 = tf.expand_dims(X1,-1)
X2 = tf.expand_dims(X2,-1)
X3 = tf.expand_dims(X3,-1)
Y = tf.expand_dims(Y,-1)

series_x = tf.concat([X1,X2,X3], axis=1)
series_y = Y
print(series_x.shape)
print(series_y.shape)
len_seq = 10
len_out = 1
shift = 1
batch_size = 1

dataset_example = prepare_dataset_XY(series_x, series_y, len_seq, len_out, batch_size,shift)
for element in dataset_example.take(1):
  print("Exogenous series: ")
  print(element[0][0])
  print("----------------------")
  print("Target series: ")
  print(element[0][1])
  print("======================")
  print("Value to predict: ")
  print(element[1])
# The characteristics of the dataset I want to create

batch_size = 128
len_out = 5
len_seq = compute_len_seq(dilation_depth)
shift=1

# Dataset creation
dataset = prepare_dataset_XY(train_x_norm[:,0:-1], train_x_norm[:,-1:], len_seq, len_out, batch_size, shift)
dataset_val = prepare_dataset_XY(val_x_norm[:,0:-1], val_x_norm[:,-1:], len_seq, len_out, batch_size, shift)
print(len(list(dataset.as_numpy_iterator())))
print(("---------------"))
for element in dataset.take(1):
  print(element[0][0].shape)
  print(element[0][1].shape)
  print(element[1].shape)
print(len(list(dataset_val.as_numpy_iterator())))
print(("---------------"))
for element in dataset.take(1):
  print(element[0][0].shape)
  print(element[0][1].shape)
  print(element[1].shape)
X1 = []
X2 = []

# Extracting x and y from the dataset
x,y = tuple(zip(*dataset)) #x: 16x((BS,32,14),(BS,32,1)) with BS= batch_size
                           #y: 16x(BS,5,1)
for i in range(len(x)):
  X1.append(x[i][0])
  X2.append(x[i][1])

X1 = np.asarray(X1, dtype = np.float32) # (16,BS,32,14)
X2 = np.asarray(X2, dtype = np.float32) # (16,BS,32,1)
y =  np.asarray(y, dtype= np.float32)    # (16,BS,5,1)

# Reshaping them
X1 = np.reshape(X1,(X1.shape[0]*X1.shape[1], X1.shape[2], X1.shape[3])) # (16,BS,32,14) --> (16xBS,32,14)
X2 = np.reshape(X2,(X2.shape[0]*X2.shape[1], X2.shape[2], X2.shape[3])) # (16,BS,32,1)  --> (16xBS,32,1)

x_train = [X1,X2]
y_train = np.reshape(y,(y.shape[0]*y.shape[1], y.shape[2], y.shape[3])) # (16,BS,5,1) --> (16xBS,5,1)

print(x_train[0].shape)
print(x_train[1].shape)
print(y_train.shape)
# Extracting x and y from the validation dataset
X1 = []
X2 = []
x, y = tuple(zip(*dataset_val))
for i in range(len(x)):
X1.append(x[i][0])
X2.append(x[i][1])
X1 = np.asarray(X1, dtype=np.float32)
X2 = np.asarray(X2, dtype=np.float32)
y = np.asarray(y, dtype=np.float32)
# Reshaping them
X1 = np.reshape(X1, (X1.shape[0] * X1.shape[1], X1.shape[2], X1.shape[3]))
X2 = np.reshape(X2, (X2.shape[0] * X2.shape[1], X2.shape[2], X2.shape[3]))
x_val = [X1, X2]
y_val = np.reshape(y, (y.shape[0] * y.shape[1], y.shape[2], y.shape[3]))
print(x_val[0].shape)
print(x_val[1].shape)
print(y_val.shape)
# detect and initialize the TPU
# tpu = tf.distribute.cluster_resolver.TPUClusterResolver()
# tf.config.experimental_connect_to_cluster(tpu)
# tf.tpu.experimental.initialize_tpu_system(tpu)
# print("All devices: ", tf.config.list_logical_devices('TPU'))
'''
如果您想将代码从使用TPU更改为使用CPU,可以使用以下代码:
📋
import tensorflow as tf
# 创建一个名为CPU的环境
cpu = tf.distribute.cluster_resolver.SimpleClusterResolver(['localhost'])
# 创建本地分发策略
strategy = tf.distribute.experimental.MultiWorkerMirroredStrategy([cpu])
# 在本地分发策略下构建模型
with strategy.scope():
model = tf.keras.models.Sequential([...])
model.compile([...])
在这里,我们使用`SimpleClusterResolver`代替原先的`TPUClusterResolver`,并且将环境的名称设置为"localhost",以使用本地的CPU。然后我们使用`MultiWorkerMirroredStrategy`分发策略来对模型进行本地分布式训练,以充分利用CPU的计算能力。
最后,我们在使用分发策略的`with`块中构建和编译模型。由于我们使用分发策略,因此模型将自动在多个CPU上运行以实现更快的训练速度。
请注意,这仅是代码的一个示例,具体的数据和模型架构可能需要根据您的需要进行修改。
'''
max_periods = 1000
# instantiate a distribution strategy
# tpu_strategy = tf.distribute.experimental.TPUStrategy(tpu)
'''
with tpu_strategy.scope():
model = model_wavenet_timeseries(len_seq, len_out, dim_exo, nb_filters, dim_filters, dilation_depth, use_bias, res_l2, final_l2, batch_size=int(batch_size/8))
lr_schedule = tf.keras.optimizers.schedules.InverseTimeDecay(
initial_learning_rate=0.005,
decay_steps=50,
decay_rate=0.01)
opt=tf.keras.optimizers.Adam(learning_rate=lr_schedule)
CheckPoint = tf.keras.callbacks.ModelCheckpoint("weights_train.hdf5", monitor='loss', verbose=1, save_best_only=True, save_weights_only = True, mode='auto', save_freq='epoch')
model.compile(loss="mse", optimizer=opt, metrics="mse")
history = model.fit(x=[x_train[0],x_train[1]],y=y_train, validation_data=([x_val[0],x_val[1]],y_val), epochs=max_periods,verbose=1, callbacks=[CheckPoint,tf.keras.callbacks.EarlyStopping(monitor='loss', patience=200)],batch_size=batch_size)
'''
'''
cpu = tf.distribute.cluster_resolver.TPUClusterResolver()
tf.config.experimental_connect_to_cluster(cpu)
tf.tpu.experimental.initialize_tpu_system(cpu)
print("All devices: ", tf.config.list_logical_devices('CPU'))
tpu_strategy = tf.distribute.experimental.TPUStrategy(cpu)
cpu_strategy = tf.distribute.get_strategy()
with cpu_strategy.scope():
'''
# 创建模型
model = model_wavenet_timeseries(len_seq, len_out, dim_exo, nb_filters, dim_filters, dilation_depth, use_bias, res_l2, final_l2, batch_size=int(batch_size))
# 定义学习率衰减
lr_schedule = tf.keras.optimizers.schedules.InverseTimeDecay(
initial_learning_rate=0.005,
decay_steps=50,
decay_rate=0.01)
# 定义优化器
opt=tf.keras.optimizers.Adam(learning_rate=lr_schedule)
# 定义回调函数
CheckPoint = tf.keras.callbacks.ModelCheckpoint("weights_train.hdf5", monitor='loss', verbose=1, save_best_only=True, save_weights_only = True, mode='auto', save_freq='epoch')
# 编译模型
model.compile(loss="mse", optimizer=opt, metrics="mse")
# 训练模型
history = model.fit(x=[x_train[0],x_train[1]],y=y_train,
validation_data=([x_val[0],x_val[1]],y_val),
epochs=max_periods,verbose=1,
callbacks=[CheckPoint,tf.keras.callbacks.EarlyStopping(monitor='loss', patience=200)],
batch_size=batch_size)
# The evolution of loss during the training
loss_train = history.history["loss"]
loss_val = history.history["val_loss"]

plt.figure(figsize=(10, 6))
plt.plot(np.arange(0,len(loss_train)),loss_train, label="Loss_train")
plt.plot(np.arange(0,len(loss_train)),loss_val, label ="Loss_val")
plt.legend()

plt.title("Evolution of the loss")
# I saved the best weights on the Kaggle/Output by using the ModelCheckPoint callback during the training phase.
model = model_wavenet_timeseries(len_seq, len_out, dim_exo, nb_filters, dim_filters, dilation_depth, use_bias, res_l2, final_l2,batch_size=batch_size)
model.load_weights("./weights_train.hdf5")
pred_train = model.predict((x_train[0],x_train[1]),verbose=1,batch_size=batch_size)
pred_val = model.predict((x_val[0],x_val[1]),verbose=1,batch_size=batch_size)
import plotly.graph_objects as go

shift = len_out
fig = go.FigureWidget()

# Original series of 'Indoor_Temperature_room'
fig.add_trace(go.Scatter(x=df.index,y=train_x_norm [:,-1],line = {'color':'blue', 'width':1}, name= 'real_temperature_train'))
fig.add_trace(go.Scatter(x=df.index[splitting_time:],y=val_x_norm[:,-1],line = {'color':'green', 'width':1}, name = 'real_temperature_val' ))

# Dislply the MultiStep predictions (for the train dataset)

preds = []
pred_index = []
step_time = []
step_val = []

max = int(len(pred_train)/len_out)

for i in range(0,max):
  preds.append(tf.squeeze(pred_train[i*len_out,0:shift,:],1))
  pred_index.append(df.index[len_seq + i*len_out:len_seq + (i+1)*len_out])
  step_val.append(pred_train[i*len_out,0,0])
  step_time.append(df.index[len_seq + i*len_out])

preds = tf.convert_to_tensor(preds).numpy()
preds = np.reshape(preds,(preds.shape[0]*preds.shape[1]))

pred_index = np.asarray(pred_index)
pred_index = np.reshape(pred_index,(pred_index.shape[0]*pred_index.shape[1]))

fig.add_trace(go.Scatter(x=pred_index,y=preds, mode='lines', line=dict(color='magenta', width=1), name= 'predicted_temperature_train'))
fig.add_trace(go.Scatter(x=step_time,y=step_val, mode='markers', line=dict(color='black', width=1), name= 'MultiStep_predicted_temperature_train'))


# Dislply the predictions (for the validation dataset)

predsv = []
predv_index = []
stepv_time = []
stepv_val = []
maxv = int(len(pred_val)/len_out)

for i in range(0,maxv):
  predsv.append(tf.squeeze(pred_val[i*len_out,0:shift,:],1))
  predv_index.append(df.index[splitting_time + i*shift+ len_seq:splitting_time+ i*shift+len_seq+len_out])
  stepv_val.append(pred_val[i*len_out,0,0])
  stepv_time.append(df.index[splitting_time + i*shift + len_seq])

predsv = tf.convert_to_tensor(predsv).numpy()
predsv = np.reshape(predsv,(predsv.shape[0]*predsv.shape[1]))
predv_index = np.asarray(predv_index)
predv_index = np.reshape(predv_index,(predv_index.shape[0]*predv_index.shape[1]))

fig.add_trace(go.Scatter(x=predv_index,y=predsv, mode='lines', line=dict(color='yellow', width=1), name= 'predicted_temperature_val'))
fig.add_trace(go.Scatter(x=stepv_time,y=stepv_val, mode='markers', line=dict(color='brown', width=1), name= 'MultiStep_predicted_temperature_val'))


fig.update_xaxes(rangeslider_visible=True)
yaxis=dict(autorange = True,fixedrange= False)
fig.update_yaxes(yaxis)
fig.show()
preds = []
pred_index = []
step_time = []
step_val = []

max = int(len(pred_train)/len_out)
for i in range(0,max):
  preds.append(tf.squeeze(pred_train[i*len_out,0:shift,:],1))
preds = tf.convert_to_tensor(preds).numpy()
preds = np.reshape(preds,(preds.shape[0]*preds.shape[1]))

train_x_norm_2 = train_x_norm[len_seq:-(train_x_norm[len_seq:,:].shape[0]-preds.shape[0]),:]
mse_train = tf.keras.losses.mse(train_x_norm_2[:,-1],preds)
print( f"MSE on the train dataset is: {mse_train.numpy()}")
predsv = []
maxv = int(len(pred_val)/len_out)
for i in range(0,maxv):
  predsv.append(tf.squeeze(pred_val[i*len_out,0:shift,:],1))

predsv = tf.convert_to_tensor(predsv).numpy()
predsv = np.reshape(predsv,(predsv.shape[0]*predsv.shape[1]))

val_x_norm_2 = val_x_norm[len_seq:-(val_x_norm[len_seq:,:].shape[0]-predsv.shape[0]),:]
mse_val = tf.keras.losses.mse(val_x_norm_2[:,-1],predsv)
print( f"MSE on the validation dataset is: {mse_val.numpy()}")
16/16 [==============================] - 2s 48ms/step
4/4 [==============================] - 0s 47ms/step
MSE on the train dataset is: 0.0016800930025056005
MSE on the validation dataset is: 0.0013739500427618623
如果你没有TPU可以参考下面的方法(或者像我全部代码里用的方法一样直接用点脑的CPU,当然这样的运行速度是比不上TPU和GPU的根据自己的配置和需要来搭建环境):
要在CPU上运行这段代码,您可以将以下行:
cpu = tf.distribute.cluster_resolver.TPUClusterResolver()tf.config.experimental_connect_to_cluster(cpu)tf.tpu.experimental.initialize_tpu_system(cpu)print("All devices: ", tf.config.list_logical_devices('CPU'))tpu_strategy = tf.distribute.experimental.TPUStrategy(cpu)
替换为以下行,这将只在CPU上运行代码:
cpu_strategy = tf.distribute.get_strategy()
然后,将以下代码添加在您模型的作用域内,以确保在CPU模式下编译模型和训练:
with cpu_strategy.scope():# 创建模型model = model_wavenet_timeseries(len_seq, len_out, dim_exo, nb_filters, dim_filters, dilation_depth, use_bias, res_l2, final_l2, batch_size=int(batch_size))# 定义学习率衰减lr_schedule = tf.keras.optimizers.schedules.InverseTimeDecay(initial_learning_rate=0.005,decay_steps=50,decay_rate=0.01)# 定义优化器opt=tf.keras.optimizers.Adam(learning_rate=lr_schedule)# 定义回调函数CheckPoint = tf.keras.callbacks.ModelCheckpoint("weights_train.hdf5", monitor='loss', verbose=1, save_best_only=True, save_weights_only = True, mode='auto', save_freq='epoch')# 编译模型model.compile(loss="mse", optimizer=opt, metrics="mse")# 训练模型history = model.fit(x=[x_train[0],x_train[1]],y=y_train,validation_data=([x_val[0],x_val[1]],y_val),epochs=max_periods,verbose=1,callbacks=[CheckPoint,tf.keras.callbacks.EarlyStopping(monitor='loss', patience=200)],batch_size=batch_size)
请注意,在使用CPU策略时,您将遵循常规的 Keras 训练和编译模型流程,而不需要使用 tpu_strategy 或特殊的 TPU API。
参考文献
注意:
这是我自己做的实现。在我的道路上,我一直使用Keras和TensorFlow作为学习和掌握这些不同框架的手段。
io: keras.ioKeras: Deep Learning for humans
TensorFlow学习:TFLearnhttps://www.tensorflow.org/learn
论文:
条件时间序列预测与卷积神经网络:WaveNet时间序列!https://arxiv.org/pdf/1703.04691.pdf
原始的WaveNet模型(Google): WaveNet论文https://www.researchgate.net/publication/308026508_WaveNet_A_Generative_Model_for_Raw_Audio
通过因果和扩展卷积神经网络预测金融时间序列:这篇文章深入研究了因果和扩展卷积(WaveNet模型的基础)。https://mdpi-res.com/d_attachment/entropy/entropy-22-01094/article_deploy/entropy-22-01094.pdf?version=1601376469
参考文献:https://www.kaggle.com/code/abireltaief/adapted-google-wavenet-time-series-forecasting

![buu [AFCTF2018]MyOwnCBC 1](https://img-blog.csdnimg.cn/b53a15be88f14bb49e60ad3d0ec8fbc7.png)




![[CTF/网络安全] 攻防世界 xff_referer 解题详析](https://img-blog.csdnimg.cn/11f390c5dd2c45fda42155833b78bd99.png#pic_center)
