tictoc13-
- tictoc13 子类化cMessage生成消息,随机目标地址
- tictoc 14 在13的基础上增加两变量显示于仿真界面
- tictoc 15 模型数据输出为直方图
tictoc13 子类化cMessage生成消息,随机目标地址
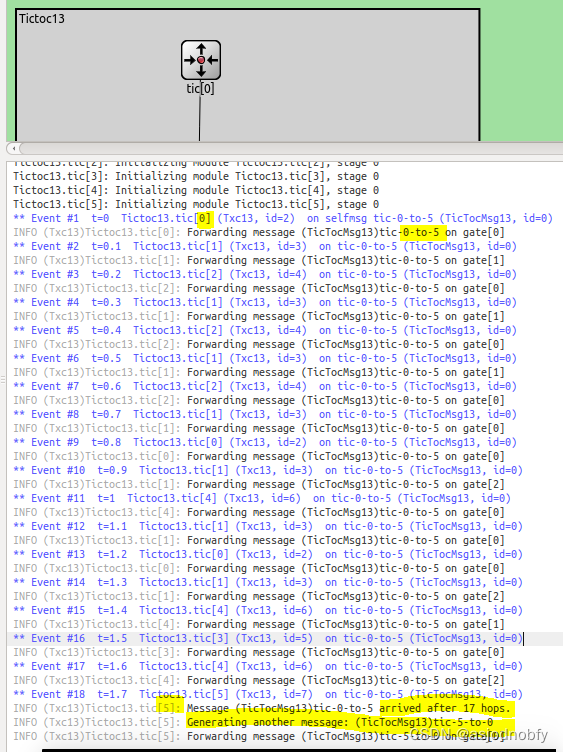
- 在这一步中,目标地址不再是节点2——我们绘制了一个随机的目的地,并将目标地址添加到消息中。
- 最好的方法是子类化cMessage并添加destination作为数据成员。
手工编写消息类通常是令人厌烦的,因为它包含很多样板代码,所以我们让omnet++为我们生成该类。 - 消息类规范在tictoc13.msg——tictoc13_m.h和.cc将从这个文件自动生成。
- 为了延长模型的执行时间,在消息到达目的地后,目标节点将生成另一个带有随机目的地地址的消息,以此类推。
tictoc13.msg
message TicTocMsg13
{
    int source;
    int destination;
    int hopCount = 0;
}
ned
simple Txc13
{
    parameters:
        @display("i=block/routing");
    gates:
        inout gate[];
}

network Tictoc13
{
    types:
        channel Channel extends ned.DelayChannel {
            delay = 100ms;
        }
    submodules:
        tic[6]: Txc13;
    connections:
        tic[0].gate++ <--> Channel <--> tic[1].gate++;
        tic[1].gate++ <--> Channel <--> tic[2].gate++;
        tic[1].gate++ <--> Channel <--> tic[4].gate++;
        tic[3].gate++ <--> Channel <--> tic[4].gate++;
        tic[4].gate++ <--> Channel <--> tic[5].gate++;
}
cc
#include <stdio.h>
#include <string.h>
#include <omnetpp.h>

using namespace omnetpp;

// Include a generated file: the header file created from tictoc13.msg.
// It contains the definition of the TictocMsg10 class, derived from
// cMessage.包含一个生成的文件:从tictoc13.msg创建的头文件。它包含了派生自cMessage的TictocMsg10类的定义。
#include "tictoc13_m.h"

/**
 * In this step the destination address is no longer node 2 -- we draw a
 * random destination, and we'll add the destination address to the message.
 *
 * The best way is to subclass cMessage and add destination as a data member.
 * Hand-coding the message class is usually tiresome because it contains
 * a lot of boilerplate code, so we let OMNeT++ generate the class for us.
 * The message class specification is in tictoc13.msg -- tictoc13_m.h
 * and .cc will be generated from this file automatically.
 *
 * To make the model execute longer, after a message arrives to its destination
 * the destination node will generate another message with a random destination
 * address, and so forth.
 * 1. 在这一步中,目标地址不再是节点2——我们绘制了一个随机的目的地,并将目标地址添加到消息中。
2. 最好的方法是子类化cMessage并添加destination作为数据成员。
手工编写消息类通常是令人厌烦的,因为它包含很多样板代码,所以我们让omnet++为我们生成该类。
3. 消息类规范在tictoc13.msg——tictoc13_m.h和.cc将从这个文件自动生成。
4. 为了延长模型的执行时间,在消息到达目的地后,目标节点将生成另一个带有随机目的地地址的消息,以此类推。
 */
class Txc13 : public cSimpleModule
{
  protected:
    virtual TicTocMsg13 *generateMessage();
    virtual void forwardMessage(TicTocMsg13 *msg);
    virtual void initialize() override;
    virtual void handleMessage(cMessage *msg) override;
};

Define_Module(Txc13);

void Txc13::initialize()
{
    // Module 0 sends the first message ,模块0发送第一个消息
    if (getIndex() == 0) {
        // Boot the process scheduling the initial message as a self-message.
        TicTocMsg13 *msg = generateMessage();
        scheduleAt(0.0, msg);
    }
}

void Txc13::handleMessage(cMessage *msg)
{
    TicTocMsg13 *ttmsg = check_and_cast<TicTocMsg13 *>(msg); //接收到的消息进行类型转换
	//如果消息到达目的地址
    if (ttmsg->getDestination() == getIndex()) {
        // Message arrived.
        EV << "Message " << ttmsg << " arrived after " << ttmsg->getHopCount() << " hops.\n";
        bubble("ARRIVED, starting new one!");
        delete ttmsg;

        // Generate another one.
        EV << "Generating another message: ";
        TicTocMsg13 *newmsg = generateMessage();
        EV << newmsg << endl;
        forwardMessage(newmsg);
    }
    else {
        // We need to forward the message.
        forwardMessage(ttmsg);
    }
}

TicTocMsg13 *Txc13::generateMessage()
{
    // Produce source and destination addresses.生成源地址和目的地址。
    int src = getIndex();  // our module index我们的模块索引 0
    int n = getVectorSize();  // module vector size模块矢量尺寸 ,共有6个节点,即模块
    int dest = intuniform(0, n-2); //0-4 均匀分布
    if (dest >= src)
        dest++;

    char msgname[20];
    sprintf(msgname, "tic-%d-to-%d", src, dest);

    // Create message object and set source and destination field.
    TicTocMsg13 *msg = new TicTocMsg13(msgname);
    msg->setSource(src);
    msg->setDestination(dest);
    return msg;
}

void Txc13::forwardMessage(TicTocMsg13 *msg)
{
    // Increment hop count. 增加跳数。
    msg->setHopCount(msg->getHopCount()+1);

    // Same routing as before: random gate.路由和之前一样,随机门。
    int n = gateSize("gate");
    int k = intuniform(0, n-1);

    EV << "Forwarding message " << msg << " on gate[" << k << "]\n";
    send(msg, "gate$o", k);
}
tictoc 14 在13的基础上增加两变量显示于仿真界面
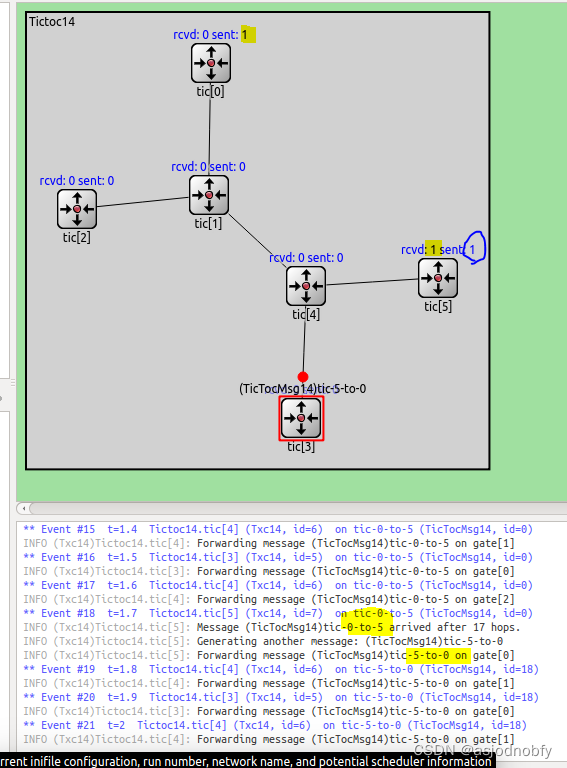
- 在此步骤中,我们跟踪发送和接收的消息数量,并将其显示在图标上方。
WATCH(numSent); WATCH(numReceived);//收发次数的变量显示在仿真界面的模块上
msg
message TicTocMsg14
{
    int source;
    int destination;
    int hopCount = 0;
}
ned
simple Txc14
{
    parameters:
        @display("i=block/routing");
    gates:
        inout gate[];
}

network Tictoc14
{
    types:
        channel Channel extends ned.DelayChannel {
            delay = 100ms;
        }
    submodules:
        tic[6]: Txc14;
    connections:
        tic[0].gate++ <--> Channel <--> tic[1].gate++;
        tic[1].gate++ <--> Channel <--> tic[2].gate++;
        tic[1].gate++ <--> Channel <--> tic[4].gate++;
        tic[3].gate++ <--> Channel <--> tic[4].gate++;
        tic[4].gate++ <--> Channel <--> tic[5].gate++;
}
cc
#include <stdio.h>
#include <string.h>
#include <omnetpp.h>
#include "tictoc14_m.h"

using namespace omnetpp;

/**
 * In this step we keep track of how many messages we send and received,
 * and display it above the icon.
 * 在此步骤中,我们跟踪发送和接收的消息数量,并将其显示在图标上方。
 */
class Txc14 : public cSimpleModule
{
  private:
    long numSent;
    long numReceived;

  protected:
    virtual TicTocMsg14 *generateMessage();
    virtual void forwardMessage(TicTocMsg14 *msg);
    virtual void refreshDisplay() const override;

    virtual void initialize() override;
    virtual void handleMessage(cMessage *msg) override;
};

Define_Module(Txc14);

void Txc14::initialize()
{
    // Initialize variables
    numSent = 0;
    numReceived = 0;
    WATCH(numSent);//收发次数的变量显示在仿真界面的模块上
    WATCH(numReceived);

    // Module 0 sends the first message
    if (getIndex() == 0) {
        // Boot the process scheduling the initial message as a self-message.
        TicTocMsg14 *msg = generateMessage();
        numSent++;
        scheduleAt(0.0, msg);
    }
}

void Txc14::handleMessage(cMessage *msg)
{
    TicTocMsg14 *ttmsg = check_and_cast<TicTocMsg14 *>(msg);

    if (ttmsg->getDestination() == getIndex()) {
        // Message arrived
        int hopcount = ttmsg->getHopCount();
        EV << "Message " << ttmsg << " arrived after " << hopcount << " hops.\n";
        numReceived++;
        delete ttmsg;
        bubble("ARRIVED, starting new one!");

        // Generate another one.
        EV << "Generating another message: ";
        TicTocMsg14 *newmsg = generateMessage();
        EV << newmsg << endl;
        forwardMessage(newmsg);
        numSent++;
    }
    else {
        // We need to forward the message.
        forwardMessage(ttmsg);
    }
}

TicTocMsg14 *Txc14::generateMessage()
{
    // Produce source and destination addresses.
    int src = getIndex();  // our module index
    int n = getVectorSize();  // module vector size
    int dest = intuniform(0, n-2);
    if (dest >= src)
        dest++;

    char msgname[20];
    sprintf(msgname, "tic-%d-to-%d", src, dest);

    // Create message object and set source and destination field.
    TicTocMsg14 *msg = new TicTocMsg14(msgname);
    msg->setSource(src);
    msg->setDestination(dest);
    return msg;
}

void Txc14::forwardMessage(TicTocMsg14 *msg)
{
    // Increment hop count.
    msg->setHopCount(msg->getHopCount()+1);

    // Same routing as before: random gate.
    int n = gateSize("gate");
    int k = intuniform(0, n-1);

    EV << "Forwarding message " << msg << " on gate[" << k << "]\n";
    send(msg, "gate$o", k);
}

void Txc14::refreshDisplay() const
{
    char buf[40];
    sprintf(buf, "rcvd: %ld sent: %ld", numReceived, numSent);
    getDisplayString().setTagArg("t", 0, buf);
}
tictoc 15 模型数据输出为直方图
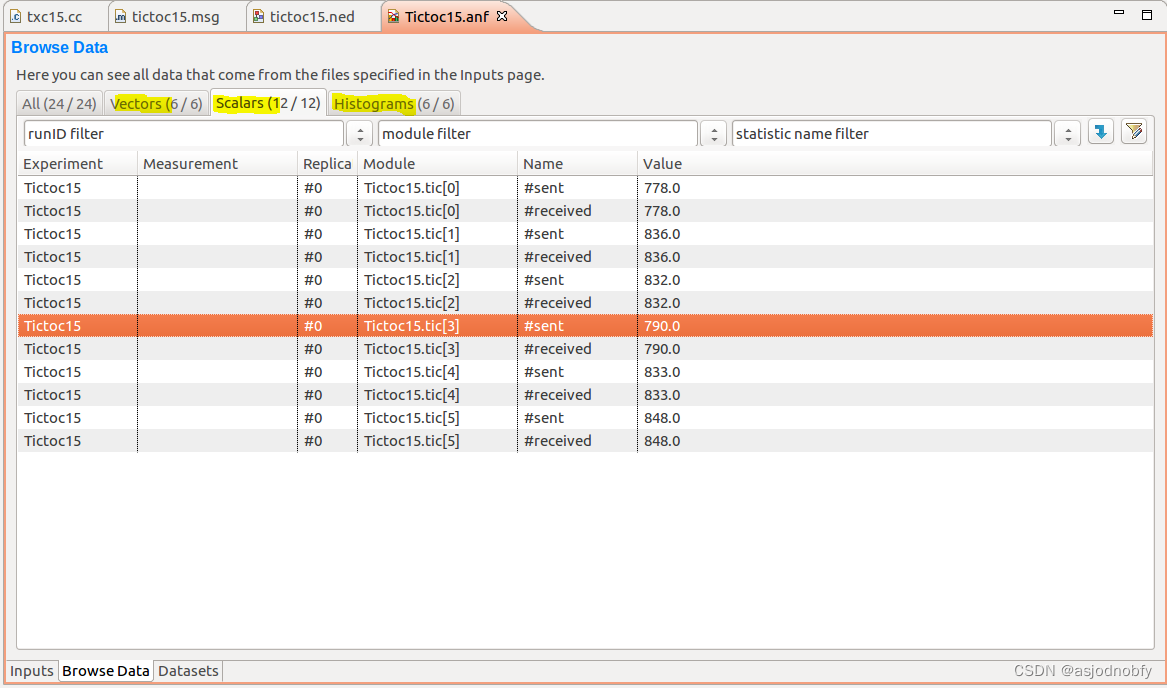
- 这个模型足够令人兴奋,因此我们可以收集一些统计数据。我们将在输出向量中记录每条消息到达时的跳数。输出向量被写入omnetpp。vec文件,可以用Plove程序可视化。
- 我们还收集基本统计数据(最小值、最大值、平均值、std.dev.)和关于跳数的直方图,我们将在模拟结束时打印出这些数据。
- 仿真结束调用finish()
recordScalar("#sent", numSent);//将一个double变量记录到标量结果文件中。
msg
message TicTocMsg15
{
    int source;
    int destination;
    int hopCount = 0;
}
ned
simple Txc15
{
    parameters:
        @display("i=block/routing");
    gates:
        inout gate[];
}

network Tictoc15
{
    types:
        channel Channel extends ned.DelayChannel {
            delay = 100ms;
        }
    submodules:
        tic[6]: Txc15;
    connections:
        tic[0].gate++ <--> Channel <--> tic[1].gate++;
        tic[1].gate++ <--> Channel <--> tic[2].gate++;
        tic[1].gate++ <--> Channel <--> tic[4].gate++;
        tic[3].gate++ <--> Channel <--> tic[4].gate++;
        tic[4].gate++ <--> Channel <--> tic[5].gate++;
}
cc
#include <stdio.h>
#include <string.h>
#include <omnetpp.h>
#include "tictoc15_m.h"

using namespace omnetpp;

/**
 * This model is exciting enough so that we can collect some statistics.
 * We'll record in output vectors the hop count of every message upon arrival.
 * Output vectors are written into the omnetpp.vec file and can be visualized
 * with the Plove program.
 *
 * We also collect basic statistics (min, max, mean, std.dev.) and histogram
 * about the hop count which we'll print out at the end of the simulation.
 * 这个模型足够令人兴奋,因此我们可以收集一些统计数据。我们将在输出向量中记录每条消息到达时的跳数。输出向量被写入omnetpp。vec文件,可以用Plove程序可视化。

我们还收集基本统计数据(最小值、最大值、平均值、std.dev.)和关于跳数的直方图,我们将在模拟结束时打印出这些数据。
 */
class Txc15 : public cSimpleModule
{
  private:
    long numSent;
    long numReceived;
    cHistogram hopCountStats;//直方图类对象
    cOutVector hopCountVector;//输出向量

  protected:
    virtual TicTocMsg15 *generateMessage();//msg作消息
    virtual void forwardMessage(TicTocMsg15 *msg);
    virtual void initialize() override;
    virtual void handleMessage(cMessage *msg) override;

    // The finish() function is called by OMNeT++ at the end of the simulation:
    //仿真结束之后会调用
    virtual void finish() override;
};

Define_Module(Txc15);

void Txc15::initialize()
{
    // Initialize variables
    numSent = 0;
    numReceived = 0;
    WATCH(numSent);
    WATCH(numReceived);

    hopCountStats.setName("hopCountStats");
    hopCountVector.setName("HopCount");

    // Module 0 sends the first message
    if (getIndex() == 0) {
        // Boot the process scheduling the initial message as a self-message.
        TicTocMsg15 *msg = generateMessage();
        scheduleAt(0.0, msg);
    }
}

void Txc15::handleMessage(cMessage *msg)
{
    TicTocMsg15 *ttmsg = check_and_cast<TicTocMsg15 *>(msg);

    if (ttmsg->getDestination() == getIndex()) {
        // Message arrived
        int hopcount = ttmsg->getHopCount();
        EV << "Message " << ttmsg << " arrived after " << hopcount << " hops.\n";
        bubble("ARRIVED, starting new one!");

        // update statistics.更新统计数据
        numReceived++;
        hopCountVector.record(hopcount);
        hopCountStats.collect(hopcount);

        delete ttmsg;

        // Generate another one.
        EV << "Generating another message: ";
        TicTocMsg15 *newmsg = generateMessage();
        EV << newmsg << endl;
        forwardMessage(newmsg);
        numSent++;
    }
    else {
        // We need to forward the message.
        forwardMessage(ttmsg);
    }
}

TicTocMsg15 *Txc15::generateMessage()
{
    // Produce source and destination addresses.
    int src = getIndex();
    int n = getVectorSize();
    int dest = intuniform(0, n-2);
    if (dest >= src)
        dest++;

    char msgname[20];
    sprintf(msgname, "tic-%d-to-%d", src, dest);

    // Create message object and set source and destination field.
    TicTocMsg15 *msg = new TicTocMsg15(msgname);
    msg->setSource(src);
    msg->setDestination(dest);
    return msg;
}

void Txc15::forwardMessage(TicTocMsg15 *msg)
{
    // Increment hop count.
    msg->setHopCount(msg->getHopCount()+1);

    // Same routing as before: random gate.
    int n = gateSize("gate");
    int k = intuniform(0, n-1);

    EV << "Forwarding message " << msg << " on gate[" << k << "]\n";
    send(msg, "gate$o", k);
}

void Txc15::finish()
{
    // This function is called by OMNeT++ at the end of the simulation.
    EV << "Sent:     " << numSent << endl;
    EV << "Received: " << numReceived << endl;
    EV << "Hop count, min:    " << hopCountStats.getMin() << endl;
    EV << "Hop count, max:    " << hopCountStats.getMax() << endl;
    EV << "Hop count, mean:   " << hopCountStats.getMean() << endl;
    EV << "Hop count, stddev: " << hopCountStats.getStddev() << endl;

    recordScalar("#sent", numSent);//将一个double变量记录到标量结果文件中。
    recordScalar("#received", numReceived);
    hopCountStats.recordAs("hop count");
}
![[附源码]计算机毕业设计springboot现代诗歌交流平台](https://img-blog.csdnimg.cn/dd85a0541e11478a8e0d8fde0a230ba1.png)

![[附源码]Python计算机毕业设计SSM开放式在线课程教学与辅助平台(程序+LW)](https://img-blog.csdnimg.cn/599888a6c0de498789464ba3346d8e04.png)
![[附源码]计算机毕业设计JAVA校园闲置物品租赁系统](https://img-blog.csdnimg.cn/d5c4b408de2d44349ad74550d7c66160.png)



![[附源码]计算机毕业设计-菜篮子系统Springboot程序](https://img-blog.csdnimg.cn/f238c89d8253447cba4f5c4ba60f3c4d.png)
