本文字数:22817字
预计阅读时间:58分钟
引言
随着App功能不断增加,工程代码量也随之快速增加,依靠人工CodeReview来保证项目的质量,越来越不现实,这时就有必要借助于自动化的代码审查工具,进行程序静态代码分析;提升自动化水平,提高团队研发效率。
程序静态代码分析(
Program Static Analysis)是指在不运行代码的方式下,通过词法分析、语法分析、控制流、数据流分析等技术对程序代码进行扫描,验证代码是否满足规范性、安全性、可靠性、可维护性等指标的一种代码分析技术。—— 来自百度百科。
由于我们项目中Swift代码占比较高,并且持续使用Swift替换旧的Objc代码,所以技术选型时,仅考虑Swift语言,选用业界主流的静态代码分析工具SwiftLint(https://github.com/realm/SwiftLint)。
本篇文章介绍了SwiftLint的工作原理和配置文件的参数含义。同时还详细介绍了SwiftLint内置规则的分类、如何理解规则说明以及如何禁用规则。此外,文章从工程实践的角度提供了一些实用的建议,并详细解释了如何添加自定义规则。最后,文章还提供了解决大项目改进耗时问题的方案。
SwiftLint简介
SwiftLint是一个用于检查Swift代码风格和诊断代码问题的工具。它通过Hook Clang和SourceKit来针对Swift代码生成的AST(Abstract Syntax Tree)抽象语法树,进行更精确分析,诊断源代码存在的问题。
工作原理
Swift文件的编译过程:

Parse(语法分析):语法分析器对Swift源码进行逐字分析,生成不包含语义和类型信息的抽象语法树AST。这个阶段生成的AST也不包含警告和错误的注入;Sema(语义分析):语义分析器会进行工作并生成一个通过类型检查的AST,并且在源码中嵌入警告和错误等信息;SilLGen(Swit中间语言生成):Swit中间语言生成 (SILGen)阶段将通过语义分析生成的AST转换为Raw SIL, 再对Raw SIL进行了一些优化(例如泛型特化,ARC优化等)之后生成了Canonical siL。slL是Switt定制的中间语言,针对Swift进行了大量的优化,使得Swit性能得到提升。SIL也是Switt编译器的精髓所在;IRGen(生成LLVM的中间语言):将SIL降级为LLVM IR,LLVM的中间语言;LLVM(LLVM编译器架下的后端):前面几个阶段属于Swift编译器,相当于OC中的Clang,属于LLVM编译器架构下的前端,这里的LLVM是编译器架构下的后端,对LLVM1R进一步优化并生成目标文件 (.o)。
AST(Abstract Syntax Tree 抽象语法树) 是源代码的抽象语法结构的树状表示,树上的每个节点都表示源代码中的一种结构,是Swift 文件编译过程中的产物。
Swiftc生成AST,Swiftc是swift语言的编译工具,它可以直接把.swift文件编译生成可执行文件,也可以产生编译过程中某个中间文件。通过生成的 AST 信息可以看到import_decl、class_decl、var_decl、func_decl、brace_stmt、call_expr等及所在的行列数。SourceKit可以通过这些信息实现语法高亮、排版、自动补全、跨语言头文件生成,等等....
SourceKit 是一套工具集,使得大多数 Swift 源代码层面的操作特性得以支持,例如源代码解析、语法高亮、排版(typesetting)、自动补全、跨语言头文件生成,等等。
SwiftLint 的工作原理是检查Swift代码编译过程中的AST和SourceKit环节,从而可以摆脱不同版本Swift语法变化的影响。AST 是编译前端形成的抽象语法书(Abstract Symbolic Tree),SourceKit过程用来对AST进行代码优化,减少内存开销,提高执行效率。
功能介绍
Swiftlint本质上是一个命令行工具,它包含很多功能。
$ swiftlint help
OVERVIEW: A tool to enforce Swift style and conventions.

USAGE: swiftlint <subcommand>

OPTIONS:
  --version               Show the version.
  -h, --help              Show help information.

SUBCOMMANDS:
  analyze                 Run analysis rules
  docs                    Open SwiftLint documentation website in the default web browser
  generate-docs           Generates markdown documentation for all rules
  lint (default)          Print lint warnings and errors
  rules                   Display the list of rules and their identifiers
  version                 Display the current version of SwiftLint

  See 'swiftlint help <subcommand>' for detailed help.
其中最常用的是两类功能:
按规则分析与检查代码
swiftlint //默认行为,按.swiftlint.yml配置文件中规则分析,打印警告和错误自动修复代码
swiftlint --fix --config .swiftlint.auto.yml //根据配置文件指定规则修复文件swiftlint中只有部分规则支持自动修复,即当检查到代码中存在违反规则的问题,例如规则trailing_comma,指数组末尾不应该加空格,let foo = [1, 2, 3,],数组中3后面逗号将会被自动去除,磁盘上的文件将被改写为更正的版本。建议请确保在运行swiftlint --fix之前对这些文件进行了备份,否则可能会丢失重要数据。
配置文件
SwiftLint通过配置文件.swiftlint.yml,允许开发者定制规则的开启与关闭。
参数说明
首先了解一下配置文件中针对规则可设置的参数:
disabled_rules: 关闭某些默认开启的规则。opt_in_rules: 一些规则是可选的,添加到这里才会生效。only_rules: 不可以和disabled_rules或者opt_in_rules并列。类似一个白名单,只有在这个列表中的规则才是开启的。analyzer_rules:这是一个完全独立的规则列表,仅由analyze命令运行。所有分析器规则都是可选择加入的,因此这是唯一可配置的规则列表,没有与disabled_rules only_rules等价的规则。included:指定需要检查的目录或文件excluded:排除需要检查的目录或文件
disabled_rules: # rule identifiers turned on by default to exclude from running
  - colon
  - comma
  - control_statement
opt_in_rules: # some rules are turned off by default, so you need to opt-in
  - empty_count # Find all the available rules by running: `swiftlint rules`

# Alternatively, specify all rules explicitly by uncommenting this option:
# only_rules: # delete `disabled_rules` & `opt_in_rules` if using this
#   - empty_parameters
#   - vertical_whitespace

included: # paths to include during linting. `--path` is ignored if present.
  - Source
excluded: # paths to ignore during linting. Takes precedence over `included`.
  - Carthage
  - Pods
  - Source/ExcludedFolder
  - Source/ExcludedFile.swift
  - Source/*/ExcludedFile.swift # Exclude files with a wildcard
analyzer_rules: # Rules run by `swiftlint analyze`
- explicit_self此外,配置文件中还可以进一步定制规则的报告等级,选择是“警告Warning”还是“错误Error”;同一条规则,符合什么条件情况下是警告,什么条件下是错误,都可以定制;
例如:规则force_cast(https://realm.github.io/SwiftLint/force_cast.html),用来检查避免强制的类型转化(xxx as! Int) 默认的报告等级是“错误Error”(Default configuration: error ),但是可以通过配置文件改为“警告Warning”。
force_cast: warning # 隐式设置
force_try:
severity: warning # 显示设置规则line_length(https://realm.github.io/SwiftLint/line_length.html),用来检查单行代码的字符长度不应超过规定限制,默认规则后是:超过120字符报告警告,超过200字符报告错误,可以通过配置修改。
line_length: 110 #警告阈值修改为110一些规则可以通过设置同时修改达到警告和错误的阈值。
# 用数组方式隐式设置
type_body_length:
  - 300 # warning
  - 400 # error
# 显示设置
file_length:
  warning: 500
error: 1200一些规则,内置详细设置参数,如规则type_name(https://realm.github.io/SwiftLint/type_name.html),用来检查类型名称是否符合规范,默认规则包括:应该只包含字母数字字符,以大写字符开头,长度在3到40个字符之间。私有类型可以以下划线开头。其中,通过min_length可以设置最小长度,通过max_length可以设置最大长度,改写规则的默认字符限制数值范围。
# 通过参数方式设置
type_name:
  min_length: 4 # only warning
  max_length: # warning and error
    warning: 40
    error: 50
  excluded: iPhone # excluded via string
  allowed_symbols: ["_"] # these are allowed in type names
identifier_name:
  min_length: # only min_length
    error: 4 # only error
  excluded: # excluded via string array
    - id
    - URL
- GlobalAPIKey还可以在配置中指定输出格式,xcode,json等。
reporter: "xcode" # reporter type (xcode, json, csv, checkstyle, codeclimate, junit, html, emoji, sonarqube, markdown, github-actions-logging)配置文件中还可以增加自定义规则,我们将在工程实践小节详细介绍。
规则
接下来,我们继续了解SwiftLint内置了哪些规则,我们可以直接使用已有的很多功能;SwiftLint内置了200多条规则:
所有规则列表
(https://realm.github.io/SwiftLint/rule-directory.html)
规则实现代码
(https://github.com/realm/SwiftLint/tree/main/Source/SwiftLintFramework/Rules)
内置规则
内置规则分为两类,默认规则(Default Rules), 可选规则(Opt-In Rules)。
默认规则是指在没有定制配置文件情况下,执行swiftlint会默认检查的规则;可选规则(Opt-In Rules)在这种默认情况下是禁用的,也就是说,你必须在你的配置文件中显式地启用它们。
那么,为什么这些规则标记为可选:
一条规则可能有很多副作用(例如
empty_count)太慢的规则
一种不被普遍认同或只在某些情况下有用的规则(例如
force_unwrap)
读懂规则说明
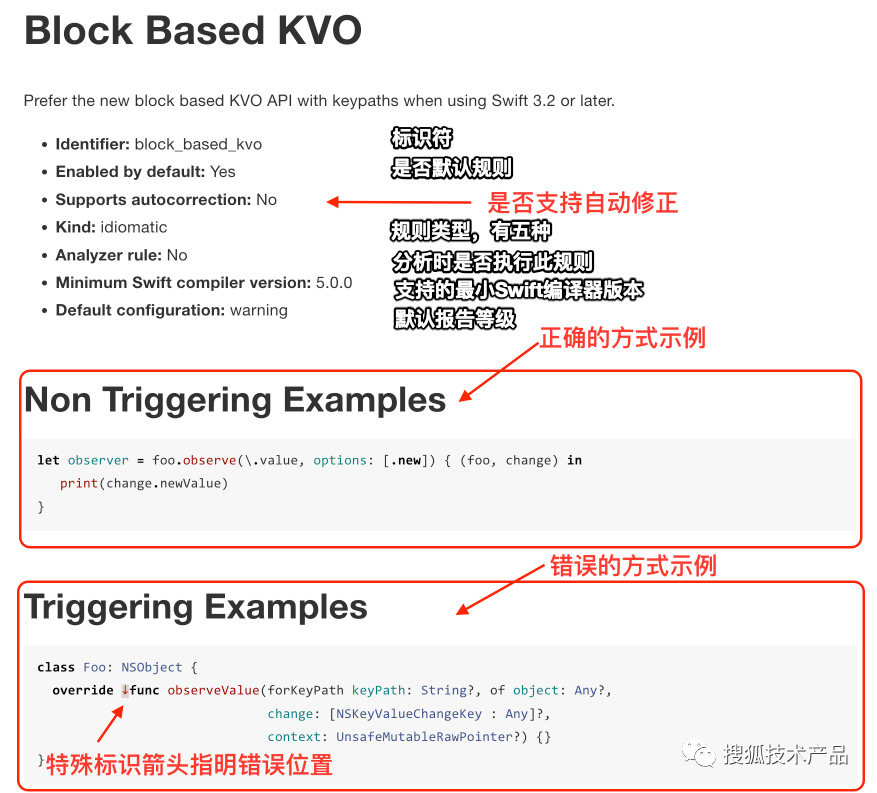
/// All the possible rule kinds (categories).
public enum RuleKind: String, Codable {
    /// Describes rules that validate Swift source conventions.
    case lint
    /// Describes rules that validate common practices in the Swift community.
    case idiomatic
    /// Describes rules that validate stylistic choices.
    case style
    /// Describes rules that validate magnitudes or measurements of Swift source.
    case metrics
    /// Describes rules that validate that code patterns with poor performance are avoided.
    case performance
}
禁用规则
可以从三个维度禁用规则:
源代码中部分代码禁用部分规则
源代码中部分代码禁用所有规则
针对文件或目录禁用所有规则
一、源代码中部分代码禁用部分视频
在源文件中,可以通过以下格式的注释禁用指定规则(一个或多个):
// swiftlint:disable <rule1> [<rule2> <rule3>...]这些规则将被禁用,直到文件结束或直到linter看到匹配的enable注释:
// swiftlint:enable <rule1> [<rule2> <rule3>...]举例:
// swiftlint:disable colon
let noWarning :String = "" // No warning about colons immediately after variable names!
// swiftlint:enable colon
let hasWarning :String = "" // Warning generated about colons immediately after variable names
二、源代码中部分代码禁用所有规则
包含all关键字将禁用所有规则,直到linter看到匹配的enable注释:
// swiftlint:disable all
let noWarning :String = "" // No warning about colons immediately after variable names!
let i = "" // Also no warning about short identifier names
// swiftlint:enable all
let hasWarning :String = "" // Warning generated about colons immediately after variable names
let y = "" // Warning generated about short identifier names还可以通过追加:previous、:this或:next来修改禁用或启用命令,以便分别只将命令应用到前一行、this(当前)或下一行。
// swiftlint:disable:next force_cast
let noWarning = NSNumber() as! Int
let hasWarning = NSNumber() as! Int
let noWarning2 = NSNumber() as! Int // swiftlint:disable:this force_cast
let noWarning3 = NSNumber() as! Int
// swiftlint:disable:previous force_cast
三、针对文件或目录禁用所有规则
通过配置文件excluded标记,前面有介绍;
工程实践
Swiftlint 规则没有完全符合每个工程期望的统一规则,建议根据各自项目的特点做定制,这里给出一些建议:
新项目建议规则可以启用更多,可以相对严格一些;反之成熟的项目规则宜松不宜紧。规则过多或过严会直接导致产生较多警告,改动会非常耗时,容易产生问题;
格式相关的规则,如闭包参数位置,集合文字中的所有元素应垂直对齐等这类规则,由于成员习惯存在较大差异,宜在团队内与成员充分讨论达成一致,再实行;
可纠正代码
bug的规则,建议提示级别为error,而非warning。如此可及时提醒修正错误;例如:
OverriddenSuperCallRule规则可用于避免遗漏调用super方法,从而避免工程中对此方法的hook不生效;例如:
DiscardedNotificationCenterObserverRule规则可用于避免因为未持有observer,不能释放内存,从而导致内存泄露的bug;
具有一定副作用的规则,开启后利大于弊,这种规则应该降低提示级别为
warning,而非error;例如:
empty_count规则可用于避免数组集合类型元素通过count函数与0比较判断是否为空,应该使用isEmpty替代,降低耗时;
SwiftLint提供了自定义规则功能,将团队中积累的经验和可能产生问题的陷阱转化为一条条规则,将极大提升发现问题的效率。
自定义规则
这一小节将详细介绍一下,如何在配置文件中,增加自定义规则——基于正则表达式的自定义规则。
示例:
custom_rules:
  pirates_beat_ninjas: # 规则标识符
    name: "Pirates Beat Ninjas" # 规则名称,可选
    regex: "([nN]inja)" # 匹配的模式
    match_kinds: # 需要匹配的语法类型,可选
      - comment
      - identifier
    message: "Pirates are better than ninjas." # 提示信息,可选
    severity: error # 提示的级别,可选
  no_hiding_in_strings:
    regex: "([nN]inja)"
match_kinds: string注意:其中的match_types需要重点关注,它用来筛选匹配,这将排除包含此列表中不存在的语法类型的匹配。
以下是match_types所有可能的匹配语法类型:
argument
attribute.builtin
attribute.id
buildconfig.id
buildconfig.keyword
comment
comment.mark
comment.url
doccomment
doccomment.field
identifier
keyword
number
objectliteral
parameter
placeholder
string
string_interpolation_anchor
typeidentifier
这些关键字怎么理解和使用呢?如何对应到代码中每一个语句呢?
语法关键字
我们通过几段非常简短的代码,来解释上面的关键字,对应到代码中如何去理解和使用。
一、简单示例
import Foundation // Hello World其中:
import是keyword;Foundation是identifier;// Hello World是comment。
这些关键的信息是怎么得到的呢?这就回到了的文章开头SwiftLint内部实现的机制,使用到了SourceKitten(https://github.com/jpsim/SourceKitten)。下面我们利用SourceKitten分析一段代码。
二、结构(structure)和语法(syntax)
对于一段Swift代码而言,通过SourceKitten的分析,我们将会得到两类信息:结构(structure)信息和语法(syntax)信息。
我们以下面这段简单的代码为例分析:
struct A { func b() {} }file.swift使用SourceKitten来分析结构(structure)和语法(syntax)。
1.结构(structure)
结构分析:
sourcekitten structure --file file.swift输出结果:
{
  "key.diagnostic_stage" : "source.diagnostic.stage.swift.parse",
  "key.length" : 24,     //长度
  "key.offset" : 0,      //开始位置
  "key.substructure" : [  //子结构
    {
      "key.accessibility" : "source.lang.swift.accessibility.internal",
      "key.bodylength" : 13,   //struct的body内容长度
      "key.bodyoffset" : 10,   //struct的body偏移值,即这段的起始位置
      "key.kind" : "source.lang.swift.decl.struct",  //类型是struct
      "key.length" : 24,       //struct的长度24
      "key.name" : "A",        //struct的名称是A
      "key.namelength" : 1,    //struct的名称(即A)的长度
      "key.nameoffset" : 7,    //struct的名称(即A)的偏移位置
      "key.offset" : 0,
      "key.substructure" : [  //二级子结构
        {
          "key.accessibility" : "source.lang.swift.accessibility.internal",
          "key.bodylength" : 0,
          "key.bodyoffset" : 21,
          "key.kind" : "source.lang.swift.decl.function.method.instance", //实例
          "key.length" : 11,
          "key.name" : "b()",     //名称
          "key.namelength" : 3,
          "key.nameoffset" : 16,
          "key.offset" : 11
        }
      ]
    }
  ]
}从这段输出的结构化数据可以看到,struct结构体的详细信息,包含多级嵌套的子结构信息,每一级都会包含当前级别的类型,开始位置,长度,名称等详细信息;可以通过这些信息准确的分析代码。
2.语法(syntax)
继续,语法分析:
sourcekitten syntax --file file.swift输出结果:
[
  {
    "length" : 6,
    "offset" : 0,
    "type" : "source.lang.swift.syntaxtype.keyword"
  },
  {
    "length" : 1,
    "offset" : 7,
    "type" : "source.lang.swift.syntaxtype.identifier"
  },
  {
    "length" : 4,
    "offset" : 11,
    "type" : "source.lang.swift.syntaxtype.keyword"
  },
  {
    "length" : 1,
    "offset" : 16,
    "type" : "source.lang.swift.syntaxtype.identifier"
  }
]语法结构的输出更简洁,包含类型(type),偏移值(offset),长度(length)三类信息。
struct A { func b() {} }可以通过上面的结构化数据,分析得出下面对应的信息:
位置0开始,长度6,
struct是关键字 ,即keyword位置7开始,长度1,A 是标识符 ,即
identifier位置11开始,长度4,
func是关键字 ,即keyword位置16开始,长度1,b() 是标识符 ,即
identifier
理解了这些关键字与代码之间的对应关系,我们就可以充分利用SwiftLint提供的自定义规则能力,在规则中指定match_types, 根据业务需要做规则扩展,在实际工程实践中,有非常广泛的使用场景。
检测UIWebView
从iOS13开始苹果将UIWebview列为过期API。2020年4月起App Store将不再接受使用UIWebView的新App上架、2020年12月起将不再接受使用UIWebView的App更新。所以我们在项目中应该避免使用UIWebView;那么我们可以简单增加一条自定义规则,来检测是否有使用UIWebview,并明确标记为Error。
示例代码如下所示:
custom_rules:
    uiwebview_deprecated: # rule identifier
        included: ".*\\.swift" # regex that defines paths to include during linting. optional.
        excluded: ".*Test\\.swift" # regex that defines paths to exclude during linting. optional
        name: "UIWebView deprecated" # rule name. optional.
        regex: "(UIWebView)" # matching pattern
        capture_group: 0 # number of regex capture group to highlight the rule violation at. optional.
        match_kinds: # SyntaxKinds to match. optional.
            - comment
            - identifier
        message: "UIWebView are deprecated, use WKWebView instead." # violation message. optional.
        severity: error # violation severity. optional.
    no_hiding_in_strings:
        regex: "(UIWebView)"
        match_kinds: string
特别注意:自定义规则时,代码缩进必须按要求,否则会导致自定义规则不被执行;
部署
一般采用Cocoapod方式安装。
pod 'SwiftLint'脚本构建阶段通过${PODS_ROOT}/SwiftLint/ SwiftLint调用它。同时,建议开启自动修复功能,指定.swiftlint.auto.yml自动修复配置文件。
我们项目全量扫描所有文件的构建脚本供大家参考:
if [ "${CONFIGURATION}" == "Debug" ]&&[ "${XCCONFIG_TYPE}" == "DEBUG" ]; then \
echo 'swiftlint start'; \
COMMAND="${PODS_ROOT}/SwiftLint/swiftlint"; \
CONFIG_PATH="${PROJECT_DIR}/.swiftlint.auto.yml"; \
CALL="$COMMAND --fix --config $CONFIG_PATH"; \
eval $CALL && "${PODS_ROOT}/SwiftLint/swiftlint"; \
fi其中为了优化构建时间,我们的自定义脚本中增加了${CONFIGURATION}和${XCCONFIG_TYPE}条件判断,只在DEBUG模式下运行SwiftLint。
改进耗时优化
但是,上面的运行方式存在一个问题:不论你的文件是否被修改,SwiftLint每次都会执行,即全量扫描所有的文件;这对于大型项目来说,耗时比较严重,约20万行代码,耗时约20秒左右,并且每次编译都会执行,SwiftLint官方Github也有相关issues(https://github.com/realm/SwiftLint/issues/4015)讨论此问题,官方暂时没有解决。
显然我们有进一步优化的空间,能否只检查被修改的文件,来降低需要扫描文件的数量,从而达到降低SwiftLint运行时间的目的呢?当然是可以的,这里我们提供一种借助git diff文件比较功能来实现的思路。
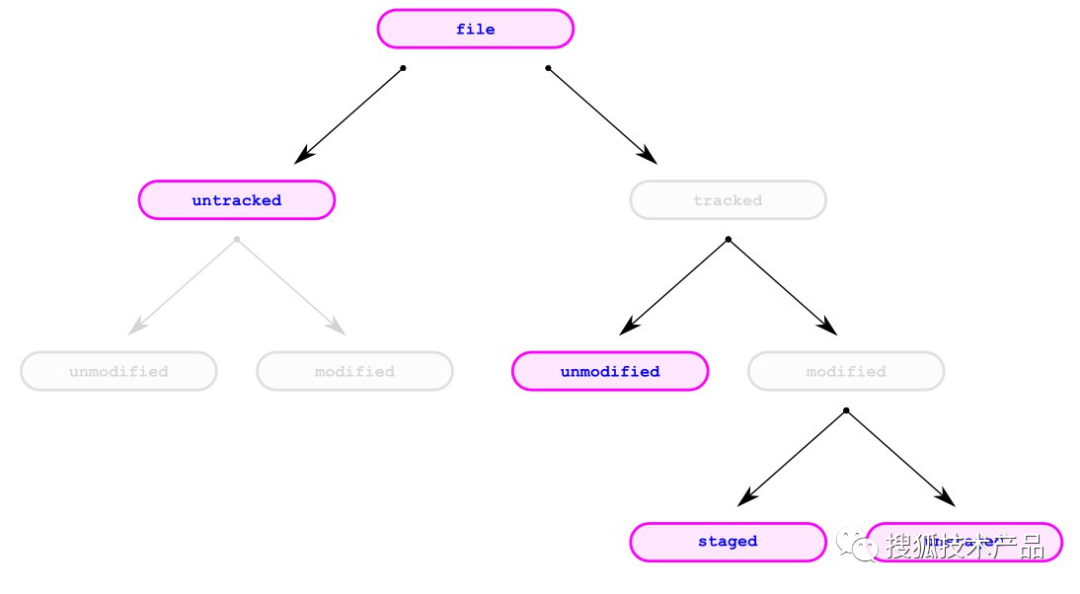
Git
文件管理的几种状态,未被
Git
跟踪的状态为
unstaged
状态,已经被
Git
跟踪的状态为
staged
状态,
untrack files
是指尚未被
git
所管理的文件,一般来说是创建了新文件,但是还没有通过
git add
添加的文件。
了解Git文件管理的几种状态后,我们通过脚本对文件的几种状态进行查找过滤,对找到的变化文件进行循环遍历,执行SwiftLint,即执行run_swiftlint函数;在run_swiftlint函数中还增加了对Swift文件的判断,降低扫描文件数量。
完整的代码如下所示:
SWIFT_LINT=${SRCROOT}/Tools/SwiftLint/swiftlint

run_swiftlint() {
  local filename="${1}"
  CONFIG_PATH="${PROJECT_DIR}/.swiftlint.auto.yml";
  CALL="$SWIFT_LINT --fix --config $CONFIG_PATH";
  # check only swift file
  if [[ "${filename##*.}" == "swift" ]]; then
    ${SWIFT_LINT} lint "${filename}";
    ${CALL} "${filename}";
  fi
}

if [ "${CONFIGURATION}" == "Debug" ]&&[ "${XCCONFIG_TYPE}" == "DEBUG" ]; then
    echo "SwiftLint version: $(${SWIFT_LINT} version)";
    # Run for staged files
    for filename in $(git diff --diff-filter=d --name-only);
    do
        run_swiftlint "${filename}";
    done

    # Run for unstaged files
    for filename in $(git diff --cached --diff-filter=d --name-only);
    do
        run_swiftlint "${filename}";
    done

    # Run for added files
    for filename in $(git ls-files --others --exclude-standard);
    do
        run_swiftlint "${filename}";
    done
fi
# This output is used by Xcode 'outputs' to avoid re-running this script phase.
echo "SUCCESS" > "${SCRIPT_OUTPUT_FILE_0}"此外,Xcode中还需要在Build Phrase的对应脚本增加输入文件列表和输出文件列表:
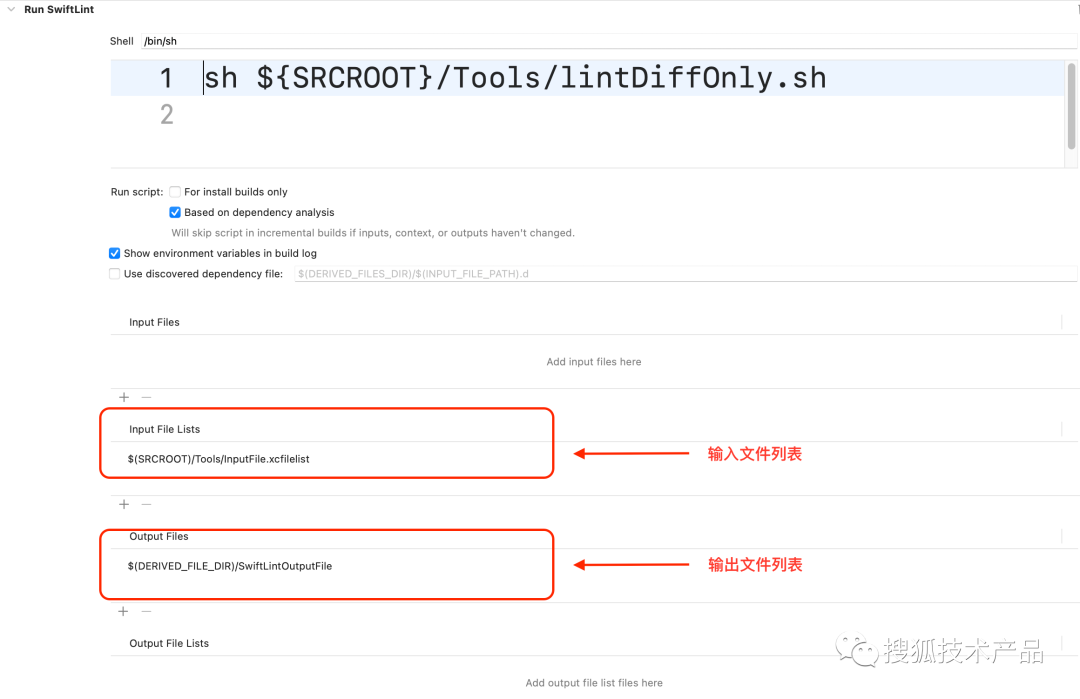
为什么要增加输入文件列表和输出文件列表呢?在官方文档改进编译时间(https://developer.apple.com/documentation/Xcode/improving-the-speed-of-incremental-builds)中,苹果提到:
If you don’t need Xcode to run your scripts every time you build a target, provide at least one input file and one output file for the script. Xcode uses a script’s input and output files to determine when to run it. Specifically, Xcode runs your script when any of the following conditions are true:
Your script doesn’t have any input files.
Your script doesn’t have any output files.
Your script’s input files changed.
Your script’s output files are missing.
如果你指定了输入文件列表和输出文件列表,将会使得Xcode根据文件变化情况决定脚本的执行,而不是每次都执行,这将明显改进编译时间。
输入文件列表$(SRCROOT)/Tools/InputFile.xcfilelist。
$(SRCROOT)/sohuhy
$(SRCROOT)/sohuhyNotificationExtention
$(SRCROOT)/sohuhyShareExtension
$(SRCROOT)/SwiftPM
$(SRCROOT)/widget由于Swiftlint对文件扫描,不会产生显现的输出结果文件,这里我们指定$(DERIVED_FILE_DIR)/SwiftLintOutputFile为输出文件,请注意前面脚本的末尾处:
# This output is used by Xcode 'outputs' to avoid re-running this script phase.
echo "SUCCESS" > "${SCRIPT_OUTPUT_FILE_0}"这里将"SUCCESS"字符串添加到${SCRIPT_OUTPUT_FILE_0},即输出文件列表的第一个文件,也就是我们前面指定的$(DERIVED_FILE_DIR)/SwiftLintOutputFile;SCRIPT_OUTPUT_FILE_0是包含脚本输出文件列表路径的环境变量。Xcode为每个输出文件列表创建一个环境变量,从SCRIPT_OUTPUT_FILE_LIST_0(https://developer.apple.com/documentation/xcode/running-custom-scripts-during-a-build?changes=_8)开始,并为每个后续文件列表依次增加数值。更多环境变量参考苹果文档run script。
经过这一系列改造后,SwiftLint在我们项目的耗时降低75%,时间降低到1-5秒内。
总结
本篇文章详细介绍了SwiftLint这个静态代码分析工具的工作原理、功能、配置文件、内置规则等方面,并给出了一些实际项目中使用SwiftLint的建议和注意事项。SwiftLint 可以帮助开发者提高代码质量,节省Code Review的时间,增强团队研发效率。文章的重点是介绍SwiftLint的工程实践中,如何自定义规则和改进耗时优化,提高执行效率,同时还提供了一些实用建议。
参考
https://github.com/realm/SwiftLint
https://rakeshchander.medium.com/swiftlint-advanced-afaa2752f0d
https://github.com/realm/SwiftLint/issues/413
https://ootips.org/yonat/useful-custom-rules-for-swiftlint/\

