pyqt5界面+myql+跳绳系统设计
改项目主要是学习界面的设计开发,已把一些流行的算法做成功能较好的系统,这里以跳绳计数算法为例子,进行一个开发流程。
跳绳计数算法
1.基于Mediapipe(本文使用0.8的版本)进行人体骨架关键点的提取
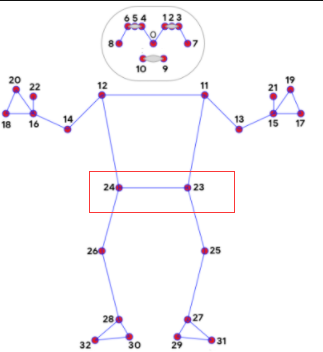
2.提取出中心点,即上图的24和23两个点的中心点
3.求出来之后,我们可以计算中心点的相对变化,以适应多种视频的情况,关键代码如下:
while success:
    success, img = cap.read()
    if success:
        img = cv2.resize(img, (640, 480))
        img = detector.findPose(img, False)
        lmList = detector.findPosition(img, False)

        if len(lmList) != 0:
            point = detector.midpoint(img, 24, 23)
            if point_sd == 0:  # 只执行一次
                point_sd = point
                his_point = point
                # print(point_sd["y"])

            # 当前点比上一时刻的大,计算累加距离
            if point["y"] > his_point["y"]:
                y_lon = point["y"] - his_point["y"]
                his_point = point  # 更新
                y_down = 0

            # 当前点比上一时刻的小,计算累加距离
            if point["y"] < his_point["y"]:
                y_down = his_point["y"] - point["y"]
                his_point = point  # 更新
                y_lon = 0

            # 若向上浮动
            if y_lon > 7:
                if dir == 0:
                    count += 0.5
                    dir = 1

            # 若向下浮动
            if y_down > 6:
                if dir == 1:
                    count += 0.5
                    dir = 0

            cv2.putText(img, str(int(count)), (45, 460), cv2.FONT_HERSHEY_PLAIN, 7, (0, 0, 255), 8)
        cTime = time.time()
        fps = 1 / (cTime - pTime)
        pTime = cTime
        cv2.putText(img, str(int(fps)), (50, 100), cv2.FONT_HERSHEY_PLAIN, 5, (255, 0, 0), 5)
        cv2.imshow("Image", img)
        cv2.waitKey(50)
很多教程使用的是绝对位置变化,这样会导致通用性问题。
界面设计
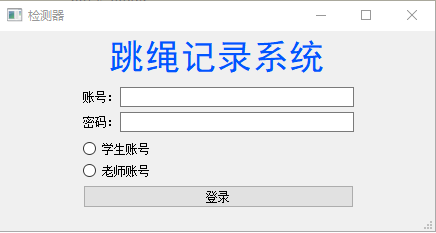
这里主界面的功能是这样,学生和老师登录是不同的界面,当然,可以添加注册功能。
登录注册功能需要用到mysql数据集,这里贴上mysql5.7的安装配置,以及便捷工具navicat的安装:
https://blog.csdn.net/m0_50089886/article/details/119984141
https://blog.csdn.net/qq_43884946/article/details/126827022
代码在初始化的时候需要连接msyql数据库,使用pymysql这个库:
 # 链接数据库
 try:
     self.sql_connection = pymysql.connect(host='localhost', user='root',
                                      password='', db='jumpdata',
                                      port=3306,
                                      autocommit=False,
                                      charset='utf8')
 except:
     print("Unable to link to myql database")
     sys.exit()
 # 如果想要操作数据库,还需要获取db上的cursor对象
 cursor = self.sql_connection.cursor()
登录学生账号后显示:
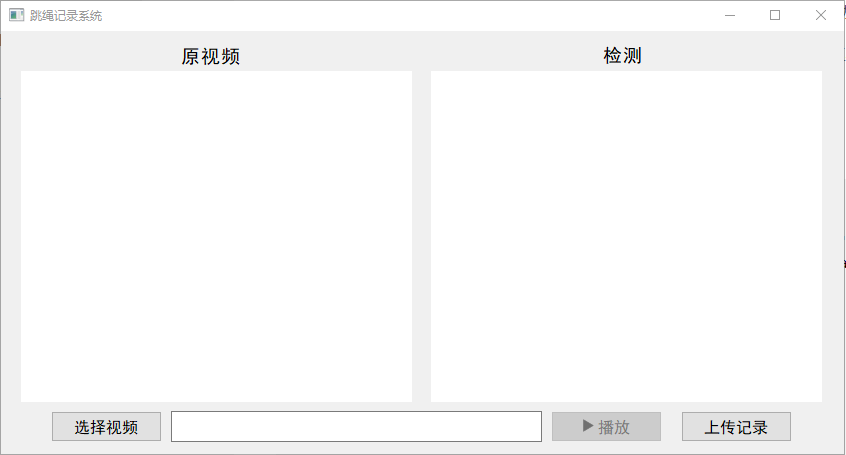
这里加载视频播放有点难度,需要使用QTimer来控制播放,大致代码如下:
# 显示视频图像
  def show_pic(self):
      ret, img = self.cap.read()
      if ret:
          cur_frame = cv2.cvtColor(img, cv2.COLOR_BGR2RGB)
          # 视频流的长和宽
          height, width = cur_frame.shape[:2]
          pixmap = QImage(cur_frame, width, height, QImage.Format_RGB888)
          pixmap = QPixmap.fromImage(pixmap)
          # 获取是视频流和label窗口的长宽比值的最大值,适应label窗口播放,不然显示不全
          ratio = max(width / self.label.width(), height / self.label.height())
          pixmap.setDevicePixelRatio(ratio)
          # 视频流置于label中间部分播放
          self.label.setAlignment(Qt.AlignCenter)
          self.label.setPixmap(pixmap)

          # 检测
          image, self.count = self.defect.defect_image(cur_frame)
          height, width = image.shape[:2]
          pixmap1 = QImage(image, width, height, QImage.Format_RGB888)
          pixmap1 = QPixmap.fromImage(pixmap1)
          # 获取是视频流和label窗口的长宽比值的最大值,适应label窗口播放,不然显示不全
          ratio1 = max(width / self.label_2.width(), height / self.label_2.height())
          pixmap1.setDevicePixelRatio(ratio1)
          # 视频流置于label中间部分播放
          self.label_2.setAlignment(Qt.AlignCenter)
          self.label_2.setPixmap(pixmap1)

          cv2.waitKey(40)
选择视频文件:
def pre_judge(self):
    self.label.clear()
    self.label_2.clear()
    self.num = 1
    # 在label中播放视频
    self.init_timer()
    # 当self.video = None时,报错。
    self.defect.clear_data()
    self.video = None
    self.timer.blockSignals(True)
    self.img_path = QFileDialog.getOpenFileName()[0]
    self.lineEdit.setText(self.img_path)
    video_type = [".mp4", ".mkv", ".MOV", "avi"]
    for vdi in video_type:
        if vdi not in self.img_path:
            continue
        else:
            self.video = True
            # 当是视频时,将开始按钮置为可点击状态
            self.pushButton_2.setEnabled(True)
    if self.video is None:
        QMessageBox.information(self, "警告", "暂不支持此格式的文件!", QMessageBox.Ok)
登录老师账号后显示:
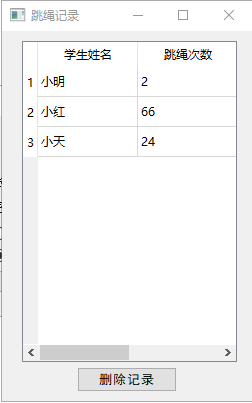
这里主要采用读取mysql数据库数据的方式,关键代码如下:
 # 如果想要操作数据库,还需要获取db上的cursor对象
  cursor = self.sql_connection.cursor()

  # 获取学生账号表数据
  cursor.execute("select * from student_account")
  student_account = cursor.fetchall()
  for i in student_account:
      self.student_account[i[0]] = i[1]
      self.student_name[i[0]] = i[2]

  # 获取教师账号表数据
  cursor.execute("select * from teacher_account")
  teacher_account = cursor.fetchall()
  for i in teacher_account:
      self.teacher_account[i[0]] = i[1]
效果:
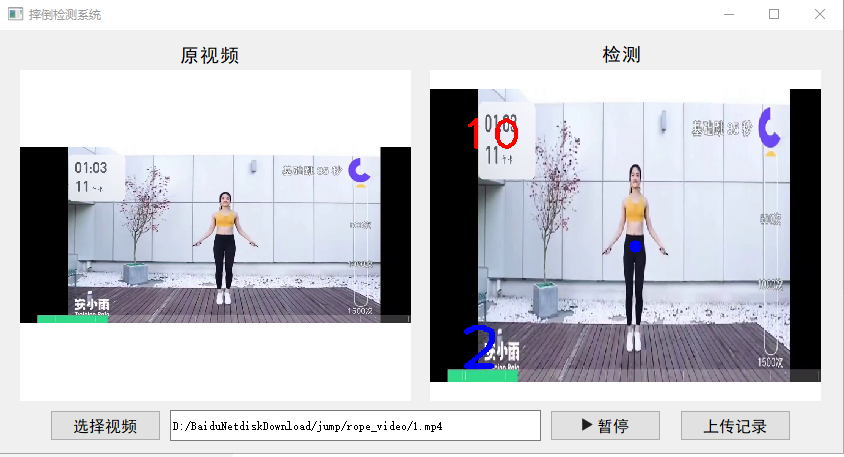
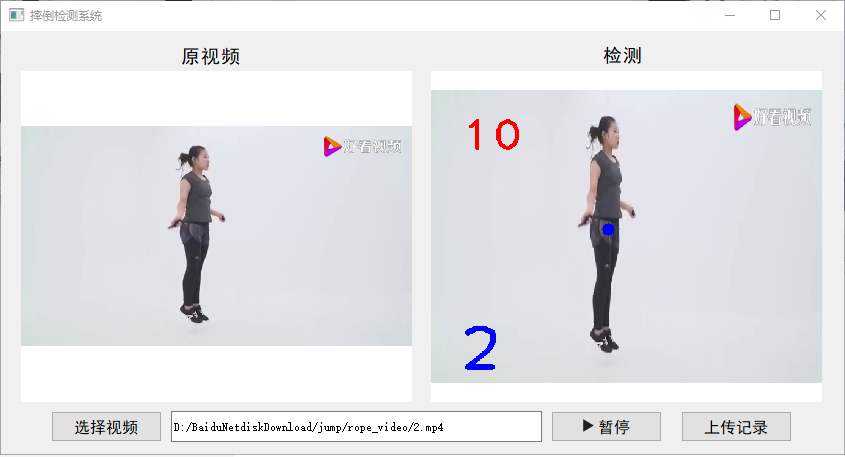
上传记录可以将调试记录上传到mysql数据库。
需要源码的可以私信我,需要定制界面,增加功能也可以私信









![[Java基础]基本概念(上)(标识符,关键字,基本数据类型)](https://img-blog.csdnimg.cn/bea8808e05e64be3b4b30446c351948c.png)