什么是环境光贴图
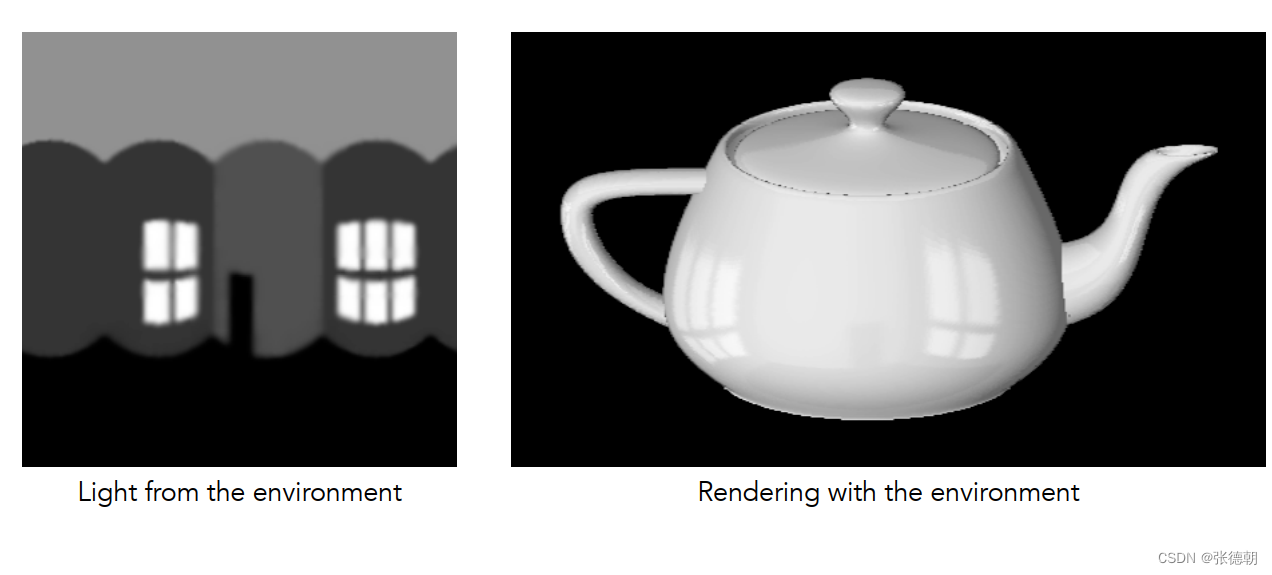
下面先看两个例子:
- 使用左侧的纹理 渲染茶壶,得到茶壶对真实空间的反射效果
- 同样使用左侧的纹理,得到中心的球对四周物体的反射效果
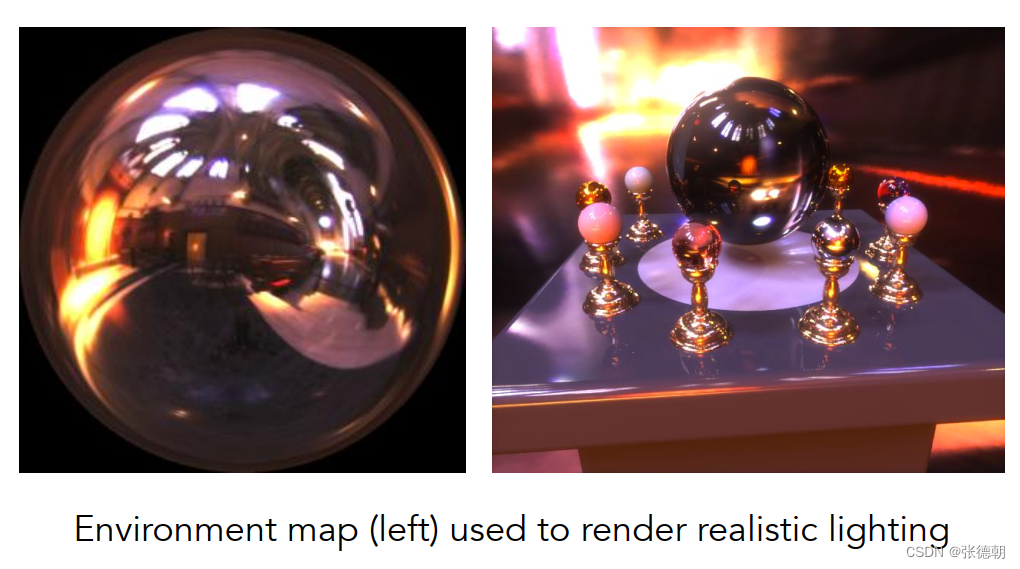
所以,环境光贴图指的是通过构建物体周围世界的纹理,使用纹理贴图的方式得到该物体对周围世界的反射效果。
环境光贴图的方式
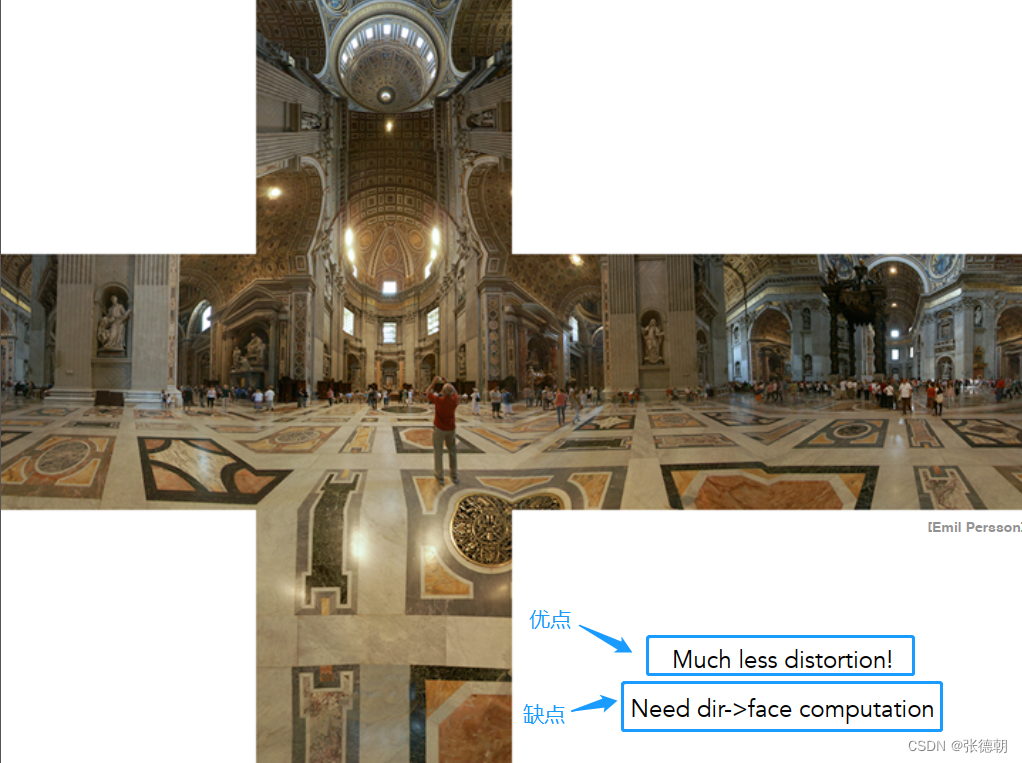
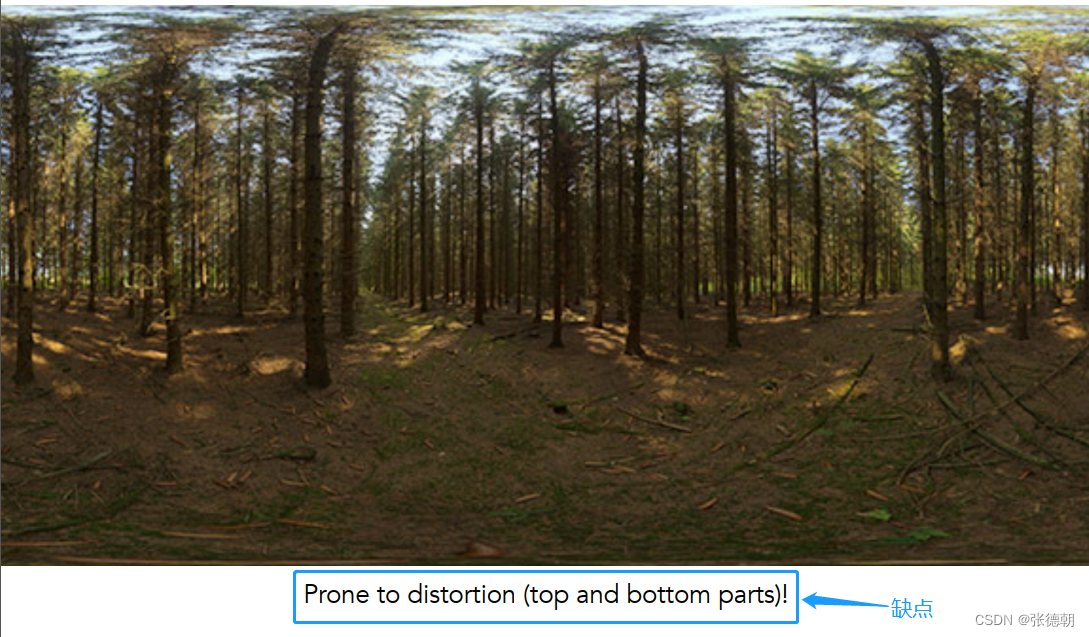
环境光贴图常见的两种方式如下,图中也描述了其各自的优缺点,下面我们尝试使用cube map的方式来实现环境光贴图。
-
cube map
-
Spherical Environment Map
实现环境光贴图
首先,我们先看最后的效果。
下面我们会分为如下几个部分在上一博客:Cube Map 系列之:手把手教你 使用 立方体贴图的代码基础上进行完善
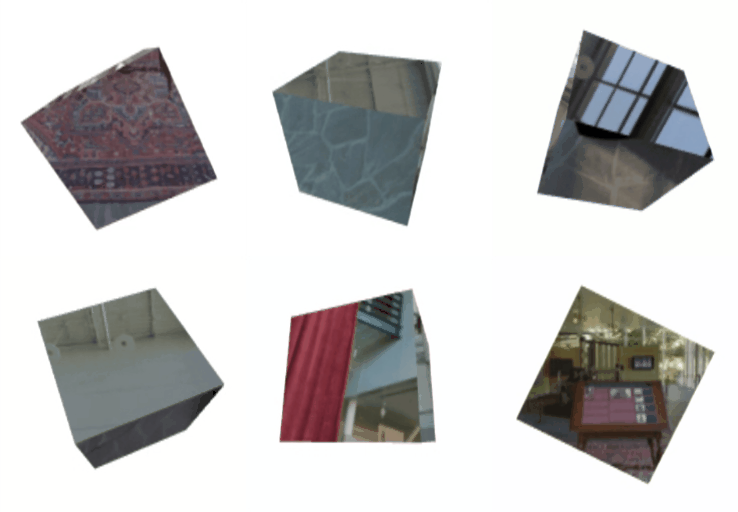
- 更新纹理材料,使用环境光纹理替换上一博客中自动生成的纹理
- 通过更新法线信息,使得物体在更新状态的过程中,获取其世界法线方向对应的纹理(而非模型坐标下的法线方向)
- 通过入射方向和法线方向,获取其反射方向,获取反射状态的纹理
步骤1:更新法线纹理
-
环境光贴图资源

-
修改
setTexture
// 创建纹理
const texture = gl.createTexture();
gl.bindTexture(gl.TEXTURE_CUBE_MAP, texture);

const ctx = document.createElement("canvas").getContext("2d");

ctx.canvas.width = 128;
ctx.canvas.height = 128;

const faceInfos = [
  {
    target: gl.TEXTURE_CUBE_MAP_POSITIVE_X,
    url: 'resources/pos-x.jpg',
  },
  {
    target: gl.TEXTURE_CUBE_MAP_NEGATIVE_X,
    url: 'resources/neg-x.jpg',
  },
  {
    target: gl.TEXTURE_CUBE_MAP_POSITIVE_Y,
    url: 'resources/pos-y.jpg',
  },
  {
    target: gl.TEXTURE_CUBE_MAP_NEGATIVE_Y,
    url: 'resources/neg-y.jpg',
  },
  {
    target: gl.TEXTURE_CUBE_MAP_POSITIVE_Z,
    url: 'resources/pos-z.jpg',
  },
  {
    target: gl.TEXTURE_CUBE_MAP_NEGATIVE_Z,
    url: 'resources/neg-z.jpg',
  },
];

faceInfos.forEach((faceInfo) => {
  const {target, url} = faceInfo;

  // Upload the canvas to the cube map face.
  const level = 0;
  const internalFormat = gl.RGBA;
  const width = 512;
  const height = 512;
  const format = gl.RGBA;
  const type = gl.UNSIGNED_BYTE;
  gl.texImage2D(target, level, internalFormat, width, height, 0, format, type, null);

  const image = new Image();
  image.src = url;
  image.addEventListener("load", function (){
    gl.bindTexture(gl.TEXTURE_CUBE_MAP, texture);
    gl.texImage2D(target, level, internalFormat, format, type, image);
    gl.generateMipmap(gl.TEXTURE_CUBE_MAP);
  })
})

gl.generateMipmap(gl.TEXTURE_CUBE_MAP);
gl.texParameteri(gl.TEXTURE_CUBE_MAP, gl.TEXTURE_MIN_FILTER, gl.LINEAR_MIPMAP_LINEAR);
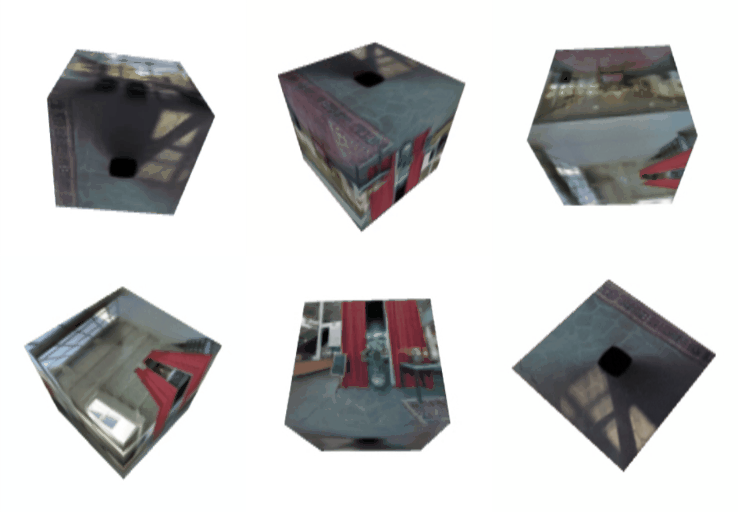
- 效果如下
步骤2:使用世界法线去获取纹理
修改顶点着色器
- 传入法线信息
- 传入 m 矩阵
- 计算
v_worldNormal,用于后续计算反射方向 - 计算
v_worldPosition,用于结合相机位置计算入射方向
  const V_SHADER_SOURCE = '' +
          'attribute vec4 a_position;' +
          'attribute vec3 a_normal;' +
          'uniform mat4 u_projection;' +
          'uniform mat4 u_view;' +
          'uniform mat4 u_world;' +
          'varying vec3 v_worldPosition;' +
          'varying vec3 v_worldNormal;' +
          'void main(){' +
          'gl_Position = u_projection * u_view * u_world * a_position;' +
          'v_worldPosition = (u_world * a_position).xyz;' +
          'v_worldNormal = mat3(u_world) * normalize(a_position.xyz);' +
          '}'
传入法线信息
- 新增函数
setNormals()
const normalBuffer = gl.createBuffer();
gl.bindBuffer(gl.ARRAY_BUFFER, normalBuffer);
gl.bufferData(gl.ARRAY_BUFFER, normal, gl.STATIC_DRAW);

const normalLocation = gl.getAttribLocation(gl.program, "a_normal");
gl.enableVertexAttribArray(normalLocation);
const size = 3;
const type = gl.FLOAT;
const normalize = false;
const stride = 0;
const offset = 0;
gl.vertexAttribPointer(normalLocation, size, type, normalize, stride, offset);
传入 m、v、p等uniform
- 修改函数
updateMatrix(time)
// 获取project的位置
const projectionLocation = gl.getUniformLocation(gl.program, "u_projection");
// 获取view的位置
const viewLocation = gl.getUniformLocation(gl.program, "u_view");
// 获取world(模型变换矩阵)的位置
const worldLocation = gl.getUniformLocation(gl.program, "u_world");
// 获取纹理的位置
const textureLocation = gl.getUniformLocation(gl.program, "u_texture");
// 获取相机坐标的位置
const worldCameraPositionLocation = gl.getUniformLocation(gl.program, "u_worldCameraPosition");

time *= 0.001;
const deltaTime = time - then;
then = time;

modelXRotationRadians += -0.7 * deltaTime;
modelYRotationRadians += -0.4 * deltaTime;
// Compute the projection matrix
const aspect = gl.canvas.clientWidth / gl.canvas.clientHeight;
const projectionMatrix =
        m4.perspective(fieldOfViewRadians, aspect, 1, 2000);

const cameraPosition = [0, 0, 2];
const up = [0, 1, 0];
const target = [0, 0, 0];

// Compute the camera's matrix using look at.
const cameraMatrix = m4.lookAt(cameraPosition, target, up);

// Make a view matrix from the camera matrix.
const viewMatrix = m4.inverse(cameraMatrix);

let worldMatrix = m4.xRotation(modelXRotationRadians);
worldMatrix = m4.yRotate(worldMatrix, modelYRotationRadians);


// 分别设置对应的uniforms
gl.uniformMatrix4fv(projectionLocation, false, projectionMatrix);
gl.uniformMatrix4fv(viewLocation, false, viewMatrix);
gl.uniformMatrix4fv(worldLocation, false, worldMatrix);
gl.uniform3fv(worldCameraPositionLocation, cameraPosition);
gl.uniform1i(textureLocation, 0);
修改片元着色器
- 使用顶点着色器计算得到的世界法线 来获取纹理
gl_FragColor = textureCube(u_texture, normalize(v_worldNormal));
效果
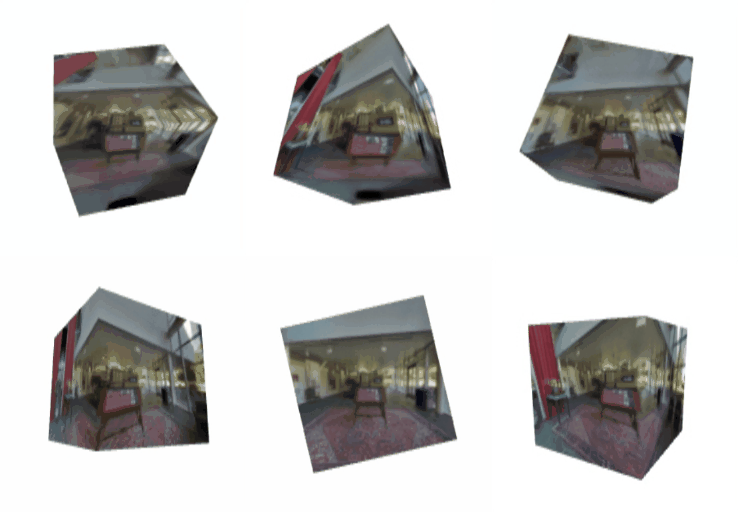
- 可以看见,现在已经初具成效,但是其效果并非是反射,而且以立方体的片元所在位置的法线向量去获取纹理,相当于真实世界的纹理投射到一个旋转的立方体上,因此在拐角处也会出现明显的拉升
步骤3:使用反射方向去获取纹理
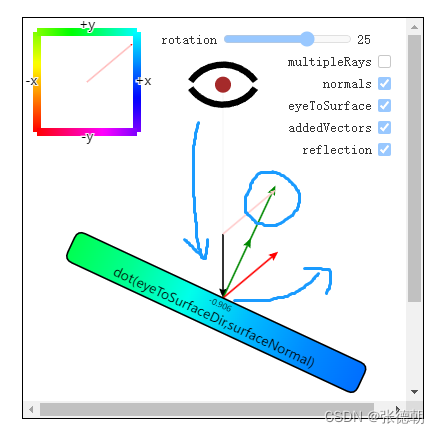
如下图所示
- 通过相机位置和所看的片元世界坐标,可以获取入射角度
- 结合法线方向 可以获取反射方向
- 通过反射方向,可以计算得到真实的反射纹理
修改片元着色器
    const F_SHADER_SOURCE = '' +
        'precision mediump float;' +
        'varying vec3 v_worldPosition;' +
        'varying vec3 v_worldNormal;' +
        'uniform samplerCube u_texture;' +
        'uniform vec3 u_worldCameraPosition;' +
        'void main(){' +
        'vec3 worldNormal = normalize(v_worldNormal);' +
        'vec3 eyeToSurfaceDir = normalize(v_worldPosition - u_worldCameraPosition);' +
        'vec3 direction = reflect(eyeToSurfaceDir, worldNormal);' +
        ' gl_FragColor = textureCube(u_texture, direction);' +
        '}'
修改顶点着色器
- 使用传入的
a_normal替换normalize(a_position.xyz)
v_worldNormal = mat3(u_world) * a_normal;
效果

完整代码
<!DOCTYPE html>
<html lang="en">
<head>
    <meta charset="UTF-8">
    <title>CubeMap</title>
</head>
<body>
<script src="https://webglfundamentals.org/webgl/resources/m4.js"></script>
<canvas id="canvas" style="height: 256px; width: 246px"></canvas>
<script>
    const V_SHADER_SOURCE = '' +
        'attribute vec4 a_position;' +
        'attribute vec3 a_normal;' +
        'uniform mat4 u_projection;' +
        'uniform mat4 u_view;' +
        'uniform mat4 u_world;' +
        'varying vec3 v_worldPosition;' +
        'varying vec3 v_worldNormal;' +
        'void main(){' +
        'gl_Position = u_projection * u_view * u_world * a_position;' +
        'v_worldPosition = (u_world * a_position).xyz;' +
        'v_worldNormal = mat3(u_world) * a_normal;' +
        '}'

    const F_SHADER_SOURCE = '' +
        'precision mediump float;' +
        'varying vec3 v_worldPosition;' +
        'varying vec3 v_worldNormal;' +
        'uniform samplerCube u_texture;' +
        'uniform vec3 u_worldCameraPosition;' +
        'void main(){' +
        'vec3 worldNormal = normalize(v_worldNormal);' +
        'vec3 eyeToSurfaceDir = normalize(v_worldPosition - u_worldCameraPosition);' +
        'vec3 direction = reflect(eyeToSurfaceDir, worldNormal);' +
        ' gl_FragColor = textureCube(u_texture, direction);' +
        '}'


    function main(){
        // Get A WebGL context
        /** @type {HTMLCanvasElement} */
        const canvas = document.querySelector("#canvas");
        const gl = canvas.getContext("webgl");
        if (!gl) {
            return;
        }

        if (!initShaders(gl, V_SHADER_SOURCE, F_SHADER_SOURCE)){
            console.log('Failed to initialize shaders.');
            return;
        }

        setGeometry(gl, getGeometry());
        setNormals(gl, getNormals())
        setTexture(gl)


        function radToDeg(r) {
            return r * 180 / Math.PI;
        }

        function degToRad(d) {
            return d * Math.PI / 180;
        }

        const fieldOfViewRadians = degToRad(60);
        let modelXRotationRadians = degToRad(0);
        let modelYRotationRadians = degToRad(0);

        // Get the starting time.
        let then = 0;

        requestAnimationFrame(drawScene);

        function drawScene(time){
            gl.viewport(0, 0, gl.canvas.width, gl.canvas.height);
            gl.enable(gl.CULL_FACE);
            gl.enable(gl.DEPTH_TEST);

            gl.clear(gl.COLOR_BUFFER_BIT | gl.DEPTH_BUFFER_BIT);

            gl.useProgram(gl.program);


            updateMatrix(gl, time);

            // Draw the geometry.
            gl.drawArrays(gl.TRIANGLES, 0, 6 * 6);

            requestAnimationFrame(drawScene);
        }

        function updateMatrix(gl, time){
            const projectionLocation = gl.getUniformLocation(gl.program, "u_projection");
            const viewLocation = gl.getUniformLocation(gl.program, "u_view");
            const worldLocation = gl.getUniformLocation(gl.program, "u_world");
            const textureLocation = gl.getUniformLocation(gl.program, "u_texture");
            const worldCameraPositionLocation = gl.getUniformLocation(gl.program, "u_worldCameraPosition");

            time *= 0.001;
            const deltaTime = time - then;
            then = time;

            modelXRotationRadians += -0.7 * deltaTime;
            modelYRotationRadians += -0.4 * deltaTime;
            // Compute the projection matrix
            const aspect = gl.canvas.clientWidth / gl.canvas.clientHeight;
            const projectionMatrix =
                m4.perspective(fieldOfViewRadians, aspect, 1, 2000);

            const cameraPosition = [0, 0, 2];
            const up = [0, 1, 0];
            const target = [0, 0, 0];

            // Compute the camera's matrix using look at.
            const cameraMatrix = m4.lookAt(cameraPosition, target, up);

            // Make a view matrix from the camera matrix.
            const viewMatrix = m4.inverse(cameraMatrix);

            let worldMatrix = m4.xRotation(modelXRotationRadians);
            worldMatrix = m4.yRotate(worldMatrix, modelYRotationRadians);


            // Set the uniforms
            gl.uniformMatrix4fv(projectionLocation, false, projectionMatrix);
            gl.uniformMatrix4fv(viewLocation, false, viewMatrix);
            gl.uniformMatrix4fv(worldLocation, false, worldMatrix);
            gl.uniform3fv(worldCameraPositionLocation, cameraPosition);
            gl.uniform1i(textureLocation, 0);
        }

    }

    /**
     * create a program object and make current
     * @param gl GL context
     * @param vShader  a vertex shader program (string)
     * @param fShader   a fragment shader program(string)
     */
    function initShaders(gl, vShader, fShader){
        const program = createProgram(gl, vShader, fShader);
        if (!program){
            console.log("Failed to create program");
            return false;
        }

        gl.useProgram(program);
        gl.program = program;

        return true;
    }

    /**
     * create a program object and make current
     * @param gl GL context
     * @param vShader  a vertex shader program (string)
     * @param fShader   a fragment shader program(string)
     */
    function createProgram(gl, vShader, fShader){
        const vertexShader = loadShader(gl, gl.VERTEX_SHADER, vShader);
        const fragmentShader = loadShader(gl, gl.FRAGMENT_SHADER, fShader);

        if (!vertexShader || !fragmentShader){
            return null;
        }

        const program = gl.createProgram();
        if (!program){
            return null;
        }

        gl.attachShader(program, vertexShader);
        gl.attachShader(program, fragmentShader);

        gl.linkProgram(program);

        const linked = gl.getProgramParameter(program, gl.LINK_STATUS);
        if (!linked){
            const error = gl.getProgramInfoLog(program);
            console.log('Failed to link program: ' + error);
            gl.deleteProgram(program);
            gl.deleteShader(vertexShader);
            gl.deleteShader(fragmentShader);
        }
        return program;
    }

    /**
     *
     * @param gl GL context
     * @param type  the type of the shader object to be created
     * @param source    shader program (string)
     */
    function loadShader(gl, type, source){
        const shader = gl.createShader(type);
        if (shader == null){
            console.log('unable to create shader');
            return null;
        }

        gl.shaderSource(shader, source);

        gl.compileShader(shader);

        const compiled = gl.getShaderParameter(shader, gl.COMPILE_STATUS);
        if (!compiled){
            const error = gl.getShaderInfoLog(shader);
            console.log('Failed to compile shader: ' + error);
            gl.deleteShader(shader);
            return null;
        }

        return shader;
    }


    function getGeometry(){
        return new Float32Array(
            [
                -0.5, -0.5, -0.5,
                -0.5, 0.5, -0.5,
                0.5, -0.5, -0.5,
                -0.5, 0.5, -0.5,
                0.5, 0.5, -0.5,
                0.5, -0.5, -0.5,

                -0.5, -0.5, 0.5,
                0.5, -0.5, 0.5,
                -0.5, 0.5, 0.5,
                -0.5, 0.5, 0.5,
                0.5, -0.5, 0.5,
                0.5, 0.5, 0.5,

                -0.5, 0.5, -0.5,
                -0.5, 0.5, 0.5,
                0.5, 0.5, -0.5,
                -0.5, 0.5, 0.5,
                0.5, 0.5, 0.5,
                0.5, 0.5, -0.5,

                -0.5, -0.5, -0.5,
                0.5, -0.5, -0.5,
                -0.5, -0.5, 0.5,
                -0.5, -0.5, 0.5,
                0.5, -0.5, -0.5,
                0.5, -0.5, 0.5,

                -0.5, -0.5, -0.5,
                -0.5, -0.5, 0.5,
                -0.5, 0.5, -0.5,
                -0.5, -0.5, 0.5,
                -0.5, 0.5, 0.5,
                -0.5, 0.5, -0.5,

                0.5, -0.5, -0.5,
                0.5, 0.5, -0.5,
                0.5, -0.5, 0.5,
                0.5, -0.5, 0.5,
                0.5, 0.5, -0.5,
                0.5, 0.5, 0.5,

            ]);

    }
    // Fill the buffer with the values that define a cube.
    function setGeometry(gl, positions) {
        const positionLocation = gl.getAttribLocation(gl.program, "a_position");

        const positionBuffer = gl.createBuffer();
        gl.bindBuffer(gl.ARRAY_BUFFER, positionBuffer);
        gl.bufferData(gl.ARRAY_BUFFER, positions, gl.STATIC_DRAW);

        gl.enableVertexAttribArray(positionLocation);
        const size = 3;
        const type = gl.FLOAT;
        const normalize = false;
        const stride = 0;
        const offset = 0;
        gl.vertexAttribPointer(positionLocation, size, type, normalize, stride, offset);

    }


    function setTexture(gl){

        // Create a texture.
        const texture = gl.createTexture();
        gl.bindTexture(gl.TEXTURE_CUBE_MAP, texture);

        const ctx = document.createElement("canvas").getContext("2d");

        ctx.canvas.width = 128;
        ctx.canvas.height = 128;

        const faceInfos = [
            {
                target: gl.TEXTURE_CUBE_MAP_POSITIVE_X,
                url: 'resources/pos-x.jpg',
            },
            {
                target: gl.TEXTURE_CUBE_MAP_NEGATIVE_X,
                url: 'resources/neg-x.jpg',
            },
            {
                target: gl.TEXTURE_CUBE_MAP_POSITIVE_Y,
                url: 'resources/pos-y.jpg',
            },
            {
                target: gl.TEXTURE_CUBE_MAP_NEGATIVE_Y,
                url: 'resources/neg-y.jpg',
            },
            {
                target: gl.TEXTURE_CUBE_MAP_POSITIVE_Z,
                url: 'resources/pos-z.jpg',
            },
            {
                target: gl.TEXTURE_CUBE_MAP_NEGATIVE_Z,
                url: 'resources/neg-z.jpg',
            },
        ];

        faceInfos.forEach((faceInfo) => {
            const {target, url} = faceInfo;

            // Upload the canvas to the cube map face.
            const level = 0;
            const internalFormat = gl.RGBA;
            const width = 512;
            const height = 512;
            const format = gl.RGBA;
            const type = gl.UNSIGNED_BYTE;
            gl.texImage2D(target, level, internalFormat, width, height, 0, format, type, null);

            const image = new Image();
            image.src = url;
            image.addEventListener("load", function (){
                gl.bindTexture(gl.TEXTURE_CUBE_MAP, texture);
                gl.texImage2D(target, level, internalFormat, format, type, image);
                gl.generateMipmap(gl.TEXTURE_CUBE_MAP);
            })


        })

        gl.generateMipmap(gl.TEXTURE_CUBE_MAP);
        gl.texParameteri(gl.TEXTURE_CUBE_MAP, gl.TEXTURE_MIN_FILTER, gl.LINEAR_MIPMAP_LINEAR);

    }
    function setNormals(gl, normal){
        const normalBuffer = gl.createBuffer();
        gl.bindBuffer(gl.ARRAY_BUFFER, normalBuffer);
        gl.bufferData(gl.ARRAY_BUFFER, normal, gl.STATIC_DRAW);
        //
        const normalLocation = gl.getAttribLocation(gl.program, "a_normal");
        gl.enableVertexAttribArray(normalLocation);
        const size = 3;
        const type = gl.FLOAT;
        const normalize = false;
        const stride = 0;
        const offset = 0;
        gl.vertexAttribPointer(normalLocation, size, type, normalize, stride, offset);
    }

    function getNormals() {
        return new Float32Array(
            [
                0, 0, -1,
                0, 0, -1,
                0, 0, -1,
                0, 0, -1,
                0, 0, -1,
                0, 0, -1,

                0, 0, 1,
                0, 0, 1,
                0, 0, 1,
                0, 0, 1,
                0, 0, 1,
                0, 0, 1,

                0, 1, 0,
                0, 1, 0,
                0, 1, 0,
                0, 1, 0,
                0, 1, 0,
                0, 1, 0,

                0, -1, 0,
                0, -1, 0,
                0, -1, 0,
                0, -1, 0,
                0, -1, 0,
                0, -1, 0,

                -1, 0, 0,
                -1, 0, 0,
                -1, 0, 0,
                -1, 0, 0,
                -1, 0, 0,
                -1, 0, 0,

                1, 0, 0,
                1, 0, 0,
                1, 0, 0,
                1, 0, 0,
                1, 0, 0,
                1, 0, 0,
            ]);
    }
    main()

</script>
</body>
</html>
参考资料
WebGL Cubemaps
WebGL Environment Maps (reflections)
WebGL SkyBox


