一.支付宝支付之前的准备工作
创建应用、配置签名、提交审核
支付宝支付之前的准备工作
支付宝开放平台支持使用 普通公钥、公钥证书 两种签名方式
公钥证书模式下完成支付需要获取的内容:
appId
应用私钥
应用公钥证书
支付宝根证书
支付宝公钥证书
普通公钥模式下完成支付需要获取的内容:
appId
应用私钥
支付宝公钥
生成私钥,证书具体可参考官方文档:https://opendocs.alipay.com/open/291/105971
普通公钥与公钥证书区别:
企业开发者若涉及 资金类支出接口接入,必须使用 公钥证书模式,如果不涉及到资金类支出接口,建议使用 普通公钥方式进行加签
接入支付宝、创建应用
(1). 必须注册企业支付宝账户,如果已有企业支付宝账户忽略此步骤
(2). 浏览器搜索《支付宝开放平台》,或者点击下面链接进入支付宝开发接入页面:
https://openhome.alipay.com/platform/home.htm

(3).鼠标放在网页&移动应用上面点击立即创建 如下图:

(4).填写对应应用名称,如下图 点击创建:

(5).创建以后进入下面页面

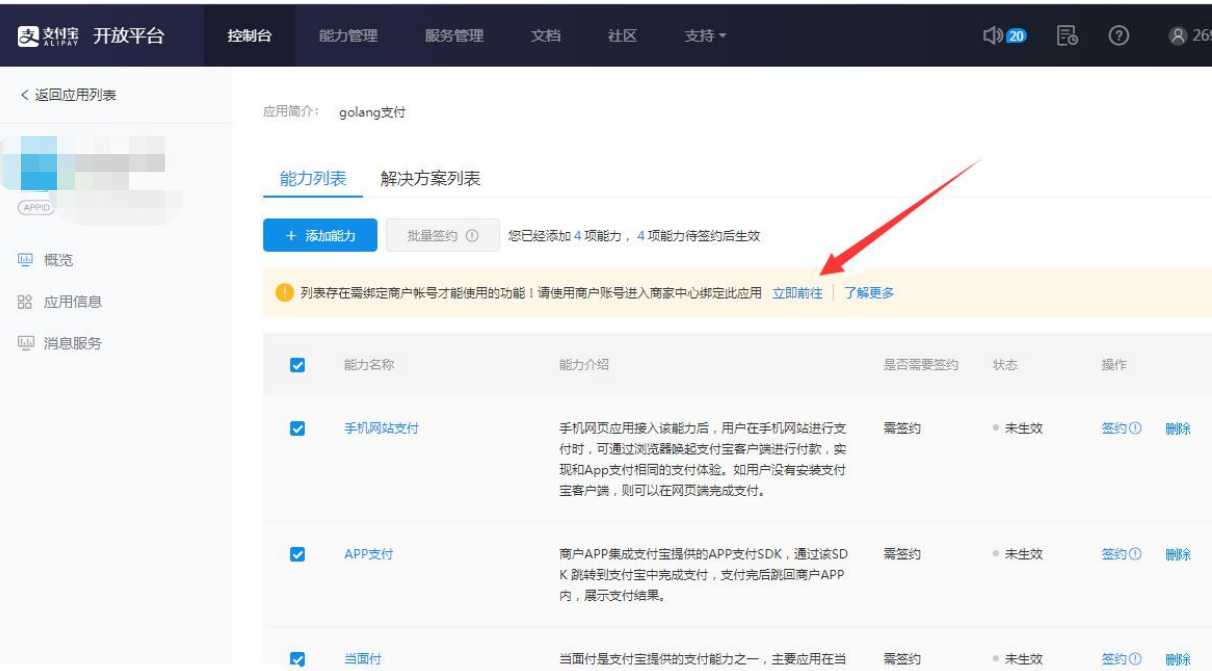
(6).添加 《电脑网站支付》功能
也可以添加其他支付( app支付,小程序支付,公众号支付,移动端支付)等功能

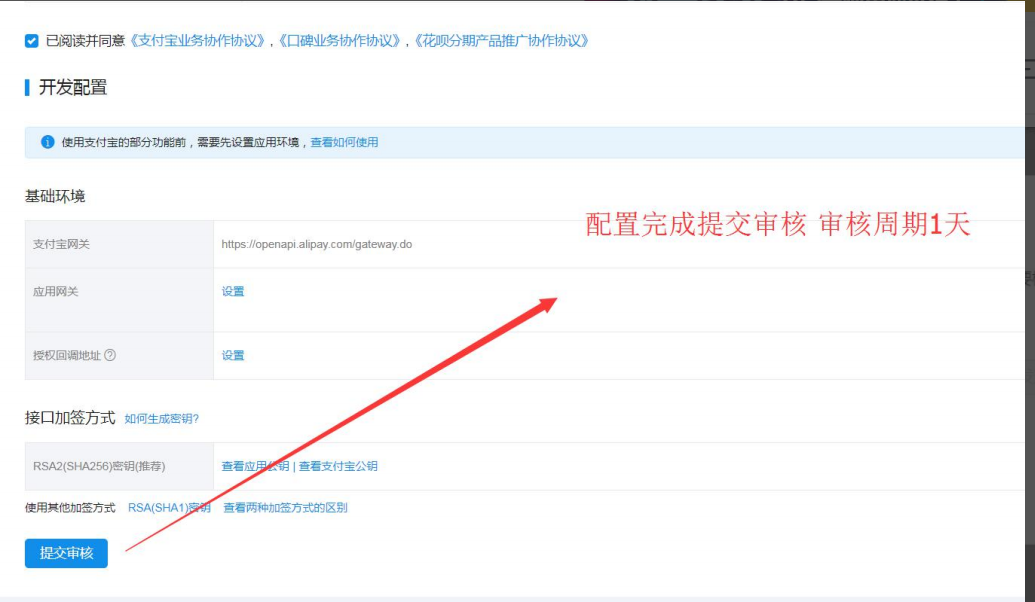
(7).设置应用接口加密方式,然后提交审核


接口加密签名
见官方文档:https://opendocs.alipay.com/open/291/105971
配置签名 提交审核

官方支付流程
见官网:https://docs.open.alipay.com/203/107084/
参考文章:支付宝手机网站支付,app支付,PC端支付流程以及服务端php支付下单,回调流程详解
二.支付案例
Golang 支付宝支付 sdk
github sdk地址: https://github.com/smartwalle/alipay/
v2版本支付
引入github.com/smartwalle/alipay/v2, 先在import中导入 github.com/smartwalle/alipay/v2,然后在main.go文件夹下运行命令: go mod tidy即可
package frontend

import (
    "fmt"
    "time"
    "github.com/gin-gonic/gin"
    "github.com/smartwalle/alipay/v2"
)

type PayV2Controller struct{}

func (con PayV2Controller) Alipay(c *gin.Context) {
    //支付宝公钥
    var aliPublicKey = "xxx" // 可选,支付宝提供给我们用于签名验证的公钥,通过支付宝管理后台获取
    //应用私钥
    var privateKey = "xxx" // 必须,上一步中使用 RSA签名验签工具 生成的私钥
    //应用id
    var appId = "xxx"

    //最后一个参数 false 表示沙箱环境 true表示正式环境
    client, _ := alipay.New(appId, aliPublicKey, privateKey, true)
    //调用Page 支付(根据不同情况,选择不同支付)
    var p = alipay.TradePagePay{}
    //配置回调地址
    p.NotifyURL = "http://xxx/alipayNotify" //post
    //配置支付完成后的跳转地址
    p.ReturnURL = "http://xxx/alipayReturn"
    p.Subject = "测试-这是一个Gin订单"
    template := "2006-01-02 15:04:05"
    //订单号
    p.OutTradeNo = time.Now().Format(template)
    p.TotalAmount = "0.1" //元
    //产品code
    p.ProductCode = "FAST_INSTANT_TRADE_PAY"

    var url, err4 = client.TradePagePay(p)
    if err4 != nil {
        fmt.Println(err4)
    }

    var payURL = url.String()
    fmt.Print(payURL)
    c.Redirect(302, payURL)
}

//异步通知  处理订单
func (con PayV2Controller) AlipayNotify(c *gin.Context) {
    var aliPublicKey = "xxx"
    var privateKey = "xxx"
    var appId = "xxx"
    var client, err1 = alipay.New(appId, aliPublicKey, privateKey, true)
    if err1 != nil {
        fmt.Println(err1)
        return
    }
    req := c.Request
    req.ParseForm()
    ok, _ := client.VerifySign(req.Form)

    fmt.Println(ok)

    //更新订单逻辑
    fmt.Println(req.Form)
    c.String(200, "ok")
}

//支付成功以后返回的地址
func (con PayV2Controller) AlipayReturn(c *gin.Context) {
    c.String(200, "支付成功")
}
v3版本支付
package frontend

import (
    "fmt"
    "time"
    "github.com/gin-gonic/gin"
    "github.com/smartwalle/alipay/v3"
)

type PayV3Controller struct{}

func (con PayV3Controller) Alipay(c *gin.Context) {
    var privateKey = ""
    var client, err = alipay.New("2021001xxx588", privateKey, true)

    client.LoadAppPublicCertFromFile("crt/appCertPublicKey_xx8.crt") // 加载应用公钥证书
    client.LoadAliPayRootCertFromFile("crt/alipayRootCert.crt")                   // 加载支付宝根证书
    client.LoadAliPayPublicCertFromFile("crt/alipayCertPublicKey_RSA2.crt")       // 加载支付宝公钥证书

    // 将 key 的验证调整到初始化阶段
    if err != nil {
        fmt.Println(err)
        return
    }

    var p = alipay.TradePagePay{}
    p.NotifyURL = "http://xxx/v3/alipayNotify"
    p.ReturnURL = "http://xxx/v3/alipayReturn"
    p.Subject = "测试 公钥证书模式-这是一个gin订单"
    template := "2006-01-02 15:04:05"
    p.OutTradeNo = time.Now().Format(template)
    p.TotalAmount = "0.1"
    p.ProductCode = "FAST_INSTANT_TRADE_PAY"

    var url, err4 = client.TradePagePay(p)
    if err4 != nil {
        fmt.Println(err4)
    }

    var payURL = url.String()
    fmt.Println(payURL)

    c.Redirect(302, payURL)
}
func (con PayV3Controller) AlipayNotify(c *gin.Context) {
    var privateKey = ""
    var client, err = alipay.New("202100xxx6588", privateKey, true)
    client.LoadAppPublicCertFromFile("crt/appCertPublicKey_2021xxx6588.crt") // 加载应用公钥证书
    client.LoadAliPayRootCertFromFile("crt/alipayRootCert.crt")                   // 加载支付宝根证书
    client.LoadAliPayPublicCertFromFile("crt/alipayCertPublicKey_RSA2.crt")       // 加载支付宝公钥证书

    if err != nil {
        fmt.Println(err)
        return
    }

    req := c.Request
    req.ParseForm()
    ok, _ := client.VerifySign(req.Form)

    fmt.Println(ok)
    //处理订单逻辑关系
    fmt.Println(req.Form)

    c.String(200, "ok")
}

func (con PayV3Controller) AlipayReturn(c *gin.Context) {
    c.String(200, "支付成功")
}
ok, 支付宝支付操作就到这里了
[上一节][golang gin框架] 31.Gin 商城项目- 提交订单逻辑操作以及去支付页面制作


![[一篇读懂]C语言十二讲:栈与队列和真题实战](https://img-blog.csdnimg.cn/52deffe5140d4d538cedf803d000e167.png#pic_center)