一、SpringSecurity 本质探寻
SpringSecurity 的原理其实就是一个过滤器链,内部包含了提供各种功能的过滤器。这样说肯定非常枯燥,所以接下来还是在代码中看一看。
前期工作,需要在代码中引入 SpringSecurity 依赖,这里不再赘述,直接 debug ,如下图。
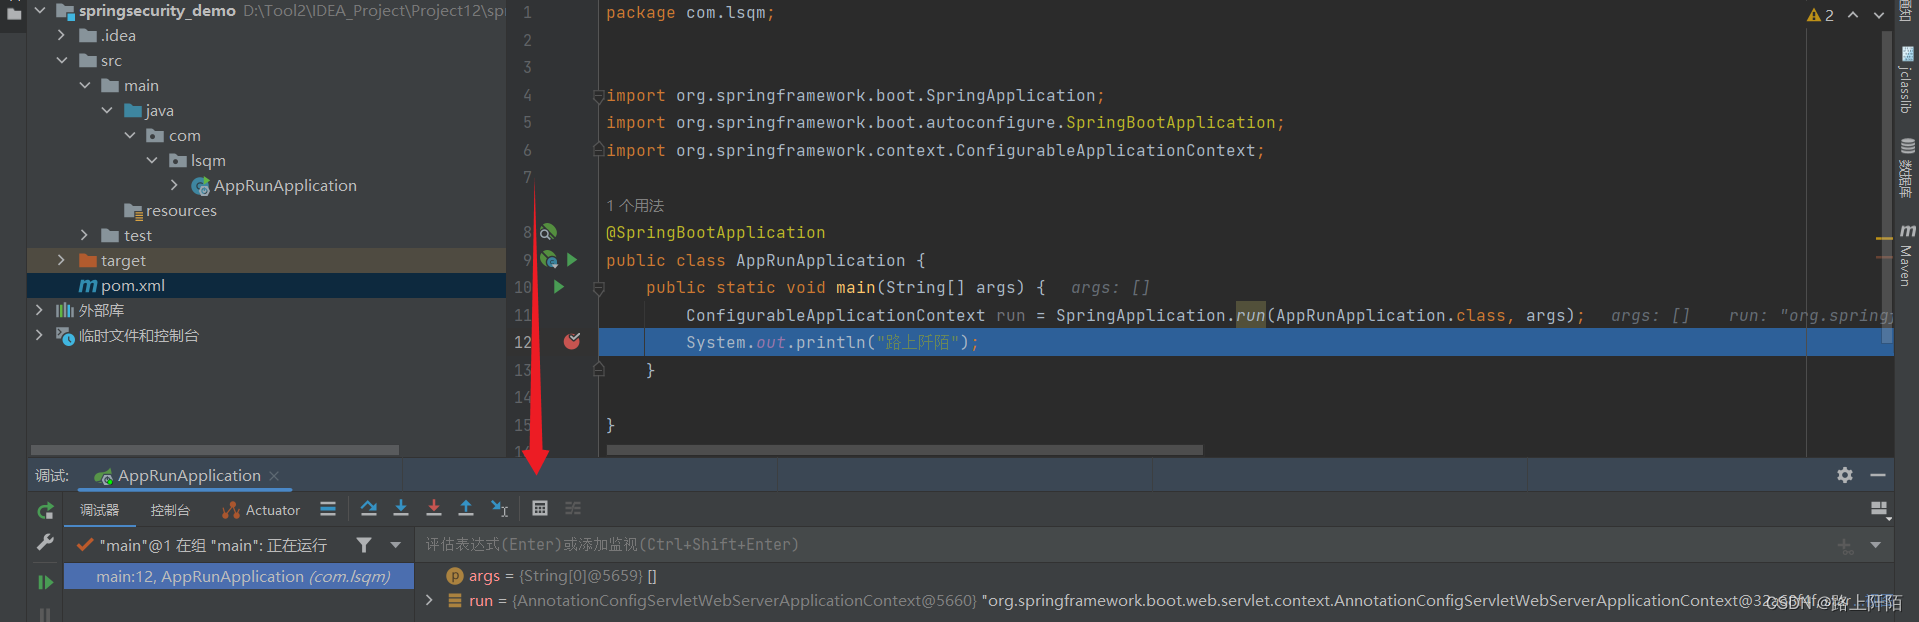
然后点击箭头指向的图标,输入 run.getBean(DefaultSecurityFilterChain.class),如下图所示。
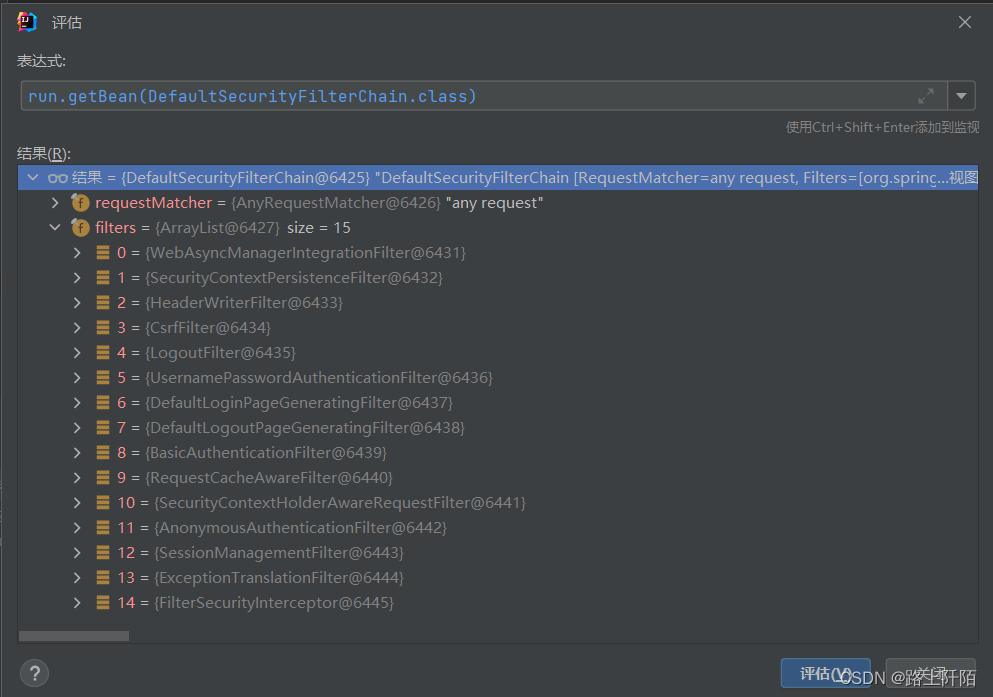
这个 run其实就是 Spring 容器,这里面存放了 SpringBoot 自动配置加载的各种 Bean 实例,SpringBoot 自动配置过程的源码解读可以参考我的另一篇文章。
这里,我们需要获取 DefaultSecurityFilterChain.class,这正是 SpringSecurity 的过滤器链。
而我们要探讨的认证过程的主角则是 :
-
UsernamePasswordAuthenticationFilter:负责处理我们在登陆页面填写了用户名密码后的登陆请求,也就是负责校验登录表单中的用户名和密码。
-
ExceptionTranslationFilter:处理过滤器链中抛出的任何 AccessDeniedException和AuthenticationException 。
-
FilterSecurityInterceptor:负责权限校验的过滤器。
其他的过滤器大家可以自己查阅相关资料学习。
二、SpringSecurity 认证流程源码解读
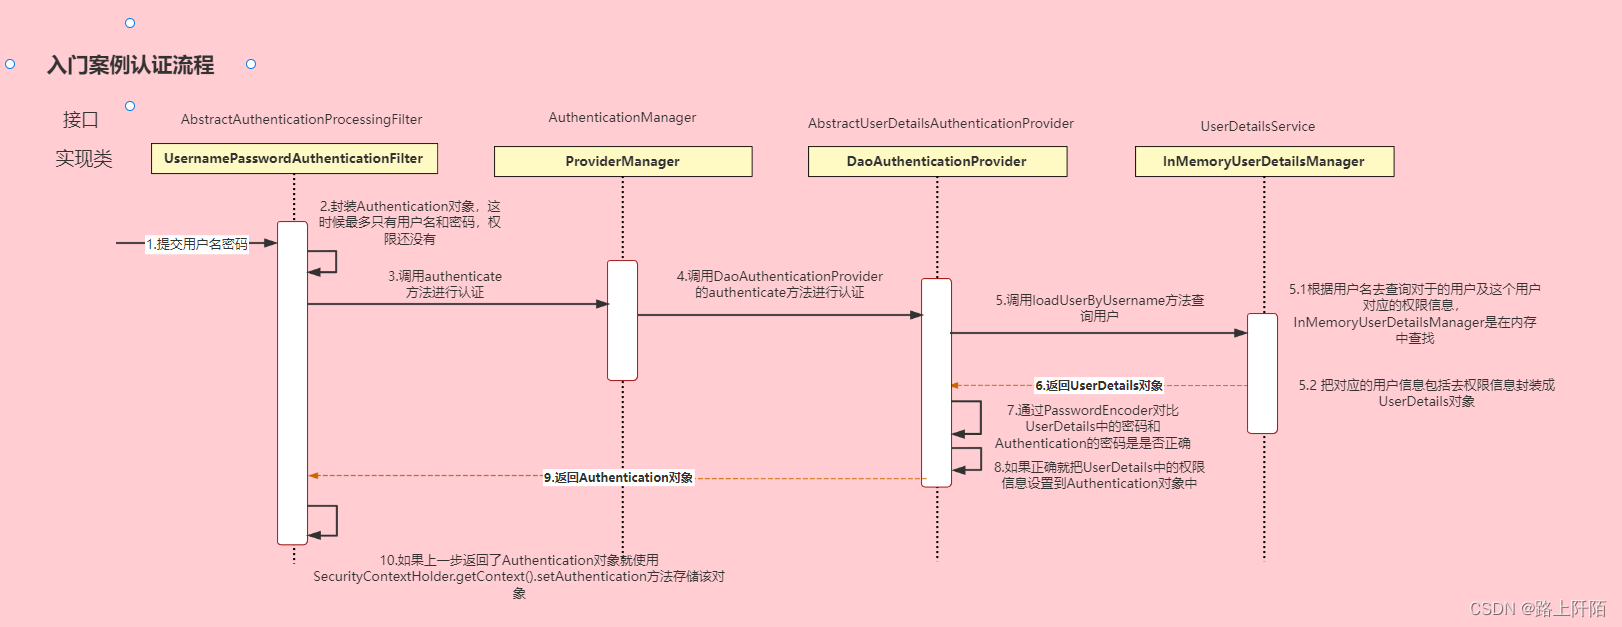
这张图基本涵盖了 SpringSecurity 整个认证过程,接下来我们将结合这张图,一步步进行分析。

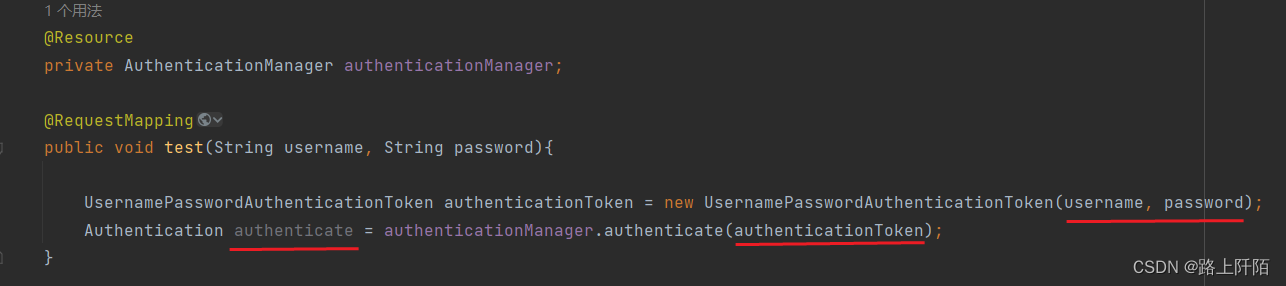
首先,UsernamePasswordAuthenticationFilter 过滤器会获取用户输入的用户名和密码,然后封装成一个 UsernamePasswordAuthenticationToken 对象,然后会调用 authenticationManager.authenticate(authenticationToken),我们继续进入 authenticate() 方法。

点进入去之后,我们来到了 AuthenticationManager 接口,但这只是一个接口,显然不是我们要的,具体的实现代码应该在实现类中,所以我们继续选择 ProviderManager ,他是 AuthenticationManager 接口的一个实现类。
下面是 ProviderManager 实现类对 AuthenticationManager 接口的 authenticate() 方法的重写,乍一看代码还是很多的,不过大家不用担心,我们只需要看重点代码即可。
@Override
	public Authentication authenticate(Authentication authentication) throws AuthenticationException {
		Class<? extends Authentication> toTest = authentication.getClass();
		AuthenticationException lastException = null;
		AuthenticationException parentException = null;
		Authentication result = null;
		Authentication parentResult = null;
		int currentPosition = 0;
		int size = this.providers.size();
		for (AuthenticationProvider provider : getProviders()) {
			if (!provider.supports(toTest)) {
				continue;
			}
			if (logger.isTraceEnabled()) {
				logger.trace(LogMessage.format("Authenticating request with %s (%d/%d)",
						provider.getClass().getSimpleName(), ++currentPosition, size));
			}
			try {
				// 委托 AbstractUserDetailsAuthenticationProvider 类的 authenticate() 方法进行认证
				result = provider.authenticate(authentication);
				if (result != null) {
					copyDetails(authentication, result);
					break;
				}
			}
			catch (AccountStatusException | InternalAuthenticationServiceException ex) {
				prepareException(ex, authentication);
				// SEC-546: Avoid polling additional providers if auth failure is due to
				// invalid account status
				throw ex;
			}
			catch (AuthenticationException ex) {
				lastException = ex;
			}
		}
		if (result == null && this.parent != null) {
			// Allow the parent to try.
			try {
				parentResult = this.parent.authenticate(authentication);
				result = parentResult;
			}
			catch (ProviderNotFoundException ex) {
				// ignore as we will throw below if no other exception occurred prior to
				// calling parent and the parent
				// may throw ProviderNotFound even though a provider in the child already
				// handled the request
			}
			catch (AuthenticationException ex) {
				parentException = ex;
				lastException = ex;
			}
		}
		if (result != null) {
			if (this.eraseCredentialsAfterAuthentication && (result instanceof CredentialsContainer)) {
				// Authentication is complete. Remove credentials and other secret data
				// from authentication
				((CredentialsContainer) result).eraseCredentials();
			}
			// If the parent AuthenticationManager was attempted and successful then it
			// will publish an AuthenticationSuccessEvent
			// This check prevents a duplicate AuthenticationSuccessEvent if the parent
			// AuthenticationManager already published it
			if (parentResult == null) {
				this.eventPublisher.publishAuthenticationSuccess(result);
			}

			return result;
		}

		// Parent was null, or didn't authenticate (or throw an exception).
		if (lastException == null) {
			lastException = new ProviderNotFoundException(this.messages.getMessage("ProviderManager.providerNotFound",
					new Object[] { toTest.getName() }, "No AuthenticationProvider found for {0}"));
		}
		// If the parent AuthenticationManager was attempted and failed then it will
		// publish an AbstractAuthenticationFailureEvent
		// This check prevents a duplicate AbstractAuthenticationFailureEvent if the
		// parent AuthenticationManager already published it
		if (parentException == null) {
			prepareException(lastException, authentication);
		}
		throw lastException;
	}
为了大家观看方便,这张图我就多引用几次。
我们把目光再次回到这张图,此时我么已经到了第二个阶段,即 ProviderManager 实现类的 authenticate() 方法实际上会调用 AbstractUserDetailsAuthenticationProvider 类的 authenticate() 方法进行认证。看到这里大家可能会想这不是套娃吗?没错,他就是在套娃!

如上图,ProviderManager 实现类重写的 authenticate() 方法实际上会调用 AbstractUserDetailsAuthenticationProvider 类的 authenticate() 方法进行认证,在上面的源码中我也进行了注释。
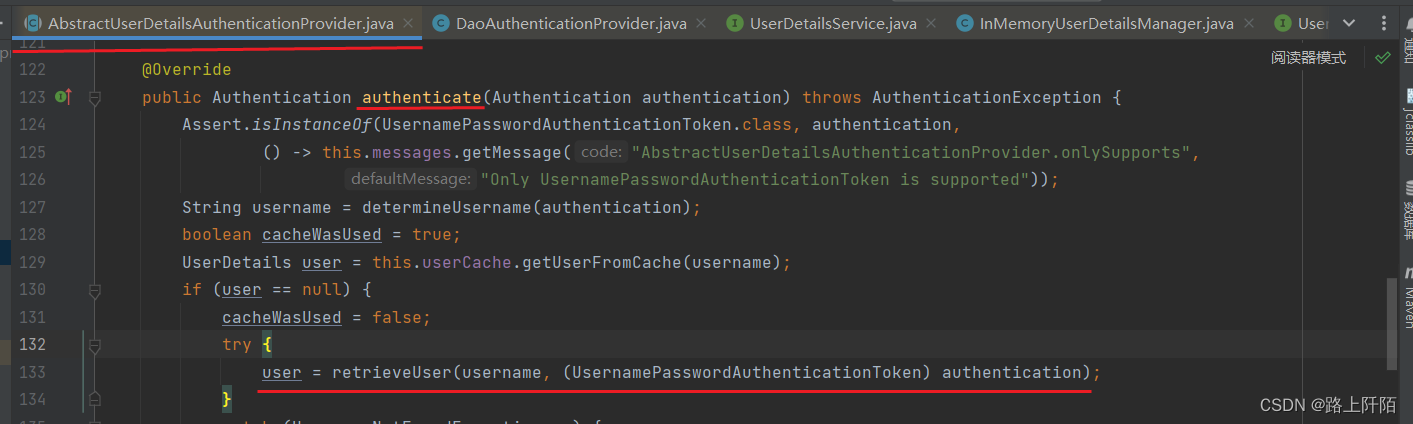
我们继续进入 AbstractUserDetailsAuthenticationProvider 类的 authenticate() 方法。点进去之后,我们发现我们进入了 AuthenticationProvider 接口,我们找到他的实现类——AbstractUserDetailsAuthenticationProvider。
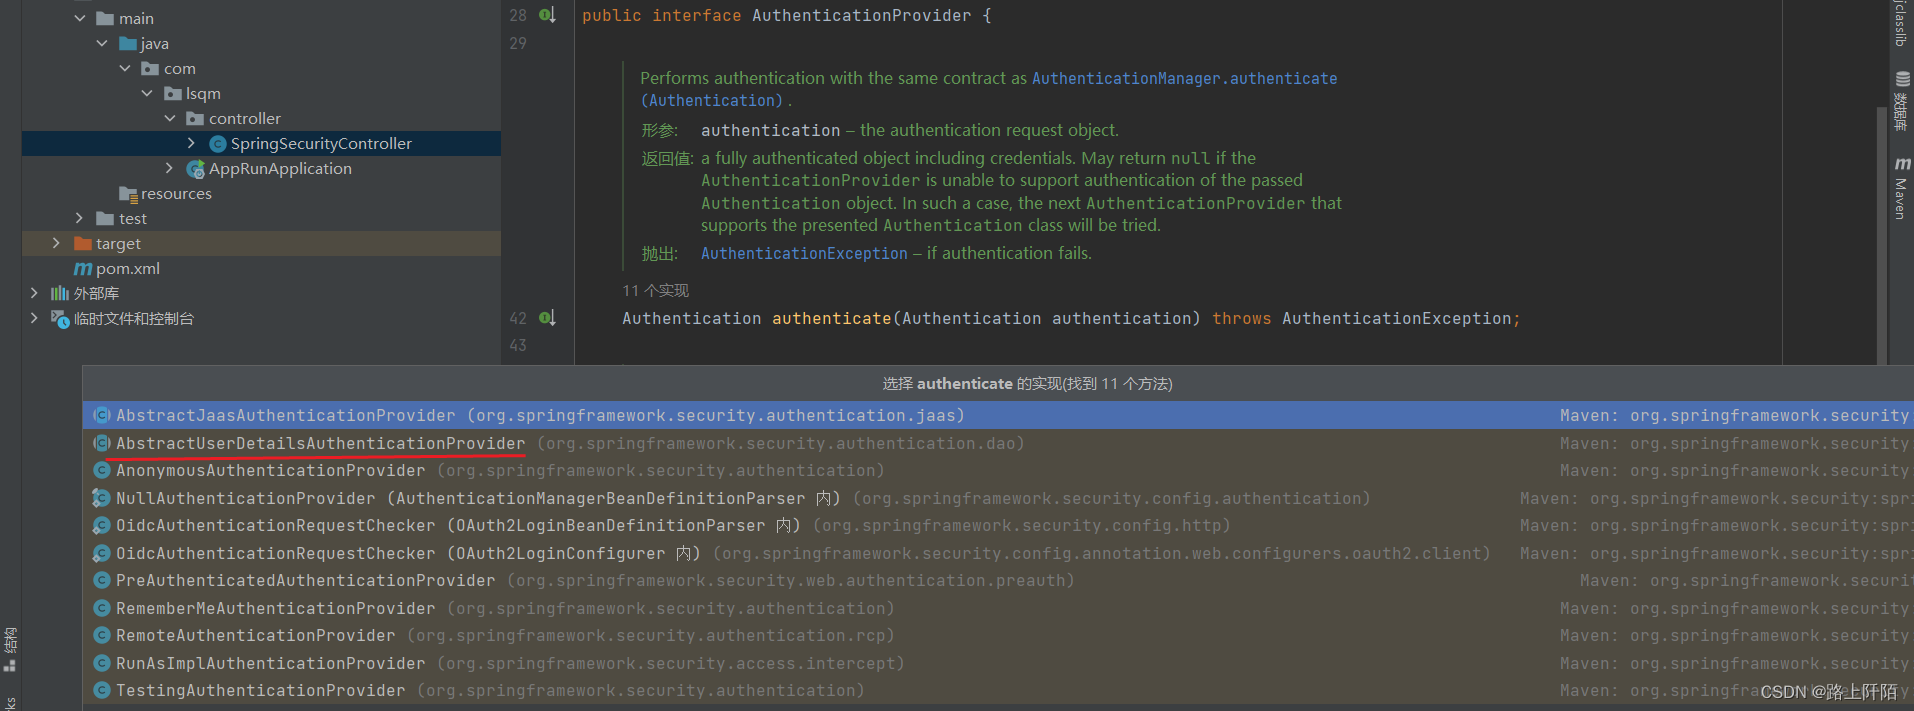
AbstractUserDetailsAuthenticationProvider 类的 authenticate() 方法源码如下:
	@Override
	public Authentication authenticate(Authentication authentication) throws AuthenticationException {
		Assert.isInstanceOf(UsernamePasswordAuthenticationToken.class, authentication,
				() -> this.messages.getMessage("AbstractUserDetailsAuthenticationProvider.onlySupports",
						"Only UsernamePasswordAuthenticationToken is supported"));
		String username = determineUsername(authentication);
		boolean cacheWasUsed = true;
		UserDetails user = this.userCache.getUserFromCache(username);
		if (user == null) {
			cacheWasUsed = false;
			try {
				user = retrieveUser(username, (UsernamePasswordAuthenticationToken) authentication);
			}
			catch (UsernameNotFoundException ex) {
				this.logger.debug("Failed to find user '" + username + "'");
				if (!this.hideUserNotFoundExceptions) {
					throw ex;
				}
				throw new BadCredentialsException(this.messages
						.getMessage("AbstractUserDetailsAuthenticationProvider.badCredentials", "Bad credentials"));
			}
			Assert.notNull(user, "retrieveUser returned null - a violation of the interface contract");
		}
		try {
			this.preAuthenticationChecks.check(user);
			additionalAuthenticationChecks(user, (UsernamePasswordAuthenticationToken) authentication);
		}
		catch (AuthenticationException ex) {
			if (!cacheWasUsed) {
				throw ex;
			}
			// There was a problem, so try again after checking
			// we're using latest data (i.e. not from the cache)
			cacheWasUsed = false;
			user = retrieveUser(username, (UsernamePasswordAuthenticationToken) authentication);
			this.preAuthenticationChecks.check(user);
			additionalAuthenticationChecks(user, (UsernamePasswordAuthenticationToken) authentication);
		}
		this.postAuthenticationChecks.check(user);
		if (!cacheWasUsed) {
			this.userCache.putUserInCache(user);
		}
		Object principalToReturn = user;
		if (this.forcePrincipalAsString) {
			principalToReturn = user.getUsername();
		}
		return createSuccessAuthentication(principalToReturn, authentication, user);
	}
我们重点看一下 retrieveUser() 方法。

点进去,发现这是 AbstractUserDetailsAuthenticationProvider 接口中的方法,而且只有一个实现,那我们继续进入实现类实现的方法。

这个实现类正是 DaoAuthenticationProvider 类。

总的来说这个 retrieveUser() 方法只做了一件事,就是调用 UserDetailsService 接口的 loadUserByUsername() 方法,拿到用户信息。
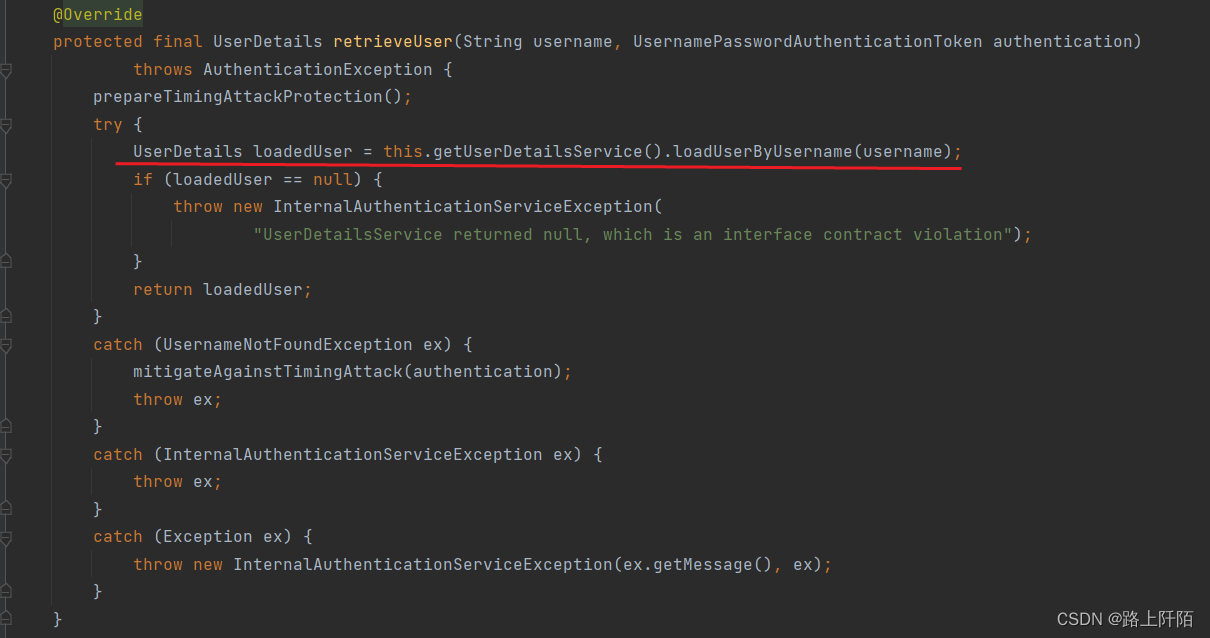
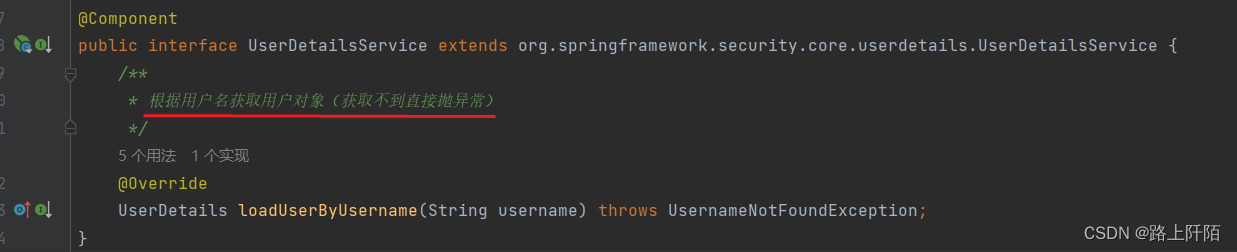
这个注释真是太给力了,直白。
我们把目光再次回到这张图,此时我们已经来到 UserDetailsService 接口这里。这个接口只有 loadUserByUsername() 方法这一个方法,这个方法默认会从内存中回去用户信息,也就是下图中的 InMemoryUserDetailsManager 实现类中的方法。但是一般情况下我们的用户数据都是存放在数据库中,所以我们一般会实现 UserDetailsService 接口,然后重写 loadUserByUsername() 方法,从数据库中差寻用户信息。

loadUserByUsername() 方法会将查询到的用户信息封装到一个 UserDetails 对象,然后将 UserDetails 对象返回。
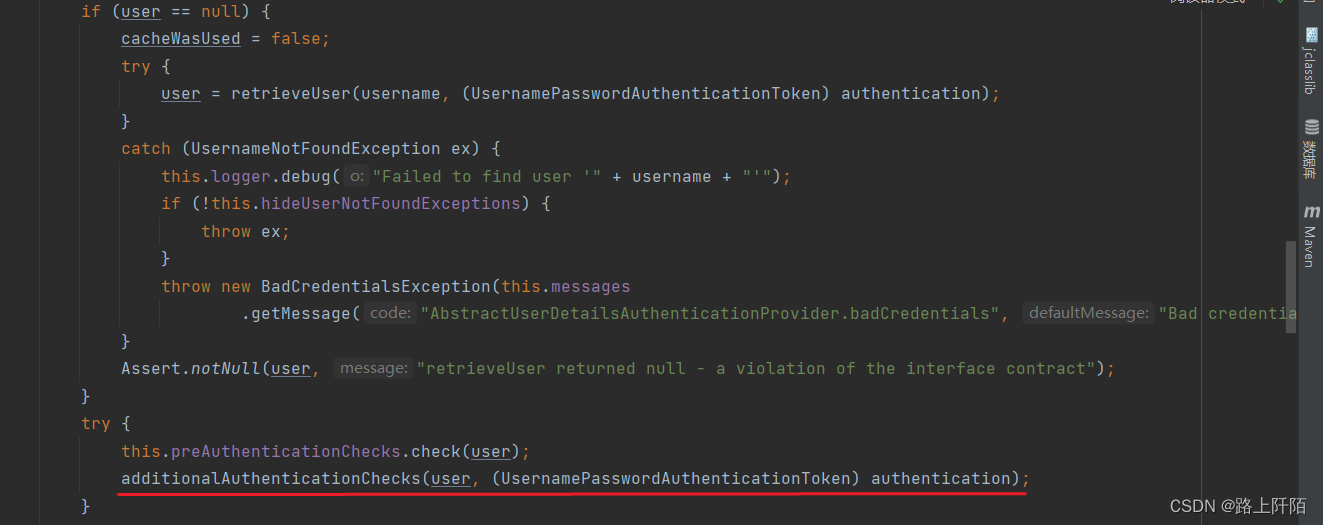
此时,我们又回到了 AbstractUserDetailsAuthenticationProvider类的 authenticate() 方法,这时我们已经从数据库拿到了用户信息(用户名、密码等)。
我们继续往下看,AbstractUserDetailsAuthenticationProvider类的 authenticate() 方法又调用了 additionalAuthenticationChecks() 方法,参数分别是从数据库中获取到的用户信息,以及根据用户在前端输入的用户信息封装成的 authentication 对象。
点进去发现这是 AbstractUserDetailsAuthenticationProvider 接口中的方法,而且只有一个实现,那我们继续进入实现类实现的方法。

这个实现类正是 DaoAuthenticationProvider 类。
总的来说,这个方法就做了一件事,将用户输入的密码和从数据库中查到的密码进行比较,如果一致就什么都不做,不一致就抛出异常。
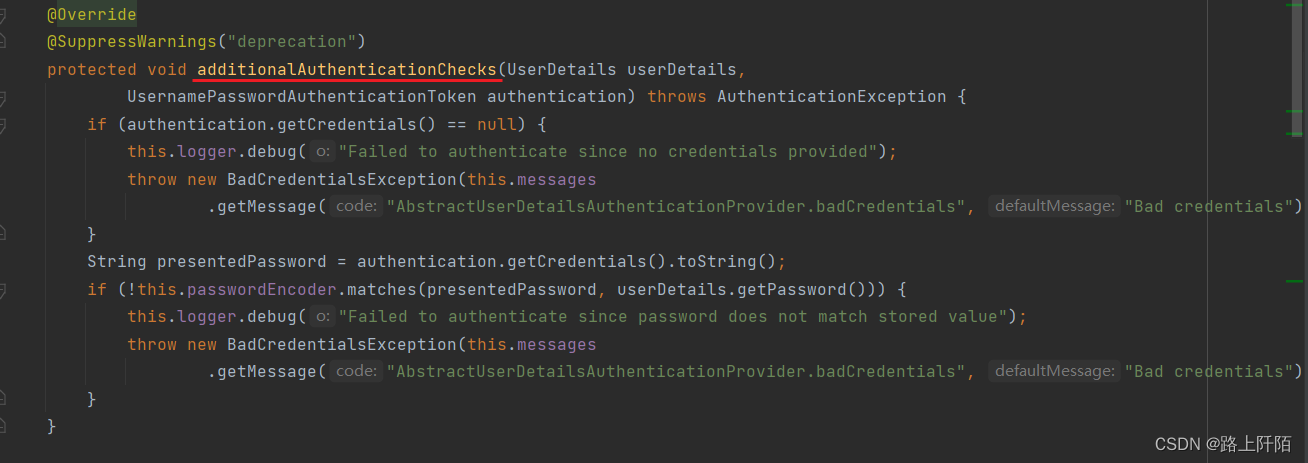
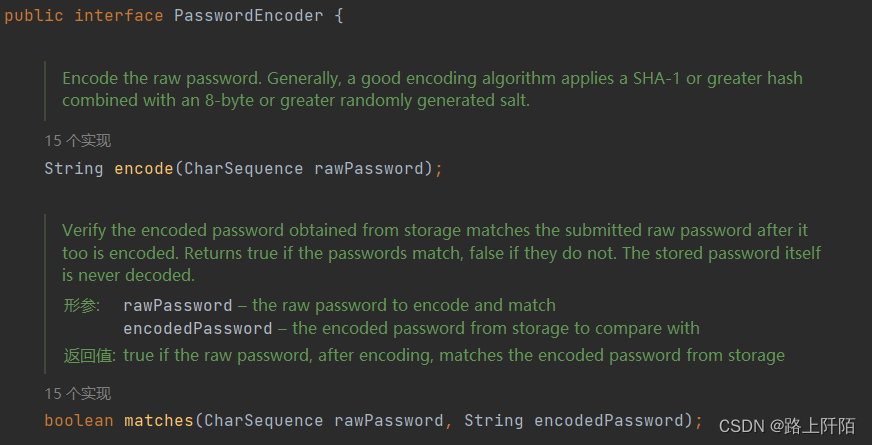
密码的比较则是通过 PasswordEncoder 接口的 matches() 方法实现的。

所以,如果你想自定义加密和解密的方式只需要自己实现 PasswordEncoder 接口,然后重写 encode() 方法 和 matches() 方法。
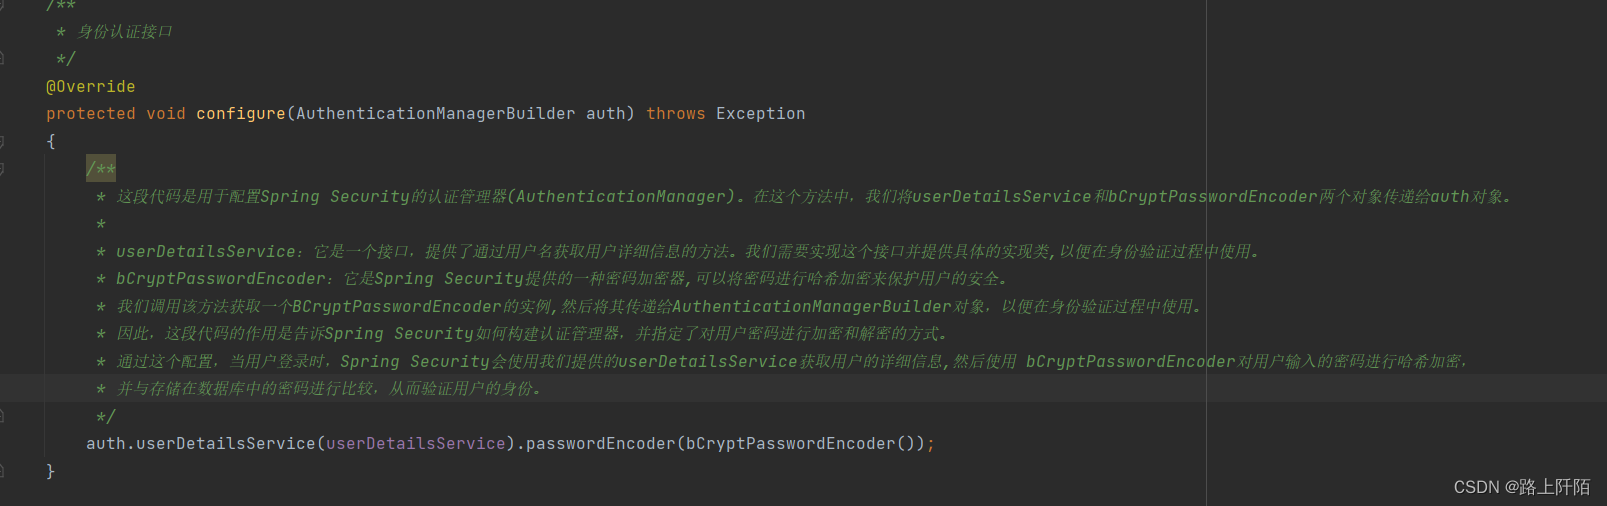
当然,我们也可以在 SpringSecurity 配置类中指定加密方式。
密码校验完成之后,我们就来到了 AbstractUserDetailsAuthenticationProvider 类的 authenticate()方法的末尾。
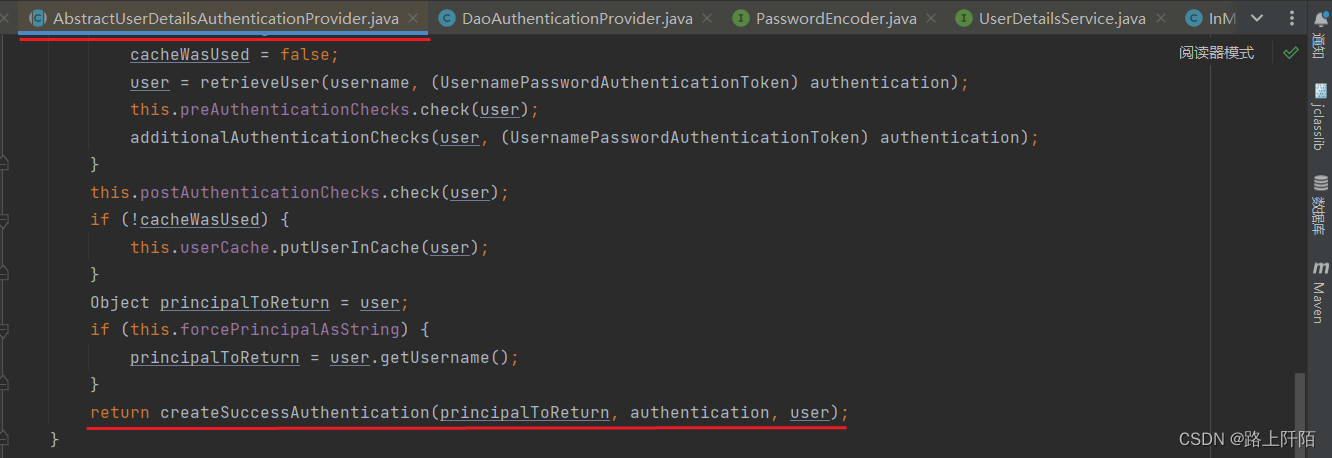
进入 createSuccessAuthentication() 方法。
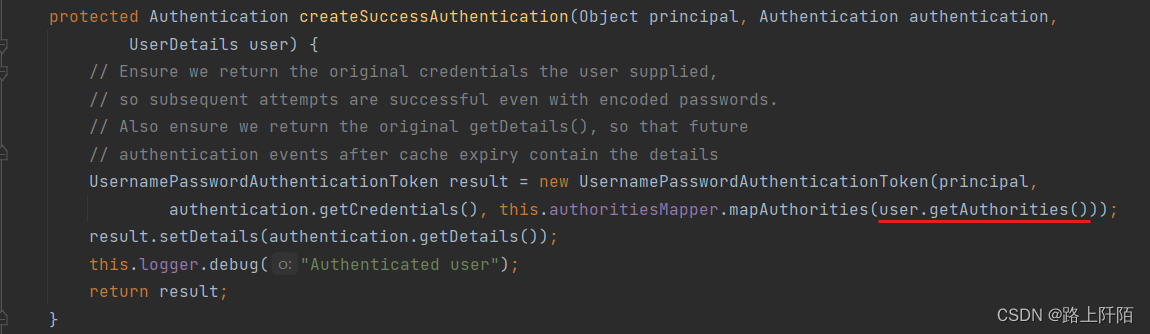
这个方法就是将 UserDetails 中的权限信息封装到 Authentication 对象中返回,方便后续权限校验,但是这个权限信息这里也可以为空,不一定非要在这里设置。
我们把目光再次回到这张图,这时候我们其实已经又回到了最开始的地方,ProviderManager 类 authenticate() 方法,没错我们终于跳出来了。
result = provider.authenticate(authentication) 这一行代码把我们折腾了这么就,终于出来了。
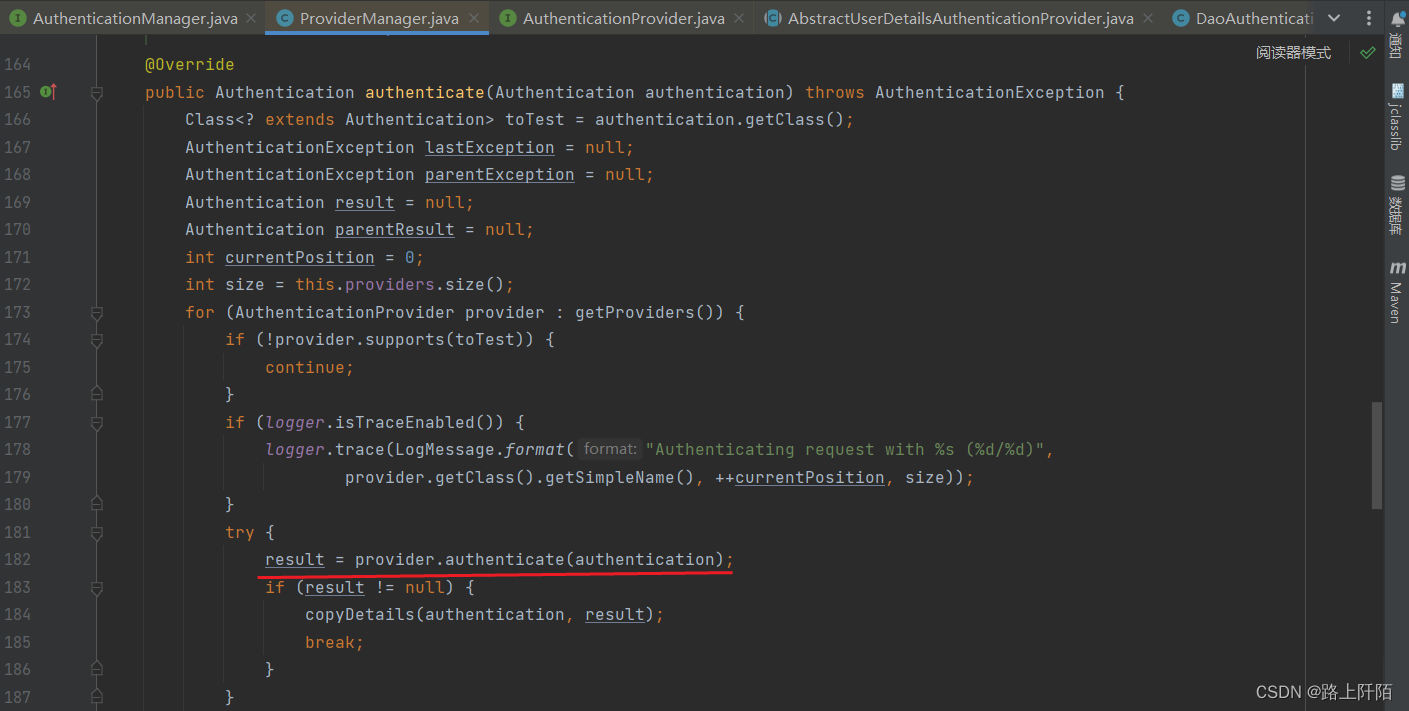
再次回顾 ProviderManager 类 authenticate() 方法的源码,可以发现 result = provider.authenticate(authentication) 这行代码之后都是围绕 result 这个放回的 Authentication 对象的一些校验工作,这都是一些细节,不影响大家对认证流程的理解。如果这些校验都通过,就会将 result 返回。
@Override
	public Authentication authenticate(Authentication authentication) throws AuthenticationException {
		Class<? extends Authentication> toTest = authentication.getClass();
		AuthenticationException lastException = null;
		AuthenticationException parentException = null;
		Authentication result = null;
		Authentication parentResult = null;
		int currentPosition = 0;
		int size = this.providers.size();
		for (AuthenticationProvider provider : getProviders()) {
			if (!provider.supports(toTest)) {
				continue;
			}
			if (logger.isTraceEnabled()) {
				logger.trace(LogMessage.format("Authenticating request with %s (%d/%d)",
						provider.getClass().getSimpleName(), ++currentPosition, size));
			}
			try {
				result = provider.authenticate(authentication);
				if (result != null) {
					copyDetails(authentication, result);
					break;
				}
			}
			catch (AccountStatusException | InternalAuthenticationServiceException ex) {
				prepareException(ex, authentication);
				// SEC-546: Avoid polling additional providers if auth failure is due to
				// invalid account status
				throw ex;
			}
			catch (AuthenticationException ex) {
				lastException = ex;
			}
		}
		if (result == null && this.parent != null) {
			// Allow the parent to try.
			try {
				parentResult = this.parent.authenticate(authentication);
				result = parentResult;
			}
			catch (ProviderNotFoundException ex) {
				// ignore as we will throw below if no other exception occurred prior to
				// calling parent and the parent
				// may throw ProviderNotFound even though a provider in the child already
				// handled the request
			}
			catch (AuthenticationException ex) {
				parentException = ex;
				lastException = ex;
			}
		}
		if (result != null) {
			if (this.eraseCredentialsAfterAuthentication && (result instanceof CredentialsContainer)) {
				// Authentication is complete. Remove credentials and other secret data
				// from authentication
				((CredentialsContainer) result).eraseCredentials();
			}
			// If the parent AuthenticationManager was attempted and successful then it
			// will publish an AuthenticationSuccessEvent
			// This check prevents a duplicate AuthenticationSuccessEvent if the parent
			// AuthenticationManager already published it
			if (parentResult == null) {
				this.eventPublisher.publishAuthenticationSuccess(result);
			}

			return result;
		}
所以,我们最终又回到了这里,authenticate 对象正是返回的 result。认证通过后,我们就可以继续我们写我们的其他业务代码,如封装响应信息返回给前端,告知用户认证成功。
好了,最后,感谢大家观看,如果有疑问或者文章有错误,可以在评论区@我。