目录
一、认识哈希表
1.unordered_set和unordered_map
2.哈希表的概念
二、闭散列哈希表的实现
1.底层本质
(1)哈希表的存储结构
(2)元素的插入与查找
(3)哈希冲突
(4)负载因子
2.哈希函数的合理设计
(1)设计原则
(2)常用哈希函数
3.类的构建
4.成员函数
(1)插入函数
(2)查找函数
(3)删除函数
三、开散列哈希表的实现
1.底层本质
2.类的构建
3.成员函数
(1)插入函数
(2)查找函数
(3)删除函数
(4)构造函数析和构函数
(5)两种扩容方式
4.测试代码
四、哈希类的改造
1.对Node进行改造
2.增加迭代器
3.unordered_set和unordered_map的封装
4.测试代码
五、位图
1.一道面试题
2.位图的实现
六、布隆过滤器
1.布隆过滤器的概念
2.布隆过滤器的实现
3.误报率
一、认识哈希表
1.unordered_set和unordered_map
STL实现了两个数据结构unordered_map和unordered_set顾名思义,因为底层的实现方式不同,它们成为了无序的map和set,但是它们的使用与普通的map和set是一样的。
我们可以通过代码测试两种数据结构搜索数据的速度。
#include<iostream>
#include<map>
#include<set>
#include<string>
#include<cstdlib>
#include<ctime>
#include<unordered_map>
using namespace std;

//改变NUM的值以测试查找效率
#define NUM 1000

//测试unordermap和map的搜索能力
int main()
{
    int arr[NUM] = { 0 };
    srand((unsigned int)time(nullptr));
    int num = rand() * 121;
    map<int, int> m1;
    unordered_map<int, int> m2;
    for (int i = 0; i < NUM; ++i)
    {
        arr[i] = num;
        m1.insert(make_pair(num, num * 2));
        m2.insert(make_pair(num, num * 2));
        num = rand();
    }
    clock_t t1 = clock();
    for (auto e : arr)
    {
        m1.find(e);
    }
    clock_t t2 = clock();
    cout << "map查找使用的时间" << t2 - t1 << endl;

    clock_t t3 = clock();
    for (auto e : arr)
    {
        m2.find(e);
    }
    clock_t t4 = clock();
    cout << "unordered_map查找使用的时间" << t4 - t3 << endl;
    return 0;
}
NUM为1000,10000时二者都差不多,甚至当NUM为10000时也不会差很多。
当数据量很大时,可以很明显地看到,unordered容器的搜索速度明显更快,下面是NUM在50000时的搜索时间。

如果将模式由debug换到release,它们的差距还会变大。

对于普通的map、set是使用红黑树实现的,而unordered系列都使用哈希表实现。
2.哈希表的概念
哈希表(也叫散列表),也是根据值Key,查找对应value的数据结构。它的查找的速度非常快,时间复杂度为O(1)。
二叉搜索树是很高效的用于数据查找的数据结构,但它j还是需要比较元素的大小进行查找,而哈希表可以不经过任何比较,一次就可以直接从表中得到要搜索的value值。哈希表的存储结构,让它可以通过某种哈希函数使元素的存储位置与它的关键值key之间能够建立一一映射的关系,那么在查找时通过该函数可以很快找到需要查找的元素。
所谓哈希函数就是哈希表在查找和插入数据时使用的使key和数据储存位置建立映射的函数。在本质上,查找函数就是用户传递一个key值到find函数里,find再调用哈希函数找到该数据对应的储存位置。
对于已经被插入的元素,key映射的位置一定储存在对应位置,返回true;而对于未被插入的元素,key映射的位置没有储存有效数据,返回false。
对于未被插入元素,key映射的位置也正是它应该被插入的位置,所以insert函数直接把函数插入在这里就可以了,如果元素已经被插入也就不再插入。
二、闭散列哈希表的实现
1.底层本质
对于闭散列哈希表我们更多的是需要根据它了解哈希的底层原理,重点在于后面的开散列。
(1)哈希表的存储结构
我们之前学过顺序表,哈希表在底层其实也是一个大数组,数组的下标和key值有着一一对应的关系,这样的映射关系通过哈希函数实现。
而我们在STL的学习中已经学了vector,数组就可以换为STL中的vector,在扩容时使用库中的扩容函数resize。
(2)元素的插入与查找
比方说,我们在哈希表中插入一个key为7,value为3的pair且默认底层vector可以储存10个元素,哈希函数设置为:hash(key) = key % capacity,其中capacity为存储元素底层空间的容量,这里capacity为10。
对于哈希表中数据的查找和插入都是先用哈希函数处理key得到对应位置的下标,在这里就是7%10,此时得到该数据储存的映射位置是下标为7的位置,查找数据就直接到下标处找寻即可,插入就在对应位置插入即可。
(3)哈希冲突
顾名思义,就是不同的key通过哈希函数可以映射到同一个下标位置。
比如说,我再插入一个key为17,value为4的pair,此时17%10=7,对应了同一个位置,就无法插入了。
为了解决这样的问题,哈希表提供了一种存储方式:闭散列。
它对于哈希冲突的解决方式是:先用哈希函数映射对应位置,如果该位置有数据就去向后找,直到找到空位置。(如果找到最后一个下标位置都没找到空,就从头继续找)对于插入函数,找到空位置时直接插入value,对于查找函数,找到空位置即表示该元素不在哈希表中。
(4)负载因子
在上面的闭散列哈希表中,如果哈希表中有大量的数据,所以当哈希表的vecto接近插满的情况下,寻找空位置将变得相当耗时。所以我们引入负载因子,当哈希表中效元素个数和容量的比值大于负载因子时,就对vector扩容,以保证哈希表不会过满,从而保证了O(1)的查找效率。
2.哈希函数的合理设计
(1)设计原则
首先,哈希希冲突在哈希表中是不可避免的,但可以减少。为了减少哈希冲突。它的设计原则有以下几种:
- 哈希函数的定义域必须包括需要存储的全部关键码key,而如果散列表允许有m个地址时,其值域必须在0到m-1之间
- 哈希函数计算出来的地址能均匀分布在整个空间中
- 哈希函数应该比较简单
(2)常用哈希函数
直接定址法--(常用)
取关键字的某个线性函数为散列地址:Hash(Key)= A*Key + B,优点为简单、均匀,缺点是需要事先知道关键字的分布情况,适用于查找比较小且连续的数据的情况。
除留余数法--(常用)
设散列表中允许的地址数为m,取一个不大于m,但最接近或者等于m的质数p作为除数, 按照哈希函数:Hash(key) = key% p(p将关键码转换成哈希地址)
平方取中法--(了解)
假设关键字为1234,对它平方就是1522756,抽取中间的3位227作为哈希地址; 再比如关键字为4321,对它平方就是18671041,抽取中间的3位671(或710)作为哈希地址。
平方取中法比较适合不知道关键字的分布,而位数又不是很大的情况。
折叠法--(了解)
折叠法是将关键字从左到右分割成位数相等的几部分(最后一部分位数可以短些),然后将这 几部分叠加求和,并按散列表表长,取后几位作为散列地址。
折叠法适合事先不需要知道关键字的分布,适合关键字位数比较多的情况。
随机数法--(了解)
选择一个随机函数,取关键字的随机函数值为它的哈希地址,即H(key) = random(key),其中random为随机数函数。通常应用于关键字长度不等时采用此法。
数学分析法--(了解)
设有n个d位数,每一位可能有r种不同的符号,这r种不同的符号在各位上出现的频率不一定 相同,可能在某些位上分布比较均匀,每种符号出现的机会均等,在某些位上分布不均匀只 有某几种符号经常出现。可根据散列表的大小,选择其中各种符号分布均匀的若干位作为散列地址。例如:
假设要存储某家公司员工登记表,如果用手机号作为关键字,那么极有可能前7位都是 相同 的,那么我们可以选择后面的四位作为散列地址,如果这样的抽取工作还容易出现 冲突,还 可以对抽取出来的数字进行反转(如1234改成4321)、右环位移(如1234改成4123)、左环移 位、前两数与后两数叠加(如1234改成12+34=46)等方法。
数字分析法通常适合处理关键字位数比较大的情,如果事先知道关键字的分布且关键字的 若干位分布较均匀的情况
3.类的构建
首先构建一个哈希节点类,里面包含一个pair和一个State类型的枚举变量。
这个State枚举变量的意义在于表示当前节点pair数据的有效性,由于pair中的数据内容你是不确定的,如果你以某种形态作为失效节点则会产生误判。
比如说你决定value值为-1时,该节点的数据无效,那么问题就出现了,如果我插入节点对应的value就是-1呢?那就会发生误判,所以用一个枚举变量标识每一个位置就显得十分有效了。
枚举常量包含DELETE(被删除)、EXIST(有效数据)和EMPTY(未被插入),其中第一和第三都表示无效数据,第二表示有效数据。
哈希表类的构建就很简单了,底层是一个存储节点的vector和一个元素个数统计的变量,成员函数包括insert、find、erase,还要加上一个仿函数用于传递哈希函数。
namespace closehash
{
    enum State
    {
        DELETE,
        EXIST,
        EMPTY,
    };

    template<class K, class V>
    struct HashtableData
    {
        std::pair<K, V> _kv;
        State _state = EMPTY;
    };


    template<class K, class V, class Hash = HashFunc<K>>
    class HashTable
    {
        typedef HashtableData<K, V> Data;
    public:
        HashTable()
        :_n(0)
        {
        _table.resize(10);
            //使用resize使vector中每一个位置都是有效元素,替代capacity
        }

        bool Insert(const std::pair<K, V>& kv);

        Data* Find(const K& key);


        bool Erase(const K& key);


    private:
        std::vector<Data> _table;
        size_t _n = 0;
    };
}
4.成员函数
(1)插入函数
insert函数就是根据待插入元素的key,用哈希函数计算出该元素的存储位置在该位置进行存放。
bool insert(const std::pair<K, V>& kv)
{
    //能找到对应值就不再插入
    if (Find(kv.first))
    {
        return false;
    }

    //用负载因子检测哈希表装满的成都决定是否2倍扩容,此处负载因子为0.7
    if (_n * 10 / _table.size() >= 7)
    {
        HashTable<K, V, Hash> newhastable;
    newhastable._table.resize(_table.size() * 2);
        //映射关系变了,需要重新插入每一个元素
        for (auto& e : _table)
        {
            if (e._state == EXIST)
            {
                newhastable.Insert(e._kv);
            }
        }
        std::swap(_table ,newhastable._table);
        //交换内部变量,原来的vector出作用域自己会调用析构函数销毁
    }

    Hash hf;
    size_t hashi = hf(kv.first) % _table.size();
    //哈希函数得到的值还需要控制在table内部
    while (_table[hashi]._state == EXIST)
    {
        ++hashi;
        hashi %= _table.size();
        //向前不断找空位
    }
    _table[hashi]._kv = kv;
    _table[hashi]._state = EXIST;
    ++_n;
    return true;
}
(2)查找函数
find函数就是根据待插入元素的key,用哈希函数计算出该元素的存储位置在该位置检查数据存在与否。
Data* find(const K& key)
{
    Hash hf;
    size_t hashi = hf(key) % _table.size();
    int starti = hashi;
    while (_table[hashi]._state != EMPTY)
    {
        if (_table[hashi]._state == EXIST && _table[hashi]._kv.first == key)
        {
            return &(_table[hashi]);
        }
        ++hashi;
        hashi %= _table.size();

        //找一圈了都没有,这种可能性很小
        //有可能是位置的元素全被删除和所有位置都满了
        //第一种理论上可以出现
        //第二种根据负载因子有可能不出现
        if (starti == hashi)
        {
            return nullptr;
        }
    }
    //全是空状态
    return nullptr;
}
(3)删除函数
删除函数erase最简单,find找到就删并返回true,没找到就返回false
bool erase(const K& key)
{
    Data* ret = Find(key);
    if (ret)
    {
        ret->_state = DELETE;
        return true;
    }
    else
    {
        return false;
    }
}
三、开散列哈希表的实现
1.底层本质
闭散列哈希表这种你占我位置,我就占其他人的位置的方式对于查找数据是十分不利的。所以又出现了开散列哈希表,开散列的本质就是将vector中储存的每一个元素换成一个单链表(节省了父指针的空间),数据会头插到该位置的链表中(因为哈希表中各个元素之间是没有关系的,所以哪个在上哪个在下没有区别,尾插还需要找尾部,头插是最好的方式),哈希冲突也不需要占用他人位置。
2.类的构建
同样也是节点类和开散列哈希类,此时就不再需要枚举变量,vector存储的也变为节点的地址。
namespace openhash
{
    template<class K, class V>
    struct HashNode
    {
        HashNode(const pair<K, V> kv)
            :_kv(kv)
        , _next(nullptr)
        {}
        std::pair<K, V> _kv;
        struct hashNode* _next;
    };

    template<class K, class V>
    class Hashtable
    {
        typedef HashNode<K, V> Node;
    public:

        //查找函数
        Node* find(K& key);

        //插入函数
        bool insert(const pair<K, V>& kv);

         //删除函数
        bool erase(const K& key)
    private:
        vector<Node*> _table;
        size_t _size = 0;
    };
}
3.成员函数
(1)插入函数
先查找表中有没有key对应的节点,没有就新建一个节点插入对应位置。
由于开散列的实现是用许多链表储存元素的,所以负载因子可以扩大,我这里取1
扩容一定是异地扩容,重新插入元素。
//插入函数
bool insert(const std::pair<K, V>& kv)
{
    if (find(kv.first))
    {
        return false;
    }
    //当足够满时扩容
    if (_table.size() == _size)//负载因子为1
    {
        //异地扩容,开一个新的vector
        vector<Node*> newtable;

        newtable.resize(_size * 2, nullptr);//每次二倍扩容
        Hash hf;
        for (size_t i = 0; i < _table.size(); ++i)
        {
            Node* cur = _table[i];
            while (cur)
            {
                //构造新节点插入新表
                Node* newnode = new Node(cur->_kv);
                size_t hashi = hf(newnode->_kv.first) % newtable.size();
                //size_t hashi = Hash()(newnode->_kv.first) % newtable.size();//匿名对象的写法
                newnode->_next = newtable[hashi];
                newtable[hashi] = newnode;
                //迭代
                cur = cur->_next;
            }
        }
        _table.swap(newtable);
    }
    //插入元素
    Node* newnode = new Node(kv);
    size_t hashi = Hash()(newnode->_kv.first) % _table.size();//匿名对象
    newnode->_next = _table[hashi];
    _table[hashi] = newnode;
    ++_size;
}
(2)查找函数
用户传递key,find通过哈希函数映射到对应链表,在链表中寻找即可
//查找函数
Node* find(const K& key)
{
    //防止后续除零错误
    if (_size == 0)
        return false;
    Hash hf;
    size_t hashi = hf(key) % _table.size();
    Node* cur = _table[hashi];
    while (cur)
    {
        if (cur->_kv.first == key)//找到了返回该节点
        {
            return cur;
        }
        cur = cur->_next;//没找到接着往下找
    }
    return nullptr;
}
(3)删除函数
使用find的思想,在链表中查找时增加一个上一个节点的指针用于链接,而且要分为头删和非头删两种情况。
//删除函数
bool erase(const K& key)
{
    //防止后续除零错误
    if (_size == 0)
        return false;
    Hash hf;
    size_t hashi = hf(key) % _table.size();
    Node* cur = _table[hashi];
    Node* prev = nullptr;
    while (cur)
    {
        if (cur->_kv.first == key)//找到了该节点
        {
            if (prev)//非头删
            {
                prev->_next = cur->_next;
                delete cur;
            }
            else//头删
            {
                _table[hashi] = cur->_next;
                delete cur;
            }
            --_size;
            return true;
        }
        prev = cur;
        cur = cur->_next;//没找到接着往下找
    }
    return false;//走到空了都找不到就是没有
}
(4)构造函数析和构函数
构造函数主要确定我们初始vector可储存的链表个数。
闭散列的析构函数直接使用vector和各节点的析构函数即可,开散列的vector可以使用vector的析构,而vector中的每一个链表就需要我们手动释放了。
HashTable()
    :_size(0)
{
    _table.resize(10, nullptr);//起始vector容量为10

}

~HashTable()
{
    for (int i = 0; i < _table.size(); ++i)
    {
        Node* cur = _table[i];
        while (cur)
        {
            Node* next = cur->_next;
            cur->_next = nullptr;
            delete cur;
            cur = next;
        }
    _table[i] = nullptr;
    }
}
(5)两种扩容方式
在上面的insert函数中,我们vector每次扩容都是从10开始,每次扩大两倍。
而在STL中,unordered_map和unordered_set会使用一系列接近二倍的奇数作为容量的大小。
上面的这种方式需要一个函数:
//由于哈希表定值使用对容器容量取余的方式,所以选用一组间隔数据接近2倍的质数就可以有效减少哈希冲突
//STL中也是使用这一样的方式
inline unsigned long __stl_next_prime(unsigned long n)
{
    static const int __stl_num_primes = 28;
    static const unsigned long __stl_prime_list[__stl_num_primes] =
    {
        53, 97, 193, 389, 769,
        1543, 3079, 6151, 12289, 24593,
        49157, 98317, 196613, 393241, 786433,
        1572869, 3145739, 6291469, 12582917, 25165843,
        50331653, 100663319, 201326611, 402653189, 805306457,
        1610612741, 3221225473, 4294967291
    };

    for (int i = 0; i < __stl_num_primes; ++i)
    {
        if (__stl_prime_list[i] > n)
        {
            return __stl_prime_list[i];
        }
    }

    return __stl_prime_list[__stl_num_primes - 1];
}
然后同时修改插入和构造函数。
//构造函数
HashTable()
    :_size(0)
{
    _table.resize(__stl_next_prime(0), nullptr);//容量按质数列控制
}

//插入函数
bool insert(const std::pair<K, V>& kv)
{
    if (find(kv.first))
    {
        return false;
    }
    //当足够满时扩容
    if (_table.size() == _size)//负载因子为1
    {
        //异地扩容,开一个新的vector
        vector<Node*> newtable;

        newtable.resize(__stl_next_prime(_table.size()), nullptr);//这里不再是二倍扩容


        Hash hf;
        for (size_t i = 0; i < _table.size(); ++i)
        {
            Node* cur = _table[i];
            while (cur)
            {
                //构造新节点插入新表
                Node* newnode = new Node(cur->_kv);
                size_t hashi = hf(newnode->_kv.first) % newtable.size();
                //size_t hashi = Hash()(newnode->_kv.first) % newtable.size();//匿名对象的写法
                newnode->_next = newtable[hashi];
                newtable[hashi] = newnode;
                //迭代
                cur = cur->_next;
            }
        }
        _table.swap(newtable);
    }
    //插入元素
    Node* newnode = new Node(kv);
    size_t hashi = Hash()(newnode->_kv.first) % _table.size();//匿名对象
    newnode->_next = _table[hashi];
    _table[hashi] = newnode;
    ++_size;
}
4.测试代码
开散列闭散列都适用,数据也可以改
#include<iostream>
#include"Hashtable.h"
#include<stdlib.h>
#include<time.h>
using namespace openhash;
using namespace std;

#define NUM 1000

int main()
{
    srand(time(nullptr));
    HashTable<int, int> t1;
    int arr[] = { 1, 4, 15, 22, 27, 13, 17, 24, 33, 7, 9, 2, 3, 6, 77, 121, 83, 59 };
    for (auto e : arr)
    {
        t1.insert(make_pair(e, e));
    }

    HashTable<int, int> t2;
    for (int i = 0; i < NUM; ++i)
    {
        int num = rand();
        t2.insert(make_pair(num * 5, num));
    }
    vector<int> v;

    cout << t1.find(1) << endl;
    cout << t1.find(24) << endl;
    cout << t1.find(28) << endl;
    cout << t1.find(3) << endl;

    cout << t1.find(1) << endl;
    cout << t1.erase(1) << endl;
    cout << t1.find(1) << endl;

    cout << t1.find(17) << endl;
    cout << t1.erase(17) << endl;
    cout << t1.erase(32) << endl;
    cout << t1.find(17) << endl;

    return 0;
}
四、哈希类的改造
1.对Node进行改造
我们原来插入的元素都是pair,把它改为T,成员变量_kv改为_data。
当然,下面的class HashTable中的内容也要改,value的类型改为T,加了一个KeyOf用于根据T找到它对应的Key(你只储存data,也就是value,所以缺乏一个获取Key的方式)
内部的函数也需要修改并增加begin()和end()
namespace openhash
{
    template<class T>
    struct HashNode
    {
        HashNode(const T& data)
            :_data(data)
            , _next(nullptr)
        {}
        T _data;
        struct HashNode* _next;
    };

    template<class K, class T, class Hash, class KeyofT>
    class HashTable
    {
    public:
        typedef HashNode<T> Node;
    private:
        std::vector<Node*> _table;
        size_t _size = 0;
    };
}
2.增加迭代器
新建一个迭代器类,用Ref和Ptr两个模板类型规定iterator和const_iterator
迭代器内部储存一个Node*指针和一个哈希表对象指针,迭代器的++按照vector从小下标到大下标,每个下标的链表从头到尾依次遍历。
template<class K, class T, class Hash, class KeyofT>
class HashTable;//声明

    template<class K, class T, class Ref, class Ptr, class Hash ,class KeyofT>
    struct __iterator
    {
        typedef HashNode<T> Node;
        typedef __iterator<K, T, Ref, Ptr, Hash, KeyofT> Self;
        typedef HashTable<K, T, Hash, KeyofT> HT;
        __iterator(Node* node, HT* ht)
            :_node(node)
            , _ht(ht)
        {}

        Node* _node;
        HT* _ht;

        Ref operator*()
        {
            return _node->_data;
        }

        Ptr operator->()
        {
            return &(_node->_data);
        }

        bool operator!=(const Self& s) const
        {
            return s._node != _node;
        }

        bool operator==(const Self& s) const
        {
            return s._node == _node;
        }

        Self& operator++()
        {
            if (_node->_next)
            {
                _node = _node->_next;
            }
            else
            {
                Hash hf;
                KeyofT kot;
                size_t hashi = hf(kot(_node->_data)) % _ht->_table.size();
                ++hashi;
                while (hashi < _ht->_table.size())
                {
                    if (_ht->_table[hashi])
                    {
                        _node = _ht->_table[hashi];
                        break;
                    }
                    else
                    {
                        ++hashi;
                    }
                }
                //后面没有桶了
                if (hashi == _ht->_table.size())
                    _node = nullptr;
            }
            return *this;
        }
    };
3.unordered_set和unordered_map的封装
修改后的hashtable.h是这样的:
#pragma once
#include<vector>

template<class K>
struct HashFunc
{
    size_t operator()(const K& key)
    {
        return (size_t)key;
    }
};

//对string进行特化
template<>
struct HashFunc<std::string>
{
    size_t operator()(const std::string& key)
    {
        size_t hash = 0;
        for (auto ch : key)
        {
            hash *= 131;
            hash += ch;
        }
        return hash;
    }
};

namespace openhash
{
    template<class T>
    struct HashNode
    {
        HashNode(const T& data)
            :_data(data)
            , _next(nullptr)
        {}
        T _data;
        struct HashNode* _next;
    };

    template<class K, class T, class Hash, class KeyofT>
    class HashTable;

    template<class K, class T, class Ref, class Ptr, class Hash ,class KeyofT>
    struct __iterator
    {
        typedef HashNode<T> Node;
        typedef __iterator<K, T, Ref, Ptr, Hash, KeyofT> Self;
        typedef HashTable<K, T, Hash, KeyofT> HT;
        __iterator(Node* node, HT* ht)
            :_node(node)
            , _ht(ht)
        {}

        Node* _node;
        HT* _ht;

        Ref operator*()
        {
            return _node->_data;
        }

        Ptr operator->()
        {
            return &(_node->_data);
        }

        bool operator!=(const Self& s) const
        {
            return s._node != _node;
        }

        bool operator==(const Self& s) const
        {
            return s._node == _node;
        }

        Self& operator++()
        {
            if (_node->_next)
            {
                _node = _node->_next;
            }
            else
            {
                Hash hf;
                KeyofT kot;
                size_t hashi = hf(kot(_node->_data)) % _ht->_table.size();
                ++hashi;
                while (hashi < _ht->_table.size())
                {
                    if (_ht->_table[hashi])
                    {
                        _node = _ht->_table[hashi];
                        break;
                    }
                    else
                    {
                        ++hashi;
                    }
                }
                //后面没有桶了
                if (hashi == _ht->_table.size())
                    _node = nullptr;
            }
            return *this;
        }
    };

    template<class K, class T, class Hash, class KeyofT>
    class HashTable
    {
    public:
        typedef HashNode<T> Node;
        template<class K, class T, class Ref, class Ptr, class Hash, class KeyofT>
        friend struct __iterator;
        typedef __iterator<K, T, T&, T*, Hash, KeyofT> iterator;
        typedef __iterator<K, T, const T&, const T*, Hash, KeyofT> const_iterator;

        iterator begin()
        {
            for (size_t i = 0; i < _table.size(); ++i)
            {
                if (_table[i])
                {
                    return iterator(_table[i], this);
                }
            }

            return iterator(nullptr, this);
        }

        iterator end()
        {
            return iterator(nullptr, this);
        }

        const_iterator begin() const
        {
            size_t i = 0;
            while (i < _table.size())
            {
                if (_table[i])
                    return const_iterator(_table[i], this);
                else
                    ++i;
            }
            return const_iterator(nullptr, this);
        }

        const_iterator end() const
        {
            return const_iterator(nullptr, this);
        }

        HashTable()
            :_size(0)
        {
            _table.resize(__stl_next_prime(0), nullptr);//容量按质数列控制
        }

        ~HashTable()
        {
            for (int i = 0; i < _table.size(); ++i)
            {
                Node* cur = _table[i];
                while (cur)
                {
                    Node* next = cur->_next;
                    cur->_next = nullptr;
                    delete cur;
                    cur = next;
                }
                _table[i] = nullptr;
            }
        }


        //查找函数
        iterator find(const K& key)
        {
            //防止后续除零错误
            if (_size == 0)
                return end();
            Hash hf;
            KeyofT kot;
            size_t hashi = hf(key) % _table.size();
            Node* cur = _table[hashi];
            while (cur)
            {
                if (kot(cur->_data) == key)//找到了返回该节点
                {
                    return iterator(cur, this);
                }
                cur = cur->_next;//没找到接着往下找
            }
            return end();
        }

        //插入函数
        std::pair<iterator, bool> insert(const T& data)
        {
            KeyofT kot;
            iterator it = find(kot(data));
            if (it != end())
                return std::make_pair(it, false);
            //当足够满时扩容
            if (_table.size() == _size)//负载因子为1
            {
                //异地扩容,开一个新的vector
                std::vector<Node*> newtable;
                newtable.resize(__stl_next_prime(_table.size()), nullptr);
                Hash hf;
                for (size_t i = 0; i < _table.size(); ++i)
                {
                    Node* cur = _table[i];
                    while (cur)
                    {
                        //构造新节点插入新表
                        Node* newnode = new Node(cur->_data);
                        size_t hashi = hf(kot(newnode->_data)) % newtable.size();
                        newnode->_next = newtable[hashi];
                        newtable[hashi] = newnode;
                        cur = cur->_next;
                    }
                    _table[i] = nullptr;
                }
                _table.swap(newtable);
            }
            //插入元素
            Node* newnode = new Node(data);
            size_t hashi = Hash()(kot(newnode->_data)) % _table.size();
            newnode->_next = _table[hashi];
            _table[hashi] = newnode;
            ++_size;
            return std::make_pair(iterator(newnode, this), true);
        }

        //删除函数
        bool erase(const K& key)
        {
            //防止后续除零错误
            if (_size == 0)
                return false;
            Hash hf;
            KeyofT kot;
            size_t hashi = hf(key) % _table.size();
            Node* cur = _table[hashi];
            Node* prev = nullptr;
            while (cur)
            {
                if (kot(cur->_data) == key)//找到了该节点
                {
                    if (prev)
                    {
                        prev->_next = cur->_next;
                    }
                    else
                    {
                        _table[hashi] = cur->_next;
                    }
                    delete cur;
                    --_size;
                    return true;
                }
                prev = cur;
                cur = cur->_next;//没找到接着往下找
            }
            return false;
        }

        //由于哈希表定值使用对容器容量取余的方式,所以选用一组间隔数据接近2倍的质数就可以有效减少哈希冲突
        //STL中也是使用这一样的方式
        inline unsigned long __stl_next_prime(unsigned long n)
        {
            static const int __stl_num_primes = 28;
            static const unsigned long __stl_prime_list[__stl_num_primes] =
            {
                53, 97, 193, 389, 769,
                1543, 3079, 6151, 12289, 24593,
                49157, 98317, 196613, 393241, 786433,
                1572869, 3145739, 6291469, 12582917, 25165843,
                50331653, 100663319, 201326611, 402653189, 805306457,
                1610612741, 3221225473, 4294967291
            };

            for (int i = 0; i < __stl_num_primes; ++i)
            {
                if (__stl_prime_list[i] > n)
                {
                    return __stl_prime_list[i];
                }
            }

            return __stl_prime_list[__stl_num_primes - 1];
        }

    private:
        std::vector<Node*> _table;
        size_t _size = 0;
    };
}
随后建立unordered_set.h和unordered_map.h
unordered_set.h
unordered_set底层是HashTable _ht;
#include"Hashtable.h"
using namespace openhash;

template<class K, class Hash = HashFunc<K>>
class unordered_set
{
    struct SetKeyOfT
    {
        const K& operator()(const K& key)
        {
            return key;
        }
    };

public:
    typedef typename HashTable<K, K, Hash, SetKeyOfT>::iterator iterator;
    typedef typename HashTable<K, K, Hash, SetKeyOfT>::const_iterator const_iterator;

    iterator begin()
    {
        return _ht.begin();
    }

    iterator end()
    {
        return _ht.end();
    }

    const_iterator begin() const
    {
        return _ht.begin();
    }

    const_iterator end() const
    {
        return _ht.end();
    }

    iterator find(const K& key)
    {
        return _ht.find(key);
    }

    std::pair<iterator, bool> insert(const K& key)
    {
        return _ht.insert(key);
    }

    bool erase(const K& key)
    {
        return _ht.erase(key);
    }
private:
    HashTable<K, K, Hash, SetKeyOfT> _ht;
};
unordered_map.h
unordered_map底层是HashTable, Hash, MapKeyOfT> _ht;
#include"Hashtable.h"
using namespace openhash;


template<class K, class V, class Hash = HashFunc<K>>
class unordered_map
{
    struct MapKeyOfT
    {
        const K& operator()(const std::pair<const K, V>& kv)
        {
            return kv.first;
        }
    };

public:

    typedef typename HashTable<K, std::pair<const K, V>, Hash, MapKeyOfT>::iterator iterator;

    iterator begin()
    {
        return _ht.begin();
    }

        iterator end()
        {
            return _ht.end();
        }

        std::pair<iterator, bool> insert(const std::pair<K, V>& data)
        {
            return _ht.insert(data);
        }

        iterator find(const K& key)
        {
            return _ht.find(key);
        }

        bool erase(const K& key)
        {
            return _ht.erase(key);
        }

        V& operator[](const K& key)
        {
            pair<iterator, bool> ret = _ht.Insert(make_pair(key, V()));
            return ret.first->second;
        }

    private:
        HashTable<K, std::pair<const K, V>, Hash, MapKeyOfT> _ht;
};
此时封装就完成了。
4.测试代码
#include<iostream>
#include"unordered_map.h"
#include"unordered_set.h"
using namespace std;

int main()
{
    unordered_map<int, int> m;
    int arr[] = { 4, 6, 9, 12, 23, 35, 22, 18, 37, 40, 47 };
    for (auto e : arr)
    {
        m.insert(make_pair(e, 2 * e));
    }
    for (auto e : m)
    {
        cout << e.second << " ";
    }
    cout << endl;
    if (m.find(4) == m.end())
        cout << 0 << " ";
    else
        cout << 1 << " ";
    cout << m.erase(4) << ' ';
    if (m.find(4) == m.end())
        cout << 0 << " ";
    else
        cout << 1 << " ";
    cout << m.erase(1) << ' ' << endl;

    unordered_set<int> s;
    for (auto e : arr)
    {
        s.insert(e);
    }
    for (auto e : s)
    {
        cout << e << " ";
    }
    cout << endl;
    if (s.find(4) == s.end())
        cout << 0 << " ";
    else
        cout << 1 << " ";
    cout << s.erase(4) << ' ';
    if (s.find(4) == s.end())
        cout << 0 << " ";
    else
        cout << 1 << " ";
    cout << s.erase(1) << ' ' << endl;

    return 0;
}
五、位图
1.一道面试题
这是一道腾讯的面试题:
给40亿个不重复的无符号整数,没排过序。给一个无符号整数,如何快速判断一个数是否在这40亿个数中。
如果使用哈希表逐个插入再查找的话,我们不妨计算一下。
40亿个元素就有40亿(4*10^9)个节点,32位系统每个节点是八字节,总共是3.2*10^10个字节,再加上vector里接近43亿个指针,又是四个字节,加起来的空间大概在十多GB,而如果我们换成位图它的空间占用回压缩到几百MB,数据的查找会变得十分高效。
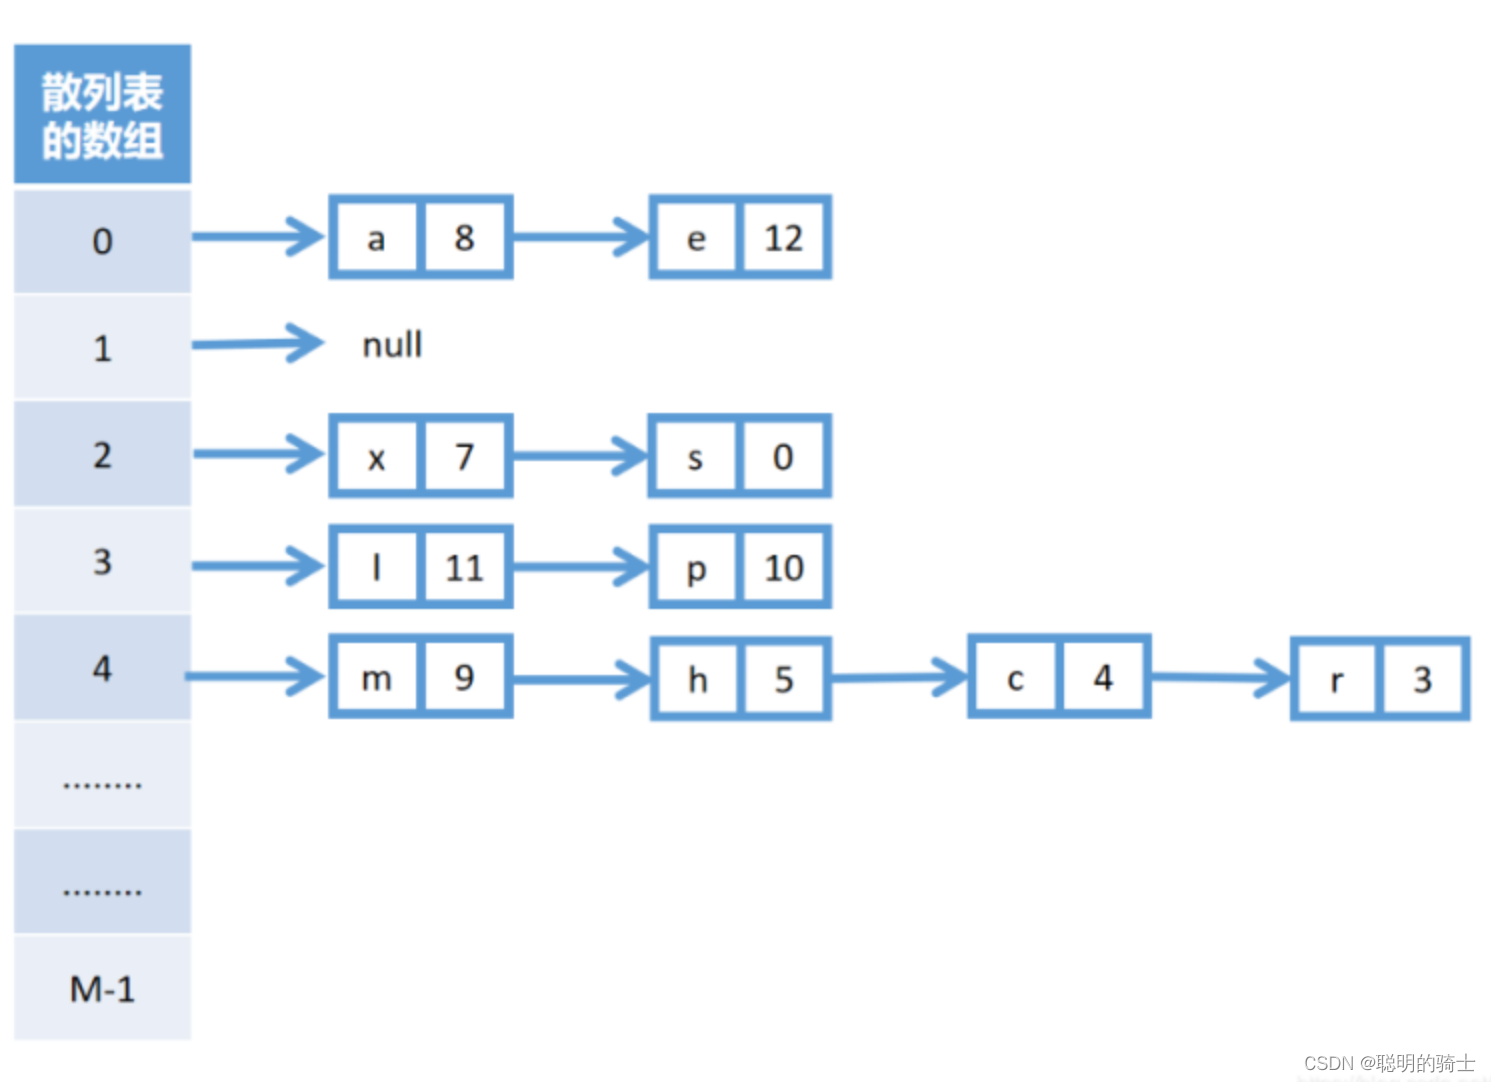
位图的大致结构如下:

它的底层是一个vector,一个char有8个比特位,对应比特位为1表示一个数字存在,为0则不存在。
这里使用的也是哈希的思想,比特位与数字一一对应,我们如果插入一个数字(这个数字就是key),先将该数字对8取余,然后从最后一位向前挪余数次就找到了对应位置,查看它是0还是1(0或者1就是value),这样的映射也是一种哈希函数不过我们不再单独写一个函数了。
2.位图的实现
#include<vector>
namespace bit
{
    template<size_t N>//非类型模板参数
    class bitset
    {
    public:
        //默认构造
        bitset()
        {
            //_bits.resize(N / 8 + 1, 0);
            _bits.resize((N >> 3) + 1, 0);
            //向右移动三位表示将比特位为1、2、4的部分去掉
            //这三位的内容一定不大于8,所以得到的自然是除8得到的结果
        }

        //添加元素
        void set(size_t x)
        {
            size_t i = x >> 3;
            size_t j = x % 8;

            _bits[i] |= (1 << j);
        }

        //清除元素
        void reset(size_t x)
        {
            size_t i = x >> 3;
            size_t j = x % 8;

            _bits[i] &= (~(1 << j));
        }

        //查看该元素是否在表中
        bool test(size_t x)
        {
            size_t i = x >> 3;
            size_t j = x % 8;
            return _bits[i] & (1 << j);

        }
    private:
        std::vector<char> _bits;
    };
}
测试代码:
#include<iostream>
#include<stdlib.h>
#include<time.h>
#include"bitset.h"

using namespace std;

using namespace bit;
int main()
{
    bitset<-1> bs;
    //非类型模板参数为无符号数,-1即为最大值,也可以写0xffffffff
    int arr[] = { 8000, 3000, 5000, 6500, 100010, 114514, 1919, 810 };
    for (auto e : arr)
    {
        bs.set(e);
    }
    cout << bs.test(8000) << " ";
    bs.reset(8000);
    cout << bs.test(8000) << " ";
    bs.reset(6500);
    cout << bs.test(114514) << endl;

    return 0;
}
六、布隆过滤器
1.布隆过滤器的概念
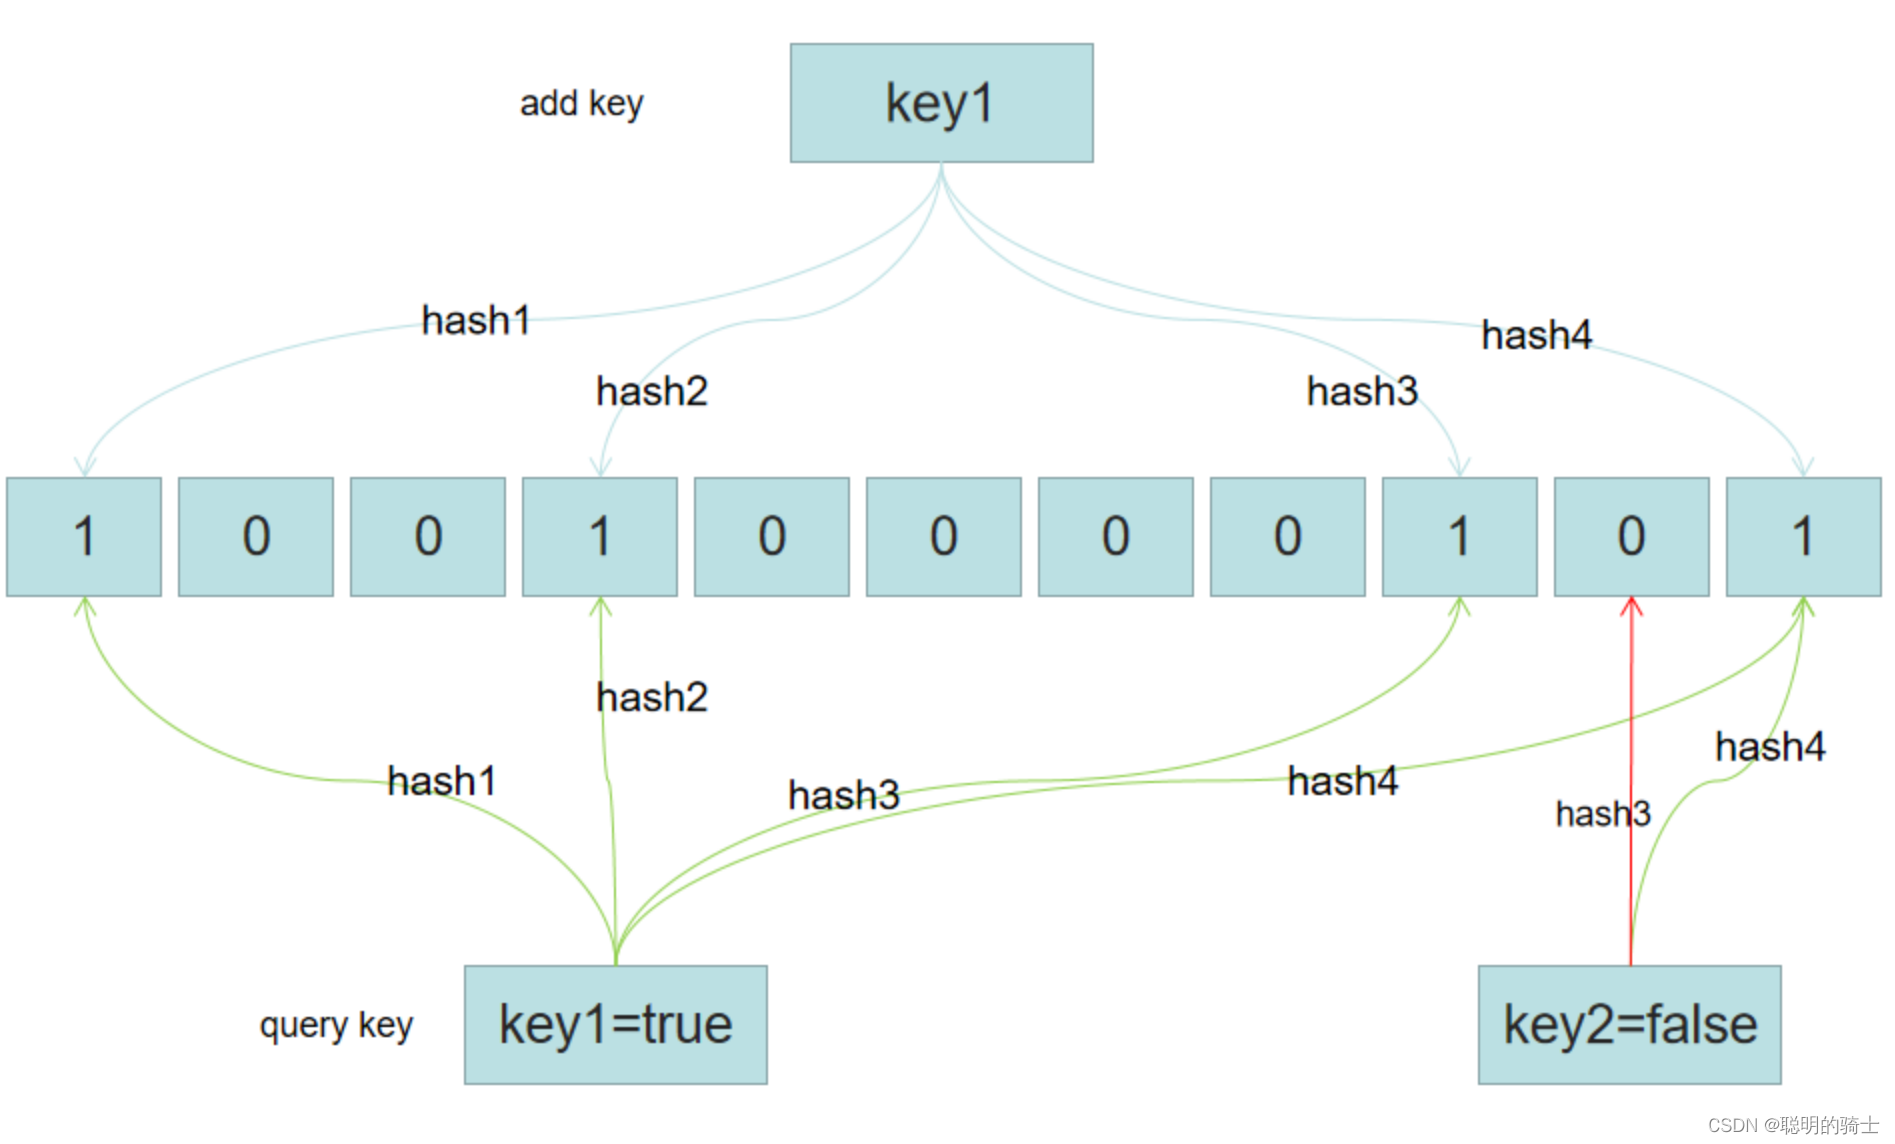
布隆过滤器是基于位图的一种数据结构,我们之前只是用一种哈希函数来处理位图key和value的映射关系,而在布隆过滤器中我们会使用四种甚至更多的哈希函数来映射多个位置,在位图中只有该key映射到的每一个位置都为1才能表明这个数据在过滤器中,有1个为0都不行。
2.布隆过滤器的实现
#include<bitset>
#include<string>
namespace BF
{
    struct BKDRHash
    {
        size_t operator()(const std::string& key)
        {
            size_t hash = 0;
            for (auto ch : key)
            {
                hash *= 131;
                hash += ch;
            }
            return hash;
        }
    };

    struct APHash
    {
        size_t operator()(const std::string& key)
        {
            unsigned int hash = 0;
            int i = 0;

            for (auto ch : key)
            {
                if ((i & 1) == 0)
                {
                    hash ^= ((hash << 7) ^ (ch) ^ (hash >> 3));
                }
                else
                {
                    hash ^= (~((hash << 11) ^ (ch) ^ (hash >> 5)));
                }

                ++i;
            }

            return hash;
        }
    };

    struct DJBHash
    {
        size_t operator()(const std::string& key)
        {
            unsigned int hash = 5381;

            for (auto ch : key)
            {
                hash += (hash << 5) + ch;
            }

            return hash;
        }
    };

    struct JSHash
    {
        size_t operator()(const std::string& s)
        {
            size_t hash = 1315423911;
            for (auto ch : s)
            {
                hash ^= ((hash << 5) + ch + (hash >> 2));
            }
            return hash;
        }
    };

    template<size_t N, size_t X = 4, class K = string,
    class HashFunc1 = BKDRHash, class HashFunc2 = APHash,
    class HashFunc3 = DJBHash, class HashFunc4 = JSHash>
    class BloomFilter
    {
    public:
        void set(const K& key)
        {
            size_t hash1 = HashFunc1()(key) % (N*X);
            size_t hash2 = HashFunc2()(key) % (N*X);
            size_t hash3 = HashFunc3()(key) % (N*X);
            size_t hash4 = HashFunc4()(key) % (N*X);

            _bs.set(hash1);
            _bs.set(hash2);
            _bs.set(hash3);
            _bs.set(hash4);
        }

        bool test(const K& key)
        {
            size_t hash1 = HashFunc1()(key) % (N*X);
            if (!_bs.test(hash1))
            {
                return false;
            }

            size_t hash2 = HashFunc2()(key) % (N*X);
            if (!_bs.test(hash2))
            {
                return false;
            }

            size_t hash3 = HashFunc3()(key) % (N*X);
            if (!_bs.test(hash3))
            {
                return false;
            }

            size_t hash4 = HashFunc4()(key) % (N*X);
            if (!_bs.test(hash4))
            {
                return false;
            }

            // 前面判断不在都是准确,不存在误判
            return true; // 可能存在误判,映射几个位置都冲突,就会误判
        }

    private:
        std::bitset<N*X> _bs;
    };
}
下面是测试代码,测试数据被误判的概率(当前布隆过滤器中没有,但检测结果为存在):
#include<iostream>
#include<stdlib.h>
#include<time.h>

#include"BloomFilter.h"
using namespace std;

using namespace BF;
int main()
{
    string str[] = { "天津", "河北", "武清", "南开", "天津1",
        "1天津", "天1津", "天11津", "1天津1" };

    BloomFilter<100> bf1;
    for (auto& e : str)
    {
        bf1.set(e);
    }

    for (auto& s : str)
    {
        cout << bf1.test(s) << endl;
    }
    cout << endl;
    /
    //相似字符的误判率
    srand(time(0));
    const size_t N = 10000;
    BloomFilter<N> bf2;

    std::vector<std::string> v1;
    std::string url = "https://legacy.cplusplus.com/reference/functional/hash/?kw=hash";

    for (size_t i = 0; i < N; ++i)
    {
        v1.push_back(url + std::to_string(i));//v1存储上面网址的字符串加上一些随机数字
    }
    for (auto& str : v1)
    {
        bf2.set(str);//设置进布隆过滤器
    }

    //v2和v1一样,存储上面网址的字符串加上一些随机数字,但是随机数不一样,导致储存的内容相近但不相同
    std::vector<std::string> v2;
    for (size_t i = 0; i < N; ++i)
    {
        std::string url = "https://legacy.cplusplus.com/reference/functional/hash/?kw=hash";
        url += std::to_string(999999 + i);//略微加一些变化,它们生成的元素与v1的元素大概率不相同
        v2.push_back(url);
    }

    size_t n2 = 0;
    for (auto& str : v2)
    {
        if (bf2.test(str))//v2元素在v1中找到,正常条件下不应该找到
        {
            ++n2;
        }
    }
    cout << "相似字符串误判率:" << (double)n2 / (double)N << endl;

    // 不相似字符串的误判率
    std::vector<std::string> v3;
    for (size_t i = 0; i < N; ++i)
    {
        string url = "https://www.lonelyplanet.com/china/tianjin";
        url += std::to_string(i + rand());
        v3.push_back(url);
    }

    size_t n3 = 0;
    for (auto& str : v3)
    {
        if (bf2.test(str))
        {
            ++n3;
        }
    }
    cout << "不相似字符串误判率:" << (double)n3 / (double)N << endl;
    return 0;
}
3.误报率
因为哈希冲突不可能消除,所以误报的情况一定存在,布隆过滤器的大小与使用的哈希函数个数都对误报率有影响。
过小的布隆过滤器很快所有的比特位都变为1,那么查询任何值都会返回存在,起不到过滤的效果了。一般而言,布隆过滤器越长其误报率越小。
哈希函数的个数也需要权衡,个数越多则布隆过滤器比特位变1的速度越快,且布隆过滤器的效率越低;但是如果太少的话,那我们的误报率又会变高。
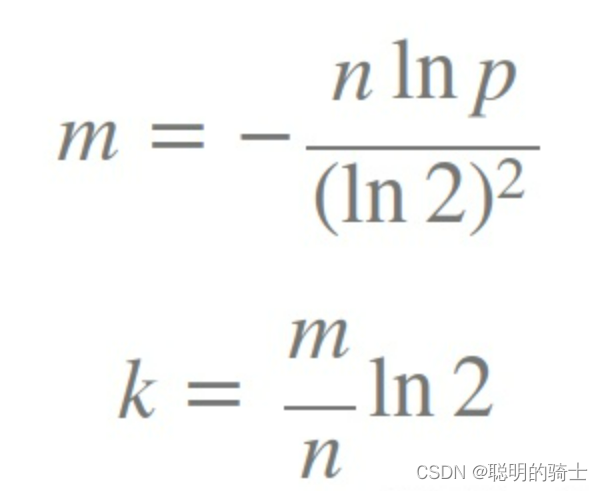
下面有一张图:

适合的哈希函数个数、过滤器长度、插入元素个数和误报率有以下关系,可以根据计算得到
总之,布隆过滤器的长度和哈希函数的数目都会影响布隆过滤器的误报率,我们需要根据实际情况,保证二者处于适应该场景的状态中。