一、介绍
在日常业务开发过程中,我们有好多资源位悬浮在页面上,特别是电商以及促销页面,有些公司恨不得把整个页面像叠汉堡一样,一层一层加内容,目的是想让更多的人通过他们的资源来完成更便捷的操作。
但是资源是会覆盖到正常的内容,如果页面在静止的时候,资源悬停下来,滑动的时候隐藏起来,这样可以最大程度让滑动过程内容完全被消费者查阅。
二、分析
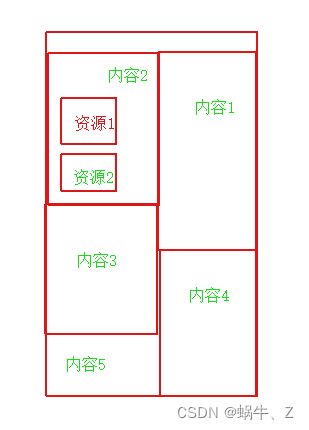
常见的有recycleview或者webview,都是viewGroup。我们只需要监听到页面滑动,但是不是所有的页面都知道滑动监听。或者能够拿到正确的滑动状态。
但是所有的view都有一个方法:
    public void setOnScrollChangeListener(OnScrollChangeListener l) {
        getListenerInfo().mOnScrollChangeListener = l;
    }
public interface OnScrollChangeListener {
/**
* Called when the scroll position of a view changes.
*
* @param v The view whose scroll position has changed.
* @param scrollX Current horizontal scroll origin.
* @param scrollY Current vertical scroll origin.
* @param oldScrollX Previous horizontal scroll origin.
* @param oldScrollY Previous vertical scroll origin.
*/
void onScrollChange(View v, int scrollX, int scrollY, int oldScrollX, int oldScrollY);
}这个是view提供的。不管是view还是viewGroup。
我们可以通过监听view在window的坐标的变化,来判断当前view是否滚动。
三、解决方案
通过分析,我们可以通过监听view来模拟滑动监听。正常滑动回调的时机在150毫秒之间是可以完成的,我们可以通过计时器来获取滑动最后一次时间与当前的时间做对比,这样可以根据业务去调整滑动与停止的时间差。
滑动监听
Demo:
class CountFlinerStatus {


    private  var time: Timer?=null

    private lateinit var scrollListener: ScrollStateCallback
    private var taskTime: Long = 0
    public fun scroll(scrollY: Int) {
        taskTime = System.currentTimeMillis()
        scrollListener?.let {
            it.onScrollState(true)
        }
        startTask()
    }

    public fun addScrollListener(scrollListener: ScrollStateCallback) {

        this.scrollListener=scrollListener
    }

    private fun startTask() {
        if (time == null) {
            time = Timer()
            time?.schedule(object : TimerTask() {
                override fun run() {

                    val newTime = System.currentTimeMillis()
                    if (newTime - taskTime > 200) {
                        //已停止

                        scrollListener?.let {
                            it.onScrollState(false)
                        }
                        cancelTask()
                    } else {
                        //还在滑动
                        scrollListener?.let {
                            it.onScrollState(true)
                        }
                    }

                }
            }, 1000,200)

        }

    }

    private fun cancelTask() {
        if (time != null) {
            time?.cancel();
            time = null;
        }
    }


    public interface ScrollStateCallback {
        public fun onScrollState(flying: Boolean)
    }

}
动画:
动画是根据滑动回调进行执行,这里面要记住view的起始位置(x或者y)
class FlingerAnmationManager {

    companion object {

        val startMillTime: Long = 600

        fun startToLeft(image: View) {


            var with = image.measuredWidth

            val animator = ObjectAnimator()
            animator.setPropertyName("X");
            animator.setFloatValues(-(with * 0.5f))

            animator.setDuration(startMillTime)
            val action = AnimatorSet()
            action.play(animator)
            action.setTarget(image)

            action.start()

        }

        fun startToRight(image: View) {


            var with = image.measuredWidth

            val animator = ObjectAnimator()
            animator.setPropertyName("X");
            val disWidth = image.context.resources.displayMetrics.widthPixels
            animator.setFloatValues(disWidth - (with * 0.5f))

            animator.setDuration(startMillTime)
            val action = AnimatorSet()
            action.play(animator)
            action.setTarget(image)
            action.addListener(object : AnimatorListenerAdapter() {
                override fun onAnimationEnd(animation: Animator) {
                    super.onAnimationEnd(animation)


                }

                override fun onAnimationStart(animation: Animator) {
                    super.onAnimationStart(animation)

                }
            })
            action.start()

        }

        fun reBackLocation(image: View) {

            var mleft = if (image.tag != null) image.tag as Float else image.marginLeft
            val animator = ObjectAnimator()
            animator.setPropertyName("X");
            animator.setFloatValues(mleft?.toFloat())
            animator.setDuration(startMillTime)

            val action = AnimatorSet()
            action.play(animator)
            action.setTarget(image)


            action.start()
        }


    }
}
实战
第一步:
初始化滑动监听
            manager = CountFlinerStatusManager()
            manager.addScrollListener(object : ScrollStateCallback {
                override fun onScrollState(flying: Boolean) {
                    if (!isAdded) return
                    runOnUiThread {
                        if (flying) {
                           onChildTouch(MotionEvent.ACTION_MOVE)
                        } else {
                            onChildTouch(MotionEvent.ACTION_UP)
                        }
                    }
                }
            })
第二步:
监听view滑动
contentView.setOnScrollChangeListener(object : View.OnScrollChangeListener {
    override fun onScrollChange(
        v: View?,
        scrollX: Int,
        scrollY: Int,
        oldScrollX: Int,
        oldScrollY: Int
    ) {

        if (oldScrollY == 0 && contentRv.contentView.scrollState == 0)
            return
        manager.scroll(scrollY)
    }
})
第三步:
处理滑动事件,在处理滑动之前,一定先记下view的坐标,否则在执行动画会出错
        view.postDelayed(object : Runnable {
            override fun run() {
                view.tag = view.x
            }
        }, 500)
处理动画
var viewFling :Boolean=false
    @Synchronized
    fun onChildTouch(action: Int) {

        when (action) {
            MotionEvent.ACTION_MOVE -> {
                if (viewFling == false) {
                    viewFling = true
                    FlingerAnmationManager.startToRight(view)
                }
            }
            MotionEvent.ACTION_UP -> {
                if (viewFling) {
                    viewFling = false
                    FlingerAnmationManager.reBackLocation(view)
                }
            }
        }

    }
四、总结
通过以上分析加实战,我们已完成处理好了资源滑动监听+动画。
这里核心:自定义自己的滑动监听机制,这个实现了,基本已成功了一半,剩下的就是动画的调试。
动画一定要先记住view的默认坐标,否则你讲无法恢复到起始位置。
