一、Qt 插件机制
.1 Qt 插件简介
插件是一种遵循一定规范的应用程序接口编写出来的程序,定位于开发实现应用软件平台不具备的功能的程序。插件与宿主程序之间通过接口联系,就像硬件插卡一样,可以被随时删除,插入和修改,所以结构很灵活,容易修改,方便软件的升级和维护。Qt 提供了两种API用于创建插件:一种是高阶 API,用于扩展 Qt 本身的功能,如自定义数据库驱动,图像格式,文本编码,自定义样式等;一种是低阶 API,用于扩展 Qt 应用程序。本文主要是通过低阶 API 来创建 Qt 插件,并通过静态、动态两种方式来调用插件。(以下都是 Qt5 的插件开发方式)
1.2 Qt 插件开发的流程
- 定义一个接口集(只有纯虚函数的类)。
- 用宏Q_DECLARE_INTERFACE()将该接口告诉 Qt 元对象系统
- 声明插件类,插件类继承自 QObject 和插件实现的接口
- 用宏Q_INTERFACES()将插件接口告诉 Qt 元对象系统(在头文件中)。
- 用适当的 .pro 文件构建插件。
1.3 Qt 插件调用的流程
- 包含接口头文件(只有纯虚函数的类)。
- 应用程序中用QPluginLoader来加载插件。
- 用宏qobject_cast()来判断一个插件是否实现了接口。
二、插件开发实例
2.1 创建目录工程
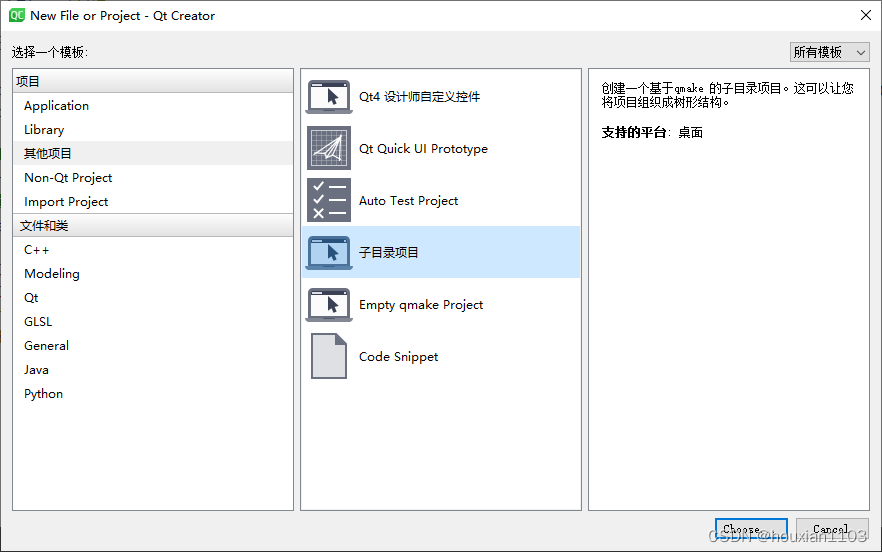
创建目录工程,以放置 GUI 应用工程和插件工程,选择 “Other Project”->“Subdirs Project”,填写工程名称为 PluginApp,选择保存目录。
2.2 创建GUI应用工程
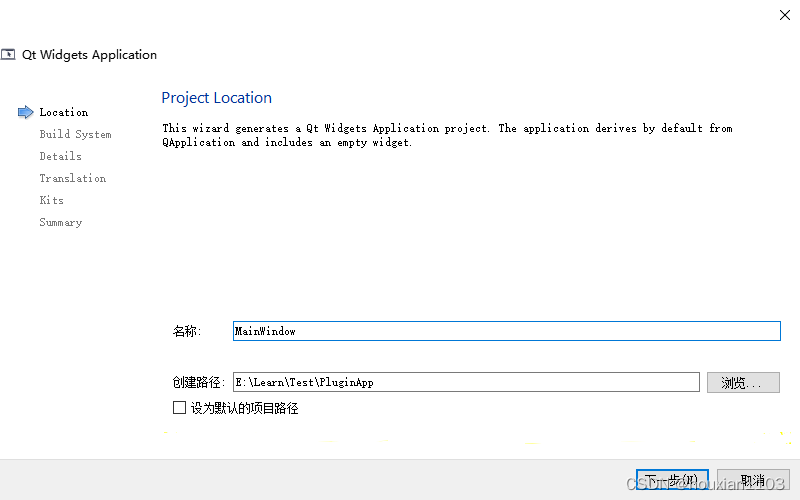
在 PluginApp 工程上右键选择 “New Subproject” 菜单项,选择创建一个 GUI 应用:
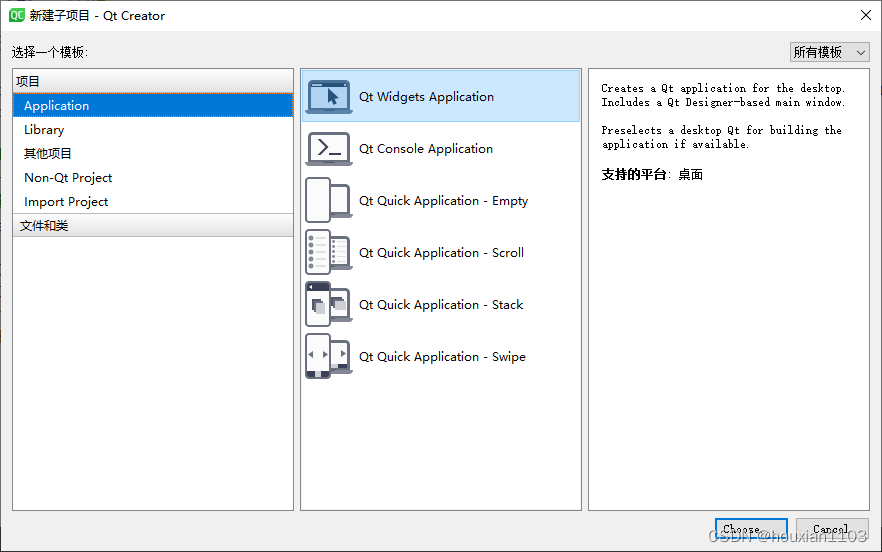
填写工程应用名称为 MainWindow:
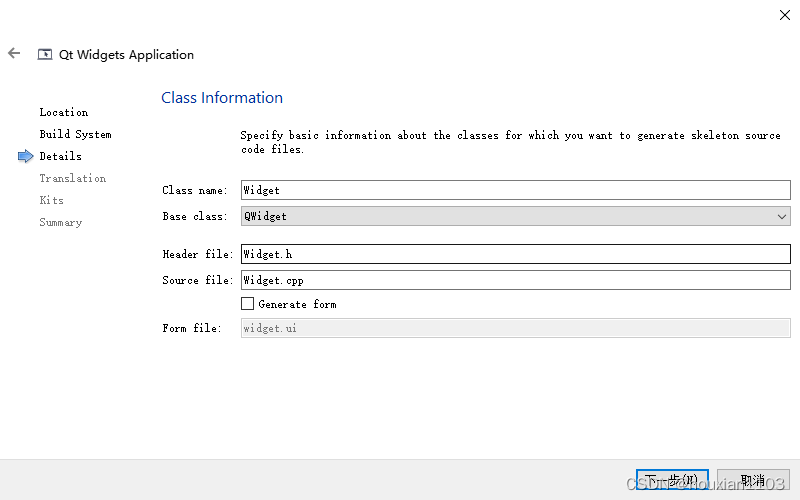
填写主界面类的名称:
2.3 创建插件子工程
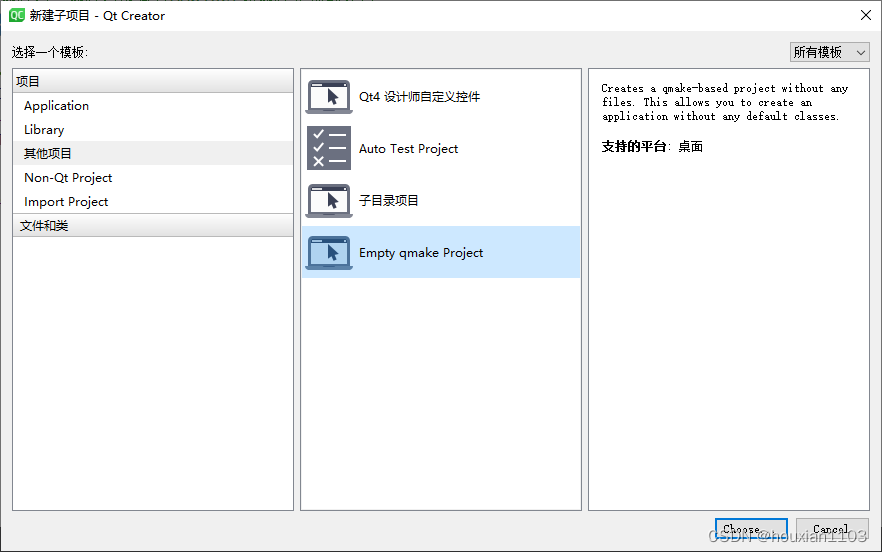
在 PluginApp 工程上右键选择 “New Subproject” 菜单项,选择创建一个空的 Qt 工程,名称为 EchoPlugin。
2.4 插件的实现
1. 定义一个接口集(只有纯虚函数的类)
在 MainWindow 应用增加一个接口 Echonterface.h。
#ifndef ECHOINTERFACE_H
#define ECHOINTERFACE_H

#include <QString>

// 1.定义一个接口集(只有纯虚函数的类)
class EchoInterface
{
public:
    virtual ~EchoInterface() {}
    virtual QString echo(const QString &message) = 0;
};

// 2.用宏Q_DECLARE_INTERFACE()将该接口告诉Qt元对象系统
QT_BEGIN_NAMESPACE
#define EchoInterface_iid "org.qt-project.Qt.Examples.EchoInterface"
Q_DECLARE_INTERFACE(EchoInterface, EchoInterface_iid)
QT_END_NAMESPACE
#endif
2. 声明插件类,插件类继承自 QObject 和插件实现的接口
EchoPlugin.pro工程文件内容如下:
TEMPLATE        = lib
CONFIG         += plugin
QT             += widgets
INCLUDEPATH    += ../MainWindow
HEADERS         = EchoPlugin.h
SOURCES         = EchoPlugin.cpp
TARGET          = $$qtLibraryTarget(echoplugin)
DESTDIR         = ../EchoPlugin

# install
target.path = $$[QT_INSTALL_EXAMPLES]/widgets/tools/echoplugin/plugins
INSTALLS += target

CONFIG += install_ok  # Do not cargo-cult this!
在插件子工程中添加一个插件类 EchoPlugin,实现如下:
EchoPlugin.h 文件:
#ifndef ECHOPLUGIN_H
#define ECHOPLUGIN_H

#include <QObject>
#include <QtPlugin>
#include "EchoInterface.h"

// 3.声明插件类,插件类继承自QObject和插件实现的接口
class EchoPlugin : public QObject, EchoInterface
{
    // 3.用宏Q_INTERFACES()将插件接口告诉Qt元对象系统(在头文件中)
    Q_OBJECT
    Q_PLUGIN_METADATA(IID "org.qt-project.Qt.Examples.EchoInterface") // 宏需要声明通过对象实现的接口的IID,并引用一个包含插件元数据的文件
    Q_INTERFACES(EchoInterface)

public:
    QString echo(const QString &message) override; // 实现的接口:返回字符串消息
};

#endif
EchoPlugin.cpp 文件:
#include "EchoPlugin.h"

// 实现的接口:返回字符串消息
QString EchoPlugin::echo(const QString &message)
{
    return message;
}
2.5 GUI应用的实现
实现 MainWindow 主界面。
MainWindow.pro 文件:
QT += widgets

HEADERS    = Widget.h \
             EchoInterface.h
SOURCES    = Widget.cpp \
             main.cpp

TARGET     = echoplugin
QMAKE_PROJECT_NAME = MainWindow
win32 {
    CONFIG(debug, release|debug):DESTDIR = ../debug/
    CONFIG(release, release|debug):DESTDIR = ../release/
} else {
    DESTDIR    = ../
}

# install
target.path = $$[QT_INSTALL_EXAMPLES]/widgets/tools/echoplugin
INSTALLS += target

CONFIG += install_ok  # Do not cargo-cult this!
Widget.h 文件:
#ifndef ECHODIALOG_H
#define ECHODIALOG_H

#include <QApplication>
#include <QWidget>
#include <QLabel>
#include <QLineEdit>
#include <QPushButton>
#include <QGridLayout>
#include <QMessageBox>
#include <QDir>
#include <QPluginLoader>
#include "EchoInterface.h"

class Widget : public QWidget
{
    Q_OBJECT

public:
    Widget();

private slots:
    void sendEcho();

private:
    void initUI(); // 初始化UI
    bool loadPlugin(); // 加载插件

    EchoInterface *m_pEchoInterface;
    QLineEdit *m_pLineEdit;
    QLabel *m_pLabel;
    QPushButton *m_pBtn;
};

#endif
Widget.cpp 文件:
#include "Widget.h"

Widget::Widget()
{
    // 初始化UI
    initUI();

    // 加载插件
    if (!loadPlugin()) {
        QMessageBox::information(this, "Error", "Could not load the plugin");
        m_pLineEdit->setEnabled(false);
        m_pBtn->setEnabled(false);
    }
}

void Widget::sendEcho()
{
    // 调用插件接口 - EchoPlugin::echo
    QString text = m_pEchoInterface->echo(m_pLineEdit->text());
    m_pLabel->setText(text);
}

// 初始化UI
void Widget::initUI()
{
    m_pLineEdit = new QLineEdit;
    m_pLabel = new QLabel;
    m_pLabel->setFrameStyle(QFrame::Box | QFrame::Plain);
    m_pBtn = new QPushButton(tr("Send Message"));

    connect(m_pLineEdit, &QLineEdit::editingFinished,
            this, &Widget::sendEcho);
    connect(m_pBtn, &QPushButton::clicked,
            this, &Widget::sendEcho);

    QGridLayout *m_pLayoutMain = new QGridLayout(this);
    m_pLayoutMain->addWidget(new QLabel(tr("Message:")), 0, 0);
    m_pLayoutMain->addWidget(m_pLineEdit, 0, 1);
    m_pLayoutMain->addWidget(new QLabel(tr("Answer:")), 1, 0);
    m_pLayoutMain->addWidget(m_pLabel, 1, 1);
    m_pLayoutMain->addWidget(m_pBtn, 2, 1, Qt::AlignRight);
    m_pLayoutMain->setSizeConstraint(QLayout::SetFixedSize);
}

// 加载插件
bool Widget::loadPlugin()
{
    bool ret = true;

    // 获取当前应用程序所在路径
    QDir pluginsDir(qApp->applicationDirPath());
    if (pluginsDir.dirName().toLower() == "debug" || pluginsDir.dirName().toLower() == "release")
        pluginsDir.cdUp();

    // 切换到插件目录
    pluginsDir.cd("plugins");
    // 遍历plugins目录下所有文件
    foreach (QString fileName, pluginsDir.entryList(QDir::Files))
    {
        QPluginLoader pluginLoader(pluginsDir.absoluteFilePath(fileName));
        QObject *plugin = pluginLoader.instance();
        if (plugin)
        {
            // 获取插件名称
            QString pluginName = plugin->metaObject()->className();
            if(pluginName == "EchoPlugin")
            {
                // 对插件初始化
                m_pEchoInterface = qobject_cast<EchoInterface *>(plugin);
                if (m_pEchoInterface)
                    ret =  true;
                break;
            }
            else
            {
                ret = false;
            }
        }
    }
    return ret;
}
Main.cpp文件:
#include <QtWidgets>
#include "Widget.h"
#include "EchoInterface.h"

int main(int argv, char *args[])
{
    QApplication app(argv, args);

    Widget window;
    window.show();

    return app.exec();
}
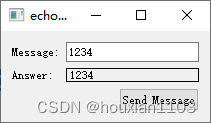
2.6 程序运行结果
三、定位插件
Qt 应用程序将会自动感知可用的插件,因为插件都被存储在标准的子目录当中。因此应用程序不需要任何查找或者加载插件的代码。
在开发过程中,插件的目录是 QTDIR/plugins(QTDIR 是 Qt 的安装目录),每个类型的插件放在相应类型的目录下面。如果想要应用程序使用插件,但不想用标准的插件存放路径,可以在应用程序的安装过程中指定要使用的插件的路径,可以使用 QSettings,保存插件路径,在应用程序运行时读取配置文件。应用程序可以通过QCoreApplication::addLibraryPath()函数将指定的插件路径加载到应用程序中。
使插件可加载的一种方法是在应用程序所在目录创建一个子目录,用于存放插件。如果要发布和 Qt 一起发布的插件(存放在 plugins 目录)中的任何插件,必须拷贝 plugins 目录下的插件子目录到应用程序的根目录下。
