一、jinjia2
1、控制结构
控制结构 Flask中的Jinja2模板提供了多种控制结构,通过这些控制结构可以改变模板的渲染过程。例如,下面展示的条件控制语句。
2、使用flask成功渲染到模板
【首先你要】
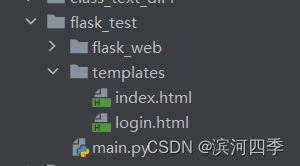
- 首先要创建一个templates目录,这里面放想要渲染到的html页面,再创建一个与templates目录同级py文件,py文件是渲染的效果;也就是说,py文件里是"骨架",templates里面的html文件是“血肉”,最终实现的效果;
导入Flask包
创建一个Flask对象
声明路由,只由声明一个路由才能访问到页面
在该路由下定义一个函数,将你想呈现的效果封装在这个函数里,在函数的最后一行return render_template
想要渲染成功必须使用
render_template('index.html', title='hello world', list2=list1, my_list=my_list)将title,list2,render_template这三个变量的内容渲染到index.html页面中
定义过滤器,也就是一个函数
注册过滤器
# 第一个参数是函数名,第二个是过滤器的名字,可在所有模板上使用这个函数
app.add_template_filter(do_listreverse, 'listreverse')
运行Flask对象
【举个栗子】
main.py
from turtle import title
from flask import Flask, render_template

app = Flask(__name__)


@app.route('/')
def index():
    list1 = list(range(10))
    my_list = [
        {'id': 1, 'value': '我爱工作'},
        {'id': 2, 'value': '工作使人快乐'},
        {'id': 3, 'value': '沉迷工作无法自拔'},
        {'id': 4, 'value': '日渐消瘦'},
        {'id': 5, 'value': '以梦为马,不负韶华'}, ]
    # 将title,list2,render_template这三个变量的内容渲染到index.html页面中
    return render_template('index.html', title='hello world', list2=list1, my_list=my_list)


# 自定义过滤器
def do_listreverse(aa):
    temp_li = list(aa)
    temp_li.reverse()  # 将列表反转
    return temp_li


# 注册过滤器
# 第一个参数是函数名,第二个是过滤器的名字,可在所有模板上使用这个函数
app.add_template_filter(do_listreverse, 'listreverse')

if __name__ == '__main__':
    app.run()
index.html
<!DOCTYPE html>
<html lang="en">
<head>
    <meta charset="UTF-8">
    <meta http-equiv="X-UA-Compatible" content="IE=edge">
    <meta name="viewport" content="width=device-width, initial-scale=1.0">
    <title>Document</title>
</head>
<body>
<!--接收从main.py传递的参数-->
<!--通过listreverse过滤器将传递过来的参数反转并且转成大写-->
    <h1>{{title | listreverse | upper}}</h1>
    <br>
<!--无序列表,ol是有序列表-->
    <ul>
<!--# 使用for循环遍历传过来的参数-->
        {% for item in my_list %}
<!--# 使用列表标签将内容一行一行显示,在main.py里mylist是一个大列表嵌套很多小的字典,其中id是k值,value是v值-->
        <li>{{item.id}}----{{item.value}}</li>
        {% endfor %}
    </ul>
    <ul>
    {% for item in my_list %}
<!--# loop是jinjia2里的内置循环变量,loop.index是从1开始升序(循环迭代)-->
        {% if loop.index == 1 %}
            <li style="background-color: red;">{{loop.index}}----{{item.get('value')}}</li>
        {% elif loop.index == 2 %}
            <li style="background-color: gray;">{{loop.index}}----{{item.get('value')}}</li>
        {% elif loop.index == 3 %}
            <li style="background-color: blue;">{{loop.index}}----{{item.get('value')}}</li>
        {% else %}
            <li style="background-color: yellow;">{{loop.index}}----{{item.get('value')}}</li>
        {% endif %}
    {% endfor %}
    </ul>
</body>
</html>
二、简单的登录成功后跳转到指定页面:
main2.py
from turtle import title

import requests
from flask import Flask, render_template, request, redirect, url_for, flash, session

app = Flask(__name__)
# 添加会话一定要设置密钥
app.secret_key = 'asdffbgsc'

@app.route('/')
def index():
    list1 = list(range(10))
    my_list = [
        {'id': 1, 'value': '我爱工作'},
        {'id': 2, 'value': '工作使人快乐'},
        {'id': 3, 'value': '沉迷工作无法自拔'},
        {'id': 4, 'value': '日渐消瘦'},
        {'id': 5, 'value': '以梦为马,不负韶华'}, ]
    # 将title,list2,render_template这三个变量的内容渲染到index.html页面中
    return render_template('index.html', title='hello world', list2=list1, my_list=my_list, username=session.get('username'), password=session.get('password'))


# 自定义过滤器
def do_listreverse(aa):
    temp_li = list(aa)
    temp_li.reverse()  # 将列表反转
    return temp_li


@app.route('/login', methods=['GET', 'POST'])
def login():
    if request.method == 'POST':
        username = request.form.get('username')
        password = request.form.get('password')
        if username == 'admin' and password == '123':
            print("登录成功!")
            # 设置会话,拿到全局的内容
            session['username']=username
            session['password'] =password
            return redirect('/')
        # else:
        #     flash("用户名或密码错误")
    return render_template('login.html')


# 注册过滤器
# 第一个参数是函数名,第二个是过滤器的名字,可在所有模板上使用这个函数
app.add_template_filter(do_listreverse, 'listreverse')

if __name__ == '__main__':
    app.run(debug=True)
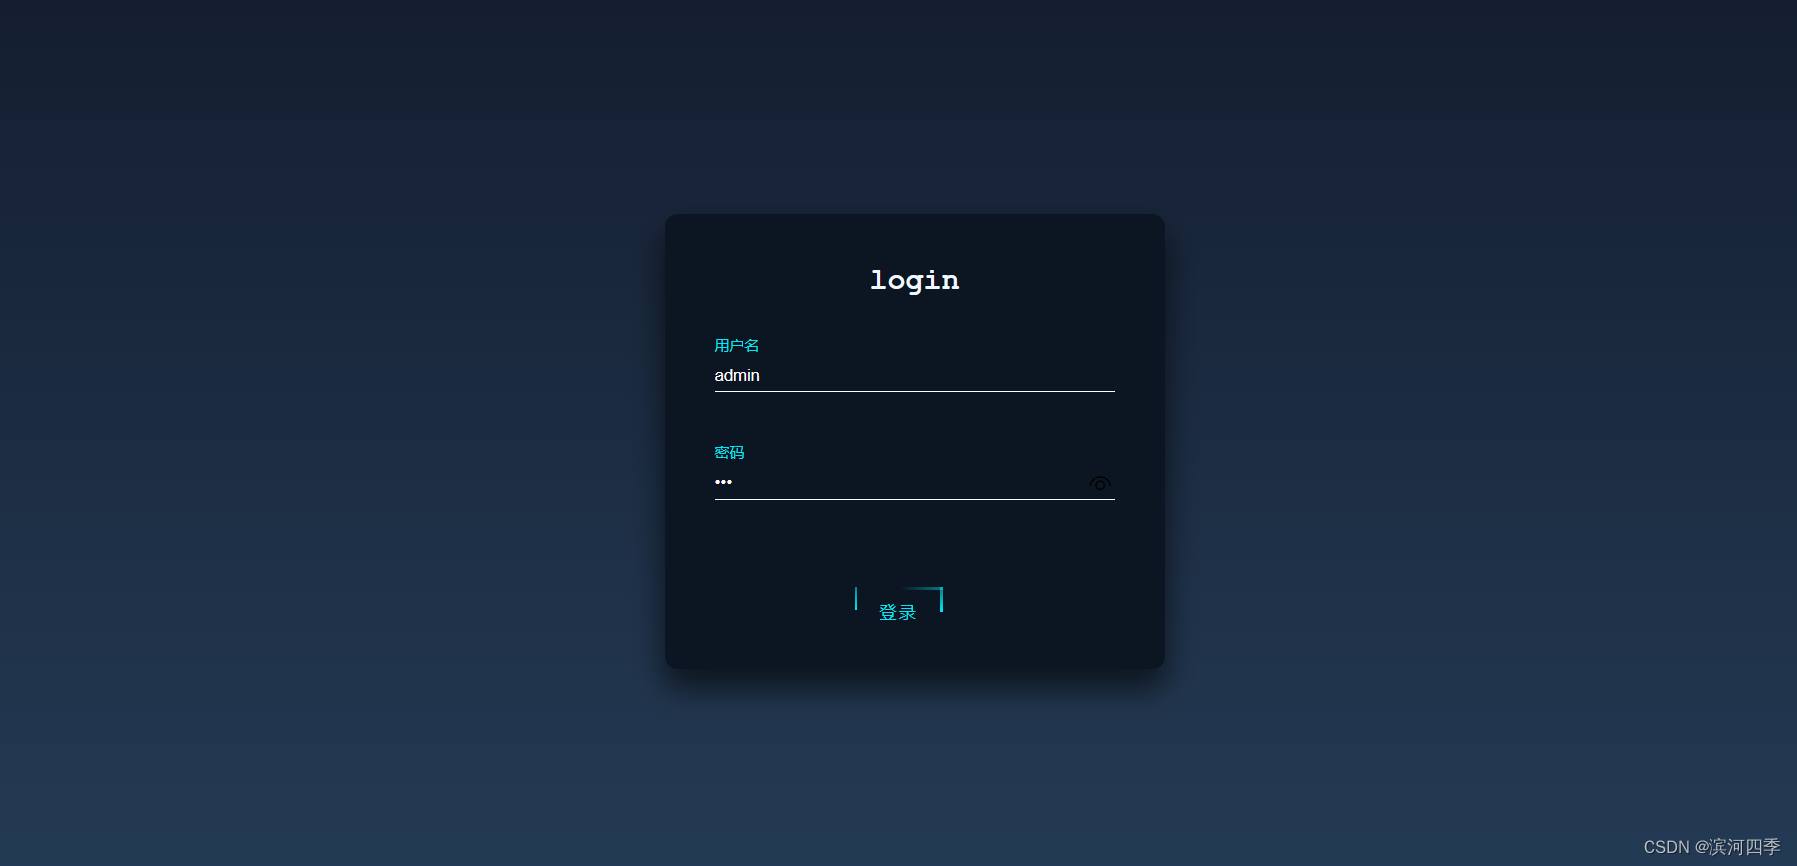
login.html
<!DOCTYPE html>
<html lang="en">

<head>
	<meta charset="UTF-8">
	<meta name="viewport" content="width=device-width, initial-scale=1.0">
	<title>Document</title>
	<style>
		* {
			margin: 0;
			padding: 0;
		}

		a {
			text-decoration: none;
		}

		input,
		button {
			background: transparent;
			border: 0;
			outline: none;
		}

		body {
			height: 100vh;
			background: linear-gradient(#141e30, #243b55);
			display: flex;
			justify-content: center;
			align-items: center;
			font-size: 16px;
			color: #03e9f4;
		}

		.loginBox {
			width: 400px;
			height: 364px;
			background-color: #0c1622;
			margin: 100px auto;
			border-radius: 10px;
			box-shadow: 0 15px 25px 0 rgba(0, 0, 0, .6);
			padding: 40px;
			box-sizing: border-box;
		}

		h2 {
			text-align: center;
			color: aliceblue;
			margin-bottom: 30px;
			font-family: 'Courier New', Courier, monospace;
		}

		.item {
			height: 45px;
			border-bottom: 1px solid #fff;
			margin-bottom: 40px;
			position: relative;
		}

		.item input {
			width: 100%;
			height: 100%;
			color: #fff;
			padding-top: 20px;
			box-sizing: border-box;
		}

		.item input:focus+label,
		.item input:valid+label {
			top: 0px;
			font-size: 2px;
		}

		.item label {
			position: absolute;
			left: 0;
			top: 12px;
			transition: all 0.5s linear;
		}

		.btn {
			padding: 10px 20px;
			margin-top: 30px;
			color: #03e9f4;
			position: relative;
			overflow: hidden;
			text-transform: uppercase;
			letter-spacing: 2px;
			left: 35%;
		}

		.btn:hover {
			border-radius: 5px;
			color: #fff;
			background: #03e9f4;
			box-shadow: 0 0 5px 0 #03e9f4,
				0 0 25px 0 #03e9f4,
				0 0 50px 0 #03e9f4,
				0 0 100px 0 #03e9f4;
			transition: all 1s linear;
		}

		.btn>span {
			position: absolute;
		}

		.btn>span:nth-child(1) {
			width: 100%;
			height: 2px;
			background: -webkit-linear-gradient(left, transparent, #03e9f4);
			left: -100%;
			top: 0px;
			animation: line1 1s linear infinite;
		}

		@keyframes line1 {

			50%,
			100% {
				left: 100%;
			}
		}

		.btn>span:nth-child(2) {
			width: 2px;
			height: 100%;
			background: -webkit-linear-gradient(top, transparent, #03e9f4);
			right: 0px;
			top: -100%;
			animation: line2 1s 0.25s linear infinite;
		}

		@keyframes line2 {

			50%,
			100% {
				top: 100%;
			}
		}

		.btn>span:nth-child(3) {
			width: 100%;
			height: 2px;
			background: -webkit-linear-gradient(left, #03e9f4, transparent);
			left: 100%;
			bottom: 0px;
			animation: line3 1s 0.75s linear infinite;
		}

		@keyframes line3 {

			50%,
			100% {
				left: -100%;
			}
		}

		.btn>span:nth-child(4) {
			width: 2px;
			height: 100%;
			background: -webkit-linear-gradient(top, transparent, #03e9f4);
			left: 0px;
			top: 100%;
			animation: line4 1s 1s linear infinite;
		}

		@keyframes line4 {

			50%,
			100% {
				top: -100%;
			}
		}
	</style>
</head>

<body>
	<div class="loginBox">
		<h2>login</h2>
		<form action="/login" method="post">
			<div class="item">
				<input type="text" required name="username">
				<label >用户名</label>
			</div>
			<div class="item">
				<input type="password" required name="password">
				<label >密码</label>
			</div>
			<button class="btn">登录
				<span></span>
				<span></span>
				<span></span>
				<span></span>
			</button>
		</form>
	</div>
</body>
</html>
index.html
<!DOCTYPE html>
<html lang="en">
<head>
    <meta charset="UTF-8">
    <meta http-equiv="X-UA-Compatible" content="IE=edge">
    <meta name="viewport" content="width=device-width, initial-scale=1.0">
    <title>Document</title>
</head>

<p align="right">欢迎 {{username}} 登录本系统,密码为{{password}}</p>
<!--使表格居中,长度自适应为60%-->
    <table border = 1 style="margin: auto;" width="60%">
        {% for item in my_list  %}
        <tr>
<!--列是id,行是value-->
        <th> {{ item.id }} </th>
        <td> {{ item.value }}</td>
        </tr>
        {% endfor %}
    </table>


    <ul>
    {% for item in my_list %}
<!--# loop是jinjia2里的内置循环变量,loop.index是从1开始升序(循环迭代)-->
        {% if loop.index == 1 %}
            <li style="background-color: red;">{{loop.index}}----{{item.get('value')}}</li>
        {% elif loop.index == 2 %}
            <li style="background-color: gray;">{{loop.index}}----{{item.get('value')}}</li>
        {% elif loop.index == 3 %}
            <li style="background-color: blue;">{{loop.index}}----{{item.get('value')}}</li>
        {% else %}
            <li style="background-color: yellow;">{{loop.index}}----{{item.get('value')}}</li>
        {% endif %}
    {% endfor %}
    </ul>
</body>
</html>
三、简单的注册登录页面
逻辑:
main.py:
因为有三个html页面,所以必须有三个路由,这里我设置了如下三个路由:
- /路由
- 根路由下绑定了有关登录成功html的函数
- /login路由
- login路由下的绑定了有关验证登录的函数:
- ①使用request.form.get()方法拿到用户输入的用户名和密码,(在login.html页面和register.html页面中用户输入的用户名和密码都是在input标签中写的,使用name属性唯一确定它们的值,在request.form.get()里输入name值,就可以拿到)
- ②创建表
- ③连接数据库,如果用户输入的用户名和密码在数据库中,则登录成功,跳转到登录成功后的界面;如果用户输入的用户名和密码不在数据库中跳转到login界面
- /register路由
- /register路由下的绑定了有关验证登录的函数:
- ①连接数据库
- ②创建表
- ③连接数据库,使用request.form.get()方法拿到用户输入的用户名和密码,如果不在数据库中则注册成功;(但是我没有实现判断用户输入的用户名和密码是否在数据库中,这里要靠JS实现用户唯一)
main2.py
from turtle import title

import requests
from flask import Flask, render_template, request, redirect, url_for, flash, session
import pymysql

app = Flask(__name__)
# 添加会话一定要设置密钥
app.secret_key = 'asdffbgsc'


@app.route('/')
def index():
    list1 = list(range(10))
    my_list = [
        {'id': 1, 'value': '我爱工作'},
        {'id': 2, 'value': '工作使人快乐'},
        {'id': 3, 'value': '沉迷工作无法自拔'},
        {'id': 4, 'value': '日渐消瘦'},
        {'id': 5, 'value': '以梦为马,不负韶华'}, ]
    # 将title,list2,render_template这三个变量的内容渲染到index.html页面中
    return render_template('index.html', title='hello world', list2=list1, my_list=my_list,
                           username=session.get('username'), password=session.get('password'))


# 自定义过滤器
def do_listreverse(aa):
    temp_li = list(aa)
    temp_li.reverse()  # 将列表反转
    return temp_li


# 验证登录
@app.route('/login', methods=['GET', 'POST'])
def login():
    if request.method == 'POST':
        connect_db = pymysql.connect(host='192.168.198.142',
                                     port=3306,
                                     user='root',
                                     password='Nebula@123',
                                     database='Python_Test')
        connect_course = connect_db.cursor()
        select_query = 'select * from user_info'
        connect_course.execute(select_query)
        user_info = connect_course.fetchall()
        username = request.form.get('username')
        password = request.form.get('password')
        for row in user_info:

            user_name.append(row[1])
            user_password.append(row[2])
            if username in user_name and password in user_password:
                print("登录成功!")
                # 设置会话,拿到全局的内容
                session['username'] = username
                session['password'] = password
                return redirect('/')
            else:
                flash("用户名或密码错误")
    return render_template('login.html')


# 注册
user_id = []
user_name = []
user_password = []


@app.route('/register', methods=['GET', 'POST'])
def register():
    if request.method == 'POST':  # 要和methods里面的POST一致
        # 创建链接
        connect_db = pymysql.connect(host='192.168.198.142',
                                     port=3306,
                                     user='root',
                                     password='Nebula@123',
                                     database='Python_Test')
        connect_course = connect_db.cursor()
        # 创建表
        create_table_sql = "create table if not exists user_info(id int NOT NULL auto_increment primary key," \
                           "user_name varchar(30)," \
                           "user_pass varchar(20))"
        connect_course.execute(create_table_sql)
        select_query = 'select * from user_info'
        connect_course.executemany(select_query)
        rows = connect_course.fetchall()
        # print(rows)
        for row in rows:
            user_id.append(row[0])
            user_name.append(row[1])
            user_password.append(row[2])
            user_list = list(map(list, zip(user_id, user_name, user_password)))
            for user in user_list:
                username = request.form.get('username')
                password = request.form.get('password')
                # print(username,password)
                # 如果用户不存在,插入信息
                if username != user[1]:
                    try:
                        insert_query = 'insert into user_info values(NULL,%s,%s);'
                        user_datas = [(username, password)]
                        # 它是一个列表所以使用executemany
                        connect_course.executemany(insert_query, user_datas)
                        connect_db.commit()
                        print('插入成功!')
                        # print(rows)
                    except Exception as e:
                        print(e, '插入失败!')
                    connect_db.close()
                    return render_template('login.html')
                else:
                    flash('用户名已存在请重新输入')

    return render_template('register.html')


# 注册过滤器
# 第一个参数是函数名,第二个是过滤器的名字,可在所有模板上使用这个函数
app.add_template_filter(do_listreverse, 'listreverse')

if __name__ == '__main__':
    app.run(debug=True)
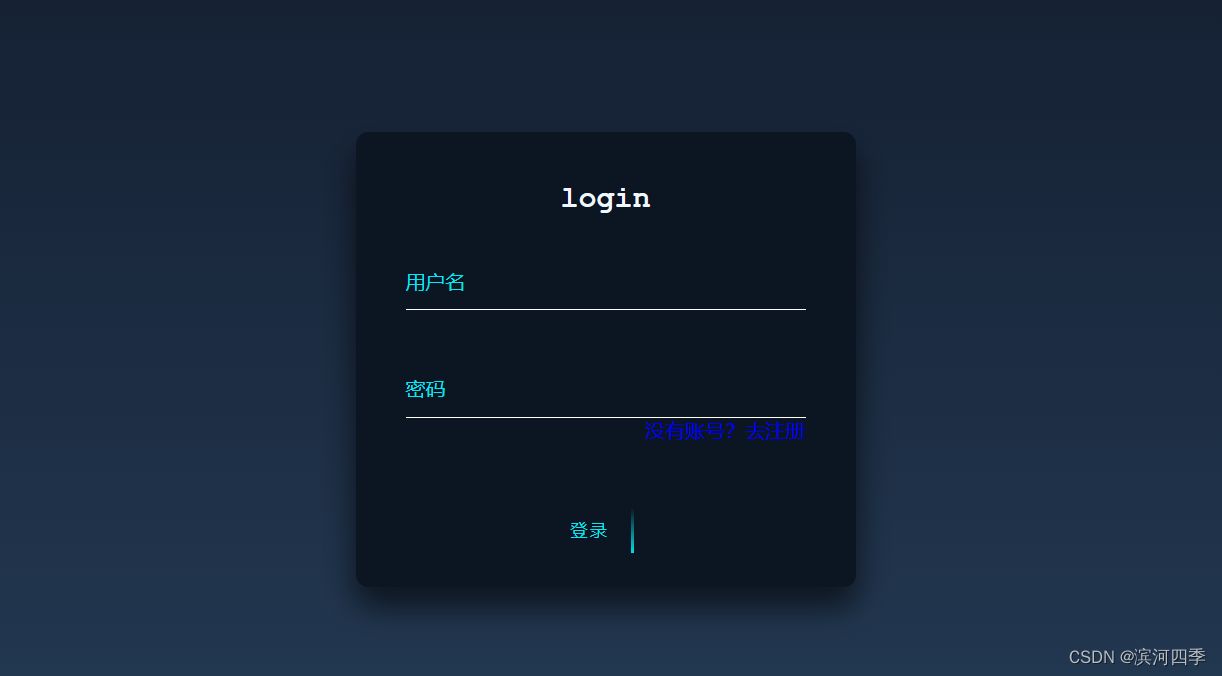
登录页面:login.html
<!DOCTYPE html>
<html lang="en">

<head>
	<meta charset="UTF-8">
	<meta name="viewport" content="width=device-width, initial-scale=1.0">
	<title>登录</title>
	<style>
		* {
			margin: 0;
			padding: 0;
		}

		a {
			text-decoration: none;
		}

		input,
		button {
			background: transparent;
			border: 0;
			outline: none;
		}

		body {
			height: 100vh;
			background: linear-gradient(#141e30, #243b55);
			display: flex;
			justify-content: center;
			align-items: center;
			font-size: 16px;
			color: #03e9f4;
		}

		.loginBox {
			width: 400px;
			height: 364px;
			background-color: #0c1622;
			margin: 100px auto;
			border-radius: 10px;
			box-shadow: 0 15px 25px 0 rgba(0, 0, 0, .6);
			padding: 40px;
			box-sizing: border-box;
		}

		h2 {
			text-align: center;
			color: aliceblue;
			margin-bottom: 30px;
			font-family: 'Courier New', Courier, monospace;
		}

		.item {
			height: 45px;
			border-bottom: 1px solid #fff;
			margin-bottom: 40px;
			position: relative;
		}

		.item input {
			width: 100%;
			height: 100%;
			color: #fff;
			padding-top: 20px;
			box-sizing: border-box;
		}

		.item input:focus+label,
		.item input:valid+label {
			top: 0px;
			font-size: 2px;
		}

		.item label {
			position: absolute;
			left: 0;
			top: 12px;
			transition: all 0.5s linear;
		}

		.btn {
			padding: 10px 20px;
			margin-top: 30px;
			color: #03e9f4;
			position: relative;
			overflow: hidden;
			text-transform: uppercase;
			letter-spacing: 2px;
			left: 35%;
		}

		.btn:hover {
			border-radius: 5px;
			color: #fff;
			background: #03e9f4;
			box-shadow: 0 0 5px 0 #03e9f4,
				0 0 25px 0 #03e9f4,
				0 0 50px 0 #03e9f4,
				0 0 100px 0 #03e9f4;
			transition: all 1s linear;
		}

		.btn>span {
			position: absolute;
		}

		.btn>span:nth-child(1) {
			width: 100%;
			height: 2px;
			background: -webkit-linear-gradient(left, transparent, #03e9f4);
			left: -100%;
			top: 0px;
			animation: line1 1s linear infinite;
		}

		@keyframes line1 {

			50%,
			100% {
				left: 100%;
			}
		}

		.btn>span:nth-child(2) {
			width: 2px;
			height: 100%;
			background: -webkit-linear-gradient(top, transparent, #03e9f4);
			right: 0px;
			top: -100%;
			animation: line2 1s 0.25s linear infinite;
		}

		@keyframes line2 {

			50%,
			100% {
				top: 100%;
			}
		}

		.btn>span:nth-child(3) {
			width: 100%;
			height: 2px;
			background: -webkit-linear-gradient(left, #03e9f4, transparent);
			left: 100%;
			bottom: 0px;
			animation: line3 1s 0.75s linear infinite;
		}

		@keyframes line3 {

			50%,
			100% {
				left: -100%;
			}
		}

		.btn>span:nth-child(4) {
			width: 2px;
			height: 100%;
			background: -webkit-linear-gradient(top, transparent, #03e9f4);
			left: 0px;
			top: 100%;
			animation: line4 1s 1s linear infinite;
		}

		@keyframes line4 {

			50%,
			100% {
				top: -100%;
			}
		}
	</style>
</head>

<body>
	<div class="loginBox">
		<h2>login</h2>
		<form action="/login" method="post">
			<div class="item">
				<input type="text" required name="username">
				<label >用户名</label>
			</div>
			<div class="item">
				<input type="password" required name="password">
				<label >密码</label>
<!--使标签居右-->
				 <div class="son">
<!--					 href通过路由跳转到register界面-->
					<a style="display: block;text-align:right;" href="/register" target="_blank">没有账号?去注册</a>
    			</div>
			</div>
			<button class="btn">登录
				<span></span>
				<span></span>
				<span></span>
				<span></span>
			</button>
		</form>
	</div>
</body>
</html>
登录成功的页面:index.html
<!DOCTYPE html> <html lang="en"> <head> <meta charset="UTF-8"> <meta http-equiv="X-UA-Compatible" content="IE=edge"> <meta name="viewport" content="width=device-width, initial-scale=1.0"> <title>Document</title> </head> <body> <!--接收从main.py传递的参数--> <!--通过listreverse过滤器将传递过来的参数反转并且转成大写--> <!-- <h1>{{title | listreverse | upper}}</h1>--> <!-- <br>--> <!--<!–无序列表,ol是有序列表–>--> <!-- <ul>--> <!--<!–# 使用for循环遍历传过来的参数–>--> <!-- {% for item in my_list %}--> <!--<!–# 使用列表标签将内容一行一行显示,在main.py里mylist是一个大列表嵌套很多小的字典,其中id是k值,value是v值–>--> <!-- <li>{{item.id}}----{{item.value}}</li>--> <!-- {% endfor %}--> <!-- </ul>--> <p align="right">欢迎 {{username}} 登录本系统,密码为{{password}}</p> <!--使表格居中,长度自适应为60%--> <table border = 1 style="margin: auto;" width="60%"> {% for item in my_list %} <tr> <!--列是id,行是value--> <th> {{ item.id }} </th> <td> {{ item.value }}</td> </tr> {% endfor %} </table> <ul> {% for item in my_list %} <!--# loop是jinjia2里的内置循环变量,loop.index是从1开始升序(循环迭代)--> {% if loop.index == 1 %} <li style="background-color: red;">{{loop.index}}----{{item.get('value')}}</li> {% elif loop.index == 2 %} <li style="background-color: gray;">{{loop.index}}----{{item.get('value')}}</li> {% elif loop.index == 3 %} <li style="background-color: blue;">{{loop.index}}----{{item.get('value')}}</li> {% else %} <li style="background-color: yellow;">{{loop.index}}----{{item.get('value')}}</li> {% endif %} {% endfor %} </ul> </body> </html>
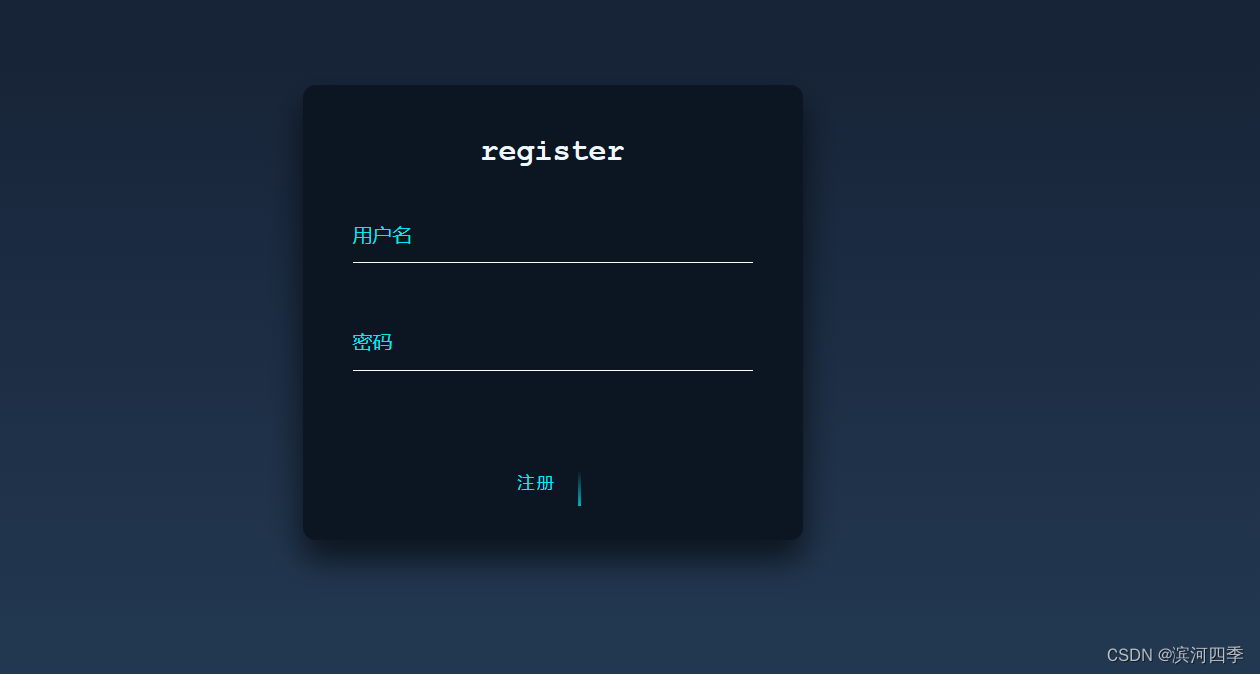
注册页面:register.html
<!DOCTYPE html>
<html lang="en">

<head>
	<meta charset="UTF-8">
	<meta name="viewport" content="width=device-width, initial-scale=1.0">
	<title>注册</title>
	<style>
		* {
			margin: 0;
			padding: 0;
		}

		a {
			text-decoration: none;
		}

		input,
		button {
			background: transparent;
			border: 0;
			outline: none;
		}

		body {
			height: 100vh;
			background: linear-gradient(#141e30, #243b55);
			display: flex;
			justify-content: center;
			align-items: center;
			font-size: 16px;
			color: #03e9f4;
		}

		.loginBox {
			width: 400px;
			height: 364px;
			background-color: #0c1622;
			margin: 100px auto;
			border-radius: 10px;
			box-shadow: 0 15px 25px 0 rgba(0, 0, 0, .6);
			padding: 40px;
			box-sizing: border-box;
		}

		h2 {
			text-align: center;
			color: aliceblue;
			margin-bottom: 30px;
			font-family: 'Courier New', Courier, monospace;
		}

		.item {
			height: 45px;
			border-bottom: 1px solid #fff;
			margin-bottom: 40px;
			position: relative;
		}

		.item input {
			width: 100%;
			height: 100%;
			color: #fff;
			padding-top: 20px;
			box-sizing: border-box;
		}

		.item input:focus+label,
		.item input:valid+label {
			top: 0px;
			font-size: 2px;
		}

		.item label {
			position: absolute;
			left: 0;
			top: 12px;
			transition: all 0.5s linear;
		}

		.btn {
			padding: 10px 20px;
			margin-top: 30px;
			color: #03e9f4;
			position: relative;
			overflow: hidden;
			text-transform: uppercase;
			letter-spacing: 2px;
			left: 35%;
		}

		.btn:hover {
			border-radius: 5px;
			color: #fff;
			background: #03e9f4;
			box-shadow: 0 0 5px 0 #03e9f4,
				0 0 25px 0 #03e9f4,
				0 0 50px 0 #03e9f4,
				0 0 100px 0 #03e9f4;
			transition: all 1s linear;
		}

		.btn>span {
			position: absolute;
		}

		.btn>span:nth-child(1) {
			width: 100%;
			height: 2px;
			background: -webkit-linear-gradient(left, transparent, #03e9f4);
			left: -100%;
			top: 0px;
			animation: line1 1s linear infinite;
		}

		@keyframes line1 {

			50%,
			100% {
				left: 100%;
			}
		}

		.btn>span:nth-child(2) {
			width: 2px;
			height: 100%;
			background: -webkit-linear-gradient(top, transparent, #03e9f4);
			right: 0px;
			top: -100%;
			animation: line2 1s 0.25s linear infinite;
		}

		@keyframes line2 {

			50%,
			100% {
				top: 100%;
			}
		}

		.btn>span:nth-child(3) {
			width: 100%;
			height: 2px;
			background: -webkit-linear-gradient(left, #03e9f4, transparent);
			left: 100%;
			bottom: 0px;
			animation: line3 1s 0.75s linear infinite;
		}

		@keyframes line3 {

			50%,
			100% {
				left: -100%;
			}
		}

		.btn>span:nth-child(4) {
			width: 2px;
			height: 100%;
			background: -webkit-linear-gradient(top, transparent, #03e9f4);
			left: 0px;
			top: 100%;
			animation: line4 1s 1s linear infinite;
		}

		@keyframes line4 {

			50%,
			100% {
				top: -100%;
			}
		}
	</style>
</head>

<body>
	<div class="loginBox">
		<h2>register</h2>
		<form action="/register" method="post">
			<div class="item">
				<input type="text" required name="username">
				<label >用户名</label>
			</div>
			<div class="item">
				<input type="password" required name="password">
				<label >密码</label>
			</div>
			<button class="btn">注册
				<span></span>
				<span></span>
				<span></span>
				<span></span>
			</button>
		</form>
	</div>
</body>
</html>
