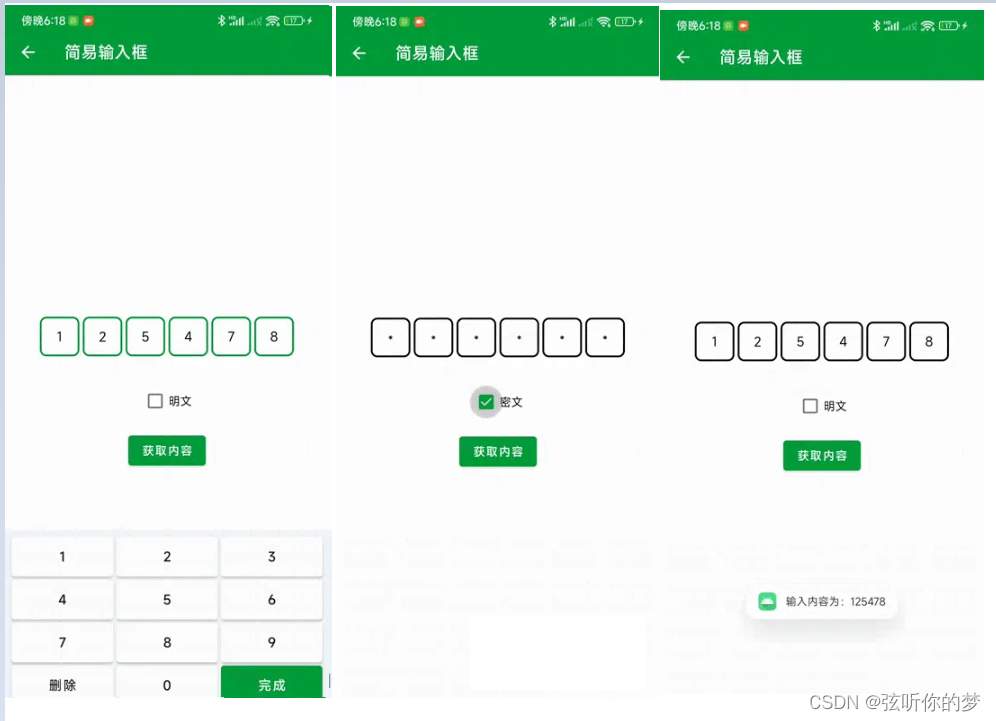
这次我们来做一个简易输入框,可以用于密码输入和验证码输入。
依然在EasyView中进行创建,在com.easy.view下新建一个EasyEditText,继承自View ,实现里面的构造方法。
① 构造方法
然后我们继承自View,重写里面的构造方法,代码如下:
public class EasyEditText extends View implements NumberKeyboardListener {

    private Context mContext;

    public EasyEditText(Context context) {
        this(context, null);
    }

    public EasyEditText(Context context, @Nullable AttributeSet attrs) {
        this(context, attrs, 0);
    }

    public EasyEditText(Context context, @Nullable AttributeSet attrs, int defStyleAttr) {
        super(context, attrs, defStyleAttr);
		mContext = context;
    }
}
下面就可以增加样式了。
② XML样式
在设置样式之前需要先知道我们的自定义View要做什么,这是一个简易输入框,可以用来做验证码输入或者密码输入,输入框4~6个,主要就是数字输入,在attrs.xml文件中,里面我们可以写自定义的样式,代码如下所示:
    <!--简易输入框-->
    <declare-styleable name="EasyEditText">
        <!-- 方框大小,宽高一致 -->
        <attr name="boxWidth" />
        <!-- 方框背景颜色 -->
        <attr name="boxBackgroundColor" />
        <!-- 方框描边颜色 -->
        <attr name="boxStrokeColor" />
        <!-- 方框焦点描边颜色 -->
        <attr name="boxFocusStrokeColor" format="color|reference"/>
        <!-- 方框描边宽度 -->
        <attr name="boxStrokeWidth" />
        <!--文字颜色-->
        <attr name="textColor" />
        <!--文字大小-->
        <attr name="textSize" />
        <!-- 方框数量 4-6 个-->
        <attr name="boxNum" format="integer"/>
        <!--是否密文-->
        <attr name="ciphertext" format="boolean"/>
    </declare-styleable>
因为在此之前我还有三个View的样式,所以重复的样式就抽离了出来,可以参见源码了解。
如需完整版Android学习笔记 请点击免费领取
下面我们回到View中去使用,先声明变量,代码如下:
    /**
     * 方框大小,因为它是相同的宽度和高度,它只需要一个值
     */
    private int mBoxWidth;
    /**
     * 方框背景颜色
     */
    private int mBoxBackgroundColor;
    /**
     * 方框默认描边颜色
     */
    private int mBoxStrokeColor;
    /**
     * 方框获取焦点描点颜色
     */
    private int mBoxFocusStrokeColor;
    /**
     * 方框描边大小
     */
    private final int mBoxStrokeWidth;
    /**
     * 文字颜色
     */
    private int mTextColor;
    /**
     * 文字大小
     */
    private float mTextSize;
    /**
     * 方框数量,最少4个 - 最多6个
     */
    private int mBoxNum;
    /**
     * 方框之间的间距
     */
    private int mBoxMargin = 4;
    /**
     * 方框画笔
     */
    private Paint mBoxPaint;
    /**
     * 方框描边画笔
     */
    private Paint mBoxStrokePaint;
    /**
     * 文字画笔
     */
    private Paint mTextPaint;
    /**
     * 文字矩形
     */
    private final Rect mTextRect = new Rect();
    /**
     * 方框圆角
     */
    private float mBoxCornerRadius = 8f;
    /**
     * 描边圆角
     */
    private float strokeRadius;

    /**
     * 输入长度
     */
    private final int mInputLength;
    /**
     * 输入数组
     */
    private final String[] inputArray;
    /**
     * 当前输入位置
     */
    private int currentInputPosition = 0;
    /**
     * 焦点边框列表
     */
    private final List<RectF> focusList = new ArrayList<>();
    /**
     * 是否获取焦点
     */
    private boolean isFocus = false;
    /**
     * 是否密文显示
     */
    private boolean ciphertext = false;
    /**
     * 密文显示 *
     */
    private String ciphertextContent = "*";
然后修改第三个构造函数,代码如下所示:
    public EasyEditText(Context context, @Nullable AttributeSet attrs, int defStyleAttr) {
        super(context, attrs, defStyleAttr);
        mContext = context;
        @SuppressLint("CustomViewStyleable")
        TypedArray typedArray = context.obtainStyledAttributes(attrs, R.styleable.EasyEditText);
        mBoxWidth = (int) typedArray.getDimensionPixelSize(R.styleable.EasyEditText_boxWidth, 48);
        mBoxBackgroundColor = typedArray.getColor(R.styleable.EasyEditText_boxBackgroundColor, ContextCompat.getColor(context, R.color.white));
        mBoxStrokeColor = typedArray.getColor(R.styleable.EasyEditText_boxStrokeColor, ContextCompat.getColor(context, R.color.box_default_stroke_color));
        mBoxFocusStrokeColor = typedArray.getColor(R.styleable.EasyEditText_boxFocusStrokeColor, ContextCompat.getColor(context, R.color.box_default_stroke_color));
        mBoxStrokeWidth = (int) typedArray.getDimensionPixelSize(R.styleable.EasyEditText_boxStrokeWidth, 2);
        mTextColor = typedArray.getColor(R.styleable.EasyEditText_textColor, ContextCompat.getColor(context, R.color.tx_default_color));
        mTextSize = typedArray.getDimensionPixelSize(R.styleable.EasyEditText_textSize, (int) TypedValue
                .applyDimension(TypedValue.COMPLEX_UNIT_SP, 14, getResources().getDisplayMetrics()));
        int number = typedArray.getInteger(R.styleable.EasyEditText_boxNum, 4);
        ciphertext = typedArray.getBoolean(R.styleable.EasyEditText_ciphertext, false);
        mBoxNum = (number > 6 || number < 4) ? 4 : number;
        mInputLength = mBoxNum;
        inputArray = new String[mInputLength];
        typedArray.recycle();
        //初始化画笔
        initPaint();
    }
这里通过EasyEditText得到TypedArray,通过TypedArray获取EasyEditText中的属性,然后进行赋值,需要注意的是这里对于输入框的大小处理,输入框个数就是输入的长度,然后初始化画笔,新增initPaint()方法,代码如下:
    private void initPaint() {
        //设置边框画笔
        mBoxPaint = new Paint();
        mBoxPaint.setAntiAlias(true);// anti-aliasing
        mBoxPaint.setColor(mBoxBackgroundColor);//Set color
        mBoxPaint.setStyle(Paint.Style.FILL);//Style filling
        //设置描边画笔
        mBoxStrokePaint = new Paint();
        mBoxStrokePaint.setAntiAlias(true);
        mBoxStrokePaint.setColor(mBoxStrokeColor);
        mBoxStrokePaint.setStyle(Paint.Style.STROKE);//Style stroke
        mBoxStrokePaint.setStrokeWidth(mBoxStrokeWidth);//Stroke width
        //设置文字画笔
        mTextPaint = new Paint();
        mTextPaint.setAntiAlias(true);
        mTextPaint.setStyle(Paint.Style.FILL);
        mTextPaint.setColor(mTextColor);
        mTextPaint.setTextSize(mTextSize);//Text size
        mTextPaint.setTextAlign(Paint.Align.CENTER);//Center the text
    }
③ 测量
我们通过变量和属性得知了方框个数,和方框间的间距,然后我们重写onMeasure()方法,代码如下:
    /**
     * View的测量
     *
     * @param widthMeasureSpec  宽度测量
     * @param heightMeasureSpec 高度测量
     */
    @Override
    protected void onMeasure(int widthMeasureSpec, int heightMeasureSpec) {
        super.onMeasure(widthMeasureSpec, heightMeasureSpec);
        int width = 0;
        int margin = EasyUtils.dp2px(mContext, mBoxMargin);
        switch (MeasureSpec.getMode(widthMeasureSpec)) {
            case MeasureSpec.UNSPECIFIED:
            case MeasureSpec.AT_MOST:   //wrap_content
                width = mBoxWidth * mBoxNum + margin * (mBoxNum - 1);
                break;
            case MeasureSpec.EXACTLY:   //match_parent
                width = MeasureSpec.getSize(widthMeasureSpec);
                mBoxWidth = (width - margin * (mBoxNum - 1)) / mBoxNum;
                break;
        }
        //设置测量后的值
        setMeasuredDimension(width, mBoxWidth);
    }
④ 绘制
测量好了之后,下面就可以开始绘制了,绘制就相当于在纸上画画,而画画呢,首先要有画笔,首先声明变量,代码如下:
    private Paint mBoxPaint;
    private Paint mBoxStrokePaint;
    private Paint mTextPaint;
    private final Rect mTextRect = new Rect();
然后我们需要对3个画笔(方框、方框边框、文字)进行设置,因为绘制文字稍微有一些不同,所以加了一个Rect,下面我们在View中新增一个初始化画笔的方法,代码如下所示:
    /**
     * 初始化画笔
     */
    private void initPaint() {
        //设置方框画笔
        mBoxPaint = new Paint();
        mBoxPaint.setAntiAlias(true);// 抗锯齿
        mBoxPaint.setColor(mBoxBackgroundColor);//设置颜色
        mBoxPaint.setStyle(Paint.Style.FILL);//风格填满
        //设置方框描边画笔
        mBoxStrokePaint = new Paint();
        mBoxStrokePaint.setAntiAlias(true);
        mBoxStrokePaint.setColor(mBoxStrokeColor);
        mBoxStrokePaint.setStyle(Paint.Style.STROKE);//风格描边
        mBoxStrokePaint.setStrokeWidth(mBoxStrokeWidth);//描边宽度
        //设置文字画笔
        mTextPaint = new Paint();
        mTextPaint.setAntiAlias(true);
        mTextPaint.setStyle(Paint.Style.FILL);
        mTextPaint.setColor(mTextColor);
        mTextPaint.setTextSize(mTextSize);//文字大小
        mTextPaint.setTextAlign(Paint.Align.CENTER);//文字居中对齐
    }
然后在第三个构造方法中去调用,如下图所示:
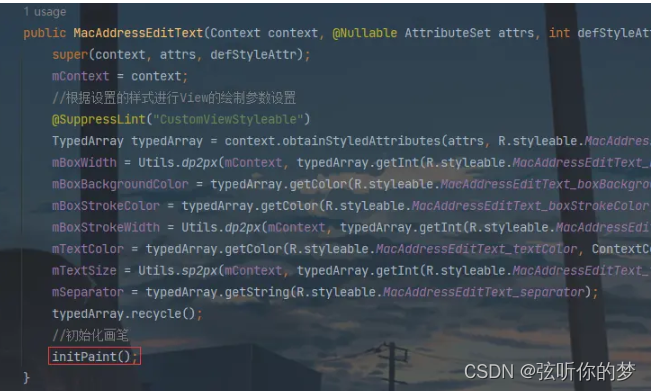
下面要进行绘制了。
    @Override
    protected void onDraw(Canvas canvas) {
        //绘制边框
        drawBox(canvas);
        //绘制文字
        drawText(canvas);
    }
这里绘制分为两步,绘制方框和绘制文字。
1. 绘制方框
首先是绘制方框,在自定义View中新增一个drawBox()方法,代码如下:
    /**
     * 绘制方框
     */
    private void drawBox(Canvas canvas) {
        //每个方框的间距
        int margin = EasyUtils.dp2px(mContext, mBoxMargin);
        int radius = EasyUtils.dp2px(mContext, mBoxCornerRadius);
        //Draw a rounded rectangle border
        float strokeWidth = mBoxStrokeWidth / 2;
        for (int i = 0; i < mBoxNum; i++) {
            //To draw a rectangular box, you need the positions of the left, top, right and bottom points
            float left = i * mBoxWidth + i * margin;
            float top = 0f;
            float right = (i + 1) * mBoxWidth + i * margin;
            float bottom = mBoxWidth;
            RectF rectF = new RectF(left, top, right, bottom);
            //画一个圆角矩形框
            canvas.drawRoundRect(rectF, radius, radius, mBoxPaint);
            RectF strokeRectF = new RectF(left + strokeWidth, top + strokeWidth, right - strokeWidth, bottom - strokeWidth);
            //添加到列表
            focusList.add(strokeRectF);
        }

        for (int i = 0; i < mBoxNum; i++) {
            strokeRadius = radius - strokeWidth;
            //根据当前绘制位置和是否获取焦点设置画笔颜色
            if (i <= currentInputPosition && isFocus) {
                mBoxStrokePaint.setColor(mBoxFocusStrokeColor);
            } else {
                mBoxStrokePaint.setColor(mBoxStrokeColor);
            }
            //绘制边框
            canvas.drawRoundRect(focusList.get(i), strokeRadius, strokeRadius, mBoxStrokePaint);
        }
    }
这里首先绘制圆角背景,然后通过绘制背景的参数得到绘制的边框,将边框保存起来,再根据当前绘制位置和是否获取焦点设置画笔颜色,这样就可以实现当前输入框的颜色变化,比如我没有输入的时候是黑色边框,当我输入第一个值的时候,第一个输入框的边框颜色变成绿色,输入完第一个,第二个框的边框变成绿色,表示你应该输入第二个框了,这样可以友好的提示用户。
2. 绘制文字
现在方框有了,而文字绘制我们需要绘制在方框的中间,自定义View中新增一个drawText()方法。
    /**
     * 绘制文字
     */
    private void drawText(Canvas canvas) {
        int boxMargin = EasyUtils.dp2px(mContext, mBoxMargin);
        for (int i = 0; i < inputArray.length; i++) {
            if (inputArray[i] != null) {
                //绘制的文字
                String content = ciphertext ? ciphertextContent : inputArray[i];
                //获取绘制的文字边界
                mTextPaint.getTextBounds(content, 0, content.length(), mTextRect);
                //绘制的位置
                int offset = (mTextRect.top + mTextRect.bottom) / 2;
                //绘制文字,需要确定起始点的X、Y的坐标点
                float x = (float) (getPaddingLeft() + mBoxWidth * i + boxMargin * i + mBoxWidth / 2);
                float y = (float) (getPaddingTop() + mBoxWidth / 2) - offset;
                //绘制文字
                canvas.drawText(content, x, y, mTextPaint);
            }
        }
    }
绘制文字和之前的MacAddressEditText中的操作差不多,我就不重复说了,下面我们来看输入。
⑤ 输入
绘制的处理已经完成了,简易地址输入框我们之前说了只输入数字,输入的数据就是:0、1、2、3、4、5、6、7、8、9,那么为了方便,我打算自己做一个键盘来进行输入。
1. 键盘布局
首先在layout下创建一个lay_number_keyboard.xml,用于作为键盘的布局,代码如下所示:
<?xml version="1.0" encoding="utf-8"?>
<androidx.constraintlayout.widget.ConstraintLayout xmlns:android="http://schemas.android.com/apk/res/android"
    xmlns:app="http://schemas.android.com/apk/res-auto"
    android:layout_width="match_parent"
    android:layout_height="wrap_content"
    android:background="#eff4f9">

    <Button
        android:id="@+id/btn_1"
        android:layout_width="0dp"
        android:layout_height="48dp"
        android:layout_marginStart="8dp"
        android:layout_marginLeft="8dp"
        android:layout_marginTop="8dp"
        android:backgroundTint="@color/key_bg_color"
        android:insetTop="0dp"
        android:insetBottom="0dp"
        android:text="@string/num_1"
        android:textColor="@color/key_tx_color"
        android:textSize="16sp"
        app:layout_constraintEnd_toStartOf="@+id/btn_2"
        app:layout_constraintHorizontal_bias="0.5"
        app:layout_constraintStart_toStartOf="parent"
        app:layout_constraintTop_toTopOf="parent" />

    <Button
        android:id="@+id/btn_2"
        android:layout_width="0dp"
        android:layout_height="48dp"
        android:layout_marginStart="4dp"
        android:layout_marginLeft="4dp"
        android:backgroundTint="@color/key_bg_color"
        android:insetTop="0dp"
        android:insetBottom="0dp"
        android:text="@string/num_2"
        android:textColor="@color/key_tx_color"
        android:textSize="16sp"
        app:layout_constraintEnd_toStartOf="@+id/btn_3"
        app:layout_constraintHorizontal_bias="0.5"
        app:layout_constraintStart_toEndOf="@+id/btn_1"
        app:layout_constraintTop_toTopOf="@+id/btn_1" />

    <Button
        android:id="@+id/btn_3"
        android:layout_width="0dp"
        android:layout_height="48dp"
        android:layout_marginStart="4dp"
        android:layout_marginLeft="4dp"
        android:layout_marginEnd="8dp"
        android:layout_marginRight="8dp"
        android:backgroundTint="@color/key_bg_color"
        android:insetTop="0dp"
        android:insetBottom="0dp"
        android:text="@string/num_3"
        android:textColor="@color/key_tx_color"
        android:textSize="16sp"
        app:layout_constraintEnd_toEndOf="parent"
        app:layout_constraintHorizontal_bias="0.5"
        app:layout_constraintStart_toEndOf="@+id/btn_2"
        app:layout_constraintTop_toTopOf="@+id/btn_2" />

    <Button
        android:id="@+id/btn_4"
        android:layout_width="0dp"
        android:layout_height="48dp"
        android:layout_marginTop="4dp"
        android:backgroundTint="@color/key_bg_color"
        android:insetTop="0dp"
        android:insetBottom="0dp"
        android:text="@string/num_4"
        android:textColor="@color/key_tx_color"
        android:textSize="16sp"
        app:layout_constraintEnd_toStartOf="@+id/btn_5"
        app:layout_constraintHorizontal_bias="0.5"
        app:layout_constraintStart_toStartOf="@+id/btn_1"
        app:layout_constraintTop_toBottomOf="@+id/btn_1" />

    <Button
        android:id="@+id/btn_5"
        android:layout_width="0dp"
        android:layout_height="48dp"
        android:layout_marginStart="4dp"
        android:layout_marginLeft="4dp"
        android:backgroundTint="@color/key_bg_color"
        android:insetTop="0dp"
        android:insetBottom="0dp"
        android:text="@string/num_5"
        android:textColor="@color/key_tx_color"
        android:textSize="16sp"
        app:layout_constraintEnd_toStartOf="@+id/btn_6"
        app:layout_constraintHorizontal_bias="0.5"
        app:layout_constraintStart_toEndOf="@+id/btn_4"
        app:layout_constraintTop_toTopOf="@+id/btn_4" />

    <Button
        android:id="@+id/btn_6"
        android:layout_width="0dp"
        android:layout_height="48dp"
        android:layout_marginStart="4dp"
        android:layout_marginLeft="4dp"
        android:layout_marginEnd="8dp"
        android:layout_marginRight="8dp"
        android:backgroundTint="@color/key_bg_color"
        android:insetTop="0dp"
        android:insetBottom="0dp"
        android:text="@string/num_6"
        android:textColor="@color/key_tx_color"
        android:textSize="16sp"
        app:layout_constraintEnd_toEndOf="parent"
        app:layout_constraintHorizontal_bias="0.5"
        app:layout_constraintStart_toEndOf="@+id/btn_5"
        app:layout_constraintTop_toTopOf="@+id/btn_5" />

    <Button
        android:id="@+id/btn_7"
        android:layout_width="0dp"
        android:layout_height="48dp"
        android:layout_marginTop="4dp"
        android:backgroundTint="@color/key_bg_color"
        android:insetTop="0dp"
        android:insetBottom="0dp"
        android:text="@string/num_7"
        android:textColor="@color/key_tx_color"
        android:textSize="16sp"
        app:layout_constraintEnd_toStartOf="@+id/btn_8"
        app:layout_constraintHorizontal_bias="0.5"
        app:layout_constraintStart_toStartOf="@+id/btn_4"
        app:layout_constraintTop_toBottomOf="@+id/btn_4" />

    <Button
        android:id="@+id/btn_8"
        android:layout_width="0dp"
        android:layout_height="48dp"
        android:layout_marginStart="4dp"
        android:layout_marginLeft="4dp"
        android:backgroundTint="@color/key_bg_color"
        android:insetTop="0dp"
        android:insetBottom="0dp"
        android:text="@string/num_8"
        android:textColor="@color/key_tx_color"
        android:textSize="16sp"
        app:layout_constraintEnd_toStartOf="@+id/btn_9"
        app:layout_constraintHorizontal_bias="0.5"
        app:layout_constraintStart_toEndOf="@+id/btn_7"
        app:layout_constraintTop_toTopOf="@+id/btn_7" />

    <Button
        android:id="@+id/btn_9"
        android:layout_width="0dp"
        android:layout_height="48dp"
        android:layout_marginStart="4dp"
        android:layout_marginLeft="4dp"
        android:backgroundTint="@color/key_bg_color"
        android:insetTop="0dp"
        android:insetBottom="0dp"
        android:text="@string/num_9"
        android:textColor="@color/key_tx_color"
        android:textSize="16sp"
        app:layout_constraintEnd_toEndOf="@+id/btn_6"
        app:layout_constraintHorizontal_bias="0.5"
        app:layout_constraintStart_toEndOf="@+id/btn_8"
        app:layout_constraintTop_toTopOf="@+id/btn_8" />

    <Button
        android:id="@+id/btn_del"
        android:layout_width="0dp"
        android:layout_height="48dp"
        android:layout_marginTop="4dp"
        android:layout_marginBottom="8dp"
        android:backgroundTint="@color/key_bg_color"
        android:insetTop="0dp"
        android:insetBottom="0dp"
        android:text="@string/delete"
        android:textColor="@color/key_tx_color"
        android:textSize="16sp"
        app:layout_constraintBottom_toBottomOf="parent"
        app:layout_constraintEnd_toStartOf="@+id/btn_0"
        app:layout_constraintHorizontal_bias="0.5"
        app:layout_constraintStart_toStartOf="@+id/btn_7"
        app:layout_constraintTop_toBottomOf="@+id/btn_7" />

    <Button
        android:id="@+id/btn_0"
        android:layout_width="0dp"
        android:layout_height="48dp"
        android:layout_marginStart="4dp"
        android:layout_marginLeft="4dp"
        android:backgroundTint="@color/key_bg_color"
        android:insetTop="0dp"
        android:insetBottom="0dp"
        android:text="@string/num_0"
        android:textColor="@color/key_tx_color"
        android:textSize="16sp"
        app:layout_constraintEnd_toStartOf="@+id/btn_complete"
        app:layout_constraintHorizontal_bias="0.5"
        app:layout_constraintStart_toEndOf="@+id/btn_del"

        app:layout_constraintTop_toTopOf="@+id/btn_del" />

    <com.google.android.material.button.MaterialButton
        android:id="@+id/btn_complete"
        android:layout_width="0dp"
        android:layout_height="48dp"
        android:layout_marginStart="4dp"
        android:layout_marginLeft="4dp"
        android:backgroundTint="@color/key_complete_bg_color"
        android:insetTop="0dp"
        android:insetBottom="0dp"
        android:text="@string/complete"
        android:textColor="@color/white"
        android:textSize="16sp"
        app:iconGravity="start|end"
        app:layout_constraintEnd_toEndOf="@+id/btn_9"
        app:layout_constraintHorizontal_bias="0.5"
        app:layout_constraintStart_toEndOf="@+id/btn_0"
        app:layout_constraintTop_toTopOf="@+id/btn_0" />

</androidx.constraintlayout.widget.ConstraintLayout>
布局的预览效果如下图所示:
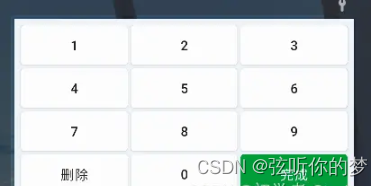
这个布局从使用上来说就很简单了,基本上一目了然,这里我们可以写一个接口用来处理键盘上按钮点击的事件。
2. 键盘接口
在com.llw.easyview下新建一个NumberKeyboardListener接口,代码如下所示:
public interface NumberKeyboardListener {

    /**
     * 数字字符
     * @param num 0~9
     */
    void onNum(String num);

    /**
     * 删除
     */
    void onDelete();

    /**
     * 完成
     */
    void onComplete();

    /**
     * 弹窗关闭
     */
    void onDialogDismiss();

    /**
     * 弹窗显示
     */
    void onDialogShow();
}
现在接口有了,接口中的方法基本上覆盖了键盘上所有按钮点击时触发的事件处理,然后是处理弹窗关闭和显示,为什么要有这个关闭和显示呢,因为要获取是否输入的状态,下面我们来写一个弹窗,用来点击简易输入框时弹出这个键盘。
3. 键盘弹窗
这个弹窗,我就写在EasyUtils类中了,在里面新增如下方法代码:
    /**
     * 显示数字键盘弹窗
     *
     * @param listener 数字键盘监听
     */
    public static void showNumKeyboardDialog(@NonNull Context context, @NonNull NumberKeyboardListener listener) {
        BottomSheetDialog dialog = new BottomSheetDialog(context);
        //从xml中获取布局视图
        View view = LayoutInflater.from(context).inflate(R.layout.lay_number_keyboard, null, false);
        //单击按钮触发接口回调
        view.findViewById(R.id.btn_0).setOnClickListener(v -> listener.onNum("0"));
        view.findViewById(R.id.btn_1).setOnClickListener(v -> listener.onNum("1"));
        view.findViewById(R.id.btn_2).setOnClickListener(v -> listener.onNum("2"));
        view.findViewById(R.id.btn_3).setOnClickListener(v -> listener.onNum("3"));
        view.findViewById(R.id.btn_4).setOnClickListener(v -> listener.onNum("4"));
        view.findViewById(R.id.btn_5).setOnClickListener(v -> listener.onNum("5"));
        view.findViewById(R.id.btn_6).setOnClickListener(v -> listener.onNum("6"));
        view.findViewById(R.id.btn_7).setOnClickListener(v -> listener.onNum("7"));
        view.findViewById(R.id.btn_8).setOnClickListener(v -> listener.onNum("8"));
        view.findViewById(R.id.btn_9).setOnClickListener(v -> listener.onNum("9"));
        view.findViewById(R.id.btn_del).setOnClickListener(v -> listener.onDelete());
        view.findViewById(R.id.btn_complete).setOnClickListener(v -> {
            listener.onComplete();
            dialog.dismiss();
        });
        //点击外面消失
        dialog.setCancelable(true);
        //设置内容视图
        dialog.setContentView(view);
        if (dialog.getWindow() != null) {
            //设置弹出窗口背景透明
            WindowManager.LayoutParams params = dialog.getWindow().getAttributes();
            params.dimAmount = 0.0f;
            dialog.getWindow().setAttributes(params);
        }
        dialog.setOnShowListener(dialog1 -> listener.onDialogShow());
        dialog.setOnCancelListener(dialog12 -> listener.onDialogDismiss());
        dialog.setOnDismissListener(dialog13 -> listener.onDialogDismiss());
        dialog.show();
    }
这里就是一个底部弹窗,然后设置布局视图,设置接口回调,设置背景透明,最后显示出来。那么下一步要做的就是点击输入框调用这个弹窗显示键盘。
4. 显示键盘
在View中是可以获取到点击触摸事件的,那么我们可以在自定义View中新增如下代码:
    /**
     * 触摸事件
     */
    @SuppressLint("ClickableViewAccessibility")
    @Override
    public boolean onTouchEvent(MotionEvent event) {
        if (event != null) {
            if (event.getAction() == MotionEvent.ACTION_DOWN) {
                //显示数字键盘
                EasyUtils.showNumKeyboardDialog(mContext, this);
                return true;
            }
        }
        return super.onTouchEvent(event);
    }
这里的代码就是当我们的手机点击这个简易输入框的时候,会先触发触摸事件,然后才是点击事件,而在这里我们就是在触摸到的时候显示键盘弹窗,然后返回 true,这里就会进行事件的拦截,这里的这个this,就是我们当前的自定义View需要实现的回调接口,将鼠标放在这个this后面,然后Alt + Enter的组合键,会出现弹窗,如下图所示:

这里点击第四项,会出现一个弹窗,勾选上所有的方法,然后点OK就可以快速实现这个接口的回调,重写接口的方法,你会看到自定义View新增了5个方法,代码如下:
    @Override
    public void onNum(String num) {
        if (currentInputPosition == mInputLength) return;
        inputArray[currentInputPosition] = num;
        currentInputPosition++;
        //Refresh View
        postInvalidate();
    }

    @Override
    public void onDelete() {
        if (currentInputPosition == 0) return;
        currentInputPosition--;
        inputArray[currentInputPosition] = null;
        //Refresh View
        postInvalidate();
    }

    @Override
    public void onComplete() {
        Log.d("TAG", "onComplete: " + getText());
    }

    @Override
    public void onDialogShow() {
        isFocus = true;
        postInvalidate();
    }

    @Override
    public void onDialogDismiss() {
        isFocus = false;
        postInvalidate();
    }
当调用postInvalidate()方法时会重新进行绘制,则按照之前的逻辑就行了。
5. 相关API
下面再增加几个可供代码调用的API方法,如下所示:
    /**
     * 设置输入框个数
     */
    public void setBoxNum(int num) {
        if (num < 4 || num > 6) {
            throw new IllegalArgumentException("The number of input boxes ranges from 4 to 6");
        }
        mBoxNum = num;
    }

    /**
     * 获取输入总长度
     */
    public int getBoxNum() {
        return mBoxNum;
    }

    /**
     * 设置是否密文
     * @param flag true 密文、false 明文
     */
    public void setCiphertext(boolean flag) {
        ciphertext = flag;
        postInvalidate();
    }

    /**
     * 设置密文时显示的内容
     * @param content 密文内容,默认是 *
     */
    public void setCiphertextContent(String content) {
        if (content == null) return;
        if (content.isEmpty()) return;
        if (content.length() > 1) return;
        ciphertextContent = content;
    }

    /**
     * 获取输入内容
     */
    public String getText() {
        StringBuilder builder = new StringBuilder();
        for (String number : inputArray) {
            if (number == null) continue;
            if (number.isEmpty()) continue;
            builder.append(number);
        }
        return builder.toString();
    }
四、使用自定义View
关于使用,我在些这个文章的时候这个自定义View已经加入到仓库中了,可以通过引入依赖的方式,例如在app模块中使用,则打开app模块下的build.gradle,在dependencies{}闭包下添加即可,之后记得要Sync Now。
dependencies {
    implementation 'io.github.lilongweidev:easyview:1.0.3'
}
或者你在自己的项目中完成了刚才上述的所有步骤,那么你就不用引入依赖了,直接调用就好了,不过要注意更改对应的包名,否则会爆红的。
可以使用了,修改activity_easy_edittext.xml中的代码,如下所示:
<?xml version="1.0" encoding="utf-8"?>
<LinearLayout xmlns:android="http://schemas.android.com/apk/res/android"
    xmlns:app="http://schemas.android.com/apk/res-auto"
    xmlns:tools="http://schemas.android.com/tools"
    android:layout_width="match_parent"
    android:layout_height="match_parent"
    android:gravity="center"
    android:orientation="vertical"
    tools:context=".used.EasyEditTextActivity">

    <!--简易输入框-->
    <com.easy.view.EasyEditText
        android:id="@+id/et_content"
        android:layout_width="wrap_content"
        android:layout_height="wrap_content"
        app:boxBackgroundColor="@color/white"
        app:boxFocusStrokeColor="@color/green"
        app:boxNum="6"
        app:boxStrokeColor="@color/black"
        app:boxStrokeWidth="2dp"
        app:boxWidth="48dp"
        app:ciphertext="false"
        app:textColor="@color/black"
        app:textSize="16sp" />

    <CheckBox
        android:id="@+id/cb_flag"
        android:layout_width="wrap_content"
        android:layout_height="wrap_content"
        android:layout_marginTop="30dp"
        android:text="明文" />

    <Button
        android:id="@+id/btn_get_content"
        android:layout_width="wrap_content"
        android:layout_height="wrap_content"
        android:layout_marginTop="12dp"
        android:text="获取内容" />
</LinearLayout>
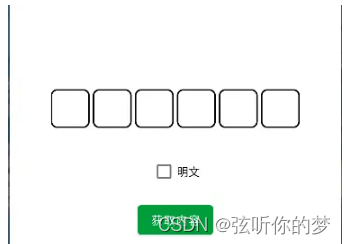
如果你发现XML预览不了,看不到这个自定义View,就Rebuild Project一下,就能看到了,预览效果如下图所示:
下面进入到EasyEditTextActivity中去使用,修改代码如下所示:
public class EasyEditTextActivity extends EasyActivity<ActivityEasyEdittextBinding> {

    @Override
    protected void onCreate() {
        getSupportActionBar().setDisplayHomeAsUpEnabled(true);
        binding.cbFlag.setOnCheckedChangeListener((buttonView, isChecked) -> {
            binding.etContent.setCiphertext(isChecked);
            binding.cbFlag.setText(isChecked ? "密文" : "明文");
        });
        //输入框
        binding.btnGetContent.setOnClickListener(v -> {
            String content = binding.etContent.getText();
            if (content.isEmpty()) {
                showMsg("请输入内容");
                return;
            }
            if (content.length() < binding.etContent.getBoxNum()) {
                showMsg("请输入完整内容");
                return;
            }
            showMsg("输入内容为:" + content);
        });
    }
}
这里的代码就很简单,获取View,然后点击按钮时获取输入框的值,获取到值显示在按钮上,下面运行测试一下。
