文章目录
- 链表
- js没有链表吗
- 203. 移除链表元素
- 为什么设置虚拟头节点
- 思路与代码分析
- 上面代码补充分析
- 注意:为什么把虚拟头节点赋值给 cur
- 204. 设计链表
- 206. 反转链表
- 双指针法--具体思路见代码
- 双指针法具体分析(上面代码看懂这里可以忽略)
- 递归法思路略
- 补充:head->next = p 和 p=head->next(可以跳过)
- 注意:a.next = b
- 142.环形链表II
- 使用快慢指针的方法
- 判断链表是否有环
- 如果有环,如何找到这个环的入口
- 代码及思路分析
- 想不通就画图模拟一下过程或者看上面提供的动态图
- 总结
- 什么时候使用虚拟头节点?
- 为什么要使用虚拟头节点?
- 双指针的使用
- 设置虚拟头节点为什么还要赋值给另外的变量?
链表
这里链表的使用部分题目也会用到双指针法
js没有链表吗
JavaScript 是一门动态语言,它没有提供原生的链表数据结构。但是可以使用对象和数组来模拟链表。
例如,可以使用对象来表示链表的节点,每个节点包含一个值和指向下一个节点的引用。定义一个链表类如下:
class LinkedList {
  constructor() {
    this.head = null;
    this.tail = null;
  }

  // 在链表末尾添加节点append(value) {
    const node = { value, next: null };
    if (this.tail) {
      this.tail.next = node;
    }
    this.tail = node;
    if (!this.head) {
      this.head = node;
    }
  }

  // 在链表中查找节点find(value) {
    let node = this.head;
    while (node) {
      if (node.value === value) {
        return node;
      }
      node = node.next;
    }
    return null;
  }

  // 在链表中删除节点delete(value) {
    if (!this.head) {
      return;
    }
    // 如果是头节点while (this.head && this.head.value === value) {
      this.head = this.head.next;
    }
    let node = this.head;
    while (node.next) {
      if (node.next.value === value) {
        node.next = node.next.next;
      } else {
        node = node.next;
      }
    }
    if (this.tail.value === value) {
      this.tail = node;
    }
  }
}
以上代码实现了链表的基本操作:添加节点、查找节点、删除节点等。对于更复杂的链表操作,可以根据需要进行扩展。
当然,如果需要在 JavaScript 中使用链表,也可以使用第三方库实现,如immutable.js、list.js、lazy.js等。这些库中都提供了链表等多种数据结构的实现。
203. 移除链表元素
为什么设置虚拟头节点
链表的第一个结点有可能需要添加或删除的时候,如果没有虚拟头结点
就要分两种情况实现添加或删除节点的操作
一种是头结点的删除,一种是其他结点的删除
有虚拟头结点,那么实际的头结点变相成为了其他结点
操作就是一样的
思路与代码分析
删除val节点:只需要将当前节点的上一个节点指向下一个节点即可
/**
 * Definition for singly-linked list.
 * function ListNode(val, next) {
 *     this.val = (val===undefined ? 0 : val)
 *     this.next = (next===undefined ? null : next)
 * }
 */
/**
 * @param {ListNode} head
 * @param {number} val
 * @return {ListNode}
 */
var removeElements = function(head, val) {
    // 添加一个虚拟头节点 head 0
    const ret = new ListNode(0, head)
    // 新建一个变量去改变ret内容,我也不是很清楚为什么临时变量可以改变初始内容(见下面注意解析)
    let cur = ret
    while(cur.next) {
        // 如果下一个地址的data===val,那么就将下一个地址赋值为下下个地址
        if(cur.next.val === val) {
            cur.next = cur.next.next
            continue
        }
        // 如果不等于,则后移下一位地址进行片段
        else {
            cur = cur.next
        }

    }
    return ret.next

};
上面代码补充分析
// 如果是首,不好操作,所以我们可以设一个虚拟头节点
    // ret 是头节点,头节点知道了整个链表就知道了
    const ret = new ListNode(0, head)
    // 这里 赋值给 cur  表示当前节点()
    let cur = ret
    while(cur.next) {
        if (cur.next.val === val) {
            cur.next = cur.next.next
            continue
        } else {
            cur = cur.next
        }
    }
    // 不能直接返回ret 因为设置了虚拟头节点 所以我们需要从下一个返回
    return ret.next
注意:为什么把虚拟头节点赋值给 cur
上面代码把 ret 赋值给cur目的就是为了,操作链表的时候不影响到头节点
我们操作链表就用 cur去操作,最后操作后的链表就用 ret返回改变后的链表
204. 设计链表
class LinkNode {
   constructor(val, next) {
       this.val = val;
       this.next = next;
   }
}

/**
* Initialize your data structure here.
* 单链表 储存头尾节点 和 节点数量
*/
var MyLinkedList = function() {
   this._size = 0;
   this._tail = null;
   this._head = null;
};

/**
* Get the value of the index-th node in the linked list. If the index is invalid, return -1.
* @param {number} index
* @return {number}
*/
MyLinkedList.prototype.getNode = function(index) {
   if(index < 0 || index >= this._size) return null;
   // 创建虚拟头节点
   let cur = new LinkNode(0, this._head);
   // 0 -> head
   while(index-- >= 0) {
       cur = cur.next;
   }
   return cur;
};
MyLinkedList.prototype.get = function(index) {
   if(index < 0 || index >= this._size) return -1;
   // 获取当前节点
   return this.getNode(index).val;
};

/**
* Add a node of value val before the first element of the linked list. After the insertion, the new node will be the first node of the linked list.
* @param {number} val
* @return {void}
*/
MyLinkedList.prototype.addAtHead = function(val) {
   const node = new LinkNode(val, this._head);
   this._head = node;
   this._size++;
   if(!this._tail) {
       this._tail = node;
   }
};

/**
* Append a node of value val to the last element of the linked list.
* @param {number} val
* @return {void}
*/
MyLinkedList.prototype.addAtTail = function(val) {
   const node = new LinkNode(val, null);
   this._size++;
   if(this._tail) {
       this._tail.next = node;
       this._tail = node;
       return;
   }
   this._tail = node;
   this._head = node;
};

/**
* Add a node of value val before the index-th node in the linked list. If index equals to the length of linked list, the node will be appended to the end of linked list. If index is greater than the length, the node will not be inserted.
* @param {number} index
* @param {number} val
* @return {void}
*/
MyLinkedList.prototype.addAtIndex = function(index, val) {
   if(index > this._size) return;
   if(index <= 0) {
       this.addAtHead(val);
       return;
   }
   if(index === this._size) {
       this.addAtTail(val);
       return;
   }
   // 获取目标节点的上一个的节点
   const node = this.getNode(index - 1);
   node.next = new LinkNode(val, node.next);
   this._size++;
};

/**
* Delete the index-th node in the linked list, if the index is valid.
* @param {number} index
* @return {void}
*/
MyLinkedList.prototype.deleteAtIndex = function(index) {
   if(index < 0 || index >= this._size) return;
   if(index === 0) {
       this._head = this._head.next;
       // 如果删除的这个节点同时是尾节点,要处理尾节点
       if(index === this._size - 1){
           this._tail = this._head
       }
       this._size--;
       return;
   }
   // 获取目标节点的上一个的节点
   const node = this.getNode(index - 1);
   node.next = node.next.next;
   // 处理尾节点
   if(index === this._size - 1) {
       this._tail = node;
   }
   this._size--;
};

// MyLinkedList.prototype.out = function() {
//     let cur = this._head;
//     const res = [];
//     while(cur) {
//         res.push(cur.val);
//         cur = cur.next;
//     }
// };
/**
* Your MyLinkedList object will be instantiated and called as such:
* var obj = new MyLinkedList()
* var param_1 = obj.get(index)
* obj.addAtHead(val)
* obj.addAtTail(val)
* obj.addAtIndex(index,val)
* obj.deleteAtIndex(index)
*/
206. 反转链表
双指针法–具体思路见代码
如果再定义一个新的链表,实现链表元素的反转,其实这是对内存空间的浪费。
其实只需要改变链表的next指针的指向,直接将链表反转 ,而不用重新定义一个新的链表
/**
 * Definition for singly-linked list.
 * function ListNode(val, next) {
 *     this.val = (val===undefined ? 0 : val)
 *     this.next = (next===undefined ? null : next)
 * }
 */
/**
 * @param {ListNode} head
 * @return {ListNode}
 */
var reverseList = function(head) {
    // 如果头节点不存在 或 头节点下一个节点不存在
    if(!head || !head.next) return head

    // 虚拟头节点
    const ret = new ListNode(0, head)

    // 利用双指针:前一个指针pre 当前指针cur
    let pre = null
    let cur = head

    // 反转:即让当前指针指向前一个指针

    while(cur) {
        // 保存一份当前节点指向的下一个节点
        const _ = cur.next
        // 反转:即让当前指针指向前一个指针
        cur.next = pre
        // 向后移动前一个节点
        pre = cur
        // 向后移动当前节点
        cur = _

    }

    // cur 为空时,上面循环结束,次吃末尾节点就是pre 也就是反转链表的头节点
    return pre
};
双指针法具体分析(上面代码看懂这里可以忽略)
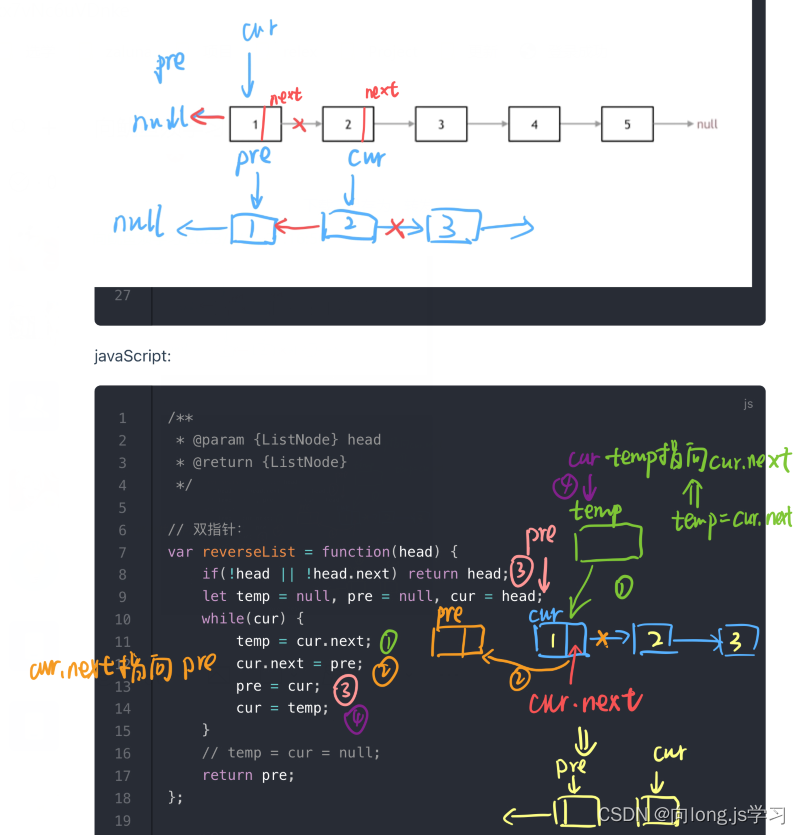
- 首先定义一个cur指针,指向头结点,再定义一个pre指针,初始化为null。
- 然后就要开始反转了,首先要把 cur->next 节点用tmp指针保存一下,也就是保存一下这个节点。
- 为什么要保存一下这个节点呢,因为接下来要改变 cur->next 的指向了,将cur->next 指向pre ,此时已经反转了第一个节点了。
- 接下来,就是循环走如下代码逻辑了,继续移动pre和cur指针。
- 最后,cur 指针已经指向了null,循环结束,链表也反转完毕了。 此时我们return pre指针就可以了,pre指针就指向了新的头结点
补充代码分析:
while(cur) {
        // 这里需要把cur.next 存起来,因为后面cur.next 会指向前面的 pre
        // 此时cur.next就变化了,所以我们需要把原始值保存一份
        temp = cur.next
        cur.next = pre
        // 先让pre移到当前cur
        pre = cur
        // 在赋值cur(如果先赋值了cur,pre移到谁呢?所以pre先移动)
        cur = temp
    }
递归法思路略
// 递归:
var reverse = function(pre, head) {
    if(!head) return pre;
    const temp = head.next;
    head.next = pre;
    pre = head
    return reverse(pre, temp);
}
var reverseList = function(head) {
    return reverse(null, head);
};

// 递归2
var reverse = function(head) {
    if(!head || !head.next) return head;// 从后往前翻
    const pre = reverse(head.next);
    head.next = pre.next;
    pre.next = head;return head;
}
var reverseList = function(head) {
    let cur = head;
    while(cur && cur.next) {
        cur = cur.next;
    }
    reverse(head);return cur;
};
补充:head->next = p 和 p=head->next(可以跳过)
谁A等于谁B,就是谁A指向谁B
原文链接:https://blog.csdn.net/skychaofan/article/details/46815007
head->next = p;和p=head->next;是不同的,当p = head->next;时,我们可以认为是把p指针指向了head->next,即是把head->next 的值赋给p,而当head->next = p时,就是head->next 的指针指向了p指针,即是把p的值赋给head->next。这一点是一开始接触链表的人最容易犯的错误。
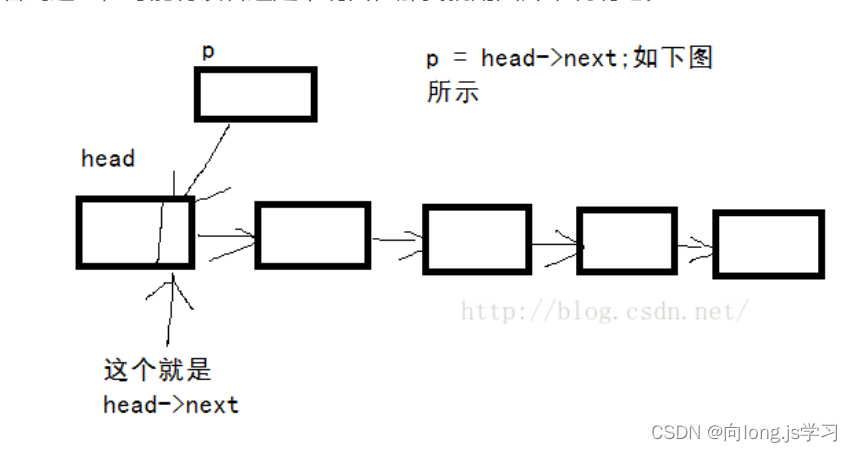
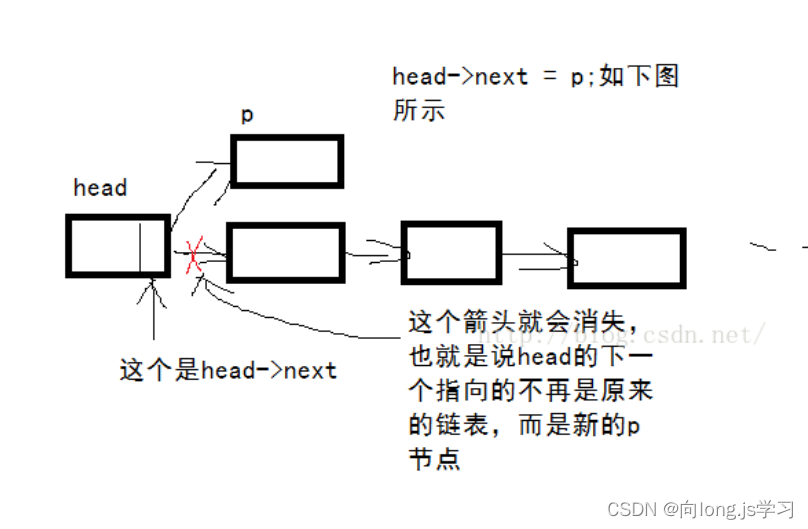
由上图我们分析可以知道,当p = head->next 时,p是指向head->next的,可以说与head的链表是没有“干扰作用”的;而当head->next = p时就不同了,这就改变了原来链表指向的方向了。所以,一般来说,p = head->next 用于显示链表,而head->next = p;多用于插入节点。
如上函数,输出的p->name和head->next->name应该是相等的,两者之间是赋值的关系。
注意:a.next = b
**上面的分析很罗嗦
就目前链表做题:只需要知道 a.next = b (a的下一个节点是b)
**
JavaScript 里面的.next 就是以前的c里面的->next
具体可以学习以下博客讲解:(写的很好)
算法:JS 中的链表简介_js链表_仙女爱吃鱼的博客-CSDN博客
142.环形链表II
使用快慢指针的方法
判断链表是否有环
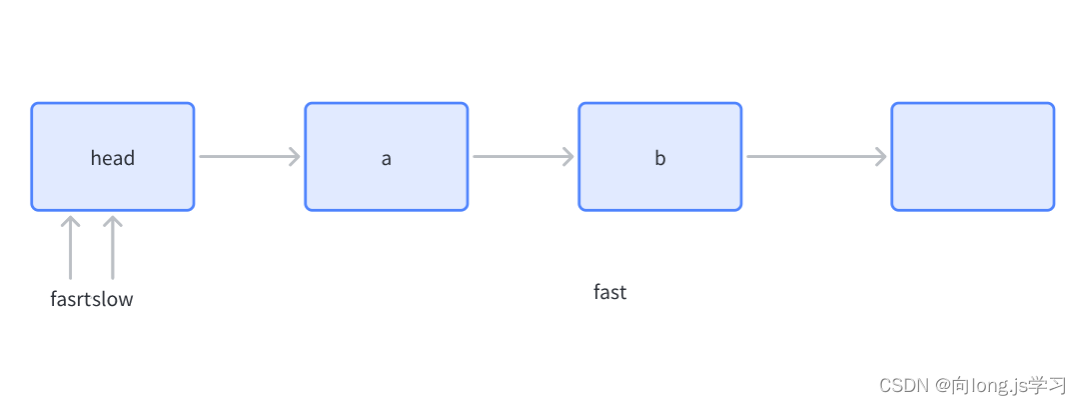
可以使用快慢指针法,分别定义 fast 和 slow 指针,从头结点出发,fast指针每次移动两个节点,slow指针每次移动一个节点,如果 fast 和 slow指针在途中相遇 ,说明这个链表有环。

如果有环,如何找到这个环的入口
推导原理略
从头结点出发一个指针,从相遇节点 也出发一个指针,这两个指针每次只走一个节点, 那么当这两个指针相遇的时候就是 环形入口的节点。

代码及思路分析
先2,1走到相遇节点,之后一个从相遇节点开始走1,一个从头节点走1,之后再次相遇的节点就是环形入口
/*
 * @lc app=leetcode.cn id=142 lang=javascript
 *
 * [142] 环形链表 II
 */

// @lc code=start
/**
 * Definition for singly-linked list.
 * function ListNode(val) {
 *     this.val = val;
 *     this.next = null;
 * }
 */

/**
 * @param {ListNode} head
 * @return {ListNode}
 */
var detectCycle = function(head) {
    /*
        快慢指针:快指针先走两步,慢指针走一步,相遇了说明有环
    */
    if(!head || !head.next) return null
    let slow = head.next, fast = head.next.next
    //  2 1 走,还没遇到
    while (fast && fast.next && fast!=slow) {
        slow = slow.next
        fast = fast.next.next
    }
    // 如果走到null 则返回null
    if(!fast || !fast.next) return null
    // 没有走到空,且到达相遇的时候,slow回到头节点,fast不变,再 1 1 走 相遇的地方便是环入口的地方
    slow = head
    // 1 1 走没有相遇的时候,就一直走
    while(fast != slow) {
        fast = fast.next
        slow =slow.next
    }
    // 1 1 相遇了
    return slow
};
// @lc code=end
想不通就画图模拟一下过程或者看上面提供的动态图
总结
什么时候使用虚拟头节点?
链表的第一个结点有可能需要添加或删除的时候,如果没有虚拟头结点
就要分两种情况实现添加或删除节点的操作
一种是头结点的删除,一种是其他结点的删除
有虚拟头结点,那么实际的头结点变相成为了其他结点
操作就是一样的
为什么要使用虚拟头节点?
可以设置一个虚拟头结点,这样原链表的所有节点就都可以按照统一的方式进行操作了。
双指针的使用
可以看数组部分双指针的使用方法,方法都是类似的,需要灵活使用
设置虚拟头节点为什么还要赋值给另外的变量?
例如把 ret 赋值给cur目的就是为了操作链表的时候不影响到头节点
我们操作链表就用 cur去操作,最后操作后的链表就用 ret返回改变后的链表


