前言
版本:spring-boot-2.7.3 | spring-context-5.3.22
main函数
直接使用静态函数启动
public static void main(String[] args) {
	SpringApplication.run(SettlleApplication.class, args);
}
静态帮助程序,可用于使用默认设置从指定源运行SpringApplication。
public static ConfigurableApplicationContext run(Class<?> primarySource, String... args) {
	// 调用下面方法
	return run(new Class<?>[] { primarySource }, args);
}
上面调用这个方法。静态帮助程序,可用于使用默认设置和用户提供的参数从指定的源运行SpringApplication
public static ConfigurableApplicationContext run(Class<?>[] primarySources, String[] args) {
	// 分成2步,看下面
	return new SpringApplication(primarySources).run(args);
}
调用new SpringApplication(primarySources).run(args)
分成2步。第一步创建一个创建一个Spring应用、第二步启动这个应用
第一步创建一个Spring应用
调用主流程
上面方法直接调用一个参数的构造函数,传入启动时初始化Spring容器的配置类
public SpringApplication(Class<?>... primarySources) {
	// 调用2个参数的构造函数
	this(null, primarySources);
}
二个参数的构造方法
// 二个参数:资源加载器、启动时初始化Spring容器的配置类
public SpringApplication(ResourceLoader resourceLoader, Class<?>... primarySources) {
	// 资源加载器
	this.resourceLoader = resourceLoader;
	// 主配置类不能为空
	Assert.notNull(primarySources, "PrimarySources must not be null");
	// 设置主配置资源为启动时初始化Spring容器的配置类
	this.primarySources = new LinkedHashSet<>(Arrays.asList(primarySources));
	// 根据项目中存在的Web应用服务类,推断Web应用类型:无、嵌入式servlet web服务器、嵌入式响应式web服务器
	this.webApplicationType = WebApplicationType.deduceFromClasspath();
	// 设置启动注册表初始化程序
	this.bootstrapRegistryInitializers = new ArrayList<>(
			getSpringFactoriesInstances(BootstrapRegistryInitializer.class));
	// 设置将应用于Spring ApplicationContext的 ApplicationContextInitializer
	setInitializers((Collection) getSpringFactoriesInstances(ApplicationContextInitializer.class));
	// 设置将应用于SpringApplication并在ApplicationContext中注册的 ApplicationListener
	setListeners((Collection) getSpringFactoriesInstances(ApplicationListener.class));
	// 从多个配置类中找到含有main方法的主配置类
	this.mainApplicationClass = deduceMainApplicationClass();
}
延展一个细节
getSpringFactoriesInstances()方法
这个方法里会有一步读取项目下所有的META-INF/spring.factories文件,把文件里配置的key多个value映射成Map<String, List<String>>并放入缓存。
得到缓存后,使用map的getOrDefault()方法,得到传入类全限定名作为key的value列表。
最后把这个value列表里的全限定名都实例化,形成成一个类List
第二步run方法启动应用
调用主流程
public ConfigurableApplicationContext run(String... args) {
	// 记录开始运行时间
	long startTime = System.nanoTime();
	// 创建启动引导程序上下文,在这个步骤的调用里可能实现Spring Cloud的初始化。详看1
	DefaultBootstrapContext bootstrapContext = createBootstrapContext();
	// 声明Spring容器
	ConfigurableApplicationContext context = null;
	// 设置java.awt.headless模式为true。详看2
	configureHeadlessProperty();
	// 创建Spring应用启动过程监听器。详看3
	SpringApplicationRunListeners listeners = getRunListeners(args);
	// 执行启动监听器的启动中方法,触发ApplicationStartingEvent事件。详看4
	listeners.starting(bootstrapContext, this.mainApplicationClass);
	try {
		// 把命令行参数转换成应用参数对象
		ApplicationArguments applicationArguments = new DefaultApplicationArguments(args);
		// 初始化准备环境。详看5
		ConfigurableEnvironment environment = prepareEnvironment(listeners, bootstrapContext, applicationArguments);
		// 配置忽略Bean属性到配置环境
		configureIgnoreBeanInfo(environment);
		// 打印旗帜
		Banner printedBanner = printBanner(environment);
		// 创建Spring应用上下文
		context = createApplicationContext();
		// 给上下文设置启用步骤监测
		context.setApplicationStartup(this.applicationStartup);
		// 准备上下文。详看6
		prepareContext(bootstrapContext, context, environment, listeners, applicationArguments, printedBanner);
		// 刷新上下文。详看7
		refreshContext(context);
		// 刷新之后,做一些事情,是个protected默认里面没有任何处理
		afterRefresh(context, applicationArguments);
		// 得到启动历经时间
		Duration timeTakenToStartup = Duration.ofNanos(System.nanoTime() - startTime);
		if (this.logStartupInfo) {
			new StartupInfoLogger(this.mainApplicationClass).logStarted(getApplicationLog(), timeTakenToStartup);
		}
		// 广播通知启动完成。详看8
		listeners.started(context, timeTakenToStartup);
		// 执行所有 Runner 运行器。详看9
		callRunners(context, applicationArguments);
	}
	catch (Throwable ex) {
		handleRunFailure(context, ex, listeners);
		throw new IllegalStateException(ex);
	}
	try {
		// 记录到达这里的时间
		Duration timeTakenToReady = Duration.ofNanos(System.nanoTime() - startTime);
		// 广播通知ready
		listeners.ready(context, timeTakenToReady);
	}
	catch (Throwable ex) {
		handleRunFailure(context, ex, null);
		throw new IllegalStateException(ex);
	}
	// 返回上下文
	return context;
}
详看2——设置java.awt.headless模式为true
private void configureHeadlessProperty() {
	// 设置系统属性 java.awt.headless
	System.setProperty(SYSTEM_PROPERTY_JAVA_AWT_HEADLESS,
			System.getProperty(SYSTEM_PROPERTY_JAVA_AWT_HEADLESS, Boolean.toString(this.headless)));
}
其中:
SYSTEM_PROPERTY_JAVA_AWT_HEADLESS="java.awt.headless";
又调用了System类的两个方法:setProperty(String key,String value)和getProperty(String a,String b)
含义是:给属性设值System.setProperty(),它的值来源于System.getProperty()
为什么把属性从一个地方取出来,然后又设置到同一个地方,这不是多此一举吗?
其实这是因为System中的两个读写属性的方法不对等。System中getProperty()有2个重载方法,但却只有一个setProperty()方法。
其中getProperty()有单参和双参两方法。
单参就是简单的获取属性,有就有,没有就没有。
双参则聪明一点,在没有的时候会返回一个调用者指定的默认值,所以经过这样操作后,不管有没有那个属性,最终都能保证有。
那么:做了这样的操作后,SpringBoot想干什么呢?其实是想设置该应用程序,即使没有检测到显示器,也允许其启动。对于服务器来说是不需要显示器的,所以要这样设置。
java.awt.headless模式是什么参看:
java.awt.headless模式
java.awt.headless 详解
详看3——Spring应用启动步骤监听器
得到 SpringApplicationRunListener 监听器集合 SpringApplicationRunListeners类
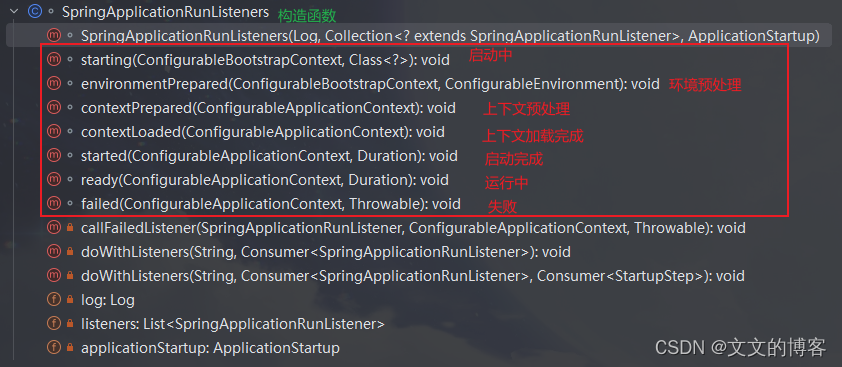
private SpringApplicationRunListeners getRunListeners(String[] args) {
	Class<?>[] types = new Class<?>[] { SpringApplication.class, String[].class };
	return new SpringApplicationRunListeners(logger,
			getSpringFactoriesInstances(SpringApplicationRunListener.class, types, this, args),
			this.applicationStartup);
}

getSpringFactoriesInstances(SpringApplicationRunListener.class, types, this, args)
这个方法熟,上面new SpringApplication中有2出用到,用来获取SpringFactories的实例列表。本方法中取key为SpringApplicationRunListener.class的实例列表。这里得到SpringApplicationRunListener的实现的类列表赋值给listeners(此listeners非前面的listeners,这个是前面listeners对象里的监听器列表)
这个版本只有一个实现 EventPublishingRunListener 类里面有一个多播器:initialMulticaster
下面看下构造函数
// 可以看到初始化了一个简单应用的事件多播器initialMulticaster,并且initialMulticaster收集了容器现在所有的监听器
public EventPublishingRunListener(SpringApplication application, String[] args) {
	this.application = application;
	this.args = args;
	this.initialMulticaster = new SimpleApplicationEventMulticaster();
	// 这里给多播器添加第一步创建Spring应用对象里的监听事件
	for (ApplicationListener<?> listener : application.getListeners()) {
		this.initialMulticaster.addApplicationListener(listener);
	}
}
下面方法starting、environmentPrepared、contextPrepared、contextLoaded、started、ready、failed用的是SimpleApplicationEventMulticaster.multicastEvent进行处理。其中starting、environmentPrepared没有
详看4——starting阶段触发ApplicationStartingEvent事件
方法的作用:在首次启动run方法时立即调用。可用于非常早期的初始化。
事件的作用:ApplicationStartingEvent事件在SpringApplication启动后尽早发布,即在Environment或ApplicationContext可用之前,但在ApplicationListeners注册之后。事件的来源是SpringApplication本身,但要注意在早期阶段不要过多地使用其内部状态,因为它可能会在生命周期的后期被修改。
看详细的监听器【细读Spring Boot源码】监听器合集
详看5——初始化准备环境
先了解相关体系类和接口
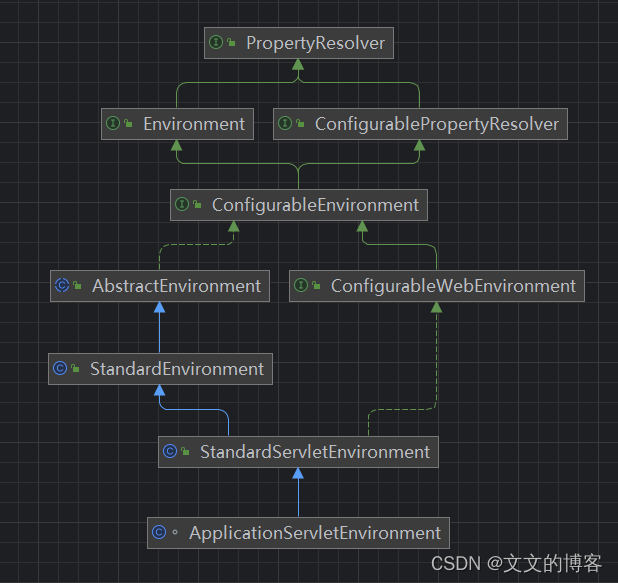
- PropertyResolver:提供属性访问功能。
- ConfigurablePropertyResolver:继承自PropertyResolver,主要提供属性类型转换(基于org.springframework.core.convert.ConversionService)功能。
- Environment:继承自PropertyResolver,提供访问和判断profiles的功能。
- ConfigurableEnvironment:继承自ConfigurablePropertyResolver和Environment,并且提供设置激活的profile和默认的profile的功能。
- ConfigurableWebEnvironment:继承自ConfigurableEnvironment,并且提供配置Servlet上下文和Servlet参数的功能。
- AbstractEnvironment:实现了ConfigurableEnvironment接口,默认属性和存储容器的定义,并且实现了ConfigurableEnvironment种的方法,并且为子类预留可覆盖了扩展方法。
- StandardEnvironment:继承自AbstractEnvironment,非Servlet(Web)环境下的标准Environment实现。
- StandardServletEnvironment:继承自StandardEnvironment,Servlet(Web)环境下的标准Environment实现。
看下顶级接口PropertyResolver
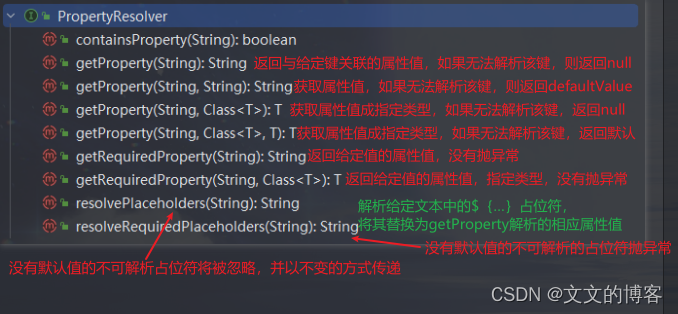
其余接口约束
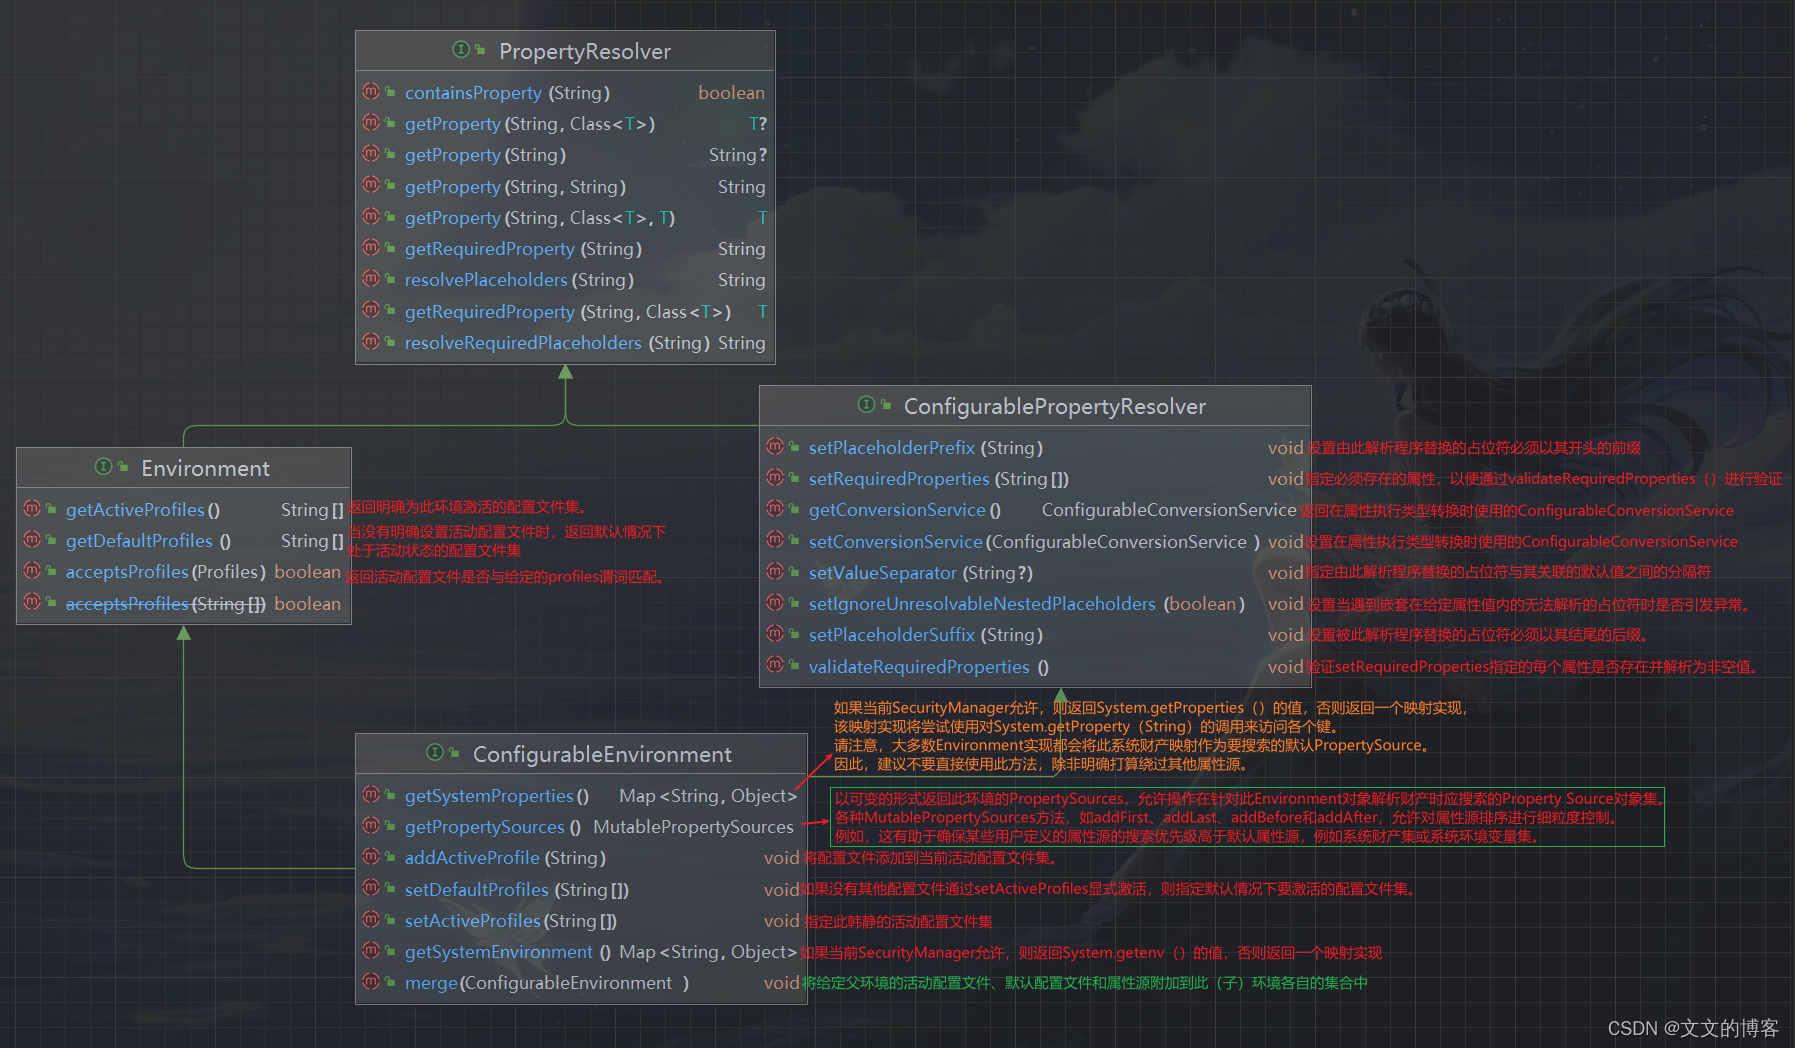
ConfigurableReactiveWebEnvironment接口里没有进行约束
AbstractEnvironment类
重点的实现都在这里
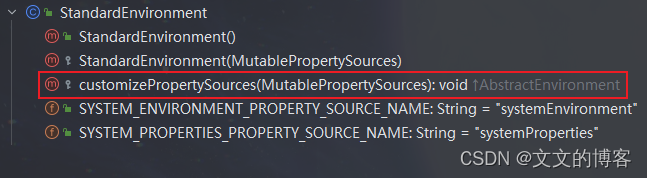
StandardEnvironment类
给propertySources添加2个对象systemProperties、systemEnvironment
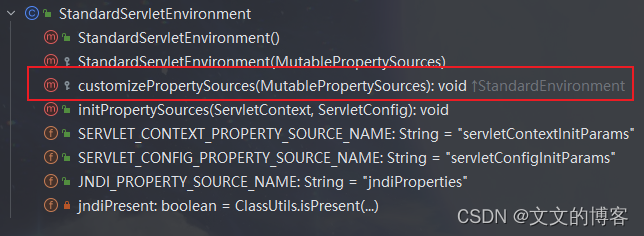
StandardServletEnvironment类
给propertySources添加3个对象
servletConfigInitParams
servletContextInitParams
jndiProperties
MutablePropertySources类
ConfigurableEnvironment接口中MutablePropertySources getPropertySources()方法可以获取到MutablePropertySources实例,这个成员变量也是最重要的,看下它的作用
从3.1版本开始存在:MutablePropertySources为PropertySources接口的默认实现。允许操作包含的属性源,并提供用于复制现有PropertySources实例的构造函数。
在addFirst和addLast等方法中提到优先级的情况下,这与使用PropertyResolver解析给定属性时搜索属性源的顺序有关。
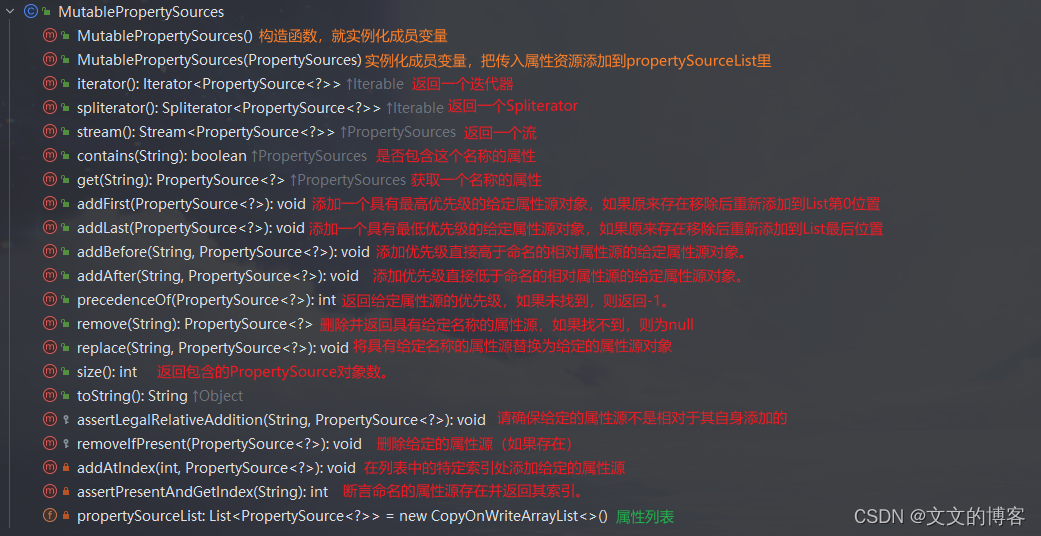
这类中最重要的就是一个成员变量List<PropertySource<?>> propertySourceList,这个PropertySource是类,与MutablePropertySources实现的接口PropertySources差了一个s
看下PropertySource这类:
源码相对简单,预留了一个getProperty抽象方法给子类实现,重点需要关注的是覆写了的equals和hashCode方法,实际上只和name属性相关,这一点很重要,说明一个PropertySource实例绑定到一个唯一的name,这个name有点像HashMap里面的key,部分移除、判断方法都是基于name属性。PropertySource的最常用子类是MapPropertySource、PropertiesPropertySource、ResourcePropertySource、StubPropertySource、ComparisonPropertySource:
- MapPropertySource:source指定为Map实例的PropertySource实现。
- PropertiesPropertySource:source指定为Map实例的PropertySource实现,内部的Map实例由Properties实例转换而来。
- ResourcePropertySource:继承自PropertiesPropertySource,source指定为通过Resource实例转化为Properties再转换为Map实例。
- StubPropertySource:PropertySource的一个内部类,source设置为null,实际上就是空实现。
- ComparisonPropertySource:继承自ComparisonPropertySource,所有属性访问方法强制抛出异常,作用就是一个不可访问属性的空实现。
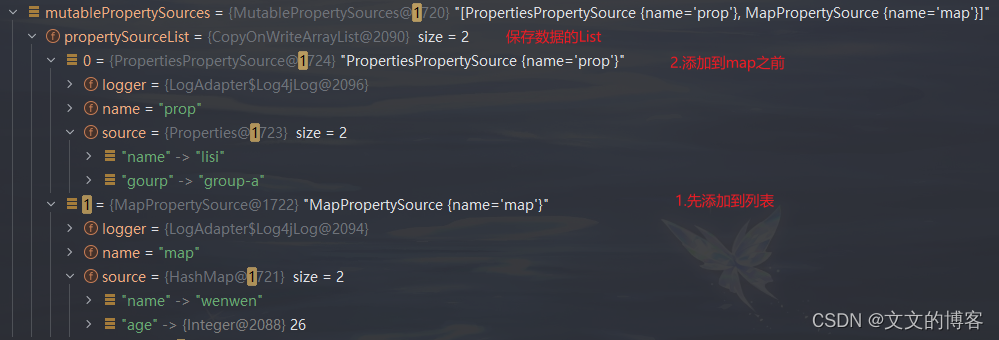
小例子理解下:
public static void main(String[] args) {
	MutablePropertySources mutablePropertySources = new MutablePropertySources();
	Map<String, Object> map = new HashMap<>(8);
	map.put("name", "wenwen");
	map.put("age", 26);
	MapPropertySource mapPropertySource = new MapPropertySource("map", map);
	mutablePropertySources.addLast(mapPropertySource);
	Properties properties = new Properties();
	PropertiesPropertySource propertiesPropertySource = new PropertiesPropertySource("prop", properties);
	properties.put("name", "lisi");
	properties.put("gourp", "group-a");
	mutablePropertySources.addBefore("map", propertiesPropertySource);
	System.out.println(mutablePropertySources);
}
执行结果
环境加载过程源码分析
// 准备环境,出入启动监听器列表、启动上下文、应用参数
private ConfigurableEnvironment prepareEnvironment(SpringApplicationRunListeners listeners,
		DefaultBootstrapContext bootstrapContext, ApplicationArguments applicationArguments) {
	// 创建和配置环境
	ConfigurableEnvironment environment = getOrCreateEnvironment();
	// 把args传入参数封装进Environment
	configureEnvironment(environment, applicationArguments.getSourceArgs());
	// 贴上,key值为configurationProperties,value为现有资源构建的SpringConfigurationPropertySources对象
	ConfigurationPropertySources.attach(environment);
	// 环境准备就绪运行监听器列表触发。详看5.1
	listeners.environmentPrepared(bootstrapContext, environment);
	DefaultPropertiesPropertySource.moveToEnd(environment);
	Assert.state(!environment.containsProperty("spring.main.environment-prefix"),
			"Environment prefix cannot be set via properties.");
	bindToSpringApplication(environment);
	if (!this.isCustomEnvironment) {
		EnvironmentConverter environmentConverter = new EnvironmentConverter(getClassLoader());
		environment = environmentConverter.convertEnvironmentIfNecessary(environment, deduceEnvironmentClass());
	}
	ConfigurationPropertySources.attach(environment);
	return environment;
}
详看5.1——listeners.environmentPrepared(bootstrapContext, environment)
环境准备就绪运行监听器列表触发
public void environmentPrepared(ConfigurableBootstrapContext bootstrapContext,
		ConfigurableEnvironment environment) {
	// 最终触发的是 实现ApplicationEnvironmentPreparedEvent接口的事件
	this.initialMulticaster.multicastEvent(
			new ApplicationEnvironmentPreparedEvent(bootstrapContext, this.application, this.args, environment));
}
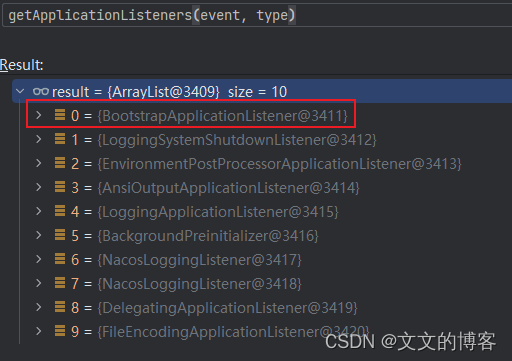
需要触发的监听器列表如下:
详看6——准备上下文
给上下文设置环境,后期处理应用上下文,应用初始化,监听器发布应用上下文已经准备完成,关闭引导程序
private void prepareContext(DefaultBootstrapContext bootstrapContext, ConfigurableApplicationContext context,
		ConfigurableEnvironment environment, SpringApplicationRunListeners listeners,
		ApplicationArguments applicationArguments, Banner printedBanner) {
	// 设置环境给Spring应用上下文
	context.setEnvironment(environment);
	// 后置处理Spring应用上下文。详看6.1
	postProcessApplicationContext(context);
	// 初始化应用,SpringApplication的applyInitializers方法在刷新之前
	// 将任何ApplicationContextInitializer应用于上下文。注意这里传入的context是未刷新的。
	applyInitializers(context);
	// 监听器发布应用上下文已经准备完成
	listeners.contextPrepared(context);
	// 关闭引导程序
	bootstrapContext.close(context);
	if (this.logStartupInfo) {
		// 记录启动信息,子类可能会覆盖以添加其他日志记录
		logStartupInfo(context.getParent() == null);
		// 记录活动的配置文件
		logStartupProfileInfo(context);
	}
	// Add boot specific singleton beans
	// 添加引导特定的单例bean
	ConfigurableListableBeanFactory beanFactory = context.getBeanFactory();
	beanFactory.registerSingleton("springApplicationArguments", applicationArguments);
	if (printedBanner != null) {
		beanFactory.registerSingleton("springBootBanner", printedBanner);
	}
	if (beanFactory instanceof AbstractAutowireCapableBeanFactory) {
		// 设置允许循环引用,是否开启循环依赖。Springboot2.6版本后默认不允许循环依赖
		((AbstractAutowireCapableBeanFactory) beanFactory).setAllowCircularReferences(this.allowCircularReferences);
		//
		if (beanFactory instanceof DefaultListableBeanFactory) {
			// 设置是否应允许通过注册具有相同名称的不同定义来覆盖bean定义,并自动替换前者。默认ture
			((DefaultListableBeanFactory) beanFactory)
					.setAllowBeanDefinitionOverriding(this.allowBeanDefinitionOverriding);
		}
	}
	// 如果设置了懒加载,添加一个懒加载初始化Bean工厂后置处理器
	if (this.lazyInitialization) {
		context.addBeanFactoryPostProcessor(new LazyInitializationBeanFactoryPostProcessor());
	}
	// 处理@PropertySource的Bean工厂后置处理器。重新定制属性资源
	context.addBeanFactoryPostProcessor(new PropertySourceOrderingBeanFactoryPostProcessor(context));
	// Load the sources
	// 获取所有的资源
	Set<Object> sources = getAllSources();
	Assert.notEmpty(sources, "Sources must not be empty");
	// 加载资源
	load(context, sources.toArray(new Object[0]));
	// 监听器发布上下文资源已加载完成
	listeners.contextLoaded(context);
}
load加载资源详情【细读Spring Boot源码】prepareContext之load
6.1——postProcessApplicationContext
protected void postProcessApplicationContext(ConfigurableApplicationContext context) {
	// 用于 Bean定义生成Bean名称策略接口
	if (this.beanNameGenerator != null) {
		context.getBeanFactory().registerSingleton(AnnotationConfigUtils.CONFIGURATION_BEAN_NAME_GENERATOR,
				this.beanNameGenerator);
	}
	// 如果资源加载器不为空,给上下文重新设置加载器。启动run时这个是null
	if (this.resourceLoader != null) {
		if (context instanceof GenericApplicationContext) {
			((GenericApplicationContext) context).setResourceLoader(this.resourceLoader);
		}
		if (context instanceof DefaultResourceLoader) {
			((DefaultResourceLoader) context).setClassLoader(this.resourceLoader.getClassLoader());
		}
	}
	// 设置转换服务,启动默认为true
	if (this.addConversionService) {
		// 执行properties类型转换时使用
		context.getBeanFactory().setConversionService(context.getEnvironment().getConversionService());
	}
}
详看7——刷新上下文
最最最为重要
private void refreshContext(ConfigurableApplicationContext context) {
	if (this.registerShutdownHook) {
		shutdownHook.registerApplicationContext(context);
	}
	refresh(context);
}

protected void refresh(ConfigurableApplicationContext applicationContext) {
	// 进入模板模式入口
	applicationContext.refresh();
}
刷新上下文refresh
详看8——广播通知启动完成
详看9——执行所有 Runner 运行器
逻辑比较简单分为三部分
- 首先分别获取ApplicationRunner和CommandLineRunner的bean放入List中
- 根据实现类上面的Order值进行排序
- 分别执行它们的run方法
private void callRunners(ApplicationContext context, ApplicationArguments args) {
	List<Object> runners = new ArrayList<>();
	runners.addAll(context.getBeansOfType(ApplicationRunner.class).values());
	runners.addAll(context.getBeansOfType(CommandLineRunner.class).values());
	AnnotationAwareOrderComparator.sort(runners);
	for (Object runner : new LinkedHashSet<>(runners)) {
		if (runner instanceof ApplicationRunner) {
			callRunner((ApplicationRunner) runner, args);
		}
		if (runner instanceof CommandLineRunner) {
			callRunner((CommandLineRunner) runner, args);
		}
	}
}
Order值相同的话ApplicationRunner先执行
在callRunner中发现ApplicationRunner和CommandLineRunner的run方法args用的不一样
private void callRunner(ApplicationRunner runner, ApplicationArguments args) {
	try {
		(runner).run(args);
	}
	catch (Exception ex) {
		throw new IllegalStateException("Failed to execute ApplicationRunner", ex);
	}
}

private void callRunner(CommandLineRunner runner, ApplicationArguments args) {
	try {
		(runner).run(args.getSourceArgs());
	}
	catch (Exception ex) {
		throw new IllegalStateException("Failed to execute CommandLineRunner", ex);
	}
}
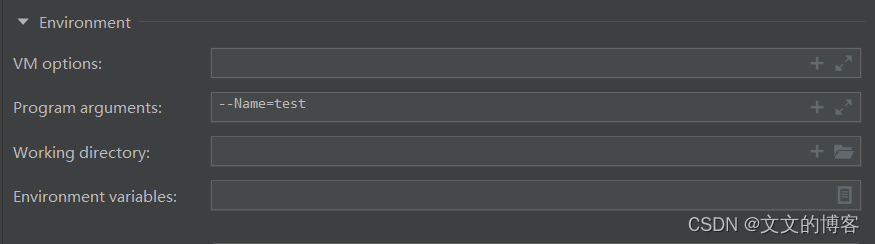
ApplicationArguments args是什么
答案:启动参数
方式:--key=value。例如启动的时候 java -jar --spring.profiles.active=prod
开发时如何使用启动参数


![[INFOCOM 2019] NeuralWalk:使用神经网络的在线社交网络中的信任评估](https://img-blog.csdnimg.cn/img_convert/25959e63a514d32f41afb0c3a284340f.gif)


![[学习笔记] [机器学习] 3. KNN( K-近邻算法)及练习案例](https://img-blog.csdnimg.cn/01ef9983549e4309ad11c9d2c159e85e.png#pic_center)
