目录
- 数据结构
- findPredecessor
- doGet
- doRemove
- doPut
- 新值插入底层
- 创建新值的索引
- 连接索引
数据结构
java源码中对ConcurrentSkipListMap的描述如下:

图中,第0层为具体的数据,第1层的每一个node都有两个子node,一个指向同层的右边,一个指向下一层,它的类结构图如下:
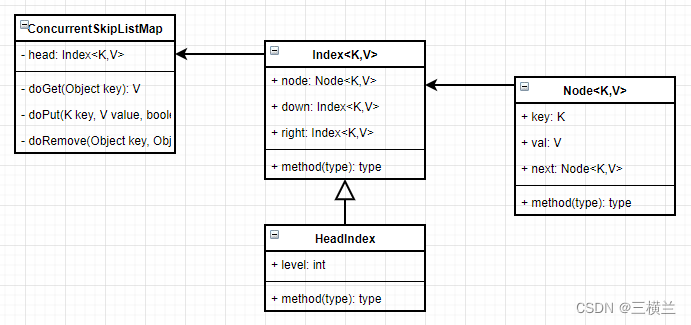
head: head是类型为Index的数据结构,里面包含了一个保存key-value值的Node、指向右边的索引right、指向下一层的索引down
对于跳跃表的分析主要是它的增删改查,其中增与改在doPut方法,因此本文主要分析类图中的doGet(), doPUT(), doRemove方法
以下面的图先看下跳跃表的具体结构

head索引:比普通的索引多一个level字段,记录层级
以图中的索引4为例,它的right为8,down为4
findPredecessor
再开始之前先介绍这个方法,因为后面的三个方法中都会用到它,它的作用就是寻找的目标值的前一个节点,以前面的图为例,假设要寻找9,则需先找到它的前一个索引8,具体的步骤如下:
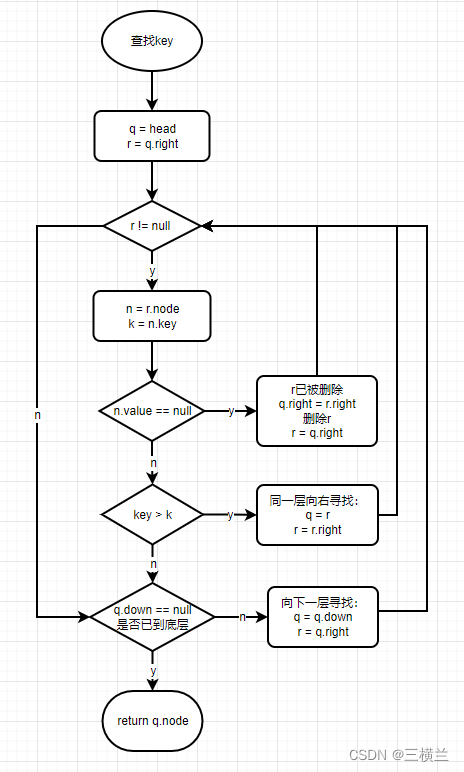
具体源码如下:
public class ConcurrentSkipListMap<K,V> extends AbstractMap<K,V>
    implements ConcurrentNavigableMap<K,V>, Cloneable, Serializable {
    // 查找带查询key的左边范围起始值,次起始值必须是最底层的值
    private Node<K,V> findPredecessor(Object key, Comparator<? super K> cmp) {
        // 1. 如果key为null则直接抛出异常
        if (key == null)
            throw new NullPointerException(); // don't postpone errors
        for (;;) { // 2. 外层循环的作用:当其他线程修改了数据,当前线程重试开始寻找头结点
            for (Index<K,V> q = head, r = q.right, d;;) {
                if (r != null) {
                    Node<K,V> n = r.node;
                    K k = n.key;
                    if (n.value == null) {
                        // 3. 如果n的value为null,则将q->right->right.right修改为q->right.right,将right从链表中删除
                        if (!q.unlink(r))
                            // 其他线程已经修改数据,跳到最外层循环从头开始重新寻找
                            break;
                        r = q.right;
                        continue;
                    }
                    if (cpr(cmp, key, k) > 0) {
                        // 4. 如果待查询的key大于right的key,说明待查询的key在right的右边,则继续往右寻找
                        q = r;
                        r = r.right;
                        continue;
                    }
                }
                if ((d = q.down) == null)
                    // 6. 已经查询到最底层,返回最底层的值
                    return q.node;
                // 5. right的key大于等于待查询的key,说明带查询的key位于head的key与right的key之间,往下寻找
                q = d;
                r = d.right;
            }
        }
    }
}
doGet
假设要查找9,则查找路径如下红色路线图:

public class ConcurrentSkipListMap<K,V> extends AbstractMap<K,V>
    implements Co ncurrentNavigableMap<K,V>, Cloneable, Serializable {
    private V doGet(Object key) {
        if (key == null)
            throw new NullPointerException();
        Comparator<? super K> cmp = comparator;
        outer: for (;;) {
            // 1. 查找索引
            for (Node<K,V> b = findPredecessor(key, cmp), n = b.next;;) {
                Object v; int c;
                if (n == null)
                    // 2. 如果n为null说明跳表中没有key的值,退出循环
                    break outer;
                Node<K,V> f = n.next;
                if (n != b.next)                // inconsistent read
                    // 3. 另一线程已经修改数据,调到外层outer循环重新开始
                    break;
                if ((v = n.value) == null) {    // n is deleted
                    // 4. n已被另一线程删除,当前线程原子性参与删除, 调到外层outer循环重新开始
                    n.helpDelete(b, f);
                    break;
                }
                if (b.value == null || v == n)  // b is deleted
                    // 5. b已被另一线程删除,重新查找
                    break;
                if ((c = cpr(cmp, key, n.key)) == 0) {
                    // 7. 查找到值,返回value
                    @SuppressWarnings("unchecked") V vv = (V)v;
                    return vv;
                }
                if (c < 0)
                    // 8. 跳表中没有值,直接跳出循环
                    break outer;
                // 6. n的key小于带查询key,继续next向右查找。
                b = n;
                n = f;
            }
        }
        return null;
    }
}
doRemove

如图中,假设要删除节点8:
- 首先需要找到Node8
- 将Node8标志为删除
- 遍历删除所有Index8
这里回顾一下**ConcurrentSkipListMap<K, V>**的索引数据结构
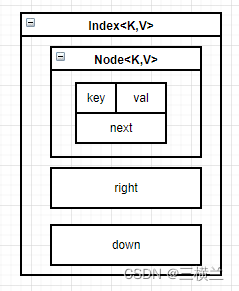
在本例中有2两个Index8,这两个Index中的Node指向的是同一个值,也就是第2步中将Node8标记为删除,则所有的Index8中的Node都被标记为删除,这样一来第3步遍历的时候就会删除所有的Index8。看下源码
public class ConcurrentSkipListMap<K,V> extends AbstractMap<K,V>
    implements Co ncurrentNavigableMap<K,V>, Cloneable, Serializable {
    final V doRemove(Object key, Object value) {
        if (key == null)
            throw new NullPointerException();
        Comparator<? super K> cmp = comparator;
        outer: for (;;) {
            // 1. findPredecessor需找到底层中最接近的8的索引b(本例中为4), n = b.next
            for (Node<K,V> b = findPredecessor(key, cmp), n = b.next;;) {
                Object v; int c;
                if (n == null)
                    break outer;
                Node<K,V> f = n.next;
                if (n != b.next)                    // inconsistent read
                    break;
                if ((v = n.value) == null) {        // n is deleted
                    n.helpDelete(b, f);
                    break;
                }
                if (b.value == null || v == n)      // b is deleted
                    break;
                if ((c = cpr(cmp, key, n.key)) < 0)
                    // 要删除的key不存在,退出
                    break outer;
                if (c > 0) {
                    // 要删除的key在n的右边,继续往右寻找
                    b = n;
                    n = f;
                    continue;
                }
                // 2. 找到Index8
                if (value != null && !value.equals(v))
                    // value不为null并且与key对应的值不匹配则不能删除
                    break outer;
                // 将n的value设置为null
                if (!n.casValue(v, null))
                    // 另一线程已经修改n的value,重新开始
                    break;
                // 设置删除标志,并将b->n->f修改为b->n
                if (!n.appendMarker(f) || !b.casNext(n, f))
                    // 3. findNode中遍历的时候同样会删除无用的Index
                    findNode(key);                  // retry via findNode
                else {
                    // 3. 将n所在的Index从跳表中删除,即findPredecessor的第3步
                    findPredecessor(key, cmp);      // clean index
                    if (head.right == null)
                        // 减少无用的层级
                        tryReduceLevel();
                }
                @SuppressWarnings("unchecked") V vv = (V)v;
                return vv;
            }
        }
        return null;
    }
}
doPut
假设要往跳表中插入7,则出现的结果可能有两种,如图:
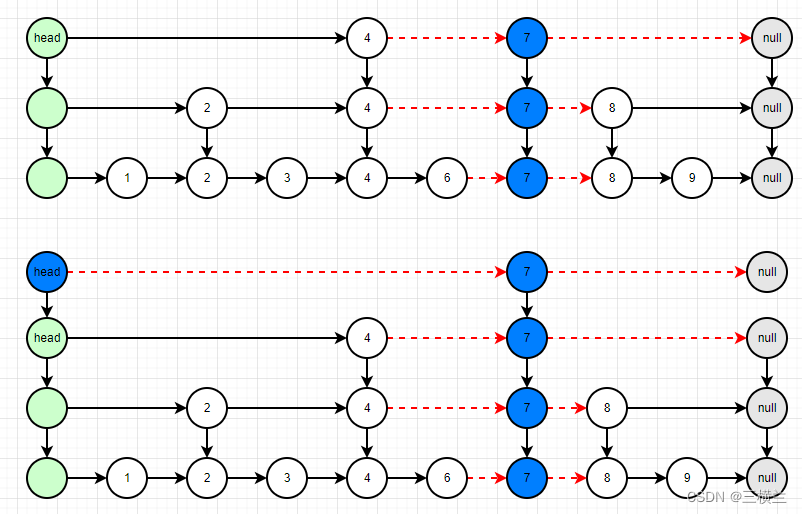
- 第一种情况是层级不变,这里称为情况A
- 第二种是层级改变,这里称为情况B
至于层级增加或者不变是随机,接下来代码的时候详细分析,这里先把插入值的步骤理一下:
- 找到底层的插入的位置,将新值插入到底层

-
创建新值的层级索引

-
将新值的层级索引与原层级的索引连接

接下来按这个顺序分析源码
新值插入底层
public class ConcurrentSkipListMap<K,V> extends AbstractMap<K,V>
    implements Co ncurrentNavigableMap<K,V>, Cloneable, Serializable {
    private V doPut(K key, V value, boolean onlyIfAbsent) {
        Node<K,V> z;             // added node
        if (key == null)
            throw new NullPointerException();
        Comparator<? super K> cmp = comparator;
        outer: for (;;) {
            // 1. 查找合适的索引Index并获取其节点Node
            for (Node<K,V> b = findPredecessor(key, cmp), n = b.next;;) {
                if (n != null) {
                    Object v; int c;
                    // n的下一个节点f
                    Node<K,V> f = n.next;
                    if (n != b.next)               // inconsistent read
                        // n被另一个线程修改,重新开始
                        break;
                    if ((v = n.value) == null) {   // n is deleted
                        // n被另一个线程删除,重新开始
                        n.helpDelete(b, f);
                        break;
                    }
                    if (b.value == null || v == n) // b is deleted
                        // b被另一线程删除,重新开始
                        break;
                    if ((c = cpr(cmp, key, n.key)) > 0) {
                        // 2. 待插入的key大于n的key, 向右继续寻找插入点
                        b = n;
                        n = f;
                        continue;
                    }
                    if (c == 0) { // 待插入的key已经存在
                        // 3. 更新原值并返回值
                        if (onlyIfAbsent || n.casValue(v, value)) {
                            @SuppressWarnings("unchecked") V vv = (V)v;
                            // 返回原值并退出
                            return vv;
                        }
                        break; // restart if lost race to replace value
                    }
                    // else c < 0; fall through
                }

                // 4. 找到插入点,即n的前一个位置, 修改底层的链表, b->n 更新为 b->z->n,即将新节点z插入链表
                z = new Node<K,V>(key, value, n);
                if (!b.casNext(n, z))
                    // 另一线程已经更改,当前线程重新开始
                    break;         // restart if lost race to append to b
                // 5. 底层链表更新结束
                break outer;
            }
        }
    }
}
创建新值的索引
public class ConcurrentSkipListMap<K,V> extends AbstractMap<K,V>
    implements Co ncurrentNavigableMap<K,V>, Cloneable, Serializable {
    private V doPut(K key, V value, boolean onlyIfAbsent) {
        Node<K,V> z;             // added node
        // ......
        // 1. 获取随机数,根据随机数二进制中从右往左连续1的个数决定链表新的level
        int rnd = ThreadLocalRandom.nextSecondarySeed();
        // 最高层级32层,最底层1层
        if ((rnd & 0x80000001) == 0) { // test highest and lowest bits
            int level = 1, max;
            // 2. 计算新值需要创建索引的层级。举例子:如果是5,即101,则level为1;如果是7,即111,则level+2为3
            while (((rnd >>>= 1) & 1) != 0)
                ++level;
            Index<K,V> idx = null;
            HeadIndex<K,V> h = head;
            // 假设此时level为3, max为3, level<=max,则先创建新插入节点的索引,即情况A
            if (level <= (max = h.level)) {
                for (int i = 1; i <= level; ++i)
                    // 3. 创建新值每一层的索引
                    idx = new Index<K,V>(z, idx, null);
            }
            else { // try to grow by one level
                // 假设level为7, max为3,则level为4,及情况B,此种情况head也需要更新层数
                level = max + 1; // hold in array and later pick the one to use
                // 创建4层新插入节点的索引
                @SuppressWarnings("unchecked")Index<K,V>[] idxs =
                    (Index<K,V>[])new Index<?,?>[level+1];
                for (int i = 1; i <= level; ++i)
                    // 3. 创建新值每一层的索引
                    // 注意这里的z,每一层的node都为z,也就是doRemove中所说的。
                    idxs[i] = idx = new Index<K,V>(z, idx, null);
                for (;;) {
                    h = head;
                    int oldLevel = h.level;
                    if (level <= oldLevel) // lost race to add level
                        break;
                    HeadIndex<K,V> newh = h;
                    Node<K,V> oldbase = h.node;
                    // 补齐头结点,并将第四层的头结点的right直接指向新插入节点的索引
                    for (int j = oldLevel+1; j <= level; ++j)
                        newh = new HeadIndex<K,V>(oldbase, newh, idxs[j], j);
                    // 将第四层的newh作为该跳表的head
                    if (casHead(h, newh)) {
                        h = newh;
                        idx = idxs[level = oldLevel];
                        break;
                    }
                }
            }
            // ......
        }
        return null;
    }
}
连接索引
public class ConcurrentSkipListMap<K,V> extends AbstractMap<K,V>
    implements Co ncurrentNavigableMap<K,V>, Cloneable, Serializable {
    private V doPut(K key, V value, boolean onlyIfAbsent) {
        Node<K,V> z;             // added node
        // ......
        // 更新层级,添加索引
        int rnd = ThreadLocalRandom.nextSecondarySeed();
        // 最高层级32层,最底层1层
        if ((rnd & 0x80000001) == 0) { // test highest and lowest bits
            // ......
            // find insertion points and splice in
            splice: for (int insertionLevel = level;;) {
                int j = h.level;
                for (Index<K,V> q = h, r = q.right, t = idx;;) {
                    if (q == null || t == null)
                        // 已经到底层,结束更新
                        break splice;
                    if (r != null) {
                        Node<K,V> n = r.node;
                        int c = cpr(cmp, key, n.key);
                        if (n.value == null) {
                            // n已经被标记,删除n
                            if (!q.unlink(r))
                                break;
                            r = q.right;
                            continue;
                        }
                        if (c > 0) {
                            // 新插入的key大于right的key,向右移动
                            q = r;
                            r = r.right;
                            continue;
                        }
                    }

                    if (j == insertionLevel) {
                        // 将q->r更新为q->t->r
                        if (!q.link(r, t))
                            // 另一线程已修改数据,重新开始
                            break; // restart
                        if (t.node.value == null) {
                            // t已被删除,通过findNode函数将key删除
                            findNode(key);
                            break splice;
                        }
                        // 已经是最底层,退出循环
                        if (--insertionLevel == 0)
                            break splice;
                    }

                    // 向下一层继续更新
                    if (--j >= insertionLevel && j < level)
                        t = t.down;
                    q = q.down;
                    r = q.right;
                }
            }
        }
        return null;
    }
}
至此,关于ConcurrentSkipListMap的分析到此结束,感谢阅读。


