近期猛然发现公司的项目都已经换成了AB升级,AB升级之前一直有所了解,只是一直都没有去仔细查看过其具体升级流程,这两天抽空捋了捋,简单整理下。
AB升级(谷歌官网叫法无缝更新)是自android7.0开始新增的一种android设备升级方式,只是这种方式对设备存储要求高,所以之前没有怎么被国内手机厂商采用。
简而言之:系统同时存在两套system分区,一套处于休眠状态不可使用,一套处于使用状态,两者通过slot的概念来做区分,在设备启动引导阶段通过特殊标记位确定启动哪个system,当有可用升级版本时候,客户端将升级包下载下来,或者将下载地址请求下来,然后通过update_engine将当前没有在使用的一套system升级到最新版本,然后修改启动标志位,在下次启动的时候,就进入升级到最新版本的那套system系统,这样做的好处就是省去了recovery升级过程的耗时,规避了recovery升级过程中发生意外中断导致设备无法开机的风险。现将其主要逻辑做简单整理归纳
AB升级的主要实现过程在udate_engine中,主要代码集中在/system/update_engine路径下
主要分为两部分:
1.update_engine的初始化过程
2.java层调用升级接口执行升级过程
1.update_engine的初始化过程
首先查看目录下的Android.bp,这里只列举重点内容
// update_engine (type: executable)
// ========================================================
// update_engine daemon.
cc_binary {
name: "update_engine",
defaults: [
"ue_defaults",
"libupdate_engine_android_exports",
],
static_libs: ["libupdate_engine_android"],
required: [
"cacerts_google",
"otacerts",
],
srcs: ["main.cc"],
init_rc: ["update_engine.rc"],
}
update_engine.rc内容如下:
service update_engine /system/bin/update_engine --logtostderr --logtofile --foreground
class late_start
user root
group root system wakelock inet cache media_rw
writepid /dev/cpuset/system-background/tasks /dev/blkio/background/tasks
disabled
on property:ro.boot.slot_suffix=*
enable update_engine
update_engine服务在init进程中启动,启动后运行main.cc中的main函数:
int main(int argc, char** argv) {
......运行UpdateEngineDaemon,这里用了c++11的新特性默认构造函数
chromeos_update_engine::UpdateEngineDaemon update_engine_daemon;
int exit_code = update_engine_daemon.Run();
chromeos_update_engine::Subprocess::Get().FlushBufferedLogsAtExit();
LOG(INFO) << "A/B Update Engine terminating with exit code " << exit_code;
return exit_code;
}
UpdateEngineDaemon 继承自 brillo::Daemon (external\libbrillo\brillo\daemons)
会运行到UpdateEngineDaemon::OnInit中:
system\update_engine\daemon.cc
int UpdateEngineDaemon::OnInit() {
subprocess_.Init(this);
int exit_code = Daemon::OnInit();
if (exit_code != EX_OK)
return exit_code;
#if USE_BINDER
android::BinderWrapper::Create();
binder_watcher_.Init();
#endif // USE_BINDER
//这里初始化daemon_state_,因为是USE_BINDER,所以初始化结果是DaemonStateAndroid
#if USE_OMAHA
RealSystemState* real_system_state = new RealSystemState();
daemon_state_.reset(real_system_state);
LOG_IF(ERROR, !real_system_state->Initialize())
<< "Failed to initialize system state.";
#else // !USE_OMAHA
DaemonStateAndroid* daemon_state_android = new DaemonStateAndroid();
daemon_state_.reset(daemon_state_android);
LOG_IF(ERROR, !daemon_state_android->Initialize())
<< "Failed to initialize system state.";
#endif // USE_OMAHA
//这里初始化binder_service_,最终将BinderUpdateEngineBrilloService注册到ServiceManager中,服务名android.os.UpdateEngineService
#if USE_BINDER
// Create the Binder Service.
#if USE_OMAHA
binder_service_ = new BinderUpdateEngineBrilloService{real_system_state};
#else // !USE_OMAHA
binder_service_ = new BinderUpdateEngineAndroidService{
daemon_state_android->service_delegate()};
#endif // USE_OMAHA
auto binder_wrapper = android::BinderWrapper::Get();
if (!binder_wrapper->RegisterService(binder_service_->ServiceName(),
binder_service_)) {
LOG(ERROR) << "Failed to register binder service.";
}
daemon_state_->AddObserver(binder_service_.get());
#endif // USE_BINDER
#if USE_DBUS
// Create the DBus service.
dbus_adaptor_.reset(new UpdateEngineAdaptor(real_system_state));
daemon_state_->AddObserver(dbus_adaptor_.get());
dbus_adaptor_->RegisterAsync(base::Bind(&UpdateEngineDaemon::OnDBusRegistered,
base::Unretained(this)));
LOG(INFO) << "Waiting for DBus object to be registered.";
#else //开始执行升级
daemon_state_->StartUpdater();
#endif // USE_DBUS
return EX_OK;
}
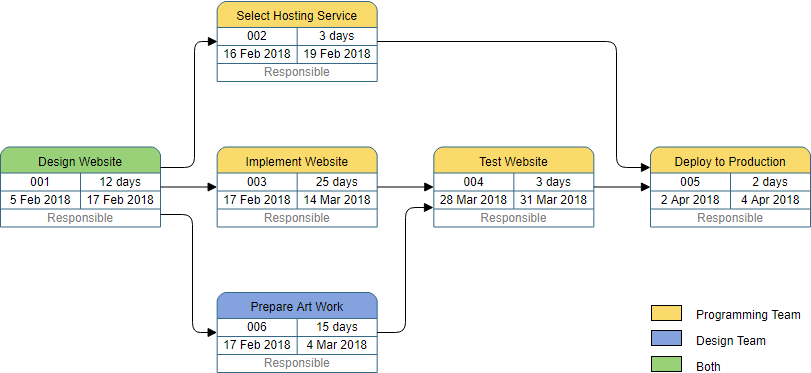
OnInit方法中执行的主要操作就是于binder服务关联起来,将BinderUpdateEngineBrilloService以android.os.UpdateEngineService的名称注册到serviceManager中,
而BinderUpdateEngineBrilloService的执行又是放到了UpdateAttempterAndroid中,一些主要的执行类关系图如下:

其主要流程时序图如下:

进入daemon_state_->StartUpdater()方法,\system\update_engine\daemon_state_android.h如下:
class DaemonStateAndroid : public DaemonStateInterface {
public:
DaemonStateAndroid() = default;
~DaemonStateAndroid() override = default;
bool Initialize();
// DaemonStateInterface overrides.
bool StartUpdater() override;
void AddObserver(ServiceObserverInterface* observer) override;
void RemoveObserver(ServiceObserverInterface* observer) override;
const std::set<ServiceObserverInterface*>& service_observers() override {
return service_observers_;
}
// Return a pointer to the service delegate.
ServiceDelegateAndroidInterface* service_delegate();
protected:
std::set<ServiceObserverInterface*> service_observers_;
// Interface for the boot control functions.
std::unique_ptr<BootControlInterface> boot_control_;
// Interface for the hardware functions.
std::unique_ptr<HardwareInterface> hardware_;
// Interface for persisted store.
std::unique_ptr<PrefsInterface> prefs_;
// The main class handling the updates.
std::unique_ptr<UpdateAttempterAndroid> update_attempter_;
// OpenSSLWrapper and CertificateChecker used for checking changes in SSL
// certificates.
OpenSSLWrapper openssl_wrapper_;
std::unique_ptr<CertificateChecker> certificate_checker_;
};
system\update_engine\daemon_state_android.cc中部分方法如下:
bool DaemonStateAndroid::StartUpdater() {
//update_attempter_的初始化在Initialize方法中,在UpdateEngineDaemon::OnInit被调用
update_attempter_->Init();
return true;
}
bool DaemonStateAndroid::Initialize() {
boot_control_ = boot_control::CreateBootControl();
if (!boot_control_) {
LOG(WARNING) << "Unable to create BootControl instance, using stub "
<< "instead. All update attempts will fail.";
boot_control_.reset(new BootControlStub());
}
hardware_ = hardware::CreateHardware();
if (!hardware_) {
LOG(ERROR) << "Error initializing the HardwareInterface.";
return false;
}
LOG_IF(INFO, !hardware_->IsNormalBootMode()) << "Booted in dev mode.";
LOG_IF(INFO, !hardware_->IsOfficialBuild()) << "Booted non-official build.";
// Initialize prefs.
base::FilePath non_volatile_path;
// TODO(deymo): Fall back to in-memory prefs if there's no physical directory
// available.
if (!hardware_->GetNonVolatileDirectory(&non_volatile_path)) {
LOG(ERROR) << "Failed to get a non-volatile directory.";
return false;
}
Prefs* prefs = new Prefs();
prefs_.reset(prefs);
if (!prefs->Init(non_volatile_path.Append(kPrefsSubDirectory))) {
LOG(ERROR) << "Failed to initialize preferences.";
return false;
}
// The CertificateChecker singleton is used by the update attempter.
certificate_checker_.reset(
new CertificateChecker(prefs_.get(), &openssl_wrapper_));
certificate_checker_->Init();
//UpdateAttempter初始化
update_attempter_.reset(new UpdateAttempterAndroid(
this, prefs_.get(), boot_control_.get(), hardware_.get()));
return true;
}
\system\update_engine\update_attempter_android.h中定义了升级过程对java层通过binder提供的全部接口
进入UpdateAttempterAndroid的Init方法中:
void UpdateAttempterAndroid::Init() {
// In case of update_engine restart without a reboot we need to restore the
// reboot needed state.
if (UpdateCompletedOnThisBoot()) {
SetStatusAndNotify(UpdateStatus::UPDATED_NEED_REBOOT);
} else {
SetStatusAndNotify(UpdateStatus::IDLE);
UpdatePrefsAndReportUpdateMetricsOnReboot();
#ifdef _UE_SIDELOAD
LOG(INFO) << "Skip ScheduleCleanupPreviousUpdate in sideload because "
<< "ApplyPayload will call it later.";
#else
ScheduleCleanupPreviousUpdate();
#endif
}
}
这里没有过多工作,就是判定状态然后发出通知
2.java层调用升级接口执行升级过程
在UpdateEngine.java中调用applyPayload方法:
public void applyPayload(String url, long offset, long size, String[] headerKeyValuePairs) {
try {
mUpdateEngine.applyPayload(url, offset, size, headerKeyValuePairs);
} catch (RemoteException e) {
throw e.rethrowFromSystemServer();
}
}
public UpdateEngine() {
mUpdateEngine = IUpdateEngine.Stub.asInterface(
ServiceManager.getService(UPDATE_ENGINE_SERVICE));
}
这里的mUpdateEngine就是BinderUpdateEngineBrilloService服务,最终执行在UpdateAttempterAndroid中:
system\update_engine\update_attempter_android.cc
bool UpdateAttempterAndroid::ApplyPayload(
const string& payload_url,
int64_t payload_offset,
int64_t payload_size,
const vector<string>& key_value_pair_headers,
brillo::ErrorPtr* error) {
//检查状态,获取传入的参数组
if (status_ == UpdateStatus::UPDATED_NEED_REBOOT) {
return LogAndSetError(
error, FROM_HERE, "An update already applied, waiting for reboot");
}
if (processor_->IsRunning()) {
return LogAndSetError(
error, FROM_HERE, "Already processing an update, cancel it first.");
}
DCHECK(status_ == UpdateStatus::IDLE);
std::map<string, string> headers;
if (!ParseKeyValuePairHeaders(key_value_pair_headers, &headers, error)) {
return false;
}
string payload_id = GetPayloadId(headers);
//初始化InstallPlan
install_plan_ = InstallPlan();
install_plan_.download_url = payload_url;
install_plan_.version = "";
base_offset_ = payload_offset;
InstallPlan::Payload payload;
payload.size = payload_size;
if (!payload.size) {
if (!base::StringToUint64(headers[kPayloadPropertyFileSize],
&payload.size)) {
payload.size = 0;
}
}
if (!brillo::data_encoding::Base64Decode(headers[kPayloadPropertyFileHash],
&payload.hash)) {
LOG(WARNING) << "Unable to decode base64 file hash: "
<< headers[kPayloadPropertyFileHash];
}
if (!base::StringToUint64(headers[kPayloadPropertyMetadataSize],
&payload.metadata_size)) {
payload.metadata_size = 0;
}
// The |payload.type| is not used anymore since minor_version 3.
payload.type = InstallPayloadType::kUnknown;
install_plan_.payloads.push_back(payload);
// The |public_key_rsa| key would override the public key stored on disk.
install_plan_.public_key_rsa = "";
install_plan_.hash_checks_mandatory = hardware_->IsOfficialBuild();
install_plan_.is_resume = !payload_id.empty() &&
DeltaPerformer::CanResumeUpdate(prefs_, payload_id);
if (!install_plan_.is_resume) {
// No need to reset dynamic_partititon_metadata_updated. If previous calls
// to AllocateSpaceForPayload uses the same payload_id, reuse preallocated
// space. Otherwise, DeltaPerformer re-allocates space when the payload is
// applied.
if (!DeltaPerformer::ResetUpdateProgress(
prefs_,
false /* quick */,
true /* skip_dynamic_partititon_metadata_updated */)) {
LOG(WARNING) << "Unable to reset the update progress.";
}
if (!prefs_->SetString(kPrefsUpdateCheckResponseHash, payload_id)) {
LOG(WARNING) << "Unable to save the update check response hash.";
}
}
install_plan_.source_slot = GetCurrentSlot();
install_plan_.target_slot = GetTargetSlot();
install_plan_.powerwash_required =
GetHeaderAsBool(headers[kPayloadPropertyPowerwash], false);
install_plan_.switch_slot_on_reboot =
GetHeaderAsBool(headers[kPayloadPropertySwitchSlotOnReboot], true);
install_plan_.run_post_install =
GetHeaderAsBool(headers[kPayloadPropertyRunPostInstall], true);
// Skip writing verity if we're resuming and verity has already been written.
install_plan_.write_verity = true;
if (install_plan_.is_resume && prefs_->Exists(kPrefsVerityWritten)) {
bool verity_written = false;
if (prefs_->GetBoolean(kPrefsVerityWritten, &verity_written) &&
verity_written) {
install_plan_.write_verity = false;
}
}
NetworkId network_id = kDefaultNetworkId;
if (!headers[kPayloadPropertyNetworkId].empty()) {
if (!base::StringToUint64(headers[kPayloadPropertyNetworkId],
&network_id)) {
return LogAndSetError(
error,
FROM_HERE,
"Invalid network_id: " + headers[kPayloadPropertyNetworkId]);
}
if (!network_selector_->SetProcessNetwork(network_id)) {
return LogAndSetError(
error,
FROM_HERE,
"Unable to set network_id: " + headers[kPayloadPropertyNetworkId]);
}
}
LOG(INFO) << "Using this install plan:";
install_plan_.Dump();
·//fetcher用来给到DownloadAction执行下载
HttpFetcher* fetcher = nullptr;
if (FileFetcher::SupportedUrl(payload_url)) {
DLOG(INFO) << "Using FileFetcher for file URL.";
fetcher = new FileFetcher();
} else {
#ifdef _UE_SIDELOAD
LOG(FATAL) << "Unsupported sideload URI: " << payload_url;
#else
LibcurlHttpFetcher* libcurl_fetcher =
new LibcurlHttpFetcher(&proxy_resolver_, hardware_);
libcurl_fetcher->set_server_to_check(ServerToCheck::kDownload);
fetcher = libcurl_fetcher;
#endif // _UE_SIDELOAD
}
// Setup extra headers.
if (!headers[kPayloadPropertyAuthorization].empty())
fetcher->SetHeader("Authorization", headers[kPayloadPropertyAuthorization]);
if (!headers[kPayloadPropertyUserAgent].empty())
fetcher->SetHeader("User-Agent", headers[kPayloadPropertyUserAgent]);
//构建执行action序列
BuildUpdateActions(fetcher);
SetStatusAndNotify(UpdateStatus::UPDATE_AVAILABLE);
UpdatePrefsOnUpdateStart(install_plan_.is_resume);
//执行action序列中的action
ScheduleProcessingStart();
return true;
}
整个升级的执行过程都在ApplyPayload方法中进行了,先是检查了参数和当前升级状态,然后构建了install_plan_,它的作用就是打印信息,将
部分升级关键信息打印出来,然后初始化了fetcher,后面的DownloadAction会用到,最后就是组建action执行序列和执行序列中的action
void UpdateAttempterAndroid::BuildUpdateActions(HttpFetcher* fetcher) {
CHECK(!processor_->IsRunning());
processor_->set_delegate(this);
// Actions:
auto update_boot_flags_action =
std::make_unique<UpdateBootFlagsAction>(boot_control_);
auto cleanup_previous_update_action =
boot_control_->GetDynamicPartitionControl()
->GetCleanupPreviousUpdateAction(boot_control_, prefs_, this);
auto install_plan_action = std::make_unique<InstallPlanAction>(install_plan_);
auto download_action =
std::make_unique<DownloadAction>(prefs_,
boot_control_,
hardware_,
nullptr, // system_state, not used.
fetcher, // passes ownership
true /* interactive */);
download_action->set_delegate(this);
download_action->set_base_offset(base_offset_);
auto filesystem_verifier_action =
std::make_unique<FilesystemVerifierAction>();
auto postinstall_runner_action =
std::make_unique<PostinstallRunnerAction>(boot_control_, hardware_);
postinstall_runner_action->set_delegate(this);
// Bond them together. We have to use the leaf-types when calling
// BondActions().
BondActions(install_plan_action.get(), download_action.get());
BondActions(download_action.get(), filesystem_verifier_action.get());
BondActions(filesystem_verifier_action.get(),
postinstall_runner_action.get());
processor_->EnqueueAction(std::move(update_boot_flags_action));
processor_->EnqueueAction(std::move(cleanup_previous_update_action));
processor_->EnqueueAction(std::move(install_plan_action));
processor_->EnqueueAction(std::move(download_action));
processor_->EnqueueAction(std::move(filesystem_verifier_action));
processor_->EnqueueAction(std::move(postinstall_runner_action));
}
构建5个执行action,并且设置好执行顺序和关联,上一次执行完成的结果会通过管道传递到下一个action中。
这里看下最重要的一个action,postinstall_runner_action::PerformPartitionPostinstall
void PostinstallRunnerAction::PerformPartitionPostinstall() {
if (install_plan_.download_url.empty()) {
LOG(INFO) << "Skipping post-install during rollback";
return CompletePostinstall(ErrorCode::kSuccess);
}
// Skip all the partitions that don't have a post-install step.
while (current_partition_ < install_plan_.partitions.size() &&
!install_plan_.partitions[current_partition_].run_postinstall) {
VLOG(1) << "Skipping post-install on partition "
<< install_plan_.partitions[current_partition_].name;
current_partition_++;
}
if (current_partition_ == install_plan_.partitions.size())
return CompletePostinstall(ErrorCode::kSuccess);
const InstallPlan::Partition& partition =
install_plan_.partitions[current_partition_];
const string mountable_device =
utils::MakePartitionNameForMount(partition.target_path);
if (mountable_device.empty()) {
LOG(ERROR) << "Cannot make mountable device from " << partition.target_path;
return CompletePostinstall(ErrorCode::kPostinstallRunnerError);
}
// Perform post-install for the current_partition_ partition. At this point we
// need to call CompletePartitionPostinstall to complete the operation and
// cleanup.
#ifdef __ANDROID__
fs_mount_dir_ = "/postinstall";
#else // __ANDROID__
base::FilePath temp_dir;
TEST_AND_RETURN(base::CreateNewTempDirectory("au_postint_mount", &temp_dir));
fs_mount_dir_ = temp_dir.value();
#endif // __ANDROID__
// Double check that the fs_mount_dir is not busy with a previous mounted
// filesystem from a previous crashed postinstall step.
if (utils::IsMountpoint(fs_mount_dir_)) {
LOG(INFO) << "Found previously mounted filesystem at " << fs_mount_dir_;
utils::UnmountFilesystem(fs_mount_dir_);
}
base::FilePath postinstall_path(partition.postinstall_path);
if (postinstall_path.IsAbsolute()) {
LOG(ERROR) << "Invalid absolute path passed to postinstall, use a relative"
"path instead: "
<< partition.postinstall_path;
return CompletePostinstall(ErrorCode::kPostinstallRunnerError);
}
string abs_path =
base::FilePath(fs_mount_dir_).Append(postinstall_path).value();
if (!base::StartsWith(
abs_path, fs_mount_dir_, base::CompareCase::SENSITIVE)) {
LOG(ERROR) << "Invalid relative postinstall path: "
<< partition.postinstall_path;
return CompletePostinstall(ErrorCode::kPostinstallRunnerError);
}
#ifdef __ANDROID__
// In Chromium OS, the postinstall step is allowed to write to the block
// device on the target image, so we don't mark it as read-only and should
// be read-write since we just wrote to it during the update.
// Mark the block device as read-only before mounting for post-install.
if (!utils::SetBlockDeviceReadOnly(mountable_device, true)) {
return CompletePartitionPostinstall(
1, "Error marking the device " + mountable_device + " read only.");
}
#endif // __ANDROID__
if (!utils::MountFilesystem(mountable_device,
fs_mount_dir_,
MS_RDONLY,
partition.filesystem_type,
constants::kPostinstallMountOptions)) {
return CompletePartitionPostinstall(
1, "Error mounting the device " + mountable_device);
}
LOG(INFO) << "Performing postinst (" << partition.postinstall_path << " at "
<< abs_path << ") installed on device " << partition.target_path
<< " and mountable device " << mountable_device;
// Logs the file format of the postinstall script we are about to run. This
// will help debug when the postinstall script doesn't match the architecture
// of our build.
LOG(INFO) << "Format file for new " << partition.postinstall_path
<< " is: " << utils::GetFileFormat(abs_path);
// Runs the postinstall script asynchronously to free up the main loop while
// it's running.
vector<string> command = {abs_path};
#ifdef __ANDROID__
// In Brillo and Android, we pass the slot number and status fd.
command.push_back(std::to_string(install_plan_.target_slot));
command.push_back(std::to_string(kPostinstallStatusFd));
#else
// Chrome OS postinstall expects the target rootfs as the first parameter.
command.push_back(partition.target_path);
#endif // __ANDROID__
current_command_ = Subprocess::Get().ExecFlags(
command,
Subprocess::kRedirectStderrToStdout,
{kPostinstallStatusFd},
base::Bind(&PostinstallRunnerAction::CompletePartitionPostinstall,
base::Unretained(this)));
// Subprocess::Exec should never return a negative process id.
CHECK_GE(current_command_, 0);
if (!current_command_) {
CompletePartitionPostinstall(1, "Postinstall didn't launch");
return;
}
// Monitor the status file descriptor.
progress_fd_ =
Subprocess::Get().GetPipeFd(current_command_, kPostinstallStatusFd);
int fd_flags = fcntl(progress_fd_, F_GETFL, 0) | O_NONBLOCK;
if (HANDLE_EINTR(fcntl(progress_fd_, F_SETFL, fd_flags)) < 0) {
PLOG(ERROR) << "Unable to set non-blocking I/O mode on fd " << progress_fd_;
}
progress_task_ = MessageLoop::current()->WatchFileDescriptor(
FROM_HERE,
progress_fd_,
MessageLoop::WatchMode::kWatchRead,
true,
base::Bind(&PostinstallRunnerAction::OnProgressFdReady,
base::Unretained(this)));
}
这里代码逻辑很多,但是之前很多都是做的各种状态检测,升级是通过执行命令
Subprocess::Get().ExecFlags(
command,
Subprocess::kRedirectStderrToStdout,
{kPostinstallStatusFd},
base::Bind(&PostinstallRunnerAction::CompletePartitionPostinstall,
base::Unretained(this)));
最后进入\system\update_engine\common\subprocess.cc中:
bool LaunchProcess(const vector<string>& cmd,
uint32_t flags,
const vector<int>& output_pipes,
brillo::Process* proc) {
for (const string& arg : cmd)
proc->AddArg(arg);
proc->SetSearchPath((flags & Subprocess::kSearchPath) != 0);
// Create an environment for the child process with just the required PATHs.
std::map<string, string> env;
for (const char* key : {"LD_LIBRARY_PATH", "PATH"}) {
const char* value = getenv(key);
if (value)
env.emplace(key, value);
}
for (const int fd : output_pipes) {
proc->RedirectUsingPipe(fd, false);
}
proc->SetCloseUnusedFileDescriptors(true);
proc->RedirectUsingPipe(STDOUT_FILENO, false);
proc->SetPreExecCallback(base::Bind(&SetupChild, env, flags));
return proc->Start();
}
cmd参数就是一开始传过来的command,这里用到了brillo/process.cc来执行命令,这里不再继续跟进了,update_engine大致的升级流程到这里就完成了,但还是有很多方面暂时没有涉及,一些详细的过程也没有去更进一步的去分析跟进,留待以后有时间或者遇到相关问题再去做进一步分析。
文件转载:
update_engine简介


![系统学习Numpy(一)——numpy的安装与基础入门[向量、矩阵]](https://img-blog.csdnimg.cn/e511d4ba9d004330b25ddbd20247f91f.png)