一. 简述
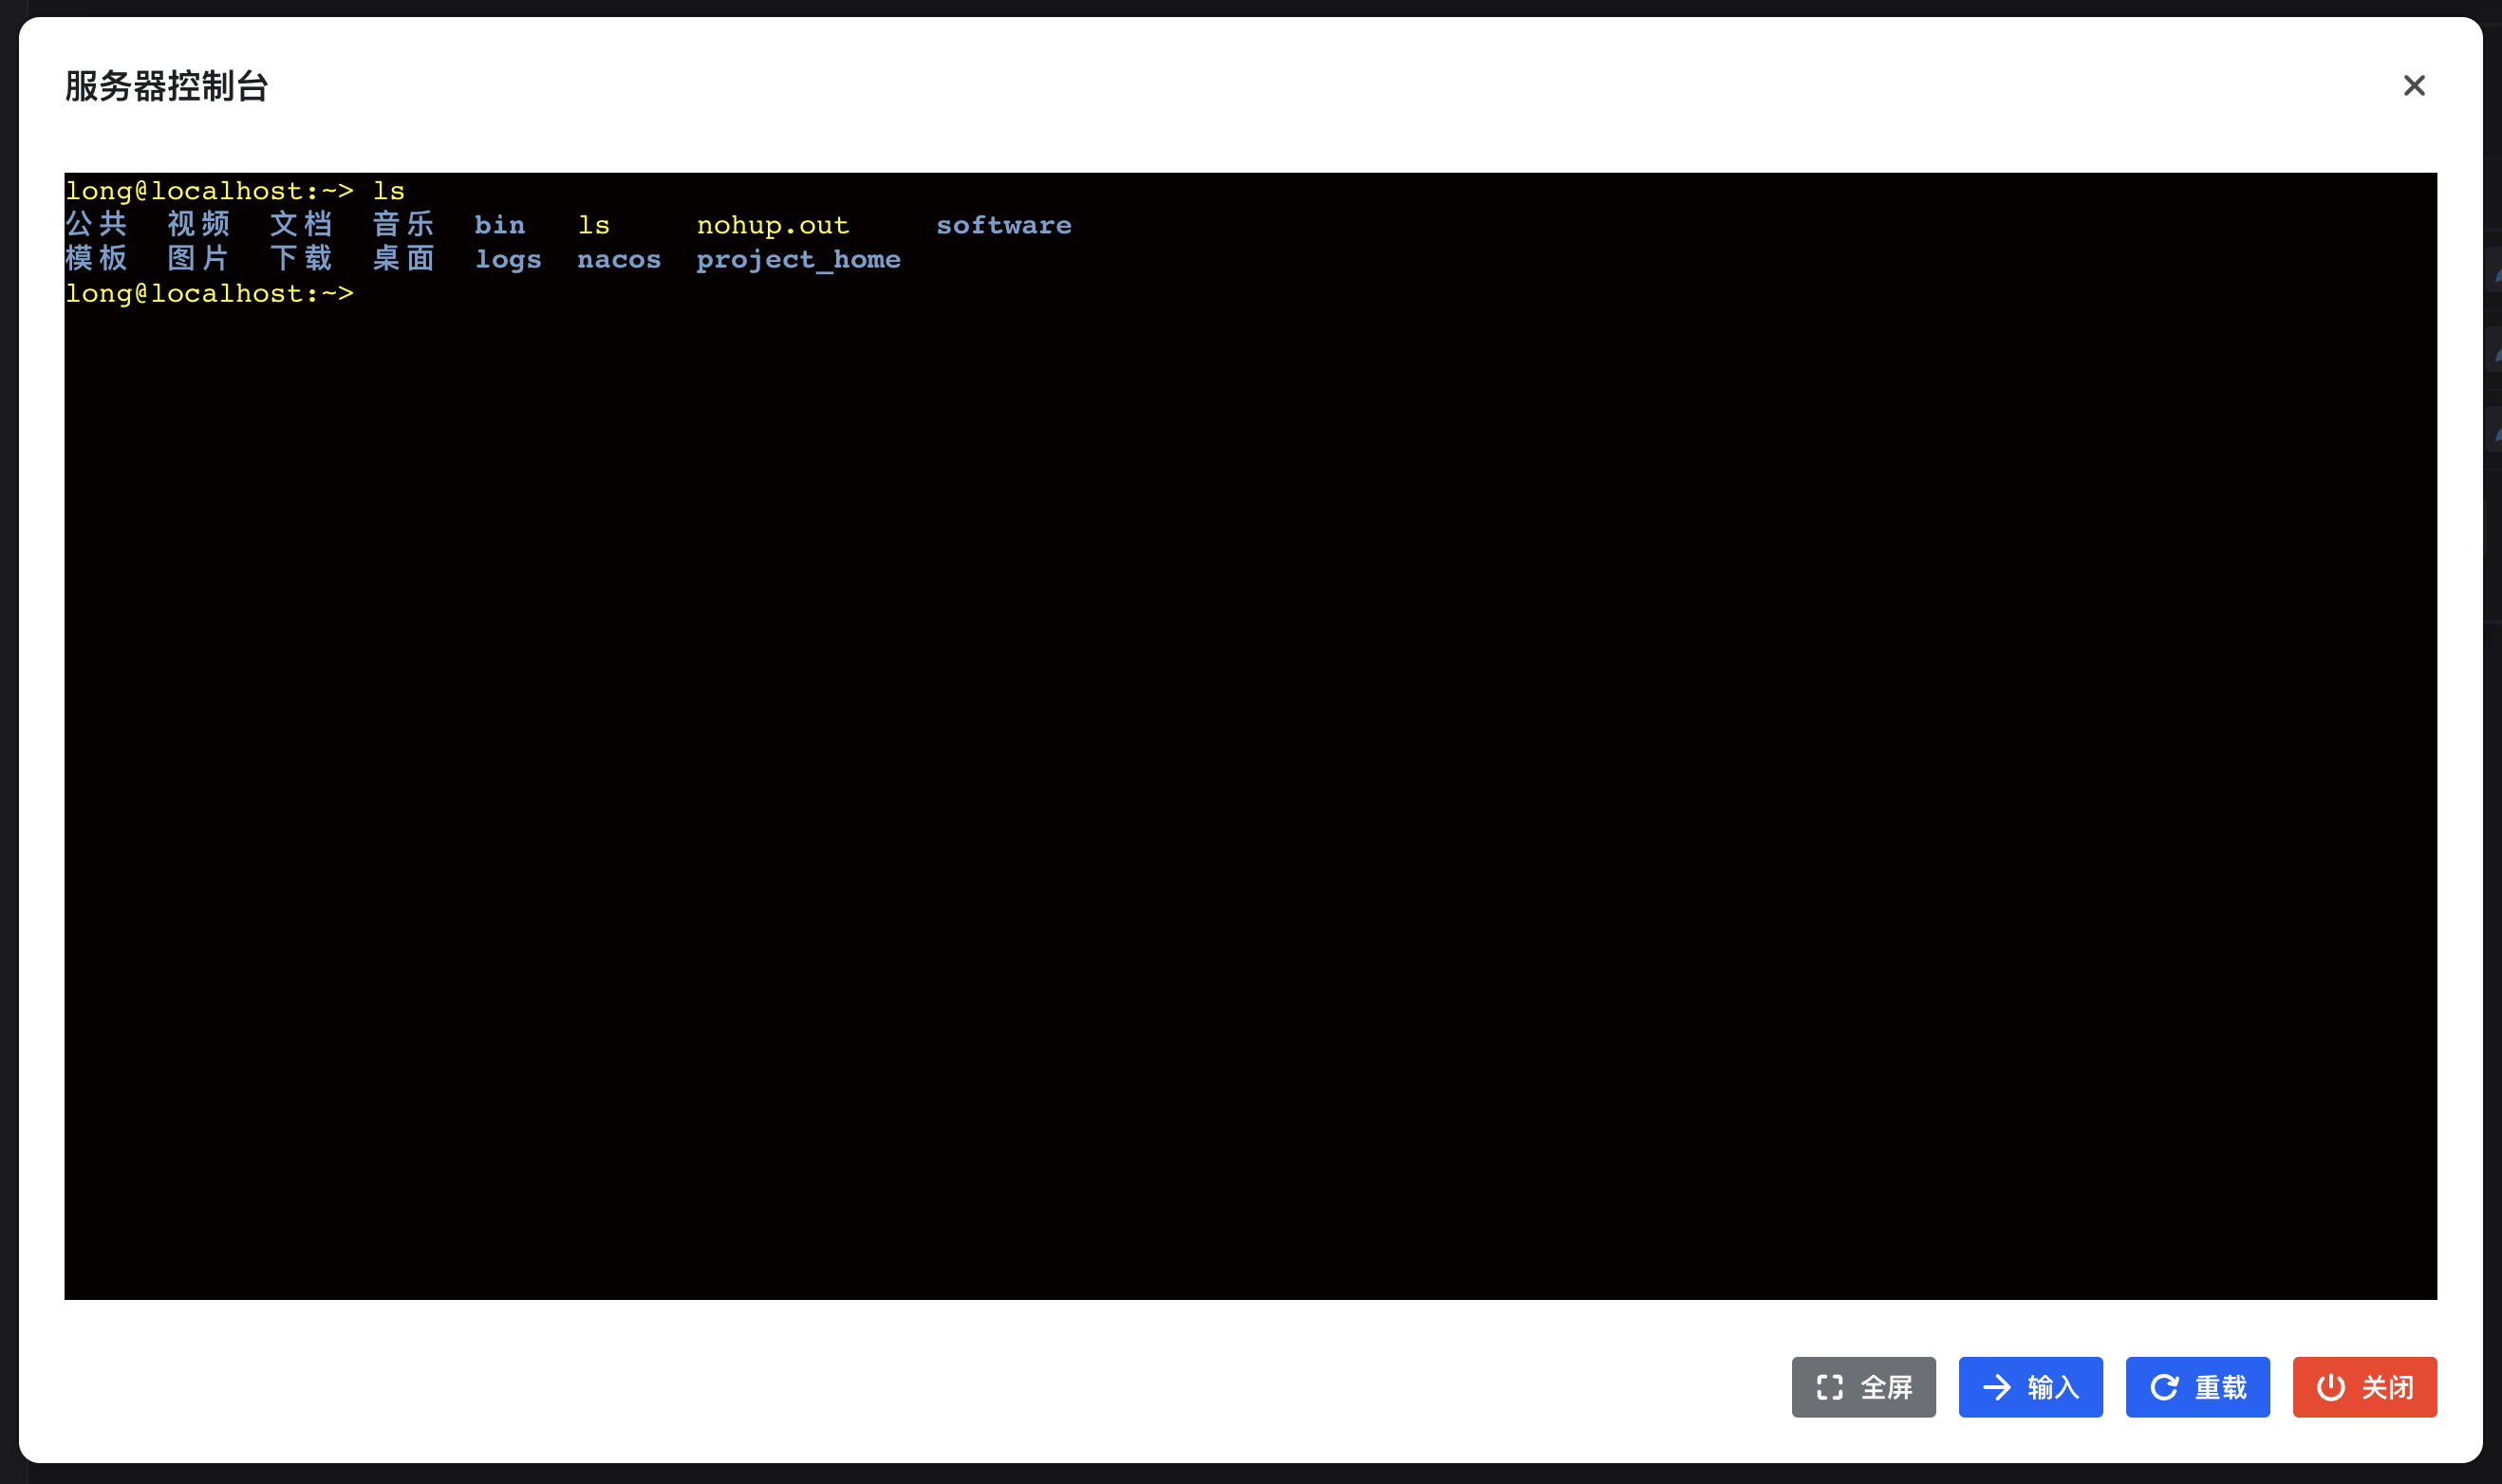
搭建一个web ssh,主要是借助websocket和xterm,可以实现一个类似于xshell的效果,如图:
二. 技术栈
这里使用了springboot、netty、jsch、react、Ts,xterm。
这里我用了springboot和netty实现了websocket,jsch用来连接服务器,react和xterm实现终端的页面。
xterm这里有一个坑,吐槽下官方文档写的有点简单。
这里的使用的版本都是最新版的,给大家踩坑,下面看一下如何实现吧!
三. 搭建websocket
这里我用netty实现了一个websocket,很简单,只需要实现了心跳的处理器和ws消息处理器。
3.1. netty的server
@Slf4j
@Component
public class WebSocketServer {

    public void Run() {
        // 这里只是使用线程工厂创建线程池,
        EventLoopGroup boss = ThreadUtil.getEventLoop(BOSS_THREAD_NAME);
        EventLoopGroup worker = ThreadUtil.getEventLoop(WORKER_THREAD_NAME);
        try {
            ChannelFuture future = new ServerBootstrap()
                    .group(boss, worker)
                    .option(ChannelOption.SO_BACKLOG, BACKLOG)
                    .channel(NioServerSocketChannel.class)
                    .childOption(ChannelOption.SO_KEEPALIVE, true)
                    .childHandler(new WSChannelInitializer())
                    .bind(PORT)
                    .sync();
            log.info("WS服务器启动......");
            future.channel().closeFuture().sync();
        } catch (Exception e) {
            log.error("WS服务器发生异常: [{}]", e.getMessage(), e);
        } finally {
            log.info("WS服务器关闭......");
            worker.shutdownGracefully();
            boss.shutdownGracefully();
        }
    }

}
接着看下核心WSChannelInitializer定义了一系列处理器:
@Component
public class WSChannelInitializer extends ChannelInitializer<SocketChannel> {

    private final ClientMsgHandler clientMsgHandler;
    private final WsHeartBeatHandler heartBeatHandler;

    public WSChannelInitializer() {
        // SpringUtil是一个工具类,从容器中获取相关的Bean
        clientMsgHandler = SpringUtil.getBean(ClientMsgHandler.class);
        heartBeatHandler = SpringUtil.getBean(WsHeartBeatHandler.class);
    }


    @Override
    protected void initChannel(@NotNull SocketChannel ch) throws Exception {
        ChannelPipeline pipeline = ch.pipeline();
        // http编解码器
        pipeline.addLast(new HttpServerCodec());
        // 块写入
        pipeline.addLast(new ChunkedWriteHandler());
        // 将请求报文聚合为完整报文,设置最大请求报文 10M
        pipeline.addLast(new HttpObjectAggregator(10 * 1024 * 1024));
        // 心跳
        pipeline.addLast(new IdleStateHandler(10, 10, 30, TimeUnit.MINUTES));
        // 处理心跳
        pipeline.addLast(heartBeatHandler);
        // 处理ws信息
        pipeline.addLast(new WebSocketServerProtocolHandler("/api/ws"));
        pipeline.addLast(clientMsgHandler);
    }
}
3.2. 心跳包
心跳包主要是为了长时间没有处理关闭连接
@Slf4j
@Component
@ChannelHandler.Sharable
public class WsHeartBeatHandler  extends ChannelInboundHandlerAdapter {

    @Resource
    private ChannelService channelService;

    @Override
    public void userEventTriggered(ChannelHandlerContext ctx, Object evt) throws Exception {
        if (evt instanceof IdleStateEvent event) {
            if (event.state() == IdleState.READER_IDLE) {
                log.debug("没有收到读数据包");
            } else if (event.state() == IdleState.WRITER_IDLE) {
                log.debug("没有发送写数据包");
            } else if (event.state() == IdleState.ALL_IDLE) {
                Channel channel = ctx.channel();
                log.error("长时间没有读写,关闭连接: {}", channel.id().asLongText());
                channelService.remove(channel);
                channel.close();
            }
        }
    }

}
3.3. WebSocket处理器
这里我就放一些核心代码吧
@Slf4j
@Component
@ChannelHandler.Sharable
public class ClientMsgHandler extends SimpleChannelInboundHandler<TextWebSocketFrame> {

    @Resource
    private ChannelService channelService;

    @Override
    protected void channelRead0(ChannelHandlerContext ctx, TextWebSocketFrame msg) throws Exception {
        String json = msg.text();
        log.info("收到数据:{}", json);
        WsMessage message = null;
        try {
            message = JSONObject.parseObject(json, WsMessage.class);
        } catch (Exception e) {
            log.error("{}", e.getMessage());
            return;
        }
        // TODO 后期优化
        if (message.getMsgType().equals(WsMessageEnum.AUTH.getType())) {
            // 用户认证
            checkoutUserHandler(message, ctx);
        } else if (message.getMsgType().equals(WsMessageEnum.KEEP.getType())) {
            // 心跳
            keepHandler(message);
        } else if (message.getMsgType().equals(WsMessageEnum.SYSTEM.getType())) {
            // 其他消息
            systemHandler(message, ctx);
        } else if (message.getMsgType().equals(WsMessageEnum.TERMINAL.getType())) {
            // xterm发送的消息
            terminalHandler(message, ctx);
        } else {
            log.info("[{}] => 当前消息类型未识别:[{}]", Thread.currentThread().getName(), message);
        }
    }

    /**
     * 校验用户认证信息
     * @param message
     * @return
     */
    private void checkoutUserHandler(WsMessage message, ChannelHandlerContext ctx) {
        log.info("[{}] => 当前消息是鉴权消息:[{}]", Thread.currentThread().getName(), message);
        DecodedJWT jwt = JwtUtil.verifyToken(message.getData());
        String data = jwt.getClaim("data").asString();
        User user = JSONObject.parseObject(data, User.class);
        channelService.add(user.getId(), ctx.channel());
        // 初始化jsch链接
        channelService.add(ctx.channel(), message.getId());
    }

}
3.4. shell和websocket的关联
这里我通过Jsch连接服务器,Jsch连接到服务器之后也是通过channel进行交互,这里可以将Jsch的channel和netty的channel进行关联。
@Slf4j
@Service
public class ChannelServiceImpl implements ChannelService {
 	  // 用户和netty的channel对应关联
    private final ConcurrentHashMap<Integer, Set<Channel>> useChannelMap = new ConcurrentHashMap<>(1 << 8);

    // netty的channel和Jsch上下文的映射关系
    private final ConcurrentHashMap<Channel, ServerTerminalVo> sshChannelMap = new ConcurrentHashMap<>(1 << 8);
    // 保持JSch的channel的线程池
    private final ExecutorService executorService = Executors.newCachedThreadPool();
    private final Lock lock = new ReentrantLock();

}
下面看一个如何进行关联,add方法将在checkoutUserHandler的方法中进行调用,创建连接。
@Slf4j
@Service
public class ChannelServiceImpl implements ChannelService {
    @Override
    public void add(Channel channel, Integer serverId) {
        // 获取server
        Server server = serverMapper.selectOne(new LambdaQueryWrapper<Server>().eq(Server::getId, serverId).eq(Server::getCanView, true));

        try {
            // 创建jsch的连接
            Properties config = new Properties();
            // 账号密码连接需要在这里设置
            config.put("StrictHostKeyChecking", "no");
            Session session = new JSch().getSession(server.getUsername(), server.getHost(), server.getPort());
            session.setConfig(config);
            session.setPassword(server.getPassword());
            session.connect(30000);
            com.jcraft.jsch.Channel shell = session.openChannel("shell");
            shell.connect(30000);
            // 设置channel
            ServerTerminalVo result = new ServerTerminalVo(server, session, shell);
            // 启动线程获取数据
            sshChannelMap.put(channel, result);
            executorService.submit(new TerminalThread(result, channel));
        } catch (JSchException e) {
            log.error("连接服务器失败:{}", e.getMessage());
            throw new SystemException(ResultCode.SERVER_CONNECT_FAIL);
        }
    }

    // 保持jsch的连接,一旦有服务端数据发将其发送到指定netty的channel中,需要使用TextWebSocketFrame进行封装
    static class TerminalThread implements Runnable {

        private final ServerTerminalVo serverTerminal;

        private final Channel channel;

        public TerminalThread(ServerTerminalVo serverTerminal, Channel channel) {
            this.serverTerminal = serverTerminal;
            this.channel = channel;
        }

        @Override
        public void run() {
            try (InputStream inputStream = serverTerminal.getChannel().getInputStream()) {
                int i = 0;
                byte[] buffer = new byte[2048];
                while ((i = inputStream.read(buffer)) != -1) {
                    byte[] bytes = Arrays.copyOfRange(buffer, 0, i);
                    String msg = new String(bytes);
                    channel.writeAndFlush(new TextWebSocketFrame(msg)).addListener((ChannelFutureListener) future -> {
                        log.debug("[{}] => 发送websocket消息:{}", Thread.currentThread().getName(), msg);
                    });
                }
            } catch (Exception e) {
                log.error("[{}] 读取服务器数据失败:[{}]", Thread.currentThread().getName(), e.getMessage());
            }
        }
    }
}
四. 搭建xterm终端
这里我使用了抖音开源的React UI框架:semi design,视觉效果还是很不错的,使用起来和antd差不多,推荐大家用一下。
4.1. 版本
这里先列一下相关技术点的版本:
- react:18.2.0
- xterm:5.0.0
- xterm-addon-attach:0.7.0
- xterm-addon-fit:0.6.0
- xterm-addon-web-links:0.7.0 (这个可以不加)
- typescript:4.6.4
网上好多版本的xterm都是使用了4.x.x的版本,但是5的版本又一些api是无法使用的,并且很多写法都是基于js的。
4.2. 服务器连接管理
这里的服务器连接管理,就是一个CRUD,很简单,主要是为了管理服务器连接,如图:

4.3. 连接websocket
这儿先创建了weksocket的对象引用:
const ws = useRef<WebSocket | null>(null);
接着在useEffect中实例化WebSocket:
useEffect(() => {
  if (visible) {
    // 初始化ws
    try {
      const token = store.getState().user.token;
      ws.current = new WebSocket('ws://127.0.0.1:8081/api/ws')
      ws.current.onopen = () => {
        // 初始化连接的时候发送认证信息
        ws.current?.send(JSON.stringify({msgType: 1, data: token, id: id}))
        // 设置状态
        setReadyState(stateArr[ws.current?.readyState ?? 0]);
      }
      ws.current.onclose = () => {
        setReadyState(stateArr[ws.current?.readyState ?? 0])
      }
      ws.current.onerror = () => {
        setReadyState(stateArr[ws.current?.readyState ?? 0])
      }
      ws.current.onmessage = (e) => {
        console.log("e => ", e)
      }
    } catch (error) {
      console.log(error)
    }
  }
  return () => {
    // 组件销毁的之前,关闭websocket连接
    ws.current?.close();
  }
}, [visible])
这儿涉及到了websocket的认证,我这里采用的是,创建连接成功之后,发送一个包含认证信息指定格式的数据给后端进行认证。
网上有好些人用new WebSocket(‘ws://127.0.0.1:8081/api/ws’, [token])这样去进行认证,我试了不行。有成功的可以留言给我
接着还需要一个websocket的心跳处理,这里可以使用定时任务,但是需要注意在组件销毁之时清理定时器。
useEffect(() => {
  let timer: number | null = null;
  // 确保ws状态是1
  if (readyState.key === 1) {
    timer = setInterval(() => {
      // 每隔10s发送一个心跳包
      ws.current?.send(JSON.stringify({msgType: 2, data: "ping"}))
    }, 10000);
  }
  // 确保ws状态是关闭状态的时候清理定时器
  if ((readyState.key === 2 || readyState.key === 3) && timer) {
    clearInterval(timer);
  }
  return () => {
    if (timer) {
      // 清理定时器
      clearInterval(timer);
    }
  }
}, [readyState])
4.4. 对接xterm
上面已经将websocket对接成功了,接着在去初始化xterm。这里需要引入xterm,添加一些必要的引用:
import { Terminal } from 'xterm'; // 必须
import { WebLinksAddon } from 'xterm-addon-web-links';
import { FitAddon } from 'xterm-addon-fit'; // 缩放
import { AttachAddon } from 'xterm-addon-attach'; // 必须
import 'xterm/css/xterm.css'; // 这个不引入样式不对
接着就可以初始化xterm了:
const divRef: any = useRef(null);

useEffect(() => {
  if (visible) {
    // 初始化ws ......

    // 初始化xterm
    terminal.current = new Terminal({
      cursorBlink: true, // 光标闪烁
      allowProposedApi: true,
      disableStdin: false, //是否应禁用输入
      cursorStyle: "underline", //光标样式
      theme: { // 设置主题
        foreground: "yellow", //字体
        background: "#060101", //背景色
        cursor: "help", //设置光标
      },
    });
    const webLinksAddon = new WebLinksAddon();
    const fitAddon = new FitAddon();
    // 将ws载入
    const attachAddon = new AttachAddon(ws.current!);
                                        terminal.current.loadAddon(webLinksAddon);
    terminal.current.loadAddon(fitAddon);
    terminal.current.loadAddon(attachAddon);
    // 在有键盘按键输入数据的时候发送指定格式的数据
    terminal.current?.onData(e => {
      ws.current?.send(JSON.stringify({msgType: 4, data: e}))
    })
    // 将div元素的引入挂在入xterm中
    terminal.current.open(divRef.current);
    fitAddon.fit();

  }
  return () => {
    // 关闭ws
    ws.current?.close();
    // 销毁xterm
    terminal.current?.dispose()
  }
}, [visible])
对应的div元素:
<div style={{ marginTop: 10, width: 1250, height: 600 }} ref={divRef} />
此时大体就完成了!
五. 源码
上面的代码并不全,可到gitee上查看:https://gitee.com/molonglove/server-manage.git

