本文目录如下:
- 一、IDEA 创建 Spring Cloud 基本步骤
- 创建父项目 (Project)
- 创建子模块 (Module)
- Spring Cloud 中的依赖版本对应关系?
- Spring Cloud实现模块间相互调用(引入模块)?
- Maven项目命名规范(groupID、artifactid)
- Spring Cloud中 父模块 和 子模块 的依赖关系?
- 二、配置文件样例
- 父项目文件
- pom.xml
- 业务子模块文件
- pom.xml
- application.yml
- common 公用模块
- pom.xml
一、IDEA 创建 Spring Cloud 基本步骤
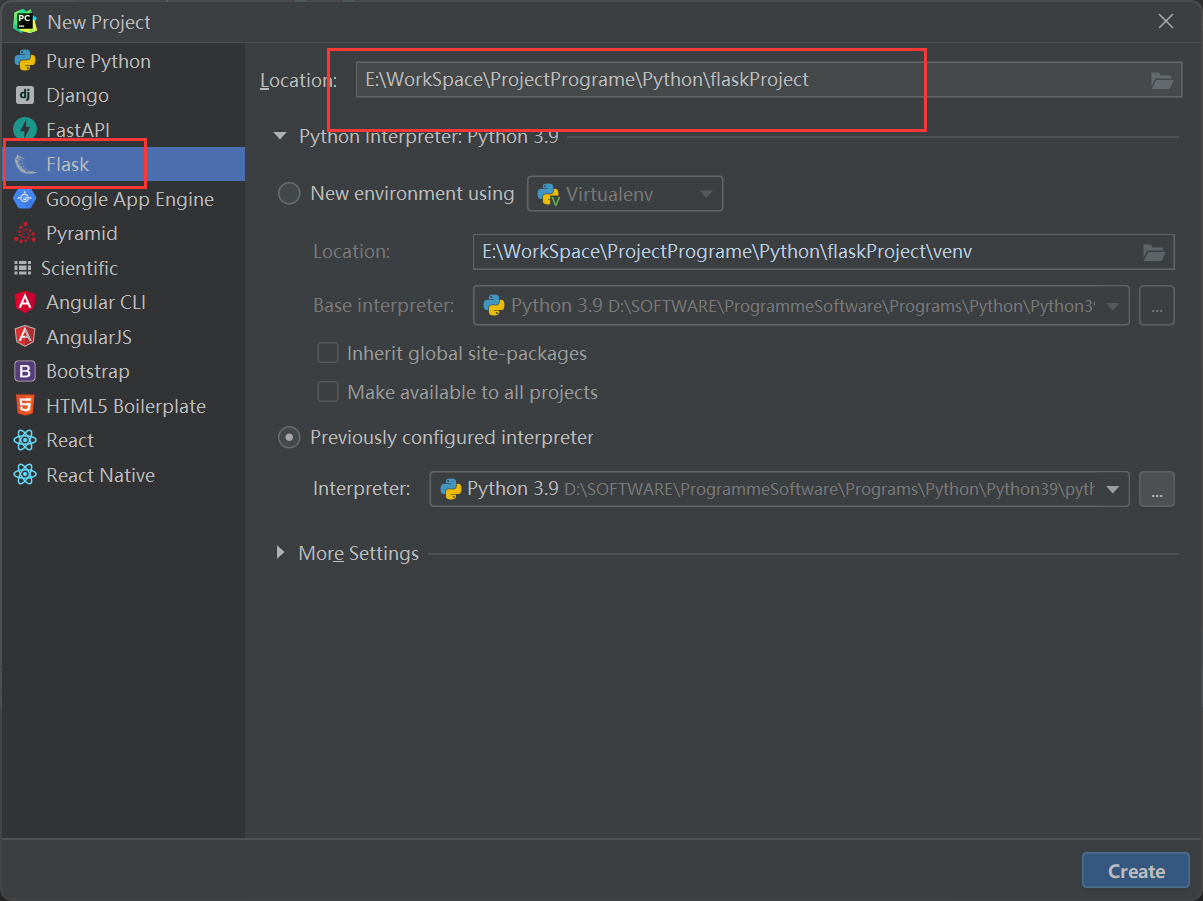
创建父项目 (Project)
点击查看: Spring Cloud实战教程
父项目
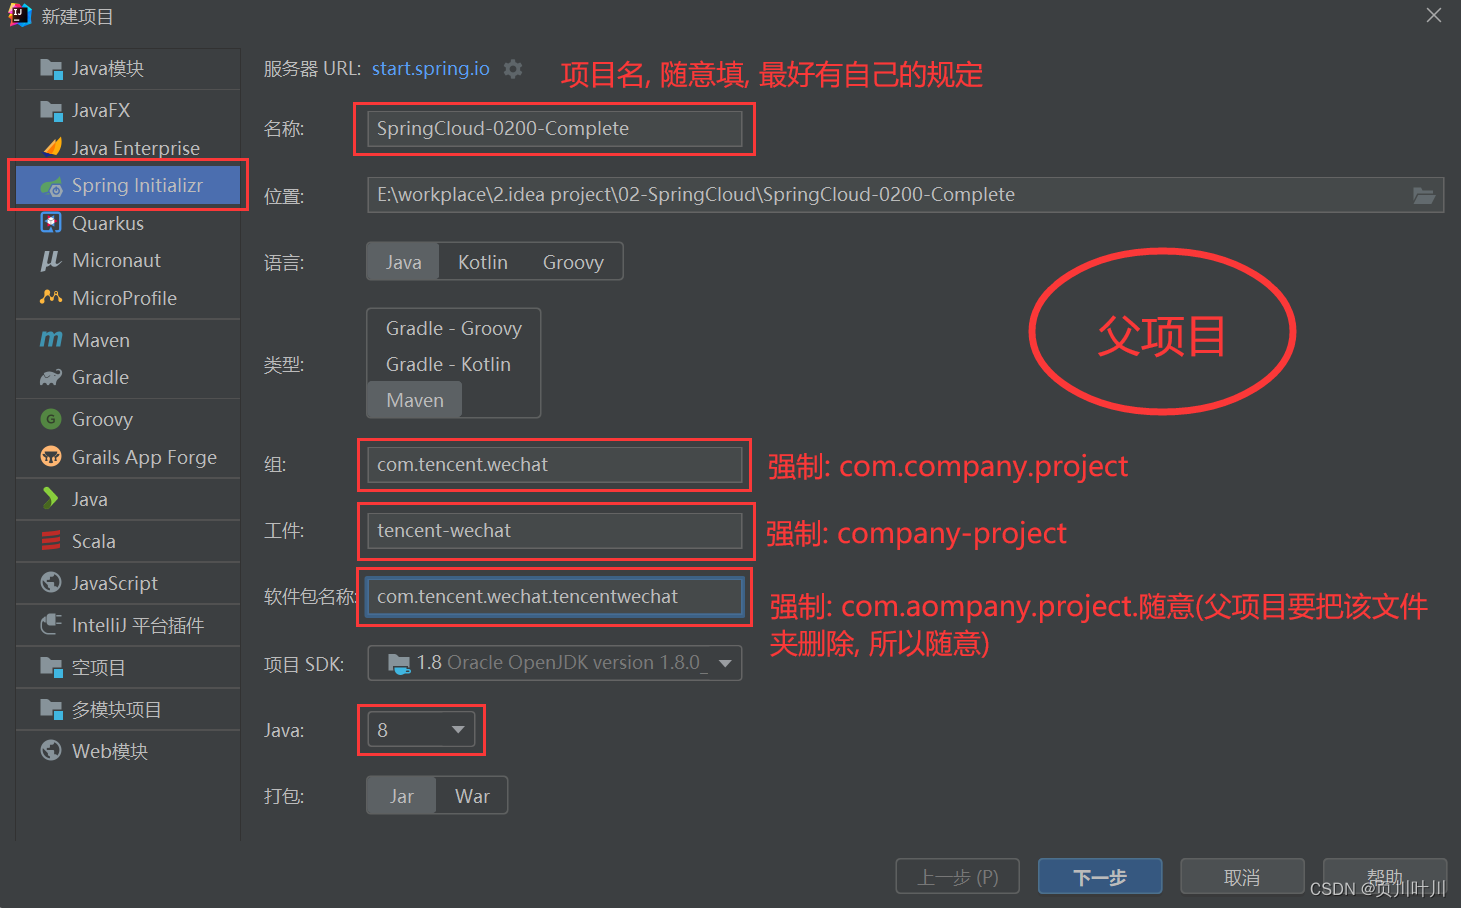
父项目只需要 保留 这些文件, 其他的 删除:

创建子模块 (Module)
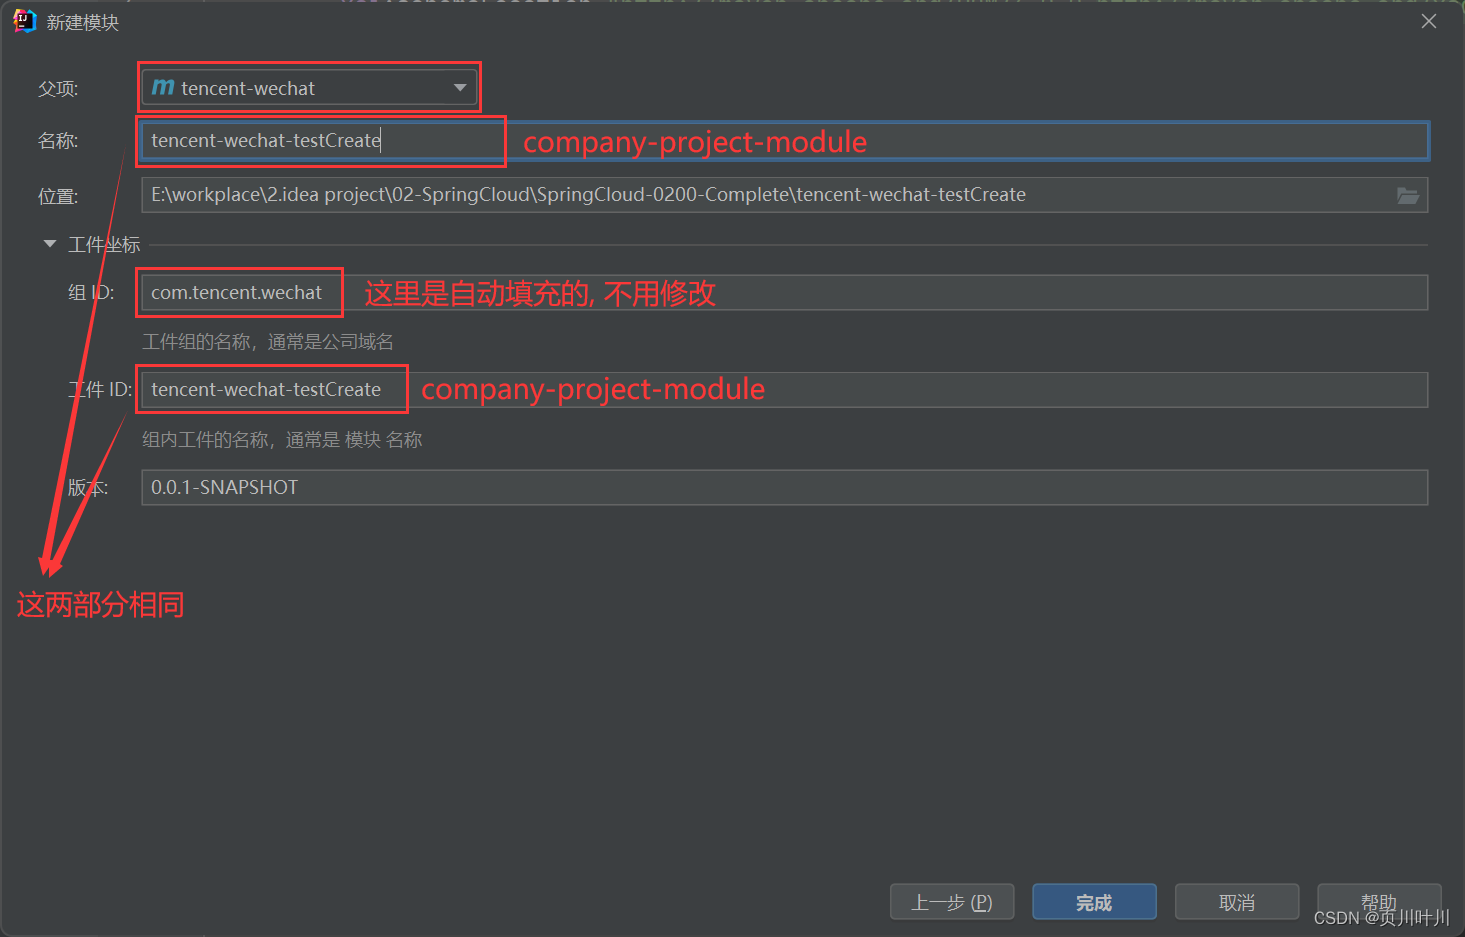
子模块 (方式一[Maven]: 推荐)
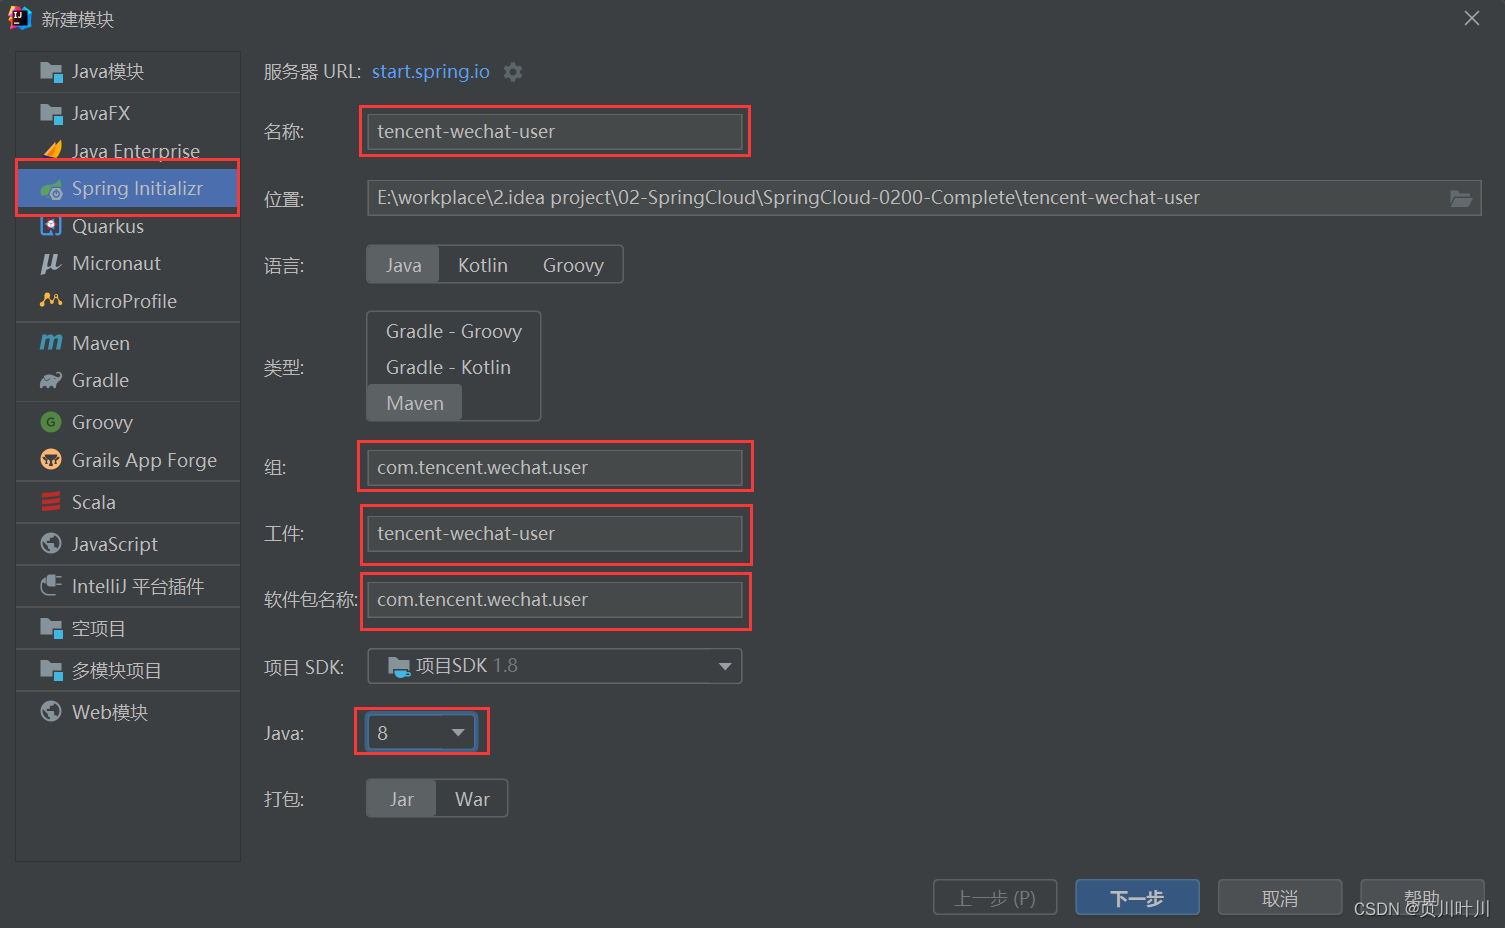
子模块 (方式二[Spring Initializr])
Spring Cloud 中的依赖版本对应关系?
点击查看: Spring Cloud 和 Spring Boot 版本对应
推荐版本:
Spring Cloud: Hoxton.SR8 (最常用的版本)Spring Cloud Alibaba: 2.2.5.RELEASESpring Boot: 2.3.2.RELEASE
所有版本关系:
<properties>
    <maven.compiler.source>8</maven.compiler.source>
    <maven.compiler.target>8</maven.compiler.target>
    <project.build.sourceEncoding>UTF-8</project.build.sourceEncoding>
    <spring-cloud.version>Hoxton.SR8</spring-cloud.version>
    <cloud-alibabba.version>2.2.5.RELEASE</cloud-alibabba.version>
    <mysql.version>8.0.26</mysql.version>
    <mybatis-plus.version>3.5.2</mybatis-plus.version>
    <druid.version>1.2.14</druid.version>
    <kaptcha.version>1.2.1</kaptcha.version>
    <fastjson.version>1.2.71</fastjson.version>
    <httpclientutil.version>1.0.4</httpclientutil.version>
    <commons-lang.version>2.6</commons-lang.version>
    <commons-collections.version>3.2.2</commons-collections.version>
    <commons-io.version>2.6</commons-io.version>
</properties>
Spring Cloud实现模块间相互调用(引入模块)?
Springcloud-实现跨项目相互调用 (简易版: 不使用Feign版本)
Maven项目命名规范(groupID、artifactid)
点击查看: Maven项目命名规范 (groupID、artifactid)
<groupId>: 定义当前 Maven项目 隶属的 实际项目,例如com.compang.project。
- 前半部分
com.compang: 代表此项目隶属的 公司。- 后半部分
project: 代表 项目的名称。- 例如: 腾讯(tencent) 的 微信(wechat)项目:
com.tencent.wechat。
<artifactId>: 构件ID, 该元素定义实际项目中的一个 Maven项目 或者是 子模块
- 构建名 称必须 小写字母,没有其他的 特殊字符。
- 父项目: 【公司名-项目名】,例如:
tencent-wechat。- 子模块: 【
公司名-项目名-模块名】,例如:tencent-wechat-user、tencent-wechat-file。
> - 子模块方案二: 【项目名-模块名】,例如:wechat-user、wechat-file。
父模块
<groupId>com.tencent.wechat</groupId>
<artifactId>tencent-wechat</artifactId>
<packaging>pom</packaging>
<version>1.0-SNAPSHOT</version>
子模块
<parent>
    <groupId>com.tencent.wechat</groupId>
    <artifactId>tencent-wechat</artifactId>
    <version>1.0-SNAPSHOT</version>
</parent>

<artifactId>tencent-wechat-user</artifactId>
Spring Cloud中 父模块 和 子模块 的依赖关系?
点击查看: Spring Cloud 中 dependencyManagement、type、scope在 父模块 和 子模块 的作用?
- 在 父项目 中使用
dependencyManagement,继承该 父项目 的 子项目 默认不会直接引入 dependencyManagement 管理的 jar包。- 子项目 要继承 父项目 的 依赖 时, 需要 显式的声明 需要用的 依赖,并且不指定 version,才会从 父项目 中继承该 依赖,这时
version和scope都读取自父pom;
<dependencyManagement>
    <dependencies>

        <!-- springCloud -->
        <dependency>
            <groupId>org.springframework.cloud</groupId>
            <artifactId>spring-cloud-dependencies</artifactId>
            <version>${spring-cloud.version}</version>
            <type>pom</type>
            <scope>import</scope>
        </dependency>

		<!-- 更多依赖... -->

    </dependencies>
</dependencyManagement>
二、配置文件样例
父项目文件
pom.xml
<?xml version="1.0" encoding="UTF-8"?>
<project xmlns="http://maven.apache.org/POM/4.0.0" xmlns:xsi="http://www.w3.org/2001/XMLSchema-instance"
         xsi:schemaLocation="http://maven.apache.org/POM/4.0.0 https://maven.apache.org/xsd/maven-4.0.0.xsd">
    <modelVersion>4.0.0</modelVersion>

    <parent>
        <groupId>org.springframework.boot</groupId>
        <artifactId>spring-boot-starter-parent</artifactId>
        <version>2.3.2.RELEASE</version>
        <relativePath/> <!-- lookup parent from repository -->
    </parent>

    <groupId>com.tencent.wechat</groupId>
    <artifactId>tencent-wechat</artifactId>
    <version>0.0.1-SNAPSHOT</version>
    <packaging>pom</packaging>

    <modules>
        <module>tencent-wechat-user</module>
        <module>tencent-wechat-blog</module>

		<!-- 公有模块 -->
        <module>tencent-wechat-common</module>
    </modules>

    <!-- 版本锁定 -->
    <properties>
        <maven.compiler.source>8</maven.compiler.source>
        <maven.compiler.target>8</maven.compiler.target>
        <project.build.sourceEncoding>UTF-8</project.build.sourceEncoding>
        <spring-cloud.version>Hoxton.SR8</spring-cloud.version>
        <cloud-alibabba.version>2.2.5.RELEASE</cloud-alibabba.version>
        <mysql.version>8.0.26</mysql.version>
        <mybatis-plus.version>3.5.2</mybatis-plus.version>
        <druid.version>1.2.14</druid.version>
        <kaptcha.version>1.2.1</kaptcha.version>
        <fastjson.version>1.2.71</fastjson.version>
        <httpclientutil.version>1.0.4</httpclientutil.version>
        <commons-lang.version>2.6</commons-lang.version>
        <commons-collections.version>3.2.2</commons-collections.version>
        <commons-io.version>2.6</commons-io.version>
    </properties>

    <dependencyManagement>
        <dependencies>

            <!-- springCloud -->
            <dependency>
                <groupId>org.springframework.cloud</groupId>
                <artifactId>spring-cloud-dependencies</artifactId>
                <version>${spring-cloud.version}</version>
                <type>pom</type>
                <scope>import</scope>
            </dependency>

            <!--nacos的管理依赖-->
<!--            <dependency>-->
<!--                <groupId>com.alibaba.cloud</groupId>-->
<!--                <artifactId>spring-cloud-alibaba-dependencies</artifactId>-->
<!--                <version>${cloud-alibabba.version}</version>-->
<!--                <type>pom</type>-->
<!--                <scope>import</scope>-->
<!--            </dependency>-->

            <!-- mysql驱动 -->
            <dependency>
                <groupId>mysql</groupId>
                <artifactId>mysql-connector-java</artifactId>
                <version>${mysql.version}</version>
            </dependency>

            <!--mybatis-plus-->
            <dependency>
                <groupId>com.baomidou</groupId>
                <artifactId>mybatis-plus</artifactId>
                <version>${mybatis-plus.version}</version>
            </dependency>

            <!--链接池-->
            <dependency>
                <groupId>com.alibaba</groupId>
                <artifactId>druid-spring-boot-starter</artifactId>
                <version>${druid.version}</version>
            </dependency>

            <!--swagger-->
<!--            <dependency>-->
<!--                <groupId>com.spring4all</groupId>-->
<!--                <artifactId>swagger-spring-boot-starter</artifactId>-->
<!--                <version>2.0.2.RELEASE</version>-->
<!--            </dependency>-->

            <!--图片验证码-->
            <dependency>
                <groupId>com.github.penggle</groupId>
                <artifactId>kaptcha</artifactId>
                <version>${kaptcha.version}</version>
            </dependency>

            <!--存储头像-->
            <dependency>
                <groupId>com.aliyun.oss</groupId>
                <artifactId>aliyun-sdk-oss</artifactId>
                <version>3.8.0</version>
            </dependency>

            <dependency>
                <groupId>com.alibaba</groupId>
                <artifactId>fastjson</artifactId>
                <version>${fastjson.version}</version>
            </dependency>

            <!--http请求工具-->
            <dependency>
                <groupId>com.arronlong</groupId>
                <artifactId>httpclientutil</artifactId>
                <version>${httpclientutil.version}</version>
            </dependency>

            <!--工具类依赖-->
            <dependency>
                <groupId>commons-lang</groupId>
                <artifactId>commons-lang</artifactId>
                <version>${commons-lang.version}</version>
            </dependency>
            <dependency>
                <groupId>commons-collections</groupId>
                <artifactId>commons-collections</artifactId>
                <version>${commons-collections.version}</version>
            </dependency>
            <dependency>
                <groupId>commons-io</groupId>
                <artifactId>commons-io</artifactId>
                <version>${commons-io.version}</version>
            </dependency>

            <!--简化bean代码的工具包-->
            <dependency>
                <groupId>org.projectlombok</groupId>
                <artifactId>lombok</artifactId>
                <optional>true</optional>
                <version>1.18.20</version>
            </dependency>
            <dependency>
                <groupId>junit</groupId>
                <artifactId>junit</artifactId>
                <version>4.13.2</version>
                <scope>test</scope>
            </dependency>
            <dependency>
                <groupId>org.slf4j</groupId>
                <artifactId>slf4j-jdk14</artifactId>
                <version>1.5.6</version>
            </dependency>

        </dependencies>
    </dependencyManagement>

</project>
业务子模块文件
pom.xml
<?xml version="1.0" encoding="UTF-8"?>
<project xmlns="http://maven.apache.org/POM/4.0.0" xmlns:xsi="http://www.w3.org/2001/XMLSchema-instance"
         xsi:schemaLocation="http://maven.apache.org/POM/4.0.0 https://maven.apache.org/xsd/maven-4.0.0.xsd">
    <modelVersion>4.0.0</modelVersion>

    <parent>
        <groupId>com.tencent.wechat</groupId>
        <artifactId>tencent-wechat</artifactId>
        <version>0.0.1-SNAPSHOT</version>
    </parent>

    <artifactId>tencent-wechat-user</artifactId>

    <properties>
        <java.version>1.8</java.version>
        <maven.compiler.source>8</maven.compiler.source>
        <maven.compiler.target>8</maven.compiler.target>
        <project.build.sourceEncoding>UTF-8</project.build.sourceEncoding>
    </properties>

    <dependencies>
        <!-- 引入公共模块 -->
        <dependency>
            <groupId>com.tencent.wechat</groupId>
            <artifactId>tencent-wechat-common</artifactId>
            <version>0.0.1-SNAPSHOT</version>
        </dependency>

        <!-- nacos 客户端 作为 注册与发现-->
<!--        <dependency>-->
<!--            <groupId>com.alibaba.cloud</groupId>-->
<!--            <artifactId>spring-cloud-starter-alibaba-nacos-discovery</artifactId>-->
<!--        </dependency>-->

        <!-- nacos 配置中心 -->
<!--        <dependency>-->
<!--            <groupId>com.alibaba.cloud</groupId>-->
<!--            <artifactId>spring-cloud-starter-alibaba-nacos-config</artifactId>-->
<!--        </dependency>-->

        <!-- Spring Security、OAuth2 和JWT等-->
<!--        <dependency>-->
<!--            <groupId>org.springframework.cloud</groupId>-->
<!--            <artifactId>spring-cloud-starter-oauth2</artifactId>-->
<!--        </dependency>-->

        <dependency>
            <groupId>org.springframework.boot</groupId>
            <artifactId>spring-boot-starter-test</artifactId>
            <scope>test</scope>
        </dependency>

        <!--热部署 ctrl+f9-->
        <dependency>
            <groupId>org.springframework.boot</groupId>
            <artifactId>spring-boot-devtools</artifactId>
        </dependency>
        <dependency>
            <groupId>com.baomidou</groupId>
            <artifactId>mybatis-plus-core</artifactId>
            <version>3.5.2</version>
            <scope>compile</scope>
        </dependency>

        <dependency>
            <groupId>org.projectlombok</groupId>
            <artifactId>lombok</artifactId>
        </dependency>

        <!-- swagger-->
<!--        <dependency>-->
<!--            <groupId>com.spring4all</groupId>-->
<!--            <artifactId>swagger-spring-boot-starter</artifactId>-->
<!--            <version>1.9.1.RELEASE</version>-->
<!--        </dependency>-->

        <dependency>
            <groupId>com.github.yulichang</groupId>
            <artifactId>mybatis-plus-join</artifactId>
            <version>1.3.8</version>
        </dependency>

    </dependencies>

    <build>
        <plugins>
            <plugin>
                <groupId>org.springframework.boot</groupId>
                <artifactId>spring-boot-maven-plugin</artifactId>
            </plugin>
        </plugins>
    </build>

</project>
application.yml
server:
  port: 8190
  servlet:
    context-path: /user #上下文请求路径,请求前缀 ip:port/user
spring:
  application:
    name: user-server #应用名
    #数据库配置
  datasource:
    url: jdbc:mysql://xxx.xxx.xxx.xxx:3306/xxx?zeroDateTimeBehavior=convertToNull&useUnicode=true&characterEncoding=utf8&serverTimezone=GMT%2B8&autoReconnect=true&nullCatalogMeansCurrent=true&allowMultiQueries=true
    username: xxx
    password: xxx
    driver-class-name: com.mysql.cj.jdbc.Driver
mybatis-plus:
  type-aliases-package: com.tencent.wechat.user.entities
  mapper-locations: classpath*:com/tencent/wechat/user/mapper/**/*.xml
  configuration:
    map-underscore-to-camel-case: false
logging:
  level:
    com.pkpmgl.pt.deptuser.mapper: debug
common 公用模块
公用模块包含的 依赖: (一般引入 依赖的启动器)
spring-boot-starter-webmysql-connector-javamybatis-plus-boot-starterdruid-spring-boot-startermybatis-plus-joinmybatis-plus-join-core- …
pom.xml
<?xml version="1.0" encoding="UTF-8"?>
<project xmlns="http://maven.apache.org/POM/4.0.0" xmlns:xsi="http://www.w3.org/2001/XMLSchema-instance"
         xsi:schemaLocation="http://maven.apache.org/POM/4.0.0 https://maven.apache.org/xsd/maven-4.0.0.xsd">
    <modelVersion>4.0.0</modelVersion>

    <parent>
        <groupId>com.tencent.wechat</groupId>
        <artifactId>tencent-wechat</artifactId>
        <version>0.0.1-SNAPSHOT</version>
    </parent>

    <artifactId>tencent-wechat-common</artifactId>

    <properties>
        <java.version>1.8</java.version>
    </properties>

    <dependencies>

        <dependency>
            <groupId>org.springframework.boot</groupId>
            <artifactId>spring-boot-starter-web</artifactId>
        </dependency>

        <!-- feign 调用服务接口 -->
<!--        <dependency>-->
<!--            <groupId>org.springframework.cloud</groupId>-->
<!--            <artifactId>spring-cloud-starter-openfeign</artifactId>-->
<!--        </dependency>-->

        <!-- Spring Security、OAuth2 和JWT等-->
<!--        <dependency>-->
<!--            <groupId>org.springframework.cloud</groupId>-->
<!--            <artifactId>spring-cloud-starter-oauth2</artifactId>-->
<!--        </dependency>-->

        <!--redis-->
<!--        <dependency>-->
<!--            <groupId>org.springframework.boot</groupId>-->
<!--            <artifactId>spring-boot-starter-data-redis</artifactId>-->
<!--        </dependency>-->

        <!--    springboot 2.3.x版本以上将validation单独抽取出来了,要我们自己引入-->
        <dependency>
            <groupId>org.springframework.boot</groupId>
            <artifactId>spring-boot-starter-validation</artifactId>
        </dependency>

        <!--mybatis-plus启动器-->
        <dependency>
            <groupId>com.baomidou</groupId>
            <artifactId>mybatis-plus-boot-starter</artifactId>
            <version>3.5.2</version>
        </dependency>

        <!--Druid连接池-->
        <dependency>
            <groupId>com.alibaba</groupId>
            <artifactId>druid-spring-boot-starter</artifactId>
        </dependency>

        <dependency>
            <groupId>mysql</groupId>
            <artifactId>mysql-connector-java</artifactId>
            <scope>runtime</scope>
        </dependency>

        <!-- 配置处理器 -->
        <dependency>
            <groupId>org.springframework.boot</groupId>
            <artifactId>spring-boot-configuration-processor</artifactId>
            <optional>true</optional>
        </dependency>

        <!--lombok setter, getter-->
        <dependency>
            <groupId>org.projectlombok</groupId>
            <artifactId>lombok</artifactId>
        </dependency>

        <!-- swagger-->
        <dependency>
            <groupId>com.spring4all</groupId>
            <artifactId>swagger-spring-boot-starter</artifactId>
            <version>1.9.1.RELEASE</version>
        </dependency>

        <!-- aliyun -->
        <!-- aliyun oss-->
<!--        <dependency>-->
<!--            <groupId>com.aliyun.oss</groupId>-->
<!--            <artifactId>aliyun-sdk-oss</artifactId>-->
<!--        </dependency>-->
        <dependency>
            <groupId>com.alibaba</groupId>
            <artifactId>fastjson</artifactId>
        </dependency>

        <!--http请求工具-->
        <dependency>
            <groupId>com.arronlong</groupId>
            <artifactId>httpclientutil</artifactId>
        </dependency>

        <!-- 工具类依赖 -->
        <dependency>
            <groupId>commons-lang</groupId>
            <artifactId>commons-lang</artifactId>
        </dependency>
        <dependency>
            <groupId>commons-collections</groupId>
            <artifactId>commons-collections</artifactId>
        </dependency>
        <dependency>
            <groupId>commons-io</groupId>
            <artifactId>commons-io</artifactId>
        </dependency>
        <dependency>
            <groupId>com.github.yulichang</groupId>
            <artifactId>mybatis-plus-join-core</artifactId>
            <version>1.3.8</version>
            <scope>compile</scope>
        </dependency>

        <dependency>
            <groupId>com.github.yulichang</groupId>
            <artifactId>mybatis-plus-join</artifactId>
            <version>1.3.8</version>
        </dependency>

    </dependencies>

    <build>
        <plugins>
            <plugin>
                <groupId>org.springframework.boot</groupId>
                <artifactId>spring-boot-maven-plugin</artifactId>
            </plugin>
        </plugins>
    </build>

</project>
