知识要点
-
PyTorch可以说是现阶段主流的深度学习框架 .
1 PyTorch入门
1.1 PyTorch概述

Torch是什么?一个火炬!其实跟Tensorflow中Tensor是一个意思,可以当做是能在GPU中计算的矩阵.,也可以当做是ndarray的GPU版!
PyTorch可以说是现阶段主流的深度学习框架了,武林盟主之争大概是这个历史。15年底之前Caffe是老大哥,随着Tensorflow的诞生,霸占江湖数载,19年起无论从学术界还是工程界PyTorch已经霸占了半壁江山!
1.2 PyTorch安装
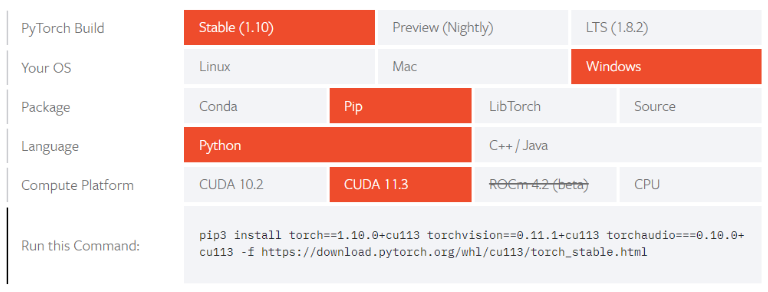
打开PyTorch 官网, 根据官网的安装提示选择符合自己情况的选项, 生成安装语句, 拷贝安装语句进行安装.
2. PyTorch张量
Pytorch最基本的操作对象是Tensor(张量),它表示一个多维矩阵.
张量类似于NumPy的ndarrays,张量可以在GPU上使用以加速计算。
2.1 张量与数据类型
import torch
import numpy as np
import pandas as pd- 创建tensor: 可以直接使用python列表或者ndarray创建tensor
x = torch.tensor([6, 2])
x = torch.tensor(np.array([1, 2, 3]))- 与ndarray类似, pytorch也有很多快捷的方法用来创建张量.
import torch

# 创建一个[0, 1)之间的随机均匀分布
x = torch.rand(2, 3)
print(x)

# 创建一个标准正态分布
x = torch.randn(2, 3)
print(x)

# 创建全是0的tensor
x = torch.zeros(2, 3)
print(x)

# 创建全是1的tensor
x = torch.ones(2, 3)
print(x)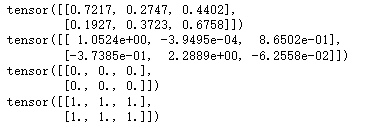
- 类似的可以通过shape或size获取tensor的形状, size可以具体制定获取哪一个维度的形状大小:
x = torch.ones(2, 3, 4)
x.shape
# 输出 torch.Size([2, 3, 4])
x.size()
# 输出 torch.Size([2, 3, 4])
x.size(0)
# 输出 2
2.2 Tensor基本数据类型
pytorch中的tensor有以下基本数据类型
-
32位浮点型: torch.float32
-
64位浮点型: torch.float64
-
32位整型: torch.int32
-
16位整型: torch.int16
-
64位整型: torch.int64
我们可以在创建tensor的时候通过dtype指定数据类型:
x = torch.tensor([6, 2], dtype=torch.float32)

# 通过.type转换数据类型
x.type(torch.int64)    # tensor([6, 2])
2.3 与ndarray数据类型的转换
ndarray可以和tensor进行转换
import numpy as np

# 标准正太分布
a = np.random.randn(2, 3)
# 通过from_numpy可以把ndarray转化为tensor
x1 = torch.from_numpy(a)
# tensor通过numpy也可以转化为ndarray
x1.numpy()
'''array([[ 0.00346987,  0.49298463,  0.8929266 ],
          [-1.21628393, -0.93081964, -0.16680752]])'''
2.4 张量运算
tensor的运算规则和numpy的运算规则很类似:
import numpy as np

a = np.random.randn(2, 3)
# 通过from_numpy可以把ndarray转化为tensor
x1 = torch.from_numpy(a)
x = torch.ones(2, 3)

# 和单个数字运算, tensor中每个元素分别和这个数字运算
x + 3
'''输出:tensor([[4., 4., 4.],
                [4., 4., 4.]], dtype=torch.float64)'''

# 两个形状相同的tensor进行运算, 对应位置元素分别运算.
x + x1

# 也可以调用pytorch的运算方法, 结果是一样的
x.add(x1)

# 加了下划线表示对x本来的值进行修改
x.add_(x1)

# 改变tensor的形状, 使用.view, 相当于numpy中的reshape
x.view(3, 2)
x.view(-1, 1)
print(x)
'''tensor([[-0.7429,  0.5438, -0.0259],
           [ 0.8848, -0.0550,  2.7443]])'''

# 单个元素的张量使用.item()转化为python数据
x = x.mean()   # tensor(0.5582)
x.item()    # 0.5581828951835632
2.5 张量的自动微分
将Torch.Tensor属性 .requires_grad 设置为True,
pytorch将开始跟踪对此张量的所有操作。
完成计算后,可以调用 .backward() 并自动计算所有梯度。
该张量的梯度将累加到.grad属性中。
x = torch.ones(2, 2, requires_grad=True)
x.requires_grad    # 输出 True

# 进行张量运算
y = x + 2

# y是由于运算而创建的,因此具有grad_fn属性
print(y.grad_fn)
# 输出: <AddBackward0 object at 0x00000096768B1708>

# 进行更多操作
z = y * y * 3
out = z.mean()

print(z, out)
# 输出
#tensor([[27., 27.],
        #[27., 27.]], grad_fn=<MulBackward0>) tensor(27., grad_fn=<MeanBackward0>)
2.6 计算梯度
out.backward()    # 自动微分运算, 注意 out 是标量值
# 打印梯度 d(out)/ dx out = f(x)
print(x.grad)
# tensor([[4.5000, 4.5000],
       # [4.5000, 4.5000]])
当张量的 requires_grad 属性为 True 时,
pytorch会一直跟踪记录此张量的运算
当不需要跟踪计算时,可以通过将代码块包装在 with torch.no_grad(): 上下文中
print(x.requires_grad)    # True
print((x ** 2).requires_grad)    # True

with torch.no_grad():
    print((x ** 2).requires_grad)    # False
也可使用 .detach() 来获得具有相同内容但不需要跟踪运算的新Tensor :
print(x.requires_grad)    # True
y = x.detach()
print(y.requires_grad)    # False
使用 requires_grad_ 就地改变张量此属性:
a = torch.randn(2, 2)
a = a*3 + 2
print(a.requires_grad)
# 输出 False
a.requires_grad_(True)
print(a.requires_grad)
# 输出True
