一、移植前的准备工作
1、三星移植过的uboot源代码准备
(1) 三星对于 S5PV210 的官方开发板为 SMDKV210,对应的移植过的 uboot 是:三星官方为210移植过的uboot和kernel/android_uboot_smdkv210.tar.bz2。
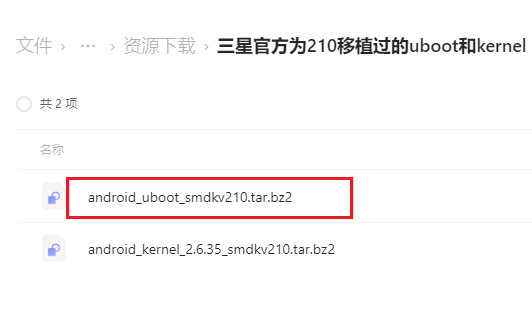
(2) 这个源代码网上是下载不到的,三星官方是不会把这些东西放在官网上下载的。这些东西都是随着官方的开发板一起流出的。
2、代码阅读工具的准备
(1) 移植的时候最重要的工作就是看代码、改代码,然后编译运行测试。
(2) 编译代码必须在 linux 中(在 windows 共享文件夹中,配置 uboot 不行的),那么看代码和改代码可以在 linux 中(vim、gedit)也可以在 windows 中(Sourceinsight)。
(3) 一般习惯的方式是:在 windows 中解压一份 uboot 源代码,在 linux 中也解压一份,注意这两份代码原始情况是一模一样的。然后移植的时候是,在 windows 中这一份中去看代码、改代码;在 linux 中这一份去编译烧写。这种做法需要在 windows 中和 linux 中, 2 份代码之间保持同步(直白点说就是 windows 中改过了后,要把改过的源代码复制到 linux 中那一份,去覆盖 linux 中那一份里面的同目录同文件)。
(4) 问题来了,怎么在 windows 中和 linux 中同步代码?通过共享文件夹,在 linux 中进行复制(cp /mnt/hgfs/winshare/xxx.c ./ );通过一些专用工具,譬如 sshsecureshell。
3、虚拟机上网
不同的 ubuntu 版本中,网卡重启的命令不同。
在 ubuntu10.04 中网卡重启使用:/etc/init.d/networking restart 或者 service network restart 就可以;
但是在 ubuntu14.04 中这两个都不行了,要重启网卡需要使用:ifdown eth0, 然后 ifup eth0 即可。
二、ubuntu14.04 上网及安装 openssh
1、ubuntu14.04 上网问题
(1) 虚拟机上网有 2 种模式,NAT 和桥接。
(2) 虚拟机上网配置要注意这几个地方:
第一个要注意选择 NAT 还是桥接模式;
第二个要注意 ubuntu 中网络配置文件 /etc/network/interfaces ,这个文件中是配置网卡信息的(譬如静态 ip 还是 dhcp,静态 ip 地址是多少等);
第三个如果是桥接模式,要注意桥接到哪个网卡上(一般笔记本都有 2 个网卡,一个是有线网卡,一个是无线网卡),如果是 NAT 模式则无所谓。
(3) ubuntu14.04 中重启网卡的命令变了。
(4) 演示:NAT 方式下,上网的配置过程。
前提是主机 windows 通过无线 wifi 上网了(或者 windows 通过有线上网也可以)。然后在虚拟机中配置 2 点:
第一,选择 NAT 方式;
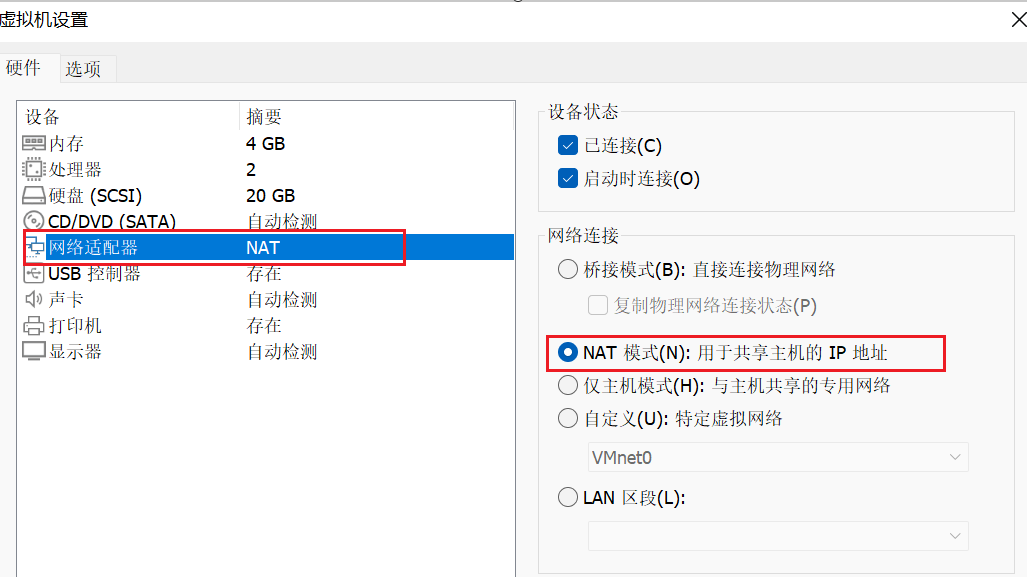
第二,配置 /etc/network/inerfaces 文件中,使用 dhcp 方式;然后重启网卡,确认 ip 地址得到后即可上网。

实验现象:
root@ubuntu:/home/aston# ifdown eth0
Internet Systems Consortium DHCP Client 4.2.4
Copyright 2004-2012 Internet Systems Consortium.
All rights reserved.
For info, please visit https://www.isc.org/software/dhcp/

Listening on LPF/eth0/00:0c:29:5f:95:ee
Sending on   LPF/eth0/00:0c:29:5f:95:ee
Sending on   Socket/fallback
DHCPRELEASE on eth0 to 192.168.124.254 port 67 (xid=0x796df21f)
root@ubuntu:/home/aston#
root@ubuntu:/home/aston# ifup eth0
Internet Systems Consortium DHCP Client 4.2.4
Copyright 2004-2012 Internet Systems Consortium.
All rights reserved.
For info, please visit https://www.isc.org/software/dhcp/

Listening on LPF/eth0/00:0c:29:5f:95:ee
Sending on   LPF/eth0/00:0c:29:5f:95:ee
Sending on   Socket/fallback
DHCPDISCOVER on eth0 to 255.255.255.255 port 67 interval 3 (xid=0x27f1e102)
DHCPREQUEST of 192.168.124.128 on eth0 to 255.255.255.255 port 67 (xid=0x27f1e102)
DHCPOFFER of 192.168.124.128 from 192.168.124.254
DHCPACK of 192.168.124.128 from 192.168.124.254
bound to 192.168.124.128 -- renewal in 782 seconds.
root@ubuntu:/home/aston#
root@ubuntu:/home/aston# ifconfig eth0
eth0      Link encap:Ethernet  HWaddr 00:0c:29:5f:95:ee
          inet addr:192.168.124.128  Bcast:192.168.124.255  Mask:255.255.255.0
          inet6 addr: fe80::20c:29ff:fe5f:95ee/64 Scope:Link
          UP BROADCAST RUNNING MULTICAST  MTU:1500  Metric:1
          RX packets:83 errors:0 dropped:0 overruns:0 frame:0
          TX packets:152 errors:0 dropped:0 overruns:0 carrier:0
          collisions:0 txqueuelen:1000
          RX bytes:10699 (10.6 KB)  TX bytes:21038 (21.0 KB)
          Interrupt:19 Base address:0x2000

root@ubuntu:/home/aston# ping www.baidu.com
PING www.a.shifen.com (163.177.151.110) 56(84) bytes of data.
64 bytes from 163.177.151.110: icmp_seq=1 ttl=128 time=57.7 ms
64 bytes from 163.177.151.110: icmp_seq=2 ttl=128 time=31.9 ms
64 bytes from 163.177.151.110: icmp_seq=3 ttl=128 time=28.8 ms
64 bytes from 163.177.151.110: icmp_seq=4 ttl=128 time=68.4 ms
64 bytes from 163.177.151.110: icmp_seq=5 ttl=128 time=31.6 ms
64 bytes from 163.177.151.110: icmp_seq=6 ttl=128 time=143 ms
64 bytes from 163.177.151.110: icmp_seq=7 ttl=128 time=41.6 ms
64 bytes from 163.177.151.110: icmp_seq=8 ttl=128 time=66.7 ms
^C
--- www.a.shifen.com ping statistics ---
8 packets transmitted, 8 received, 0% packet loss, time 8102ms
rtt min/avg/max/mdev = 28.884/58.835/143.660/35.367 ms
root@ubuntu:/home/aston#
如果无法 ping 通外网,可以尝试重启 ubuntu 虚拟机,或者可能是其他网络配置问题,比如 DNS 服务等。
(5) 演示:桥接方式上网的配置过程。
前提是主机 windows 通过无线 wifi 上网了(主机通过有线网卡上网的配置方式有不同)。然后虚拟机中配置注意三点:
第一,选择 桥接 方式;
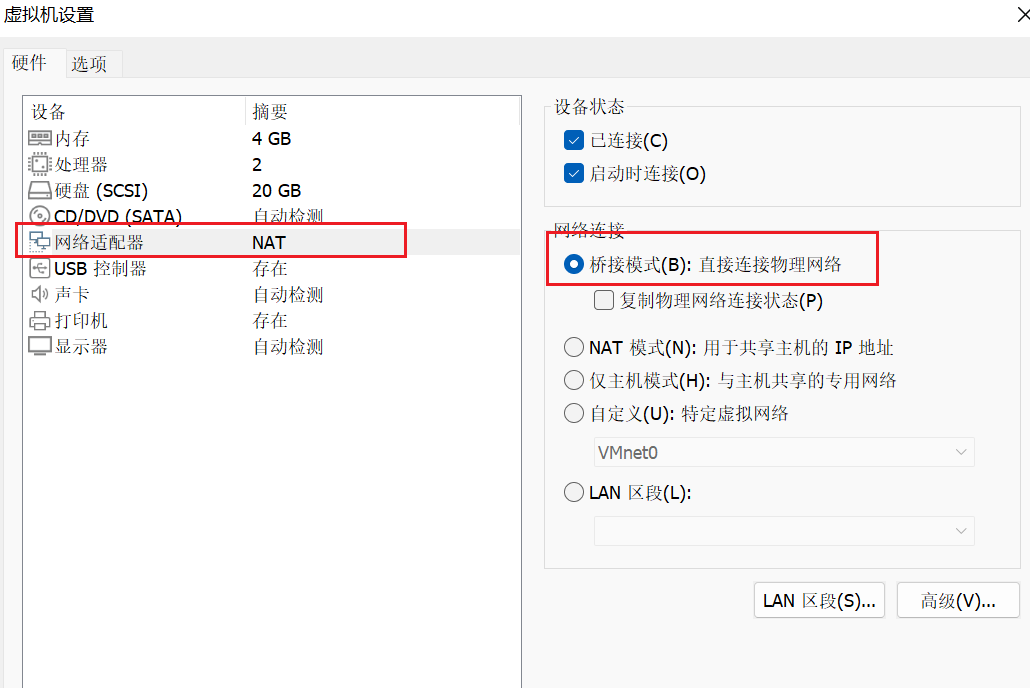
第二,配置桥接到无线网卡(如果主机 windows 是通过有线上网的,则桥接到有线网卡);
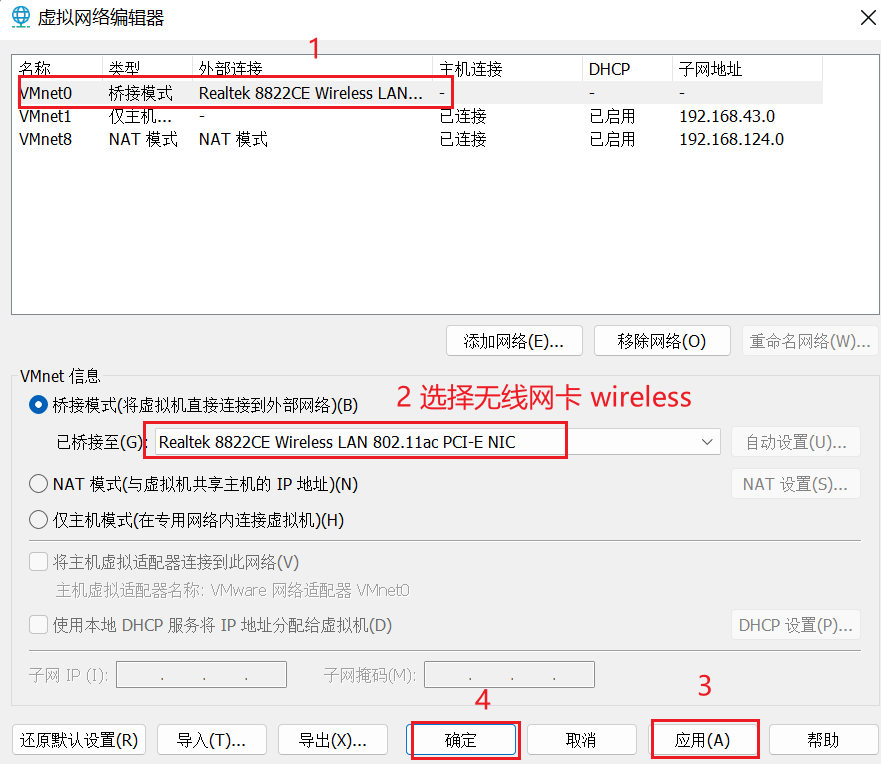
第三,配置 /etc/network/inerfaces 文件中,使用 dhcp 方式;然后重启网卡,确认 ip 地址得到后即可上网。
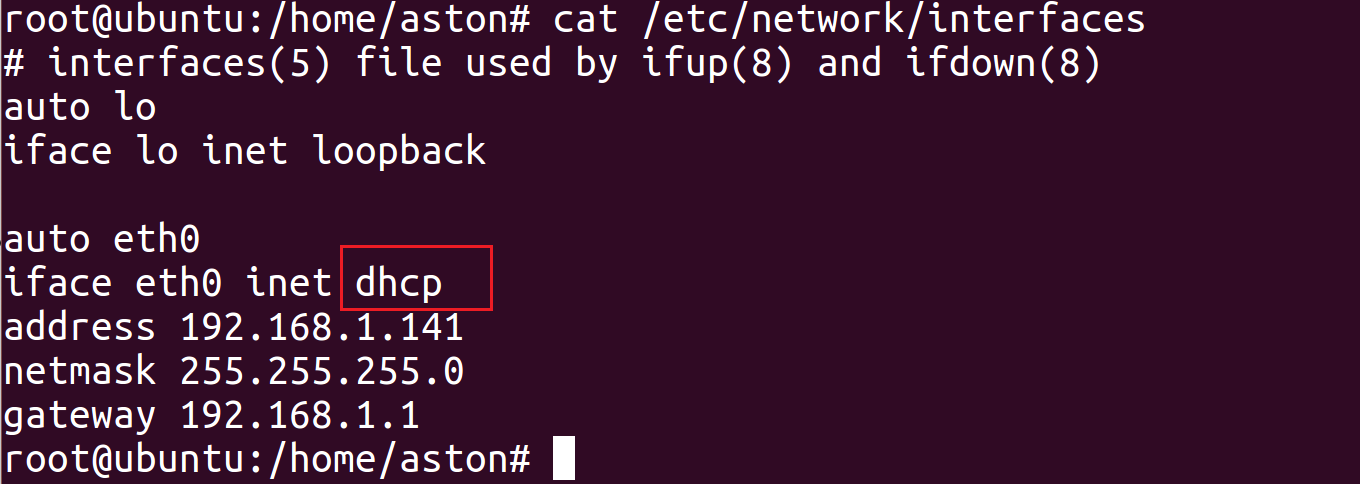
实验现象:
root@ubuntu:/home/aston# ifdown eth0
Internet Systems Consortium DHCP Client 4.2.4
Copyright 2004-2012 Internet Systems Consortium.
All rights reserved.
For info, please visit https://www.isc.org/software/dhcp/

Listening on LPF/eth0/00:0c:29:5f:95:ee
Sending on   LPF/eth0/00:0c:29:5f:95:ee
Sending on   Socket/fallback
DHCPRELEASE on eth0 to 192.168.124.254 port 67 (xid=0x299584b2)
root@ubuntu:/home/aston#
root@ubuntu:/home/aston# ifup eth0
Internet Systems Consortium DHCP Client 4.2.4
Copyright 2004-2012 Internet Systems Consortium.
All rights reserved.
For info, please visit https://www.isc.org/software/dhcp/

Listening on LPF/eth0/00:0c:29:5f:95:ee
Sending on   LPF/eth0/00:0c:29:5f:95:ee
Sending on   Socket/fallback
DHCPDISCOVER on eth0 to 255.255.255.255 port 67 interval 3 (xid=0x4ea857b1)
DHCPREQUEST of 192.168.101.23 on eth0 to 255.255.255.255 port 67 (xid=0x4ea857b1)
DHCPOFFER of 192.168.101.23 from 192.168.101.94
DHCPACK of 192.168.101.23 from 192.168.101.94
bound to 192.168.101.23 -- renewal in 1537 seconds.
root@ubuntu:/home/aston#
root@ubuntu:/home/aston#
root@ubuntu:/home/aston# ping www.baidu.com
PING www.a.shifen.com (163.177.151.109) 56(84) bytes of data.
64 bytes from 163.177.151.109: icmp_seq=1 ttl=53 time=62.9 ms
64 bytes from 163.177.151.109: icmp_seq=2 ttl=53 time=36.6 ms
64 bytes from 163.177.151.109: icmp_seq=3 ttl=53 time=45.6 ms
64 bytes from 163.177.151.109: icmp_seq=4 ttl=53 time=50.1 ms
64 bytes from 163.177.151.109: icmp_seq=5 ttl=53 time=37.1 ms
^C
--- www.a.shifen.com ping statistics ---
5 packets transmitted, 5 received, 0% packet loss, time 4016ms
rtt min/avg/max/mdev = 36.648/46.507/62.915/9.671 ms
root@ubuntu:/home/aston#
(6) 演示:虚拟机要 ping 通开发板 的配置过程。
前提是,开发板和电脑之间通过网线连接好。然后虚拟机中配置注意三点:
第一,选择桥接方式;

第二,配置桥接到有线网卡(如果配置为自动,或者配置桥接到无线网卡,则肯定无法 ping 通开发板);
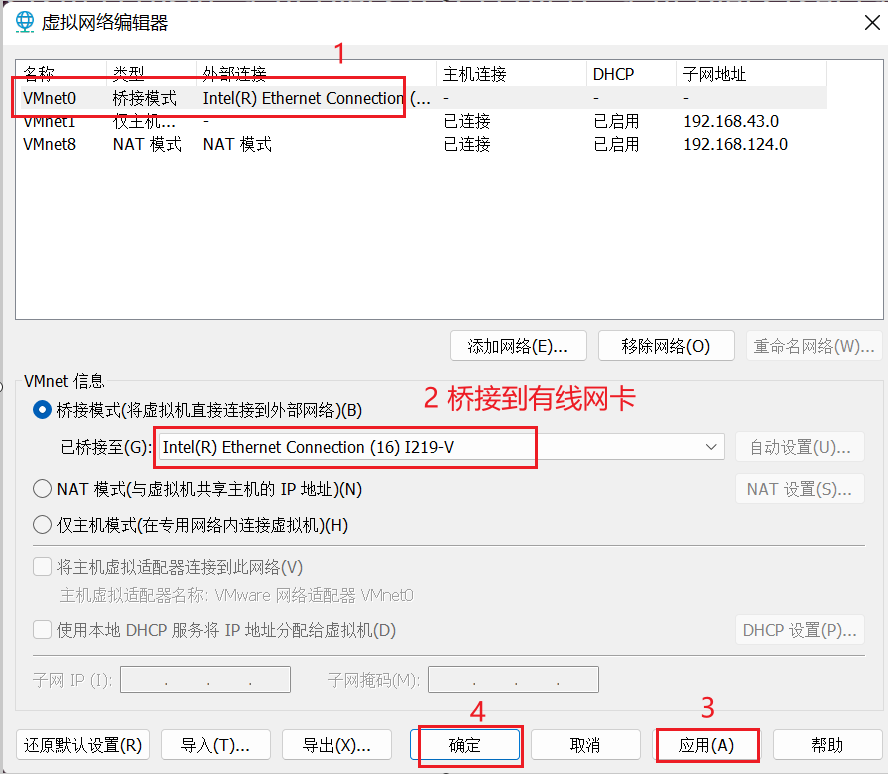
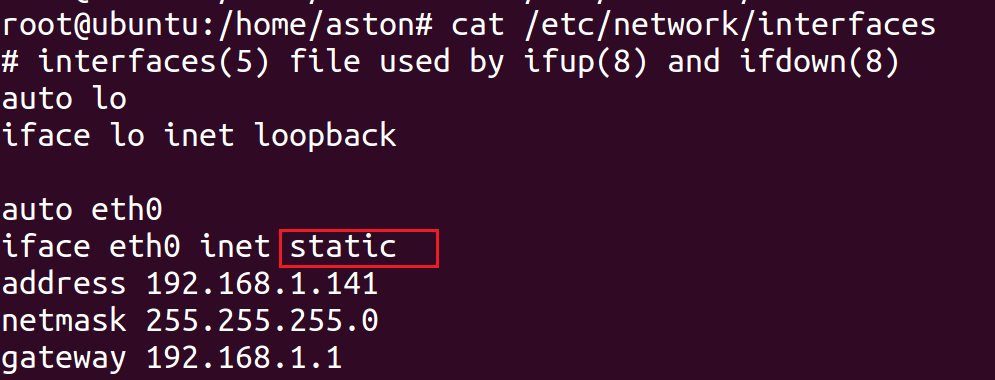
第三,配置 /etc/network/inerfaces 文件中使用 static 方式,ip 地址配置保证和主机 windows、开发板三者处于同一网段;然后重启网卡,确认 ip 地址得到后,即可 ping 通开发板。


(7) windows 系统中有一个 bug,如果 windows 没有检测到有线网卡连接了外部网络,则 windows 中本地连接是不工作的,网卡不工作。解决方案是用网线随便连接一个有联网能力的东西即可,譬如网线连接你的电脑到旁边兄弟的电脑上,譬如插上你的开发板(开发板中运行了 linux 系统),譬如插上路由器端口。
2、搭建 openssh 环境
(1) 安装ssh-server。(sudo apt-get install openssh-server)如果报错提示依赖错误,可以参考:http://www.cnblogs.com/mliudong/p/4094519.html
(2) securecrt 登录。如果使用 root 用户登录不上,可以切换为普通用户尝试(我的情况是,root 登录不成功,普通用户可以登录成功)
(3) sshsecureshell 登录
ssh登录不上,要修改/etc/ssh/sshd_config,参考:http://blog.sina.com.cn/s/blog_5f435c130102v6pv.html。 修改完重启时如果/etc/init.d/ssh restart不起作用,可以使用:ps -e | grep ssh,看sshd的进程号,然后kill -9 进程号杀死 ssh 进程以达到重启的目的,或者直接重启 ubuntu 系统。
源自朱友鹏老师.


![[vue]vue3.x 组合式API不同写法](https://img-blog.csdnimg.cn/f2427de30d9e4ff6a73423d5b04ac997.png)

