目录
一、 下载seata server和seata源码
二、配置启动seata
2.1 在nacos控制台,新建一个seata的名称空间,用于存放seata的专用配置
2.2 创建seata server的mysql库
2.3 在nacos上配置seata相关配置 (seata名称空间)
2.4 启动seata server
三、springcloud客户端服务集成
3.1、pom.xml中引入相应依赖包
3.2 、服务的application.yml配置,新增以下配置
四、分布式事务(AT)案例演示
一、 下载seata server和seata源码
alibaba seata 分为server和client(java)两个部分组成,server是独立的jar服务,需要从seata 官网或github下载。
seata官方文档:http://seata.io/zh-cn/docs/user/quickstart.html
seata server下载地址:https://github.com/seata/seata/releases
笔者下载的是1.6版本 seata-server-1.6.0.zip ,加压缩seata-server-1.6.0.zip ,得到seata-1.6.0目
seata 源代码下载: https://github.com/seata/seata
git clone https://github.com/seata/seata
cd seata
git checkout -b 1.6.0 origin/1.6.0
二、配置启动seata
2.1 在nacos控制台,新建一个seata的名称空间,用于存放seata的专用配置

2.2 创建seata server的mysql库
创建seata的mysql的db:
CREATE DATABASE seata_1.6 DEFAULT CHARACTER SET utf8mb4 COLLATE utf8mb4_0900_ai_ci;
找到 seata-1.6\script\server\db\下的mysql.sql文件, 在 seata_1.6 db中执行,生成seata server所需要的表。
2.3 在nacos上配置seata相关配置 (seata名称空间)
在nacos的seata空间下,创建一个seataServer.properties的配置 和service.vgroupMapping.default_tx_group 配置值为default
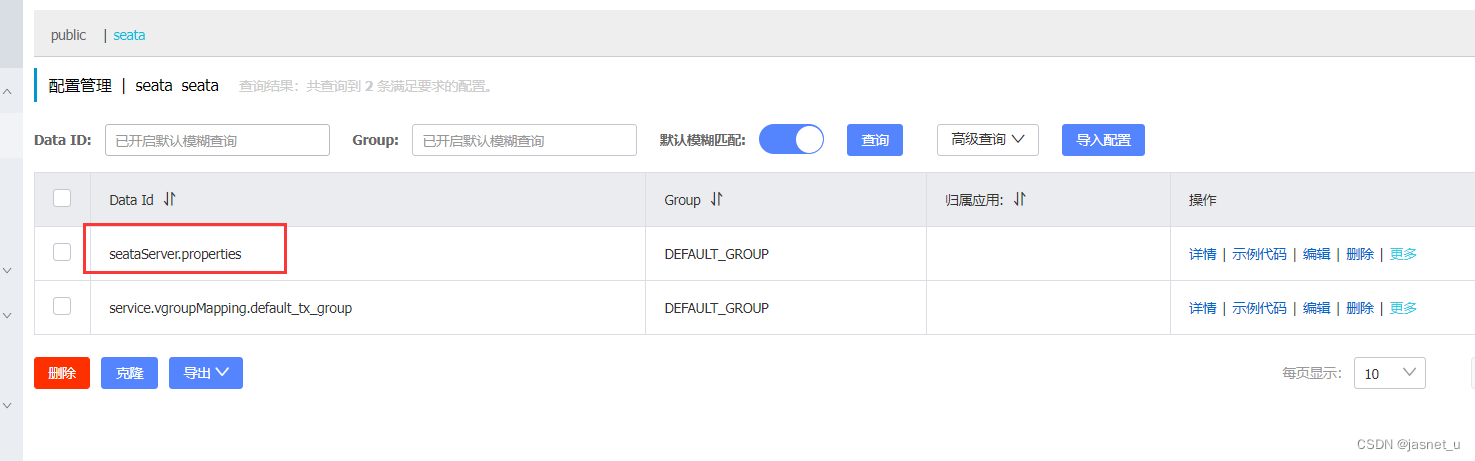
找到 seata-1.6\script\config-center\config.txt ,修改其中内容(修改前可备份一下文件),将所有配置复制到seataServer.properties中。最终seataServer.properties的配置内容如下:
#For details about configuration items, see https://seata.io/zh-cn/docs/user/configurations.html
#Transport configuration, for client and server
transport.type=TCP
transport.server=NIO
transport.heartbeat=true
transport.enableTmClientBatchSendRequest=false
transport.enableRmClientBatchSendRequest=true
transport.enableTcServerBatchSendResponse=false
transport.rpcRmRequestTimeout=30000
transport.rpcTmRequestTimeout=30000
transport.rpcTcRequestTimeout=30000
transport.threadFactory.bossThreadPrefix=NettyBoss
transport.threadFactory.workerThreadPrefix=NettyServerNIOWorker
transport.threadFactory.serverExecutorThreadPrefix=NettyServerBizHandler
transport.threadFactory.shareBossWorker=false
transport.threadFactory.clientSelectorThreadPrefix=NettyClientSelector
transport.threadFactory.clientSelectorThreadSize=1
transport.threadFactory.clientWorkerThreadPrefix=NettyClientWorkerThread
transport.threadFactory.bossThreadSize=1
transport.threadFactory.workerThreadSize=default
transport.shutdown.wait=3
transport.serialization=seata
transport.compressor=none

#Transaction routing rules configuration, only for the client
service.vgroupMapping.default_tx_group=default
#If you use a registry, you can ignore it
#service.default.grouplist=127.0.0.1:8091

service.enableDegrade=false
service.disableGlobalTransaction=false

#Transaction rule configuration, only for the client
client.rm.asyncCommitBufferLimit=10000
client.rm.lock.retryInterval=10
client.rm.lock.retryTimes=30
client.rm.lock.retryPolicyBranchRollbackOnConflict=true
client.rm.reportRetryCount=5
client.rm.tableMetaCheckEnable=true
client.rm.tableMetaCheckerInterval=60000
client.rm.sqlParserType=druid
client.rm.reportSuccessEnable=false
client.rm.sagaBranchRegisterEnable=false
client.rm.sagaJsonParser=fastjson
client.rm.tccActionInterceptorOrder=-2147482648
client.tm.commitRetryCount=5
client.tm.rollbackRetryCount=5
client.tm.defaultGlobalTransactionTimeout=60000
client.tm.degradeCheck=false
client.tm.degradeCheckAllowTimes=10
client.tm.degradeCheckPeriod=2000
client.tm.interceptorOrder=-2147482648
client.undo.dataValidation=true
client.undo.logSerialization=kryo
client.undo.onlyCareUpdateColumns=true
server.undo.logSaveDays=7
server.undo.logDeletePeriod=86400000
client.undo.logTable=undo_log
client.undo.compress.enable=true
client.undo.compress.type=zip
client.undo.compress.threshold=64k
#For TCC transaction mode
tcc.fence.logTableName=tcc_fence_log
tcc.fence.cleanPeriod=1h

#Log rule configuration, for client and server
log.exceptionRate=100

#Transaction storage configuration, only for the server. The file, db, and redis configuration values are optional.
store.mode=db
store.lock.mode=file
store.session.mode=file
#Used for password encryption
store.publicKey=

#If `store.mode,store.lock.mode,store.session.mode` are not equal to `file`, you can remove the configuration block.
store.file.dir=file_store/data
store.file.maxBranchSessionSize=16384
store.file.maxGlobalSessionSize=512
store.file.fileWriteBufferCacheSize=16384
store.file.flushDiskMode=async
store.file.sessionReloadReadSize=100

#These configurations are required if the `store mode` is `db`. If `store.mode,store.lock.mode,store.session.mode` are not equal to `db`, you can remove the configuration block.
store.db.datasource=druid
store.db.dbType=mysql
store.db.driverClassName=com.mysql.jdbc.Driver
store.db.url=jdbc:mysql://127.0.0.1:3306/seata_1.6?useUnicode=true&characterEncoding=utf-8&useSSL=false&serverTimezone=GMT%2B8&allowMultiQueries=true&rewriteBatchedStatements=true
store.db.user=root
store.db.password=123456
store.db.minConn=5
store.db.maxConn=30
store.db.globalTable=global_table
store.db.branchTable=branch_table
store.db.distributedLockTable=distributed_lock
store.db.queryLimit=100
store.db.lockTable=lock_table
store.db.maxWait=5000

#These configurations are required if the `store mode` is `redis`. If `store.mode,store.lock.mode,store.session.mode` are not equal to `redis`, you can remove the configuration block.
store.redis.mode=single
store.redis.single.host=127.0.0.1
store.redis.single.port=6379
store.redis.sentinel.masterName=
store.redis.sentinel.sentinelHosts=
store.redis.maxConn=10
store.redis.minConn=1
store.redis.maxTotal=100
store.redis.database=0
store.redis.password=
store.redis.queryLimit=100

#Transaction rule configuration, only for the server
server.recovery.committingRetryPeriod=1000
server.recovery.asynCommittingRetryPeriod=1000
server.recovery.rollbackingRetryPeriod=1000
server.recovery.timeoutRetryPeriod=1000
server.maxCommitRetryTimeout=-1
server.maxRollbackRetryTimeout=-1
server.rollbackRetryTimeoutUnlockEnable=false
server.distributedLockExpireTime=10000
server.xaerNotaRetryTimeout=60000
server.session.branchAsyncQueueSize=5000
server.session.enableBranchAsyncRemove=false
server.enableParallelRequestHandle=false

#Metrics configuration, only for the server
metrics.enabled=false
metrics.registryType=compact
metrics.exporterList=prometheus
metrics.exporterPrometheusPort=9898
(由于笔者的使用的mysql8,jdbc驱动需要修改为com.mysql.cj.jdbc.Driver, jdbcUrl也需要调整)
2.4 启动seata server
修改 seata\config\application.yml配置
server:
  port: 7091

spring:
  application:
    name: seata-server

logging:
  config: classpath:logback-spring.xml
  file:
    path: ${user.home}/logs/seata

console:
  user:
    username: seata
    password: seata

seata:
  security:
    secretKey: icilfnMRQmKi847ofQUD9UrNaStS9sl0tKlc21s6uSBRbrSldZzVLuPMEfkZZlP3
    tokenValidityInMilliseconds: 1800000
    ignore:
      urls: /,/**/*.css,/**/*.js,/**/*.html,/**/*.map,/**/*.svg,/**/*.png,/**/*.ico,/console-fe/public/**,/api/v1/auth/login

  config:
    # support: nacos 、 consul 、 apollo 、 zk  、 etcd3
    type: nacos
    nacos:
      server-addr: 127.0.0.1:8850
      namespace: seata
      group: DEFAULT_GROUP
      username: nacos
      password: nacos
      context-path:
      data-id: seataServer.properties


  registry:
    type: nacos
    #preferred-networks: 30.240.*
    nacos:
      application: seata-server
      server-addr: 127.0.0.1:8850
      group: DEFAULT_GROUP
      namespace: seata
      cluster: default
      username: nacos
      password: nacos
      context-path:
  server:
    service-port: 8091 #If not configured, the default is '${server.port} + 1000'
    max-commit-retry-timeout: -1
    max-rollback-retry-timeout: -1
    rollback-retry-timeout-unlock-enable: false
    enable-check-auth: true
    enable-parallel-request-handle: true
    retry-dead-threshold: 130000
    xaer-nota-retry-timeout: 60000
    recovery:
      committing-retry-period: 1000
      async-committing-retry-period: 1000
      rollbacking-retry-period: 1000
      timeout-retry-period: 1000
    undo:
      log-save-days: 7
      log-delete-period: 86400000
    session:
      branch-async-queue-size: 5000 #branch async remove queue size
      enable-branch-async-remove: false #enable to asynchronous remove branchSession
  store:
    # support: file 、 db 、 redis
    mode: db
    session:
      mode: db
    lock:
      mode: db
    file:
      dir: sessionStore
      max-branch-session-size: 16384
      max-global-session-size: 512
      file-write-buffer-cache-size: 16384
      session-reload-read-size: 100
      flush-disk-mode: async
    db:
      datasource: druid
      db-type: mysql
      driver-class-name: com.mysql.cj.jdbc.Driver
      url: jdbc:mysql://127.0.0.1:3306/seata_1.6?useUnicode=true&characterEncoding=utf-8&useSSL=false&serverTimezone=GMT%2B8&allowMultiQueries=true&rewriteBatchedStatements=true
      user: root
      password: 123456
      min-conn: 5
      max-conn: 100
      global-table: global_table
      branch-table: branch_table
      lock-table: lock_table
      distributed-lock-table: distributed_lock
      query-limit: 100
      max-wait: 5000

  metrics:
    enabled: false
    registry-type: compact
    exporter-list: prometheus
    exporter-prometheus-port: 9898
  transport:
    rpc-tc-request-timeout: 30000
    enable-tc-server-batch-send-response: false
    shutdown:
      wait: 3
    thread-factory:
      boss-thread-prefix: NettyBoss
      worker-thread-prefix: NettyServerNIOWorker
      boss-thread-size: 1
找到 seata-1.6\bin ,执行seata-server.bat (windows) 或seata-server.sh (linux)启动
seata-server.bat -m db
(启动参数
-h 主机名地址
-p 端口(默认8090)
-m 存储模式默认file,支持db、redis等
-n 节点, 默认1
-e 环境 ,默认无)
seata 管理控制台,用户名及密码: seata/seata


三、springcloud客户端服务集成
笔者使用的springcloud 及springcloud-alibaba版本如下
    <properties>
        <maven.compiler.source>11</maven.compiler.source>
        <maven.compiler.target>11</maven.compiler.target>

        <spring-boot.version>2.7.2</spring-boot.version>
        <spring-cloud.version>2021.0.3</spring-cloud.version>
        <spring-cloud-alibaba.version>2021.0.1.0</spring-cloud-alibaba.version>
        <project.build.sourceEncoding>UTF-8</project.build.sourceEncoding>

    </properties>
3.1、pom.xml中引入相应依赖包
<!-- seata-->
        <dependency>
            <groupId>com.alibaba.cloud</groupId>
            <artifactId>spring-cloud-starter-alibaba-seata</artifactId>
        </dependency>

        <!--  seata kryo 序列化-->
        <dependency>
            <groupId>io.seata</groupId>
            <artifactId>seata-serializer-kryo</artifactId>
            <version>1.5.2</version>
        </dependency>
3.2 、服务的application.yml配置,新增以下配置
seata:
  enabled: true
  tx-service-group: default_tx_group
  service:
    vgroup-mapping:
      default_tx_group: default
  registry:
    type: nacos
    nacos:
      application: seata-server
      server-addr: localhost:8850
      namespace: seata
      group: DEFAULT_GROUP
  config:
    type: nacos #配置中心
    nacos:
      server-addr: localhost:8850
      namespace: seata
      group: DEFAULT_GROUP
      data-id: seataServer.properties
四、分布式事务(AT)案例演示
新建两个服务
yscloud-demo1 ,对应db : demo1 库中创建一个t_person表 ,服务端口:8082
yscloud-demo2 ,对应db : demo2 库中创建一个t_person_ext表,服务端口:8083
每一个服务的db中需要创建seata的undo_log表。
CREATE TABLE `undo_log` (
  `branch_id` bigint NOT NULL COMMENT 'branch transaction id',
  `xid` varchar(128) NOT NULL COMMENT 'global transaction id',
  `context` varchar(128) NOT NULL COMMENT 'undo_log context,such as serialization',
  `rollback_info` longblob NOT NULL COMMENT 'rollback info',
  `log_status` int NOT NULL COMMENT '0:normal status,1:defense status',
  `log_created` datetime(6) NOT NULL COMMENT 'create datetime',
  `log_modified` datetime(6) NOT NULL COMMENT 'modify datetime',
  UNIQUE KEY `ux_undo_log` (`xid`,`branch_id`)
) ENGINE=InnoDB DEFAULT CHARSET=utf8 COMMENT='AT transaction mode undo table'
-- demo1 db
CREATE TABLE `t_person` (
`id` bigint NOT NULL AUTO_INCREMENT,
`name` varchar(32) DEFAULT NULL,
`birthday` date DEFAULT NULL,
`sex` tinyint DEFAULT NULL,
`phone` varchar(32) DEFAULT NULL,
`email` varchar(128) DEFAULT NULL,
`create_time` datetime DEFAULT NULL,
PRIMARY KEY (`id`)
) ENGINE=InnoDB DEFAULT CHARSET=utf8mb4 COLLATE=utf8mb4_0900_ai_ci;
-- demo2 db
CREATE TABLE `t_person_ext` (
`id` bigint NOT NULL AUTO_INCREMENT,
`person_id` bigint DEFAULT NULL,
`wx_open_id` varchar(32) DEFAULT NULL,
`portrait` varchar(128) DEFAULT NULL,
`create_time` datetime DEFAULT NULL,
PRIMARY KEY (`id`)
) ENGINE=InnoDB DEFAULT CHARSET=utf8mb4 COLLATE=utf8mb4_0900_ai_ci;PersonController 类
    @Autowired
    private PersonExtFeign personExtFeign;

    /**
     * SEATA AT分布式事务测试
     * @return
     */
    @GlobalTransactional
    @Transactional
    @RequestMapping(value = "/updatePerson",method = RequestMethod.GET)
    public Resp updatePerson(Long personId ,String name,String portrait){
        Person person = personMapper.selectById(personId);
        person.setName(name);
        personMapper.updateById(person);
        log.info("更新person表成功");

        log.info("调用远端feign接口");
        Resp ret = personExtFeign.updatePersonPortrait(personId, portrait);
        log.info("调用远端feign接口返回:"+ JSON.toJSONString(ret));

        int i=1/0; //模拟发生异常
        return Resp.success();
    }
注意: 需要在起调的方法上标记 @GlobalTransactional ,开启全局事务,内部调用feign方法无需标记此注解。
PersonExtFeign类
@FeignClient(contextId = "PersonExtFeign",
        value= "demo2-server",
        path = "/personExt"
 )
public interface PersonExtFeign {


 @RequestMapping(value = "/updatePersonPortrait",method = RequestMethod.GET)
 public Resp updatePersonPortrait(@RequestParam("personId") Long personId,
                                  @RequestParam("portrait") String portrait);

}
PersonExtController类
@Slf4j
@RestController
@RequestMapping(value = "/personExt")
public class PersonExtController implements PersonExtFeign {
@Autowired
private PersonExtMapper personExtMapper;
@Transactional
@RequestMapping(value = "/updatePersonPortrait",method = RequestMethod.GET)
public Resp updatePersonPortrait(@RequestParam("personId") Long personId,
@RequestParam("portrait") String portrait){
PersonExt personExt = personExtMapper
.selectOne(new QueryWrapper<PersonExt>().lambda().eq(PersonExt::getPersonId, personId));
personExt.setPortrait(portrait);
personExtMapper.updateById(personExt);
log.info("更新personExt表成功");
return Resp.success();
}
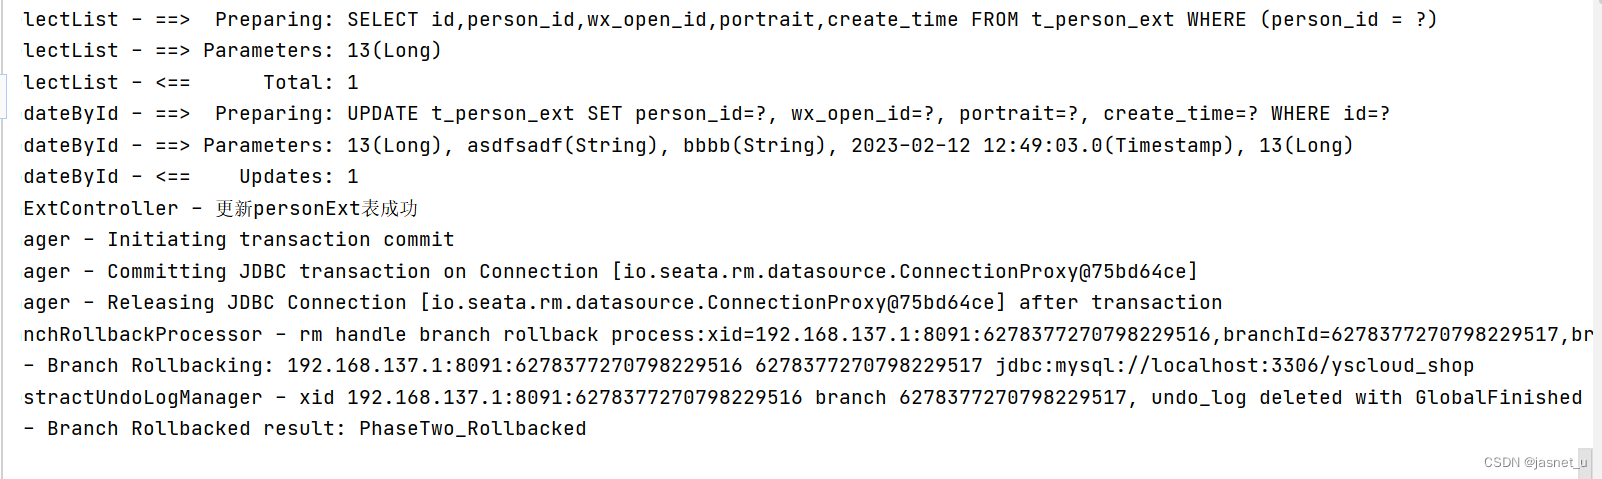
}浏览器请求;
http://localhost:8012/person/updatePerson?personId=13&name=zhangsan2&portrait=bbbbdemo2的回滚日志(控制台)
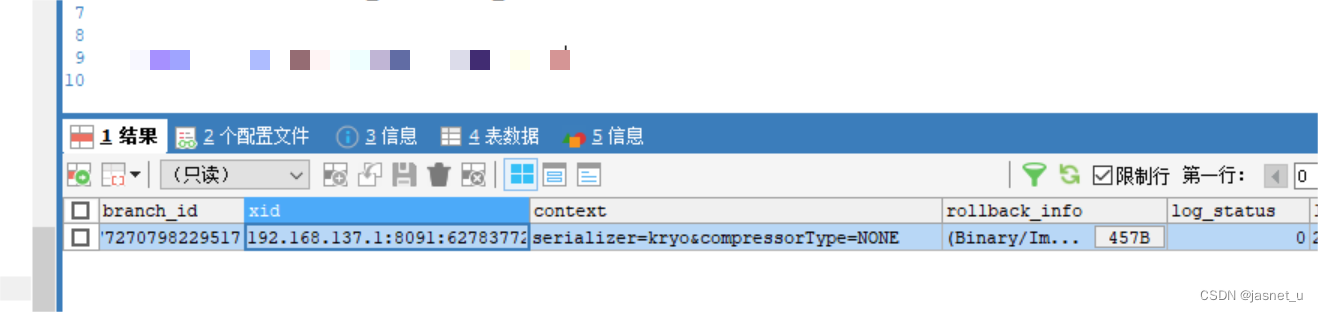
undo_log日志

![[Java 进阶面试题] CAS 和 Synchronized 优化过程](https://img-blog.csdnimg.cn/2e801aa85df74f31ba85ab1273150b1d.png)


![学习open62541 --- [75] 生成namespace文件的简便方法](https://img-blog.csdnimg.cn/4152a82e3dcd414a9ed1ebac058e4894.png)