加入HikariCP的maven依赖
<dependency>
    <groupId>com.zaxxer</groupId>
    <artifactId>HikariCP</artifactId>
    <version>4.0.3</version>
</dependency>
<dependency>
    <groupId>mysql</groupId>
    <artifactId>mysql-connector-java</artifactId>
    <version>8.0.15</version>
</dependency>
<!-- log -->
<dependency>
    <groupId>ch.qos.logback</groupId>
    <artifactId>logback-core</artifactId>
    <version>1.2.3</version>
    <type>jar</type>
</dependency>
<dependency>
    <groupId>ch.qos.logback</groupId>
    <artifactId>logback-classic</artifactId>
    <version>1.2.3</version>
    <type>jar</type>
</dependency>
测试代码
public static void main(String[] args) throws SQLException {
    Properties properties = new Properties();
    properties.setProperty("jdbcUrl", jdbcUrl);
    properties.setProperty("username", username);
    properties.setProperty("password", password);
    properties.setProperty("driverClassName", driverClassName);

    HikariConfig config = new HikariConfig(properties);

    HikariDataSource dataSource = new HikariDataSource(config);

    Connection connection = dataSource.getConnection();

    String sql = "select * from table";
    PreparedStatement preparedStatement = connection.prepareStatement(sql);
    ResultSet set = preparedStatement.executeQuery();
    while (set.next()) {
        ……
    }
    connection.close();
    dataSource.close();
}
在执行的过程中,测试代码核心主要只有这几行
HikariConfig config = new HikariConfig(properties);

HikariDataSource dataSource = new HikariDataSource(config);

Connection connection = dataSource.getConnection();

connection.close();

dataSource.close();
从测试代码中可将源码阅读流程主要分以下几步:
- 加载配置
- 通过配置创建连接池
- 从连接池里获取连接
- 关闭连接
- 关闭连接池
下面分别对这五步进行介绍
一. 加载配置
HikariConfig config = new HikariConfig(properties);流程如下:
- 将Properties对象作为参数通过HikariConfig的构造方法传入进这个类中
- 在HikariConfig类初始化的过程中就完成了部分属性的加载和设置。
- 完成对HikariConfig类的部分属性的初次赋值后,执行传入参数Properties的动态加载处理
- Properties对象的映射关系中,key对应的是HikariConfig的属性
- 根据反射,对HikariConfig的属性通过set方法,把Properties对应的value值进行设置
- 如果能匹配上,就相当于进行了第二次的赋值。
- 最终得到一个带有属性的HikariConfig对象。
其他说明:配置的来源为自定义的Properties类、指定的Properties文件路径、系统环境变量hikaricp.configurationFile所指向的Poperties文件路径。
二. 通过配置创建连接池
HikariDataSource dataSource = new HikariDataSource(config);流程图如下:
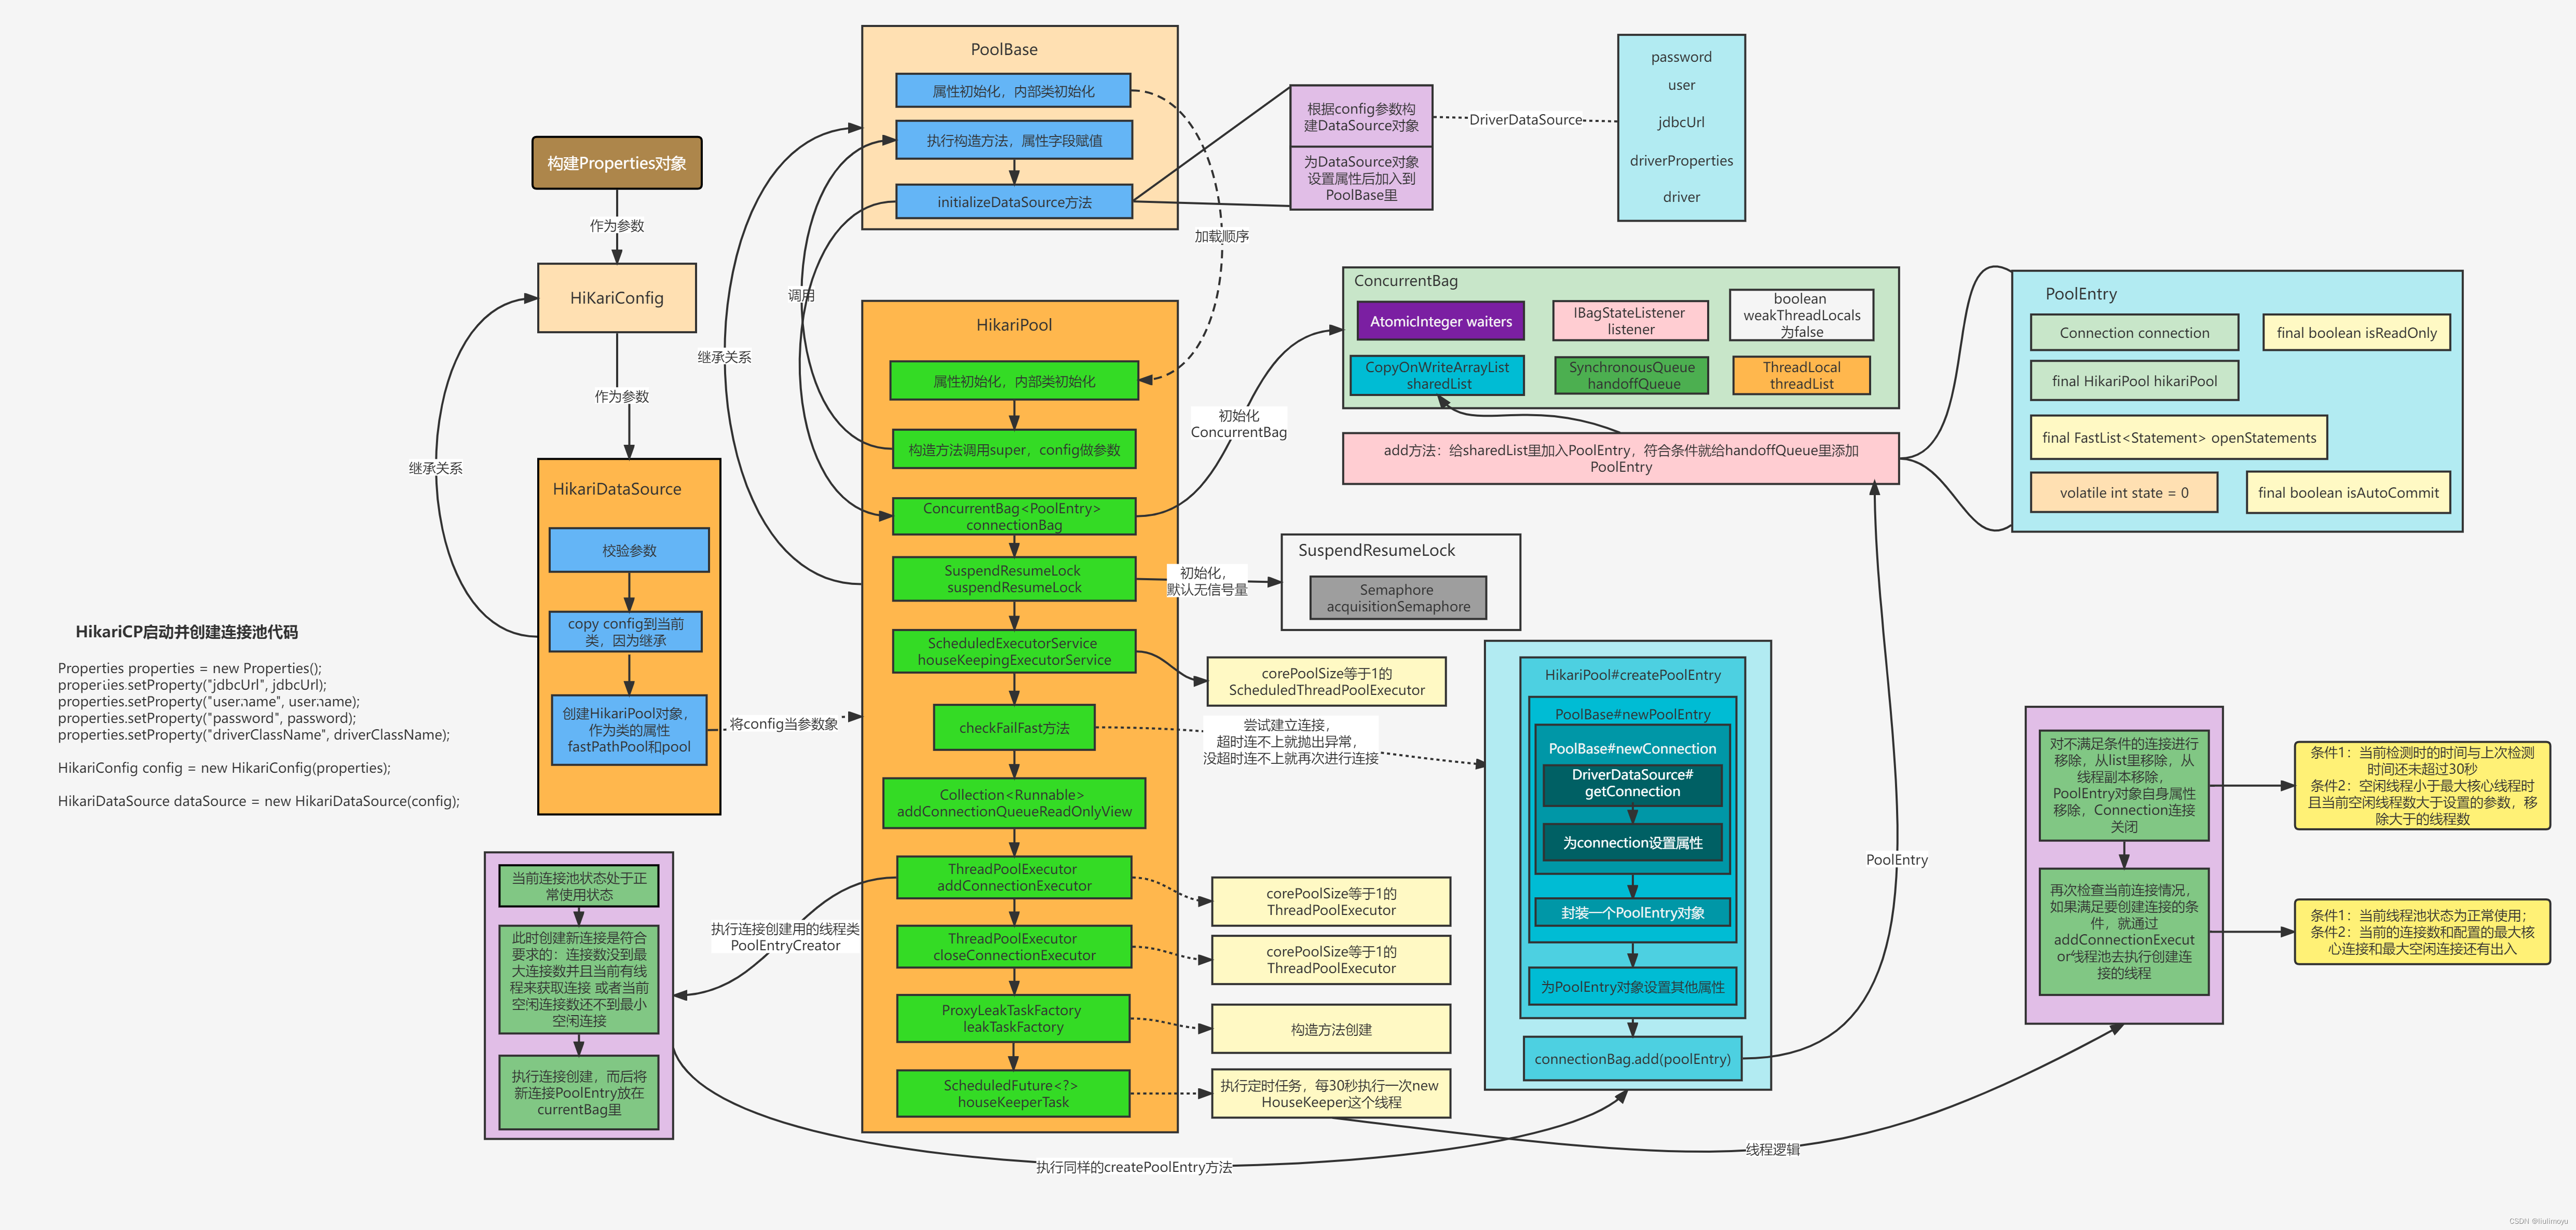
HikariDataSource类是HikariConfig类的子类,它内部定义了如下属性,主要是一个不会再被修改的fastrPathPool,和一个内部一致性的pool。
public class HikariDataSource extends HikariConfig implements DataSource, Closeable{
   private static final Logger LOGGER = LoggerFactory.getLogger(HikariDataSource.class);

   private final AtomicBoolean isShutdown = new AtomicBoolean();

   private final HikariPool fastPathPool;
   private volatile HikariPool pool;

    public HikariDataSource(){
       super();
       fastPathPool = null;
    }

    public HikariDataSource(HikariConfig configuration){
       configuration.validate();
       configuration.copyStateTo(this);

       LOGGER.info("{} - Starting...", configuration.getPoolName());
       pool = fastPathPool = new HikariPool(this);
       LOGGER.info("{} - Start completed.", configuration.getPoolName());

       this.seal();
    }
}
HikariDataSource有两个构造方法:
一个是无参的, 如果使用它进行HikariDataSource的类对象创建,它会通过super方法,访问HikariConfig类的无参方法,进行HikariConfig类的初始化和部分属性加载。
一个是有参的,接收一个HikariConfig类,相当于作为父类的HikariyConfig提前完成了初始化和属性分配,然后传到了子类HikariDataSource里。从构造方法里可以简单的看到执行流程主要分为以下四步:
1.执行configuration.validate()
- 如果当前连接池还没有poolName,那就自动创建一个poolName
- 对加载到的配置参数进行校验,例如jdbcUrl,driverClassName等
- 对数字类的配置参数进行校验和有界处理,例如maxPoolSize,没指定时默认是10;minIdle如果没指定或者指定不合规矩时,就等于maxPoolSize,等等。
2.执行configuration.copyStateTo(this)
- 把传来的参数configuration,也就是HikariConfig对象的属性都给当前的HikariDataSource对象赋值一份,相当于本身继承父类的属性原本为null,现在都被赋值了。
- 设置HikariDataSource的sealed值等于false
3. pool = fastPathPool = new HikariPool(this);
我们发现HikariPool类继承了PoolBase类,实现了接口HikariPoolMXBean和接口IBagStateListener。
所以在通过构造方法获得HikariPool对象前,会先初始化PoolBase类和HikariPool类。
在PoolBase类里,因为它对外的构造方法必须是有参的,所以在初始化的时候,PoolBase类只将相关属性进行了初始化,同时因为在该类内部有多个静态类、接口等,这些也要完成初始化。
PoolBase类下的静态类、接口等
static class ConnectionSetupException extends Exception
private static class SynchronousExecutor implements Executor{
   @Override
   public void execute(Runnable command){
      try {
         command.run();
      } catch (Exception t) {
         LoggerFactory.getLogger(PoolBase.class).debug("Failed to execute: {}", command, t);
      }
   }
}
interface IMetricsTrackerDelegate extends AutoCloseable
static class MetricsTrackerDelegate implements IMetricsTrackerDelegate
static final class NopMetricsTrackerDelegate implements IMetricsTrackerDelegate
HikariPool类下的静态类、接口等
private final class PoolEntryCreator implements Callable<Boolean>{
    // PoolEntry对象的创建类线程
}
private final class HouseKeeper implements Runnable{
    // …… 定时任务执行的线程
}
private final class MaxLifetimeTask implements Runnable{
    ……
}
private final class KeepaliveTask implements Runnable{
    ……
}
public static class PoolInitializationException extends RuntimeException{
    ……
}
构造方法
在PoolBase类和HikariPool类完成初始化后,HikariPool开始了构造方法的执行。
public HikariPool(final HikariConfig config){
   super(config);

   this.connectionBag = new ConcurrentBag<>(this);
   this.suspendResumeLock = config.isAllowPoolSuspension() ? new SuspendResumeLock() : SuspendResumeLock.FAUX_LOCK;

   this.houseKeepingExecutorService = initializeHouseKeepingExecutorService();

   checkFailFast();

   if (config.getMetricsTrackerFactory() != null) {
      setMetricsTrackerFactory(config.getMetricsTrackerFactory());
   }else {
      setMetricRegistry(config.getMetricRegistry());
   }

   setHealthCheckRegistry(config.getHealthCheckRegistry());

   handleMBeans(this, true);

   ThreadFactory threadFactory = config.getThreadFactory();

   final int maxPoolSize = config.getMaximumPoolSize();
   LinkedBlockingQueue<Runnable> addConnectionQueue = new LinkedBlockingQueue<>(maxPoolSize);
   this.addConnectionQueueReadOnlyView = unmodifiableCollection(addConnectionQueue);
   this.addConnectionExecutor = createThreadPoolExecutor(addConnectionQueue, poolName + " connection adder", threadFactory, new ThreadPoolExecutor.DiscardOldestPolicy());
   this.closeConnectionExecutor = createThreadPoolExecutor(maxPoolSize, poolName + " connection closer", threadFactory, new ThreadPoolExecutor.CallerRunsPolicy());

   this.leakTaskFactory = new ProxyLeakTaskFactory(config.getLeakDetectionThreshold(), houseKeepingExecutorService);

   this.houseKeeperTask = houseKeepingExecutorService.scheduleWithFixedDelay(new HouseKeeper(), 100L, housekeepingPeriodMs, MILLISECONDS);

   if (Boolean.getBoolean("com.zaxxer.hikari.blockUntilFilled") && config.getInitializationFailTimeout() > 1) {
      addConnectionExecutor.setMaximumPoolSize(Math.min(16, Runtime.getRuntime().availableProcessors()));
      addConnectionExecutor.setCorePoolSize(Math.min(16, Runtime.getRuntime().availableProcessors()));

      final long startTime = currentTime();
      while (elapsedMillis(startTime) < config.getInitializationFailTimeout() && getTotalConnections() < config.getMinimumIdle()) {
         quietlySleep(MILLISECONDS.toMillis(100));
      }

      addConnectionExecutor.setCorePoolSize(1);
      addConnectionExecutor.setMaximumPoolSize(1);
   }
}
通过super(config)方法,
访问PoolBase的有参构造方法,将当前HikariDataSource作为一个HikariConfig传到PoolBase里。
PoolBase(final HikariConfig config){
   this.config = config;

   this.networkTimeout = UNINITIALIZED;
   this.catalog = config.getCatalog();
   this.schema = config.getSchema();
   this.isReadOnly = config.isReadOnly();
   this.isAutoCommit = config.isAutoCommit();
   this.exceptionOverride = UtilityElf.createInstance(config.getExceptionOverrideClassName(), SQLExceptionOverride.class);
   this.transactionIsolation = UtilityElf.getTransactionIsolation(config.getTransactionIsolation());

   this.isQueryTimeoutSupported = UNINITIALIZED;
   this.isNetworkTimeoutSupported = UNINITIALIZED;
   this.isUseJdbc4Validation = config.getConnectionTestQuery() == null;
   this.isIsolateInternalQueries = config.isIsolateInternalQueries();

   this.poolName = config.getPoolName();
   this.connectionTimeout = config.getConnectionTimeout();
   this.validationTimeout = config.getValidationTimeout();
   this.lastConnectionFailure = new AtomicReference<>();

   initializeDataSource();
}
在PoolBase类里完成了对PoolBase类里的部分属性字段的赋值工作。完毕后执行了initializeDataSource()方法。
private void initializeDataSource(){
   final String jdbcUrl = config.getJdbcUrl();
   final String username = config.getUsername();
   final String password = config.getPassword();
   final String dsClassName = config.getDataSourceClassName();
   final String driverClassName = config.getDriverClassName();
   final String dataSourceJNDI = config.getDataSourceJNDI();
   final Properties dataSourceProperties = config.getDataSourceProperties();

   DataSource ds = config.getDataSource();
   if (dsClassName != null && ds == null) {
      ds = createInstance(dsClassName, DataSource.class);
      PropertyElf.setTargetFromProperties(ds, dataSourceProperties);
   } else if (jdbcUrl != null && ds == null) {
      ds = new DriverDataSource(jdbcUrl, driverClassName, dataSourceProperties, username, password);
   } else if (dataSourceJNDI != null && ds == null) {
      try {
         InitialContext ic = new InitialContext();
         ds = (DataSource) ic.lookup(dataSourceJNDI);
      } catch (NamingException e) {
         throw new PoolInitializationException(e);
      }
   }

   if (ds != null) {
      setLoginTimeout(ds);
      createNetworkTimeoutExecutor(ds, dsClassName, jdbcUrl);
   }

   this.dataSource = ds;
}
因为一般不会设定DataSourceClassName,所以最终会通过DriverDataSource类的构造方法创建一个DataSource对象ds。
ds = new DriverDataSource(jdbcUrl, driverClassName, dataSourceProperties, username, password);该构造方法的作用主要是完成了对DriverDataSource类的属性的赋值操作,同时对jdbcUrl进行了格式验证。如果格式不正确就会抛出异常。
public final class DriverDataSource implements DataSource{
   private static final Logger LOGGER = LoggerFactory.getLogger(DriverDataSource.class);
   private static final String PASSWORD = "password";
   private static final String USER = "user";

   private final String jdbcUrl;
   private final Properties driverProperties;
   private Driver driver;
   ……
   ……
}
得到的这个ds对象会进行login超时时间设置,为当前配置的connectionTimeout。
因为当前连接的是mysql数据库,所会设置当前PoolBase里的netTimeoutExecutor属性为new SynchronousExecutor对象,非Mysql时会创建一个ThreadPoolExecutor对象作为这个netTimeExecutor。
设置当前PoolBase里的dataSource属性为当前的ds。
设置HikariPool里的connectionBag属性。
因为HikariPool也实现了IBagStateListener接口,所以通过ConcurrentBag的构造方法创建此connectionBag对象时,将HikariPool作为参数进行传递。
public class ConcurrentBag<T extends IConcurrentBagEntry> implements AutoCloseable{
   private static final Logger LOGGER = LoggerFactory.getLogger(ConcurrentBag.class);

   private final CopyOnWriteArrayList<T> sharedList;
   private final boolean weakThreadLocals;

   private final ThreadLocal<List<Object>> threadList;
   private final IBagStateListener listener;
   private final AtomicInteger waiters;
   private volatile boolean closed;

   private final SynchronousQueue<T> handoffQueue;

   public ConcurrentBag(final IBagStateListener listener){
       this.listener = listener;
       this.weakThreadLocals = useWeakThreadLocals();

       this.handoffQueue = new SynchronousQueue<>(true);
       this.waiters = new AtomicInteger();
       this.sharedList = new CopyOnWriteArrayList<>();
       if (weakThreadLocals) {
          this.threadList = ThreadLocal.withInitial(() -> new ArrayList<>(16));
       } else {
          this.threadList = ThreadLocal.withInitial(() -> new FastList<>(IConcurrentBagEntry.class, 16));
       }
    }
}
构造方法完成了对ConncurentBag对象属性的赋值,threadList最终使用的是自定义的FastList。
设置SuspendResumeLock
因为config的isAllowPoolSuspension默认是false,所以对于HikariPool的suspendResumeLock属性,默认使用了空的SuspendResumeLock对象,即它的方法都没有具体实现。如果isAllowPoolSuspension是true,会通过SuspendResumeLock构造方法创建对象,里面会使用到Semaphore类创建一个公平的信号量对象,最大容量是10000。
设置ScheduledExecutorService类型的houseKeepingExecutorService。
因为当前的config并没有配置ScheduledExecutor对象,所以就会默认实现一个corePoolSize等于1的ScheduledThreadExecutor对象作为houseKeepingExecutorService.
执行checkFailFast方法:
- 如果配置了initiallizationFailTimeout小于0,跳过该方法。没配置使用默认的1,就会执行该方法。
- 访问HikariPool的createPoolEntry方法,然后跳到父类PoolBase的newPoolEntry方法里。
- 该newPoolEntry方法会访问newConnection方法,进行一次数据库的连接操作。
- 连接成功会得到一个Connection对象,并为此对象设置原始的属性。连接失败则会记录此次失败的异常,并抛出此异常。
- 创建成功的Connection对象则会和其他属性一起创建一个PoolEntry对象。
- 同时在HikariPool的createPoolEntry方法里为PoolEntry再次设置属性。并将此PoolEntry对象加入到connectionBag对象的sharedList中。
- 遇到异常,会抛出来,中断后续所有流程。
PoolEntry(final Connection connection, final PoolBase pool, final boolean isReadOnly, final boolean isAutoCommit){
   this.connection = connection;
   this.hikariPool = (HikariPool) pool;
   this.isReadOnly = isReadOnly;
   this.isAutoCommit = isAutoCommit;
   this.lastAccessed = currentTime();
   this.openStatements = new FastList<>(Statement.class, 16);
}
以当前已设置好的maxPoolSize作为长度,创建一个LinkedBlockingQueue,
同时根据此队列,分别设置HikariPool的属性:
- addConnectionQueueReadOnlyView 是一个UnmodifiableCollection的对象。
- addConnectionExecutor是一个核心和最大线程数都等于1的线程池。
- closeConnectionExecutor是一个核心和最大线程数都等于1的线程池。
后续完成HikariPool完成对leakTaskFactory和houseKeeperTask的设置操作。至此,一个HikariPool对象就创建完毕了。同时也完成了对HikariDataSource的pool和fastPathPool的赋值操作。
4. this.seal();
将继承HikariConfig类而复制过来的sealed值,从原本的false修改成true
三. 从连接池里获取连接
Connection connection = dataSource.getConnection();流程图如下:
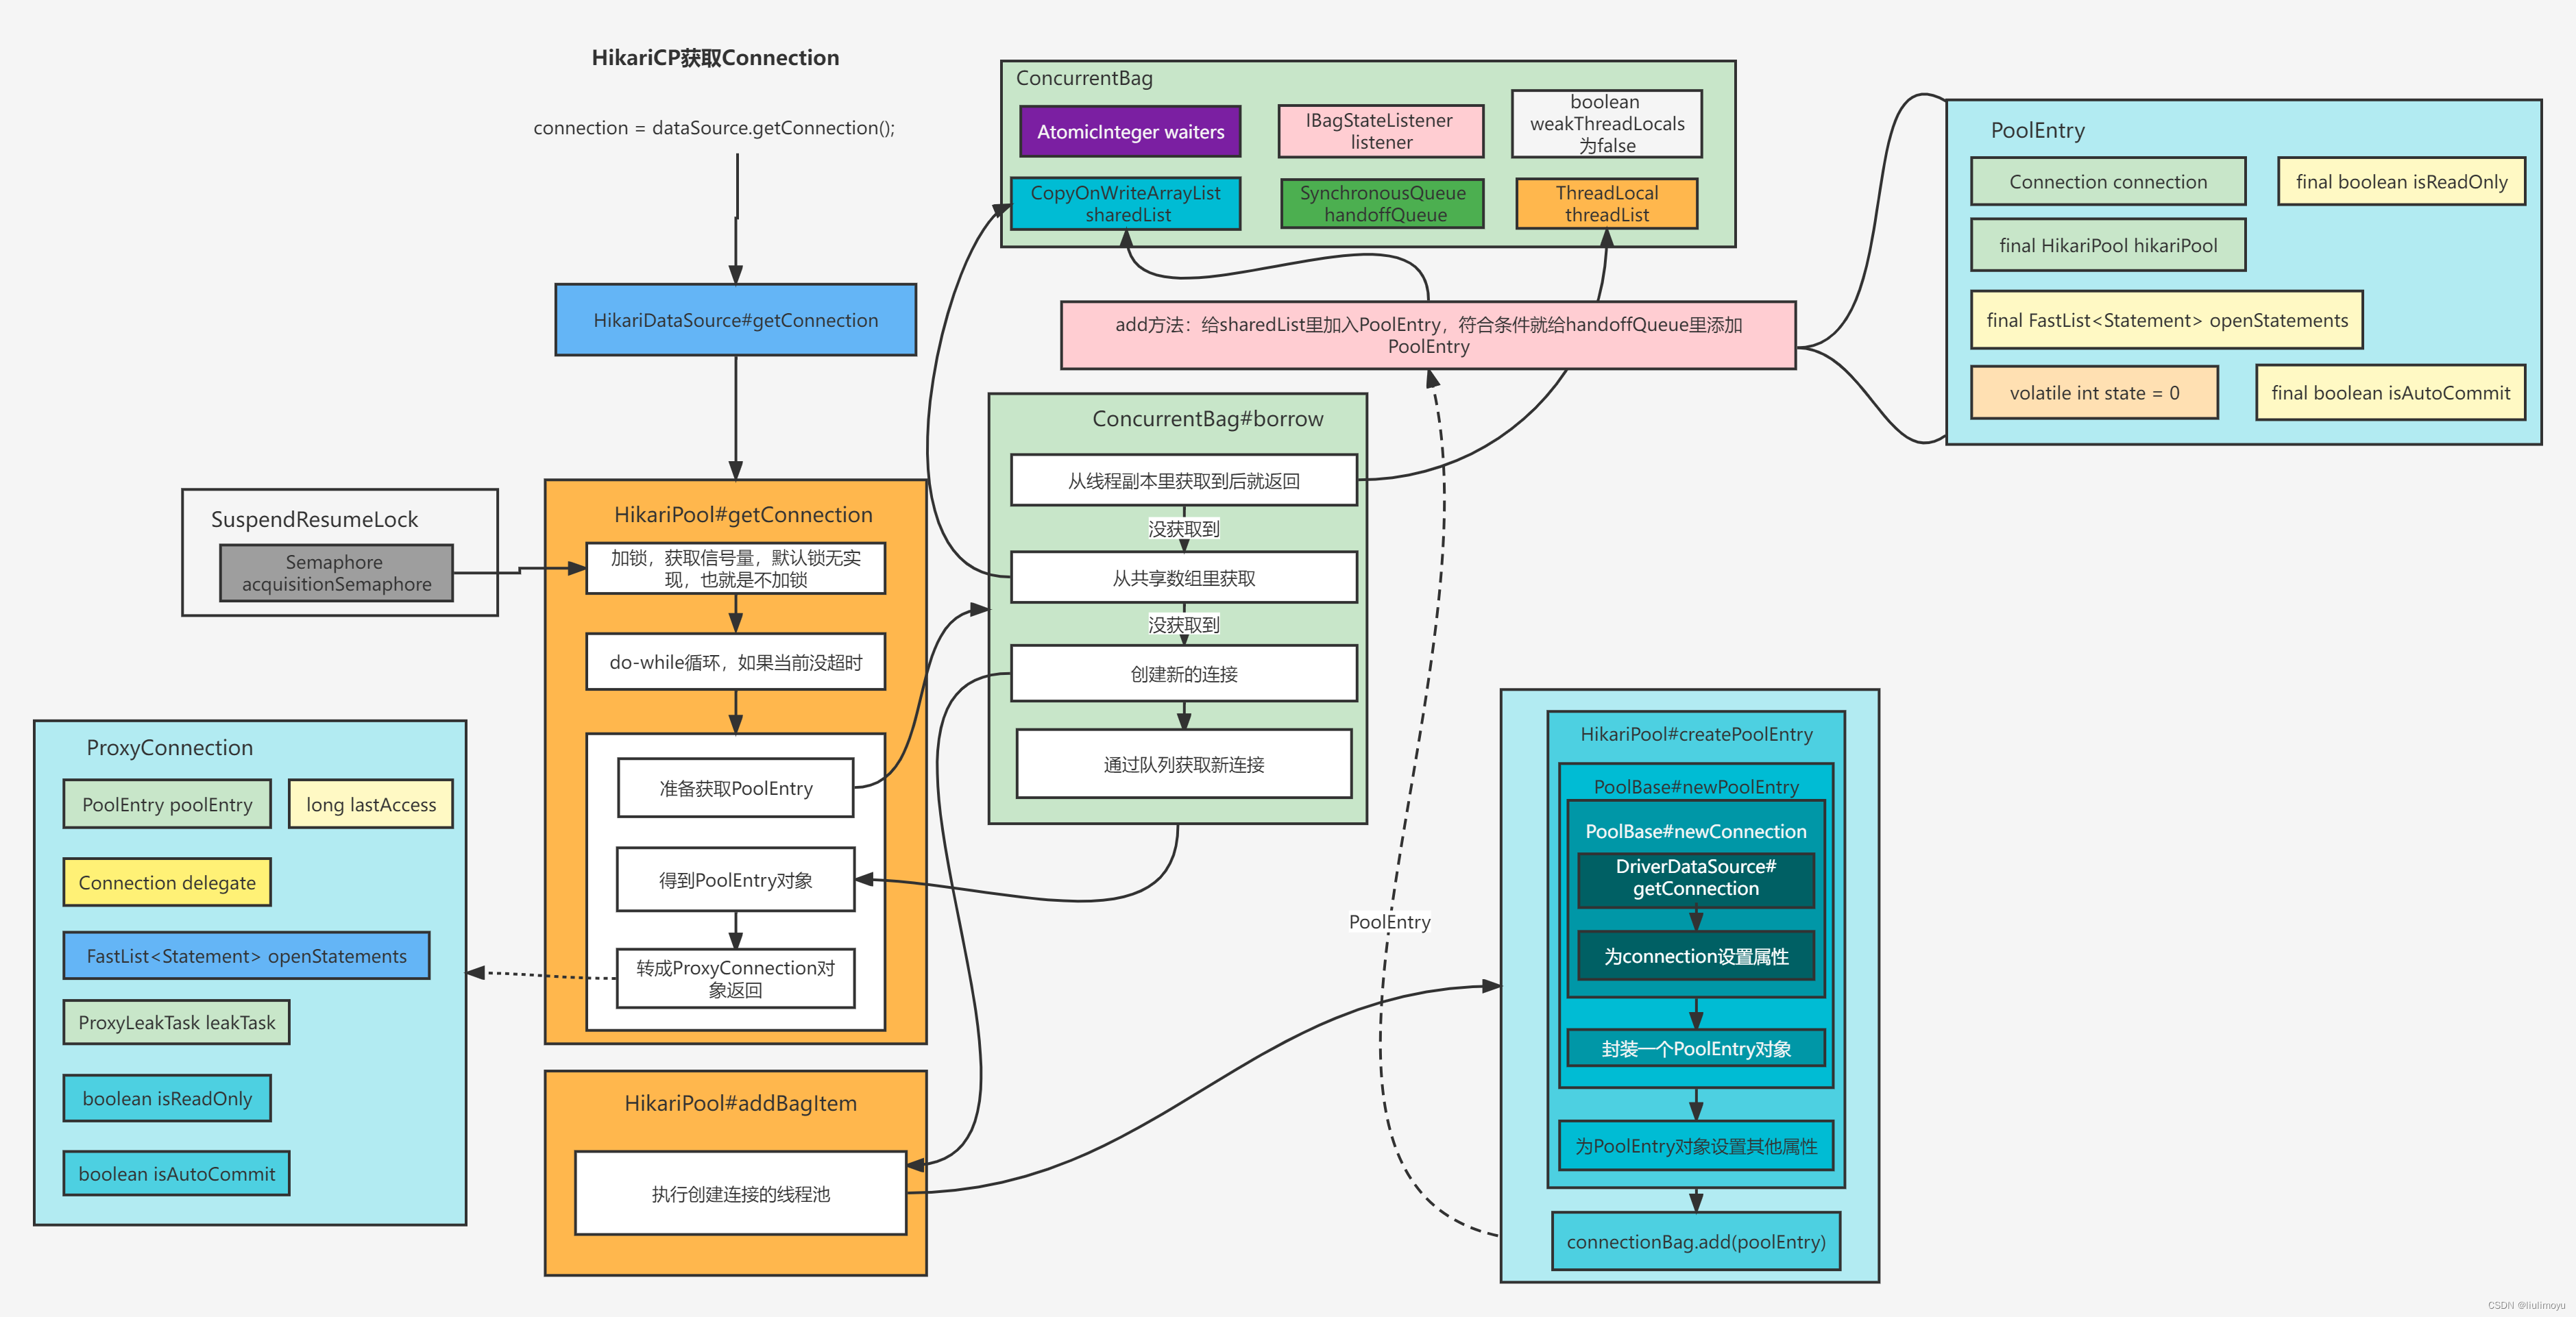
执行的就是HikariDataSource的getConnection方法。
@Override
public Connection getConnection() throws SQLException{
   if (isClosed()) {
      throw new SQLException("HikariDataSource " + this + " has been closed.");
   }

   if (fastPathPool != null) {
      return fastPathPool.getConnection();
   }

   // See http://en.wikipedia.org/wiki/Double-checked_locking#Usage_in_Java
   HikariPool result = pool;
   if (result == null) {
      synchronized (this) {
         result = pool;
         if (result == null) {
            validate();
            LOGGER.info("{} - Starting...", getPoolName());
            try {
               pool = result = new HikariPool(this);
               this.seal();
            }
            catch (PoolInitializationException pie) {
               if (pie.getCause() instanceof SQLException) {
                  throw (SQLException) pie.getCause();
               }
               else {
                  throw pie;
               }
            }
            LOGGER.info("{} - Start completed.", getPoolName());
         }
      }
   }

   return result.getConnection();
}
如果当前HikariDataSource的fastPathPool不为null,就通过fastPathPool来获取Connection。
如果为null,再看pool对象,如果pool对象不为null,就通过pool来获取Connection。
如果pool为null,那么使用synchronized对此类进行加锁,并且使用双重检查方式判断pool是否为null。如果还为null,就通过new HikariPool()创建一个pool,(也就是上述的流程执行一遍)。最终还是要使用pool创建一个Conneciton。
程序逻辑转移到HikariPool的getConnection方法中
public Connection getConnection() throws SQLException{
   return getConnection(connectionTimeout);
}

public Connection getConnection(final long hardTimeout) throws SQLException{
   suspendResumeLock.acquire();
   final long startTime = currentTime();

   try {
      long timeout = hardTimeout;
      do {
         PoolEntry poolEntry = connectionBag.borrow(timeout, MILLISECONDS);
         if (poolEntry == null) {
            break; // We timed out... break and throw exception
         }

         final long now = currentTime();
         if (poolEntry.isMarkedEvicted() || (elapsedMillis(poolEntry.lastAccessed, now) > aliveBypassWindowMs && !isConnectionAlive(poolEntry.connection))) {
            closeConnection(poolEntry, poolEntry.isMarkedEvicted() ? EVICTED_CONNECTION_MESSAGE : DEAD_CONNECTION_MESSAGE);
            timeout = hardTimeout - elapsedMillis(startTime);
         } else {
            metricsTracker.recordBorrowStats(poolEntry, startTime);
            return poolEntry.createProxyConnection(leakTaskFactory.schedule(poolEntry), now);
         }
      } while (timeout > 0L);

      metricsTracker.recordBorrowTimeoutStats(startTime);
      throw createTimeoutException(startTime);
   } catch (InterruptedException e) {
      Thread.currentThread().interrupt();
      throw new SQLException(poolName + " - Interrupted during connection acquisition", e);
   } finally {
      suspendResumeLock.release();
   }
}
会先通过suspendResumeLock进行加锁acquire,默认使用无锁方式,所以这个方法直接跳过了。
在没超时的do while循环里,先通过connectionBag的borrow方法得到一个PoolEntry对象,borrow方法如下:
public T borrow(long timeout, final TimeUnit timeUnit) throws InterruptedException{
   // Try the thread-local list first
   final List<Object> list = threadList.get();
   for (int i = list.size() - 1; i >= 0; i--) {
      final Object entry = list.remove(i);
      @SuppressWarnings("unchecked")
      final T bagEntry = weakThreadLocals ? ((WeakReference<T>) entry).get() : (T) entry;
      if (bagEntry != null && bagEntry.compareAndSet(STATE_NOT_IN_USE, STATE_IN_USE)) {
         return bagEntry;
      }
   }

   // Otherwise, scan the shared list ... then poll the handoff queue
   final int waiting = waiters.incrementAndGet();
   try {
      for (T bagEntry : sharedList) {
         if (bagEntry.compareAndSet(STATE_NOT_IN_USE, STATE_IN_USE)) {
            // If we may have stolen another waiter's connection, request another bag add.
            if (waiting > 1) {
               listener.addBagItem(waiting - 1);
            }
            return bagEntry;
         }
      }

      listener.addBagItem(waiting);

      timeout = timeUnit.toNanos(timeout);
      do {
         final long start = currentTime();
         final T bagEntry = handoffQueue.poll(timeout, NANOSECONDS);
         if (bagEntry == null || bagEntry.compareAndSet(STATE_NOT_IN_USE, STATE_IN_USE)) {
            return bagEntry;
         }

         timeout -= elapsedNanos(start);
      } while (timeout > 10_000);

      return null;
   } finally {
      waiters.decrementAndGet();
   }
}
在borrow方法里,首先从ThreadLocal的本地线程threadList里获取bagEntry,前提是这个list里有,并且这个bagEntry通过CAS设置state=1(USE)成功。不成功就只是单纯从列表里移除了这个bagEntry。
从ThreadLocal里获取不到说明当前线程属于一个竞争获取连接的行为,那么就先设置waiters加1,然后从CopyOnWriteArrayList的sharedList获取,state=0的。如果state=0更改为1成功,那么这个bagEntry就被获取返回。在返回之前判断,如果当前waiters大于1,执行HikariPool的addBagItem方法。
如果没从sharedList拿到bagEntry对象,那就先执行HikariPool的addBagItem方法。
public void addBagItem(final int waiting){
   final boolean shouldAdd = waiting - addConnectionQueueReadOnlyView.size() >= 0; // Yes, >= is intentional.
   if (shouldAdd) {
      addConnectionExecutor.submit(poolEntryCreator);
   }else {
      logger.debug("{} - Add connection elided, waiting {}, queue {}", poolName, waiting, addConnectionQueueReadOnlyView.size());
   }
}
如果当前waiters还小于maxPoolSize,那就让线程池addConnectionExecutor执行早已初始化的内部类PoolEntryCreator线程。
PoolEntryCreator线程的核心还是这个call方法
@Override
public Boolean call(){
   long sleepBackoff = 250L;
   while (poolState == POOL_NORMAL && shouldCreateAnotherConnection()) {
      final PoolEntry poolEntry = createPoolEntry();
      if (poolEntry != null) {
         connectionBag.add(poolEntry);
         logger.debug("{} - Added connection {}", poolName, poolEntry.connection);
         if (loggingPrefix != null) {
            logPoolState(loggingPrefix);
         }
         return Boolean.TRUE;
      }

      // failed to get connection from db, sleep and retry
      if (loggingPrefix != null) logger.debug("{} - Connection add failed, sleeping with backoff: {}ms", poolName, sleepBackoff);
      quietlySleep(sleepBackoff);
      sleepBackoff = Math.min(SECONDS.toMillis(10), Math.min(connectionTimeout, (long) (sleepBackoff * 1.5)));
   }

   // Pool is suspended or shutdown or at max size
   return Boolean.FALSE;
}
如果当前连接池状态正常(等于0,默认就是0),并且此时应该创建新的连接(已有连接数还小于最大连接数 同时 有等待的线程或者当前空闲连接还不够配置的值)。那么就执行createPoolEntry方法,去创建Connection对象并得到poolEntry对象。
得到poolEntry对象后,就执行ConcurrentBag的add方法(将poolEntry对象放在sharedList中,同时,如果将waiters大于0 且此entry对象还没使用,就给ConcurrentBag的队列handoffQueue里放入)。
得不到poolEntry对象时线程就先sleep而后再进行while循环。
此时只是让别的线程给ConcurrentBag的队列里放入了bagEntry,原先获取连接的borrow方法还没结束。还需要从队列中拿出此bagEntry,然后作为方法结果返回。如果超时就返回null。最终的waiters个数一定要减一。
此时上述返回的bagEntry对象就是带有Connection的最终PoolEntry对象。释放最初加的锁,然后方法返回Connection。此时返回的Connection是一个被代理后的ProxyConnection类。
protected ProxyConnection(final PoolEntry poolEntry,
                          final Connection connection,
                          final FastList<Statement> openStatements,
                          final ProxyLeakTask leakTask,
                          final long now,
                          final boolean isReadOnly,
                          final boolean isAutoCommit) {
   this.poolEntry = poolEntry;
   this.delegate = connection;
   this.openStatements = openStatements;
   this.leakTask = leakTask;
   this.lastAccess = now;
   this.isReadOnly = isReadOnly;
   this.isAutoCommit = isAutoCommit;
}
四. 关闭连接
connection.close();流程图如下:
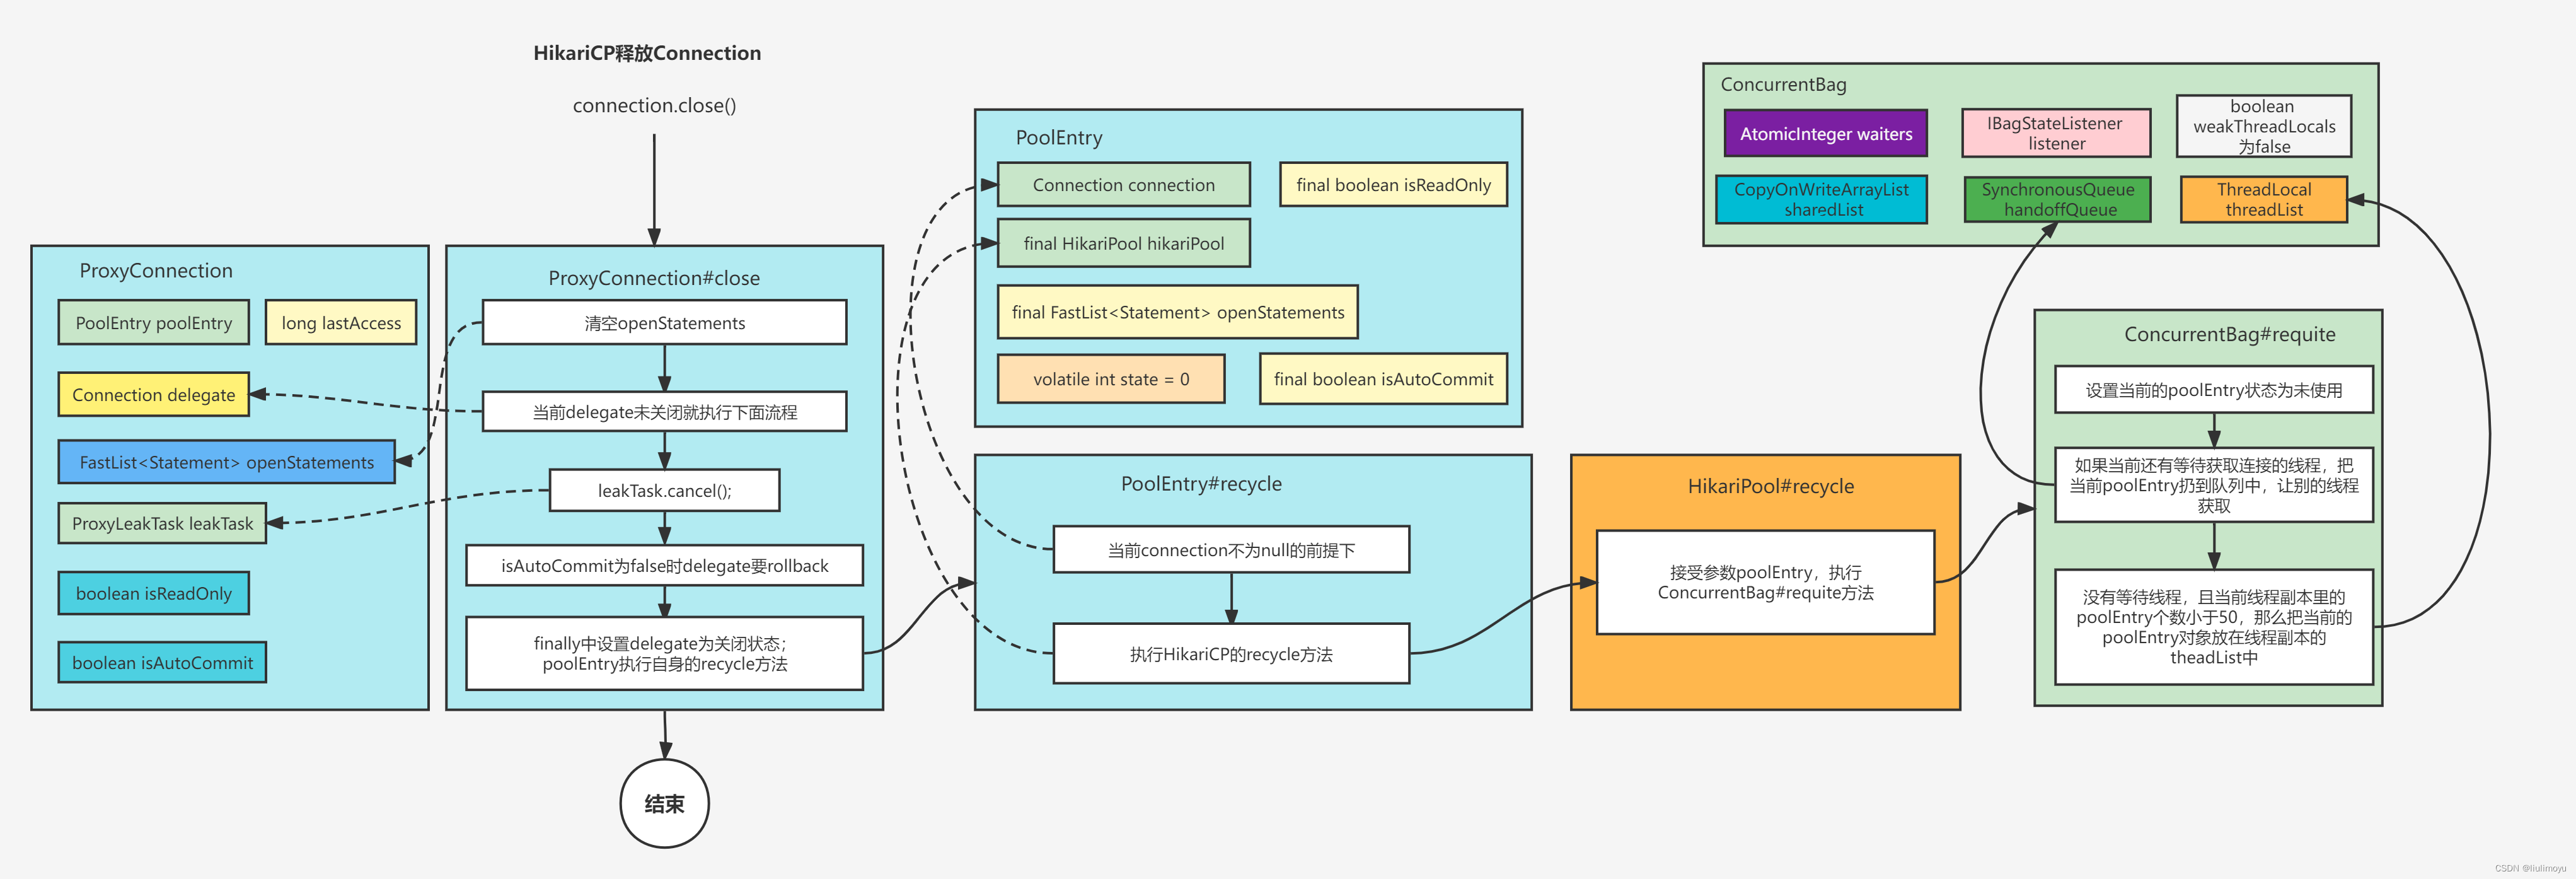
对应的是ProxyConnection的close方法,因为得到Connection时,本质通过了代理方式得到的是这个ProxyConnection。
@Override
public final void close() throws SQLException{
   // Closing statements can cause connection eviction, so this must run before the conditional below
   closeStatements();

   if (delegate != ClosedConnection.CLOSED_CONNECTION) {
      leakTask.cancel();

      try {
         if (isCommitStateDirty && !isAutoCommit) {
            delegate.rollback();
            lastAccess = currentTime();
            LOGGER.debug("{} - Executed rollback on connection {} due to dirty commit state on close().", poolEntry.getPoolName(), delegate);
         }

         if (dirtyBits != 0) {
            poolEntry.resetConnectionState(this, dirtyBits);
            lastAccess = currentTime();
         }

         delegate.clearWarnings();
      } catch (SQLException e) {
         // when connections are aborted, exceptions are often thrown that should not reach the application
         if (!poolEntry.isMarkedEvicted()) {
            throw checkException(e);
         }
      }finally {
         delegate = ClosedConnection.CLOSED_CONNECTION;
         poolEntry.recycle(lastAccess);
      }
   }
}
这个close方法会先把属于这个connection对象里的statements对象数组清空。
然后当前连接未标记关闭的话,就会进行事务回滚。
如果当前有脏标记,会根据脏标记进行连接池对象的重新标记。
最终会把当前这个给Connection设置为Closed状态,ProxyConnection所属的poolEntry执行recycle方法。
void recycle(final long lastAccessed){
   if (connection != null) {
      this.lastAccessed = lastAccessed;
      hikariPool.recycle(this);
   }
}
跳到HikariPool里执行recycle
void recycle(final PoolEntry poolEntry){
   metricsTracker.recordConnectionUsage(poolEntry);
   connectionBag.requite(poolEntry);
}
跳到ConcurrentBag里执行requite方法
public void requite(final T bagEntry){
   bagEntry.setState(STATE_NOT_IN_USE);

   for (int i = 0; waiters.get() > 0; i++) {
      if (bagEntry.getState() != STATE_NOT_IN_USE || handoffQueue.offer(bagEntry)) {
         return;
      } else if ((i & 0xff) == 0xff) {
         parkNanos(MICROSECONDS.toNanos(10));
      }  else {
         Thread.yield();
      }
   }

   final List<Object> threadLocalList = threadList.get();
   if (threadLocalList.size() < 50) {
      threadLocalList.add(weakThreadLocals ? new WeakReference<>(bagEntry) : bagEntry);
   }
}
如果当前还有等待获取连接的线程,那么就把这个poolEntry放入到handoffQueue中,让等待的线程能够获取到。
如果当前没有等待获取连接的线程,同时ThreadLocal的副本threadList个数还小于50,就把当前poolEntry对象放在threadList中。
五. 关闭连接池
- 将连接池的isShutdown设置为true,其他线程如果看到这个状态,会暂停相关功能执行。
- pool对象还存在,就执行shutdown方法。
- 设置pool状态,设置为2,表示终止,其他线程如果看到这个状态,会暂停相关功能
- 将后台执行HouseKeeper线程的定时任务终止
- 循环CurrentBag里poolEntry所在的sharedList,遍历出来的poolEntry对象进行Connection的关闭
- 创建连接的线程池addConnectionExecutor关闭
- CurrentBag执行close方法
- 中断当前还在活跃的连接,并进行关闭
- 关闭其他线程池
- 完成终止
总结
HikariCP的连接池实现方式比较简单的。使用CocurrentBag类管理了线程副本、共享数组和队列第三个集合,从CocurrerntBag里获取连接的顺序是,线程副本 > 共享数组 > 队列。队列的作用是将创建连接和获取连接两个操作进行了分离。每创建一次连接,就会在共享数组里放一个。线程副本只有在执行连接的close方法时,才会放入当前连接到副本。
在构建连接池的时候,会先创建一个连接来检测是否能连上数据库。这个连接就是初始连接,在检测完毕后并不会销毁。连接池创建完毕后,会启动定时的线程池执行线程检测任务,主要做两件事:1.如果当前总的连接数不满足配置,就创建连接;2.如果当前连接数超过配置要求,那么就销毁一部分连接,销毁顺序也是按照创建的时间,把最早的连接销毁。
![[附源码]java毕业设计疫情背景下社区公共卫生服务系统](https://img-blog.csdnimg.cn/15054854ad2540da850cb2a800f4eebb.png)


