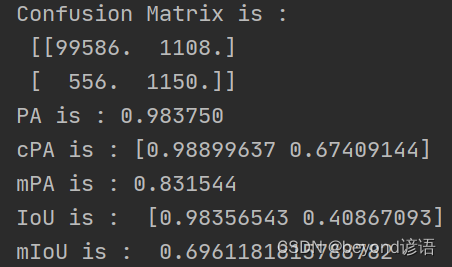
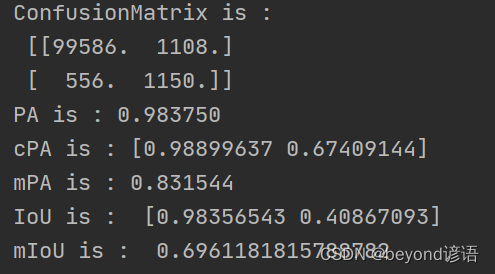
当训练好模型之后,检测模型训练效果如何,评价指标有哪些?通过查阅相关资料,我将以这五个指标来对所训练的模型进行评估,下图是评价指标运行结果图。
一、混淆矩阵(Confusion Matrix)
解释:也就是个n维矩阵,n表示分类的类别数。
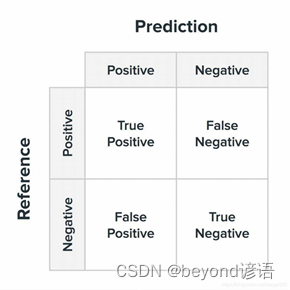
具体的表示如下(这里以二分类任务为例):也就是图中的二维矩阵
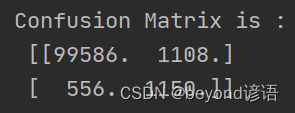
上述的所有指标都是建立在混淆矩阵的基础上进行计算的
我这里以织物毛球和纹理进行识别,毛球为Positive,纹理为Negative
这个二维矩阵有四个参数:
| 参数 | 解释 |
|---|---|
| True Positive | 模型预测识别为Positive,识别正确True;实际为Positive |
| False Negative | 模型预测识别为Negative,识别错误False;实际为Positive |
| False Positive | 模型预测识别为Positive,识别错误False;实际为Negative |
| True Negative | 模型预测识别为Negative,识别正确True;实际为Negative |
这些值对测试图像中所有像素点进行分类统计
代码实现:
修改:SegmentationMetric(2)改成实际训练模型的分类数,我这个模型训练的是二分类任务
imgPredict和imgLabel 改成自己模型预测的图像和标签图像的路径
实际上,imgLabel为正确答案,依次遍历imgPredict中像素点,与正确答案进行对比,统计上述参数的个数,最后绘制成混淆矩阵。
import numpy as np
import cv2

class SegmentationMetric(object):
    def __init__(self, numClass):
        self.numClass = numClass
        self.confusionMatrix = np.zeros((self.numClass,) * 2)  # 混淆矩阵(空)


    def addBatch(self, imgPredict, imgLabel):
        assert imgPredict.shape == imgLabel.shape
        self.confusionMatrix += self.genConfusionMatrix(imgPredict, imgLabel)  # 得到混淆矩阵
        return self.confusionMatrix


    def genConfusionMatrix(self, imgPredict, imgLabel):
        mask = (imgLabel >= 0) & (imgLabel < self.numClass)
        label = self.numClass * imgLabel[mask] + imgPredict[mask]
        count = np.bincount(label, minlength=self.numClass ** 2)
        confusionMatrix = count.reshape(self.numClass, self.numClass)
        return confusionMatrix


# 测试内容
if __name__ == '__main__':
    imgPredict = cv2.imread("../result/qqq.png")
    = cv2.imread("../result/img.jpg")

    imgPredict = np.array(cv2.cvtColor(imgPredict, cv2.COLOR_BGR2GRAY) / 255., dtype=np.uint8)
    imgLabel = np.array(cv2.cvtColor(imgLabel, cv2.COLOR_BGR2GRAY) / 255., dtype=np.uint8)

    metric = SegmentationMetric(2)  # 2表示有2个分类
    ConfusionMatrix = metric.addBatch(imgPredict, imgLabel)

    print('ConfusionMatrix is :\n', ConfusionMatrix)
运行结果如下:
二、像素准确率PA(Pixel Accuracy)
PA最后的输出是一个数值,因为是,无论多少类别的分类,都是跟标准标签进行对比,一致就是True,不一致就是False
PA,别的论文也称为准确率、Acc等,都指的是像素准确率
Accuracy = (TP + TN) / (TP + TN + FP + FN),也就是对角线元素之和/总的元素之和
(99586+1150)/(99586+1108+556+1150)= 0.983750,这也对应了第一张图的显示结果
代码实现:
import numpy as np
import cv2

class SegmentationMetric(object):
    def __init__(self, numClass):
        self.numClass = numClass
        self.confusionMatrix = np.zeros((self.numClass,) * 2)  # 混淆矩阵(空)


    def addBatch(self, imgPredict, imgLabel):
        assert imgPredict.shape == imgLabel.shape
        self.confusionMatrix += self.genConfusionMatrix(imgPredict, imgLabel)  # 得到混淆矩阵
        return self.confusionMatrix


    def genConfusionMatrix(self, imgPredict, imgLabel):
        mask = (imgLabel >= 0) & (imgLabel < self.numClass)
        label = self.numClass * imgLabel[mask] + imgPredict[mask]
        count = np.bincount(label, minlength=self.numClass ** 2)
        confusionMatrix = count.reshape(self.numClass, self.numClass)
        return confusionMatrix


    def pixelAccuracy(self):
        acc = np.diag(self.confusionMatrix).sum() / self.confusionMatrix.sum()
        return acc

# 测试内容
if __name__ == '__main__':
    imgPredict = cv2.imread("../result/qqq.png")
    imgLabel = cv2.imread("../result/img.jpg")

    imgPredict = np.array(cv2.cvtColor(imgPredict, cv2.COLOR_BGR2GRAY) / 255., dtype=np.uint8)
    imgLabel = np.array(cv2.cvtColor(imgLabel, cv2.COLOR_BGR2GRAY) / 255., dtype=np.uint8)

    metric = SegmentationMetric(2)  # 2表示有2个分类
    ConfusionMatrix = metric.addBatch(imgPredict, imgLabel)

    PixelAccuracy = metric.pixelAccuracy()

    print('PixelAccuracy is :\n', PixelAccuracy)
运行结果如下:

三、类别像素准确率CPA(Class Pixel Accuracy)
CPA与PA不同,PA是将整体区分True和False最后结果是一个数值
CPA则先将不同的类别进行划分,每个类别再分别与标签给定的正确答案进行对比统计,最后的个数是类别个数,有几个类别就是几个数值。
代码实现:
import numpy as np
import cv2

class SegmentationMetric(object):
    def __init__(self, numClass):
        self.numClass = numClass
        self.confusionMatrix = np.zeros((self.numClass,) * 2)  # 混淆矩阵(空)


    def addBatch(self, imgPredict, imgLabel):
        assert imgPredict.shape == imgLabel.shape
        self.confusionMatrix += self.genConfusionMatrix(imgPredict, imgLabel)  # 得到混淆矩阵
        return self.confusionMatrix


    def genConfusionMatrix(self, imgPredict, imgLabel):
        mask = (imgLabel >= 0) & (imgLabel < self.numClass)
        label = self.numClass * imgLabel[mask] + imgPredict[mask]
        count = np.bincount(label, minlength=self.numClass ** 2)
        confusionMatrix = count.reshape(self.numClass, self.numClass)
        return confusionMatrix

    def classPixelAccuracy(self):
        classAcc = np.diag(self.confusionMatrix) / self.confusionMatrix.sum(axis=1)
        return classAcc  # 返回的是一个列表值,如:[0.90, 0.80, 0.96],表示类别1 2 3各类别的预测准确率

# 测试内容
if __name__ == '__main__':
    imgPredict = cv2.imread("../result/qqq.png")
    imgLabel = cv2.imread("../result/img.jpg")

    imgPredict = np.array(cv2.cvtColor(imgPredict, cv2.COLOR_BGR2GRAY) / 255., dtype=np.uint8)
    imgLabel = np.array(cv2.cvtColor(imgLabel, cv2.COLOR_BGR2GRAY) / 255., dtype=np.uint8)

    metric = SegmentationMetric(2)  # 2表示有2个分类
    ConfusionMatrix = metric.addBatch(imgPredict, imgLabel)

    cpa = metric.classPixelAccuracy()

    print('classPixelAccuracy is :\n', cpa)
因为是二分类任务,故分别显示这两个类别的PA值
运行效果如下:

四、类别平均像素准确率MPA(Mean class Pixel Accuracy)
也就是将所有的CPA加一块,求个平均值
代码实现:
import numpy as np
import cv2

class SegmentationMetric(object):
    def __init__(self, numClass):
        self.numClass = numClass
        self.confusionMatrix = np.zeros((self.numClass,) * 2)  # 混淆矩阵(空)


    def addBatch(self, imgPredict, imgLabel):
        assert imgPredict.shape == imgLabel.shape
        self.confusionMatrix += self.genConfusionMatrix(imgPredict, imgLabel)  # 得到混淆矩阵
        return self.confusionMatrix


    def genConfusionMatrix(self, imgPredict, imgLabel):
        mask = (imgLabel >= 0) & (imgLabel < self.numClass)
        label = self.numClass * imgLabel[mask] + imgPredict[mask]
        count = np.bincount(label, minlength=self.numClass ** 2)
        confusionMatrix = count.reshape(self.numClass, self.numClass)
        return confusionMatrix

    def classPixelAccuracy(self):
        classAcc = np.diag(self.confusionMatrix) / self.confusionMatrix.sum(axis=1)
        return classAcc  # 返回的是一个列表值,如:[0.90, 0.80, 0.96],表示类别1 2 3各类别的预测准确率

    def meanPixelAccuracy(self):
        classAcc = self.classPixelAccuracy()
        meanAcc = np.nanmean(classAcc)  # np.nanmean 求平均值,nan表示遇到Nan类型,其值取为0
        return meanAcc  # 返回单个值,如:np.nanmean([0.90, 0.80, 0.96, nan, nan]) = (0.90 + 0.80 + 0.96) / 3 =  0.89

# 测试内容
if __name__ == '__main__':
    imgPredict = cv2.imread("../result/qqq.png")
    imgLabel = cv2.imread("../result/img.jpg")

    imgPredict = np.array(cv2.cvtColor(imgPredict, cv2.COLOR_BGR2GRAY) / 255., dtype=np.uint8)
    imgLabel = np.array(cv2.cvtColor(imgLabel, cv2.COLOR_BGR2GRAY) / 255., dtype=np.uint8)

    metric = SegmentationMetric(2)  # 2表示有2个分类
    ConfusionMatrix = metric.addBatch(imgPredict, imgLabel)

    mpa = metric.meanPixelAccuracy()

    print('meanPixelAccuracy is :\n', mpa)
(0.98899637+0.67409144)/ 2 = 0.831543905
运行结果如下:

五、交并比IoU(Intersection Over Union)
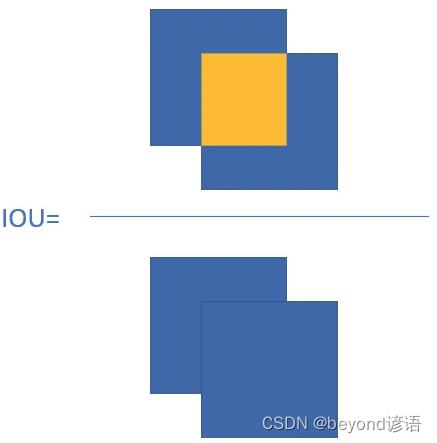
通俗来说:将标签图像和模型预测出的图像重叠一下,分别取交集和并集,这里的交集和并集取得是统计像素点的个数
IoU是按不同类别分别进行求解的,几个类别就有几个IoU
IoU = 交集 / 并集
代码实现:
import numpy as np
import cv2

class SegmentationMetric(object):
    def __init__(self, numClass):
        self.numClass = numClass
        self.confusionMatrix = np.zeros((self.numClass,) * 2)  # 混淆矩阵(空)


    def addBatch(self, imgPredict, imgLabel):
        assert imgPredict.shape == imgLabel.shape
        self.confusionMatrix += self.genConfusionMatrix(imgPredict, imgLabel)  # 得到混淆矩阵
        return self.confusionMatrix


    def genConfusionMatrix(self, imgPredict, imgLabel):
        mask = (imgLabel >= 0) & (imgLabel < self.numClass)
        label = self.numClass * imgLabel[mask] + imgPredict[mask]
        count = np.bincount(label, minlength=self.numClass ** 2)
        confusionMatrix = count.reshape(self.numClass, self.numClass)
        return confusionMatrix


    def pixelAccuracy(self):
        acc = np.diag(self.confusionMatrix).sum() / self.confusionMatrix.sum()
        return acc


    def IntersectionOverUnion(self):
        # Intersection = TP Union = TP + FP + FN
        # IoU = TP / (TP + FP + FN)
        intersection = np.diag(self.confusionMatrix)  # 取对角元素的值,返回列表
        union = np.sum(self.confusionMatrix, axis=1) + np.sum(self.confusionMatrix, axis=0) - np.diag(
            self.confusionMatrix)  # axis = 1表示混淆矩阵行的值,返回列表; axis = 0表示取混淆矩阵列的值,返回列表
        IoU = intersection / union  # 返回列表,其值为各个类别的IoU
        return IoU
# 测试内容
if __name__ == '__main__':
    imgPredict = cv2.imread("../result/qqq.png")
    imgLabel = cv2.imread("../result/img.jpg")

    imgPredict = np.array(cv2.cvtColor(imgPredict, cv2.COLOR_BGR2GRAY) / 255., dtype=np.uint8)
    imgLabel = np.array(cv2.cvtColor(imgLabel, cv2.COLOR_BGR2GRAY) / 255., dtype=np.uint8)

    metric = SegmentationMetric(2)  # 2表示有2个分类
    ConfusionMatrix = metric.addBatch(imgPredict, imgLabel)


    IoU = metric.IntersectionOverUnion()

    print('IntersectionOverUnion is :\n', IoU)
效果图如下:

六、平均交并比MIoU(Mean Intersection Over Union)
将不同类别的IoU求个平均数
代码实现:
import numpy as np
import cv2

class SegmentationMetric(object):
    def __init__(self, numClass):
        self.numClass = numClass
        self.confusionMatrix = np.zeros((self.numClass,) * 2)  # 混淆矩阵(空)


    def addBatch(self, imgPredict, imgLabel):
        assert imgPredict.shape == imgLabel.shape
        self.confusionMatrix += self.genConfusionMatrix(imgPredict, imgLabel)  # 得到混淆矩阵
        return self.confusionMatrix


    def genConfusionMatrix(self, imgPredict, imgLabel):
        mask = (imgLabel >= 0) & (imgLabel < self.numClass)
        label = self.numClass * imgLabel[mask] + imgPredict[mask]
        count = np.bincount(label, minlength=self.numClass ** 2)
        confusionMatrix = count.reshape(self.numClass, self.numClass)
        return confusionMatrix


    def pixelAccuracy(self):
        acc = np.diag(self.confusionMatrix).sum() / self.confusionMatrix.sum()
        return acc


    def IntersectionOverUnion(self):
        # Intersection = TP Union = TP + FP + FN
        # IoU = TP / (TP + FP + FN)
        intersection = np.diag(self.confusionMatrix)  # 取对角元素的值,返回列表
        union = np.sum(self.confusionMatrix, axis=1) + np.sum(self.confusionMatrix, axis=0) - np.diag(
            self.confusionMatrix)  # axis = 1表示混淆矩阵行的值,返回列表; axis = 0表示取混淆矩阵列的值,返回列表
        IoU = intersection / union  # 返回列表,其值为各个类别的IoU
        return IoU


    def meanIntersectionOverUnion(self):
        mIoU = np.nanmean(self.IntersectionOverUnion())  # 求各类别IoU的平均
        return mIoU
# 测试内容
if __name__ == '__main__':
    imgPredict = cv2.imread("../result/qqq.png")
    imgLabel = cv2.imread("../result/img.jpg")

    imgPredict = np.array(cv2.cvtColor(imgPredict, cv2.COLOR_BGR2GRAY) / 255., dtype=np.uint8)
    imgLabel = np.array(cv2.cvtColor(imgLabel, cv2.COLOR_BGR2GRAY) / 255., dtype=np.uint8)

    metric = SegmentationMetric(2)  # 2表示有2个分类
    ConfusionMatrix = metric.addBatch(imgPredict, imgLabel)

    mIoU = metric.meanIntersectionOverUnion()

    print('meanIntersectionOverUnion is :\n', mIoU)
运行结果如下:

七、完整代码
import numpy as np
import cv2

__all__ = ['SegmentationMetric']

"""
confusionMetric  # 注意:此处横着代表预测值,竖着代表真实值
P\L     P    N
P      TP    FP
N      FN    TN
"""


class SegmentationMetric(object):
    def __init__(self, numClass):
        self.numClass = numClass
        self.confusionMatrix = np.zeros((self.numClass,) * 2)  # 混淆矩阵(空)

    def pixelAccuracy(self):
        # return all class overall pixel accuracy 正确的像素占总像素的比例
        #  PA = acc = (TP + TN) / (TP + TN + FP + TN)
        acc = np.diag(self.confusionMatrix).sum() / self.confusionMatrix.sum()
        return acc

    def classPixelAccuracy(self):
        # return each category pixel accuracy(A more accurate way to call it precision)
        # acc = (TP) / TP + FP
        classAcc = np.diag(self.confusionMatrix) / self.confusionMatrix.sum(axis=1)
        return classAcc  # 返回的是一个列表值,如:[0.90, 0.80, 0.96],表示类别1 2 3各类别的预测准确率

    def meanPixelAccuracy(self):
        """
        Mean Pixel Accuracy(MPA,均像素精度):是PA的一种简单提升,计算每个类内被正确分类像素数的比例,之后求所有类的平均。
        :return:
        """
        classAcc = self.classPixelAccuracy()
        meanAcc = np.nanmean(classAcc)  # np.nanmean 求平均值,nan表示遇到Nan类型,其值取为0
        return meanAcc  # 返回单个值,如:np.nanmean([0.90, 0.80, 0.96, nan, nan]) = (0.90 + 0.80 + 0.96) / 3 =  0.89

    def IntersectionOverUnion(self):
        # Intersection = TP Union = TP + FP + FN
        # IoU = TP / (TP + FP + FN)
        intersection = np.diag(self.confusionMatrix)  # 取对角元素的值,返回列表
        union = np.sum(self.confusionMatrix, axis=1) + np.sum(self.confusionMatrix, axis=0) - np.diag(
            self.confusionMatrix)  # axis = 1表示混淆矩阵行的值,返回列表; axis = 0表示取混淆矩阵列的值,返回列表
        IoU = intersection / union  # 返回列表,其值为各个类别的IoU
        return IoU

    def meanIntersectionOverUnion(self):
        mIoU = np.nanmean(self.IntersectionOverUnion())  # 求各类别IoU的平均
        return mIoU

    def genConfusionMatrix(self, imgPredict, imgLabel):  #
        """
        同FCN中score.py的fast_hist()函数,计算混淆矩阵
        :param imgPredict:
        :param imgLabel:
        :return: 混淆矩阵
        """
        # remove classes from unlabeled pixels in gt image and predict
        mask = (imgLabel >= 0) & (imgLabel < self.numClass)
        label = self.numClass * imgLabel[mask] + imgPredict[mask]
        count = np.bincount(label, minlength=self.numClass ** 2)
        confusionMatrix = count.reshape(self.numClass, self.numClass)
        # print(confusionMatrix)
        return confusionMatrix

    def Frequency_Weighted_Intersection_over_Union(self):
        """
        FWIoU,频权交并比:为MIoU的一种提升,这种方法根据每个类出现的频率为其设置权重。
        FWIOU =     [(TP+FN)/(TP+FP+TN+FN)] *[TP / (TP + FP + FN)]
        """
        freq = np.sum(self.confusion_matrix, axis=1) / np.sum(self.confusion_matrix)
        iu = np.diag(self.confusion_matrix) / (
                np.sum(self.confusion_matrix, axis=1) + np.sum(self.confusion_matrix, axis=0) -
                np.diag(self.confusion_matrix))
        FWIoU = (freq[freq > 0] * iu[freq > 0]).sum()
        return FWIoU

    def addBatch(self, imgPredict, imgLabel):
        assert imgPredict.shape == imgLabel.shape
        self.confusionMatrix += self.genConfusionMatrix(imgPredict, imgLabel)  # 得到混淆矩阵
        return self.confusionMatrix

    def reset(self):
        self.confusionMatrix = np.zeros((self.numClass, self.numClass))


# 测试内容
if __name__ == '__main__':
    imgPredict = cv2.imread("../result/qqq.png")
    imgLabel = cv2.imread("../result/img.jpg")
    #"../result/standard/mask/SM50GRADE1PLAIN(1).jpg"
    #"../result/predict/image/SM50GRADE1BLANKET(1).jpg"

    imgPredict = np.array(cv2.cvtColor(imgPredict, cv2.COLOR_BGR2GRAY) / 255., dtype=np.uint8)
    imgLabel = np.array(cv2.cvtColor(imgLabel, cv2.COLOR_BGR2GRAY) / 255., dtype=np.uint8)
    # imgPredict = np.array([0, 0, 1, 1, 2, 2])  # 可直接换成预测图片
    # imgLabel = np.array([0, 0, 1, 1, 2, 2])  # 可直接换成标注图片

    metric = SegmentationMetric(2)  # 2表示有2个分类,有几个分类就填几
    ConfusionMatrix = metric.addBatch(imgPredict, imgLabel)
    pa = metric.pixelAccuracy()
    cpa = metric.classPixelAccuracy()
    mpa = metric.meanPixelAccuracy()
    IoU = metric.IntersectionOverUnion()
    mIoU = metric.meanIntersectionOverUnion()
    print('ConfusionMatrix is :\n', ConfusionMatrix)
    print('PA is : %f' % pa)
    print('cPA is :', cpa)
    print('mPA is : %f' % mpa)
    print('IoU is : ', IoU)
    print('mIoU is : ', mIoU)
效果图如下:

![[carla] GNSS传感器与Carla坐标系 转换方法](https://img-blog.csdnimg.cn/a21b45652631446492992a23aa20880b.png)
