目录
| Bom概述
| window 、Bom、Dom 的关系
| window的load事件:把JS写进head里
如何把 JS 代码写到head里(页面加载事件 onload)
比onload更高效的加载事件 DOMContentLoaded
| window的resize事件(窗口大小改变的时候触发)
| 定时器
1-1 setTimeout() 定时器
1-2 回调函数的概念
1-3 清除setTimeOut定时器
2-1 setInterval() 定时器
2-2 清除setInterval定时器
2-2 案例:倒计时
2-4 案例:点击”发送“按钮后 60s不能再点击
| this
| JS 同步与异步
现在的 JS 支持异步执行了
JS 中的同步任务和异步任务
JS 同步任务、异步任务 的执行机制
JS 异步任务(回调函数)放入任务队列的顺序
| location 对象
1-1 概述
1-2 url 复习
2-1 location 对象的相关属性
2-2 location.href 获取或修改URL
2-3 location.search 获取参数
3-1 location 对象的相关方法
| history对象:在页面中实现前进页面、后退页面
| Bom概述
-
Bom比Dom的范围更大。Bom包含Dom
-
Bom的标准由不同浏览器厂商自己制定,没有统一标准,因此兼容性有些不确定性

| window 、Bom、Dom 的关系
-
Bom是浏览器对象模型
-
Bom的最高级对象是window
-
Bom的其它对象还有 location navigation history
-
实际上,document也是一个 window的对象,即它也是Bom(浏览器对象模型)的一部分。但是在Dom(文档对象模型)中,它是最高级别的对象
即:Bom包含Dom
-
一切window的对象都可以通过【window.对象】调用 如window.document ,但是也可以省略

-
window是浏览器的顶级祖先对象。相当于Java万物源于Object
-
window下有一个特殊属性name,默认打印出来是空的。建议命名的时候不要用name

alert() 等价于 window.alert()| window的load事件:把JS写进head里
如何把 JS 代码写到head里(页面加载事件 onload)
window.onload = function(){}
或者监听事件:
window.addEventListener("load",function(){});-
window.onload 是窗口 (页面)加载事件,当文档内容完全加载完成会触发该事件(包括图像、脚本文件、CSS 文件等), 就调用的处理函数。 -
有了 window.onload 就可以把 JS 代码写到页面元素的上方,因为 onload 是等页面内容全部加载完毕, 再去执行处理函数
-
window.onload 传统注册事件方式 只能写一次,如果有多个,会以最后一个 window.onload 为准。 如果使用 addEventListener 则没有限制
代码示例
<!DOCTYPE html>
<html lang="en">
<head>
    <meta charset="UTF-8">
    <meta http-equiv="X-UA-Compatible" content="IE=edge">
    <meta name="viewport" content="width=device-width, initial-scale=1.0">
    <title>Document</title>
    <script>
        window.addEventListener('load',function(){
            // 在这里面写上所有的JS代码
            // onload会在所有的dom对象加载完毕,才会执行。因此可以把JS写在最上面
            var btn = document.querySelector('button');
            btn.addEventListener('click',f);
            function f(){
                alert('Click')
            }
        })
    </script>
</head>
<body>
    <button>点我</button>
</body>
</html>
比onload更高效的加载事件 DOMContentLoaded
-
onload会等页面所有的元素加载完,才会执行onload内的JS函数
-
DOMContentLoaded 事件触发时,仅当DOM加载完成,不包括样式表,图片,flash等等(IE9+才支持)
-
如果页面的图片很多的话, 从用户访问到onload触发需要较长的时间, 交互效果就不能实现,必然影响用 户的体验,此时用 DOMContentLoaded 事件比较合
document.addEventListener('DOMContentLoaded',function(){})| window的resize事件(窗口大小改变的时候触发)
-
window.onresize 是调整窗口大小加载事件, 当触发时就调用的处理函数
-
只要窗口大小发生像素变化,就会触发这个事件。
-
在没有CSS3之前,我们经常利用这个事件完成响应式布局。搭配 window.innerWidth 获取当前屏幕尺寸
window.onresize = function(){}
或者监听事件:
window.addEventListener("resize",function(){});
| 定时器
1-1 setTimeout() 定时器
window.setTimeout(调用函数, [延迟的毫秒数]);-
setTimeout() 方法用于设置一个定时器,该定时器在定时器到期后执行调用函数 -
window 可以省略
-

-
延迟的毫秒数省略默认是 0,如果写,必须是毫秒
-
因为定时器可能有很多,所以我们经常给定时器赋值一个标识符。
代码示例
<!DOCTYPE html>
<html lang="en">
<head>
    <meta charset="UTF-8">
    <meta http-equiv="X-UA-Compatible" content="IE=edge">
    <meta name="viewport" content="width=device-width, initial-scale=1.0">
    <title>Document</title>
    <script>
        //以后都把JS写在预加载监听事件里
        window.addEventListener('load',function(){

            //写法一:window.定时器。 在里面写上函数体,定义1000ms延迟触发
            window.setTimeout(function(){
                alert(1);
            },1000);

            //写法二:window.定时器。 直接写函数名
            window.setTimeout(f,2000);

            //写法三:直接写定时器,调用
            setTimeout(f,3000);

            //为了区别不同的定时器,我们给不同的定时器起一个标识符(名字)
            var timeCommand = setTimeout(f,5000);


            function f(){
                alert('2');
            }


        })
    </script>
</head>
<body>

</body>
</html>
1-2 回调函数的概念

1-3 清除setTimeOut定时器
-
应用场景:肥皂剧中,女主被捆绑了炸弹,然后男主奋不顾身让炸弹停止。
-
语法
window.clearTimeout(定时器的名字变量)2-1 setInterval() 定时器
-
setTimeout( ) 至始至终只会执行一次!(亲测,即使放进while循环也不会在每次循环的时候重新执行)
-
setInterval 和 setInterval 的使用方法完全相同,不同之处在于 setInterval( ) 定时器会间隔某个时间段一直反复执行

2-2 清除setInterval定时器
window.clearInterval(interval定时器的变量名);2-2 案例:倒计时
<!DOCTYPE html>
<html lang="en">

<head>
    <meta charset="UTF-8">
    <meta name="viewport" content="width=device-width, initial-scale=1.0">
    <meta http-equiv="X-UA-Compatible" content="ie=edge">
    <title>Document</title>
    <style>
        div {
            margin: 200px;
        }

        span {
            display: inline-block;
            width: 40px;
            height: 40px;
            background-color: #333;
            font-size: 20px;
            color: #fff;
            text-align: center;
            line-height: 40px;
        }
    </style>
</head>

<body>
    <div>
        <span class="hour">1</span>
        <span class="minute">2</span>
        <span class="second">3</span>
    </div>
    <script>
        // 1. 获取元素
        var hour = document.querySelector('.hour'); // 小时的黑色盒子
        var minute = document.querySelector('.minute'); // 分钟的黑色盒子
        var second = document.querySelector('.second'); // 秒数的黑色盒子
        var inputTime = +new Date('2019-5-1 18:00:00'); // 返回的是用户输入时间总的毫秒数
        countDown(); // 我们先调用一次这个函数,防止第一次刷新页面有空白
        // 2. 开启定时器
        setInterval(countDown, 1000);

        function countDown() {
            var nowTime = +new Date(); // 返回的是当前时间总的毫秒数
            var times = (inputTime - nowTime) / 1000; // times是剩余时间总的秒数
            var h = parseInt(times / 60 / 60 % 24); //时
            h = h < 10 ? '0' + h : h;
            hour.innerHTML = h; // 把剩余的小时给 小时黑色盒子
            var m = parseInt(times / 60 % 60); // 分
            m = m < 10 ? '0' + m : m;
            minute.innerHTML = m;
            var s = parseInt(times % 60); // 当前的秒
            s = s < 10 ? '0' + s : s;
            second.innerHTML = s;
        }
    </script>
</body>

</html
2-4 案例:点击”发送“按钮后 60s不能再点击
<!DOCTYPE html>
<html lang="en">

<head>
    <meta charset="UTF-8">
    <meta name="viewport" content="width=device-width, initial-scale=1.0">
    <meta http-equiv="X-UA-Compatible" content="ie=edge">
    <title>Document</title>
</head>

<body>
    手机号码: <input type="number"> <button>发送</button>
    <script>
        // 按钮点击之后,会禁用 disabled 为true
        // 同时按钮里面的内容会变化, 注意 button 里面的内容通过 innerHTML修改
        // 里面秒数是有变化的,因此需要用到定时器
        // 定义一个变量,在定时器里面,不断递减
        // 如果变量为0 说明到了时间,我们需要停止定时器,并且复原按钮初始状态
        var btn = document.querySelector('button');
        var time = 3; // 定义剩下的秒数
        btn.addEventListener('click', function() {
            btn.disabled = true;
            var timer = setInterval(function() {
                if (time == 0) {
                    // 清除定时器和复原按钮
                    clearInterval(timer);
                    btn.disabled = false;
                    btn.innerHTML = '发送';
                } else {
                    btn.innerHTML = '还剩下' + time + '秒';
                    time--;
                }
            }, 1000);

        })
    </script>
</body>

</html>
| this
-
全局作用域或者普通函数中this指向全局对象window(注意定时器里面的this指向window)
-
方法调用中谁调用this指向谁
-
构造函数中this指向构造函数的实例
易错示例:

代码示例:
<!DOCTYPE html>
<html lang="en">
<head>
    <meta charset="UTF-8">
    <meta http-equiv="X-UA-Compatible" content="IE=edge">
    <meta name="viewport" content="width=device-width, initial-scale=1.0">
    <title>Document</title>
    <script>
        window.addEventListener('load',function(){

            // 1.全局作用域或者普通函数中this指向全局对象window(注意定时器里面的this指向window)
            console.log(this); //window

            function f(){
                console.log(this);
            }
            f();//window


            // 2.方法调用中谁调用this指向谁
            var obj = {
                objf : function(){
                    console.log(this);
                }
            }
            obj.objf();//Object { objf: objf() }


            //  3.构造函数中this指向构造函数的实例
            function Person(name , age){
                this.name = name;
                this.age = age;
                console.log(this);
            }
            var person = new Person('Klee');//Object { name: "Klee", age: undefined }


        })
    </script>
</head>
<body>

</body>
</html>
| JS 同步与异步
现在的 JS 支持异步执行了

现在的 JS引入了”执行栈、回调函数“ 相关标准和技术,使得可以把需要等待执行的代码(回调函数)添加到任务队列中,把事件给那些不需要等待的代码。从而实现异步
包括今后的Ajax,就是一个异步回调函数!
代码示例
<!DOCTYPE html>
<html lang="en">
<head>
    <meta charset="UTF-8">
    <meta http-equiv="X-UA-Compatible" content="IE=edge">
    <meta name="viewport" content="width=device-width, initial-scale=1.0">
    <title>Document</title>
    <script>
        window.addEventListener('load',function(){
            console.log(1);
            window.setTimeout(function(){
                console.log(2);
            },2000);
            console.log(3);

            //按照以前的JS,输出结果是 1 2 3
            //但是现在的JS支持异步,所以输出结果是 1 3 2
        })
    </script>
</head>
<body>

</body>
</html>
JS 中的同步任务和异步任务
-
JS 为了实现异步,添加了”执行栈、回调函数“等概念,从而帮助我们把那些需要等待的任务放到栈中,稍后再执行。
-
我们需要弄懂,哪些是同步任务(按照顺序依次执行)、哪些是异步任务(放入执行栈中,等待回调的代码)
常见的异步任务
普通事件 click resize
资源加载 load error
定时器 setInterval setTimeOut
JS 同步任务、异步任务 的执行机制
-
先区分同步任务和异步任务。
-
同步任务先放到执行栈中,先执行完所有同步任务
-
一旦所有同步任务执行完毕,则系统依次读取任务队列的异步任务,把异步任务进入执行栈,开始执行

JS 异步任务(回调函数)放入任务队列的顺序
-
有时候,代码中可能有许多异步任务,比如【延时2s执行】的任务可能定义在【延时3s执行】的任务前面,如果我们只按照【异步函数定义的顺序 + 按照顺序将其丢入任务队列】的做法,则会导致任务队列中【延时2s】的任务被【延时3s】的任务所耽误了一秒(因为是【延时3s】的任务先进去的,根据栈的后进先出,则【延时3s】的任务出栈后才轮到【延时2s】的任务出栈)
-
观察下列代码 输出的结果是【1 4 休眠2s 休眠3s】 这说明,异步任务的任务队列入栈顺序并不是简单的顺序关系
            console.log(1);
            window.setTimeout(function(){
                console.log('休眠2s');
            },2000);
            window.setTimeout(function(){
                console.log('休眠3s');
            },3000);
console.log(4);-
实际上,异步任务的任务队列入栈顺序,是由异步任务处理来管理的
对于定时器:只有计时结束了,异步任务处理 才会把该任务 放入任务队列!然后等同步任务全部执行完成后,再从任务队列调用该函数(这也就解释了上述的现象)
对于点击:只有点击了,异步任务处理 才会把该任务 放入任务队列!
-
实际上,系统会在【同步任务执行 → 查看任务队列是否有任务 → 从任务队列获得任务并执行】 【异步任务处理 → 添加异步任务到任务队列】两条任务线上不断循环,这种机制被称为事件循环(event loop)

| location 对象
1-1 概述
-
location是隶属于window下的一个对象,其地位和document相当
-
区别在于:document 是 Dom(文档对象模型)的 ; location 是 Bom(浏览器对象模型)的。
-
location 与 url 有关,location这个Bom对象,是用来对url的相关属性进行操作的

1-2 url 复习

2-1 location 对象的相关属性
注意这是属性!不是函数!不需要括号

location属性的获取方式
window.location.属性名当然,也可以省略window
location.属性名2-2 location.href 获取或修改URL
var url = location.href;  //获取url
location.href = 'url';  //修改当前页面url
2-3 location.search 获取参数
location.search; //获取的是一个从 ? 开头的字符串若有中文,则需要进行转码,使用下面这个代码
var parameter = decodeURIComponent(window.location.search);代码示例:

//登录页代码
<!DOCTYPE html>
<html lang="en">
<head>
    <meta charset="UTF-8">
    <meta http-equiv="X-UA-Compatible" content="IE=edge">
    <meta name="viewport" content="width=device-width, initial-scale=1.0">
    <title>Document</title>
    <style>
        form {
            width: 300px;
            height: 200px;
            border: 1px transparent;
            margin: 200px auto;
        }

        form .name {
            width: 200px;
            height: 20px;
            margin: 5px calc(50% - 100px);
        }

        form .sex {
            display: block;
            width: 200px;
            height: 20px;
            margin: 5px calc(50% - 70px);
        }

        form .submit {
            display: block;
            width: 100px;
            height: 40px;
            background-color: lightcyan;
            margin: 20px calc(50% - 50px);

        }

    </style>
</head>
<body>
    <form action="13-2 跳转页面.html">
        <input type="text" name="name" placeholder="输入" value="" class="name">
        <div class="sex">
            <input type="radio" name="sex" value="man">man
            <input type="radio" name="sex" value="woman">women
        </div>
        <input type="submit" value="登录" class="submit">
    </form>
</body>
</html>
//跳转页代码
<!DOCTYPE html>
<html lang="en">
<head>
<meta charset="UTF-8">
<meta http-equiv="X-UA-Compatible" content="IE=edge">
<meta name="viewport" content="width=device-width, initial-scale=1.0">
<title>Document</title>
<script>
window.addEventListener('load',function(){
//获取参数字符串
var parameter = decodeURIComponent(window.location.search);//?name=SSS&sex=woman
//去掉开头的?
var parameter2 = parameter.substring(1,parameter.length);//name=SSS&sex=woman
//根据 & 符号分割字符串
var parameterArray = parameter2.split('&');//Array [ "name=SSS", "sex=woman" ]
//遍历字符串,依次获取
for(var i=0 ; i<parameterArray.length ; i++){
var para = parameterArray[i];
var name = para.split('=')[0];
var value = para.split('=')[1];
//展示参数值
var newDiv = document.createElement('div');
var box = document.querySelector('.box');
box.appendChild(newDiv);
newDiv.innerText = '参数名:' + name + ',参数值:' + value;
}
})
</script>
</head>
<body>
<div class="box">
</div>
</body>
</html>3-1 location 对象的相关方法
方法是要加括号的哦,注意和属性区别开

| navigater对象:根据设备不同跳转页面
navigator 对象包含有关浏览器的信息,它有很多属性,我们最常用的是 userAgent,该属性可以返回由客 户机发送服务器的 user-agent 头部的值。
下面前端代码可以判断用户那个终端打开页面,实现跳转
if((navigator.userAgent.match(/(phone|pad|pod|iPhone|iPod|ios|iPad|Android|
Mobile|BlackBerry|IEMobile|MQQBrowser|JUC|Fennec|wOSBrowser|BrowserNG|WebOS
|Symbian|Windows Phone)/i))) {
 window.location.href = ""; //手机
} else {
 window.location.href = ""; //电脑
}
| history对象:在页面中实现前进页面、后退页面
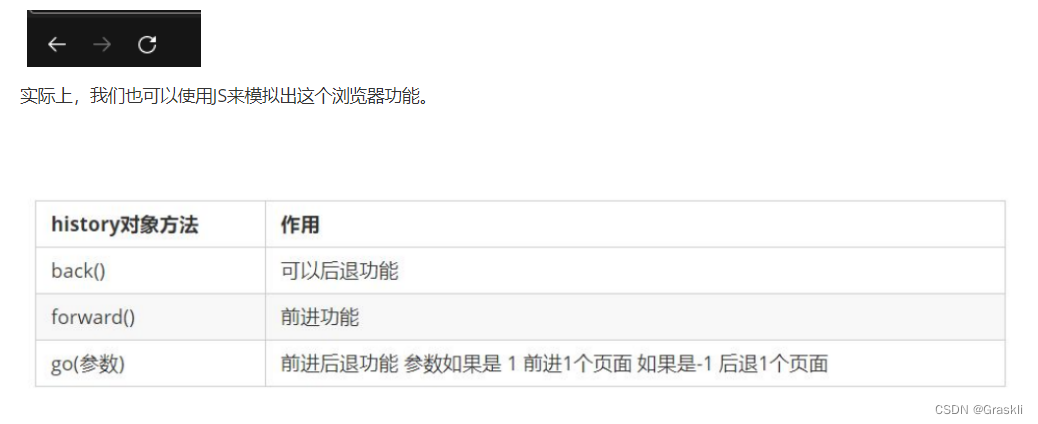
代码示例:
<!DOCTYPE html>
<html lang="en">
<head>
    <meta charset="UTF-8">
    <meta http-equiv="X-UA-Compatible" content="IE=edge">
    <meta name="viewport" content="width=device-width, initial-scale=1.0">
    <title>Document</title>
    <script>
        window.addEventListener('load',function(){
            var button1 = document.querySelector('body button:nth-of-type(1)');
            button1.addEventListener('click',function(){
                //通过back返回上级页面
                history.back();
            })

            var button2 = document.querySelector('body button:nth-of-type(2)');
            button2.addEventListener('click',function(){
                window.location.href = '14-3 跳转页面2.html';
            })
        })
    </script>
</head>
<body>
    <span>当前页面:2</span>
    <button>上一级</button>
    <button>下一级</button>
</body>
</html>
