unity3d入门教程八-飞机大战
- 19.2竖屏设置
- 19.3主控脚本
- 19.4制作子弹
- 19.5制作飞机
- 19.6制作怪物
- 19.7击中目标
- 19.8随机生成怪物
- 19.9预制体怪物随机更换头像
- 19.10怪物相关优化
- 19.11游戏背景
- 19.12游戏最终优化
- 一、 HP显示
- 二、怪物预制体
- 三、分值显示
- 四、背景音乐
19.2竖屏设置


切换到 Game 窗口,修改分辨率

点加号,

Type : 选择 Aspect Ration ( 长宽比 )
Width & Height : 设为 9 : 16
点 OK 即可

19.3主控脚本


主控脚本优先级暂时不设置了
设置帧率等,全局性,运行一次即可的放在主控脚本中即可

using System.Collections;
using System.Collections.Generic;
using UnityEngine;

public class MyGame : MonoBehaviour
{
    // Start is called before the first frame update
    void Start()
    {
        Application.targetFrameRate = 60;
    }

    // Update is called once per frame
    void Update()
    {

    }
}
19.4制作子弹
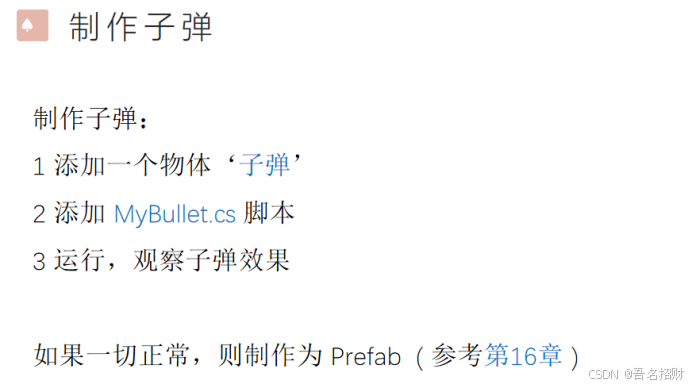
子弹制作过程和16章是相同的制作成预制体,让其不断的发射子弹
可以详细看到第16章

using System.Collections;
using System.Collections.Generic;
using UnityEngine;

public class MyBullet : MonoBehaviour
{
    // Start is called before the first frame update
    void Start()
    {
        //transform.localPosition = new Vector3(0, 1.0f, 0);
    }

    // Update is called once per frame
    void Update()
    {
        //另其向上移动
        float step = 1.8f * Time.deltaTime;
        transform.Translate(0, step, 0, Space.Self);

        //判断子弹的对象是否超出视野,若超出,则销毁
        Vector3 sp = Camera.main.WorldToScreenPoint(transform.position);
        if (sp.y > Screen.height)
        {
            GameObject.Destroy(this.gameObject);
        }

    }
}
19.5制作飞机
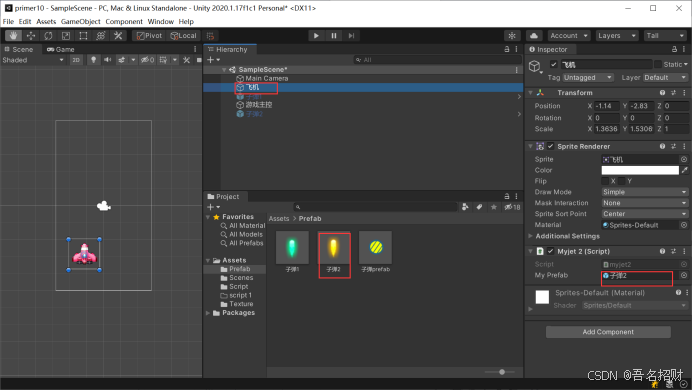
和16张相同,可以参照16章


using System.Collections;
using System.Collections.Generic;
using UnityEngine;

public class myjet2 : MonoBehaviour
{
    //预制体资源 ‘子弹’
    public GameObject myPrefab;

    //定时
    private float interval = 0.4f;//计时,每个0.4秒发射一颗子弹
    private float count = 0;

    // Start is called before the first frame update
    void Start()
    {
        Application.targetFrameRate = 60;
    }

    // Update is called once per frame
    void Update()
    {
        如果鼠标按下就发射
        //if (Input.GetMouseButtonDown(0))
        //{
        //    Fire();
        //}

        //计时,每个0.4秒发射一颗子弹
        count += Time.deltaTime;
        if (count >= interval)
        {
            count = 0;
            Fire();
        }

        //按键响应
        float step = 2.5f * Time.deltaTime;

        //若左键被按下(按下的状态是一直按着的,不是按下一次)
        if (Input.GetKey(KeyCode.LeftArrow))
        {
            transform.Translate(-step, 0, 0);
        }
        if (Input.GetKey(KeyCode.RightArrow))
        {
            transform.Translate(step, 0, 0);
        }

    }

    //发射开火子弹
    private void Fire()
    {
        //Instantiate方法可以将预制体资源创建为一个object
        GameObject bullet = Instantiate(myPrefab);
        bullet.transform.position = transform.position + new Vector3(0, 1f, 0);//创建位置放在飞机的上方
        bullet.name = "bullet";//更改创建的实例的名称
    }
}
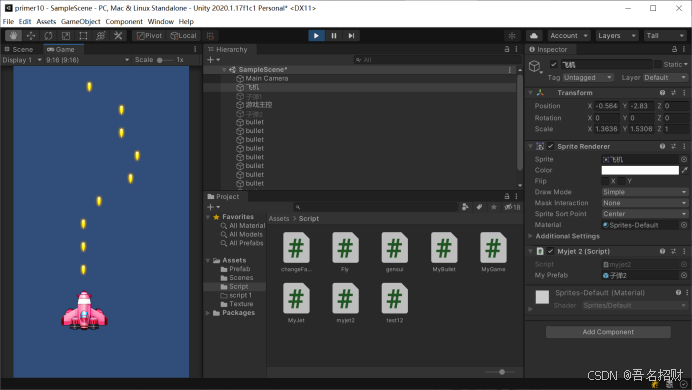
19.6制作怪物
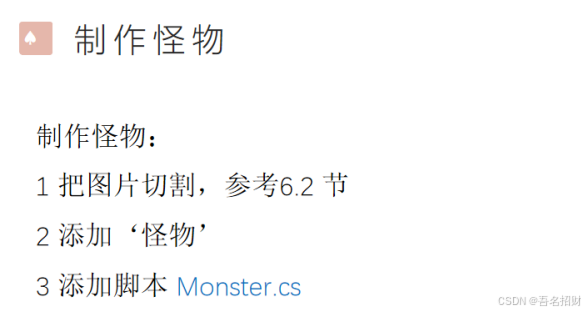
怪物图片是一张大图,需要切割获得,具体可参考6.2节


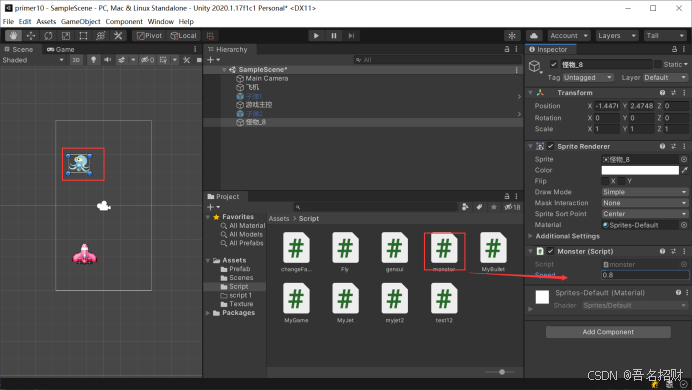
Monster脚本如下,怪物只进行向下移动
using System.Collections;
using System.Collections.Generic;
using UnityEngine;

public class monster : MonoBehaviour
{
    public float speed = 1.0f;      //定义移动速度

    // Start is called before the first frame update
    void Start()
    {

    }

    // Update is called once per frame
    void Update()
    {
        float dy = speed * Time.deltaTime;
        transform.Translate(0, -dy, 0);     //向下移动
    }
}
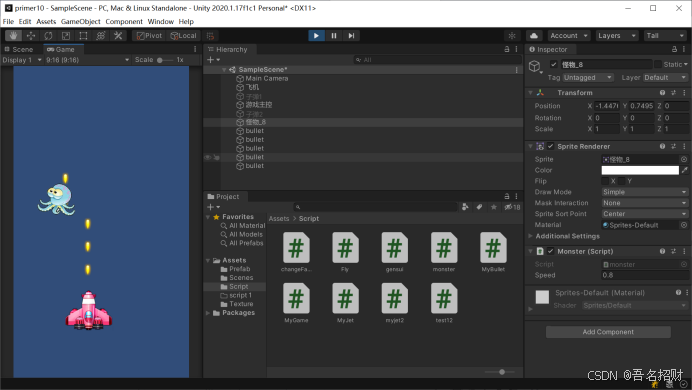
其实怪物也是一个模板,一个预制体了,后面要将其转换成预制体
19.7击中目标
击中目标时的处理
飞机发射子弹,怪物子弹下降
子弹击中怪物的时候应该将其怪物消灭
需要给子弹加入刚体组件和碰撞组件


给怪物添加刚体组件和碰撞组件
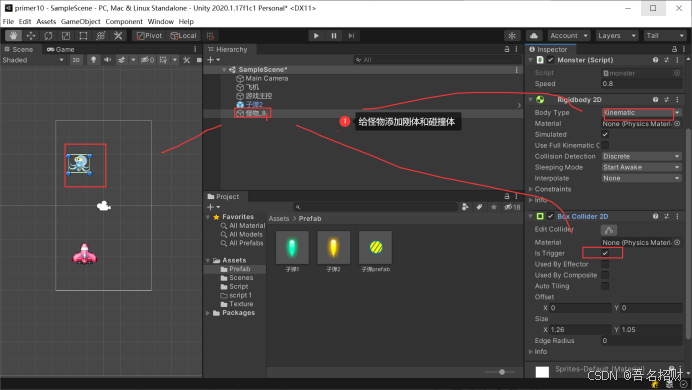
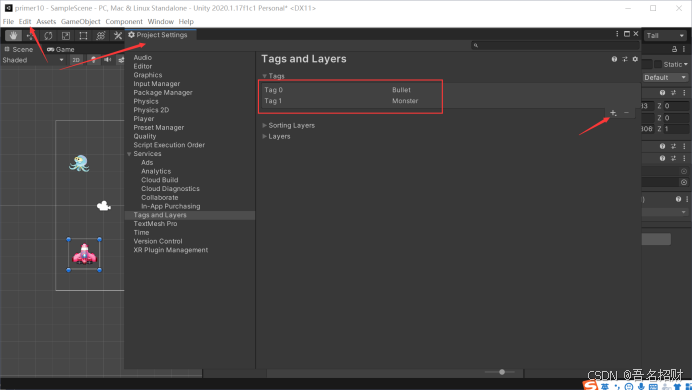

Player是默认存在的,不要额外添加标签


此时游戏中的tag都设置好了,这样就可以通过标签来判断对方身份,接着进行碰撞检测函数了
在子弹的对象脚本组件中加入碰撞检测函数进行碰撞的判断,实现与怪物的销毁和子弹的销毁

using System.Collections;
using System.Collections.Generic;
using UnityEngine;

public class MyBullet : MonoBehaviour
{
    // Start is called before the first frame update
    void Start()
    {
        //transform.localPosition = new Vector3(0, 1.0f, 0);
    }

    // Update is called once per frame
    void Update()
    {
        //另其向上移动
        float step = 1.8f * Time.deltaTime;
        transform.Translate(0, step, 0, Space.Self);

        //判断子弹的对象是否超出视野,若超出,则销毁
        Vector3 sp = Camera.main.WorldToScreenPoint(transform.position);
        if (sp.y > Screen.height)
        {
            GameObject.Destroy(this.gameObject);
        }

    }

    //设置碰撞事件,发生碰撞时会调用此函数(此为子弹与怪物碰撞时,销毁怪物)
    private void OnTriggerEnter2D(Collider2D collision)
    {
        //如果碰撞的物体标签时MOnster
        if (collision.tag.Equals("Monster"))
        {
            Destroy(collision.gameObject);  //销毁子弹碰到的对象即怪物

            Destroy(this.gameObject);   //销毁子弹本身的对象
        }
    }

}

怪物与飞机相撞游戏结束
19.8随机生成怪物


随机数 API
value = Random.Range( min, max )
定时器 API
InvokeRepeating ( method, delay, interval )
将怪物作成预制体,且其出现位置是随机的
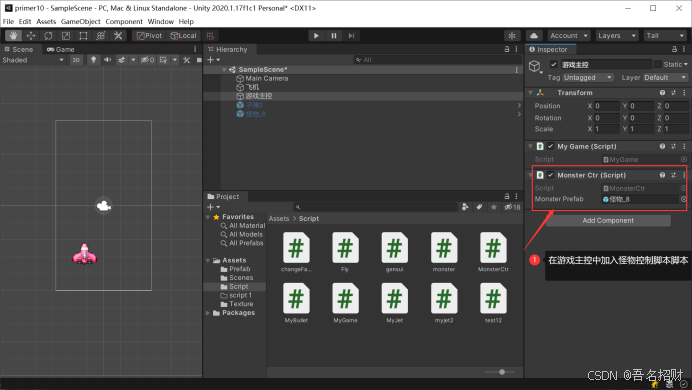
要将预制体拖到右侧的怪物控制脚本中
所有怪物控制代码如下
using System.Collections;
using System.Collections.Generic;
using UnityEngine;

public class MonsterCtr : MonoBehaviour
{

    public GameObject monsterPrefab;
    // Start is called before the first frame update
    void Start()
    {
        InvokeRepeating("CreateMonster", 0.1f, 2f);    //定时调用CreateMonster函数,第一次在0.1秒后,每个2秒出现一次
    }

    // Update is called once per frame
    void Update()
    {

    }

    void CreateMonster()
    {
        float x = Random.Range(-2, 2);  //根据屏幕实际宽度
        float y = 5;                    //
        GameObject monster = Instantiate(monsterPrefab);    //通过预制体创建怪物对象
        monster.transform.position = new Vector3(x, y, 0);  //设置出现的位置

    }
}
19.9预制体怪物随机更换头像
之前随机生成预制体怪物可以了,此时需要更改一下怪物控制脚本进行

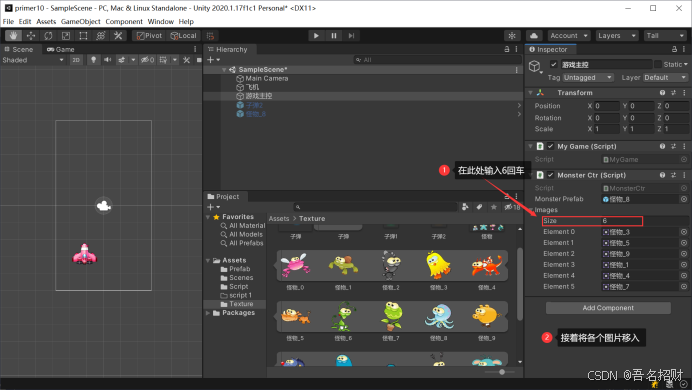
上方图片数组为6个

所有代码如下:
using System.Collections;
using System.Collections.Generic;
using UnityEngine;

public class MonsterCtr : MonoBehaviour
{

    public GameObject monsterPrefab;

    public Sprite[] images;     //用于接收各个怪物图片

    // Start is called before the first frame update
    void Start()
    {
        InvokeRepeating("CreateMonster", 0.1f, 2f);    //定时调用CreateMonster函数,第一次在0.1秒后,每个2秒出现一次
    }

    // Update is called once per frame
    void Update()
    {

    }

    void CreateMonster()
    {
        float x = Random.Range(-2, 2);  //根据屏幕实际宽度
        float y = 5;                    //
        GameObject monster = Instantiate(monsterPrefab);    //通过预制体创建怪物对象
        monster.transform.position = new Vector3(x, y, 0);  //设置出现的位置


        int index = Random.Range(0, images.Length); //范围在int类型,不包含最后数
        SpriteRenderer renderer = monster.GetComponent<SpriteRenderer>();
        renderer.sprite = this.images[index];       //渲染预制体的图像
    }
}

19.10怪物相关优化
自动分割的怪物大小不一致,需要将其宽度变为一致,高度角不管了

修改monsterctr

using System.Collections;
using System.Collections.Generic;
using UnityEngine;

public class MonsterCtr : MonoBehaviour
{

    public GameObject monsterPrefab;

    public Sprite[] images;     //用于接收各个怪物图片

    // Start is called before the first frame update
    void Start()
    {
        InvokeRepeating("CreateMonster", 0.1f, 2f);    //定时调用CreateMonster函数,第一次在0.1秒后,每个2秒出现一次
    }

    // Update is called once per frame
    void Update()
    {

    }

    void CreateMonster()
    {
        float x = Random.Range(-2, 2);  //根据屏幕实际宽度
        float y = 5;                    //
        GameObject monster = Instantiate(monsterPrefab);    //通过预制体创建怪物对象
        monster.transform.position = new Vector3(x, y, 0);  //设置出现的位置

        //随机选择一个头像
        int index = Random.Range(0, images.Length); //范围在int类型,不包含最后数
        SpriteRenderer renderer = monster.GetComponent<SpriteRenderer>();
        renderer.sprite = this.images[index];       //渲染预制体的图像

        //头像的大小设置为100PX(宽度)
        Sprite sprite = this.images[index]; //图像的实际宽度获取
        float imgWidth = sprite.rect.width; //缩放比列(宽度总是设置为100个像素即一个单位)
        float scale = 100 / imgWidth;       //(宽度总是设置为100个像素即一个单位)
        monster.transform.localScale = new Vector3(scale, scale, scale);    //设置实际怪物物体宽度等比例缩放

    }
}

此时怪物自动被销毁,就不会额外消耗资源了
要将飞出边界的怪物对象进行销毁,修改monster
using System.Collections;
using System.Collections.Generic;
using UnityEngine;

public class monster : MonoBehaviour
{
    public float speed = 1.0f;      //定义移动速度

    // Start is called before the first frame update
    void Start()
    {

    }

    // Update is called once per frame
    void Update()
    {
        float dy = speed * Time.deltaTime;
        transform.Translate(0, -dy, 0);     //向下移动

        //怪物飞离开屏幕下边界,则销毁该怪物
        Vector3 sp = Camera.main.WorldToScreenPoint(transform.position);    //获取世界坐标系转换为屏幕坐标,左下角坐标0
        if (sp.y < 0)
        {
            Destroy(this.gameObject);   //销毁此怪物对象
        }
    }
}
19.11游戏背景
使用一张图像作为游戏背景
注意图片的高度,最好和相机匹配
高度10个格,图片应为1000像素,而宽度不固定是需要和宽高比的,要多宽一些


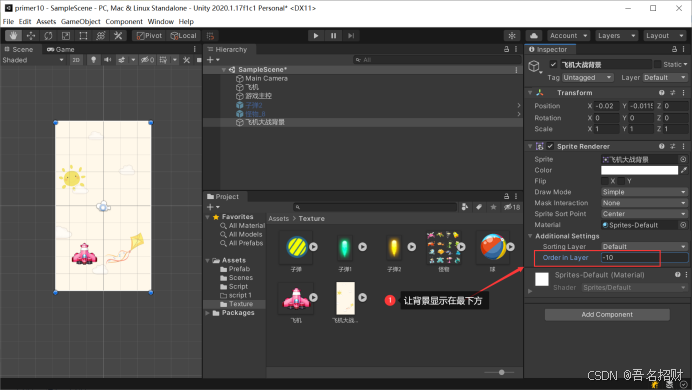
还需要让背景图片进行滚动
即需要两张背景图
复制


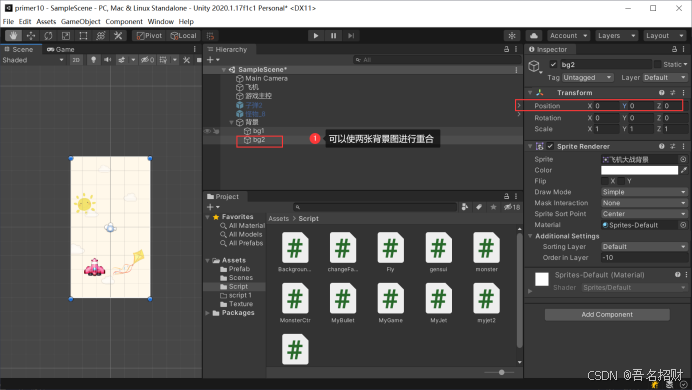
在脚本中设置背景图初始位置
using System.Collections;
using System.Collections.Generic;
using UnityEngine;

public class BackgroundCtr : MonoBehaviour
{
    Transform bg1;
    Transform bg2;

    public float speed = 1.0f;

    // Start is called before the first frame update
    void Start()
    {
        bg1 = GameObject.Find("/背景/bg1").transform;     //获取
        bg2 = GameObject.Find("/背景/bg2").transform;

        //设置bg12的初始位置
        bg1.position = new Vector3(0, 0, 0);
        bg2.position = new Vector3(0, 10, 0);
    }

    // Update is called once per frame
    void Update()
    {
        float dy = speed * Time.deltaTime;
        bg1.Translate(0, -dy, 0);               //向下移动背景
        bg2.Translate(0, -dy, 0);

        //当第一个背景移出主摄像机的范围时,将其移动到第二个背景上方,依次循环
        // 交替时,显式的设置位置,以清除float累计误差
        if (bg1.position.y <= -10)
        {
            //bg1.Translate(0, 20, 0);
            bg1.position = new Vector3(0, 10, 0); // 交替时,显式的设置位置,以清除float累计误差
            bg2.position = new Vector3(0, 0, 0);
        }
        if (bg2.position.y <= -10)
        {
            //bg2.Translate(0, 20, 0);
            bg1.position = new Vector3(0, 0, 0); // 交替时,显式的设置位置,以清除float累计误差
            bg2.position = new Vector3(0, 10, 0);
        }
    }
}
19.12游戏最终优化
怪物有分值,不同次数才能急啥一个怪物,还有得分显示

一、 HP显示
在怪下的上方,添加HP显示。

(1) 准备素材

细节:把hpvalue的pivot修改为 Left Center ,即靠左。
(2) 套2个子节点,模拟一个百分比进度条的效果

hp节点:背景
value节点,红色的前景,用以表示百分比。
(3) 在Monster.cs中,添加 SetHealth()方法。通过修改子节点的scale,来实现百分比的效果。

二、怪物预制体
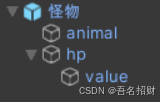
根节点 ‘怪物’ 是一个空物体。下挂 animal 为实物图片,hp为血条。
虽然 ‘怪物’ 是一空物体,但可以挂载 Monster.cs / Rigidbody 2D / Box Collider 2D 。
注意,也要给 Box Collider 2D 指定碰撞范围


三、分值显示

这个是UI 技术,参考 22、23、24章的技术。
(1) 添加UI

(2) 在 Canvas 上添加一个 GameUI.cs 脚本

在 GameUI.cs 里,添加一个更新分值 显示 的方法

四、背景音乐
背景音乐的使用,参考第20章。背景音乐放在 Audio目录下。
把MP3音乐挂载到 游戏主控 节点下。如图所示。

五、分值规则
每个怪物的价值不等,1-5之间。如果一个怪物价值为5,则击杀后,得5分。
怪物的价值 在 Monster.Start() 里随机指定。

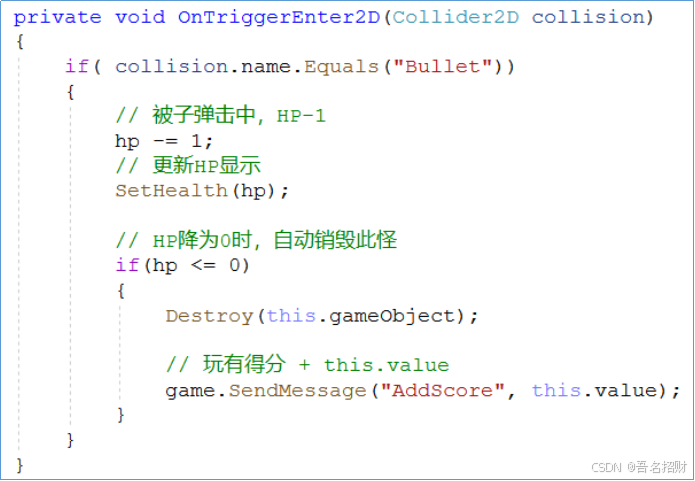
当怪被命中时,HP减1,如果HP降为0则标识该怪物被杀死。
