简介:
概念
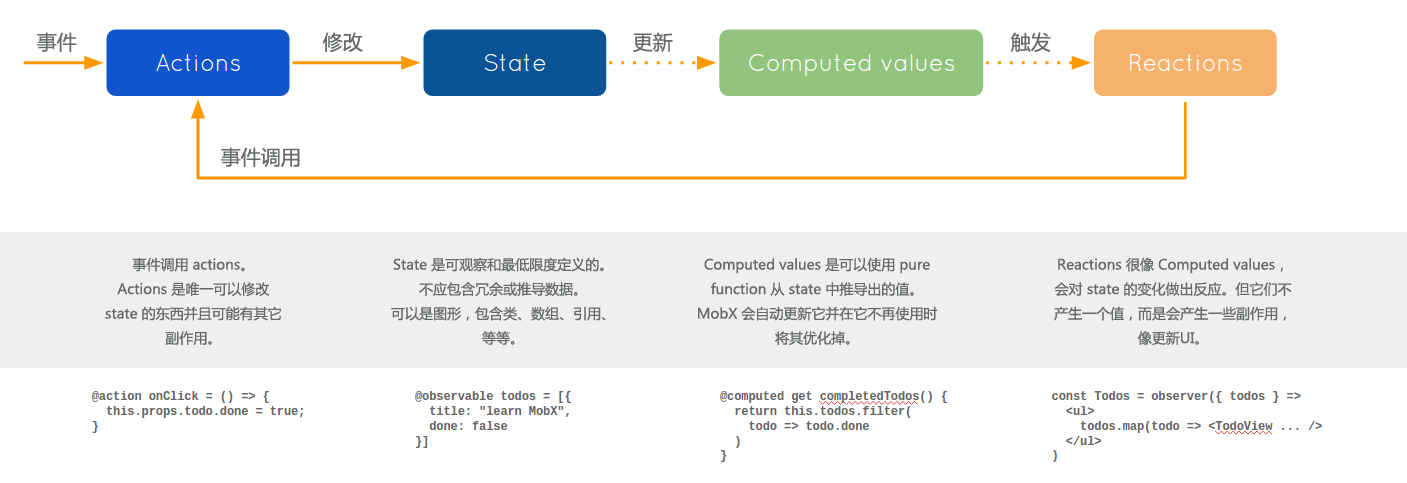
MobX 区分了以下几个应用中的概念:
State(状态)
状态 是驱动应用的数据。 通常有像待办事项列表这样的领域特定状态,还有像当前已选元素的视图状态。 记住,状态就像是有数据的excel表格。
Derivations(衍生)
任何 源自状态并且不会再有任何进一步的相互作用的东西就是衍生。 衍生以多种形式存在:
- 用户界面
- 衍生数据,比如剩下的待办事项的数量。
- 后端集成,比如把变化发送到服务器端。
MobX 区分了两种类型的衍生:
- Computed values(计算值) - 它们是永远可以使用纯函数(pure function)从当前可观察状态中衍生出的值。
- Reactions(反应) - Reactions 是当状态改变时需要自动发生的副作用。需要有一个桥梁来连接命令式编程(imperative programming)和响应式编程(reactive programming)。或者说得更明确一些,它们最终都需要实现I / O 操作。
刚开始使用 MobX 时,人们倾向于频繁的使用 reactions。 黄金法则: 如果你想创建一个基于当前状态的值时,请使用 computed。
回到excel表格这个比喻中来,公式是计算值的衍生。但对于用户来说,能看到屏幕给出的反应则需要部分重绘GUI。
Actions(动作)
动作 是任一一段可以改变状态的代码。用户事件、后端数据推送、预定事件、等等。 动作类似于用户在excel单元格中输入一个新的值。
在 MobX 中可以显式地定义动作,它可以帮你把代码组织的更清晰。 如果是在严格模式下使用 MobX的话,MobX 会强制只有在动作之中才可以修改状态。
原则
MobX 支持单向数据流,也就是动作改变状态,而状态的改变会更新所有受影响的视图。

当状态改变时,所有衍生都会进行原子级的自动更新。因此永远不可能观察到中间值。
所有衍生默认都是同步更新。这意味着例如动作可以在改变状态之后直接可以安全地检查计算值。
计算值 是延迟更新的。任何不在使用状态的计算值将不会更新,直到需要它进行副作用(I / O)操作时。 如果视图不再使用,那么它会自动被垃圾回收。
所有的计算值都应该是纯净的。它们不应该用来改变状态。
相关文章:
mobx官方文档:
https://cn.mobx.js org/refguide/action.html
https://mobx.netlify.app/api/reaction
原理:
https://takeroro.github.io/2020/06/30/mobX%20flutter%20%E6%95%B0%E6%8D%AE%E6%B5%81%E5%8A%A8/
https://juejin.cn/post/6844903860184563720
https://www.jianshu.com/p/a47d77f6371d
https://zhuanlan.zhihu.com/p/421675450
基本用法:
-
使用
Observer包裹需要刷新的UI组件。 -
创建可观察的
model -
使用命令自动生成.g文件
flutter pub run build_runner build
示例代码:
import 'package:flutter/material.dart';
import 'package:flutter_mobx/flutter_mobx.dart';
import 'counter.dart';
class CounterExample extends StatefulWidget {
const CounterExample({Key? key}) : super(key: key);
CounterExampleState createState() => CounterExampleState();
}
class CounterExampleState extends State<CounterExample> {
final Counter counter = Counter();
Widget build(BuildContext context) => Scaffold(
appBar: AppBar(
backgroundColor: Colors.blue,
title: const Text('MobX Counter'),
),
body: Center(
child: Column(
mainAxisAlignment: MainAxisAlignment.center,
children: <Widget>[
const Text(
'You have pushed the button this many times:',
),
Observer(
builder: (_) => Text(
'${counter.value}',
style: const TextStyle(fontSize: 40),
)),
],
),
),
floatingActionButton: FloatingActionButton(
onPressed: counter.increment,
tooltip: 'Increment',
child: const Icon(Icons.add),
),
);
}
// GENERATED CODE - DO NOT MODIFY BY HAND
part of 'counter.dart';
// **************************************************************************
// StoreGenerator
// **************************************************************************
// ignore_for_file: non_constant_identifier_names, unnecessary_brace_in_string_interps, unnecessary_lambdas, prefer_expression_function_bodies, lines_longer_than_80_chars, avoid_as, avoid_annotating_with_dynamic
mixin _$Counter on _Counter, Store {
final _$valueAtom = Atom(name: '_Counter.value');
int get value {
_$valueAtom.reportRead();
return super.value;
}
set value(int value) {
_$valueAtom.reportWrite(value, super.value, () {
super.value = value;
});
}
final _$_CounterActionController = ActionController(name: '_Counter');
void increment() {
final _$actionInfo =
_$_CounterActionController.startAction(name: '_Counter.increment');
try {
return super.increment();
} finally {
_$_CounterActionController.endAction(_$actionInfo);
}
}
String toString() {
return '''
value: ${value}
''';
}
}
import 'package:mobx/mobx.dart';
part 'counter.g.dart';
class Counter = _Counter with _$Counter;
abstract class _Counter with Store {
int value = 0;
void increment() {
value++;
}
}
依赖:
dependencies:
  flutter:
    sdk: flutter


  # The following adds the Cupertino Icons font to your application.
  # Use with the CupertinoIcons class for iOS style icons.
  cupertino_icons: ^1.0.2
  mobx: ^2.0.6+1
  flutter_mobx: ^2.0.4


dev_dependencies:
  flutter_test:
    sdk: flutter
  build_runner: ^2.1.0
  mobx_codegen: ^2.0.0
运行原理:
Observer组件初始化
首先父组件调用build,接着创建Observer组件,调用Observer组件的mount和build
Observer继承关系
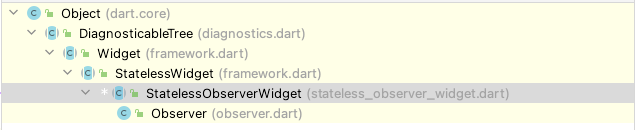
Observer组件继承自StatelessObservderWidget
class Observer extends StatelessObserverWidget
StatelessObserverWidget调用了createElement方法
abstract class StatelessObserverWidget extends StatelessWidget
with ObserverWidgetMixin {
...
StatelessObserverElement createElement() => StatelessObserverElement(this);
}
StatelessObserverElement混入了ObserverElementMixin类
class StatelessObserverElement extends StatelessElement
    with ObserverElementMixin {
ObserverElementMixin继承自ComponentElement,ComponentElement继承自Element
mount方法
ObserverElementMixin复写了Element类的mount方法
element的mount方法的作用:将该元素添加到指定父节点的指定槽位的树中。当一个新创建的元素被添加到框架中时,框架调用这个函数
mount方法,在初始化的时候被调用。
mixin ObserverElementMixin on ComponentElement {
...
late ReactionImpl _reaction;
...
void mount(Element? parent, dynamic newSlot) {
_reaction = _widget.createReaction(invalidate, onError: (e, _) {
···
}) as ReactionImpl;
super.mount(parent, newSlot);
}
void invalidate() => markNeedsBuild();
...
}
ObserverElementMixin调用了_widget.createReaction方法,用于_reaction初始化:
mixin ObserverWidgetMixin on Widget {
...
ReactiveContext getContext() => mainContext;
/// A convenience method used for testing.
Reaction createReaction(
Function() onInvalidate, {
Function(Object, Reaction)? onError,
}) =>
ReactionImpl(
getContext(),
onInvalidate,
name: getName(),
onError: onError,
);
...
}
_reaction初始化时传入的invalidate如下,该方法是状态变换时widget的行为,就是重新绘制
void invalidate() => markNeedsBuild();
ReactionImpl类
每个ObserverElementMixin都持有一个ReactionImpl 类型的_reaction,
可以这么理解,_reaction等同于一个Observer组件
ReactionImpl类的继承关系如下:

Derivation类的代码如下:
abstract class Derivation {
  String get name;
  late Set<Atom> _observables;
  Set<Atom>? _newObservables;

  MobXCaughtException? _errorValue;
  MobXCaughtException? get errorValue;

  late DerivationState _dependenciesState;

  void _onBecomeStale();

  // ignore: unused_element
  void _suspend();
}
每个derivation类都有自己的name,_observables监听者集合, _dependenciesState状态
我们来简单看下mobx里的几种状态(DerivationState)
enum DerivationState {
  // 在运行之前或(在批处理之外并且没有被观察到)此时派生没有保存任何关于依赖树的数据
  notTracking,

  // 自上次计算以来没有改变浅依赖不会重新计算推导这就是使 mobx 快速的原因
  upToDate,

  // 一些深度依赖改变了,但是不知道浅依赖改变是否需要先检查 UP_TO_DATE 或 POSSIBLY_STALE 目前只有 Computed 会传播 	      			POSSIBLY_STALE
  possiblyStaleß,

  // 自上次计算以来,浅层依赖关系发生了变化,并且在下次需要时需要重新计算推导。
  stale
}
ReactiveContext类
MobX 的主要Context。 所有反应性操作和观察都在发生在这个Context中。 单例。
主要的属性和方法如下:
class ReactiveContext {
  ReactiveContext({ReactiveConfig? config}) {
    this.config = config ?? ReactiveConfig.main;
  }

  late ReactiveConfig _config;

  _ReactiveState _state = _ReactiveState();

  void startBatch() {
    ···
  }

  void endBatch() {
    ···
  }

  Derivation? _startTracking(Derivation derivation) {
    ···
  }

  void _endTracking(Derivation currentDerivation, Derivation? prevDerivation) {
    ···
  }

  T? trackDerivation<T>(Derivation d, T Function() fn) {
    ···
  }

  void _reportObserved(Atom atom) {
    ···
  }

  void _bindDependencies(Derivation derivation) {
    ···
  }

  void runReactions() {
    ···
  }

  void _runReactionsInternal() {
    ···
  }

}
_ReactiveState类
简单介绍一下context类里的state
class _ReactiveState {
  /// 当前批次深度。 这用于跟踪 `transaction` / `action` 的深度。
  /// 当批处理结束时,我们执行所有的 [pendingReactions]
  int batch = 0;

  /// 跟踪当前执行的Derivation(reactions or computeds)。
  /// 这里使用的 Observables 链接到这个Derivation。
  Derivation? trackingDerivation;

  /// Are we in middle of executing the [pendingReactions].
  bool isRunningReactions = false;

	···
}
build方法:
初始化时build调用了两次,调用super.build调用一次,接着自身又调用一次
在mount方法执行完成之后,ObserverElementMixin重写的build方法被调用。
mixin ObserverElementMixin on ComponentElement {
···
Widget build() {
late final Widget built;
reaction.track(() {
built = super.build();
});
···
return built;
}
···
}
ObserverElementMixin的build方法,调用了ReactionImpl的track方法
ReactionImpl类里的track方法主要调用了ReactiveContext 里的三个方法
  void track(void Function() fn) {
    _context.startBatch();
		···
    _context.trackDerivation(this, fn);
    ···
    _context.endBatch();
  }
startBatch方法:
  void startBatch() {
    _state.batch++;
  }
trackDerivation方法:
trackDerivation方法有两个参数,一个是ReactionImpl对象的内存地址,一个是Widget的build函数。
T? trackDerivation<T>(Derivation d, T Function() fn) {
    final prevDerivation = _startTracking(d);
    T? result;
  	···
    result = fn();
  	···
    _endTracking(d, prevDerivation);
    return result;
  }
trackDerivation方法内部主要调用了两个方法_startTracking和 _endTracking
-
_startTracking方法:_startTracking将当前ReactiveContext持有的_ReactivState里的trackingDerivation设置为当前ReactionImplReactiveContext持有的_ReactivState里的trackingDerivation个人理解就是记录当前执行任务的ReactionImpl首先
_startTracking调用_resetDerivationStateDerivation? _startTracking(Derivation derivation) { final prevDerivation = _state.trackingDerivation; _state.trackingDerivation = derivation; _resetDerivationState(derivation); derivation._newObservables = {}; return prevDerivation; }在
_resetDerivationState方法里更改了状态,将当前ReactionImpl的_dependenciesState状态变为upToDate,将当前ReactionImpl的_observables里的``Atom的_lowestObserverState状态变为upToDate`void _resetDerivationState(Derivation d) { if (d._dependenciesState == DerivationState.upToDate) { return; } d._dependenciesState = DerivationState.upToDate; for (final obs in d._observables) { obs._lowestObserverState = DerivationState.upToDate; } } -
result = fn():result = fn()调用了fn()方法() { built = super.build(); }调用了父组件的
build,给Observer组件的built方法赋值父组件
build后就会调用CounterExampleState组件的build,而在CounterExampleState组件里使用了CounterBase的值,所以在这里就会走到CounterBase下的get value方法里int get value { _$valueAtom.reportRead(); return super.value; }他将
atom添加到ReactionImpl维护的_newObservables里
主要看一下第一个方法
_reportObserved。void _reportObserved(Atom atom) { final derivation = _state.trackingDerivation; if (derivation != null) { derivation._newObservables!.add(atom); } }可以这样理解,当前的
element一旦使用了atom维护的value(会调用_$Counter.getValue),这一步就会把对应的atom加入到element下的ReactionImpl维护的_newObservables里接着回到
_context.trackDerivation方法里,fn执行完成之后,执行_endTracking -
_endTracking方法:_endTracking将当前ReactiveContext持有的_ReactivState里的trackingDerivation设置为prevDerivationvoid _endTracking(Derivation currentDerivation, Derivation? prevDerivation) { _state.trackingDerivation = prevDerivation; _bindDependencies(currentDerivation); }_bindDependencies代码如下,ReactionImpl类维护了两个_observables集合将当前
ReactionImpl加入到Atom类型的observable集合的每一个子元素Atom中,只保留活跃的Atom,删除旧的Atomvoid _bindDependencies(Derivation derivation) { final staleObservables = derivation._observables.difference(derivation._newObservables!); final newObservables = derivation._newObservables!.difference(derivation._observables); var lowestNewDerivationState = DerivationState.upToDate; // Add newly found observables for (final observable in newObservables) { observable._addObserver(derivation); ··· } // Remove previous observables for (final ob in staleObservables) { ob._removeObserver(derivation); } ··· derivation .._observables = derivation._newObservables! .._newObservables = {}; // No need for newObservables beyond this point }
endBatch方法:
endBatch会判断context的state是否还有任务,当没有任务的时候,调用runReactions。
void endBatch() {
  if (--_state.batch == 0) {
    runReactions();
    ···
}
如果还有待办batch,或者已经正在执行重绘就返回
void runReactions() {
  if (_state.batch > 0 || _state.isRunningReactions) {
    return;
  }

  _runReactionsInternal();
}

void _runReactionsInternal() {

	...

	//context里_state的待办Reactions集合,也就是需要刷新的Observer
  final allReactions = _state.pendingReactions;
  final remainingReactions = allReactions.toList(growable: false);
  //清空待办
  allReactions.clear();
  for (final reaction in remainingReactions) {
  //
      reaction._run();
  }
  //清空待办
  _state
    ..pendingReactions = []
    ..isRunningReactions = false;
}
run里主要执行_onInvalidate()
void _run() {

  _context.startBatch();

  _onInvalidate();

  _context.endBatch();

}
还记得之前在ReactionImpl类初始化时介绍的吗
_reaction初始化时传入的invalidate如下,该方法是状态变换时widget的行为,就是重新绘制
void invalidate() => markNeedsBuild();
完整的更改value过程:
在阅读完整过程之前,先简单的介绍一下action
part of '../core.dart';

class Action {
  /// Creates an action that encapsulates all the mutations happening on the
  /// observables.
  ///
  /// Wrapping mutations inside an action ensures the depending observers
  /// are only notified when the action completes. This is useful to silent the notifications
  /// when several observables are being changed together. You will want to run your
  /// reactions only when all the mutations complete. This also helps in keeping
  /// the state of your application consistent.
  ///
  /// You can give a debug-friendly [name] to identify the action.
  ///
  /// ```
  /// var x = Observable(10);
  /// var y = Observable(20);
  /// var total = Observable(0);
  ///
  /// autorun((){
  ///   print('x = ${x}, y = ${y}, total = ${total}');
  /// });
  ///
  /// var totalUp = Action((){
  ///   x.value++;
  ///   y.value++;
  ///
  ///   total.value = x.value + y.value;
  /// }, name: 'adder');
  /// ```
  /// Even though we are changing 3 observables (`x`, `y` and `total`), the [autorun()]
  /// is only executed once. This is the benefit of action. It batches up all the change
  /// notifications and propagates them only after the completion of the action. Actions
  /// can also be nested inside, in which case the change notification will propagate when
  /// the top-level action completes.
  factory Action(Function fn, {ReactiveContext? context, String? name}) =>
      Action._(context ?? mainContext, fn, name: name);

  Action._(ReactiveContext context, this._fn, {String? name})
      : _controller = ActionController(context: context, name: name);

  String get name => _controller.name;

  final ActionController _controller;
  final Function _fn;

  dynamic call([List args = const [], Map<String, dynamic>? namedArgs]) {
    final runInfo = _controller.startAction();

    try {
      // Invoke the actual function
      if (namedArgs == null) {
        return Function.apply(_fn, args);
      } else {
        // Convert to symbol-based named-args
        final namedSymbolArgs =
            namedArgs.map((key, value) => MapEntry(Symbol(key), value));
        return Function.apply(_fn, args, namedSymbolArgs);
      }
    } finally {
      _controller.endAction(runInfo);
    }
  }
}

/// `ActionController` is used to define the start/end boundaries of code which
/// should be wrapped inside an action. This ensures all observable mutations are neatly
/// encapsulated.
///
/// You would rarely need to use this directly. This is primarily meant for the **`mobx_codegen`** package.
///
class ActionController {
  ActionController({ReactiveContext? context, String? name})
      : this._(context ?? mainContext, name: name);

  ActionController._(this._context, {String? name})
      : name = name ?? _context.nameFor('Action');

  final ReactiveContext _context;
  final String name;

  ActionRunInfo startAction({String? name}) {
    final reportingName = name ?? this.name;
    _context.spyReport(ActionSpyEvent(name: reportingName));
    final startTime = _context.isSpyEnabled ? DateTime.now() : null;

    final prevDerivation = _context.startUntracked();
    _context.startBatch();
    final prevAllowStateChanges = _context.startAllowStateChanges(allow: true);

    return ActionRunInfo(
      prevDerivation: prevDerivation,
      prevAllowStateChanges: prevAllowStateChanges,
      name: reportingName,
      startTime: startTime,
    );
  }

  void endAction(ActionRunInfo info) {
    final duration = _context.isSpyEnabled
        ? DateTime.now().difference(info.startTime!)
        : Duration.zero;
    _context.spyReport(
      EndedSpyEvent(type: 'action', name: info.name, duration: duration),
    );

    // ignore: cascade_invocations
    _context
      ..endAllowStateChanges(allow: info.prevAllowStateChanges)
      ..endBatch()
      ..endUntracked(info.prevDerivation);
  }
}

class ActionRunInfo {
  ActionRunInfo({
    required this.name,
    this.startTime,
    this.prevDerivation,
    this.prevAllowStateChanges = true,
  });

  final Derivation? prevDerivation;
  final bool prevAllowStateChanges;
  final String name;
  final DateTime? startTime;
}
action,创建一个封装所有发生在可观察对象上的变化的action。在action中包装变化可确保仅在action完成时通知依赖的观察者。当多个可观察对象一起更改时,这对于使通知静音很有用。只有在所有变化完成后,您才会想要运行您的反应。这也有助于保持应用程序状态的一致性。
首先是点击事件increment(),可以看到开启了一个action
void increment() {
final _$actionInfo = _$CounterBaseActionController.startAction(
name: 'CounterBase.increment');
try {
return super.increment();
} finally {
_$CounterBaseActionController.endAction(_$actionInfo);
}
}
startAction()主要调用了_context.startBatch();
ActionRunInfo startAction({String? name}) {
  final reportingName = name ?? this.name;
  _context.spyReport(ActionSpyEvent(name: reportingName));
  final startTime = _context.isSpyEnabled ? DateTime.now() : null;

  final prevDerivation = _context.startUntracked();
  _context.startBatch();
  final prevAllowStateChanges = _context.startAllowStateChanges(allow: true);

  return ActionRunInfo(
    prevDerivation: prevDerivation,
    prevAllowStateChanges: prevAllowStateChanges,
    name: reportingName,
    startTime: startTime,
  );
}
ReactiveContext下的startBatch,该state为Context持有的_ReactiveState
void startBatch() {
  _state.batch++;
}
接下来调用set value方法
set value(int value) {
  _$valueAtom.reportWrite(value, super.value, () {
    super.value = value;
  });
}
存值的时候调用了reportWrite方法
  void reportWrite<T>(T newValue, T oldValuße, void Function() setNewValue) {
    context.spyReport(ObservableValueSpyEvent(this,
        newValue: newValue, oldValue: oldValue, name: name));

    final actionName = context.isSpyEnabled ? '${name}_set' : name;

    // ignore: cascade_invocations
    context.conditionallyRunInAction(() {
      setNewValue();
      reportChanged();
    }, this, name: actionName);

    // ignore: cascade_invocations
    context.spyReport(EndedSpyEvent(type: 'observable', name: name));
  }
conditionallyRunInAction方法在第一次运行的时候isWithinBatch是true,没有开启新的action而是直接开始执行fn()
void conditionallyRunInAction(void Function() fn, Atom atom,
    {String? name, ActionController? actionController}) {
  if (isWithinBatch) {
    enforceWritePolicy(atom);
    fn();
  } else {
    final controller = actionController ??
        ActionController(
            context: this, name: name ?? nameFor('conditionallyRunInAction'));
    final runInfo = controller.startAction();

    try {
      enforceWritePolicy(atom);
      fn();
    } finally {
      controller.endAction(runInfo);
    }
  }
}
执行fn()也就是 setNewValue()和reportChanged(),调用reportChanged
  void reportChanged() {
    _context
      ..startBatch()
      ..propagateChanged(this)
      ..endBatch();
  }
首先是ReactiveContext下的startBatch,该state为Context持有的_ReactiveState
void startBatch() {
  _state.batch++;
}
接着调用propagateChanged方法,将所有订阅该atom的element下的ReactionImpl的状态都变为需要更新。
  void propagateChanged(Atom atom) {
    if (atom._lowestObserverState == DerivationState.stale) {
      return;
    }

    atom._lowestObserverState = DerivationState.stale;

    for (final observer in atom._observers) {
      if (observer._dependenciesState == DerivationState.upToDate) {
        observer._onBecomeStale();
      }
      observer._dependenciesState = DerivationState.stale;
    }
  }
当observer._dependenciesState == DerivationState.upToDate为真时, 执行 onBecomeStale
void _onBecomeStale() {
  schedule();
}
void schedule() {
  if (_isScheduled) {
    return;
  }

  _isScheduled = true;
  _context
    ..addPendingReaction(this)
    ..runReactions();
}
在第一次调用时,batch的数量大于0,因为上面开启了一次action,调用了startBatch,并且reportChanged调用了startBatch
void runReactions() {
  if (_state.batch > 0 || _state.isRunningReactions) {
    return;
  }
  _runReactionsInternal();
}
然后来到endBatch(),endBatch首先将_state.batch进行--操作,代表着执行完了一个batch,只有所有batch都执行完成时,才会运行runReactions。
先简单看下_ReactiveState的batch
class _ReactiveState {
/// 当前批次深度。 这用于跟踪 `transaction` / `action` 的深度。
   /// 当批处理结束时,我们执行所有的 [pendingReactions]
  int batch = 0;
void endBatch() {
  if (--_state.batch == 0) {
    runReactions();

    for (var i = 0; i < _state.pendingUnobservations.length; i++) {
      final ob = _state.pendingUnobservations[i]
        .._isPendingUnobservation = false;

      if (ob._observers.isEmpty) {
        if (ob._isBeingObserved) {
          // if this observable had reactive observers, trigger the hooks
          ob
            .._isBeingObserved = false
            .._notifyOnBecomeUnobserved();
        }

        if (ob is Computed) {
          ob._suspend();
        }
      }
    }

    _state.pendingUnobservations = [];
  }
}
运行到这里内部的batch已经执行完了,接下来会执行外部action的endAction,再次贴一下代码
void increment() {
final _$actionInfo = _$CounterBaseActionController.startAction(
name: 'CounterBase.increment');
try {
return super.increment();
} finally {
_$CounterBaseActionController.endAction(_$actionInfo);//这里被调用了
}
}
endAction代码如下
  void endAction(ActionRunInfo info) {
    final duration = _context.isSpyEnabled
        ? DateTime.now().difference(info.startTime!)
        : Duration.zero;
    _context.spyReport(
      EndedSpyEvent(type: 'action', name: info.name, duration: duration),
    );

    // ignore: cascade_invocations
    _context
      ..endAllowStateChanges(allow: info.prevAllowStateChanges)
      ..endBatch()
      ..endUntracked(info.prevDerivation);
  }
再次进入endBatch()
void endBatch() {
  if (--_state.batch == 0) {
    runReactions();

    for (var i = 0; i < _state.pendingUnobservations.length; i++) {
      final ob = _state.pendingUnobservations[i]
        .._isPendingUnobservation = false;

      if (ob._observers.isEmpty) {
        if (ob._isBeingObserved) {
          // if this observable had reactive observers, trigger the hooks
          ob
            .._isBeingObserved = false
            .._notifyOnBecomeUnobserved();
        }

        if (ob is Computed) {
          ob._suspend();
        }
      }
    }

    _state.pendingUnobservations = [];
  }
}
这次所有的batch执行完了,batch已经为0
void runReactions() {
  if (_state.batch > 0 || _state.isRunningReactions) {
    return;
  }

  _runReactionsInternal();
}
_runReactionsInternal主要执行 reaction. _run();
void _runReactionsInternal() {
  _state.isRunningReactions = true;

  var iterations = 0;
  final allReactions = _state.pendingReactions;

  // While running reactions, new reactions might be triggered.
  // Hence we work with two variables and check whether
  // we converge to no remaining reactions after a while.
  while (allReactions.isNotEmpty) {
    if (++iterations == config.maxIterations) {
      final failingReaction = allReactions[0];

      // Resetting ensures we have no bad-state left
      _resetState();

      throw MobXCyclicReactionException(
          "Reaction doesn't converge to a stable state after ${config.maxIterations} iterations. Probably there is a cycle in the reactive function: $failingReaction");
    }

    final remainingReactions = allReactions.toList(growable: false);
    allReactions.clear();
    for (final reaction in remainingReactions) {
      reaction._run();
    }
  }

  _state
    ..pendingReactions = []
    ..isRunningReactions = false;
}
run里主要执行_onInvalidate()
void _run() {
  if (_isDisposed) {
    return;
  }

  _context.startBatch();

  _isScheduled = false;

  if (_context._shouldCompute(this)) {
    try {
      _onInvalidate();
    } on Object catch (e, s) {
      // Note: "on Object" accounts for both Error and Exception
      _errorValue = MobXCaughtException(e, stackTrace: s);
      _reportException(_errorValue!);
    }
  }

  _context.endBatch();
}
创建Atom
完整代码:
class Atom {
  /// Creates a simple Atom for tracking its usage in a reactive context. This is useful when
  /// you don't need the value but instead a way of knowing when it becomes active and inactive
  /// in a reaction.
  ///
  /// Use the [onObserved] and [onUnobserved] handlers to know when the atom is active and inactive
  /// respectively. Use a debug [name] to identify easily.
  factory Atom(
          {String? name,
          Function()? onObserved,
          Function()? onUnobserved,
          ReactiveContext? context}) =>
      Atom._(context ?? mainContext,
          name: name, onObserved: onObserved, onUnobserved: onUnobserved);

  Atom._(this._context,
      {String? name, Function()? onObserved, Function()? onUnobserved})
      : name = name ?? _context.nameFor('Atom') {
    if (onObserved != null) {
      onBecomeObserved(onObserved);
    }

    if (onUnobserved != null) {
      onBecomeUnobserved(onUnobserved);
    }
  }

  final ReactiveContext _context;
  ReactiveContext get context => _context;

  final String name;

  // ignore: prefer_final_fields
  bool _isPendingUnobservation = false;

  DerivationState _lowestObserverState = DerivationState.notTracking;

  // ignore: prefer_final_fields
  bool _isBeingObserved = false;

  final Set<Derivation> _observers = {};

  bool get hasObservers => _observers.isNotEmpty;

  final Map<_ListenerKind, Set<void Function()>?> _observationListeners = {};

  void reportObserved() {
    _context._reportObserved(this);
  }

  void reportChanged() {
    _context
      ..startBatch()
      ..propagateChanged(this)
      ..endBatch();
  }

  void _addObserver(Derivation d) {
    _observers.add(d);

    if (_lowestObserverState.index > d._dependenciesState.index) {
      _lowestObserverState = d._dependenciesState;
    }
  }

  void _removeObserver(Derivation d) {
    _observers.remove(d);
    if (_observers.isEmpty) {
      _context._enqueueForUnobservation(this);
    }
  }

  void _notifyOnBecomeObserved() {
    final listeners = _observationListeners[_ListenerKind.onBecomeObserved];
    listeners?.forEach(_notifyListener);
  }

  static void _notifyListener(void Function() listener) => listener();

  void _notifyOnBecomeUnobserved() {
    final listeners = _observationListeners[_ListenerKind.onBecomeUnobserved];
    listeners?.forEach(_notifyListener);
  }

  void Function() onBecomeObserved(void Function() fn) =>
      _addListener(_ListenerKind.onBecomeObserved, fn);

  void Function() onBecomeUnobserved(void Function() fn) =>
      _addListener(_ListenerKind.onBecomeUnobserved, fn);

  void Function() _addListener(_ListenerKind kind, void Function() fn) {
    if (_observationListeners[kind] == null) {
      _observationListeners[kind] = {}..add(fn);
    } else {
      _observationListeners[kind]!.add(fn);
    }

    return () {
      final listeners = _observationListeners[kind];
      if (listeners == null) {
        return;
      }

      listeners.removeWhere((f) => f == fn);
      if (listeners.isEmpty) {
        _observationListeners[kind] = null;
      }
    };
  }
}
创建Atom
final _$valueAtom = Atom(name: 'CounterBase.value');
构造如下:
Atom._(context ?? mainContext,
    name: name, onObserved: onObserved, onUnobserved: onUnobserved);
mainContext定义如下:
final ReactiveContext mainContext = createContext(config: ReactiveConfig.main);

ReactiveContext createContext({ReactiveConfig? config}) =>
    ReactiveContext(config: config);
维护了一个_observersset,监听者合集。
final Set<Derivation> _observers = {};