Python 数据分析之Numpy学习(一)
一、Numpy的引入
1.1 矩阵/向量的按位运算
需求:矩阵的按位相加
[0,1,4] + [0,1,8] = [0,2,12]
1.1.1 利用python实现矩阵/向量的按位运算
# 1.通过列表实现
list1 = [0, 1, 4]
list2 = [0, 1, 8]
# 列表使用 + 操作是将两个列表进行连接,不是算术运算
list1 + list2

# 结果:
[0, 1, 4, 0, 1, 8]
# 使用循环 + append实现
list_sum = []

# 通过索引进行遍历
for i in range(len(list1)):
    # 通过索引同时遍历list1和list2,方便从2个列表中同时提取数据
    list_sum.append(list1[i] + list2[i])

list_sum
[0, 2, 12]
# 2.通过推导式实现
[list1[i] + list2[i] for i in range(len(list1))]
[0, 2, 12]
对上述的按位相加运算进行扩充:
扩充到两个n位的列表进行按位相加操作,第一个列表的元素是0到n-1的平方,第二个列表的元素是0到n-1的三次方
[0, 1, 4, …] + [0, 1, 8, …] = [0, 2, 12, …]
# 构建一个函数,用来生成 0 到 n-1 的 m 次方列表
def create_list(n,m):    # n是列表中的元素数量,m是所求次方
    return [item ** m for item in range(n)]
# 测试构建的函数
# 生成 10 个元素的平方
create_list(10, 2)
[0, 1, 4, 9, 16, 25, 36, 49, 64, 81]
# 生成 5 个元素的立方
create_list(5, 3)
[0, 1, 8, 27, 64]
# 构建函数用来实现 n 个元素的平方和立方的按位相加
def pySum(n):  # n是列表的元素数量
    list_1 = create_list(n, 2)
    list_2 = create_list(n, 3)
    return [list_1[i] + list_2[i] for i in range(n)]
# 测试Pysum函数
pySum(5)
[0, 2, 12, 36, 80]
pySum(10)
[0, 2, 12, 36, 80, 150, 252, 392, 576, 810]
1.1.2 用numpy实现矩阵/向量的按位运算
# 载入库
import numpy as np
# 构建用Numpy实现按位相加的函数
def npSum(n):
    a = np.arange(n) ** 2
    b = np.arange(n) ** 3
    return a + b
# 测试npSum函数
npSum(5)
array([ 0, 2, 12, 36, 80])
npSum(10)
array([ 0, 2, 12, 36, 80, 150, 252, 392, 576, 810])
1.1.3 numpy与原生python在科学计算上的对比
# (1)溢出的问题
# python实现,正常
pySum(100000)[-3:]
[999920002099982, 999950000799996, 999980000100000]
# numpy实现,出现了溢出问题
npSum(100000)[-3:]
array([ 75983630, 9912572, -55558496])
在Windows操作系统下,用numpy创建的整数类型的数组默认采用的是 np.int32 数据类型,该数据类型能容纳的最大数值是2^31-1,当我们要计算的数值超过该数值,计算结果就会出错,解决方法是采用更大的数据类型 np.int64。
# 修改按位相加函数中的数组的数据类型改为 np.int64
def npSum64(n):
    a = np.arange(n, dtype = np.int64) ** 2
    b = np.arange(n, dtype = np.int64) ** 3
    return a + b
# 测试npSum64函数是否还会出现溢出问题,结果是输出正确结果
npSum64(100000)[-3:]
array([999920002099982, 999950000799996, 999980000100000], dtype=int64)
# (2)代码简洁程度:numpy代码比python代码实现按位相加要更简洁
# (3) numpy与原生python在科学计算上的性能差异
# %timeit    #精确计算其后代码执行的时间长度,是jupyter上的一个特殊的命令(魔法命令)
%timeit pySum(100000)
36.4 ms ± 922 μs per loop (mean ± std. dev. of 7 runs, 10 loops each)
%timeit npSum64(100000)
1.03 ms ± 11.6 μs per loop (mean ± std. dev. of 7 runs, 1,000 loops each)
两者执行相差:35.7 / 1,相差三十多倍,随着计算的复杂程度的提高,numpy节约的时间越多
总结:从上述情况来看,在实现科学计算上,不管是从代码的简洁程度还是执行效率上来看,numpy的表现较好
1.2 Numpy的简介
NumPy是一个开源的Python科学计算库,它包括:
- 一个强大的N维数组对象ndrray;
- 比较成熟的函数库;
- 用于整合C/C++和Fortran代码的工具包;
- 实用的线性代数、傅里叶变换和随机数生成函数
NumPy支持高维度数组与矩阵运算,此外也针对数组运算提供大量的数学函数库。
Numpy成为事实上的Scipy、Pandas、Scikit-Learn、Tensorflow、PaddlePaddle等框架的"通用底层语言"。
Numpy的array和Python的List的一个区别,是它元素必须都是同一种数据类型,比如都是数字int类型,这也是Numpy高性能的一个原因。
1.2.1 Python的缺点和Numpy的改进
标准Python中用列表(list)可以用来当作数组使用,但是列表中所保存的是对象(任意对象)的指针。对于数值运算来说这种结构比较浪费内存和CPU计算时间。
NumPy提供了以下对象,解决标准Python的不足:
①ndarray:N维数组(简称数组)对象,存储单一数据类型的N维数组
②ufunc:通用函数对象,对数组进行处理的函数。
1.2.2 Ndarray的理解
NumPy中的ndarray是一个多维数组对象,它是一个快速而灵活的大数据集容器,它由两部分组成:
①实际的数据;
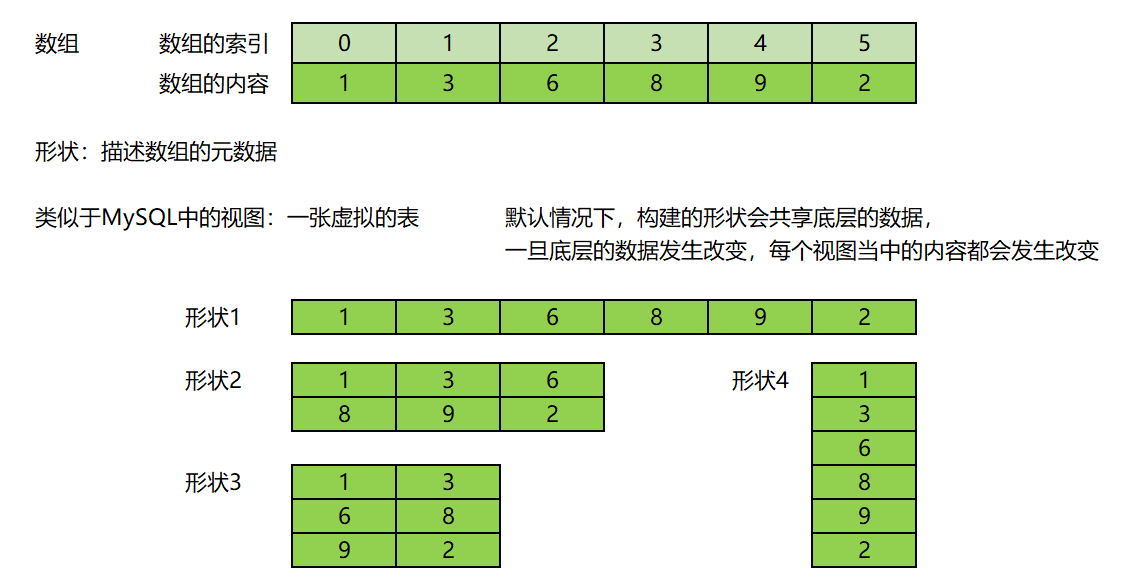
②描述这些数据的元数据。(相当于形状)
大部分的数组操作仅仅修改元数据部分,而不改变底层的实际数据。

形状:描述数组的元数据

二、创建Ndarray
2.1 一维数组的创建
2.1.1 np.array创建数组
# ?np.array
array(object, dtype=None, *, copy=True, order='K', subok=False, ndmin=0, like=None)
- object:用来转换为数组的对象,一般是容器/序列类对象
- dtype:数据类型,一般不专门设置,因为np会自动识别对象的数据类型
注意:array是个函数,后面要写成()
# 1.列表转数组
arr1 = np.array([1, 2, 3, 4, 5])
arr1   # 直接写是访问对象,直接访问对象是用逗号隔开
array([1, 2, 3, 4, 5])
# 用print输出,输出结果用空格隔开
print(arr1)
[1 2 3 4 5]
列表直接访问和用print输出没有区别,都是用逗号隔开,但是数组不一样
# 观察arr1的数据类型
type(arr1)     # numpy.ndarray
numpy.ndarray
# 2.元组转数组
np.array((1, 2, 3))
array([1, 2, 3])
# 3.range转数组
np.array(range(10))
array([0, 1, 2, 3, 4, 5, 6, 7, 8, 9])
# 4.字符串转数组,得到的不是字符,而是一个完整的字符串
np.array('hello')
array('hello', dtype='<U5')
# 如果要得到字符串中每个字符构成的数组,先将字符串转为列表,然后将列表转换为数组
np.array(list('hello'))
array(['h', 'e', 'l', 'l', 'o'], dtype='<U1')
2.1.2 数组相关概念
- 数组的维度
ndarray.ndim - 返回数组维度的数量(轴),返回的是1,2……,表示一维、二维……
arr1.ndim
# 返回数字1,说明arr1是一个一维数组(数组的轴的数量是1)
1
- 数组的形状
ndarray.shape - 返回数组的形状,即数组在每个维度(轴)上的元素数量,结果是一个元组
arr1.shape
# 返回一个元组,说明arr1是一个一维数组(只有第一个元素有值),该维度上有5个元素
(5,)
type(arr1.shape) # 返回的对象是元组类型
tuple
- 数组的数据类型
ndarray.dtype - 返回数组的数据类型
type和dtype的区别:type得到的是对象的数据类型,dtype得到的是对象中的元素的数据类型
type(arr1) # 返回的是arr1对象的数据类型
numpy.ndarray
arr1.dtype # arr1的数据类型是np.int32
dtype('int32')
# 数组的数据类型会根据转换的对象自动设定,数组的数据类型由数组中兼容性最强的数据决定
arr2 = np.array([1,2,3,4.5,6])
arr2
array([1. , 2. , 3. , 4.5, 6. ])
arr2.dtype
dtype('float64')
2.2 等差数组的创建
2.2.1 np.arange创建
# ?np.arange
arange([start,] stop[, step,], dtype=None, *, like=None)
其中start/stop/step都可以使用浮点数,最终返回的是左闭右开的区间
arange和range的区别:range中的三个参数必须是整数,而arange中的三个参数可以是整数,也可以是浮点数
np.array(range(9))
array([0, 1, 2, 3, 4, 5, 6, 7, 8])
# np.array(range(0.1,1.1,0.1))   # 报错
# TypeError: 'float' object cannot be interpreted as an integer
arr3 = np.arange(0.1,1.1,0.1)
arr3
array([0.1, 0.2, 0.3, 0.4, 0.5, 0.6, 0.7, 0.8, 0.9, 1. ])
arange返回的是左闭右开的区间,如果要对称的,就需要自己计算stop和step的值
# 例如,要返回-1,1,0.05
np.arange(-1,1.05,0.05)
array([-1.0000000e+00, -9.5000000e-01, -9.0000000e-01, -8.5000000e-01,
       -8.0000000e-01, -7.5000000e-01, -7.0000000e-01, -6.5000000e-01,
       -6.0000000e-01, -5.5000000e-01, -5.0000000e-01, -4.5000000e-01,
       -4.0000000e-01, -3.5000000e-01, -3.0000000e-01, -2.5000000e-01,
       -2.0000000e-01, -1.5000000e-01, -1.0000000e-01, -5.0000000e-02,
        8.8817842e-16,  5.0000000e-02,  1.0000000e-01,  1.5000000e-01,
        2.0000000e-01,  2.5000000e-01,  3.0000000e-01,  3.5000000e-01,
        4.0000000e-01,  4.5000000e-01,  5.0000000e-01,  5.5000000e-01,
        6.0000000e-01,  6.5000000e-01,  7.0000000e-01,  7.5000000e-01,
        8.0000000e-01,  8.5000000e-01,  9.0000000e-01,  9.5000000e-01,
        1.0000000e+00])
# 如果修改了步长,就不对称了
np.arange(-1,1.05,0.03)
array([-1.  , -0.97, -0.94, -0.91, -0.88, -0.85, -0.82, -0.79, -0.76,
       -0.73, -0.7 , -0.67, -0.64, -0.61, -0.58, -0.55, -0.52, -0.49,
       -0.46, -0.43, -0.4 , -0.37, -0.34, -0.31, -0.28, -0.25, -0.22,
       -0.19, -0.16, -0.13, -0.1 , -0.07, -0.04, -0.01,  0.02,  0.05,
        0.08,  0.11,  0.14,  0.17,  0.2 ,  0.23,  0.26,  0.29,  0.32,
        0.35,  0.38,  0.41,  0.44,  0.47,  0.5 ,  0.53,  0.56,  0.59,
        0.62,  0.65,  0.68,  0.71,  0.74,  0.77,  0.8 ,  0.83,  0.86,
        0.89,  0.92,  0.95,  0.98,  1.01,  1.04])
2.2.2 np.linspace创建
np.linspace用于创建等差数组,可以得到闭区间s=0,
)
np.linspace(
    start,    # 起始值
    stop,     # 结束值
    num=50,    # 数据的分割点数
    endpoint=True,   # True,闭区间
    retstep=False,
    dtype=None,
    axis=0,
)
返回一个将指定的区间划分为若干段的数组,返回结果是一个闭区间的等差数组
# ?np.linspace
# -1, 1
arr4 = np.linspace(-1, 1, 20)
arr4
array([-1.        , -0.89473684, -0.78947368, -0.68421053, -0.57894737,
       -0.47368421, -0.36842105, -0.26315789, -0.15789474, -0.05263158,
        0.05263158,  0.15789474,  0.26315789,  0.36842105,  0.47368421,
        0.57894737,  0.68421053,  0.78947368,  0.89473684,  1.        ])
# 每段的距离
(1-(-1))/(20-1)
0.10526315789473684
-0.89473684 - (-1)
0.10526316000000002
# 如果希望每段的距离都是0.1
np.linspace(-1,1,21)
array([-1. , -0.9, -0.8, -0.7, -0.6, -0.5, -0.4, -0.3, -0.2, -0.1,  0. ,
        0.1,  0.2,  0.3,  0.4,  0.5,  0.6,  0.7,  0.8,  0.9,  1. ])
在NumPy中,linspace 函数用于创建一个特定范围内的均匀间隔的数组。但是,NumPy 并没有提供直接的功能来获取 linspace 数组的分割点数量。不过,你可以通过计算数组的长度并除以(数组元素总数 - 1)来大致估算分割点的数量。
2.3 二维数组的创建
2.3.1 np.array创建
利用嵌套array的方式进行创建,语法:np.array(嵌套的iterable)
arr5 = np.array([
    np.array([1, 2, 3]),
    np.array([4, 5, 6]),
    np.array([7, 8, 9]),
])
arr5
array([[1, 2, 3],
       [4, 5, 6],
       [7, 8, 9]])
如何看创建的数组是几维数组:
- 通过看array()里面[]的数量
- 通过ndarray.ndim进行查看
- 通过ndarray.shape进行观察
arr5.ndim
2
arr5.shape
# 数组的维度是二维,第一个维度(行)上的元素数量是3个,第二个维度(列)上的元素数量是3个
(3, 3)
# 也可以使用嵌套容器
arr6 = np.array(
    [
        [1,2,3,4],
        (5,6,7,8),
        range(9,13)
    ]
)
arr6
array([[ 1,  2,  3,  4],
       [ 5,  6,  7,  8],
       [ 9, 10, 11, 12]])
arr6.ndim
2
arr6.shape
(3, 4)
2.3.2 用占位方法创建数组
通常,数组的元素最初是未知的,但它的大小是已知的。因此,NumPy提供了几个函数来创建具有初始占位符内容的数组。这就减少了数组增长的必要,因为数组增长的操作很麻烦。
2.3.2.1 np.zeros/np.zeros_like 全0数组
np.zeros语法:np.zeros(shape, dtype=float, order='C', *, like=None)
(1)shape:维度信息,整数(一维数组),多维需要放到元组中
(2)dtype:数据类型,默认是np.float64
(3)like:用来进行参考的类数组对象,如果设置,则生成的数组的形状和数据类型会和参考的类数组对象一致
np.zeros((3,6))
array([[0., 0., 0., 0., 0., 0.],
       [0., 0., 0., 0., 0., 0.],
       [0., 0., 0., 0., 0., 0.]])
np.zeros_like语法:np.zeros_like(a, dtype=None, order='K', subok=True, shape=None)
(1)a:用来参考的类数组对象
(2)shape:维度信息,整数(一维数组),多维需要放到元组中
(3)dtype:数据类型,默认是np.float64
返回一个形状和数据类型和参考对象一致的全0数组
# ?np.zeros_like
# 当设置成python数据类型是,np会自动转换成numpy所对应的数据类型
a1x = np.zeros((3,3), dtype = int)
a1x
array([[0, 0, 0],
       [0, 0, 0],
       [0, 0, 0]])
a2 = np.zeros_like(arr6)
a2
array([[0, 0, 0, 0],
       [0, 0, 0, 0],
       [0, 0, 0, 0]])
2.3.2.2 np.ones/np.ones_like 全1数组
np.ones语法:np.ones(shape, dtype=None, order='C', *, like=None)
(1)shape:维度信息,整数(一维数组),多维需要放到元组中
(2)dtype:数据类型,默认是np.float64
(3)like:用来进行参考的类数组对象,如果设置,则生成的数组的形状和数据类型会和参考的类数组对象一致
a3 = np.ones((5,3))
a3
array([[1., 1., 1.],
       [1., 1., 1.],
       [1., 1., 1.],
       [1., 1., 1.],
       [1., 1., 1.]])
a4 = np.ones((5,3), dtype =int)
a4
array([[1, 1, 1],
       [1, 1, 1],
       [1, 1, 1],
       [1, 1, 1],
       [1, 1, 1]])
np.ones_like语法:np.ones_like(a, dtype=None, order='K', subok=True, shape=None)
(1)a:用来参考的类数组对象
(2)shape:维度信息,整数(一维数组),多维需要放到元组中
(3)dtype:数据类型,默认是np.float64
返回一个形状和数据类型和参考对象一致的全1数组
# ?np.ones_like
a6 = np.ones_like(arr6)
a6
array([[1, 1, 1, 1],
       [1, 1, 1, 1],
       [1, 1, 1, 1]])
2.3.2.3 np.full/np.full_like全填充数组
np.full语法:np.full(shape, fill_value, dtype=None, order='C', *, like=None)
(1)shape : 维度信息,多维需要放到元组中
(2)fill_value : 填充的内容,可以是单个的值(不一定是数值),或者类数组对象
(3)dtype : 数据类型 根据fill_value的值决定
# ?np.full_like
np.full_like语法:np.full_like(a, fill_value, dtype=None, order='K', subok=True, shape=None)
(1)a:用来参考的类数组对象
(2)fill_value : 填充的内容,可以是单个的值(不一定是数值),或者类数组对象
(3)dtype:数据类型,根据fill_value的值决定
(4)shape:维度信息,整数(一维数组),多维需要放到元组中
返回一个形状和数据类型跟参考对象一致的用指定值填充的数组
a7 = np.full((4,5),fill_value=7)
a7
# fill_value同时决定了填充的内容和数组的数据类型
array([[7, 7, 7, 7, 7],
       [7, 7, 7, 7, 7],
       [7, 7, 7, 7, 7],
       [7, 7, 7, 7, 7]])
a8 = np.full((4,6), fill_value='python')
a8
array([['python', 'python', 'python', 'python', 'python', 'python'],
       ['python', 'python', 'python', 'python', 'python', 'python'],
       ['python', 'python', 'python', 'python', 'python', 'python'],
       ['python', 'python', 'python', 'python', 'python', 'python']],
      dtype='<U6')
np.full((5,5), fill_value = range(5))
# 对每一行的内容用0~4的序列进行填充,用类数组对象在填充时要注意形状的匹配
array([[0, 1, 2, 3, 4],
       [0, 1, 2, 3, 4],
       [0, 1, 2, 3, 4],
       [0, 1, 2, 3, 4],
       [0, 1, 2, 3, 4]])
# np.full((5,5), fill_value = [1,2])
# ValueError: could not broadcast input array from shape (2,) into shape (5,5)
# 注意fill_value的内容形状与full的内容形状要匹配,否则会报错
# 布尔数组
np.full((4,5),True)
array([[ True,  True,  True,  True,  True],
       [ True,  True,  True,  True,  True],
       [ True,  True,  True,  True,  True],
       [ True,  True,  True,  True,  True]])
np.full_like(arr1,fill_value=5)
array([5, 5, 5, 5, 5])
2.3.2.4 np.eye对角矩阵
对角矩阵:对角线位置是1,其他位置是0
语法:np.eye(np.eye(N, M=None, k=0, dtype=<class 'float'>, order='C', *, like=None))
(1)N,M : 行列的元素数量
(2)k : 对角线的位置,该值为正,对角线向右移动,该值为负,对角线的位置向左移动
(3)dtype : 数据类型,默认是浮点型,可以根据需求进行指定
# ?np.eye
# 行列数一致时
np.eye(7)
array([[1., 0., 0., 0., 0., 0., 0.],
       [0., 1., 0., 0., 0., 0., 0.],
       [0., 0., 1., 0., 0., 0., 0.],
       [0., 0., 0., 1., 0., 0., 0.],
       [0., 0., 0., 0., 1., 0., 0.],
       [0., 0., 0., 0., 0., 1., 0.],
       [0., 0., 0., 0., 0., 0., 1.]])
# 行列数不一致时
np.eye(3,5)
array([[1., 0., 0., 0., 0.],
       [0., 1., 0., 0., 0.],
       [0., 0., 1., 0., 0.]])
# 对角线的移动
np.eye(7,k=2)
array([[0., 0., 1., 0., 0., 0., 0.],
       [0., 0., 0., 1., 0., 0., 0.],
       [0., 0., 0., 0., 1., 0., 0.],
       [0., 0., 0., 0., 0., 1., 0.],
       [0., 0., 0., 0., 0., 0., 1.],
       [0., 0., 0., 0., 0., 0., 0.],
       [0., 0., 0., 0., 0., 0., 0.]])
np.eye(7, k=-2)
array([[0., 0., 0., 0., 0., 0., 0.],
       [0., 0., 0., 0., 0., 0., 0.],
       [1., 0., 0., 0., 0., 0., 0.],
       [0., 1., 0., 0., 0., 0., 0.],
       [0., 0., 1., 0., 0., 0., 0.],
       [0., 0., 0., 1., 0., 0., 0.],
       [0., 0., 0., 0., 1., 0., 0.]])
# 更改数据类型
np.eye(7, dtype =int)
array([[1, 0, 0, 0, 0, 0, 0],
       [0, 1, 0, 0, 0, 0, 0],
       [0, 0, 1, 0, 0, 0, 0],
       [0, 0, 0, 1, 0, 0, 0],
       [0, 0, 0, 0, 1, 0, 0],
       [0, 0, 0, 0, 0, 1, 0],
       [0, 0, 0, 0, 0, 0, 1]])
2.3.3 通过随机的方式创建数组
2.3.3.1 按照指定的分布特征构
- 正态分布 np.random.randn,语法:
np.random.randn(d0, d1, ..., dn) - 均匀分布 np.random.rand 范围是 [0, 1),语法:
np.random.rand(d0, d1, ..., dn)
其中d0, d1, …, dn代表每个维度上的元素数量
# 创建一个均匀分布的随机数组,利用round控制小数位数
np.random.rand(3,4).round(3)
array([[0.516, 0.725, 0.887, 0.496],
       [0.592, 0.773, 0.192, 0.284],
       [0.363, 0.058, 0.715, 0.586]])
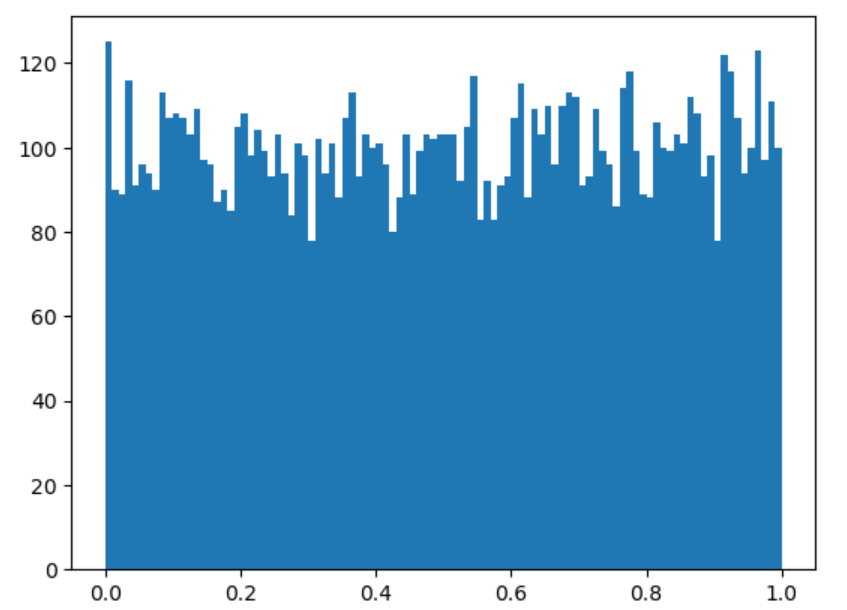
# 如何查看它符合均匀分布,通过可视化进行观察
a4 = np.random.rand(10000)
import matplotlib.pyplot as plt
# 绘制一个直方图,观察数据分布情况
plt.hist(a4, bins=100)
plt.show()

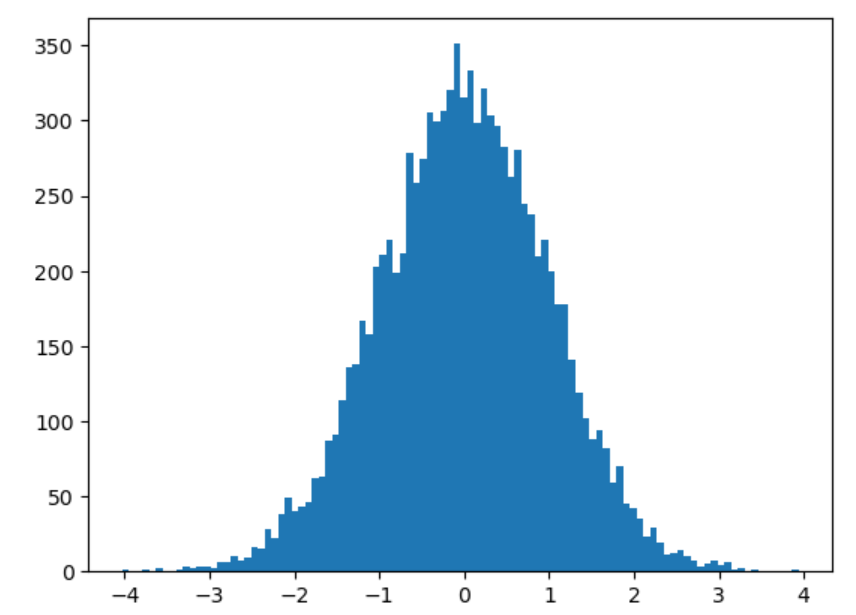
# 创建一个符合正态分布的数组
a5 = np.random.randn(10000)
# 绘制一个直方图,观察数据分布情况
plt.hist(a5, bins=100)
plt.show()

2.3.3.2 按照指定的数据范围
-
np.random.randint 生成指定范围的随机整数数组
语法:np.random.randint(low, high=None, size=None, dtype=int) -
np.random.uniform 生成指定范围的随机浮点数数组
语法:np.random.uniform(low=0.0, high=1.0, size=None)low/high :数组元素的最小/最大值
size : 数组的形状
返回的结果都是左闭右开的区间
import random
# 4名学生,5门功课的成绩(成绩在60~100分之间),要写101,因为右边是开区间
a6 = np.random.randint(60, 101, size=(4,5),dtype=int)
a6
array([[100,  95,  97,  99,  99],
       [ 67,  61,  89,  93,  63],
       [ 94,  67,  82,  74,  75],
       [ 96,  84,  76,  64,  71]])
while True:
    a = random.randint(60,100)
    print('随机值:',a)
    if a == 100:
        break
随机值: 87
随机值: 64
随机值: 65
随机值: 92
随机值: 61
随机值: 76
随机值: 96
随机值: 78
随机值: 97
随机值: 69
随机值: 60
随机值: 61
随机值: 100
# 生成5支股票7天的收盘价 8~20之间
np.random.uniform(8,20,(7,5)).round(2)
array([[10.44, 11.39, 12.04, 12.69, 11.47],
       [15.85, 11.96, 17.18, 12.4 , 10.39],
       [11.42,  8.42, 16.64, 19.38,  9.54],
       [10.06, 11.71,  8.19, 18.55, 11.  ],
       [ 8.69, 18.28, 14.5 , 11.41, 14.21],
       [ 9.79, 11.8 , 11.41, 10.37, 17.61],
       [18.11, 19.35, 17.8 , 18.09, 10.78]])
# randint生成方式
np.random.randint(80, 201, (7,5)) / 10
array([[11.3, 14.8, 12.1, 13.7,  8.3],
       [ 9.9, 12.2, 13. , 13.6, 10.6],
       [10.3, 10. , 20. , 20. ,  8.7],
       [ 9.2, 14.5, 11.1, 12.3, 15.4],
       [15.3, 15.7, 15.3,  9.5, 12.2],
       [14.8, 15.7, 15.2, 13.7, 14.3],
       [ 8.5, 13.3, 11.2,  9. , 15.2]])
2.4 高维数组(三维及以上的维度)的创建
2.3.1 用占位方法创建数组
# 创建一个三层,三行,三列的全 0 数组
a7 = np.zeros((3, 3, 3))
a7
array([[[0., 0., 0.],
        [0., 0., 0.],
        [0., 0., 0.]],

       [[0., 0., 0.],
        [0., 0., 0.],
        [0., 0., 0.]],

       [[0., 0., 0.],
        [0., 0., 0.],
        [0., 0., 0.]]])
a7.ndim
3
a7.shape
(3, 3, 3)
2.3.2 使用reshape方法创建数组
2.3.2.1 在数组上调用
ndarray.reshape,语法:a.reshape(shape, order='C')
shape:希望改变成的形状,如果是int,就是一维数组,如果是int的元组,就是多维数组
# ?np.ndarray.reshape
# 创建一个5行6列,值是1~30的数组
# (1)先创建一个1~30的一维数组
a01 = np.arange(1,31)
a01
array([ 1,  2,  3,  4,  5,  6,  7,  8,  9, 10, 11, 12, 13, 14, 15, 16, 17,
       18, 19, 20, 21, 22, 23, 24, 25, 26, 27, 28, 29, 30])
# (2)针对创建的数组进行reshape操作
a01_re = a01.reshape((5,6))
a01_re
array([[ 1,  2,  3,  4,  5,  6],
       [ 7,  8,  9, 10, 11, 12],
       [13, 14, 15, 16, 17, 18],
       [19, 20, 21, 22, 23, 24],
       [25, 26, 27, 28, 29, 30]])
a01_re.ndim
2
a01_re1 = a01.reshape((3,2,5))
a01_re1
array([[[ 1,  2,  3,  4,  5],
        [ 6,  7,  8,  9, 10]],

       [[11, 12, 13, 14, 15],
        [16, 17, 18, 19, 20]],

       [[21, 22, 23, 24, 25],
        [26, 27, 28, 29, 30]]])
a01_re1.ndim
3
2.3.2.2 在numpy上调用
np.reshape,语法:np.reshape(a, newshape, order='C'),其中a是要改变的数组
newshape:希望改变成的形状,如果是int,就是一维数组,如果是int的元组,就是多维数组
# 创建一个5行6列,值是1~30的数组
np.reshape(np.arange(1,31),(5,6))
array([[ 1,  2,  3,  4,  5,  6],
       [ 7,  8,  9, 10, 11, 12],
       [13, 14, 15, 16, 17, 18],
       [19, 20, 21, 22, 23, 24],
       [25, 26, 27, 28, 29, 30]])
np.reshape(np.arange(1,31),(5,3,2))
array([[[ 1,  2],
        [ 3,  4],
        [ 5,  6]],

       [[ 7,  8],
        [ 9, 10],
        [11, 12]],

       [[13, 14],
        [15, 16],
        [17, 18]],

       [[19, 20],
        [21, 22],
        [23, 24]],

       [[25, 26],
        [27, 28],
        [29, 30]]])
np.reshape(a01,(3,2,5))
array([[[ 1,  2,  3,  4,  5],
        [ 6,  7,  8,  9, 10]],

       [[11, 12, 13, 14, 15],
        [16, 17, 18, 19, 20]],

       [[21, 22, 23, 24, 25],
        [26, 27, 28, 29, 30]]])
注意:
(1)使用reshape时,要注意转换前后数组的元素数量要保持一致,否则会报错
(2)使用负数可以实现某个维度上元素数量的快速计算,不能用0,且必须被行数/列数整除,否则报错
(3)如果直接在数组上调用reshape,则newshape可以不用写成元组
# (1)使用reshape时,要注意转换前后数组的元素数量要保持一致,否则会报错
# np.reshape(a01,(4, 6))
# ValueError: cannot reshape array of size 30 into shape (4,6)
a01.shape
(30,)
# (2)使用负数可以实现某个维度上元素数量的快速计算,不能用0,且必须被行数/列数整除,否则报错
# 变成3行n列的数组
a01.reshape(3,-1)    # 会用30除以3,然后得到的数放在-1的位置上
array([[ 1,  2,  3,  4,  5,  6,  7,  8,  9, 10],
       [11, 12, 13, 14, 15, 16, 17, 18, 19, 20],
       [21, 22, 23, 24, 25, 26, 27, 28, 29, 30]])
a01.reshape((-1,1))
# 将数组变为多行1列的结构,类似表格中的一列(表示一个特征)
array([[ 1],
       [ 2],
       [ 3],
       [ 4],
       [ 5],
       [ 6],
       [ 7],
       [ 8],
       [ 9],
       [10],
       [11],
       [12],
       [13],
       [14],
       [15],
       [16],
       [17],
       [18],
       [19],
       [20],
       [21],
       [22],
       [23],
       [24],
       [25],
       [26],
       [27],
       [28],
       [29],
       [30]])
a01.reshape((1,-1)) # 变成一行多列的结构(表示一个记录)
array([[ 1,  2,  3,  4,  5,  6,  7,  8,  9, 10, 11, 12, 13, 14, 15, 16,
        17, 18, 19, 20, 21, 22, 23, 24, 25, 26, 27, 28, 29, 30]])
#(3)如果直接在数组上调用reshape,则newshape可以不用写成元组
a01.reshape(6,5)
array([[ 1,  2,  3,  4,  5],
       [ 6,  7,  8,  9, 10],
       [11, 12, 13, 14, 15],
       [16, 17, 18, 19, 20],
       [21, 22, 23, 24, 25],
       [26, 27, 28, 29, 30]])
a01.reshape(3,-1)
array([[ 1,  2,  3,  4,  5,  6,  7,  8,  9, 10],
       [11, 12, 13, 14, 15, 16, 17, 18, 19, 20],
       [21, 22, 23, 24, 25, 26, 27, 28, 29, 30]])
三、Numpy数据类型
Python支持的数据类型不足以满足科学计算的需求,因此NumPy添加了很多其他的数据类型,它们占用的内存空间也是不同的。在NumPy中,大部分数据类型名是以数字结尾的,这个数字表示其在内存中占用的位数。
| 名称 | 描述 |
|---|---|
| bool_ | 布尔型数据类型(True 或者 False) |
| int_ | 默认的整数类型(类似于 C 语言中的 long,int32 或 int64) |
| intc | 与 C 的 int 类型一样,一般是 int32 或 int 64 |
| intp | 用于索引的整数类型(类似于 C 的 ssize_t,一般情况下仍然是 int32 或 int64) |
| int8 | 字节(-128 to 127) |
| int16 | 整数(-32768 to 32767) |
| int32 | 整数(-2147483648 to 2147483647) |
| int64 | 整数(-9223372036854775808 to 9223372036854775807) |
| uint8 | 无符号整数(0 to 255) |
| uint16 | 无符号整数(0 to 65535) |
| uint32 | 无符号整数(0 to 4294967295) |
| uint64 | 无符号整数(0 to 18446744073709551615) |
| float_ | float64 类型的简写 |
| float16 | 半精度浮点数,包括:1 个符号位,5 个指数位,10 个尾数位 |
| float32 | 单精度浮点数,包括:1 个符号位,8 个指数位,23 个尾数位 |
| float64 | 双精度浮点数,包括:1 个符号位,11 个指数位,52 个尾数位 |
| complex_ | complex128 类型的简写,即 128 位复数 |
| complex64 | 复数,表示双 32 位浮点数(实数部分和虚数部分) |
| complex128 | 复数,表示双 64 位浮点数(实数部分和虚数部分) |
非数组对象默认的数据类型是python原生数据类型,数组对象默认的数据类型是Numpy数据类型
3.1 关于溢出的问题
# 在创建对象时,尤其是非数组对象,会自动使用原生python的数据类型
a = 40
type(a)
int
b = np.arange(10)
b
# 创建的对象是数组时,会自动使用numpy的数据类型
array([0, 1, 2, 3, 4, 5, 6, 7, 8, 9])
b.dtype
dtype('int32')
# 即使手动指定为python数据类型,也会转换为numpy数据类型
c = np.zeros((3, 3),dtype = int)
c
array([[0, 0, 0],
       [0, 0, 0],
       [0, 0, 0]])
c.dtype
dtype('int32')
可以将非数组对象的值转换为numpy数据类型
# 直接利用数据类型进行转换
a
40
a1 = np.int8(40)
a1
40
type(a1)
numpy.int8
# 溢出的问题,解决:使用更大的数据类型
d = 2 ** 20
d
1048576
d1 = np.int8(d)
d1

# 输出 0
# 提醒
'''
C:\Users\LiLin\AppData\Local\Temp\ipykernel_15164\4039848811.py:1: DeprecationWarning: NumPy will stop allowing conversion of out-of-bound Python integers to integer arrays.  The conversion of 1048576 to int8 will fail in the future.
For the old behavior, usually:
    np.array(value).astype(dtype)
will give the desired result (the cast overflows).
  d1 = np.int8(d)
'''
# 使用int32进行转换
d2 = np.int32(d)
d2
1048576
3.2 python容器数据结构和numpy数组之间的转换
3.2.1 python容器转numpy数组
转换方法:np.array,会将容器中元素的数据类型都转换为numpy的数据类型
# 列表转数组
list1 = [1,2,3,4,5,6,7]
type(list1)
list
type(list1[1])
int
arr01 = np.array(list1)
arr01
array([1, 2, 3, 4, 5, 6, 7])
arr01.dtype
dtype('int32')
3.2.2 numpy数组转换为python原生数据类型
3.2.2.1 推导式
[int(item) for item in ndadday]
arr01
array([1, 2, 3, 4, 5, 6, 7])
arr01.dtype
dtype('int32')
list_a01 = list(arr01)
list_a01
[1, 2, 3, 4, 5, 6, 7]
# 使用list转换后,列表中的元素依然是numpy类型
type(list_a01[6])
numpy.int32
推导式:提取数组中的每个元素,转换为整数,再构成列表
list_a01x = [int(each) for each in arr01]
list_a01x
[1, 2, 3, 4, 5, 6, 7]
type(list_a01x)
list
type(list_a01x[5])
int
3.2.2.2 数组的tolist方法
ndarray.tolist():将数组转换为列表,同时将数组中每个元素的数据类型转换为对应的原生python数据类型,没有参数
list_a01y = arr01.tolist()
list_a01y
[1, 2, 3, 4, 5, 6, 7]
type(list_a01y)
list
type(list_a01y[1])
int
y will stop allowing conversion of out-of-bound Python integers to integer arrays. The conversion of 1048576 to int8 will fail in the future.
For the old behavior, usually:
np.array(value).astype(dtype)
will give the desired result (the cast overflows).
d1 = np.int8(d)
‘’’
```python
# 使用int32进行转换
d2 = np.int32(d)
d2
1048576
3.2 python容器数据结构和numpy数组之间的转换
3.2.1 python容器转numpy数组
转换方法:np.array,会将容器中元素的数据类型都转换为numpy的数据类型
# 列表转数组
list1 = [1,2,3,4,5,6,7]
type(list1)
list
type(list1[1])
int
arr01 = np.array(list1)
arr01
array([1, 2, 3, 4, 5, 6, 7])
arr01.dtype
dtype('int32')
3.2.2 numpy数组转换为python原生数据类型
3.2.2.1 推导式
[int(item) for item in ndadday]
arr01
array([1, 2, 3, 4, 5, 6, 7])
arr01.dtype
dtype('int32')
list_a01 = list(arr01)
list_a01
[1, 2, 3, 4, 5, 6, 7]
# 使用list转换后,列表中的元素依然是numpy类型
type(list_a01[6])
numpy.int32
推导式:提取数组中的每个元素,转换为整数,再构成列表
list_a01x = [int(each) for each in arr01]
list_a01x
[1, 2, 3, 4, 5, 6, 7]
type(list_a01x)
list
type(list_a01x[5])
int
3.2.2.2 数组的tolist方法
ndarray.tolist():将数组转换为列表,同时将数组中每个元素的数据类型转换为对应的原生python数据类型,没有参数
list_a01y = arr01.tolist()
list_a01y
[1, 2, 3, 4, 5, 6, 7]
type(list_a01y)
list
type(list_a01y[1])
int


