使用TinyPNG API压缩图片
在撰写论文的时候,美观,大气,上档次的图标能够很好地给自己的论文加分,好的可视化结果也能够让审稿人赏心悦目。但是有时候在可视化图片的时候有可能原始图像过大从而很占内存;这时候就希望能够是有一个无损压缩工具来压缩图像。目前笔者尝试过TinyPNG 感觉能够达到较好的压缩效果而且基本上不影响视觉效果。而且也有对应的安装包TinyGUI, TinyGUI 是网友根据TinyPNG提供的应用程序接口开发的本地桌面端工具。它具有以下特点:
- 无单张图片最大5M的限制
- 无压缩图片数量限制
- 免费且使用简单,图片拖放到界面就可以压缩
桌面端使用教程
- TinyGUI需要用到TinyPNG的API,这里先打开Developer API,填入用户名和邮箱,然后点击“Get Your API key”。当页面显示“We have sent you an email with a link to your API key!” 就可以到邮箱找到收到的API key了。

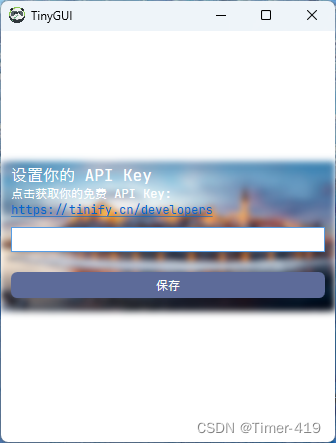
- 打开TinyGUI,在“设置你的 API Key”下框中输入刚收到的API(有可能在垃圾箱里),再选择保存。
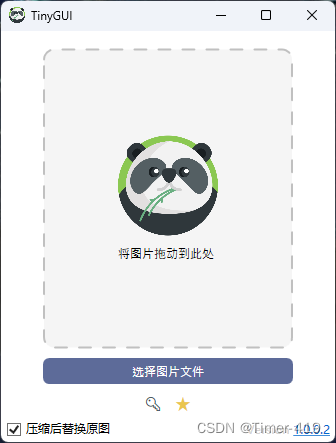
- 选择“选择图片文件”上传需要压缩的图片,或者直接拖拽图片到“将图片拖动到此处”区域
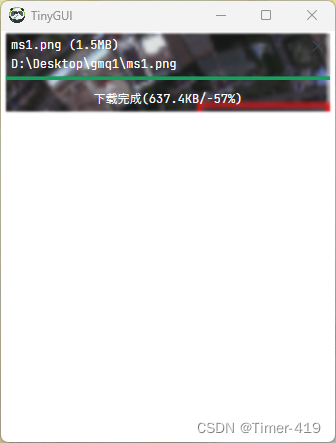
- 然后就可以开始等待图片压缩了,可以看到TinyPNG可以将1.5MB的图片压缩到637.4KB,压缩了57%,非常不错。
但是又到了但是环节。
本地桌面端工具用起来虽然比较方便,但是当图片比较多,或者图片存在多个文件夹下时就没那么方便了,作为一名程序猿 这时候当然想到的是用python来写一份调用API遍历文件夹的程序咯。
Python调用TinyPNG API 遍历文件夹压缩图片
同样的也需要使用上面的第一步来获取API key。
# -*- coding:utf-8 -*-
# 使用tinypng API压缩项目图片
import tinify
import os
import time
from os.path import join, getsize
import math

# 压缩图片的key
online_key_list = [
    "FCBMvlXLZzGKxwLBQ0CCl4hyrpLMWKt*",
    "FCBMvlXLZzGKxwLBQ0CCl4hyrpLMWKt*",  # 可以继续添加  防止一个key不够
]

# 获取key
online_key_list_iter = iter(online_key_list)
online_key = next(online_key_list_iter)
tinifyAPi = tinify.tinify

def size_format(size, dot=2):
    ## 文件大小 单位转化
    if 1 <= size < 1024:
        human_size = str(round(size, dot)) + 'B'
    # 千字节 千字节 Kilo Byte
    elif math.pow(1024, 1) <= size < math.pow(1024, 2):
        human_size = str(round(size / math.pow(1024, 1), dot)) + 'KB'
    # 兆字节 兆 Mega Byte
    elif math.pow(1024, 2) <= size < math.pow(1024, 3):
        human_size = str(round(size / math.pow(1024, 2), dot)) + 'MB'
    # 吉字节 吉 Giga Byte
    elif math.pow(1024, 3) <= size < math.pow(1024, 4):
        human_size = str(round(size / math.pow(1024, 3), dot)) + 'GB'
    # 太字节 太 Tera Byte
    elif math.pow(1024, 4) <= size < math.pow(1024, 5):
        human_size = str(round(size / math.pow(1024, 4), dot)) + 'TB'
    return human_size


# 在线压缩
def compress_online(sourcefile):
    global online_key
    compresskey = online_key
    tinify.key = compresskey
    rs = False
    outputfile = sourcefile
    old_size = getsize(sourcefile)
    try:
        source = tinifyAPi.from_file(sourcefile)
        source.to_file(outputfile)
        new_size = getsize(outputfile)
        sub_size = old_size - new_size
        print('保存路径:{} | 压缩前文件大小:{}; 压缩后文件大小:{}; 压缩比例:{:.2}%'.format(outputfile, size_format(old_size),
                                                                     size_format(new_size), sub_size / new_size * 100))
        rs = True
        pass
    except tinify.AccountError:
        # Verify your API key and account limit.
        # 如果key值无效 换一个key继续压缩
        print("key值无效 换一个继续。。。")
        online_key = next(online_key_list_iter)
        compress_online(sourcefile)  # 递归方法 继续读取
        rs = True

    except tinify.ClientError:
        # Check your source image and request options.
        print("Check your source image and request options.")
        rs = False
        pass
    except tinify.ServerError:
        # Temporary issue with the Tinify API.
        # print("Temporary issue with the Tinify API. %s" % e.message)
        print("Temporary issue with the Tinify API.")

        rs = False
        pass
    except tinify.ConnectionError:
        # A network connection error occurred.
        print("网络故障。。。休息1秒继续")
        time.sleep(1)
        compress_online(sourcefile)  # 递归方法 继续读取
        rs = True
        pass
    except Exception:
        # Something else went wrong, unrelated to the Tinify API.
        print("Something else went wrong, unrelated to the Tinify API.")
        rs = False
        pass
    return rs


def fileofdir_iterate(path):
    folderlist = os.listdir(path)  # 列举文件夹
    folderlist.sort()
    for item in folderlist:
        item_name = os.path.join(path, item)
        if os.path.isfile(item_name):
            compress_online(item_name)
        else:
            fileofdir_iterate(item_name)

if __name__ == '__main__':
    dir_path = r"D:\Desktop\fig\figures\examples\GF2"
    fileofdir_iterate(dir_path)
上面的程序参考了:https://github.com/haoma2012/PythonProject/blob/master/ComPressPic.py。
这里作者直接把压缩后的图片替换了原始的图片,可以根据自己的需求来调整输出结果的存放位置。
以上便是本次分享,如有问题可添加笔者QQ:


![[附源码]SSM计算机毕业设计智慧教学平台JAVA](https://img-blog.csdnimg.cn/4b6f7df217d34fa198a261be5e721897.png)
![[附源码]java毕业设计生产型企业员工管理系统](https://img-blog.csdnimg.cn/f5a27bd8baed466ebcf762d95e947736.png)



![[附源码]java毕业设计汽车票售票系统lunwen](https://img-blog.csdnimg.cn/e0b0a758c19445f78012b9b0e47ae5a4.png)


![[附源码]SSM计算机毕业设计远程在线教育平台JAVA](https://img-blog.csdnimg.cn/b769895b2ef94babb5c396c2b36d1f59.png)