Wallis匀色原理:
# f(x,y):Wallis匀色后结果
# g(x,y):输入的待匀色影像
# mg:待处理影像的灰度均值
# mf:参考影像的灰度均值
# sg:待处理影像和的标准偏差
# sf:参考影像的标准偏差
f(x,y)=(g(x,y)−mg)⋅(sf/sg)+mf
匀色代码逻辑解释:
(1)使用变异系数计算影像的分块数目;
(2)分块计算各块的均值、标准差;
(3)均值、标准差图重采样(双线性)成与输入影像相同行列数;
(4)代入Wallis匀色计算公式计算匀色后的图像数组并保存结果。
代码使用注意:
(1)输入影像与参考影像一定要行列数一致,后面采用GDAL的算法做了重采样,但是GDAL重采样要求输入的影像一定要有坐标;
(2)代码里给Wallis匀色后的值取了绝对值,因为保存成8bit的时候一些负值变成255了;
(3)处理的数据必须是8位的,输出也被固定成8位的了(band_i.astype(np.uint)),如果输入别的位深的数据需要修改一下输出时的数值转换。
算法脚本:
cv2进行Wallis匀色处理的代码
cv2适合对没有坐标、数据量小的图片进行处理,带坐标且数据量极大的卫星影像等往下看GDAL的算法。
"""Wallis匀光——cv"""
import cv2
import numpy as np
from osgeo import gdal
import matplotlib.pyplot as plt
org_file = r"输入影像.tif"
ref_file = r"参考影像.tif"
img_org = cv2.imread(org_file)
infer_img = cv2.imread(ref_file)
width,height,bands = img_org.shape
# 将影像分块进行处理
# 计算变异系数
cv_org = np.std(img_org)/np.mean(img_org)
cv_ref = np.std(infer_img)/np.mean(infer_img)
r = cv_org/cv_ref
num = int(np.ceil(8*r))
w = int(np.ceil(width/num))
h = int(np.ceil(height/num))
# mg:待处理影像的灰度均值
# mf:参考影像的灰度均值
# sg:待处理影像和的标准偏差
# sf:参考影像的标准偏差
mg = np.zeros((num,num,bands),dtype=np.float)
mf = np.zeros_like(mg)
sg = np.zeros_like(mg)
sf = np.zeros_like(mg)
for b in range(bands):
    for i in range(num):
        for j in range(num):
            orgin_x = i*w
            if orgin_x + w > width:orgin_x = width - w
            orgin_y = j*h
            if orgin_y + h > height:orgin_y = height - h
            end_x = orgin_x + w
            end_y = orgin_y + h
            img = img_org[orgin_x:end_x,orgin_y:end_y,b]
            ref = infer_img[orgin_x:end_x,orgin_y:end_y,b]
            mg[i,j,b] = np.mean(img)
            sg[i,j,b] = np.std(img)
            mf[i,j,b] = np.mean(ref)
            sf[i,j,b] = np.std(ref)

"""Wallis公式:f(x,y)=(g(x,y)−mg)⋅(sf/sg)+mf"""
eps = 1e-8
waillisImg = np.zeros_like(img_org)
for i in range(bands):
    mg_res = cv2.resize(mg[:,:,i],(height,width),interpolation=cv2.INTER_LINEAR)
    mf_res = cv2.resize(mf[:,:,i],(height,width),interpolation=cv2.INTER_LINEAR)
    sf_res = cv2.resize(sf[:,:,i],(height,width),interpolation=cv2.INTER_LINEAR)
    sg_res = cv2.resize(sg[:,:,i],(height,width),interpolation=cv2.INTER_LINEAR)
    band_i = np.abs((img_org[:,:,i] - mg_res) * (sf_res / (sg_res+ eps)) + mf_res)
    waillisImg[:,:,i] = band_i.astype(np.uint)
cv2.imwrite(r"waillis匀色结果.tif",waillisImg)
plt.subplot(1,3,1)
plt.imshow(img_org)
plt.subplot(1,3,2)
plt.imshow(infer_img)
plt.subplot(1,3,3)
plt.imshow(waillisImg)
plt.show()
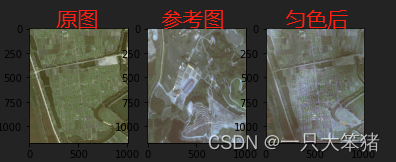
贴一下匀色结果:
GDAL的Wallis匀色算法代码
GDAL的算法就没有办法像上面cv2一样把全图读完计算变异系数了(计算量太大了),采用的是经典的分块处理,将图像分成固定大小的方形切片,计算均值和标准差,并使用gdal.warp进行重采样,后面就是简单的分波段计算、保存与输出了。
"""Wallis匀光——GDAL"""

from osgeo import gdal,gdalconst
import numpy as np

org_file = r"输入影像.tif"
ref_file = r"参考影像.tif"

raster = gdal.Open(org_file)
rows = raster.RasterYSize
cols = raster.RasterXSize
bands = raster.RasterCount
print(cols,rows,bands)
OriginX,psX,_,OriginY,_,psY = raster.GetGeoTransform()
EndX = OriginX + cols * psX
EndY = OriginY + rows * psY
extent = [OriginX,EndY,EndX,OriginY]
# 分块大小定义为512
bk_size = 512
num_w = int(np.ceil(cols / bk_size))
num_h = int(np.ceil(rows/ bk_size))
print(num_w,num_h)
ref_raster = gdal.Open(ref_file)
# 输入影像对齐(对参考影像重采样成相同行列数)
if ref_raster.RasterXSize != cols and ref_raster.RasterYSize != rows:
    new_ref = ref_file[0:-4]+"_resample.tif"
    warp_ds = gdal.Warp(new_ref,ref_file,width = cols,height = rows)
    warp_ds = None
    ref_raster = gdal.Open(new_ref)
# 计算Wallis需要的参数
# mg:待处理影像的灰度均值
# mf:参考影像的灰度均值
# sg:待处理影像和的标准偏差
# sf:参考影像的标准偏差
res_out = np.zeros((4,num_h,num_w,bands),dtype=np.float)
for b in range(bands):
    img_band = raster.GetRasterBand(b+1)
    ref_img = ref_raster.GetRasterBand(b+1)
    for i in range(num_h):
        for j in range(num_w):
            orgin_x = min(j*bk_size,cols -  bk_size)
            orgin_y = min(i*bk_size,rows - bk_size)
            img = img_band.ReadAsArray(orgin_x,orgin_y, bk_size, bk_size)
            ref = ref_img.ReadAsArray(orgin_x,orgin_y, bk_size, bk_size)
            res_out[0,i,j,b] = np.mean(img)#mg
            res_out[1,i,j,b] = np.std(img)#sg
            res_out[2,i,j,b] = np.mean(ref)#mf
            res_out[3,i,j,b] = np.std(ref)#sf

# 重采样
# 对输入影像重采样是为了获得采样后的Projection和GeoTransform,用来赋给mg/sg/mf/sf进行上采样
# 测试中发现gdal.warp无法对没有坐标的图像重采样
outimg = r"输入影像重采样.tif"
warp_ds = gdal.Warp(outimg,org_file,resampleAlg=gdalconst.GRA_Average,width = num_w,height = num_h)
del warp_ds
temp_ref = gdal.Open(outimg)
in_list = []
for i in range(4):
    driver = gdal.GetDriverByName("GTiff")
    temp_out = r"temp%d.tif" % i # 过程数据 完成后可以删除
    temp_ds = driver.Create(temp_out,num_w,num_h,bands,gdal.GDT_Float32)
    temp_ds.SetGeoTransform(temp_ref.GetGeoTransform())
    temp_ds.SetProjection(temp_ref.GetProjection())
    for tb in range(bands):
        temp_ds.GetRasterBand(tb+1).WriteArray(res_out[i,:,:,tb])
    temp_ds.FlushCache()
    del temp_ds
    temp_res = r"temp_res%d.tif" % i # 过程数据 完成后可以删除
    warp_ds = gdal.Warp(temp_res,temp_out,resampleAlg=gdalconst.GRA_Bilinear,outputBounds = extent,xRes = psX,yRes =psY,targetAlignedPixels=True)
    del warp_ds
    in_raster = gdal.Open(temp_res)
    in_list.append(in_raster)

# 输出匀色结果
eps = 1e-8
[mean_raster,std_raster,mean_ref_raster,std_ref_raster] = in_list
driver = gdal.GetDriverByName("GTiff")
out_ds= driver.Create(r"Wallis匀色结果.tif",cols,rows,bands,gdal.GDT_Byte)
out_ds.SetGeoTransform(raster.GetGeoTransform())
out_ds.SetProjection(raster.GetProjection())
for b in range(bands):
    # 输入影像
    in_band = raster.GetRasterBand(b+1)
    mean_band = mean_raster.GetRasterBand(b+1)
    std_band = std_raster.GetRasterBand(b+1)
    # 参考影像
    mean_ref_band = mean_ref_raster.GetRasterBand(b+1)
    std_ref_band = std_ref_raster.GetRasterBand(b+1)
    # 输出影像
    out_band = out_ds.GetRasterBand(b+1)
    # 分块处理
    for i in range(num_h):
        for j in range(num_w):
            orgin_x = min(j*bk_size,cols -  bk_size)
            orgin_y = min(i*bk_size,rows - bk_size)
            # 读取输入参数
            gx = in_band.ReadAsArray(orgin_x, orgin_y, bk_size, bk_size)
            mg = mean_band.ReadAsArray(orgin_x, orgin_y, bk_size, bk_size)
            sg = std_band.ReadAsArray(orgin_x, orgin_y, bk_size, bk_size)
            mf = mean_ref_band.ReadAsArray(orgin_x, orgin_y, bk_size, bk_size)
            sf = std_ref_band.ReadAsArray(orgin_x, orgin_y, bk_size, bk_size)
            # 计算匀色影像
            wallis = np.abs((gx - mg) * (sf / (sg+ eps)) + mf)
            # 保存匀色结果
            out_band.WriteArray(wallis.astype(np.uint),orgin_x,orgin_y)
    out_band.FlushCache()
del out_band
out_ds.FlushCache()
del out_ds
print("Done")


![[附源码]SSM计算机毕业设计智慧教学平台JAVA](https://img-blog.csdnimg.cn/4b6f7df217d34fa198a261be5e721897.png)
![[附源码]java毕业设计生产型企业员工管理系统](https://img-blog.csdnimg.cn/f5a27bd8baed466ebcf762d95e947736.png)



![[附源码]java毕业设计汽车票售票系统lunwen](https://img-blog.csdnimg.cn/e0b0a758c19445f78012b9b0e47ae5a4.png)


![[附源码]SSM计算机毕业设计远程在线教育平台JAVA](https://img-blog.csdnimg.cn/b769895b2ef94babb5c396c2b36d1f59.png)
