本教程翻译至这里
https://detectron2.readthedocs.io/en/latest/tutorials/deployment.html
detectron2模型训练以后如果想要部署,就需要导出专门的模型才可以。
三种模型导出方式
detectron2支持的模型导出方式有:
-
tracing
该方式导出的格式是TorchScript,运行环境是PyTorch -
scripting
该方式导出的格式是TorchScript,运行环境是PyTorch -
caffe2_tracing
该方式导出的格式可以是Caffe2、TorchScript或ONNX,运行的环境是Caffe2或PyTorch
这三种方式的具体情况如下表:
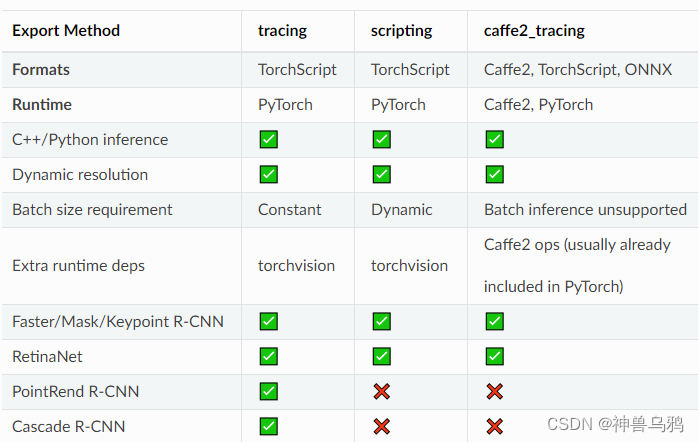
其中要注意的是如果要通过caffe2_tracing方式转换,是不支持batch输入的,也不支持PointRend R-CNN和Cascade R-CNN算法,它的好处是不需要依赖torchvision
关于这三种方式的区别参考这里:
https://pytorch.org/tutorials/beginner/Intro_to_TorchScript_tutorial.html
https://pytorch.org/tutorials/beginner/Intro_to_TorchScript_tutorial.html
通过Caffe2-tracing导出方式部署
如果想要把模型转换为Caffe2、TorchScript或ONNX这三种格式,需要用到Caffe2Tracer 这个类,这种部署方式可以不用依赖detectron2和torchvision就可以运行在cpu或者gpu环境下,但是只在cpu的移动设备上进行了优化,没有在gpu设备上进行优化。
此外,要求ONNX ≥ 1.6
官方支持基于GeneralizedRCNN、RetinaNet、PanopticFPN这三种算法的模型转换,但是不支持Cascade R-CNN算法,也不支持Batch推理。
一、模型导出方式
参考的方法在这里API documentation,后面有时间我再进行下一步翻译,因为还需要写另一篇文章。
这里还有一个demo示例 export_model.py
二、在C++中调用
如果想在C++或者Python中调用,这里也提供了一个demo示例 C++ examples
注意点是:
- 模型导出方式必须是 caffe2_tracing
- The converted models do not contain post-processing operations that transform raw layer outputs into formatted predictions. For example, the C++ examples only produce raw outputs (28x28 masks) from the final layers that are not post-processed, because in actual deployment, an application often needs its custom lightweight post-processing, so this step is left for users.(这一步不理解)
为了能够帮助您更好的转换模型,我们封装了一个类 Caffe2Tracer 该类包含了如何在detectron2中如何调用caffe2模型。


