基于树莓派的智能小车,用摄像头实现识别道路中的车道线识别、行人检测与车辆检测。

本项目旨在开发一套基于摄像头的智能道路环境感知系统,该系统能够实时识别道路中的车道线、行人与车辆,为自动驾驶汽车、智能交通管理以及辅助驾驶系统提供关键的视觉信息。系统集成先进的计算机视觉技术和深度学习算法,确保在复杂多变的交通环境中实现高精度的目标检测与分类。
关键技术组件:
-
车道线识别模块:
- 技术方法:采用基于图像处理和机器学习的方法,如Canny边缘检测、Hough变换、深度神经网络(如U-Net、Faster R-CNN)等,以准确检测和追踪车道线。
- 功能:实时识别车道线位置,支持车道偏离预警、自动车道保持等功能。
-
行人检测模块:
- 技术方法:利用深度学习模型,如YOLOv5/v8、SSD或RetinaNet,这些模型在行人检测任务中表现出色,能够快速准确地识别出画面中的行人。
- 功能:提前预警可能的碰撞风险,支持行人避让策略,提高道路安全。
-
车辆检测模块:
- 技术方法:同样采用先进的深度学习模型,这些模型经过大规模车辆数据集训练,能够有效区分不同类型的车辆(轿车、卡车、摩托车等)。
- 功能:实现对周围车辆的精确跟踪,支持自适应巡航控制、紧急制动辅助等功能。
-
图像处理与预处理:
- 内容:包括图像去噪、曝光补偿、白平衡调整、图像增强等,确保输入到模型的图像质量,优化检测效果。
-
硬件平台:
- 摄像头:高分辨率、宽动态范围的摄像头,安装于车辆前方,可覆盖较宽视野。
- 计算单元:高性能GPU或专用AI芯片,用于加速深度学习模型的推理。
-
软件架构:
- 实时操作系统:确保系统的低延迟响应和稳定运行。
- 算法集成框架:如TensorFlow、PyTorch或OpenCV,便于模型部署和更新。
-
数据处理与融合:
- 多传感器融合:虽然本项目主要依赖摄像头,但在高级应用中,可与雷达、激光雷达(LiDAR)数据融合,提高环境感知的鲁棒性和精度。
项目应用:
- 自动驾驶汽车:为自动驾驶系统提供基础视觉信息,提升安全性和自主驾驶能力。
- 智能交通系统:改善交通流管理,减少交通事故,提升交通效率。
- 辅助驾驶系统:在传统车辆中增加智能辅助功能,如盲点监测、交叉路口警报等。
该项目展现了现代智能交通技术的发展方向,通过摄像头的智能化应用,为未来的交通安全和效率提升奠定坚实的基础。
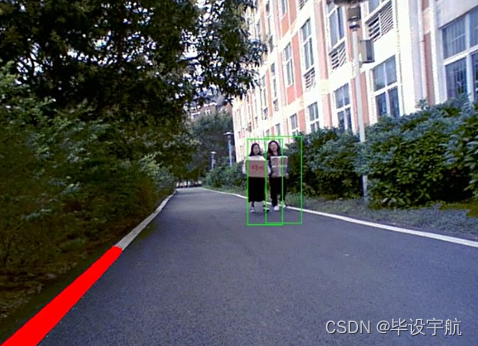

车道线识别 (使用OpenCV)
import cv2
import numpy as np

def detect_lane_lines(image):
    # 图像预处理
    gray = cv2.cvtColor(image, cv2.COLOR_BGR2GRAY)
    blur = cv2.GaussianBlur(gray, (5, 5), 0)
    edges = cv2.Canny(blur, 50, 150)

    # 使用霍夫变换检测直线
    lines = cv2.HoughLinesP(edges, rho=1, theta=np.pi/180, threshold=50, minLineLength=50, maxLineGap=10)

    if lines is not None:
        for line in lines:
            x1, y1, x2, y2 = line.reshape(4)
            cv2.line(image, (x1, y1), (x2, y2), (0, 255, 0), 2)

    return image

# 加载测试图像
image_path = 'path_to_your_test_image.jpg'
image = cv2.imread(image_path)
lane_detected_image = detect_lane_lines(image)
cv2.imshow('Lane Detection', lane_detected_image)
cv2.waitKey(0)
cv2.destroyAllWindows()
行人检测 (使用YOLOv5)
首先确保你已经安装了torch和下载了YOLOv5模型。
import torch
from PIL import Image

def detect_pedestrians(image_path, model_path='yolov5s.pt'):
    model = torch.hub.load('ultralytics/yolov5', 'custom', path=model_path)
    img = Image.open(image_path)
    results = model(img)
    results.show()  # 显示检测结果

detect_pedestrians('path_to_your_test_image.jpg')
车辆检测 (使用TensorFlow和预训练模型)
确保安装了tensorflow和相关的模型库。
import tensorflow as tf
from object_detection.utils import label_map_util
from object_detection.utils import visualization_utils as viz_utils
import numpy as np
import cv2

def detect_vehicles(image_path, model_path, label_map_path):
    # 加载模型和标签映射
    detection_model = tf.saved_model.load(model_path)
    category_index = label_map_util.create_category_index_from_labelmap(label_map_path, use_display_name=True)

    # 加载并预处理图像
    img = cv2.imread(image_path)
    image_np_expanded = np.expand_dims(img, axis=0)

    # 运行检测
    input_tensor = tf.convert_to_tensor(image_np_expanded)
    detections = detection_model(input_tensor)

    # 可视化结果
    num_detections = int(detections.pop('num_detections'))
    detections = {key: value[0, :num_detections].numpy()
                   for key, value in detections.items()}
    detections['num_detections'] = num_detections

    # 滤除置信度低的框
    detection_threshold = 0.5
    boxes = detections['detection_boxes']
    scores = detections['detection_scores']
    classes = detections['detection_classes'].astype(np.int64)

    indices = np.where(scores > detection_threshold)[0]
    boxes = boxes[indices]
    scores = scores[indices]
    classes = classes[indices]

    viz_utils.visualize_boxes_and_labels_on_image_array(
        img,
        boxes,
        classes,
        scores,
        category_index,
        use_normalized_coordinates=True,
        min_score_thresh=detection_threshold,
        line_thickness=8)

    cv2.imshow('Vehicle Detection', img)
    cv2.waitKey(0)
    cv2.destroyAllWindows()

# 示例用法
detect_vehicles('path_to_your_test_image.jpg', 'path_to_your_saved_model_directory', 'path_to_your_label_map.pbtxt')
请根据实际情况调整模型路径、标签文件路径等,并确保已下载相关模型和依赖库。上述代码仅提供了基本框架,具体实现时还需考虑性能优化、模型选择与微调等问题。





![mst[讲课留档]](https://img-blog.csdnimg.cn/direct/05a3a6e1395943c2af4c142d4d259695.png)

