1. 下载anaconda安装包
根据自己的操作系统不同,选择不同的安装包Anaconda3-2024.06-1-MacOSX-x86_64.pkg,我用的还是旧的intel所以下载这个,https://mirrors.tuna.tsinghua.edu.cn/anaconda/archive/,如果mac用的是M1,M2芯片,需要下后缀为_arm64.pkg
2. 安装anaconda
双击打开安装包,一路继续,安装完成打不开请到设置中允许

3. 配置环境变量
打开终端:
source ~/.bash_profile,如果路径中含user/xxx,需要更改用户为自己所在的目录路径,我这里用的opt目录,不用再改,所以直接source ~/.bash_profile,激活环境。
否则需要更改完成保存之后,激活环境
测试环境是否安装成功,如果输出一大堆依赖,则代表安装成功:
conda list4. 创建3.11.7版本的虚拟环境
1. 命令行输入创建3.17版本的虚拟环境命令:
conda create --name py3117 python=3.11.72. 激活虚拟环境:
conda activate py31173. 安装常用库:
conda install anaconda4. 将新的虚拟环境添加到Jupyter:
python -m ipykernel install --name=py31175. 安装pytorch, transformers, dashscope, modelscope, gradio 等深度学习的库,这一步最后启动号jupyter再做。
6. jupyter notebook安装目录插件
# (安装了目录插件,我们用jupyter notebook读取python文本时就可以看到python的文本目录了,这样方便查看带有目录的python代码文本。)

# 在 cmd黑色命令窗口或者anaconda prompt 执行如下命令, (windows(windows窗口标志)+R,输入cmd,进入cmd命令窗口)

# 第一步:更新pip
python -m pip install --upgrade pip --user -i https://pypi.tuna.tsinghua.edu.cn/simple

# 第二步:更新Jupyter
pip install --upgrade jupyter -i https://pypi.tuna.tsinghua.edu.cn/simple


# 第三步:安装 jupyter_contrib_nbextensions
pip install jupyter_contrib_nbextensions -i https://pypi.tuna.tsinghua.edu.cn/simple


# 第四步:配置 nbextension
jupyter contrib nbextension install --user

# 直接使用以上命令报错:
File "/opt/anaconda3/lib/python3.12/site-packages/jupyter_contrib_core/notebook_compat/nbextensions.py", line 6, in <module>
    from notebook.extensions import BaseExtensionApp
ModuleNotFoundError: No module named 'notebook.extensions'
# 解决办法:改用以下命令安装
conda install -c conda-forge jupyter_contrib_nbextensions
# 安装后,再次输入成功
jupyter contrib nbextension install --user

###安装问题备注:
出现连接中断之类的,做-i+国内源地址尝试
例如:pip install --upgrade jupyter
加国内源地址:  pip install --upgrade jupyter  -i https://pypi.tuna.tsinghua.edu.cn/simple

常用国内源地址
#清华大学源
https://pypi.tuna.tsinghua.edu.cn/simple

#阿里巴巴源
https://pypi.doubanio.com/simple

#中国科学技术大学源
https://pypi.mirrors.ustc.edu.cn/simple/

#豆瓣源
https://pypi.doubanio.com/simple
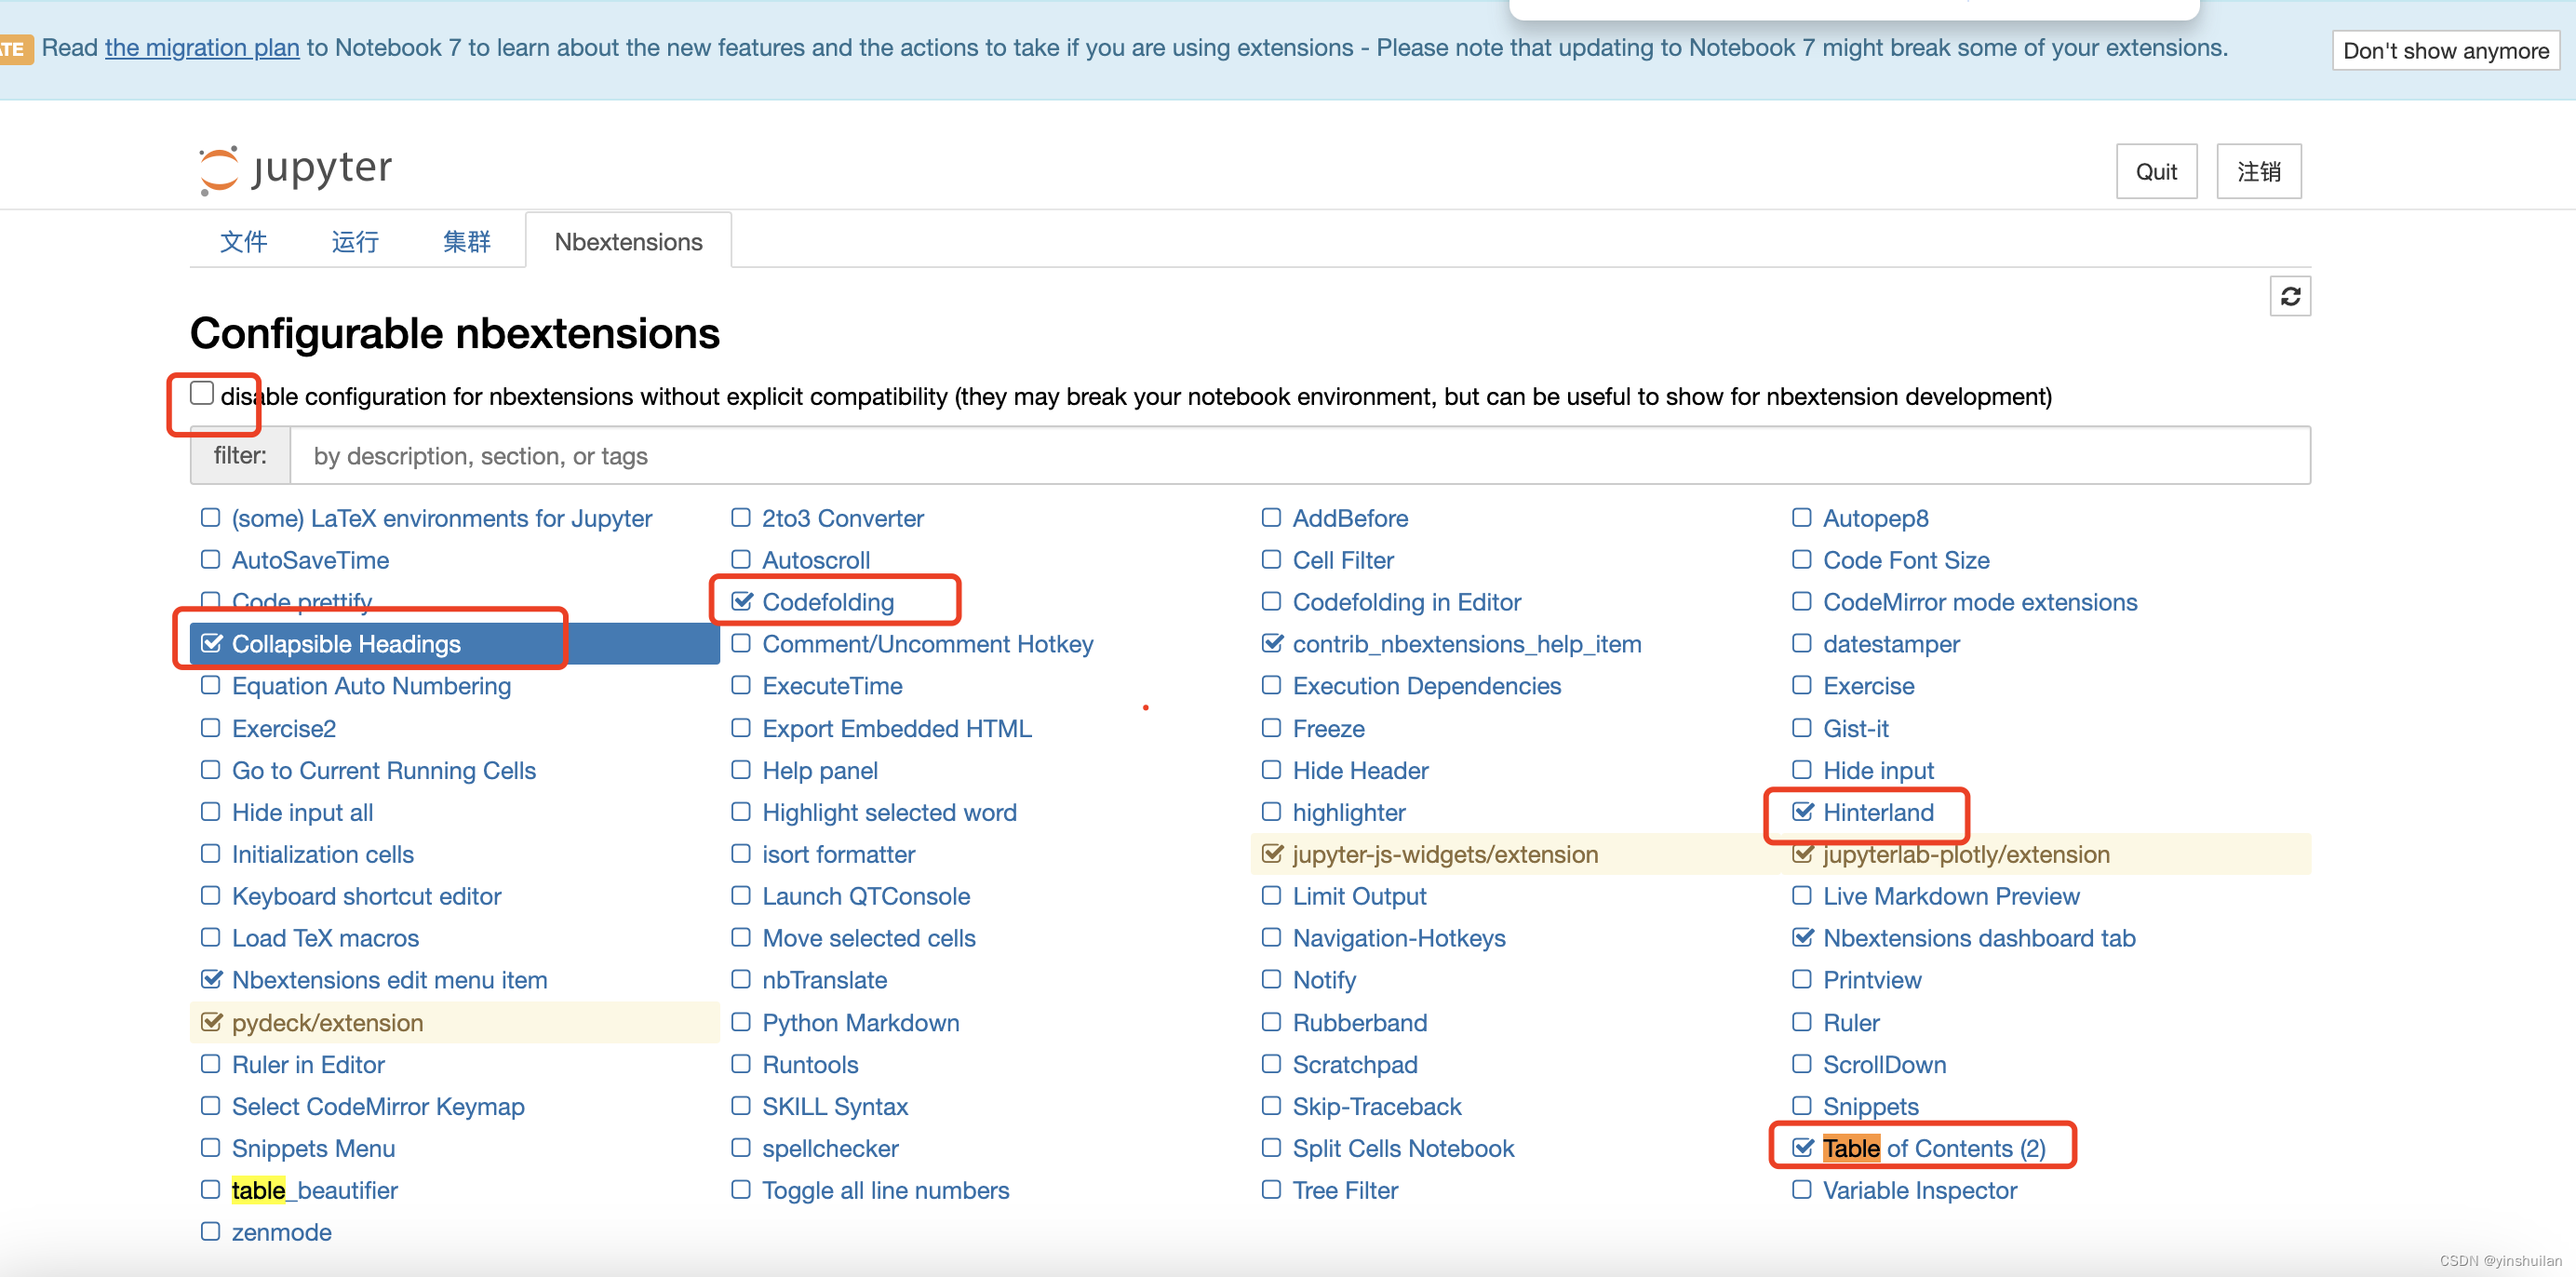
# 第五步:启动jupyter notebook,选择 Nbextensions,勾选 Table of Contents(2) ,
选做步骤
勾选Collapsible headings---将标题内部的内容全部折叠起来
Code folding---代码折叠插件,允许你将缩进内容折叠起来,节省屏幕空间
Hinterland---代码提示自动补全功能
Jupyter页面打开《各种库和模型安装》代码包后,先把Kernel(内核)改为py3117(学习另外三个代码包时也保持使用)
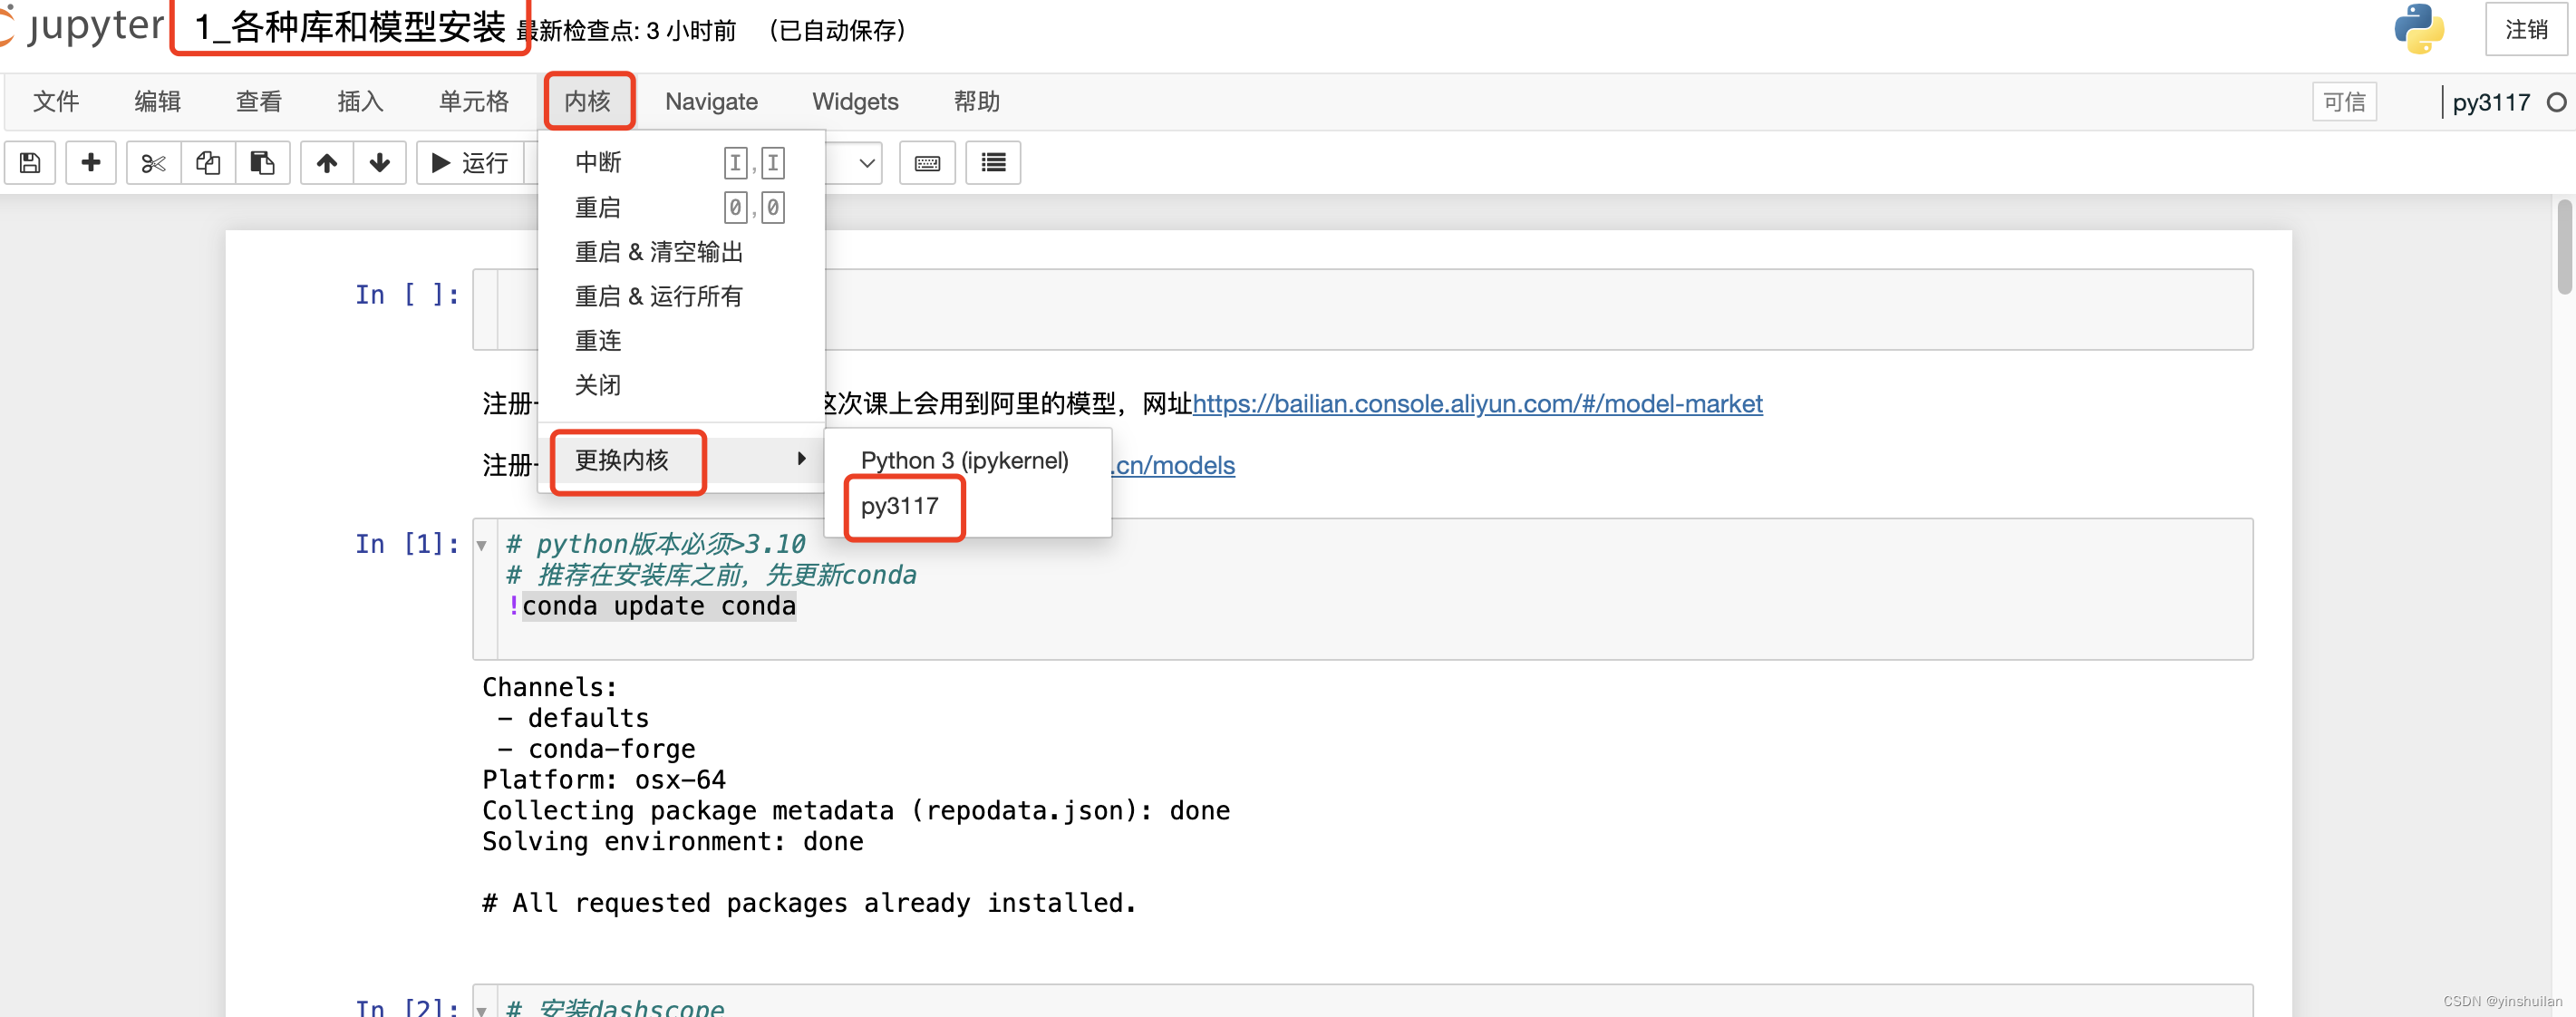
切换好内核后,开始逐一安装深度学习的库。
5. 安装深度学习的库
这里可以逐一点击代码框,点Run ,耐心等候下载和安装。下载和安装时,这里会变*,每完成一个代码框,这里会变成数字码。
如果不想在这里安装,也可以在命令行逐一安装
# python版本必须>3.10
# 推荐在安装库之前,先更新conda
# conda update conda

# 安装dashscope
!pip install dashscope -i https://pypi.tuna.tsinghua.edu.cn/simple

# 安装modelscope
!pip install modelscope -i https://pypi.tuna.tsinghua.edu.cn/simple

# 报错:ERROR: pip's dependency resolver does not currently take into account all the packages that are installed. This behaviour is the source of the following dependency conflicts.
s3fs 2024.3.1 requires fsspec==2024.3.1, but you have fsspec 2024.2.0 which is incompatible.


# 安装pytorch
!pip3 install torch torchvision torchaudio -i https://pypi.tuna.tsinghua.edu.cn/simple

# 安装transformers
!pip install transformers -i https://pypi.tuna.tsinghua.edu.cn/simple

# 安装datasets
!pip install datasets -i https://pypi.tuna.tsinghua.edu.cn/simple

# 安装gradio
!pip install gradio -i https://pypi.tuna.tsinghua.edu.cn/simple

# 下载上课用的预训练模型,warning信息请忽略
from modelscope.models import Model
model = Model.from_pretrained('damo/nlp_bert_fill-mask_chinese-base')
model = Model.from_pretrained('damo/nlp_structbert_zero-shot-classification_chinese-base')
如果上面的虚拟环境未切换直接用jupyter安装这些库,则安装到了base内核了,则后续再切换到虚拟环境无法安装的,需要到命令行逐一输入命令安装。
备注: 因为老师给的安装没有用国内镜像,我统一加了国内镜像安装,速度会快些。
7. 注册账号
注册一个阿里云的账号
我们这次课上会用到阿里的模型,网址https://bailian.console.aliyun.com/#/model-market
注册一个Model Scope的账号
网址https://modelscope.cn/models
退出虚拟环境:conda deactivate
删除虚拟环境:conda env remove --name py3117
现有虚拟环境列表:conda env list
