个人简介:Java领域新星创作者;阿里云技术博主、星级博主、专家博主;正在Java学习的路上摸爬滚打,记录学习的过程~
个人主页:.29.的博客
学习社区:进去逛一逛~

注解管理Bean
- 一、注解的功能
- 二、四个典型注解
- 三、扫描注解
- ①基本的扫描方式
- ②指定匹配模式
- ③指定扫描时要排除的组件
- ④指定仅扫描什么组件
- 注:bean的id属性
- 四、自动装配
- 五、完全注解开发
- ⚪配置类
- ⚪测试
- 六、整合Junit 4
- ⚪组件类
- ⚪XML配置文件
- ⚪测试类
- 🚀小结
一、注解的功能
注解本身只是一种标记,是不能被执行的,但是框架功能检测到注解后,会根据当前位置注解标记的功能来执行具体的操作。
框架中的操作都由Java代码执行,注解只是告诉框架需要执行那些代码。
二、四个典型注解
@Component: 标记普通的组件@Controller: 标记三层架构表述层中的控制器组件(controller)@Service: 标记表述层中的业务逻辑组件(service)@Repository: 标记持久化层组件(DAO)
@Controller、@Service、@Repository这三个注解只是在@Component注解的基础上起了三个新的名字,对于Spring使用IOC容器管理这些组件来说没有任何区别,也就是语法层面没有区别。之所以这么做是为了增加代码可读性,让我们能够便于分辨组件的作用。
三、扫描注解
①基本的扫描方式
- XML配置文件中,配置自动扫描的包;
<context:component-scan base-package="com.haojin.ioc.component"/>
base-package属性 配置自动扫描的包
包名:使用注解组件类所在的包
②指定匹配模式
- XML配置文件中,配置了自动扫描的包的基础上,指定匹配模式
<context:component-scan base-package="com.haojin.ioc.component"
                            resource-pattern="Test*.class"/>
resource-pattern属性 指定匹配模式
指定匹配模式外组件类的bean不会创建,所以获取没有创建的bean时会报错
③指定扫描时要排除的组件
- XML配置文件中,指定不扫描的组件/扫描时排除的组件
    <context:component-scan base-package="com.haojin.ioc.component">
        <context:exclude-filter type="annotation" expression="org.springframework.stereotype.Controller"/>
    </context:component-scan>
- context:exclude-filter标签,指定不扫描的组件
- type属性指定根据什么来进行排除,annotation取值表示根据注解来排除
- expression属性:指定排除规则的表达式,对于注解来说指定全类名即可
④指定仅扫描什么组件
- 仅扫描 = 关闭默认规则 + 追加规则
- 属性 use-default-filters ,取值false表示关闭默认扫描规则
- context:include-filter标签:指定在原有扫描规则的基础上追加的规则(仅扫描)
- expression属性:指定仅扫描规则的表达式,对于注解来说指定全类名即可
    <context:component-scan base-package="com.haojin.ioc.component" use-default-filters="false">
        <context:include-filter type="annotation" expression="org.springframework.stereotype.Controller"/>
    </context:component-scan>
注:bean的id属性
在我们使用 XML 方式管理 bean 的时候,每个 bean 都有一个唯一标识——id 属性的值,便于在其他地方引用。现在使用注解后,每个组件仍然应该有一个唯一标识。
默认:类名首字母小写就是 bean 的 id。如:TestController 类对应 testController
指定:标记注解时,使用value属性指定
@Controller(value = "controller")
public class TestController {
}
四、自动装配
- 前提:参与自动装配的组件,全部都必须在IOC容器中。(都需要创建bean)
- 使用
@Autowired注解实现自动装配
案例:
- TestController 需要 TestService;
- TestService 需要 TestDao;
- 同时在各个组件中声明要调用的方法。
- TestDao组件,含getMessage()方法
@Repository
public class TestDao {

    public void getMessage(){
        System.out.println("all girls are the same...");
    }

}
- TestService组件,@Autowired注解标记 TestDao
//这个组件就是我们在三层架构中使用的业务逻辑组件。
@Service
public class TestService {
	//在成员变量上直接标记@Autowired注解即可
    @Autowired
    TestDao testDao;

    public void getMessage(){
        testDao.getMessage();
    }
}
- TestController组件,@Autowired注解标记 TestService
//这个组件就是我们在三层架构中表述层里面,使用的控制器。以前是Servlet,以后我们将会使用Controller来代替Servlet。
@Controller(value = "controller")
public class TestController {
    @Autowired
    TestService testService;

    public void getMessage(){
        testService.getMessage();
    }


}
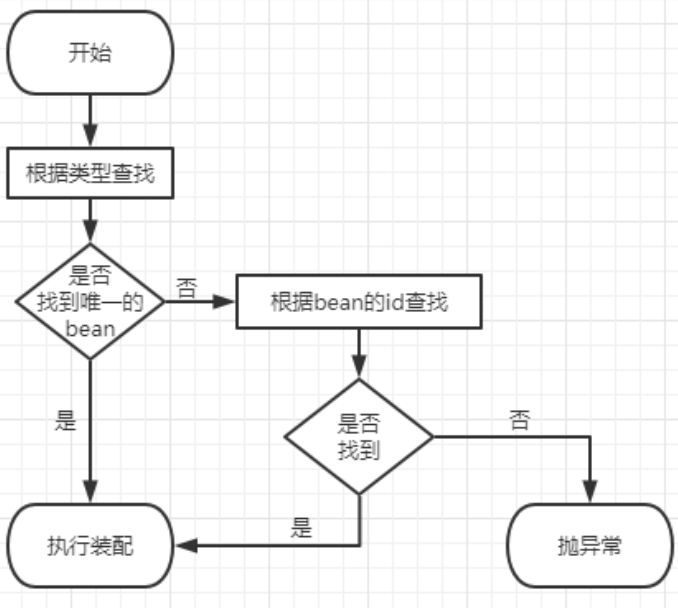
自动装配的流程:
在@Autowired注解的下一行,
可以使用@Qualifier注解 指定 bean 的 id ,不使用则默认id;
    @Autowired
    @Qualifier(value = "beanIdName")
五、完全注解开发
-
@Configuration注解将一个普通的类标记为 Spring 的配置类; -
@ComponentScan注解配置类中配置自动扫描的包; -
@Bean注解相当于XML文件中的bean标签,标记的方法的返回值会被放入 IOC 容器,默认以方法名作为 bean 的 id; -
使用 AnnotationConfigApplicationContext 根据配置类创建 IOC 容器对象;
⚪配置类
//@Configuration注解 将一个普通的类标记为 Spring 的配置类
@Configuration
//@ComponentScan注解 配置类中配置自动扫描的包
@ComponentScan("com.haojin.ioc.component")
public class TestController {
    // @Bean 注解相当于 XML 配置文件中的 bean 标签
    // @Bean 注解标记的方法的返回值会被放入 IOC 容器
    // 默认以方法名作为 bean 的 id
    @Bean
    public void getMessage(){

    }

}
⚪测试
public class TestComponent {
    @Test
    public void test1(){
    //使用ClassPathXmlApplicationContext读取XML配置文件的方式
//        ApplicationContext context = new ClassPathXmlApplicationContext("component_bean.xml");

        //根据配置类创建 IOC 容器对象;
        ApplicationContext context = new AnnotationConfigApplicationContext(TestController.class);

        TestController controller = context.getBean(TestController.class);

        System.out.println(controller);

    }
}
六、整合Junit 4
优点:
1:不需要自己创建IOC容器对象了
2:任何需要的bean都可以在测试类中直接享受自动装配
⚪组件类
@Controller(value = "controller")
public class TestController {

}
⚪XML配置文件
component_bean.xml配置文件
    <context:component-scan base-package="com.haojin.ioc.component" use-default-filters="false">
        <context:include-filter type="annotation" expression="org.springframework.stereotype.Controller"/>
    </context:component-scan>
</beans>
⚪测试类
- junit的
@RunWith注解:指定Spring为Junit提供的运行器 - Spring的
@ContextConfiguration注解: 指定Spring配置文件的位置
**
 * @author .29.
 * @create 2023-01-21 14:18
 */
// junit的@RunWith注解:指定Spring为Junit提供的运行器
// Spring的@ContextConfiguration指定Spring配置文件的位置
@RunWith(SpringJUnit4ClassRunner.class)
@ContextConfiguration(value = {"classpath:component_bean.xml"})
public class TestComponent {
    //自定装配
    @Autowired
    TestController controller;

    @Test
    public void test1(){
        System.out.println(controller);
    }
}
🚀小结
-
@Component: 标记普通的组件 -
@Controller: 标记三层架构表述层中的控制器组件(controller) -
@Service: 标记表述层中的业务逻辑组件(service) -
@Repository: 标记持久化层组件(DAO) -
@Autowired: 实现自动装配 -
@Qualifier: 用在@Autowired下一行,指定 bean 的 id -
@Configuration: 将一个普通的类标记为 Spring 的配置类 -
@ComponentScan: 配置类中配置自动扫描的包 -
@Bean相当于XML文件中的bean标签,标记的方法的返回值会被放入 IOC 容器,默认以方法名作为 bean 的 id -
@RunWith:指定Spring为Junit提供的运行器 -
@ContextConfiguration: 指定Spring XML配置文件的位置


![[论文笔记]A ConvNet for the 2020s](https://img-blog.csdnimg.cn/434abf6df16e4b1dba1cbcd668ce8ca8.png)

