第一章 SpringBoot简介
第1节 SpringBoot是什么
1 2 | 1.SpringBoot是一个可以快速创建可运行的、独立的、生产级的基于Spring的应用程序 2.SpringBoot采用一种约定优于配置的设计理念,可以快速让用户创建出一个可运行的基于Spring的应用 |
第2节 SpringBoot的优势
1 2 3 4 5 | 1.快速构建项目 2.对主流的开发框架无需配置集成,会自动的集成到一起(约定优于配置) 3.项目可独立运行,不需要外部servlet容器(不需要额外配置tomcat或者jetty容器) 4.提供运行时的应用监控(健康检查机制) 5.极大的提高了开发部署效率 |
第3节 SpringBoot的系统需求
1 2 3 4 5 6 7 8 9 10 11 | 由于每隔一段时间官网就会提升一次版本,当前授课采用的SpringBoot2.1.18版本(2020年11月)
当前版本的系统需求:
1、JDK8到JDK12(包含)版本
2、Spring框架版本5.1.19.RELEASE或者更高
3、项目构建工具
- 3.1 Maven版本 3.3+
- 3.2 Gradle版本 4.x (4.4 and later) and 5.x
4、Servlet Containers
- 4.1 Tomcat 9.0
- 4.2 Jetty 9.4
|
第二章 快速入门
第1节 SpringBoot的脚手架
- 脚手架的概念
在我们软件开发中的脚手架的概念,类似于我们的maven工具一样,以一种预先定义好的方式生成特定环境,特定的项目目录结构,并且预先定义好了每一个目录文件的具体功能
- 官网脚手架地址
https://start.spring.io/
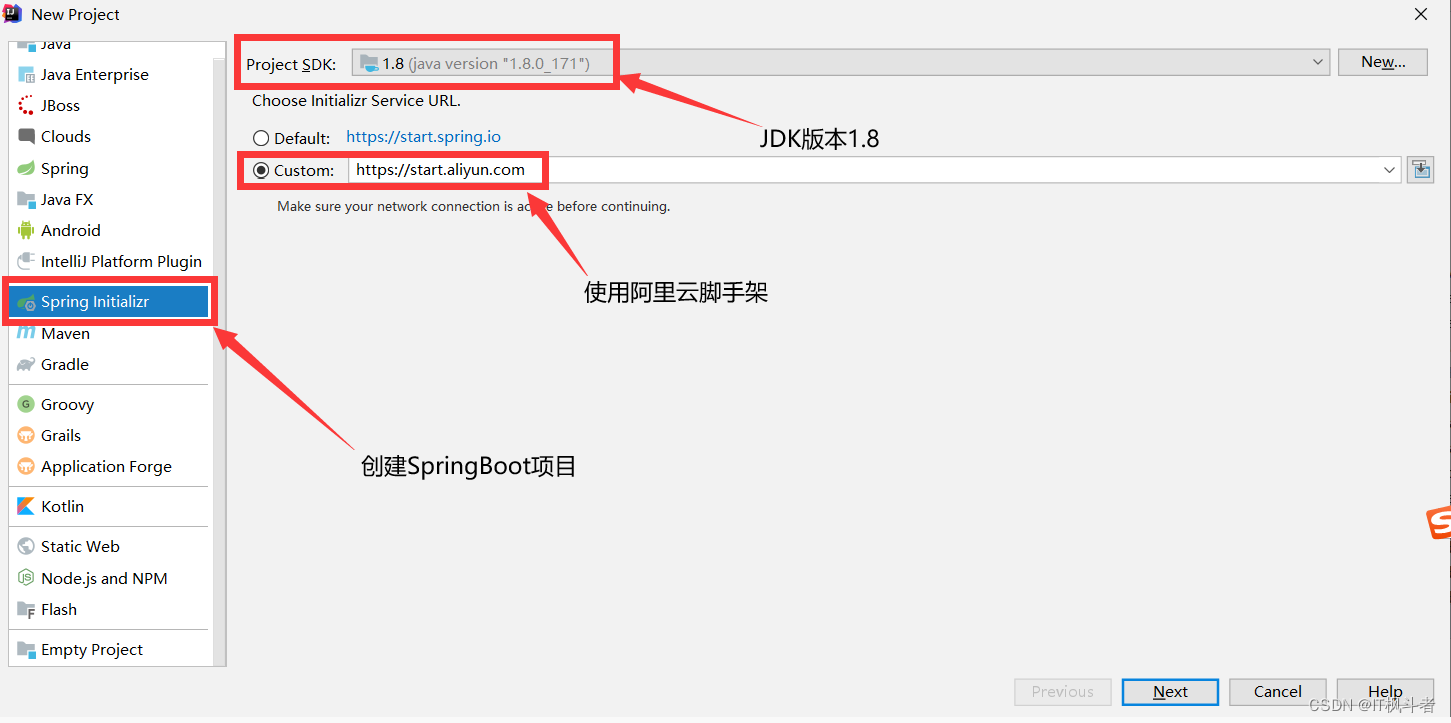
- 阿里云脚手架地址
https://start.aliyun.com
第2节 创建SpringBoot项目的方式
- 使用官网提供的工具创建(Spring官网下载sts)
- 使用IDEA创建
- 使用脚手架在线创建
第3节 SpringBoot项目结构以及依赖
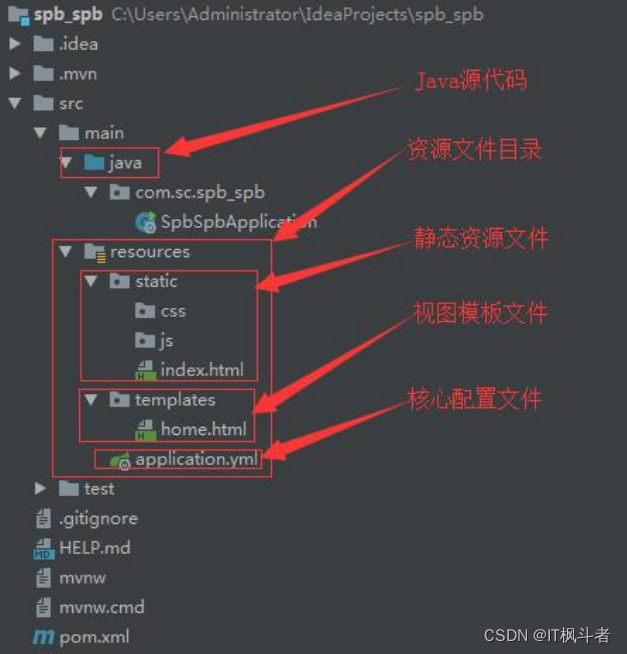
- SpringBoot的目录结构
- SpringBoot的依赖样式
1
2
3
4
5
<dependency>
    <groupId>org.springframework.boot</groupId>
    <!--带有starter样式-->
    <artifactId>spring-boot-starter-web</artifactId>
</dependency>
第4节 快速入门代码编写
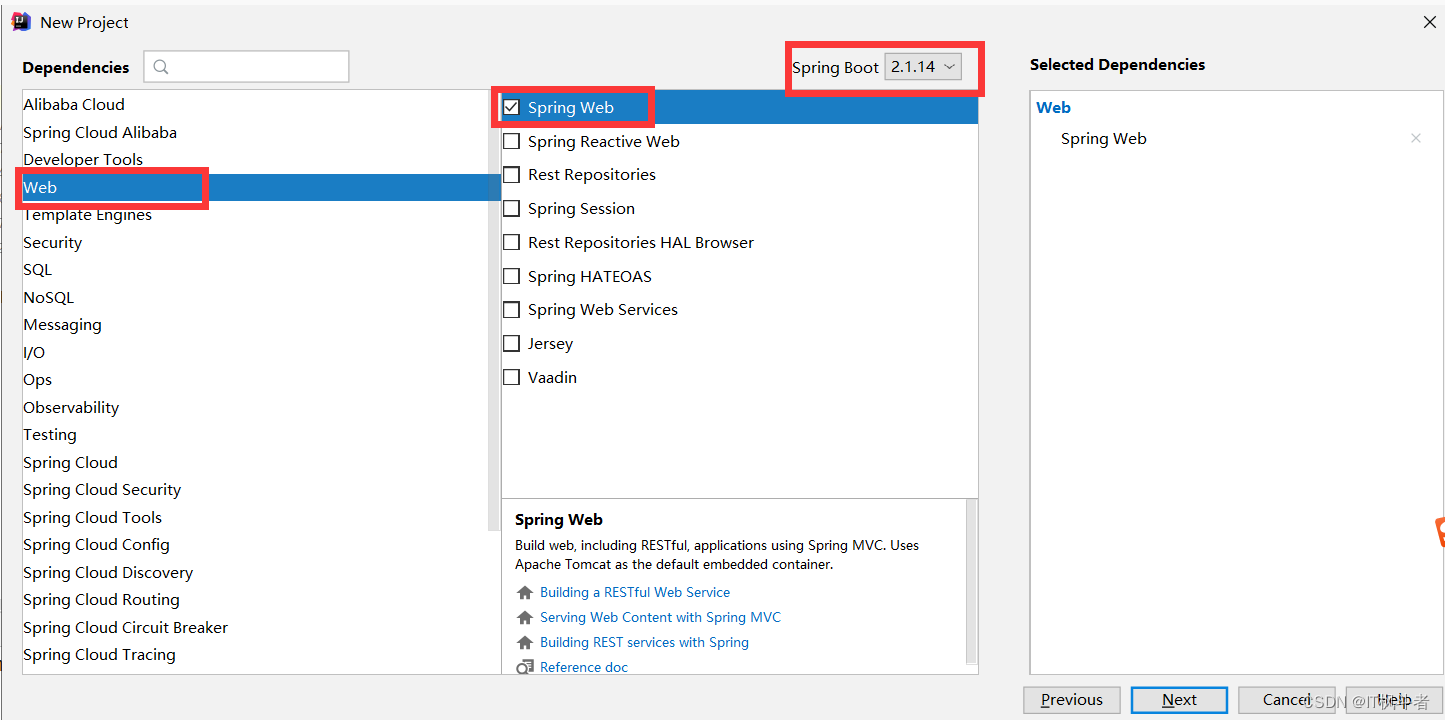
- 使用IDEA创建项目(2.1.14版本)
- 勾选web依赖(首先创建一个web项目[相当于我们的SpringMVC项目])
- 编写CRUD方法(API方式)
-
- 编写代码需要的POJO类
1
2
3
4
5
public class Book {
    private Integer bookId;
    private String bookName;
    private Double price;
}
- 编写代码需要的POJO类
-
- CRUD代码
1
2
3
4
5
6
7
8
9
10
11
12
13
14
15
16
17
18
19
20
21
22
23
24
25
26
27
28
29
30
31
32
33
34
35
36
37
38
39
40
41
42
43
44
45
46
47
48
49
50
51
52
53
54
55
56
57
58
59
60
61
62
63
64
65
66
67
68
69
70
71
72
73
74
75
76
77
78
79
80
81
82
83
84
85
86
87
88
89
90
91
92
93
94
95
96
97
98
99
100
101
102
103
104
105
106
107
108
109
110
@RestController
public class BookController {

    /**
     * 添加图书(方式一)
     * PostMapping: 是SpringBoot新增注解,由RequestMapping和RequestMethod.POST组合而成
     */
    //@RequestMapping(value = "/addBook",method = RequestMethod.POST)
    @PostMapping(value = "/addBook1")
    public Object addBook1(Book book){
        System.out.println("添加图书1...入参为: "+book);
        Map<String,Object> result = new HashMap<>();
        result.put("code",200);
        result.put("msg","OK");
        return result;
    }

    /**
     * 添加图书(方式二)
     * 如果后台请求参数使用@RequestBody修饰那么前端发送数据需要设置请求头headers
     * Content-Type: application/json
     */
    @PostMapping(value = "/addBook2")
    public Object addBook2(@RequestBody Book book){
        System.out.println("添加图书2...入参为: "+book);
        Map<String,Object> result = new HashMap<>();
        result.put("code",200);
        result.put("msg","OK");
        return result;
    }

    /**
     * 删除图书(方式一)
     */
    @DeleteMapping(value = "/deleteBook1")
    public Object deleteBook1(Integer bookId){
        System.out.println("删除图书1...入参为: "+bookId);
        Map<String,Object> result = new HashMap<>();
        result.put("code",200);
        result.put("msg","OK");
        return result;
    }
    /**
     * 删除图书(方式二)
     */
    @DeleteMapping(value = "/deleteBook2/{bookId}")
    public Object deleteBook2(@PathVariable("bookId") Integer bookId){
        System.out.println("删除图书2...入参为: "+bookId);
        Map<String,Object> result = new HashMap<>();
        result.put("code",200);
        result.put("msg","OK");
        return result;
    }

    /**
     * 更新图书(方式一)
     */
    @PutMapping(value = "/updateBook1")
    public Object updateBook1(Book book){
        System.out.println("修改图书1...入参为: "+book);
        Map<String,Object> result = new HashMap<>();
        result.put("code",200);
        result.put("msg","OK");
        return result;
    }

    /**
     * 更新图书(方式二)
     */
    @PutMapping(value = "/updateBook2")
    public Object updateBook2(@RequestBody Book book){
        System.out.println("修改图书2...入参为: "+book);
        Map<String,Object> result = new HashMap<>();
        result.put("code",200);
        result.put("msg","OK");
        return result;
    }

    /**
     * 查询图书(方式一)
     */
    @GetMapping(value = "/queryBooks1")
    public Object queryBooks1(int pageNo,int pageSize){
        System.out.println("查询图书1...入参为: pageNo:"+pageNo+" pageSize:"+pageSize);
        Book book1 = new Book(1001,"三国演义",66.66);
        Book book2 = new Book(1003,"红楼梦",99.66);
        Book book3 = new Book(1002,"水浒传",22.66);
        List<Book> books = new ArrayList<>();
        books.add(book1);
        books.add(book2);
        books.add(book3);
        return books;
    }

    /**
     * 查询图书(方式二)
     */
    @GetMapping(value = "/queryBooks2/{pageNo}/{pageSize}")
    public Object queryBooks2(@PathVariable("pageNo") int pageNo,@PathVariable("pageSize") int pageSize){
        System.out.println("查询图书2...入参为: pageNo:"+pageNo+" pageSize:"+pageSize);
        Book book1 = new Book(1001,"三国演义",66.66);
        Book book2 = new Book(1003,"红楼梦",99.66);
        Book book3 = new Book(1002,"水浒传",22.66);
        List<Book> books = new ArrayList<>();
        books.add(book1);
        books.add(book2);
        books.add(book3);
        return books;
    }
}
- CRUD代码
-
- 文件上传/下载
1
2
3
4
5
6
7
8
9
10
11
12
13
14
15
16
17
18
19
20
21
22
23
24
25
26
27
28
29
30
31
32
33
34
35
36
37
38
39
40
41
42
43
44
45
46
47
48
49
50
51
/**
 * 单文件上传
 */
@PostMapping(value = "/uploadFile")
public Object uploadFile(@RequestParam("file")MultipartFile file) throws IOException {
    System.out.println("文件上传...文件名为: "+file.getOriginalFilename());
    //将文件保存到指定位置 比如保存到D盘
    file.transferTo(new File("d:\\"+file.getOriginalFilename()));
    Map<String,Object> result = new HashMap<>();
    result.put("code",200);
    result.put("msg","OK");
    return result;
}

/**
 * 多文件文件上传
 */
@PostMapping(value = "/uploadFiles")
public Object uploadFiles(@RequestParam("file")MultipartFile[] files) throws IOException {
    for (MultipartFile file : files) {
        System.out.println("文件上传...文件名为: "+file.getOriginalFilename());
        //将文件保存到指定位置 比如保存到D盘
        file.transferTo(new File("d:\\"+file.getOriginalFilename()));
    }
    Map<String,Object> result = new HashMap<>();
    result.put("code",200);
    result.put("msg","OK");
    return result;
}
/**
 * 文件下载
 */
@GetMapping(value = "/downLoad")
public ResponseEntity<byte[]> downLoad() throws IOException {
    System.out.println("文件下载...");
    //获取下载文件的输入流
    BufferedInputStream in = new BufferedInputStream(new FileInputStream(new File("d:\\logo-footer.png")));
    //创建下载缓冲区
    byte[] body = new byte[in.available()];
    //将输入流数据读入缓冲区
    in.read(body);
    //创建响应头
    HttpHeaders headers = new HttpHeaders();
    //构建文件名称
    String fileName="abc.png";
    headers.add("Content-Disposition", "attachment;filename="+fileName);
    //创建响应状态码
    HttpStatus ok = HttpStatus.OK;
    ResponseEntity<byte[]> response = new ResponseEntity<>(body,headers,ok);
    return response;
}
- 文件上传/下载
-
- JSON数据交互
1
2
3
4
5
6
7
8
9
10
11
12
13
14
15
16
17
18
19
20
21
22
23
24
25
26
27
28
29
30
31
32
33
public class User {
    private Integer userId;
    private String userName;
    private Date hireDate;
}


/**
 * JSON数据返回时间格式处理
 * 当前jackson返回时间格式不符合我们中国人的习惯可以修改成我们的习惯格式
 * 当前jackson返回时间和我们国家的东八区区时查了八个小时所以需要将时区修改为东八区(GMT+8)
 */
@GetMapping(value = "/queryUserJson")
public List<User> queryUserJson(){
    List<User> list = new ArrayList<>();
    User u1 = new User(1001,"user01",new Date());
    User u2 = new User(1002,"user02",new Date());
    User u3 = new User(1003,"user03",new Date());
    list.add(u1);
    list.add(u2);
    list.add(u3);
    return list;
}

修改方式:
1、可以在返回值类型的类中添加jackson注解
public class User {
    private Integer userId;
    private String userName;
    @JsonFormat(pattern = "yyyy-MM-dd HH:mm:ss",timezone = "GMT+8")
    private Date hireDate;
}
2、采用全局配置方式
第5节 SpringBoot的常用配置
1
2
3
4
5
6
7
8
9
10
11
12
# 服务器端口号
server.port=8080
# 请求上下文地址
# server.servlet.context-path=/book
# 单个文件上传大小
spring.servlet.multipart.max-file-size=10MB
# 上传文件总大小
spring.servlet.multipart.max-request-size=100MB
# 修改jackson格式
spring.jackson.date-format=yyyy-MM-dd HH:mm:ss
# 设置时区
spring.jackson.time-zone=GMT+8
- JSON数据交互
第三章 启动方式
第1节 热部署
- 添加maven依赖
1
2
3
4
5
<dependency> <groupId>org.springframework.boot</groupId> <artifactId>spring-boot-devtools</artifactId> <optional>true</optional><!--设置子项是否依赖,如果不设置为true热加载也不会成功--> </dependency> - 配置maven插件
1
2
3
4
5
6
7
<plugin> <groupId>org.springframework.boot</groupId> <artifactId>spring-boot-maven-plugin</artifactId> <configuration> <fork>true</fork><!-- 如果不配置fork热加载不会成功 --> </configuration> </plugin> - IDEA设置
1
2
1、打开IDEA 在当前路径下: File->Settings->Build, Execution, Deployment->Compiler 勾选Build project automatically 然后确定
2、继续在使用快捷键(Ctrl+Shift+Alt+/)打开面板,选择Registry勾选compiler.automake.allow.when.app.running
第2节 启动方式
1
2
3
4
1. 使用自带的main方法启动
2. 在当前项目的根目录下(pom文件所在目录)执行 mvn spring-boot:run 命令
3. 执行 java -jar xxx.jar 命令
4. 修改端口号 java -jar xxx.jar --server.port=9999
第四章 配置文件
第1节 SpringBoot配置文件的两种格式
1 2 3 4 | 1、application.properties 2、application.yml 上面这是SpringBoot支持的两种配置文件的格式,在开发中使用哪种都可以,最常见的是yml方式. |
第2节 配置文件中自定义配置属性的获取
-
@Value(“${名称}”) 获取单个属性
1
2
3
4
5
6
7
8
9
10
11
12
13
14
15
16
17
18
19
20
21
22
23
1. 在application.properties自定义配置文件 # 自定义配置 com.qianfeng.springboot=hello name=Tom age=18 2. 在我们的Java类中获取 @Value("${com.qianfeng.springboot}") private String qianfeng; @Value("${name}") private String name; @Value("${age}") private Integer age; /** * 测试配置文件获取 */ @GetMapping(value = "/getProperties") public String getProperties(){ System.out.println(qianfeng); System.out.println(name); System.out.println(age); return "ok"; } -
@ConfigurationProperties 获取实体对象
-
- 自定义配置(application.yml)
1
2
3
4
user:
  userId: 1001
  userName: Tom
  hireDate: 2020-12-12 22:22:22
- 自定义配置(application.yml)
-
- 使用实体对象压入配置信息
1
2
3
4
5
6
7
8
9
10
11
12
13
14
15
16
@Component  //加入IOC容器进行实例化
@ConfigurationProperties(prefix = "user") //指定配置前缀
public class User {
    private Integer userId;
    private String userName;
    @DateTimeFormat(pattern = "yyyy-MM-dd HH:mm:ss") //时间格式
    private Date hireDate;
}

注意:当使用ConfigurationProperties注解时会报一个警告,官网解释需添加一个依赖即可

<dependency>
	<groupId>org.springframework.boot</groupId>
	<artifactId>spring-boot-configuration-processor</artifactId>
	<optional>true</optional>
</dependency>
- 使用实体对象压入配置信息
-
- 测试
1
2
3
4
5
6
7
8
9
10
@Autowired
private User user;
/**
 * 测试配置文件获取
 */
@GetMapping(value = "/getProperties")
public String getProperties(){
    System.out.println(user);
    return "ok";
}
第3节 SpringBoot多环境配置
- 测试
-
多环境配置(方式一)
1
2
3
4
5
6
7
SpringBoot多环境管理必须要遵循SpringBoot官方配置文件命名规则 application-{profile}.properties或者application-{profile}.yml


eg:
application-dev.yml  开发环境
application-test.yml 测试环境
application-pro.yml  生产环境
按照这个格式编写好的配置默认不会被SpringBoot执行,在运行时springboot还会默认执行application.yml文件,可以在appliaction.yml配置文件中设置Spring.profiles.active=dev 这样在项目运行时就会走application-dev.yml配置,但是这样还是需要频繁的修改配置,所以SpringBoot还提供了一个方式在不修改配置的情况下动态的进行配置文件修改
-
多环境配置(方式二)
1
2
3
4
5
6
7
8
9
10
11
12
13
14
15
16
17
18
19
20
在同一个文件中进行多环境配置的时候使用 --- 三个横线方式进行分割,在yml文件中配置 spring: profiles: active: dev --- spring: profiles: dev server: port: 8080 --- spring: profiles: test server: port: 8081 --- spring: profiles: pro server: port: 8082 -
使用命令动态的选择环境
1
2
3
4
5
1、使用命令将项目打成jar包,然后使用java -jar xxx.jar 运行
java -jar thymeleaf01-0.0.1-SNAPSHOT.jar --spring.profiles.active=pro

2、使用maven命令运行(2.x版本)
mvn spring-boot:run -Dspring-boot.run.profiles=test
-
maven命令地址
1
https://docs.spring.io/spring-boot/docs/current/maven-plugin/reference/html/#run-example-active-profiles
第五章 异常处理
第1节 单个异常处理
1 2 3 4 5 6 7 8 | //设置指定捕获当前类中的哪些异常,当前设置为Exception异常以及其子类都会被捕获到
@ExceptionHandler(value= {Exception.class})
public Object testException(Exception e){
Map<String,Object> result = new HashMap();
result.put("code",200);
result.put("msg":e.getMessage());
return result;
}
|
第2节 统一异常处理
1 2 3 4 5 6 7 8 9 10 11 | @RestController
@ControllerAdvice
public class CommonException {
@ExceptionHandler(value = {Exception.class})
public Object testException(Exception e){
Map<String,Object> result = new HashMap();
result.put("code",200);
result.put("msg":e.getMessage());
return result;
}
}
|
- 异常的优先级
1
先查找当前类里面的异常处理,如果不存在在去统一异常处理类中匹配
第六章 日志设置
第1节 SpringBoot的日志
1 2 3 4 5 6 7 8 | SpringBoot默认使用的是Slf4J+logback的日志
<dependency>
<groupId>org.springframework.boot</groupId>
<artifactId>spring-boot-starter-logging</artifactId>
</dependency>
//日志的依赖一般都不需要加,因为很多其他依赖都带着此依赖,例如 web依赖
|
1.1 日志的配置
1 2 3 4 5 6 7 | # 修改日志级别 logging.level.root=INFO # 日志输出路径(会在当前文件夹下生成一个名字为spring.log的日志文件) logging.path=C:\\log # 修改生成的文件名称(会在项目的当前路径下生成一个 xxx.log 日志文件) # logging.path和logging.file不能同时使用,如果同时使用,那么只有logging.file生效 logging.file=abc.log |
第2节 SpringBoot的统一日志处理
2.1 使用AOP进行日志处理
1 2 3 4 | <dependency>
<groupId>org.springframework.boot</groupId>
<artifactId>spring-boot-starter-aop</artifactId>
</dependency>
|
2.2 使用
1 2 3 4 5 6 7 8 9 10 11 12 13 14 15 16 17 18 19 20 21 22 23 | @Aspect
@Component
public class LogAspect {
private final static Logger LOGGER = LoggerFactory.getLogger(LogAspect.class);
@Pointcut(value = "execution(* cn.ukoko.springbootaop.controller..*.*(..))")
public void log(){}
@Around(value = "log()")
public Object methodAroud(ProceedingJoinPoint joinPoint) throws Throwable {
ServletRequestAttributes attributes = (ServletRequestAttributes) RequestContextHolder.getRequestAttributes();
HttpServletRequest request = attributes.getRequest();
//获取主机IP
LOGGER.info("IP :{}",request.getRemoteAddr());
//获取请求地址
LOGGER.info("URL:{}",request.getRequestURL().toString());
//获取请求方式
LOGGER.info("HTTP Method:{}",request.getMethod());
//获取类名和方法名
LOGGER.info("Class Method:{}.{}",joinPoint.getSignature().getDeclaringTypeName(),joinPoint.getSignature().getName());
Object proceed = joinPoint.proceed();
LOGGER.info("Result:{}",proceed);
return proceed;
}
}
|
第七章 Spring5.x与Spring4.x版本的差异化
Spring5.x版本相比较于4.x版本发生了很大的变化
第1节 注解的变化
1 2 3 4 5 | 1. @RestController : 组合注解(@ResponseBody + @Controller) 2. @SpringBootApplication : 组合注解(多用于SpringBoot的启动注解) 3. @ImportResource : 如果一定要使用xml配置文件可以使用此注解加载 4. @ConfigurationProperties : 获取以xxx作为前缀的数据 5. @value : 获取以什么命名的数据 |
第2节 配置文件的变化
1 | 传统的配置比如ssm框架采用的xml配置,而SpringBoot官方不建议使用xml配置,而是采用传统的API和注解的方式进行配置 |
举一个例子(整合一个不遵循SpringBoot约定优于配置的依赖[非start依赖])
- 添加依赖
1
2
3
4
5
6
7
8
9
10
11
<dependency> <groupId>mysql</groupId> <artifactId>mysql-connector-java</artifactId> <version>5.1.49</version> </dependency> <dependency> <groupId>com.alibaba</groupId> <artifactId>druid</artifactId> <version>1.1.20</version> </dependency> - 创建配置文件
1
2
3
4
5
6
7
8
9
10
11
12
13
14
15
16
17
18
19
20
21
22
23
24
25
26
27
28
29
30
31
32
33
34
35
applicaton.yml username1: root password1: root jdbcurl1: jdbc:mysql:///ssm /** * 如果maven的依赖满足start这样的类型,多半是不需要配置的,这样的类型的依赖可以和SpringBoot直接整合到一起 * 但是有一些框架或者工具没有提供start这样类型的依赖,在加入依赖之后不会自动整合到SpringBoot上面,这时候就需要我们配置 */ //@ImportResource(locations = {"classpath:bean.xml"}) @Configuration public class DruidConfiguration { @Value("${username1}") //在进行配置时候不要取有歧义的名字 private String username; @Value("${password1}") private String password; @Value("${jdbcurl1}") private String jdbcurl; /** * 配置Druid */ //@Primary //自动装配时当出现多个Bean候选者时,被注解为@Primary的Bean将作为首选者,否则将抛出异常 @Bean //将方法的返回值加入到IOC容器中,和我们的xml配置中的bean标签功能相同,内部有name属性,设置为IOC容器中的对象取别名 public DataSource createDruid(){ DruidDataSource dataSource = new DruidDataSource(); dataSource.setUsername(username); dataSource.setPassword(password); dataSource.setUrl(jdbcurl); System.out.println("------------"+dataSource); return dataSource; } } - 测试
1
2
3
4
5
6
7
8
9
10
11
12
13
14
15
@Autowired //从IOC容器中获取对象
private DataSource dataSource;


System.out.println("从ioc容器中获取对象:"+dataSource);
//获取数据库连接
Connection connection = dataSource.getConnection();
Statement statement = connection.createStatement();
String sql="SELECT * FROM user";
ResultSet rs = statement.executeQuery(sql);
while(rs.next()){
    int userId = rs.getInt("user_id");
    System.out.println("userId="+userId);
    System.out.println();
}
第八章 CRUD练习(API版本)
- 添加依赖
1
2
3
4
5
6
7
8
9
10
11
12
13
14
15
<dependency> <groupId>com.alibaba</groupId> <artifactId>druid-spring-boot-starter</artifactId> <version>1.1.17</version> </dependency> <dependency> <groupId>com.github.pagehelper</groupId> <artifactId>pagehelper-spring-boot-starter</artifactId> <version>1.3.0</version> </dependency> <dependency> <groupId>mysql</groupId> <artifactId>mysql-connector-java</artifactId> <scope>runtime</scope> </dependency> - 基础配置
1
2
3
4
5
6
7
8
9
10
11
12
13
14
15
16
17
@Mapper: SpringBoot的Mapper层需要添加此注解

# 数据库配置
spring.datasource.url=jdbc:mysql://localhost:3306/ssm?characterEncoding=utf-8&useUnicode=true&serverTimezone=GMT%2B8
spring.datasource.username=root
spring.datasource.password=root

# mybatis配置
mybatis.mapper-locations=classpath:mapper/*Mapper.xml
mybatis.type-aliases-package=com.ssm.testdemo.entity
mybatis.config-location=classpath:mybatis-config.xml

# 中文编码(处理请求)
spring.http.encoding.charset=UTF-8
spring.http.encoding.force=true
spring.http.encoding.enabled=true
server.tomcat.uri-encoding=UTF-8
- 单元测试(2.1.x版本)
1
2
@RunWith(SpringRunner.class)
@SpringBootTest
第九章 Thymeleaf模板
Thymeleaf是一个web端的并且独立的Java模板引擎,他能够处理HTML、XML、JavaScript、CSS以及纯文本,Thymeleaf的理念是创建一种优雅和易维护的模板,为了实现这一点,它建立在自然模板之上,将逻辑注入到模板文件中,还不会影响到模板被用作设计原型。Thymeleaf一开始就设计了Web标准,SpringBoot官方推荐使用Thymeleaf 而不是JSP
第1节 快速入门
- 添加依赖
1
2
3
4
<dependency> <groupId>org.springframework.boot</groupId> <artifactId>spring-boot-starter-thymeleaf</artifactId> </dependency> - 配置文件
1
2
3
4
5
spring: thymeleaf: mode: HTML cache: false encoding: utf-8 - 创建页面
1
2
3
4
5
6
7
8
9
10
11
12
13
14
15
16
17
18
19
20
21
22
23
24
25
26
27
28
29
在templates目录下创建index.html和result.html 1、index.html <!DOCTYPE html> <html lang="en"> <head> <meta charset="UTF-8"> <title>首页</title> </head> <body> <!--第一个页面请求--> <a href="/helloworld">Hello World</a> </body> </html> ------------------------------------------------------------------- 2、result.html <!DOCTYPE html> <html lang="en"> <head> <meta charset="UTF-8"> <title>结果页</title> </head> <body> <!--结果页面--> <h1>结果页面</h1> </body> </html> - 创建控制器(@Controller)
1
2
3
4
5
6
7
8
9
10
11
12
13
14
15
16
17
18
19
/** * @Author 枫桥夜泊1990 * @BLOG https://hd1611756908.github.io/ * @BSITE https://space.bilibili.com/514155929/ * @DATE 2020/8/8 */ @Controller public class UserController { /** * 快速入门 */ @GetMapping(value = "/helloworld") public String helloworl(){ System.out.println("第一个thymeleaf请求..."); return "result"; } } - 刷新前端页面快捷键
1
ctrl+F9
第2节 常见语法
- index.html
1
<a href="/HelloThymeleaf">HelloThymeleaf</a>
- result.html
1
2
3
4
5
6
7
8
9
10
11
12
13
14
15
16
17
18
19
20
21
22
23
24
25
26
27
28
29
30
31
32
33
34
35
36
37
38
39
40
41
42
43
44
45
46
47
48
49
50
51
52
53
54
55
56
57
58
59
60
61
62
63
64
65
66
67
<!DOCTYPE html> <html lang="en" xmlns:th="http://www.thymeleaf.org"> <head> <meta charset="UTF-8"> <title>结果页</title> </head> <body> <!--结果页面--> <h1>结果页面</h1> <!--显示普通文本,从域对象中获取--> <p th:text="${username}"></p> <hr> <!--显示带有样式的普通文本--> <p th:utext="${desc}"></p> <hr> <!--显示对象,数据处理(thymeleaf提供了内置对象API可以操作数据,比如对前端显示时间的格式化)--> <div> <p th:text="${user.userId}"></p> <p th:text="${user.userName}"></p> <p th:text="${user.createTime}"></p> <p th:text="${#dates.format(user.createTime,'yyyy-MM-dd HH:mm:ss')}"></p> </div> <hr> <!--内置域对象--> <p th:text="${#httpServletRequest.getAttribute('password')}"></p> <hr> <!--数据遍历 list集合--> <table> <tr> <td>No.</td> <td>UID</td> <td>姓名</td> <td>创建时间</td> <td>偶数</td> <td>奇数</td> </tr> <tr th:each="x,y:${users}"> <td th:text="${y.index+1}"/> <td th:text="${x.userId}"/> <td th:text="${x.userName}"/> <td th:text="${x.createTime}"/> <td th:text="${y.even}"/><!--偶数--> <td th:text="${y.odd}"/><!--奇数--> </tr> </table> <hr> <!--数据遍历 map集合--> <table> <tr> <td>No.</td> <td>UID</td> <td>姓名</td> <td>创建时间</td> <td>偶数</td> <td>奇数</td> </tr> <tr th:each="x,y:${map}"> <td th:text="${y.index+1}"/> <td th:text="${x.value.userId}"/> <td th:text="${x.value.userName}"/> <td th:text="${x.value.createTime}"/> <td th:text="${y.even}"/><!--偶数--> <td th:text="${y.odd}"/><!--奇数--> </tr> </table> </body> </html> - 控制器
1
2
3
4
5
6
7
8
9
10
11
12
13
14
15
16
17
18
19
20
21
22
23
24
25
26
27
28
@GetMapping(value = "/HelloThymeleaf")
public String HelloThymeleaf(Model model, HttpServletRequest request){
    //显示普通文本,从域对象中获取
    model.addAttribute("username","Tom");
    //显示带有样式的普通文本
    model.addAttribute("desc","<span style='color:red'>你好,中国</span>");
    //显示对象,数据处理(thymeleaf提供了内置对象API可以操作数据,比如对前端显示时间的格式化)
    User user = new User(1001,"user01",new Date());
    model.addAttribute("user",user);
    //内置域对象
    request.setAttribute("password","123456");
    //数据遍历 list
    User user1 = new User(1002,"user02",new Date());
    User user2 = new User(1003,"user03",new Date());
    User user3 = new User(1004,"user04",new Date());
    List<User> users = new ArrayList<>();
    users.add(user1);
    users.add(user2);
    users.add(user3);
    model.addAttribute("users",users);
    //数据遍历 map
    Map<String,User> map = new HashMap<>();
    map.put("user01",user1);
    map.put("user02",user2);
    map.put("user03",user3);
    model.addAttribute("map",map);
    return "result";
}
第3节 路径处理
1
2
3
<script type="text/javascript" th:src="@{/js/main.js}"></script>
<a th:href="@{/show}">访问controller方法</a>
<a th:href="@{/static_index.html}">访问静态页面</a>
第4节 条件语句
1
2
3
4
5
6
th:if="boolean" th:if的表达式需为boolean值。如果为true,则标签显示,如果为false,则标签不显示

th:unless="boolean" th:unless和th:if相反,表达式也需为boolean值。如果为true,则标签不显示,如果为false,则标签显示

<span th:if="${stat}">偶</span>
<span th:unless="${stat}">奇</span>
第5节 页面引入
- 页面引入介绍
1
我们常常需要在一个页面当中引入另一个页面,例如,公用的导航栏以及页脚页面。thymeleaf中提供了两种方式进行页面引入
- 引入方式一[th:replace(替换全部)]
- 引入方式二[th:include(替换内容)]
1
2
3
4
5
6
7
8
9
10
1、新建需要被引入的页面文件,路径为"/templates/footer.html"

<meta http-equiv="Content-Type" content="text/html;charset=UTF-8"/>
<footer th:fragment="companyInfo">
    <p>设为首页 ©2018 SpringBoot 使用<span th:text="${name}"/>前必读意见反馈京ICP证030173号 </p>
</footer>

2、在目标页面引入footer.html有两种方式
    - 2.1 <div th:include="footer :: companyInfo" th:with="name=${username}"/> 可以设置参数
    - 2.2 <div th:replace="footer :: companyInfo"/> 设置参数无效,所以直接引入即可
第6节 使用thymeleaf实现CRUD
1
2
3
4
5
6
7
请求路径的参数设置

<a th:href="@{/delteUser(userId=${x.userId})}">删除</a>
删除路径会构建成一个类似于 deleteUser?userId=1000

<a th:href="@{/jumpUser/{userId}(userId=${x.userId})}">更新</a>
更新路径会构建成一个类似于 jumpUser/1000
第十章 Shiro整合(注解与传统xml对比)
Spring5.x版本在SpringBoot中官方推荐使用Java配置的方式来进行与第三方框架的集成
我们这里以springBoot和Shiro的整合方式来讲解Java的配置.
- 版本介绍
1
2
3
4
5
6
7
8
9
10
11
12
13
14
15
SpringBoot版本 : 2.1.14.RELEASE shiro-spring版本 : 1.5.0 <dependency> <groupId>org.apache.shiro</groupId> <artifactId>shiro-spring</artifactId> <version>1.5.0</version> </dependency> //如果使用Shiro的注解功能需要添加springboot的aop依赖 //同时在application.properties中配置spring.aop.proxy-target-class=true,有的版本不需要配置(当前的2.1.17.RELEASE不需要) <dependency> <groupId>org.springframework.boot</groupId> <artifactId>spring-boot-starter-aop</artifactId> </dependency> - 整合用到的核心注解
1
2
@Bean: 可以修饰方法和注解,功能和<bean>标签相同,将对象加入到IOC容器中
@Configuration : 修饰类,被次注解修饰的类,会被Spring扫描到,被认定为是一个配置类
- 集成Shiro配置代码
1
2
3
4
5
8
9
10
11
12
13
14
15
16
17
18
19
20
21
22
23
24
25
26
27
28
29
30
31
32
33
34
35
36
37
38
39
40
41
42
43
44
45
46
47
48
49
50
51
52
53
54
55
56
57
58
59
60
61
62
63
64
65
66
67
68
69
70
71
72
73
74
75
76
@Configuration public class ShiroConfig { /** * 将Realm注入到IOC中 * @return */ @Bean public UserRealm createUserRealm(HashedCredentialsMatcher hashedCredentialsMatcher){ //创建Realm实例 UserRealm userRealm = new UserRealm(); //设置加密规则,HashedCredentialsMatcher对象通过给方法入参注入到此方法中 userRealm.setCredentialsMatcher(hashedCredentialsMatcher); return userRealm; } @Bean public HashedCredentialsMatcher createHashedCredentialsMatcher(){ //创建加密对象 HashedCredentialsMatcher credentialsMatcher = new HashedCredentialsMatcher(); //加密方式 credentialsMatcher.setHashAlgorithmName("md5"); //迭代次数 credentialsMatcher.setHashIterations(1024); return credentialsMatcher; } /** * 安全管理器 */ @Bean public SecurityManager createSecurityManager(UserRealm userRealm){ //创建web的安全管理器 DefaultWebSecurityManager securityManager = new DefaultWebSecurityManager(); //配置realm securityManager.setRealm(userRealm); return securityManager; } /** * 将ShiroFilter加入到IOC */ @Bean public ShiroFilterFactoryBean createShiroFilter(SecurityManager securityManager){ ShiroFilterFactoryBean shiroFilter = new ShiroFilterFactoryBean(); shiroFilter.setSecurityManager(securityManager); shiroFilter.setLoginUrl("/unauthentication");//未认证 shiroFilter.setUnauthorizedUrl("/unauthorized");//未授权控制器 Map<String,String> map = new HashMap<String, String>(); map.put("/login","anon"); map.put("/home1","authc,roles[admin]"); map.put("/home2","authc,roles[admin],perms[user:update]"); map.put("/**","authc"); //如果使用注解就不需要再这里配置拦截规则,可以注释掉 shiroFilter.setFilterChainDefinitionMap(map); return shiroFilter; } /** * 注解生效 * 如果使用Shiro注解,需要配置AuthorizationAttributeSourceAdvisor,否则注解不生效 */ @Bean public AuthorizationAttributeSourceAdvisor authorizationAttributeSourceAdvisor(SecurityManager securityManager){ AuthorizationAttributeSourceAdvisor authorizationAttributeSourceAdvisor = new AuthorizationAttributeSourceAdvisor(); authorizationAttributeSourceAdvisor.setSecurityManager(securityManager); return authorizationAttributeSourceAdvisor; } } - 控制器测试方法
1
2
3
4
5
6
7
8
9
10
11
12
13
14
15
16
17
18
19
20
21
22
23
24
25
26
27
28
29
30
31
32
33
34
35
36
37
38
39
40
41
42
43
44
45
46
47
48
49
50
51
52
53
54
55
56
57
58
59
60
61
62
63
@RestController public class UserController { /** * 登陆请求 */ @PostMapping(value = "/login") public String login(SysUsers sysUsers){ UsernamePasswordToken token = new UsernamePasswordToken(sysUsers.getUsername(),sysUsers.getPassword()); Subject subject = SecurityUtils.getSubject(); try { subject.login(token); }catch (AuthenticationException e) { e.printStackTrace(); throw new RuntimeException("用户名错误"); //return "账号或密码错误!"; } catch (AuthorizationException e) { e.printStackTrace(); throw new RuntimeException("密码错误"); //return "没有权限"; } return "success"; } /** * 测试请求 */ @RequiresRoles({"admin"}) @GetMapping(value = "/home1") public String index(){ System.out.println("我是home1,需要认证用户的角色为admin才能访问"); return "我是home1..."; } /** * 测试请求 */ @RequiresRoles({"admin"}) @RequiresPermissions({"user:update"}) @GetMapping(value = "/home2") public String index1(){ System.out.println("我是home2,需要认证用户的角色是admin并且权限为user:update才可以访问"); return "我是home2..."; } /** * 处理未认证的请求 */ @GetMapping("/unauthentication") public void unAuthorization(){ System.out.println("当前请求未认证..."); throw new RuntimeException("当前请求未认证..."); } /** * 处理未授权的请求 */ @GetMapping("/unauthorized") public void unauthorized(){ System.out.println("当前请求未授权..."); throw new RuntimeException("当前请求未授权..."); } } - 统一异常处理
1
2
3
4
5
6
7
8
9
10
11
12
13
14
15
16
@Component @ControllerAdvice public class ShiroExceptionHandler { @ResponseBody @ExceptionHandler(value = {AuthorizationException.class}) public Object processShiroAuthorizationException(){ return "授权失败..."; } @ResponseBody @ExceptionHandler(value = {AuthenticationException.class}) public Object processShiroAuthenticationException(){ return "认证失败..."; } } - 自定义的Realm
1
2
3
4
5
6
7
8
9
10
11
12
13
14
15
16
17
18
19
20
21
22
23
24
25
26
27
28
29
30
31
32
33
34
35
36
37
38
39
40
41
42
43
44
45
46
47
48
49
50
51
52
53
54
55
56
57
58
59
60
61
62
63
64
65
66
67
68
69
70
71
72
73
74
75
76
77
78
79
80
81
82
83
84
85
86
public class UserRealm extends AuthorizingRealm { @Autowired private SysUsersService sysUsersService; @Autowired private SysUsersRolesService sysUsersRolesService; @Autowired private SysRolesService sysRolesService; @Autowired private SysRolesPermissionsService sysRolesPermissionsService; @Autowired private SysPermissionsService sysPermissionsService; /** * 获取授权数据 * @param principalCollection * @return */ @Override protected AuthorizationInfo doGetAuthorizationInfo(PrincipalCollection principalCollection) { //获取用户名 String username = principalCollection.getPrimaryPrincipal().toString(); System.out.println("username:"+username); SimpleAuthorizationInfo info = new SimpleAuthorizationInfo(); //通过用户名查询当前用户的所有角色 SysUsers user = sysUsersService.getUserByUsername(username); //根据用户ID查询角色信息 List<SysUsersRoles> usersRoles = sysUsersRolesService.getSysUsersRolesByUserId(user.getUserId()); //根据角色ID查询角色名称 Set<String> roleNames = new HashSet<>(); for (SysUsersRoles usersRole : usersRoles) { SysRoles roles = sysRolesService.getSysRolesByRoleId(usersRole.getRoleId()); roleNames.add(roles.getRoleName()); //通过角色ID查询权限列表 List<SysRolesPermissions> sysRolesPermissionss = sysRolesPermissionsService.getSysRolesPermissionsByRoleId(roles.getRoleId()); //根据权限ID查询权限名称 Set<String > permissionsNames = new HashSet<>(); for (SysRolesPermissions rolesPermissionss : sysRolesPermissionss) { SysPermissions permissions = sysPermissionsService.getSysPermissionsByPermissionsId(rolesPermissionss.getPermissionId()); if (null!=permissions){ permissionsNames.add(permissions.getPermissionName()); } } //将权限信息封装进info info.addStringPermissions(permissionsNames); } info.setRoles(roleNames); return info; } /** * 获取认证数据 * @param authenticationToken * @return * @throws AuthenticationException */ @Override protected AuthenticationInfo doGetAuthenticationInfo(AuthenticationToken authenticationToken) throws AuthenticationException { //获取用户名 String username = authenticationToken.getPrincipal().toString(); System.out.println("realm: username:"+username); if(username==null || username.length()<=0){ throw new UnknownAccountException("当前用户不存在"); } //通过用户名查询数据库 SysUsers user = sysUsersService.getUserByUsername(username); if(user==null){ throw new UnknownAccountException("当前用户不存在"); } System.out.println("====="+user); //从数据库中获取数据,并且将查询出来的认证数据封装进alt ByteSource salt = ByteSource.Util.bytes(user.getSalt()); SimpleAuthenticationInfo info = new SimpleAuthenticationInfo(user.getUsername(),user.getPassword(),salt,getName()); return info; } } - 测试(postman)