本文来自:
任治桐 极狐(GitLab) 前端工程师
NPM 是 Node.js 的包管理工具,用来安装各种 Node.js 的扩展。本文将分享如何通过极狐GitLab,让 NPM 依赖发布更新更加快速和自动化,让你轻松管理依赖,拥有更多时间专注于核心工作!
少年小明之烦恼
在开发团队日常工作中,不可避免的会依赖大量第三方模块;同时,团队内部也会发布一些公共模块到内部或外部源中,方便跨团队复用。但往往会遇到和小明一样的烦恼。
小明同学负责内部公共 NPM 模块发布和升级工作。他每天的工作是这样的:
1. 开发同学通知小明某个公共模块代码有更新;
2. 小明打包内部公共模块;
3. 发布到 NPM 源;
4. 在开发群里通知各个团队升级到最新版本。
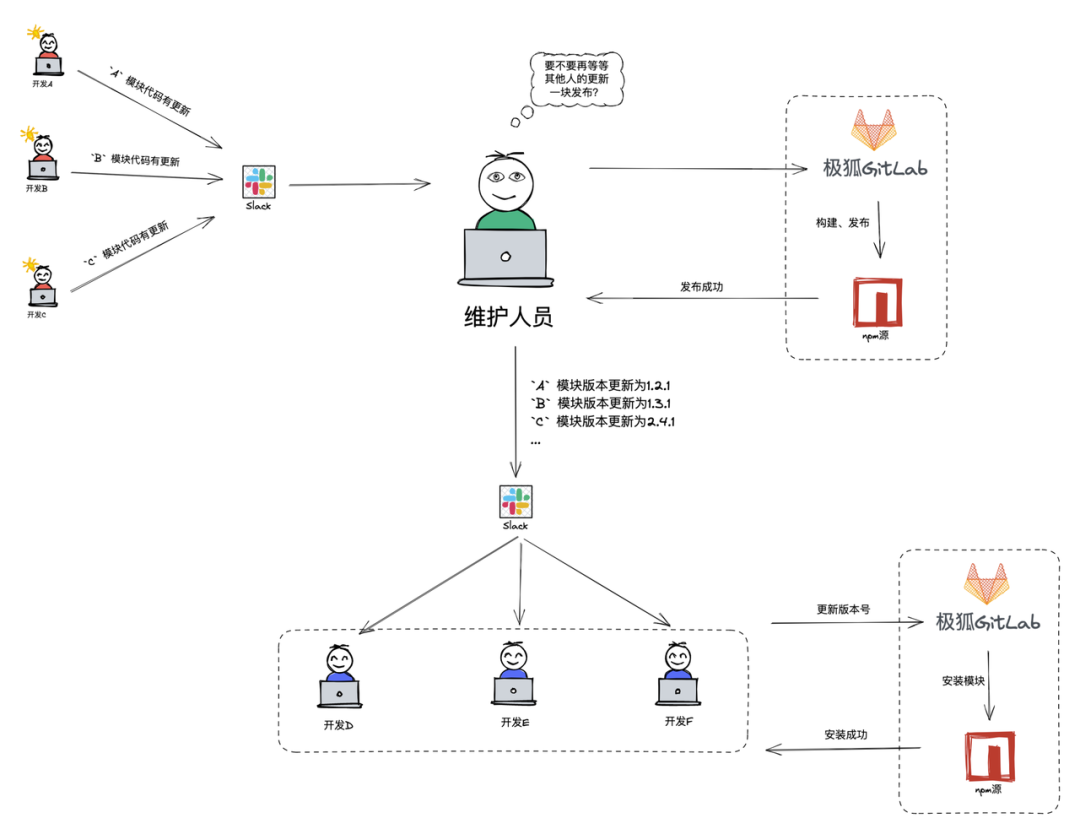
渐渐的,每个团队都被繁琐小事缠身,低效:
-
开发同学需要经常检查依赖的 NPM 模块是否有更新;
-
公共模块的维护同学更新代码后需要决定是否发布版本;
-
版本更新后还需要通知各个团队;
-
各个团队还是容易出现更新不及时、容易遗漏等问题。
终于有一天,小明同学灵机一动:如果以后更新公共模块代码能够根据一定规则,自动更新版本号→自动发布日志→自动发布到 NPM 源→自动将公司内所有依赖该模块的代码库更新为最新版本,岂不乐哉?
经过一番探索,小明发现,通过极狐GitLab CI 和第三方工具结合,就可以达到目的。一起实践吧!
NPM 自动发布-操作指南
我们知道,NPM 包版本规范为 Semantic Versioning ,即为 major.minor.patch 格式数字组成。
那么,如果我们可以识别开发人员的 git commit message ,通过对提交信息进行形式化约定,就可以自动生成新的符合 Semantic Versioning 的版本号。然后,将新版本号更新到我们的 package.json 文件中,最后发布到 NPM 源中即可。
commitlint
首先,我们需要通过 commitlint 或类似工具,强制规范化团队的 git commit message ,通过如下命令将 commitlint 安装到项目中:
yarn add --dev @commitlint/cli @commitlint/config-conventional

# 设置 commitlint 配置文件使用 conventional config
echo "module.exports = { extends: ['@commitlint/config-conventional'] };" > commitlint.config.js
我们采用 @commitlint/config-conventional 作为常规配置,它默认采用 Angular Commit Message 规范,也可自行修改。默认 git commit message 格式如下:
<type>(<scope>): <short summary>
  │
  └─⫸ 可选类型: build|ci|docs|feat|fix|perf|refactor|test|chore
流水线配置
之后,需要在极狐GitLab CI 流水线中执行 commitlint ,在项目根目录新建一个 .gitlab-ci.yml 文件,添加如下代码:
# .gitlab-ci.yml

stages:
  - lint

workflow:
  rules:
    - if: $CI_MERGE_REQUEST_IID
    - if: $CI_COMMIT_TAG
    - if: $CI_COMMIT_BRANCH == $CI_DEFAULT_BRANCH

default:
  image: node:16
  cache:
    paths:
      - node_modules/
      - .yarn

.yarn_install:
  before_script:
    - yarn install --frozen-lockfile --check-files --cache-folder .yarn

lint:commit:
  extends: .yarn_install
  stage: lint
  rules:
    - if: '$CI_PIPELINE_SOURCE == "merge_request_event"'
  script:
    - yarn commitlint --from ${CI_MERGE_REQUEST_DIFF_BASE_SHA} --to HEAD --verbose
如果有不符合 commitlint 规范的 git commit message,极狐GitLab CI 就会阻止该 MR 合入。

这样,我们就拥有了符合约定的提交信息。
semantic-release
Semantic-release 是一个可以根据约定提交信息类型生成新版本号、极狐GitLab Changelog,还提供了大量插件用于发布 NPM 的工具。
首先安装 semantic-release 到我们的项目:
yarn add --dev semantic-release
与此同时,我们还想同步 publish 到 NPM 源,接着将更新的版本号推送到主分支,最后创建极狐GitLab Changelog。所以还需要安装如下 semantic-release plugins:
yarn add --dev @semantic-release/changelog @semantic-release/git @semantic-release/gitlab
由于 @semantic-release/npm 插件已经是 semantic-release 的一部分,所以不需要单独安装,参见文档 。
需要注意的是,通常情况下,我们只需针对主分支流水线执行:
-
更新 package.json 版本号;
-
推送 NPM 源;
-
生成 changelog。
而在 MR 流水线中,我们只需确保能够正常生成 changelog 即可。为此,针对 MR 执行 --dry-run 模式,然后在 semantic-release 配置文件中区分执行步骤。
默认情况下,我们的提交信息会按照如下规则更新版本号:

完整的匹配规则参见 default-release-rules.js :
/**
 * Default `releaseRules` rules for common commit formats, following conventions.
 *
 * @type {Array}
 */
module.exports = [
  {breaking: true, release: 'major'},
  {revert: true, release: 'patch'},
  // Angular
  {type: 'feat', release: 'minor'},
  {type: 'fix', release: 'patch'},
  {type: 'perf', release: 'patch'},
  // Atom
  {emoji: ':racehorse:', release: 'patch'},
  {emoji: ':bug:', release: 'patch'},
  {emoji: ':penguin:', release: 'patch'},
  {emoji: ':apple:', release: 'patch'},
  {emoji: ':checkered_flag:', release: 'patch'},
  // Ember
  {tag: 'BUGFIX', release: 'patch'},
  {tag: 'FEATURE', release: 'minor'},
  {tag: 'SECURITY', release: 'patch'},
  // ESLint
  {tag: 'Breaking', release: 'major'},
  {tag: 'Fix', release: 'patch'},
  {tag: 'Update', release: 'minor'},
  {tag: 'New', release: 'minor'},
  // Express
  {component: 'perf', release: 'patch'},
  {component: 'deps', release: 'patch'},
  // JSHint
  {type: 'FEAT', release: 'minor'},
  {type: 'FIX', release: 'patch'},
];
如需修改上述规则,就需要添加 semantic-release 配置文件,新建 release.config.js 文件到项目根目录下:
const { execSync } = require('child_process');

const isDryRun = () => {
  return process.argv.includes('--dry-run'); // 通过命令行参数判断当前模式
};

const getCurrentBranch = () => {
  return execSync('git rev-parse --abbrev-ref HEAD').toString().trim();
};

// MR运行配置
const getDryRunConfig = () => {
  return {
    branches: getCurrentBranch(),
    plugins: [
      [
        '@semantic-release/commit-analyzer',
        {
          preset: 'conventionalCommits',
          releaseRules: [
            { type: 'feat', release: 'minor' },
            { type: 'revert', release: 'patch' },
            { type: 'docs', release: 'patch' },
            { type: 'style', release: 'patch' },
            { type: 'chore', release: 'patch' },
            { type: 'refactor', release: 'patch' },
            { type: 'test', release: 'patch' },
            { type: 'build', release: 'patch' },
            { type: 'ci', release: 'patch' },
            { type: 'improvement', release: 'patch' },
          ],
        },
      ],
      [
        '@semantic-release/release-notes-generator',
        {
          preset: 'conventionalCommits',
          presetConfig: {
            types: [
              { type: 'feat', section: 'Features' },
              { type: 'fix', section: 'Bug Fixes' },
              { type: 'perf', section: 'Performance Improvements' },
              { type: 'revert', section: 'Reverts' },
              { type: 'docs', section: 'Documentation', hidden: false },
              { type: 'style', section: 'Styles', hidden: true },
              { type: 'chore', section: 'Miscellaneous Chores' },
              { type: 'refactor', section: 'Code Refactors', hidden: false },
              { type: 'test', section: 'Tests', hidden: true },
              { type: 'build', section: 'Build System', hidden: false },
              { type: 'ci', section: 'CI/CD', hidden: false },
              { type: 'improvement', section: 'Improvements', hidden: false },
            ],
          },
        },
      ],
    ],
  };
};

// 主分支运行配置
const defaultConfig = {
  branches: ['main'],
  plugins: [
    [
      '@semantic-release/commit-analyzer',
      {
        preset: 'conventionalCommits',
        releaseRules: [
          { type: 'feat', release: 'minor' },
          { type: 'revert', release: 'patch' },
          { type: 'docs', release: 'patch' },
          { type: 'style', release: 'patch' },
          { type: 'chore', release: 'patch' },
          { type: 'refactor', release: 'patch' },
          { type: 'test', release: 'patch' },
          { type: 'build', release: 'patch' },
          { type: 'ci', release: 'patch' },
          { type: 'improvement', release: 'patch' },
        ],
      },
    ],
    [
      '@semantic-release/release-notes-generator',
      {
        preset: 'conventionalCommits',
        presetConfig: {
          types: [
            { type: 'feat', section: 'Features' },
            { type: 'fix', section: 'Bug Fixes' },
            { type: 'perf', section: 'Performance Improvements' },
            { type: 'revert', section: 'Reverts' },
            { type: 'docs', section: 'Documentation', hidden: false },
            { type: 'style', section: 'Styles', hidden: true },
            { type: 'chore', section: 'Miscellaneous Chores' },
            { type: 'refactor', section: 'Code Refactors', hidden: false },
            { type: 'test', section: 'Tests', hidden: true },
            { type: 'build', section: 'Build System', hidden: false },
            { type: 'ci', section: 'CI/CD', hidden: false },
            { type: 'improvement', section: 'Improvements', hidden: false },
          ],
        },
      },
    ],
    '@semantic-release/changelog', // 仅有主分支需要更新极狐GitLab changelog
    '@semantic-release/npm', // 仅有主分支需要npm publish
    '@semantic-release/git',
    ['@semantic-release/gitlab', { gitlabUrl: 'https://jihulab.com' }], // 需要指定gitlabUrl 为极狐GitLab地址
  ],
  success: false,
  fail: false,
};

module.exports = isDryRun() ? getDryRunConfig() : defaultConfig;
流水线配置
此时,就可以进入上文提到的 .gitlab-ci.yml 文件,添加 semantic-release 相关的 stage:
stages:
  - lint
  - test
  - release

workflow:
  rules:
    - if: $CI_MERGE_REQUEST_IID
    - if: $CI_COMMIT_TAG
    - if: $CI_COMMIT_BRANCH == $CI_DEFAULT_BRANCH

default:
  image: node:16
  cache:
    paths:
      - node_modules/
      - .yarn

.yarn_install:
  before_script:
    - yarn install --frozen-lockfile --check-files --cache-folder .yarn

lint:commit:
  extends: .yarn_install
  stage: lint
  rules:
    - if: '$CI_PIPELINE_SOURCE == "merge_request_event"'
  script:
    - yarn commitlint --from ${CI_MERGE_REQUEST_DIFF_BASE_SHA} --to HEAD --verbose

lint:prettier:
  extends: .yarn_install
  stage: lint
  script:
    - yarn lint:prettier

jest:test:
  extends: .yarn_install
  stage: test
  script:
    - yarn test

semantic-release:
  extends: .yarn_install
  stage: release
  rules:
    - if: $CI_COMMIT_BRANCH == $CI_DEFAULT_BRANCH
  script:
    - git config --global http.emptyAuth true
    - yarn semantic-release

# Run a dry run on Merge Requests
semantic-release-dry-run:
  needs: ['jest:test']
  script:
    - git config --global http.emptyAuth true
    - yarn semantic-release --branches $CI_MERGE_REQUEST_SOURCE_BRANCH_NAME --dry-run --no-ci
  rules:
    - if: $CI_MERGE_REQUEST_IID
下面,我们就需要进入极狐GitLab CI 设置页面,添加对应的变量。
首先前往 https://www.npmjs.com/ 生成 access token 用来发布 NPM 模块:

然后,进入极狐GitLab 项目设置 → 访问令牌生成项目 access token,用来推送版本号更新,生成 release note 等:
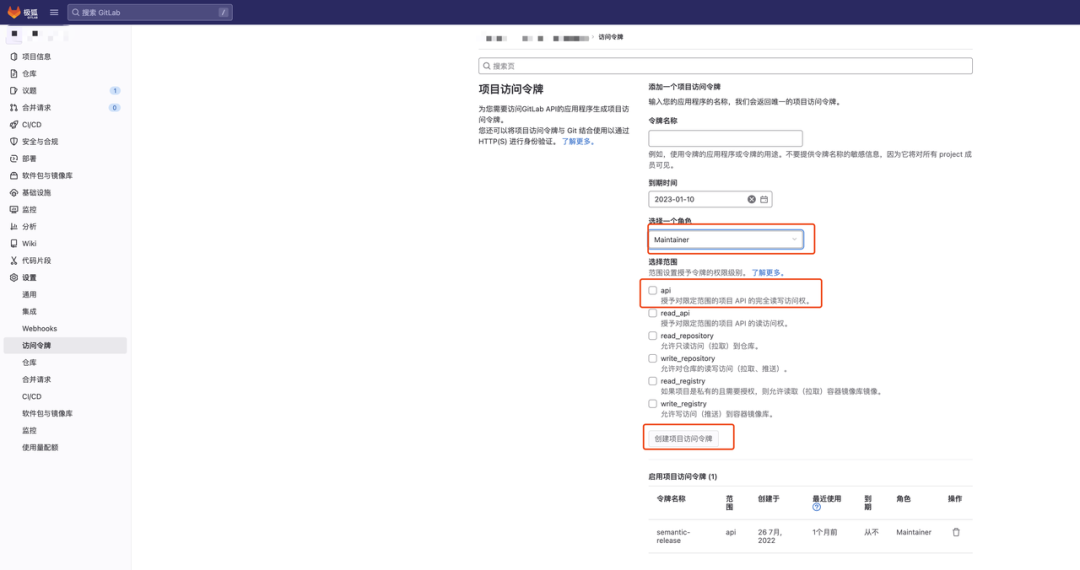
最后,前往极狐GitLab 项目设置 → CI/CD → 变量新增 NPM_TOKEN,GITLAB_TOKEN 两个变量,分别输入刚才生成的 npm access token 和 项目 access token 。切记设为保护和隐藏变量,否则会存在 token 泄露的风险。

此时,我们所有准备工作都完成了。下面就提交一个 MR 试验一下:

该 MR 包含了一个 chore 类型的 commit message ,等待流水线通过后,合入该 MR。此时可以看到创建了一条主分支流水线,并且执行了 semantic-release 将版本号更新到 13.3.2 后 publish 到 NPM 源:


此时进入项目发布页面,可以看到 semantic-release 根据提交信息生成的极狐GitLab release-note:


🎉 至此,通过极狐GitLab CI 和第三方工具的结合,我们实现了:
-
根据提交信息自动更新版本号;
-
自动发布 NPM 模块;
-
自动生成极狐GitLab release-note。
新的 NPM 模块发布流程,如下图所示:

下面让我们继续尝试,优化项目依赖 NPM 模块版本更新流程。
NPM 模块自动更新-操作指南
随着我们依赖的 NPM 模块增多,频繁手动更新版本也是一件麻烦事。下面就来介绍,如何通过极狐GitLab + renovate bot 自动更新第三方依赖版本号。
Renovate Bot
Renovate bot 是一款能够自动更新依赖版本的工具,不仅适用于 NPM 依赖,同样适用于 Docker、Ruby gem 等多种依赖。
Renovate bot 官方提供了一个 renovate-runner 项目,来帮助我们托管自己的 renovate bot。由于官方的 renovate-runner 位于 GitLab.com 。为了方便大家访问,我将这个项目镜像到了极狐GitLab 里,镜像项目地址位于:https://jihulab.com/gitlab-cn/frontend/renovate-runner。
那么如何基于 renovate-runner 项目托管自己的 renovate 机器人呢?
1. 我们需要创建一个自己的 my-renovate-bot 项目。项目名字可自拟。
2. 在 my-renovate-bot 创建 .gitlab-ci.yml 文件:
include:
    - project: 'gitlab-cn/frontend/renovate-runner'
      file: '/templates/renovate-dind.gitlab-ci.yml'

variables:
  RENOVATE_ONBOARDING: 'false'
  RENOVATE_REQUIRE_CONFIG: 'ignored'
配置项含义如下:
-
project 配置为 renovate-runner 项目地址;
-
file 为我们需要使用流水线模板;
-
variables 可以对模板中变量的默认值进行覆盖。
3. 在 my-renovate-bot 下创建一个 renovate bot 配置文件 config.js :
module.exports = {
    endpoint: 'https://jihulab.com/api/v4/',
    platform: 'gitlab',
    labels: ['renovate', 'dependencies', 'automated'],
    includeForks: true,
    extends: ['config:base'],
    rangeStrategy: 'pin',
    enabledManagers: ["npm", "regex"],
    repositories: [{
        repository: 'your project path',
        bumpVersion: true,
        internalChecksFilter: "strict",
        stabilityDays: 30,
        reviewersFromCodeOwners: true,
    }]
}
其中 repositories 的配置有两种方式,如上文所示,添加在 config.js 中可以针对不同项目使用不同的配置项。如果不需要针对各个项目单独定制,则可以在 my-renovate-bot 项目设置→ CI/CD 变量中添加 RENOVATE_EXTRA_FLAGS 配置项,以空格分隔多个项目名称即可:


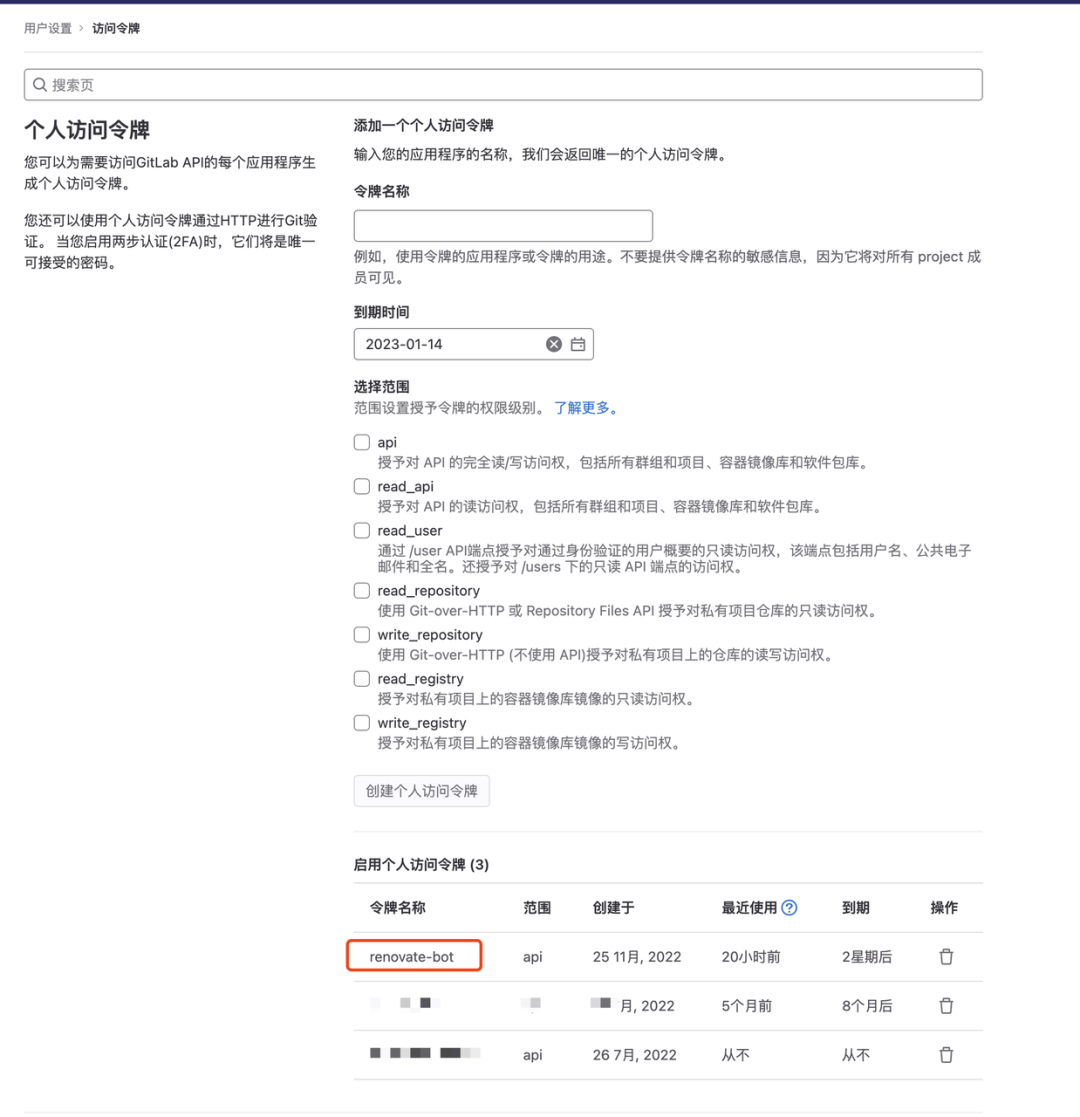
4. 生成 RENOVATE_TOKEN 来方便 renovate bot 访问项目、创建 MR 。如果是个人使用,可以前往个人设置页面创建 Access Token 即可:
5. 为了方便 renovate bot 创建 MR 时携带上本次更新的 changelog,我们还需要前往 GitHub 生成一个 GITHUB_COM_TOKEN 。
设置定时任务
至此,我们的配置准备工作已经完成。下一步前往 my-renovate-bot 项目 → CI/CD → 计划 页面设置定时任务。我们可以选择每天凌晨自动执行 renovate bot ,它会自动扫描我们的 package.json 文件,获取最新依赖版本,然后创建更新版本号的 MR 。


注意:如果我们选择自定义执行时间,需要按照 Cron 语法 输入。大家可以使用这个工具 方便生成自己的 Cron 表达式。
到这里,我们所有的配置工作已经完成。下面就尝试触发 renovate bot 进行测试。前往我们在 config.js 或 RENOVATE_EXTRA_FLAGS 中配置的项目 MR 页面,可以看到 renovate-bot 已经帮助我们创建了三个 MR ,分别进行了固定版本号,升级 path 版本,升级 major 版本的操作。

进入 MR 详情,可以看到,renovate bot 帮助我们抓取了详细的 changelog 。表格中的字段含义分别是:
-
Age - 该版本发布至今的时间;
-
Adoption - 该版本在使用 renovate bot 的项目中接受安装的比例;
-
Passing - 该版本通过测试的更新的百分比;
-
Confidence - 该版本的可信度。

最后,我们只需要查看最新的 MR,选择是否需要合并即可。🎉
总结

如上图所示,我们已经实现了通过极狐GitLab 和 renovate bot 结合自动更新 NPM 依赖版本号的功能。
通过和第一部分所述 NPM 自动发布相结合,就可以实现不需要人工介入的 NPM 包自动发布 + 自动更新的工作流了,很大程度上节约开发时间,减少沟通成本,让 NPM 发布更新更及时,让研发工作更高效!爱钻研的小明,浅尝到了精英效能的奇妙滋味。😁


![[FUNC]在AHK中实现Pyhton的range函数](https://img-blog.csdnimg.cn/img_convert/fcde9a487b1c204d9b7324e3a1f55a9c.png)

![[前端笔记——HTML介绍] 5.文档与网站架构](https://img-blog.csdnimg.cn/5846598d054c48898293853b8f610513.png)

