CUDA 简介
- CUDA(Compute Unified Device Architecture)是由NVIDIA开发的一种并行计算平台和应用编程接口(API),允许软件开发者和软件工程师使用NVIDIA的图形处理单元(GPU)进行通用计算。自2007年推出以来,CUDA已经使得利用GPU的强大计算能力进行高性能计算(HPC)和复杂图形渲染成为可能,广泛应用于科学计算、工程、机器学习和深度学习等领域。
- CUDA 相关资料
- 官方文档:https://docs.nvidia.com/cuda/cuda-c-programming-guide/index.html
- 入门样例:https://cuda-tutorial.readthedocs.io/en/latest/tutorials/tutorial01/
Reflect Padding 介绍
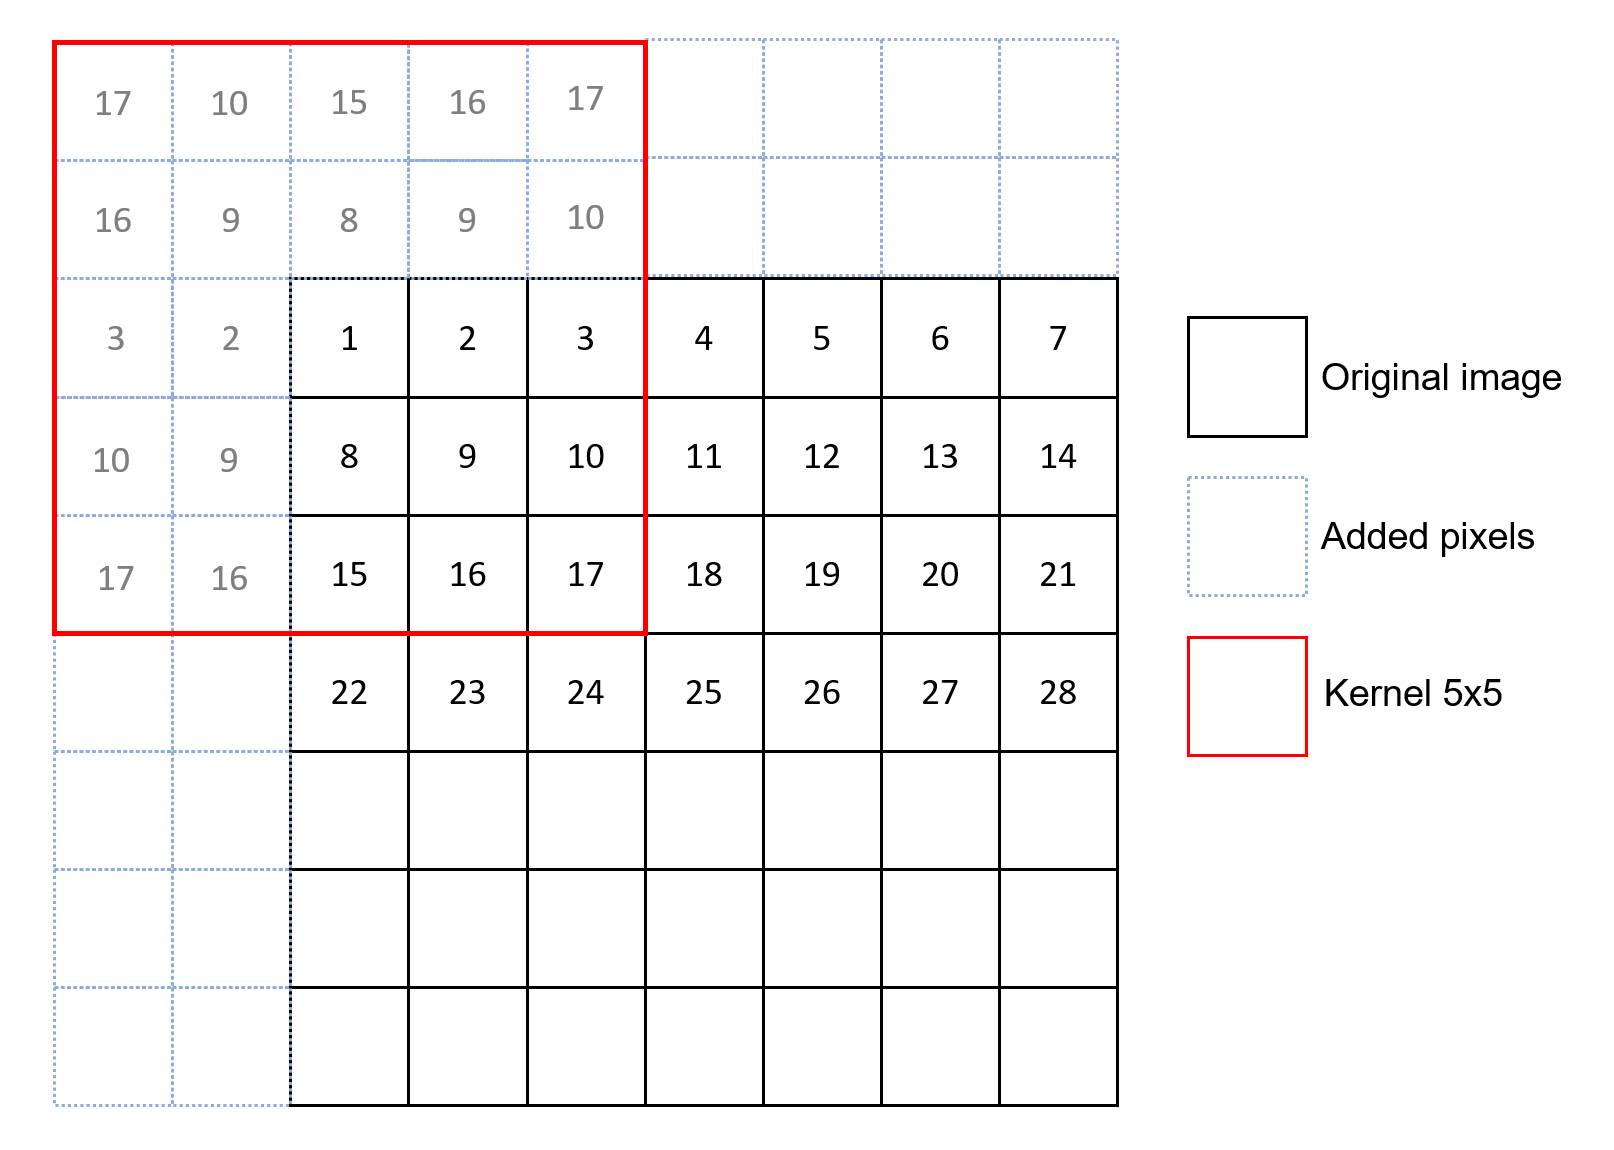
- 反射填充是一种常见的图像边缘填充技术,用于卷积神经网络中,特别是在处理图像数据时。它通过镜像边缘像素来扩展图像的尺寸,从而使得边缘信息在卷积操作中得到更好的保留。reflect padding 样例如下图所示:
- Q: 反射填充与零填充在实际应用中有何不同?
- A: 反射填充通过复制边缘像素来扩展图像,保持了图像边缘的自然连续性,而零填充则在边缘添加零值,可能会在卷积后引入人为的边缘效应。
Pytorch Reflect Padding 实现
- torch reflect padding 文档:https://pytorch.org/docs/stable/generated/torch.nn.ReflectionPad2d.html
>>> import torch.nn as nn
>>> import torch
>>> m = nn.ReflectionPad2d(2)
>>> input = torch.arange(9, dtype=torch.float).reshape(1, 1, 3, 3)
>>> input
tensor([[[[0., 1., 2.],
          [3., 4., 5.],
          [6., 7., 8.]]]])
>>> m(input)
tensor([[[[8., 7., 6., 7., 8., 7., 6.],
          [5., 4., 3., 4., 5., 4., 3.],
          [2., 1., 0., 1., 2., 1., 0.],
          [5., 4., 3., 4., 5., 4., 3.],
          [8., 7., 6., 7., 8., 7., 6.],
          [5., 4., 3., 4., 5., 4., 3.],
          [2., 1., 0., 1., 2., 1., 0.]]]])
>>> # using different paddings for different sides
>>> m = nn.ReflectionPad2d((1, 1, 2, 0))
>>> m(input)
tensor([[[[7., 6., 7., 8., 7.],
          [4., 3., 4., 5., 4.],
          [1., 0., 1., 2., 1.],
          [4., 3., 4., 5., 4.],
          [7., 6., 7., 8., 7.]]]])
CUDA Reflect Padding 代码实现理解
forward
reflection_pad2d_out_template实现,用于执行二维反射填充。
// 定义一个函数,用于对输入Tensor进行二维反射填充,并将结果输出到output Tensor。
void reflection_pad2d_out_template(
    Tensor &output, const Tensor &input_, IntArrayRef padding) {

  // 检查输入Tensor是否可以使用32位索引数学运算。
  TORCH_CHECK(canUse32BitIndexMath(input_),
    "input tensor must fit into 32-bit index math");

  // 初始化一些维度标识符和批次大小。
  int plane_dim = 0;
  int dim_h = 1;
  int dim_w = 2;
  int nbatch = 1;

  // 检查输入Tensor和padding参数是否合法。
  at::native::padding::check_valid_input<2>(input_, padding);

  // 如果输入Tensor是4维的,说明有批次维度,需要相应调整其他维度的索引,并更新批次大小。
  if (input_.ndimension() == 4) {
    nbatch = input_.size(0);
    plane_dim++;
    dim_h++;
    dim_w++;
  }

  // 从padding参数中提取左、右、上、下四个方向的填充大小。
  int64_t pad_l = padding[0];
  int64_t pad_r = padding[1];
  int64_t pad_t = padding[2];
  int64_t pad_b = padding[3];

  // 获取输入Tensor在不同维度上的大小。
  int nplane = input_.size(plane_dim);
  int input_h = input_.size(dim_h);
  int input_w = input_.size(dim_w);

  // 检查左右填充大小是否小于输入宽度,上下填充大小是否小于输入高度。
  TORCH_CHECK(pad_l < input_w && pad_r < input_w, ...);
  TORCH_CHECK(pad_t < input_h && pad_b < input_h, ...);

  // 计算输出Tensor的高度和宽度。
  int output_h = input_h + pad_t + pad_b;
  int output_w = input_w + pad_l + pad_r;

  // 确保计算出的输出Tensor尺寸是有效的。
  TORCH_CHECK(output_w >= 1 || output_h >= 1, ...);

  // 根据输入Tensor的维度,调整输出Tensor的尺寸。
  if (input_.ndimension() == 3) {
    output.resize_({nplane, output_h, output_w});
  } else {
    output.resize_({nbatch, nplane, output_h, output_w});
  }
  // 如果输出Tensor为空,则不执行后续操作。
  if (output.numel() == 0) {
    return;
  }

  // 确保输入Tensor是连续的,便于后续处理。
  Tensor input = input_.contiguous();

  // 计算输出平面的大小,用于配置CUDA核函数的参数。
  int64_t output_plane_size = output_h * output_w;
  dim3 block_size(output_plane_size > 256 ? 256 : output_plane_size);

  // 准备在CUDA核函数中使用的变量。
  int64_t size_y = nplane;
  int64_t size_z = nbatch;

  // 对所有数据类型执行反射填充操作
  AT_DISPATCH_ALL_TYPES_AND_COMPLEX_AND2(kHalf, kBFloat16,
    input.scalar_type(), "reflection_pad2d_out_template", [&] {

      // 遍历所有平面和批次进行填充
      for (int64_t block_y = 0; block_y < size_y; block_y += 65535) {
        int64_t block_y_size = std::min(size_y - block_y, static_cast<int64_t>(65535));
        for (int64_t block_z = 0; block_z < size_z; block_z += 65535) {
          int64_t block_z_size = std::min(size_z - block_z, static_cast<int64_t>(65535));

          // 计算网格大小并启动CUDA核心
          dim3 grid_size(at::ceil_div(output_plane_size, static_cast<int64_t>(256)), block_y_size, block_z_size);

          // 计算网格大小并启动CUDA核心
          // 这里使用了CUDA的核心启动语法,`<<<grid_size, block_size, 0, at::cuda::getCurrentCUDAStream()>>>`,
          // 其中grid_size和block_size是CUDA核心执行时网格和块的维度配置,这里的0表示使用默认的共享内存大小,
          // at::cuda::getCurrentCUDAStream()获取当前CUDA流,用于并行计算。
          reflection_pad2d_out_kernel<<<
            grid_size, block_size, 0, at::cuda::getCurrentCUDAStream()>>>(
              // 传递给核心函数的参数,包括输入和输出张量的数据指针,
              // 输入的宽度和高度,四个方向的填充大小,当前处理的平面和批次索引,以及平面的总数。
              input.const_data_ptr<scalar_t>(), output.mutable_data_ptr<scalar_t>(),
              input_w, input_h,
              pad_t, pad_b, pad_l, pad_r, block_y, block_z, nplane);
          // 检查CUDA核心启动后是否有错误发生
          C10_CUDA_KERNEL_LAUNCH_CHECK();
        }
      }
    }
  );
}
代码的最后部分是关键的,它展示了如何调用CUDA核心函数(reflection_pad2d_out_kernel)来实际执行反射填充操作。这个核心函数利用 CUDA 的并行计算能力,对输入张量的每个元素进行填充处理,确保在 GPU 上高效地完成操作。C10_CUDA_KERNEL_LAUNCH_CHECK() 是用于检测核心启动后是否有任何错误发生。
reflection_pad2d_out_kernel实现:CUDA reflect pad2d 核函数。它接收输入和输出张量的指针、输入尺寸、填充尺寸和平面偏移量,然后计算每个线程应处理的输出张量中的像素位置,并根据输入张量中相应位置的值来填充它。
template<typename scalar_t>
__global__ void reflection_pad2d_out_kernel(
    const scalar_t * input, scalar_t * output,
    int64_t input_dim_x, int64_t input_dim_y,
    int pad_t, int pad_b, int pad_l, int pad_r, int y_shift, int z_shift, int nplane) {
  // 计算当前线程负责的输出位置
  auto output_xy = threadIdx.x + blockIdx.x * blockDim.x;
  // 计算输出维度
  auto output_dim_x = input_dim_x + pad_l + pad_r;
  auto output_dim_y = input_dim_y + pad_t + pad_b;

  // 如果当前线程负责的位置在输出范围内
  if (output_xy < output_dim_x * output_dim_y) {
    // 获取输入和输出索引映射
    auto index_pair = get_index_mapping2d(
      input_dim_x, input_dim_y,
      output_dim_x, output_dim_y,
      pad_l, pad_t,
      output_xy, y_shift, z_shift, nplane);

    // 根据映射关系复制数据
    output[index_pair.second] = input[index_pair.first];
  }
}
get_index_mapping2d函数实现:基于输出像素位置、填充参数和偏移量,计算出反射填充后的输入和输出索引。这个函数利用了 CUDA 的内置函数 abs 来处理反射逻辑,确保输出位置正确地映射到输入张量上
// 定义一个 mapping 函数,用于计算从输出位置到输入位置的索引映射。
__device__
inline thrust::pair<int64_t, int64_t>  get_index_mapping2d(
    int64_t input_dim_x, int64_t input_dim_y,
    int64_t output_dim_x, int64_t output_dim_y,
    int64_t pad_l, int64_t pad_t,
    int64_t output_xy, int y_shift, int z_shift, int nplane) {

  // 计算输入和输出的偏移量,考虑了批次和通道的变化。
  auto input_offset =
    ((blockIdx.y + y_shift) + (blockIdx.z + z_shift) * nplane) * input_dim_x * input_dim_y;
  auto output_offset =
    ((blockIdx.y + y_shift) + (blockIdx.z + z_shift) * nplane) * output_dim_x * output_dim_y;

  // 根据线性索引计算输出坐标。
  auto output_x = output_xy % output_dim_x;
  auto output_y = output_xy / output_dim_x;

  // 计算输入和输出坐标的起始点。
  auto i_start_x = ::max(int64_t(0), -pad_l);
  auto i_start_y = ::max(int64_t(0), -pad_t);
  auto o_start_x = ::max(int64_t(0), pad_l);
  auto o_start_y = ::max(int64_t(0), pad_t);

  // 根据反射逻辑计算输入坐标。
  auto input_x = ::abs(output_x - pad_l)
                 - ::abs(output_x - (input_dim_x + pad_l - 1))
                 - output_x
                 + 2 * pad_l + input_dim_x - 1
                 - o_start_x + i_start_x;

  auto input_y = ::abs(output_y - pad_t)
                 - ::abs(output_y - (input_dim_y + pad_t - 1))
                 - output_y
                 + 2 * pad_t + input_dim_y - 1
                 - o_start_y + i_start_y;

  // 返回输入和输出坐标的线性索引对。
  return thrust::make_pair<int64_t, int64_t>(
    input_offset + input_y * input_dim_x + input_x,
    output_offset + output_y * output_dim_x + output_x);
}
backward
- backward 与 forward 整体实现思路接近,主要是梯度反传时逻辑与前传时需要反过来,代码实现思路基本和之前介绍的 forward 部分一致
- backward 函数入口
// 定义一个函数,用于计算二维反射填充的梯度输出。
void reflection_pad2d_backward_out_template(
    Tensor &grad_input, const Tensor &grad_output_,
    const Tensor &input, IntArrayRef padding) {

  // 如果梯度输入的元素数为0,则不执行任何操作。
  if (grad_input.numel() == 0) {
    return;
  }

  // 检查输入张量和梯度输出张量是否可以使用32位索引进行数学运算,如果不可以则抛出错误。
  TORCH_CHECK(canUse32BitIndexMath(input),
    "input tensor must fit into 32-bit index math");
  TORCH_CHECK(canUse32BitIndexMath(grad_output_),
    "output gradient tensor must fit into 32-bit index math");

  // 初始化一些维度和批次的变量,用于后续的张量尺寸计算。
  int plane_dim = 0;
  int dim_h = 1;
  int dim_w = 2;
  int nbatch = 1;

  // 如果输入张量的维度是4,说明有一个批次维度,需要相应地调整其他维度的索引,并计算批次大小。
  if (input.ndimension() == 4) {
    nbatch = input.size(0);
    plane_dim++;
    dim_h++;
    dim_w++;
  }

  // 解析padding参数,得到左、右、上、下的填充尺寸。
  int64_t pad_l = padding[0];
  int64_t pad_r = padding[1];
  int64_t pad_t = padding[2];
  int64_t pad_b = padding[3];

  // 计算输入张量在特定维度上的尺寸。
  int nplane = input.size(plane_dim);
  int input_h = input.size(dim_h);
  int input_w = input.size(dim_w);

  // 根据输入尺寸和填充尺寸计算输出尺寸。
  int output_h = input_h + pad_t + pad_b;
  int output_w  = input_w + pad_l + pad_r;

  // 检查梯度输出张量的尺寸是否与预期一致,如果不一致则抛出错误。
  TORCH_CHECK(output_w == grad_output_.size(dim_w), "grad_output width unexpected. Expected: ", output_w, ", Got: ", grad_output_.size(dim_w));
  TORCH_CHECK(output_h == grad_output_.size(dim_h), "grad_output height unexpected. Expected: ", output_h, ", Got: ", grad_output_.size(dim_h));

  // 为了保证数据的连续性,将梯度输出张量转换为连续的。
  Tensor grad_output = grad_output_.contiguous();

  // 计算输出平面的大小,用于后续的CUDA核函数配置。
  int64_t output_plane_size = output_h * output_w;
  // 配置CUDA核函数的线程块大小,取256或输出平面大小的较小者。
  dim3 block_size(output_plane_size > 256 ? 256 : output_plane_size);

  // 准备循环遍历的尺寸变量。
  int64_t size_y = nplane;
  int64_t size_z = nbatch;

  // 对输入张量的数据类型进行分派,支持多种浮点和复数类型。
  AT_DISPATCH_FLOATING_AND_COMPLEX_TYPES_AND2(kHalf, kBFloat16,
    input.scalar_type(), "reflection_pad2d_backward_out_template", [&] {

      // 对每个平面(通道)和批次进行循环,处理大于65535的情况。
      for (int64_t block_y = 0; block_y < size_y; block_y += 65535) {
        int64_t block_y_size = std::min(size_y - block_y, static_cast<int64_t>(65535));
        for (int64_t block_z = 0; block_z < size_z; block_z += 65535) {
          int64_t block_z_size = std::min(size_z - block_z, static_cast<int64_t>(65535));

          // 计算网格大小,用于CUDA核函数的配置。
          dim3 grid_size(at::ceil_div(output_plane_size, static_cast<int64_t>(256)), block_y_size, block_z_size);

          // 调用CUDA核函数,计算梯度输入。
          reflection_pad2d_backward_out_kernel<<<
            grid_size, block_size, 0, at::cuda::getCurrentCUDAStream()>>>(
              grad_input.mutable_data_ptr<scalar_t>(), grad_output.const_data_ptr<scalar_t>(),
              input_w, input_h,
              pad_t, pad_b, pad_l, pad_r, block_y, block_z, nplane);
          // 检查CUDA核函数的启动是否有错误。
          C10_CUDA_KERNEL_LAUNCH_CHECK();
        }
      }
    }
  );
}
reflection_pad2d_backward_out_kernel实现:
// 定义模板函数,用于CUDA内核,处理反射填充的梯度反向传播。
template <typename scalar_t>
__global__ void reflection_pad2d_backward_out_kernel(
    scalar_t * grad_input, // 指向梯度输入的指针,即对应前向传播输入的梯度
    const scalar_t * grad_output, // 指向梯度输出的指针,即损失函数对输出的偏导
    int64_t input_dim_x, // 输入的宽度
    int64_t input_dim_y, // 输入的高度
    int pad_t, // 顶部填充的大小
    int pad_b, // 底部填充的大小
    int pad_l, // 左侧填充的大小
    int pad_r, // 右侧填充的大小
    int y_shift, // 平面(plane)的偏移量,用于多通道数据处理
    int z_shift, // 批量的偏移量,用于批处理
    int nplane) { // 通道数或平面数
  auto output_xy = threadIdx.x + blockIdx.x * blockDim.x; // 计算当前线程处理的输出位置索引
  auto output_dim_x = input_dim_x + pad_l + pad_r; // 计算经过填充后的输出宽度
  auto output_dim_y = input_dim_y + pad_t + pad_b; // 计算经过填充后的输出高度

  // 判断当前线程负责的输出位置是否在有效范围内
  if (output_xy < output_dim_x * output_dim_y) {
    // 计算输出位置对应的输入位置索引
    auto index_pair = get_index_mapping2d(
      input_dim_x, input_dim_y,
      output_dim_x, output_dim_y,
      pad_l, pad_t,
      output_xy, y_shift, z_shift, nplane);

    // 使用原子操作累加计算梯度输入。这里的原子操作确保了多个线程更新同一位置时的正确性。
    gpuAtomicAddNoReturn(&grad_input[index_pair.first], grad_output[index_pair.second]);
  }
}
总结
- PyTorch 中的 CUDA 反射填充通过两个 CUDA 核函数实现:
reflection_pad2d_out_kernel和reflection_pad2d_backward_out_kernel。
这两个核函数利用了 CUDA 的并行计算能力,可以高效地执行反射填充操作。- 其中
reflection_pad2d_out_kernel理解了之后reflection_pad2d_backward_out_kernel理解起来就比较容易了 - 代码的核心逻辑主要是在 padding 时输入输出之间的映射关系实现部分,也即
get_index_mapping2d函数实现需要关注下具体实现细节
- 其中
- 通过这篇博客,我们简单介绍了 CUDA 和反射填充的概念和应用,提供了实际的代码实现理解和对应资源的链接,希望能帮助读者更深入地理解并利用这些技术。